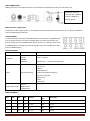
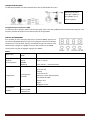
afx light 16-2750 Manuel utilisateur
- Catégorie
- Projecteurs
- Taper
- Manuel utilisateur
Ce manuel convient également à

©Copyright LOTRONIC 2017 SPOT180LED Page 1
1
1
8
8
0
0
W
W
L
L
E
E
D
D
M
M
O
O
V
V
I
I
N
N
G
G
H
H
E
E
A
A
D
D
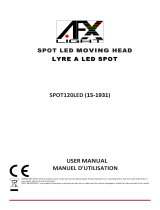
Ref.: SPOT180LED (16-2750)
USER
MANUAL
MANUEL D’UTILISATION
BEDIENUNGSANLEITUNG
HANDLEIDING

©Copyright LOTRONIC 2017 SPOT180LED Page 2
180W WHITE LED MOVING HEAD
BEFORE YOU BEGIN
Contents of the carton:
• 1 x LED light effect
• 1x omega clamp
• 1x Powercon cable
• 1x DMX lead
• 1x User Manual
Unpacking Instructions
Immediately upon receiving a fixture, carefully unpack the carton, check the contents to ensure that all parts are
present and have been received in good condition. Notify the freight company immediately and retain packing
material for inspection if any parts appear to be damaged from shipping or the carton itself shows signs of
mishandling. Keep the carton and all packing materials. In the event that a fixture must be returned to the factory, it
is important that the fixture be returned in the original factory box and packing.
Safety Instructions
Please read these instructions carefully, they include important information about the installation, usage and
maintenance of this product.
• Please keep this User Guide for future reference. If you sell the unit to another user, be sure that he also receives
this instruction booklet.
• Always make sure that you are connecting to the proper voltage, and that the line voltage you are connecting to is
not higher than that stated on the decal or rear panel of the fixture.
• This product is intended for indoor use only!
• It is essential that the device is earthed. A qualified person must carry out the electric connection.
• To prevent risk of fire or shock, do not expose fixture to rain or moisture. Make sure there are no flammable
materials close to the unit while operating.
• The unit must be installed in a location with adequate ventilation, at least 20in (50cm) from adjacent surfaces. Be
sure that no ventilation slots are blocked.
• Always disconnect from power source before servicing or replacing fuse and be sure to replace with same fuse size
and type.
• Secure fixture to fastening device using a safety chain. Never carry the fixture solely by its head. Use its carrying
handles.
• Maximum ambient temperature (Ta) is 104° F (40°C). Do not operate the fixture at temperatures higher than this.
• In the event of a serious operating problem, stop using the unit immediately. Never try to repair the unit by
yourself. Repairs carried out by unskilled people can lead to damage or malfunction. Please contact the nearest
authorized technical assistance center. Always use the same type of spare parts.
• Don’t connect the device to a dimmer pack.
• Make sure the power cord is never crimped or damaged.
• Never disconnect the power cord by pulling or tugging on the cord.
• Avoid direct eye exposure to the light source while it is on.
DISCONNECT DEVICE: Where the MAINS plug or an appliance coupler is used as the disconnect device, the
disconnect device shall remain readily operable.
GB

©Copyright LOTRONIC 2017 SPOT180LED Page 3
Features
• 10/12/14/16 DMX channels
• Sound active, DMX, auto, master-slave mode
• 1 static Gobo Wheel: 8 gobos + open, rotation and shake
• 1 rotating Gobo Wheel: 6 gobos +open, rotation and shake
• Color Wheel: 7 colors + white, rotation with variable direction and speed
• Prism: 3-facet Prism, bi-directionally rotatable at variable speeds
• Automatic focus
• High quality optics
• 3-phase Pan/Tilt motor
• 15° beam angle
• High speed strobe effect with 1-25 flashes per second
• Color LCD
• Efficient low noise fan cooling system
• Two ¼ turn fastening omega clamps
• POWERCON IN/OUT
• 3-pin XLR connectors IN/OUT
• IP20 protection rating
Specifications
Power supply ....................................................................................... 90-240Vac 50/60Hz
Consumption ............................................................................................................. 250W
Fuse ................................................................................................................................ 5A
Light source .......................................................................... White ultra bright 180W LED
Beam angle .................................................................................................................... 15°
Dimensions .......................................................................................... 270 x 270 x 470mm
Weight ...................................................................................................................... 11.5kg
Photometric Data
Installation
The unit should be mounted via its screw holes on the bracket. Always ensure that the unit is firmly fixed to avoid
vibration and slipping while operating. Always ensure that the structure to which you are attaching the unit is secure
and able to support a weight of 10 times of the unit’s weight. Also always use a safety cable that can hold 12 times
the weight of the unit when installing the fixture.
The equipment must be fixed by professionals at a place where is out of the reach of people and where nobody can
pass by or under it.

©Copyright LOTRONIC 2017 SPOT180LED Page 4
Mounting
ORIENTATION
This fixture may be mounted in any position provided there is adequate room for ventilation.
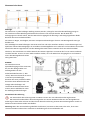
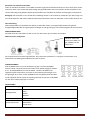
RIGGING
The LED moving head provides
a unique mounting bracket
assembly that integrates the
bottom of the base, the
included ‘omega bracket’ and
the safety cable rigging point in
one unit (see illustration).When
mounting this fixture on a truss,
be sure to use an appropriate
clamp with the included omega
bracket using a M10 screw
fitted through the center hole
of the ‘omega bracket’. As an
added safety measure, be sure
to attach at least one properly
rated safety cable to the fixture
using one of the safety cable
rigging points integrated in the
base assembly.
Fuse Replacement
Disconnect the power cord before replacing a fuse and always replace with the same type fuse.
With a screwdriver wedge the fuse holder out of its housing.
Remove the damaged fuse from its holder and replace with exactly the same type of fuse.
Insert the fuse holder back in its place and reconnect power.
Warning: If after replacing the fuse you continue to blow fuses, STOP using the unit. Contact customer support for
further instructions. Continuing to use the unit may cause serious damage.
Fixture Linking
You will need a serial data link to run light shows of one or more fixtures using a DMX-512 controller or to run
synchronized shows on two or more fixtures set to a master/slave operating mode. The combined number of
channels required by all fixtures on a serial data link determines the number of fixtures that the data link can
support.
Important: Fixtures on a serial/data link must be daisy chained in one single line. Maximum recommended serial
data link distance: 500 meters (1640 ft.) Maximum recommended number of fixtures on a serial data link: 32 fixtures
Data Cabling
To link fixtures together you must use data cables. If you choose to create your own cable, please use data-grade
cables that can carry a high quality signal and are less prone to electromagnetic interference.

©Copyright LOTRONIC 2017 SPOT180LED Page 5
CABLE CONNECTORS
Cabling must have a male XLR connector on one end and a female XLR connector on the other end.
DMX connector configuration
Termination reduces signal errors. To avoid signal transmission problems and interference, it is always advisable to
connect a DMX signal terminator.
CONTROL PANEL
To access the main menu press the MENU button. Press the UP or DOWN buttons
until you reach function you wish to change. When you reach the function you
wish to change, press the ENTER button. When a function is selected, use the UP
or DOWN buttons to change the function settings. Once your changes are made,
press the ENTER button.
FUNCTION MENU
Address Set
DMX Address setting
Run mode
DMX
AUTO
SOUND
MANUAL
Auto 1 – Auto2
Manual Test -> Function and Operation
SETUP Advanced setting
Pan reverse
Tilt reverse
Display
Screen Reverse
Channel (16/14/12/10 Select)
Sensitivity (01-100)
Motor zero
Reset
Factory Set
System Information
Ver V1
DMX address
Temperature
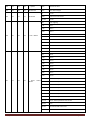
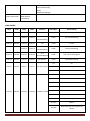
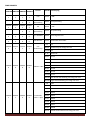
DMX CHANNELS
CH10 CH12
14CH
16CH
Function
Channel
Value
Discription
CH1 CH1
CH1
CH1
Pan
0
-255 0-540°
CH2
CH2
Pan fine
0
-255 Pan Fine
CH2 CH2
CH3
CH3
Tilt
0
-255 0-270°
CH4
CH4
Tilt Fine
0
-255 Tilt Fine
Resistance 120 ohm
between pin 2 (DMX-)
and pin 3 (DMX+) of
the last fixture.

©Copyright LOTRONIC 2017 SPOT180LED Page 6
CH3 CH3
CH5
CH5
X, Y speed
0
-255 From fast to slow
CH4 CH4
CH6
CH6
LED Dimmer
0
-255 From dark to bright
CH5 CH5
CH7
CH7
LED Strobe
0
-7 Turn on
8
-250 Strobe from slow to fast
251
-255 Turn on
CH6 CH6
CH8
CH8
7 color + White
0
-15 White Lighting
16
-31 Color 1
32
-47 Color 2
48
-63 Color 3
64-79
Color 4
80
-95 Color 5
96
-111 Color 6
112
-127 Color 7
128
-191 CW from slow to fast
192
-255 CCW from slow to fast
CH7 CH7
CH9
CH9
8 Static Gobos
+White
0-6
Open
7
-13 Gobo 1
14
-20 Gobo 2
21
-27 Gobo 3
28
-34 Gobo 4
35
-41 Gobo 5
42
-48 Gobo 6
49
-55 Gobo 7
56
-63 Gobo 8
64
-70 Gobo 8 shake speed from slow to fast
71
-77 Gobo 7 shake speed from slow to fast
78
-84 Gobo 6 shake speed from slow to fast
85
-91 Gobo 5 shake speed from slow to fast
92
-98 Gobo 4 shake speed from slow to fast
99
-105 Gobo 3 shake speed from slow to fast
106
-112 Gobo 2 shake speed from slow to fast
113
-119 Gobo 1 shake speed from slow to fast
120
-127 Open
128
-191 Gobo Rotate CW slow to fast
192
-255 Gobo Rotate CCW slow to fast

©Copyright LOTRONIC 2017 SPOT180LED Page 7
CH8
CH10
6 rotation gobos
+White
0-15
open
16-31
Gobo1
32-47
Gobo2
48-63
Gobo3
64-79
Gobo4
80-95
Gobo5
96-127
Gobo6
128
-191
Gobo Rotate CW slow to fast
192
-255
Gobo Rotate CCW slow to fast
CH9
CH11
Gobo Rotation
0-15
open
16-95
Gobo Fine 0-360
96
-135
Gobo Rotating 0-90
136
-155
Gobo Rotating 0-180
156
-175
Gobo Rotating 0-720
176
-215
Gobo self-rotating CW from slow to fast
216
-255 Gobo self-rotating CCW rotating from slow to fast
CH8 CH10
CH10
CH12
Focus
0
-255 Gobo hazy to clear
CH9 CH11
CH11
CH13
Prism
0
-63 Open
64
-255 Prism In
CH10 CH12
CH12
CH14
Prism Rotation
0
-15 Stop
16
-135 Rotate CW slow > fast
136
-255 Rotate CCW slow > fast
CH13
CH15
self
-setting
Program
0
-7 No action
8
-131 Auto mode
132
-255 Sound mode
CH14
CH16
Reset
0
-249 No function
250
-253 Reset
254
-255 No function
Cleaning
Due to fog residue, smoke, and dust cleaning the internal and external lenses should be carried out periodically to
optimize light output.
1. Use normal glass cleaner and a soft cloth to wipe down the out-side casing.
2. Clean the external optics with glass cleaner and a soft cloth every 20 days.
3. Always be sure to dry all parts completely before plugging the unit back in.
IMPORTANT NOTE: Electric products must not be put into household waste. Please bring them to a recycling centre. Ask
your local authorities or your dealer about the way to proceed.

©Copyright LOTRONIC 2017 SPOT180LED Page 8
PREPARATIFS
Contenu de l’emballage:
• 1 effet de lumière à LED
• 1x attache oméga
• 1x cable signal
• 1 cordon Powercon
• 1 Mode d’emploi
Déballage
Dès réception de l’appareil, ouvrez le carton et vérifiez que le contenu est complet et en bon état. Sinon, prévenez
immédiatement le transporteur et conservez l’emballage s’il montre des signes de mauvais traitements. Conservez le
carton et tous les matériaux d’emballage afin de pouvoir transporter l’appareil en toute sécurité.
Consignes de sécurité
Lisez attentivement ce manuel qui contient des informations importantes sur l’installation, l’utilisation et l’entretien
de cet appareil.
• Conservez le manuel pour référence ultérieure. Si l’appareil change un jour de propriétaire, assurez-vous que le
nouvel utilisateur est en possession du manuel.
• Assurez-vous que la tension secteur convient à cet appareil et qu’elle ne dépasse pas la tension d’alimentation
indiqué sur la plaque signalétique de l’appareil.
• Uniquement pour utilisation à l’intérieur!
• L’appareil doit être impérativement relié à la terre.
• Afin d’éviter tout risque d’incendie ou de choc électrique, ne pas exposer cet appareil à la pluie ou à l’humidité.
Assurez-vous qu’aucun objet inflammable ne se trouve à proximité de l’appareil pendant son fonctionnement.
• Installez l’appareil à un endroit bien ventilé à une distance minimum de 50cm de toute surface. Assurez-vous que
les fentes de ventilation ne sont pas bloquées.
• Débranchez l’appareil du secteur avant toute manipulation ou entretien. Lorsque vous remplacez le fusible, utilisez
uniquement un fusible qui présente exactement les mêmes caractéristiques que l’ancien.
• Sécurisez l’appareil sur le dispositif de fixation au moyen d’une chaîne. Ne portez jamais l’appareil en le tenant par
le boîtier. Tenez-le par l’étrier.
• La température ambiante ne doit pas dépasser 40°C. Ne pas faire fonctionner l’appareil à des températures
supérieures.
• En cas de dysfonctionnement, arrêtez immédiatement l’appareil. N’essayez jamais de réparer l’appareil par vous-
même. Une réparation mal faite peut entraîner des dommages et des dysfonctionnements. Contactez un service
technique agréé. Utilisez uniquement des pièces détachées identiques aux pièces d’origine.
• Ne pas brancher l’appareil sur un variateur.
• Assurez-vous que le cordon d’alimentation n’est jamais écrasé ni endommagé.
• Ne jamais débrancher l’appareil en tirant sur le cordon.
• Ne pas exposer vos yeux à la source lumineuse.
• Lorsque le cordon d'alimentation ou un coupleur d'appareil est utilisé comme dispositif de déconnexion, ce
dispositif doit rester facilement accessible;
Si un interrupteur omnipolaire est utilisé comme dispositif de déconnexion, l'emplacement sur l'appareil et la
fonction de l'interrupteur doit être décrite, et le commutateur doit rester facilement accessible
F

©Copyright LOTRONIC 2017 SPOT180LED Page 9
Description
• 10/12/14/16 canaux DMX
• Modes de fonctionnement: DMX, activé par le son, maître-esclave et automatique
• 1 roue de 8 gobos fixes + ouvert, rotation et shake
• 1 roue de 6 gobos rotatifs + ouvert, rotation et shake
• 1 roue de 7 couleurs + blanc, sens de rotation et vitesse variables
• Prisme rotatif à 3 faces, bidirectionnel à vitesses variables
• Focus motorisé
• Optique haute qualité
• Moteur Pan/Tilt 3 phases
• Ouverture faisceau 15°
• Strobo haute vitesse de 1-25 flashs/seconde
• Display couleur
• 2 attaches rapides Oméga
• Powercon I/O
• DMX 3 points I/O
• Protection IP20
Caractéristiques techniques
Alimentation ..................................................................................... 100-240Vac 50/60Hz
Consommation .......................................................................................................... 250W
Fusible ............................................................................................................................ 5A
Source lumineuse ....................................................... LED 180W blanche ultra lumineuse
Angle des rayons ........................................................................................................... 15°
Dimensions .......................................................................................... 270 x 270 x 470mm
Poids ......................................................................................................................... 11,5kg
Données photométriques
Remplacement du fusible
Sortez le porte-fusible de son logement à l’aide d’un tournevis. Sortez le fusible grillé et remplacez-le par un autre en
tous points identiques. Remettez le porte-fusible dans son logement et rebranchez l’appareil sur le secteur.
Attention : Si le fusible continue à sauter après avoir été remplacé, ARRETEZ l’appareil. Contactez votre revendeur.
Vous risquez d’endommager l’appareil si vous continuez à l’utiliser.

©Copyright LOTRONIC 2017 SPOT180LED Page 10
Montage
Vous pouvez installer cet appareil dans n’importe quelle position pourvu qu’il y ait une ventilation suffisante. Lors du
choix d’un emplacement, tenez compte de la facilité d’accès à l’appareil pour des travaux de maintenance et de
nettoyage.
Utilisez toujours de câbles de sécurité
Ne jamais installer l’appareil à un endroit exposé à la pluie, l’humidité, aux changements de température importants
et présentant une ventilation limitée.
RIGGING
L’appareil comporte un dispositif
de fixation unique qui se trouve
en-dessous de la base. C’est la
combinaison de l’attache omega
fourni et du point de fixation du
cable de sécurité (voir ci-contre).
Lorsque vous installez cet
appareil sur une traverse, utilisez
un crochet compatible avec
l’attache omega et fixez-le à
travers le trou au moyen d’une
vis M10. Pour une sécurité
supplémentaire, attachez un
cable d’acier sur l’un des points
de fixation presents sur la base.
Branchement de plusieurs effets
Vous avez besoin d’un câble de données sériel pour faire fonctionner plusieurs effets au moyen d’une commande
DMX512 ou pour faire fonctionner deux ou plusieurs effets en mode maître/esclave. Le nombre combiné de canaux
requis par l’ensemble des appareils sur un câble de données sériel définit le nombre d’appareils que le câble de
données peut supporter.
Important: Les appareils doivent être branchés en série sur une seule ligne. Pour être conforme à la norme EIA-485 il
ne faut pas brancher plus de 32 appareils sur une ligne. Si plus de 32 appareils sont branchés sur une seule ligne de
données série sans répartiteur DMX à isolation optique, le signal numérique DMX risque d’être détérioré.
La distance maximale recommandée est de 500m. Le nombre maximum d’appareils branchés sur une liaison de
données est de 32.
Câblage
Pour relier des appareils ensemble, vous devez utiliser des câbles de transmission de données. Vous pouvez acheter
des câbles DMX certifiés directement chez un revendeur/distributeur ou construire vos propres câbles. Si vous
souhaitez fabriquer le câble vous-même, utilisez des câbles de données faible capacitance de haute qualité qui sont
moins sujets à des interférences électromagnétiques.

©Copyright LOTRONIC 2017 SPOT180LED Page 11
CONNECTEURS DE CABLE
Le câble doit posséder une fiche XLR mâle d’un côté et XLR femelle de l’autre. .
Configuration des connecteurs DMX
La résistance de fin de ligne réduit les erreurs de signal. Pour éviter des problèmes de transmission des signaux, il est
toujours conseillé de brancher une résistance de fin de ligne DMX.
TABLEAU DE COMMANDE
Pour accéder au menu principal, appuyez sur la touche MENU. Appuyez sur
les touches UP/DOWN jusqu’à ce que vous atteigniez la fonction souhaitée.
Lorsque vous l’avez atteinte, appuyez sur ENTER. Lorsqu’une fonction a été
sélectionnée, changez les réglages au moyen des touches UP et DOWN.
Lorsque vous avez fini les réglages, appuyez sur ENTER.
MENU
Address Set
Réglage de l’adresse
DMX
Mode de
fonctionnement
DMX
AUTO
SOUND
MANUAL
Auto 1 – Auto2
Test manuel -> Fonctionnement
Configuration
Configuration
avancée
Inversion Pan
Inversion Tilt
Display
Inversion Ecran
Sélection canaux (16/14/12/10)
Sensibilité (01-100)
Moteur zero
Reset
Réglages d’usine
Informations
Système
Ver V1
Adresse DMX
Température
Résistance de 120 Ω
entre pin 2 (DMX-) et
pin 3 (DMX+) sur le
dernier appareil

©Copyright LOTRONIC 2017 SPOT180LED Page 12
CANAUX DMX
10
CANAUX
12
CANAUX
14
CANAUX
16
CANAUX
Fonction
Valeur du
Canal
Description
Canal 1
Canal 1
Canal 1
Canal 1
Pan
0-255
0-540°
Canal 2 Canal 2
Réglage fin du
Pan
0-255 Réglage fin du Pan
Canal 2
Canal 2
Canal 3
Canal 3
Tilt
0-255
0-270°
Canal 4
Canal 4
Réglage Tilt fin
0-255
Réglage Tilt fin
Canal 3
Canal 3
Canal 5
Canal 5
Vitesse X, Y
0-255
Rapide vers lent
Canal 4
Canal 4
Canal 6
Canal 6
LED Dimmer
0-255
Obscur vers lumineux
Canal 5 Canal 5 Canal 7 Canal 7 LED Stroboscope
0-7
allumé
8-250
Stroboscope lent rapide
251-255
allumé
Canal 6 Canal 6 Canal 8 Canal 8
7 couleurs +
Blanc
0-15
Blanc
16-31
Couleur 1
32-47
Couleur 2
48-63
Couleur 3
64-79
Couleur 4
80-95
Couleur 5
96-111
Couleur 6
112-127
Couleur 7
128-191
Rotation vers la droite lent vers rapide
192-255
Rotation vers la gauche lent vers rapide
Canal 7 Canal 7 Canal 9 Canal 9
8 gobos
statiques +
ouvert
0-6
Ouvert
7-13
Gobo 1
14-20
Gobo 2
21-27
Gobo 3
28-34
Gobo 4
35-41
Gobo 5
42-48
Gobo 6
49-55
Gobo 7
56-63
Gobo 8

©Copyright LOTRONIC 2017 SPOT180LED Page 13
64-70
Vitesse shake du gobo 8 lent rapide
71-77
Vitesse shake du gobo 7 lent rapide
78-84
Vitesse shake du gobo 6 lent rapide
85-91
Vitesse shake du gobo 5 lent rapide
92-98
Vitesse shake du gobo 4 lent rapide
99-105
Vitesse shake du gobo 3 lent rapide
106-112
Vitesse shake du gobo 2 lent rapide
113-119
Vitesse shake du gobo 1 lent rapide
120-127
Ouvert
128-191
Rotation du gobo vers la droite lent rapide
192-255
Rotation du gobo vers la gauche lent rapide
Canal 8 Canal 10
6 gobos en
rotation + ouvert
0-15
ouvert
16-31
Gobo 1
32-47
Gobo 2
48-63
Gobo 3
64-79
Gobo 4
80-95
Gobo 5
96-127
Gobo 6
128-191
Rotation du gobo vers la droite lent rapide
192-255
Rotation du gobo vers la gauche lent rapide
Canal 9 Canal 11
Rotation des
gobos
0-15
ouvert
16-95
Gobo réglage fin 0-360
96-135
Rotation gobos 0-90
136-155
Rotation gobos 0-180
156-175
Rotation gobos 0-720
176-215
Rotation automatique des gobos vers la droite lent
rapide
216-255
Rotation automatique des gobos vers la gauche
lent rapide
Canal 8
Canal 10
Canal 10
Canal 12
Mise au point
0-255
Gobo flou à net
Canal 9 Canal 11
Canal 11
Canal 13
Prisme
0-63
Ouvert
64-255
Prisme
Canal 10
Canal 12
Canal 12
Canal 14
Rotation du
prisme
0-15
Arrêt
16-135
Rotation vers la droite lent > rapide
136-255
Rotation vers la gauche lent > rapide

©Copyright LOTRONIC 2017 SPOT180LED Page 14
Canal 13
Canal 15
Réglage
automatique
Programme
0-7
Aucune fonction
8-131
Mode Automatique
132-255
Mode Son
Canal 14
Canal 16
Reset
0-249
Aucune fonction
250-253
Reset
254-255
Aucune fonction
Entretien
En raison des résidus de fumée et de poussière, il convient de nettoyer régulièrement les lentilles internes et
externes pour optimizer la puissance lumineuse.
1. Essuyez le boîtier extérieur avec un nettoyant de vitre classique et un chiffon doux.
2. Nettoyez les optiques externs avec du nettoyant à vitres et un chiffon doux toutes les 3 semaines.
3. Séchez soigneusement toutes les pieces avant de rebrancher l’appareil.
NOTE IMPORTANTE : Les produits électriques ne doivent pas être mis au rebut avec les ordures ménagères. Veuillez les faire recycler là où il existe des
centres pour cela. Consultez les autorités locales ou votre revendeur sur la façon de les recycler.
1. VORBEREITUNGEN
Verpackungsinhalt:
• 1 x LED Lichteffektgerät
• 1x Omega Halter
• 1x DMX Signalkabel
• 1 Powercon Kabel
• Bedienungsanleitung
Auspacken
Sofort nach Empfang vorsichtig den Karton auspacken und den Inhalt überprüfen. Alle Teile müssen vollzählig und in
einwandfreiem Zustand sein. Sofort die Transportfirma benachrichtigen und das Verpackungsmaterial aufbewahren,
wenn Teile Transportschäden aufweisen. Verpackungsmaterial auch für späteren Transport des Geräts aufbewahren.
Sicherheitshinweise
Diese Anleitung sorgfältig vor der ersten Inbetriebnahme lesen. Sie enthält wichtige Informationen über Installation,
Gebrauch und Instandhaltung des Geräts.
• Die Anleitung für spätere Bezugnahme aufbewahren und an den nächsten Bediener weitergeben.
• Stets die Netzspannung vor Anschluss des Geräts überprüfen Sie muss mit der auf der Rückseite des Geräts
angegebenen Spannung übereinstimmen und darf auf keinen Fall höher sein.
• Dieses Gerät ist nur für Innengebrauch!
• Das Gerät gehört zur Schutzklasse I. Daher muss es unbedingt an eine geerdete Steckdose angeschlossen werden.
• Um Brand und Stromschlag zu vermeiden, das Gerät vor Regen und Feuchtigkeit schützen. Keine brennbaren
Materialien während des Betriebs in der Nähe des Geräts lassen.
• Das Gerät muss an einem gut belüfteten Ort und in mindestens 50cm Entfernung zur nächsten Fläche angebracht
D

©Copyright LOTRONIC 2017 SPOT180LED Page 15
werden. Darauf achten, dass die Belüftungsschlitze nicht blockiert oder verstopft sind.
• Immer erst das Gerät vom Netz trennen, bevor es gewartet oder die Sicherung ersetzt wird. Die Sicherung nur
durch eine identische ersetzen.
• Das Gerät mit einer Sicherheitskette befestigen. Das Gerät niemals nur am Kopf tragen, sondern auch am Sockel.
• Die Raumtemperatur darf 40°C nicht überschreiten. Das Gerät niemals bei höheren Temperaturen betreiben.
• Bei Betriebsstörungen das Gerät sofort ausschalten. Das Gerät niemals selbst reparieren. Reparaturen dürfen nur
von einem Fachmann vorgenommen werden. Alle verwendeten Ersatzteile müssen mit den Originalteilen identisch
sein.
• Das Gerät nicht an ein Dimmerpack anschließen.
• Das Netzkabel niemals quetschen oder beschädigen.
• Beim Abziehen des Netzsteckers nur am Stecker ziehen, niemals am Kabel.
• Niemals direkt in die Lichtquelle blicken.
• Netztrennungsvorrichtungen
a) Wenn das Gerät über den Netzstecker ausgeschaltet wird, muss die Steckdose jederzeit leicht zugänglich
bleiben
b) Wenn das Gerät über einen Schalter ausgeschaltet wird, muss dieser klar gekennzeichnet und leicht zugänglich
sein.
Features
• 10/12/14/16 DMX Kanäle
• Musikaktivierter, DMX, automatischer und Master-Slave Betrieb
• 1 statische Goboscheibe: 8 Gobos + offen, Drehung & Shake
• 1 drehende Goboscheibe: 6 Gobos + offen, Drehung & Shake
• Farbscheibe: 7 Farben+ Weiß, Drehung mit einstellbarer Richtung und Geschwindigkeit
• Prisma: 3-seitiges Prisma mit bidirektionaler Drehrichtung und einstellbarer Geschwindigkeit
• Automatische Scharfeinstellung
• Hochwertige Optik
• 3-phasen Pan/Tilt Motor
• 15° Öffnungswinkel
• Superschnelle Blitzleuchte mit 1-25 Blitzen/Sekunde
• Farb-LCD
• Effizienter, leise gängiger Kühlventilator
• Zwei Omega-Halter
• POWERCON Ein-/Ausgang
• 3-pin XLR Ein-/Ausgang
• Schutzfaktor IP20
Technische Daten
Versorgung .......................................................................................... 90-240Vac 50/60Hz
Verbrauch .................................................................................................................. 250W
Sicherung........................................................................................................................ 5A
Leuchtmittel ........................................................................................... weisse 180W LED
Strahlenwinkel .............................................................................................................. 15°
Abmessungen ...................................................................................... 270 x 270 x 470mm
Gewicht .................................................................................................................... 11,5kg

©Copyright LOTRONIC 2017 SPOT180LED Page 16
Photometrische Daten
Montage
Das Gerät kann in jeder beliebigen Stellung montiert werden, solange für ausreichende Belüftung gesorgt ist.
Der Ventilator und die Belüftungsschlitze dürfen auf keinen Fall verstopft werden. Bei der Wahl des
Anbringungsortes darauf achten, dass das Gerät leicht zugänglich für Wartungs- und Reinigungsarbeiten bleibt.
Benutzen Sie immer Sicherheitskabel.
Das Gerät vor Regen, Feuchtigkeit, extremen Temperaturschwankungen schützen. Die Montagestelle muss gut
belüftet sein.
Den Haltebügel am Gerät befestigen. Das Gerät muss fest und sicher installiert werden, um Erschütterungen und
Spielraum während der Bewegungen zu vermeiden. Die Montagefläche muss stabil sein und mindestens 10-mal das
Gewicht des Geräts tragen können. Bei der Montage das Gerät immer zusätzlich durch ein Sicherheitskabel
absichern, dass mindestens 12-mal das Gewicht des Geräts tragen kann. Das Gerät darf nur von einem Fachmann
installiert werden. Es muss an einer Stelle installiert werden, wo es für Menschen unzugänglich ist und niemand
unter dem Montagebereich stehen
oder gehen kann.
RIGGING
Das Gerät besitzt eine
Spezialbefestigung auf der Unterseite,
die aus dem Omega-Halter und
Aufhängestellen für das
Sicherheitskabel besteht. (s. Abb.
rechts). Wenn Sie das Gerät an einem
Traversensystem befestigen,
benutzen Sie einen passenden Haken,
den Siemit einer M10 Schraube am
Omega-Halter befestigen. Als
zusätzliche Sicherheitsmassnahme
müssen Sie ein Stahlkabel an einer
der Aufhängestellen befestigen.
Auswechseln der Sicherung
Vor Auswechseln der Sicherung Gerät vom Netz trennen. Nur eine identische Sicherung benutzen.
Mit einem Schraubendreher den Sicherungshalter aus seinem Gehäuse entfernen. Die durchgebrannte
Sicherung aus dem Halter nehmen und durch eine identische Sicherung ersetzen.Den Sicherungshalter zurück ins
Gehäuse setzen und Netz wieder anschließen.
Warnung: Wenn die neue Sicherhung ebenfalls durchbrennt, benutzen Sie das Gerät nicht mehr, da es sonst
schweren Schaden nehmen kann. Nehmen Sie Verbindung mit Ihrem Fachhändler auf.

©Copyright LOTRONIC 2017 SPOT180LED Page 17
Hintereinanderschalten mehrerer Geräte
Wenn mehrere Geräte über einen DMX Controller gesteuert werden oder zwei und mehr Geräte im Master/Slave
Betrieb arbeiten sollen, wird ein serielles Datenkabel benötigt. Die kombinierte Anzahl von Kanälen, die von allen
Geräten in einer seriellen Datenverbindung benötigt werden, bestimmt die Anzahl von Geräten, die die
Datenverbindung unterstützen kann.
Die empfohlene Höchstlänge einer seriellen Datenverbindung beträgt 500m. Die empfohlene Höchstmenge an
Geräten in einer seriellen Datenverbindung beträgt 32.
Verkabelung
Für den Anschluss der Geräte muss spezielles Datenkabel verwendet werden. Sie können solche DMX Kabel direkt im
Fachhandel erwerben oder selbst ein Kabel fertigen. Wenn Sie Ihr Kabel selbst herstellen möchten, benutzen Sie
bitte Datenkabel, dass eine hochwertige Signalübertragung gewährleistet und weniger anfällig für
elektromagnetische Störfelder ist.
KABELVERBINDER
Die Kabel müssen einen XLR Stecker auf der einen und eine XLR Buchse auf der anderen Seite besitzen.
DMX Steckerbelegung
Der Endwiderstand verringert Signalfehler. Um Signalübertragungsprobleme und Störungen zu vermeiden, ist es
ratsam, einen DMX Signalwiderstand zwischenzuschalten.
BEDIENFELD
Auf MENU drücken, um ins Hauptmenü zu gehen. Mit den UP / DOWN
Tasten zur gewünschten Funktion gehen und auf ENTER drücken. Wenn
eine Funktion gewählt ist, mit den UP / DOWN Tasten die Einstellung
ändern und auf ENTER drücken.
MENÜ
Einstellung der DMX
Adresse
DMX Adresse
Betriebsart
DMX
AUTO
SOUND
MANUAL
Auto 1 – Auto2
Manueller Test -> Funktionen und Betrieb
Konfiguration
Fortgeschrittene
Einstellungen
Pan Umkehrung
Tilt Umkehrung
Display
Display Umkehrung
Kanalwahl (16/14/12/10)
120 Ohm Widerstand
zwischen Pin2 (DMX-)
und Pin 3 (DMX+) am
letzten Gerät

©Copyright LOTRONIC 2017 SPOT180LED Page 18
Empfindlichkeit (01-100)
Motor Nullstellung
Reset
Werkseinstellungen
System Information
Ver V1
DMX Adresse
Temperatur
DMX KANÄLE
CH10
CH12
14CH
16CH
Funktion
Kanal Wert
Beschreibung
Kanal 1
Kanal 1
Kanal 1
Kanal 1
Pan
0-255
0-540°
Kanal 2 Kanal 2
Pan
Feineinstellung
0-255 Pan Feineinstellung
Kanal 2
Kanal 2
Kanal 3
Kanal 3
Tilt
0-255
0-270°
Kanal 4 Kanal 4
Tilt
Feineinstellung
0-255 Tilt Feineinstellung
Kanal 3 Kanal 3 Kanal 5 Kanal 5
X, Y
Geschwindigkeit
0-255 Von schnell auf langsam
Kanal 4
Kanal 4
Kanal 6
Kanal 6
LED Dimmer
0-255
Von dunkel auf hell
Kanal 5 Kanal 5 Kanal 7 Kanal 7 LED Stroboskop
0-7
an
8-250
Stroboskop von langsam auf schnell
251-255
an
Kanal 6 Kanal 6 Kanal 8 Kanal 8 7 Farben + Weiß
0-15
Weißes Licht
16-31
Farbe 1
32-47
Farbe 2
48-63
Farbe 3
64-79
Farbe 4
80-95
Farbe 5
96-111
Farbe 6
112-127
Farbe 7
128-191
Rechtsdrehung von langsam auf
schnell

©Copyright LOTRONIC 2017 SPOT180LED Page 19
192-255
Linksdrehung von langsam auf
schnell
Kanal 7 Kanal 7 Kanal 9 Kanal 9
8 feste Gobos +
offen
0-6
offen
7-13
Gobo 1
14-20
Gobo 2
21-27
Gobo 3
28-34
Gobo 4
35-41
Gobo 5
42-48
Gobo 6
49-55
Gobo 7
56-63
Gobo 8
64-70
Gobo 8 Shake Geschwindigkeit von
langsam auf schnell
71-77
Gobo 7 Shake Geschwindigkeit von
langsam auf schnell
78-84
Gobo 6 Shake Geschwindigkeit von
langsam auf schnell
85-91
Gobo 5 Shake Geschwindigkeit von
langsam auf schnell
92-98
Gobo 4 Shake Geschwindigkeit von
langsam auf schnell
99-105
Gobo 3 Shake Geschwindigkeit von
langsam auf schnell
106-112
Gobo 2 Shake Geschwindigkeit von
langsam auf schnell
113-119
Gobo 1 Shake Geschwindigkeit von
langsam auf schnell
120-127
offen
128-191
Gobo Rechtsdrehung von langsam
auf schnell
192-255
Gobo Linksdrehung von langsam auf
schnell

©Copyright LOTRONIC 2017 SPOT180LED Page 20
Kanal 8 Kanal 10
6 drehende
Gobos + offen
0-15
offen
16-31
Gobo 1
32-47
Gobo 2
48-63
Gobo 3
64-79
Gobo 4
80-95
Gobo 5
96-127
Gobo 6
128-191
Gobo Rechtsdrehung von langsam
auf schnell
192-255
Gobo Linksdrehung von langsam auf
schnell
Kanal 9 Kanal 11 Gobodrehung
0-15
offen
16-95
Gobofeineinstellung 0-360
96-135
Gobodrehung 0-90
136-155
Gobodrehung 0-180
156-175
Gobodrehung 0-720
176-215
Gobodrehung rechts von langsam auf
schnell
216-255
Gobodrehung links von langsam auf
schnell
Kanal 8 Kanal 10 Kanal 10 Kanal 12
Scharfeinstellun
g
0-255 Gobo unscharf auf scharf
Kanal 9 Kanal 11 Kanal 11 Kanal 13 Prisma
0-63
offen
64-255
Prisma
Kanal 10 Kanal 12 Kanal 12 Kanal 14 Prisma Drehung
0-15
Stopp
16-135
Rechtsdrehung von langsam auf
schnell
136-255
Linksdrehung von langsam auf
schnell
Kanal 13
Kanal 15
Automatische
0-7
Unbelegt
La page est en cours de chargement...
La page est en cours de chargement...
La page est en cours de chargement...
La page est en cours de chargement...
La page est en cours de chargement...
La page est en cours de chargement...
La page est en cours de chargement...
-
 1
1
-
 2
2
-
 3
3
-
 4
4
-
 5
5
-
 6
6
-
 7
7
-
 8
8
-
 9
9
-
 10
10
-
 11
11
-
 12
12
-
 13
13
-
 14
14
-
 15
15
-
 16
16
-
 17
17
-
 18
18
-
 19
19
-
 20
20
-
 21
21
-
 22
22
-
 23
23
-
 24
24
-
 25
25
-
 26
26
-
 27
27


afx light 16-2750 Manuel utilisateur
- Catégorie
- Projecteurs
- Taper
- Manuel utilisateur
- Ce manuel convient également à
dans d''autres langues
- Deutsch: afx light 16-2750 Benutzerhandbuch
- Nederlands: afx light 16-2750 Handleiding
Documents connexes
-
 afx light MY60-SPOT Le manuel du propriétaire
-
 afx light BEAM7R Le manuel du propriétaire
-
 afx light HOTBEAM-3R Le manuel du propriétaire
-
 afx light MY712-Z Manuel utilisateur
-
 afx light SPOT120LED Manuel utilisateur
-
 afx light 16-2742 Manuel utilisateur
-
 afx light HOTBEAM-10R Le manuel du propriétaire
-
 afx light SPOTY60LED Manuel utilisateur
-
afx light SPOT100-LED Le manuel du propriétaire
-
 AFXlight BEAM100-LED Manuel utilisateur