Asco Series 290 390 Pressure Operated Valves Stroke Limiter Guide d'installation
- Taper
- Guide d'installation

1
GB
FR
DE
NO
Ø63
➠
Ø125 mm
NF / NC
Ø50
➠
Ø125 mm
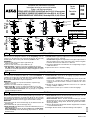
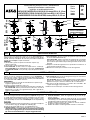
STROKE LIMITER ON SERIES 290 VALVES with dia. 50, 63, 90, 125 mm operators
LIMITEUR DE COURSE SUR VANNES 290, têtes Ø50, 63, 90, 125 mm
HUBBEGRENZER AUF VENTILE 290, Steuerkopf Ø50, 63, 90, 125 mm
Installation and maintenance instructions
Instructions de mise en service et d'entretien
Einbau- und Wartungsanleitung
Series
Série
Baureihe
290
30 mm
A
B
1
6 mm
C
2
3834485
IM405-2-X-R3
3b
D
B
G
3
19 mm
19 mm
24 mm
v
v
D
E
4 - 5
19 mm
27 mm
v
H
4 - 5
S
1
30 mm
A
B
2
6 mm
C
TIGHTENING TORQUE
COUPLES DE SERRAGE
ANZIEHDREHMOMENTE
v 5 44
Rep. N.m in.Lb
19-27-30
6
19-24-30
6
3a
D
F
B
GB INSTALLATION
FUNCTION
This accessory is designed to limit the stroke on opening. It fi ts the
operators of all 290 series 2/2 valves NC (Ø 50, 63, 90, 125 mm)
and NO (Ø 63, 90, 125 mm) with fl uid entry under the disc.
ASSEMBLY
1. Unscrew and remove the upper sight dome (A).
Remove the seal (B).
2. Unscrew and remove the optical indicator (C).
3. For NC valves: install the screw/nut assembly (G) by hand
For NO valves: With no pressure applied to the operator,
install the stroke limiter (D) with the seal (B) and tighten to torque
v indicated above.
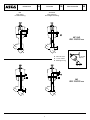
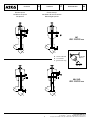
STROKE ADJUSTMENT
4. For NC valves: Tighten tje adjustment screw (H) until the desired
reduced stroke (S) is obtained.
For NO valves: Tighten the adjustment screw (E) in replacement of
plug (F) until it bottoms on the valve stem; then continue to tighten
it until the desired stroke reduction is obtained.
5. Secure the adjustment screw with the lock-nut, tightening to torque
v indicated above.
6. Operate the valve to check the setting.
FR MISE EN SERVICE
FONCTION
Cet accessoire est destiné à limiter la course à l'ouverture, il
s'adapte sur les têtes de commande des vannes 2/2 NF (Ø 50, 63,
90, 125 mm) ou NO (Ø 63, 90, 125 mm) série 290 avec utilisation
en arrivée du fl uide sous le clapet uniquement.
MONTAGE
1. Dévisser et enlever le capot de visualisation supérieur (A).
Retirer le joint (B).
2. Dévisser et enlever l'indicateur optique (C)
3. Pour vanne NF : monter à la main l'ensemble vis écrou (G)
Pour vanne NO : Monter le limiteur de course (D), sans pres-
sion dans la tête de commande, avec le joint (B), au couple de
serrage v indiqué ci-dessus.
REGLAGE COURSE
4. Pour vanne NF : Serrer la vis de réglage (H) jusqu'à obtenir la
course réduite souhaitée (S).
Pour vanne NO : Serrer la vis de réglage (E), en lieu et place du
bouchon (F), jusqu'à venir en butée sur la tige de vanne; puis
continuer à serrer de manière à obtenir la réduction de course
souhaitée.
5. Bloquer la vis de réglage à l'aide du contre-écrou, au couple de
serrage v indiqué ci-dessus.
6. Manoeuvrer la vanne pour contrôler la valeur de réglage.
DE EINBAU
FUNKTION
Mit diesem Zubehörteil kann der Öffnungshub begrenzt werden. Er
wird auf den Steuerkopf der 2/2-Ventile NC (Ø 50, 63, 90, 125 mm)
oder NO (Ø 63, 90, 125 mm) der Baureihe 290 montiert (nur für Ventile
bei denen das Medium von unten gegen den Ventilteller strömt).
MONTAGE
1. Schrauben Sie die obere Sichtanzeige (A) ab. Entfernen Sie die
Dichtung (B).
2. Schrauben Sie die optische Anzeige ab (C).
3. Beim Ventil NC: Die Einheit aus Schraube und Mutter (G) ist von
Hand zu montieren
Beim Ventil NO : Montieren Sie den Hubbegrenzer (D) bei druck-
losem Steuerkopf sowie die Dichtung (B) mit dem o.a. Anzieh-
drehmoment v.
EINSTELLUNG DES HUBES
4. Beim Ventil NC: Ziehen Sie die Einstellschraube (H) an, bis der
gewünschte reduzierte Hub erreicht ist (S).
Beim Ventil NO: Ziehen Sie die Einstellschraube (E) anstelle
des Stopfens (F) an, bis sie an der Spindel des Ventils anschlägt.
Drehen Sie dann solange weiter, bis Sie die gewünschte Hubre-
duzierung erhalten.
5. Sichern Sie die Einstellschraube mit der Gegenmutter und dem
o.a. Anziehdrehmoment v.
6. Betätigen Sie das Ventil, um die Einstellung zu überprüfen.
La page charge ...
La page charge ...
La page charge ...
-
 1
1
-
 2
2
-
 3
3
-
 4
4


Asco Series 290 390 Pressure Operated Valves Stroke Limiter Guide d'installation
- Taper
- Guide d'installation
dans d''autres langues
- italiano: Asco Series 290 390 Pressure Operated Valves Stroke Limiter Guida d'installazione
- English: Asco Series 290 390 Pressure Operated Valves Stroke Limiter Installation guide
- español: Asco Series 290 390 Pressure Operated Valves Stroke Limiter Guía de instalación
- Deutsch: Asco Series 290 390 Pressure Operated Valves Stroke Limiter Installationsanleitung
- Nederlands: Asco Series 290 390 Pressure Operated Valves Stroke Limiter Installatie gids