Crux 17461 Le manuel du propriétaire
- Catégorie
- Gaufriers
- Taper
- Le manuel du propriétaire

4 Slice wae maker with detachable plates
Instruction Manual
Manuel d’instructions
Styled for Life
Designed & Engineered in New York City
Gaufrier 4 gaufres avec plaques amovibles

Thank You for choosing
We hope your new CRUX
small kitchen appliance will add
sleek elegance to your kitchen

Thank You for choosing
We hope your new CRUX
small kitchen appliance will add
sleek elegance to your kitchen
Important Safeguards ................................................................................................................ 2-4
Additional Important Safeguards .........................................................................................4-6
Notes on the Plug .............................................................................................................................4
Notes on the Cord (Detachable Cord Instructions) .................................................... 4-5
Plasticizer Warning ...........................................................................................................................5
Electric Power.....................................................................................................................................5
Getting To Know Your 4 Slice Belgian Waffle Maker ........................................................ 6
Before Using For The First Time ................................................................................................ 7
Operating Instructions ....................................................................................................................7
Waffle Baking Tips ..................................................................................................................... 8-9
User Maintenance Instructions .................................................................................................. 10
Care & Cleaning Instructions .....................................................................................................10
Storing Instructions ......................................................................................................................... 11
Recipes ...........................................................................................................................................12-15
Warranty ....................................................................................................................................... 16-17
Table des matières
Consignes de sécurité importantes .................................................................................. 18-19
Consignes de sécurité importantes supplémentaires ....................................................20
Remarques concernant la fiche ............................................................................................... 20
Remarques concernant le cordon ..........................................................................................20
Avertissement concernant les plastifiants ........................................................................... 21
Alimentation Électrique ............................................................................................................... 21
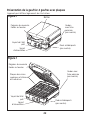
Présentation de la gaufrier 4 gaufres avec plaques ....................................................... 22
Instructions d’utilisation .............................................................................................................. 23
Conseils de cuisson des gaufres ...................................................................................... 24-26
Instructions d’entretien pour l’utilisateur ............................................................................ 26
Rangement ........................................................................................................................................ 27
Recettes ....................................................................................................................................... 28-31
Garantie ........................................................................................................................................32-33
Table of Contents

2
IMPORTANT SAFEGUARDS
When using electrical appliances, basic safety precautions should
always be followed, including the following:
1. READ ALL INSTRUCTIONS CAREFULLY.
2. The cord to this appliance should be plugged into a 120V AC
electrical outlet only.
3. To protect against risk of electric shock, do not immerse the cord,
plug or cooking unit in water or any other liquid.
4. Do not touch hot surfaces. Use handles.
5. This appliance is not intended for use by persons (including
children) with reduced physical, sensory or mental capabilities, or
lack of experience and knowledge, unless they have been given
supervision or instruction concerning use of the appliance by a
person responsible for their safety.
6. Close supervision is necessary when any appliance is used by or
near children.
7. Unplug from wall outlet when not in use and before cleaning. Allow
to cool before cleaning or storing this appliance.
8. Never yank the cord to disconnect the cooking unit from the outlet.
Instead, grasp the plug and pull to disconnect.
9. Do not operate any appliance if the cord is damaged. Do not use
this appliance if the unit malfunctions, if it is dropped or has been
damaged in any manner. Return the appliance to the nearest

3
authorized service facility for examination, repair or electrical or
mechanical adjustment.
10. The use of accessories or attachments not recommended by the
manufacturer may cause fire, electrical shock or injury.
11. Do not use outdoors or for commercial purposes.
12. Do not use this appliance for purposes other than the one for which
it was designed.
13. Do not let the electrical cord hang over the edge of the table or
countertop, or touch hot surfaces.
14. Do not place on or near a hot gas or electric burner or heated oven.
15. Use on a heat-resistant, flat level surface only.
16. Use extreme caution when moving any appliance containing hot
food, water, oil or other liquids.
17. To disconnect, remove plug from outlet.
18. Always unplug after use. The appliance will remain ON unless
unplugged.
19. CAUTION HOT SURFACES: This appliance generates heat during use.
Proper precautions must be taken to prevent the risk of burns, fire
or other damage to persons or property.
20. When using this appliance, provide adequate ventilation above and
on all sides for air circulation. Do not allow this appliance to touch
curtains, wall coverings, clothing, dish towels or other flammable
materials during use.

4
FOR HOUSEHOLD USE ONLY
SAVE THESE INSTRUCTIONS
ADDITIONAL IMPORTANT
SAFEGUARDS
CAUTION: This appliance is hot during operation and retains heat for
some time after turning OFF. Always use oven mitts when handling
hot materials and allow metal parts to cool before cleaning. Do not
place anything on top of the appliance while it is operating or while
it is hot.
1. All users of this appliance must read and understand this Instruction
Manual before operating or cleaning this appliance.
2. Do not leave this appliance unattended during use.
NOTES ON THE PLUG
This appliance has a polarized plug (one blade is wider than the other).
To reduce the risk of electric shock, this plug will fit in a polarized outlet
only one way. If the plug does not fit fully into the outlet, reverse the
plug. If it still does not fit, contact a qualified electrician. Do not modify
the plug in any way.
NOTES ON THE CORD
A. A short power-supply cord (or detachable power-supply cord) is to

5
be provided to reduce the risk resulting from becoming entangled
in or tripping over a longer cord.
B. Longer detachable power-supply cords or extension cords are
available and may be used if care is exercised in their use.
C. If a long detachable power-supply cord or extension cord is used :
1. The marked electrical rating of the cord or extension cord should
be at least as great as the electrical rating of the appliance;
2. If the appliance is of the grounded type, the extension cord
should be a grounding-type3-wire cord; and
3. The longer cord should be arranged so that it does not drape
over the countertop or table top where it can be pulled on by
children or tripped over unintentionally.
PLASTICIZER WARNING
CAUTION: To prevent Plasticizers from migrating to the finish of
the counter top or table top or other furniture, place NON-PLASTIC
coasters or place mats between the appliance and the finish of the
counter top or table top. Failure to do so may cause the finish to
darken; permanent blemishes may occur or stains can appear.
ELECTRIC POWER
If the electrical circuit is overloaded with other appliances, your
appliance may not operate properly. It should be operated on a
separate electrical circuit from other appliances.

6
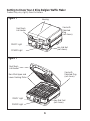
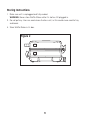
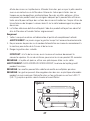
Product may vary slightly from illustrations
Figure 1
Figure 1
Cool-Touch
Lid Handles
Non-Stick Upper and
Lower Cooking Plates
Non-Skid Feet
(not shown)
Cord with
Polarized Plug
(not shown)
Housing
Cord with
Polarized
Plug
(not shown)
non skid feet
(not shown)
Cool-Touch
Lid Handles
POWER Light
READY Light
POWER Light
READY Light
Getting to Know Your 4 Slice Belgian Wae Maker

7
Before Using for the First time
1. Carefully unpack the Waffle Maker and remove all packaging and materials.
2. Before using your Waffle Maker for the first time, wipe the cooking plates with a damp
cloth toremove all dust and then dry. Wipe outer surfaces with a slightly damp, soft
cloth or sponge.
CAUTION: Take care to prevent water from running into the appliance.
Never immerse wae maker BODY in water or any other liquids!
3. Set the appliance on a dry, clean and flat surface. Keep the Waffle Maker closed
until use.
Operating Instructions
1. Using the handle latch, lift the top lid to the open position.
2. Before baking the first waffles of the day, select the plate with the pattern of your
choice and use a heat-resistant brush to apply 1 teaspoon of vegetable oil to both the
upper and lower cooking plates. If a brush is not available, spread withanabsorbent
kitchen towel and wipe off any excess oil.
3. Plug unit into a 120V AC electrical outlet. The white POWER light will illuminate as the
WaffleMakerpreheats.
NOTE: When your Waffle Maker is heated for the first time, it may emit slight smoke
or odor. Thisisnormal and should disappear after 1 or 2 uses. This does not affect
the safety of the appliance. However, as it may affect the flavor of the first waffles
prepared in the Waffle Maker,
it is recommended that these be discarded.
4. While preheating, prepare waffle batter.
5. After approximately 3 to 5 minutes, the white READY light will illuminate, indicating
the unit ispreheated and is ready for use.
6. Recipes will vary in cook time and brownness; batters with more sugar will brown
quicker.
Note the perfect cook times for each batter recipe for future use.
7. Pour waffle batter onto the center of each of the 4 waffles on the lower cooking plate.
If batter is thick, use a spatula to spread batter to edges.
CAUTION: DO NOT OVERFILL; batter will expand when cooked.
8. Close supervision is necessary when any appliance is used by or near children.
9. Allow the Waffle Maker to cook for 4 to 5 minutes, according to recipe directions.
ThewhiteREADYlight will cycle on and off as the unit maintains baking temperature.

8
10. Wipe the outside with a clean paper towel or cleaning cloth if necessary.
11. At the end of the cook time, open the latch and lift the top lid gently; if it pulls,
continue baking for30 seconds and test again. If the waffles need to bake to a darker
finish, close the lid and continue cooking in 20 second intervals until the desired color
is achieved.
12. Wearing oven mitts, remove waffles from the cooking plates using a non-metallic
utensil. Awoodenor heat-proof plastic spatula can be used to remove the waffles.
CAUTION: To avoid damage to the non-stick surface, never use any sharp, pointed or
metal objects.
WARNING: Cooking surfaces are hot, do not touch; use caution until cooking plates
are cool.
NOTE: If additional waffles are to be cooked, keep the Waffle Maker closed to retain
heat. Alwayswait until the blue READY light illuminates before baking more waffles.
NOTE: Waffles made later will bake faster because extra heat has been retained.
It may be necessary to adjust to a shorter cooking time to accommodate.
13. When baking is complete, after waffles have been removed, unplug the power cord
fromelectricoutlet. Lift the top lid to expose the cooking plates and allow unit to cool.
14. Do not clean until unit has been fully cooled.
Wae Baking Tips
• Most recipes can be easily halved or doubled.
• Do not open the Waffle Maker during the first minute of baking or the waffle will
separate. Completely cook the waffle before removing.
• When a waffle is done, the top lid should lift easily. Lift gently; if it pulls, continue
cooking for30seconds and test again.
• When preparing waffle batter, do not over-mix or waffles will be tough.
Stir batter only until largelumps of dry ingredients disappear. Some lumps are ok.
• The optimal amount of batter to produce a full-shaped waffle, without overflowing,
will vary withdifferent waffle batters.
• For more evenly shaped waffles, spread thick batters to the outer edge of the lower
cooking plate using a heat-proof rubber spatula or other non-metallic utensil before
closing the lid.
• Cake-based waffles are more tender than regular waffles, and may require more care
when removing from the Waffle Maker. Wearing oven mitts, use a spatula to support
waffles when removing from the Waffle Maker.

9
• To retain crispness, move baked waffles to a paper napkin or a wire cooling rack to
absorb any condensation. To keep waffles hot, place in an ovenproof dish on an oven
rack and warm at about 200-250°F (90-120°C). Waffles will keep for about 20 minutes
before they begin to dry out.
• Cooled waffles can be re-warmed and re-crisped individually by returning to hot
Waffle Maker. Place waffles on lower cooking plate so grooves match; close lid and
heat for 1 to 2 minutes, watching carefully to prevent burning.
• Baked waffles freeze well. Cool waffles completely on a wire rack. Store in a plastic
freezer bag or ina covered container, separating waffles with wax paper.
• Reheat frozen waffles in a toaster oven, 300ºF oven or wide-mouth toaster until hot
and crisp.
For lower sugar wafes and/or toppings:
• Use sugar substitutes.
• Use organic agave nectar.
• Use low-sugar preserves, marmalades or jellies.
• Use macerated dried fruits such as figs, dates, prunes.
• Use apple or mango sauce.
• Use sugar-free maple syrup.
For lower fat, lower cholesterol wafes:
• Use skim milk, almond milk, coconut milk, soy milk, etc.
• Adapt recipes by eliminating egg yolks.
• Always use liquid vegetable oils such as canola, corn or
sunflower, instead of butter.
For higher ber wafes:
• Substitute half of the recipe white flour with whole-wheat flour.
• Substitute one-quarter of the recipe white flour with wheat or oat bran.
• Use macerated high-fiber dried fruits such as figs, dates, baby prunes.

10
User maintenance instructions
This appliance requires little maintenance. It contains no user serviceable parts.
Do not try to repair it yourself. Contact a qualified appliance repair technician if the
product requiresservicing.
Care & Cleaning Instructions
CAUTION: Unplug from electrical outlet and allow to cool thoroughly before
cleaning orstoring.
1. The Waffle Maker does not disassemble for cleaning.
2. Never immerse appliance in water or other liquids. Never place Waffle Maker in
dishwasher.
3. The waffle cooking plates should be cleaned and conditioned before each heating.
4. Brush cooking plates with a clean, soft pastry brush or cloth.
5. To condition plates, lightly coat cooking surfaces with solid vegetable shortening or
vegetable oil.
6. Carefully follow suggested cleaning procedures described below. After a time, if
waffles show signs of sticking, recondition as needed.
7. To protect the non-stick surfaces, use only plastic, nylon or wooden utensils.
8. To remove any batter baked onto the cooking plates, pour a small amount of cooking
oil onto thehardened batter. Allow to set for 5 minutes, then wipe softened batter
off with a paper towel or soft cloth. Remove stubborn stains with a plastic mesh puff
or pad. For best results, use only products with directions stating they are safe for
cleaning non-stick cooking surfaces.
Do not use steel wool or coarse scouring pads as metal will damage the cooking
plates.
9. The exterior finish should be cleaned with a non-abrasive cleaner and a soft, damp
cloth. Drythoroughly.

11
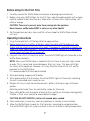
Storing Instructions
1. Make sure unit is unplugged and fully cooled.
WARNING: Never store Waffle Maker while it is hot or still plugged in.
3. Do not put any stress on cord where it enters unit, as this could cause cord to fray
and break.
4. Store Waffle Maker in its box.
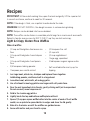
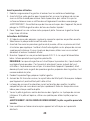
Figure 2

12
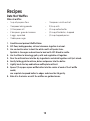
Recipes
IMPORTANT: At the end of cooking time, open the lock and gently lift the superior lid.
In case of resistance, continue to cook for 30 seconds.
NOTE: If the dough is thick, use a spatula to extend onto the sides.
WARNING: DO NOT OVERFILL; the dough increases in volume during baking.
NOTE: Recipes can be divided into two or doubled.
NOTE: The waffles can be frozen in resealable plastic bags for a maximum of one month.
Reheat in toaster oven or oven to 300 ºF (149 ºC) up they are hot and crispy.
Light & Crispy Gluten-Free Waes
Makes 6 waes
• 1/2 cup certified gluten-free brown rice
flour
• 1/4 cup certified gluten-free chickpea
flour
• 1/4 cup certified gluten-free tapioca
flour
• 3/4 teaspoons baking powder
• 1 teaspoon pure vanilla extract
• 1/4 teaspoon fine salt
• 1/2 cup milk
• 1/4 cup vegetable oil
• 1 large egg, separated
• 2 tablespoons organic agave nectar
• Soft unsalted butter and syrup, for
topping
1. In a large bowl, whisk rice, chickpea and tapioca flours together.
Add baking powder, vanilla and salt in a large bowl.
2. In another bowl, whisk milk, oil and egg yolks.
3. Use a 3rd bowl to beat egg whites and sugar until soft peaks form.
4. Pour the wet ingredients into the dry, gently stirring until just incorporated.
Do not overmix, some lumps are ok.
5. Fold in the beaten egg whites.
6. Lightly brush the top and bottom wae plates with oil.
7. Spoon 1/3 cup per square wae batter into the center of each of the 2 wae
molds; use a spatula to spread batter to edges and close the lid gently.
8. Bake 4 to 5 minutes or until the waes are golden brown.
9. Serve with butter and your favorite syrup.

13
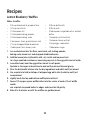
Recipes
Date Nut Waes
Makes 6 waes
• 1 cup all-purpose flour
• 1 teaspoon baking powder
• 1/4 teaspoon salt
• 2 teaspoons ground cinnamon
• 2 eggs, separated
• 1 tablespoon sugar
• 1 teaspoons vanilla extract
• 3/4 cup milk
• 1/4 cup melted butter
• 1/4 cup pitted dates, chopped
• 1/4 cup chopped pecans
1. Condition and preheat Wae Maker.
2. Sift flour, baking powder, salt and cinnamon together in a bowl.
3. Use an electric mixer to beat the whites until soft peaks form.
Sprinkle in the sugar and continue to beat until sti. Blend in vanilla.
4. Use the Mixer to blend egg yolks, milk and vegetable oil together.
5. Pour the milk mixture into the dry ingredients and whisk together until just mixed.
6. Gently fold egg white mixture, dates and pecans into the batter.
7. Lightly brush the top and bottom wae plates with oil.
8. Spoon 1/3 cup per square wae batter into the center of each of the 2 wae
molds;
use a spatula to spread batter to edges and close the lid gently.
9. Bake 4 to 5 minutes or until the waes are golden brown.

14
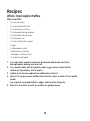
Recipes
Lemon Blueberry Waes
Makes 6 waes
• 3/4 cup bleached all-purpose flour
• 1/4 cup cornstarch
• 1/2 teaspoon salt
• 1/2 teaspoon baking powder
• 1/4 teaspoon baking soda
• 2 teaspoons finely grated lemon zest
• 1/2 cup chopped dried blueberries
• 1 tablespoon fresh lemon juice
• 3/8 cup buttermilk
• 3/8 cup milk
• 3 tablespoons vegetable oil or melted
butter
• 1 teaspoon vanilla extract
• 1 teaspoon lemon extract
• 2 large eggs, separated
• 1 tablespoon sugar
1. In a medium bowl mix the flour, cornstarch, salt, baking powder,
baking soda, lemon zest and chopped dried blueberries.
2. Add the lemon juice, buttermilk, milk, oil, vanilla and lemon extract
toa large spouted container or measuring cup; mix in the egg yolks and set aside.
3. In another bowl, beat the egg whites almost to soft peaks.
Sprinkle in the sugar and continue to beat until peaks are firm and glossy.
4. Pour the buttermilk mixture into the dry ingredients and whisk until just mixed.
5. Use a spatula to fold in dollops of whipped egg white into the batter until just
incorporated.
6. Lightly brush the top and bottom wae plates with oil.
7. Spoon 1/3 cup per square wae batter into the center of each of the 2 wae
molds;
use a spatula to spread batter to edges and close the lid gently.
8. Bake 4 to 5 minutes or until the waes are golden brown.

15
Recipes
Whole-Grain Apple Waes
Makes 6 waes
• 1/4 cup cornmeal
• 1/4 cup buckwheat flour
• 1/2 cup brown rice flour
• 1/2 teaspoon baking powder
• 1/2 teaspoon baking soda
• 1/4 teaspoon salt
• 1/2 cup nonfat plain yogurt
• 2 eggs
• 2 tablespoons water
• 1 tablespoon canola oil
• 1 teaspoon vanilla extract
• 1 cup diced red apple
1. In a large bowl, combine cornmeal, buckwheat and brown rice flours,
baking powder, baking soda and salt.
2. In a separate bowl, whisk together yogurt, eggs, water, oil and vanilla.
Add to dry ingredients. Stir in apples.
3. Lightly brush the top and bottom wae plates with oil.
4. Spoon 1/3 cup per square wae batter into the center of each of the 2 wae
molds;
use a spatula to spread batter to edges and close the lid gently.
5. Bake 4 to 5 minutes or until the waes are golden brown.

Limited Two-Year Warranty
SENSIO Inc. hereby warrants that for
a period of TWO YEARS from the date
of purchase, this product will be free
from mechanical defects in material
and workmanship, and for 90 days in
respect to non-mechanical parts. At its
sole discretion, SENSIO Inc. will either
repair or replace the product found to
be defective, or issue a refund on the
product during the warranty period.
The warranty is only valid for the
original retail purchaser from the
date of initial retail purchase and is
not transferable. Keep the original
sales receipt, as proof of purchase
isrequired to obtain warranty
validation. Retail stores selling this
product do not have the right to alter,
modify, or in any way revise the terms
and conditions of the warranty.
Exclusions:
The warranty does not cover normal
wear of parts or damage resulting
from any of thefollowing: negligent
use of the product, use of improper
voltage or current, improper routine
maintenance, use contrary to the
operating instructions, disassembly,
repair, or alteration by anyone other
than qualified SENSIO Inc. personnel.
Also, the warranty does not cover
Acts of God such as fire, floods,
hurricanes, or tornadoes.
SENSIO Inc. shall not be liable for
any incidental or consequential
damages caused by the breach of
any express or implied warranty.
Apart from the extent prohibited by
applicable law, any implied warranty
of merchantability or fitness for a
particular purpose is limited in time
to the duration of the warranty. Some
states, provinces or jurisdictions do
not allow the exclusion or limitation of
incidental or consequential damages,
or limitations on how long an implied
warranty lasts, and therefore, the
above exclusions or limitations may
not apply to you. The warranty covers
specific legal rights which may vary by
state, province and/or jurisdiction.
16

17
How To Obtain Warranty Service:
You must contact Customer Service at
our toll-free number: 1-866-832-4843.
A Customer Service Representative
will attempt to resolve warranty issues
over thephone. If the Customer Service
Representative is unable to resolve the
problem, you will be provided with a
case number and asked to return the
product to SENSIOInc. Attach a tag to
the product that includes: your name,
address, daytime contact telephone
number, case number, and description
of the problem.
Also, include a copy of the original
sales receipt. Carefully package
the tagged product with the sales
receipt, and send it (with shipping
and insurance prepaid) to SENSIO
Inc.’s address. SENSIO Inc. shall bear
no responsibility or liability for the
returned product while in transit
to SENSIO Inc.’s Customer Service
Center.

18
CONSIGNES DE SÉCURITÉ
IMPORTANTES
Lorsque vous utilisez des appareils électriques, il est nécessaire de toujours suivre des
précautions de sécurité de base, y compris ce qui suit :
1. LIRE L’ENSEMBLE DES CONSIGNES AVEC ATTENTION.
2. Le cordon de cet appareil doit être branché sur une prise électrique de 120 V CA
uniquement.
3. Pour se protéger contre un risque de décharge électrique, ne pas mettre le cordon, la
fiche ou l’appareil de cuisson dans de l’eau ou un autre liquide.
4. Ne pas toucher les surfaces chaudes. Utiliser les poignées.
5. Cet appareil n’est pas prévu pour être utilisé par des personnes (y compris
des enfants) à capacité physique, sensorielle ou mentale réduite, ou manquant
d’expérience et de connaissances, sauf si elles bénéficient de la surveillance ou
d’instructions concernant l’utilisation de l’appareil de la part d’une personne
responsable de leur sécurité.
6. Les enfants doivent rester sous surveillance afin de s’assurer qu’ils ne jouent pas avec
l’appareil.
7. Débrancher l’appareil de la prise murale lorsqu’il ne sert pas et avant de le nettoyer.
Laisser refroidir avant de nettoyer ou de ranger cet appareil.
8. Ne pas tirer d’un coup sec sur le cordon pour débrancher l’appareil de cuisson de la
prise. À la place, saisir la fiche et tirer dessus pour débrancher.
9. Ne pas utiliser un appareil quand le cordon est endommagé. Ne pas utiliser cet
appareil s’il dysfonctionne, s’il est tombé ou a été endommagé de quelque manière
que ce soit. Rapporter l’appareil dans le centre de service agréé le plus proche pour
qu’il subisse un examen, une réparation ou un ajustement électrique ou mécanique.
10. L’utilisation d’accessoires non recommandés par le fabricant peut entraîner un
incendie, une décharge électrique ou des blessures.
11. Ne pas l’utiliser à l’extérieur ou à des fins commerciales.
12. Ne pas utiliser cet appareil pour des fins autres que celle pour laquelle il a été conçu.
13. Ne pas laisser le cordon électrique suspendu par-dessus le bord de la table ou du plan
de travail, ou en contact avec des surfaces chaudes.
La page charge ...
La page charge ...
La page charge ...
La page charge ...
La page charge ...
La page charge ...
La page charge ...
La page charge ...
La page charge ...
La page charge ...
La page charge ...
La page charge ...
La page charge ...
La page charge ...
La page charge ...
La page charge ...
La page charge ...
-
 1
1
-
 2
2
-
 3
3
-
 4
4
-
 5
5
-
 6
6
-
 7
7
-
 8
8
-
 9
9
-
 10
10
-
 11
11
-
 12
12
-
 13
13
-
 14
14
-
 15
15
-
 16
16
-
 17
17
-
 18
18
-
 19
19
-
 20
20
-
 21
21
-
 22
22
-
 23
23
-
 24
24
-
 25
25
-
 26
26
-
 27
27
-
 28
28
-
 29
29
-
 30
30
-
 31
31
-
 32
32
-
 33
33
-
 34
34
-
 35
35
-
 36
36
-
 37
37


Crux 17461 Le manuel du propriétaire
- Catégorie
- Gaufriers
- Taper
- Le manuel du propriétaire
dans d''autres langues
- English: Crux 17461 Owner's manual