
FormNo.3375-32RevB
12inCordlessTrimmer
ModelNo.51487—SerialNo.313000001andUp
Operator'sManual
Ifyouhavequestionsorproblems,contactusatwww.Toro.comor
calltollfree1-800-237-2654(US)or1-800-248-3258(Canada)before
returningthisproduct.
GeneralSafetyRules
WARNING:Whenusingelectricgardeningappliances,basic
safetyprecautionsshouldalwaysbefollowedtoreducetheriskof
re,electricshock,andpersonalinjury,includingthefollowing:
Readallinstructions.
Theterm“powertool”inallofthewarningsreferstoyour
mains-operated(corded)powertoolorbattery-operated(cordless)
powertool.
1.Workareasafety
A.Keepworkareacleanandwelllit.Clutteredordark
areasinviteaccidents
B.Donotoperatepowertoolsinexplosive
atmospheres,suchasinthepresenceofammable
liquids,gasesordust.Powertoolscreatesparks
whichmayignitethedustorfumes.
C.Keepchildrenandbystandersawaywhileoperating
apowertool.Distractionscancauseyoutolose
control.
2.Electricalsafety
A.Powertoolplugsmustmatchtheoutlet.Never
modifythepluginanyway.Donotuseany
adapterplugswithearthed(grounded)powertools.
Unmodiedplugsandmatchingoutletswillreducerisk
ofelectricshock.
B.Avoidbodycontactwithearthedorgrounded
surfacessuchaspipes,radiators,rangesand
refrigerators.Thereisanincreasedriskofelectric
shockifyourbodyisearthedorgrounded.
C.Donotexposepowertoolstorainorwetconditions.
Waterenteringapowertoolwillincreasetheriskof
electricshock.
D.Donotabusethecord.Neverusethecordfor
carrying,pullingorunpluggingthepowertool.
Keepcordawayfromheat,oil,sharpedgesor
movingparts.Damagedorentangledcordsincrease
theriskofelectricshock.
E.Whenoperatingapowertooloutdoors,usean
extensioncordsuitableforoutdooruse.Useofa
cordsuitableforoutdoorusereducestheriskofelectric
shock.
F.Ifoperatingapowertoolinadamplocationis
unavoidable,usearesidualcurrentdevice(RCD)
protectedsupply.UseofanRCDreducestheriskof
electricshock.
3.Personalsafety
A.Stayalert,watchwhatyouaredoinganduse
commonsensewhenoperatingapowertool.Do
notuseapowertoolwhileyouaretiredorunderthe
inuenceofdrugs,alcoholormedication.Amoment
ofinattentionwhileoperatingpowertoolsmayresult
inseriouspersonalinjury.
B.Usepersonalprotectiveequipment.Alwayswear
eyeprotection.Protectiveequipmentsuchasdust
mask,non-skidsafetyshoes,hardhat,orhearing
protectionusedforappropriateconditionswillreduce
personalinjuries.
C.Preventunintentionalstarting.Ensuretheswitch
isintheoff-positionbeforeconnectingtopower
sourceand/orbatterypack,pickinguporcarrying
thetool.Carryingpowertoolswithyourngeronthe
switchorenergizingpowertoolsthathavetheswitch
oninvitesaccidents.
D.Removeanyadjustingkeyorwrenchbeforeturning
thepowertoolon.Awrenchorakeyleftattachedto
arotatingpartofthepowertoolmayresultinpersonal
injury.
E.Donotoverreach.Keepproperfootingandbalance
atalltimes.Thisenablesbettercontrolofthepower
toolinunexpectedsituations.
F.Dressproperly.Donotwearlooseclothingor
jewelry.Keepyourhair,clothingandglovesaway
frommovingparts.Looseclothes,jewelry,orlonghair
canbecaughtinmovingparts.
G.Ifdevicesareprovidedfortheconnectionofdust
extractionandcollectionfacilities,ensuretheseare
connectedandproperlyused.Useofthesedevices
canreducedust-relatedhazards.
H.Keephandsandfeetawayfromthecuttingarea.
4.Powertooluseandcare
A.Donotforcethepowertool.Usethecorrectpower
toolforyourapplication.Thecorrectpowertoolwill
dothejobbetterandsaferattherateforwhichitwas
designed.
B.Donotusethepowertooliftheswitchdoesnotturn
itonandoff.Anypowertoolthatcannotbecontrolled
withtheswitchisdangerousandmustberepaired.
C.Disconnecttheplugfromthepowersourceand/or
thebatterypackfromthepowertoolbeforemaking
anyadjustments,changingaccessories,orstoring
powertools.Suchpreventivesafetymeasuresreduce
theriskofstartingthepowertoolaccidentally.
©2012—TheToro®Company
8111LyndaleAvenueSouth
Bloomington,MN55420
Registeratwww.Toro.com.OriginalInstructions(EN)
PrintedinChina.
AllRightsReserved*3375-32*B

D.Storeidlepowertoolsoutofthereachofchildren
anddonotallowpersonsunfamiliarwiththepower
toolortheseinstructionstooperatethepowertool.
Powertoolsaredangerousinthehandsofuntrained
users.
E.Storeidleappliancesindoors.Whennotinuse,
appliancesshouldbestoredindoorsinadryandhigh
orlocked-upplace,outofthereachofchildren.
F.Maintainpowertools.Checkformisalignmentor
bindingofmovingparts,breakageofpartsand
anyotherconditionthatmayaffectthepowertools
operation.Ifdamaged,havethepowertoolrepaired
beforeuse.Manyaccidentsarecausedbypoorly
maintainedpowertools.
G.Keepcuttingtoolssharpandclean.Properly
maintainedcuttingtoolswithsharpcuttingedgesare
lesslikelytobindandareeasiertocontrol.
H.Usethepowertool,accessoriesandtoolbitsetc.,
inaccordancewiththeseinstructionsandinthe
mannerintendedfortheparticulartypeofpower
tool,takingintoaccounttheworkingconditions
andtheworktobeperformed.Useofthepowertool
foroperationsdifferentfromthoseintendedcouldresult
inahazardoussituation.
I.Keepguardsinplaceandinworkingorder.
5.Service
Haveyourpowertoolservicedbyaqualiedrepair
personusingonlyidenticalreplacementparts.Thiswill
ensurethatthesafetyofthepowertoolismaintained.
6.BatterySafety
A.Donotchargeapplianceinrain,orinwetlocations.
B.Donotusebattery-operatedapplianceintherain.
C.Useonlythefollowingtypeandsizebattery:Toro
batterymodel88504or88506andbatterycharger
88503.
D.Removeordisconnectthebatterybeforeservicing,
cleaning,orremovingmaterialfromthegardening
appliance.
E.Donotdisposeofthebatteryinare.Thecellmay
explode.Checkwithlocalcodesforpossiblespecial
disposalinstructions.
F.Donotopenormutilatethebattery.Releasedelectrolyte
iscorrosiveandmaycausedamagetotheeyesorskin.
Itmaybetoxicifswallowed.
G.Exercisecareinhandlingbatteriesinordernottoshort
thebatterywithconductingmaterialssuchasrings,
bracelets,andkeys.Thebatteryorconductormay
overheatandcauseburns.
H.Chargingtimewillbeincreasedifthebatteryischarged
whenthetemperatureisnotbetween41to104degrees
F(5to40degreesC).
SAVETHESEINSTRUCTIONS
2

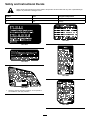
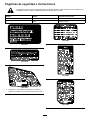
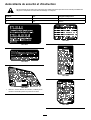
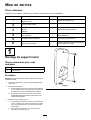
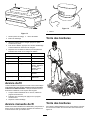
SafetyandInstructionalDecals
Safetydecalsandinstructionsareeasilyvisibletotheoperatorandarelocatednearanyareaofpotentialdanger.
Replaceanydecalthatisdamagedorlost.
SymbolNameDesignation/Explanation
DCDirectcurrentTypeofcurrent
VVoltsVoltage
121–7615
121–7614
125–3227
1.Warning—readtheOperator’sManual;donotoperatein
wetconditions;weareyeprotection.
125–3291
121–7602
125–3226
3

121–7606
4

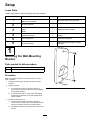
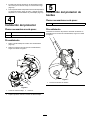
Setup
LooseParts
Usethechartbelowtoverifythatallpartshavebeenshipped.
ProcedureDescriptionQty.Use
Screw2
1Wall-mountingbracket1Mountthewall-mountingbracket.
2Nopartsrequired–
Auxiliaryhandle1
Latch1
3Brace1
Installtheauxiliaryhandle.
Guard1
4Phillipsheadscrew1
Mounttheguardtothebaseofthe
trimmer.
5Wireedgeguard1Installtheedgeguard
6Nopartsrequired–Adjustthetrimmerheightandbase
orientation
1
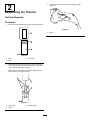
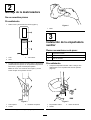
MountingtheWall-Mounting
Bracket
Partsneededforthisprocedure:
2Screw
1Wall-mountingbracket
Procedure
Note:Thebracketshouldbemountedindoorsandoutofthe
reachofchildren.
1.Placethebracketagainstthewallandmarkthe2hole
locations.
2.Drillthepilotholes.
A.Ifmountingthebracketonwallboard,plaster,or
cement,drill2holesforthewallanchors(notsupplied)
atthemarkedlocations.
B.Ifmountingthebracketonwood,drill2holesslightly
smallerthanthediameterofthescrewthreadsatthe
markedlocations.
3.Installthescrews(Figure1).
A.Ifmountingthebracketonwallboard,plaster,or
cement,insertthe2wallanchors(notsupplied)intothe
holesthenthreadthescrewsintothewallanchors.
B.Ifinstallingthebracketonwood,drivethe2screwsinto
thewall.
G018599
1
Figure1
5

2
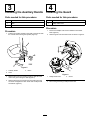
AssemblingtheTrimmer
NoPartsRequired
Procedure
1.Removethetapeandthetubefromthelowerpole(Figure2).
Figure2
1.Tube3.Lowerpole
2.Tape
2.Slidetheupperpoleintothelowerpole,liningupthetabs
intheupperpolewiththereceivingtabsinthelowerpole,
andsecureitbytighteningthescrew.
Note:Thereisanaudibleclickwhentheupperpoleand
lowerpoleareintheproperposition.
Figure3
1.Upperpole3.Receivingtabs
2.Screw
3.Cutthezip-tieandremoveitfromthetriggerhandle
(Figure4).
Figure4
1.Zip-tie
6

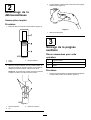
3
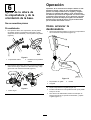
InstallingtheAuxiliaryHandle
Partsneededforthisprocedure:
1Auxiliaryhandle
1Latch
1Brace
Procedure
1.Positiontheauxiliaryhandleontheshaftofthetrimmerwith
thesmoothsurfacefacingtheoperator(Figure5).
G017277
Figure5
1.Auxiliaryhandle3.Brace
2.Latch
2.Slidethebraceintotheauxiliaryhandlesothatthebrace
restsinthegroovealongtheshaft(Figure5).
3.Slidethelatchfromtheleftthroughthehandleandbrace
asshownandtightenthelatchscrewwithaPhillipshead
screwdriver(Figure5).
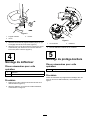
4
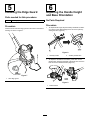
InstallingtheGuard
Partsneededforthisprocedure:
1Guard
1Phillipsheadscrew
Procedure
1.RemovethePhillipsheadscrewinstalledinthetrimmer
base(Figure6).
2.SlidetheguardontothetrimmerbaseasshowninFigure6.
G017622
Figure6
1.Phillipsheadscrew2.Guard
3.SecuretheguardusingaPhillipsheadscrew.
7

5
InstallingtheEdgeGuard
Partsneededforthisprocedure:
1Wireedgeguard
Procedure
Inserttheendsofthewireedgeguardintotheholesinthetrimmer
housing,asshowninFigure7.
G017621
1
Figure7
1.Wireedgeguard
6
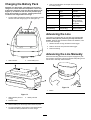
AdjustingtheHandleHeight
andBaseOrientation
NoPartsRequired
Procedure
•Toadjusthandleheight,iptheauxiliaryhandlelatch,slideit
upordowntothedesiredheight,thensecureitinplaceby
closingthelatch(Figure8).
Figure8
1.Auxiliaryhandle2.Auxiliaryhandlelatch
•Toadjusttheorientationofthebase,pressdownonthe
rotatorbuttonlocatedatthebaseoftheshaft,thenmovethe
basetofacethedesireddirection(Figure9).
1
G015683
Figure9
1.Rotatorbutton
8

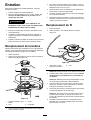
Operation
Important:Thebatterypackisnotfullychargedwhenit
ispurchased.Beforeusingthetrimmerforthersttime,
placethebatterypackinthechargerandchargeuntilthe
LEDindicatorsturngreen.Makesuretoreadallsafety
precautions.Withregularuse,itwillneedshortercharging
time.Ifstoringforaprolongedperiodoftime,removethe
battery.Whenreadytouseagain,chargethebatterypack
untiltheLEDindicatorsturngreen.
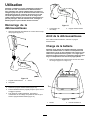
StartingtheTrimmer
1.Alignthetongueofthebatterypackwiththecavityinthe
handlehousing(Figure10).
g017453
1
2
3
Figure10
1.Triggerhandle3.Latch
2.Tongue
2.Graspthetriggerhandle(Figure10).
3.Pushthebatterypackintothehandleuntilthelatchlocks
intoplace.
4.Tostartthetrimmer,slidethelockswitchbacktotheOn
position,thensqueezethetrigger(Figure11).
g017454
1
2
Figure11
1.Lockswitch2.Trigger
StoppingtheTrimmer
Tostopthetrimmer,releasethetrigger.
9

ChargingtheBatteryPack
Important:Forbestresults,yourbatterytoolshouldbe
chargedinalocationwherethetemperatureismorethan
41degreesF(5degreesC)butlessthan104degreesF(40
degreesC).Toreducetheriskofseriouspersonalinjury,
donotstoreoutsideorinvehicles.Chargingtimewillbe
increasedifnotchargedwithinthisrange.
1.Turnthebatteryupsidedownandlineupthebatteryterminal
withtheslotinthecharger(Figure12andFigure13).
G017407
1
2
Figure12
1.LEDindicators2.Insertbatteryhere
G016223
1
2
3
Figure13
1.LEDindicators(levelof
charge)
3.Batteryterminal
2.Releasebutton
2.Slidethebatteryintothechargeruntilitclicksintoplace.
3.Toremovethebattery,pressdownonthereleasebutton
andslidethebatterybackwardsoutofthecharger.
4.RefertothetablebelowtointerprettheLEDindicatorson
thebatterycharger.
LEDCOLOR
LeftRightIndicates:
RedRedBatteryischarging
RedGreenFullycharged
RedOrangeBatteryistoo
warm:Remove
forapproximately
30minutes
RedGreenNobatterypresent
Red(blinking)Red(blinking)Defectivebattery
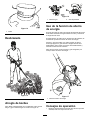
AdvancingtheLine
Thetrimmerisequippedwithanauto-feedhead.Thelinewill
advance6mm(1/4inch)eachtimeyoustopandstartthe
trimmer.Whenthelinereachesthebladeinthedeector,itwill
becutoffatthatlength.
1.Withthetrimmerrunning,releasetheswitchtrigger.
2.Waittwoseconds,thenpresstheswitchtrigger.
3.Resumetrimming.
AdvancingtheLineManually
Disconnectthestringtrimmerfromthepowersupply,thenpush
theredbuttonatthebaseofthespoolretainerwhilepullingonthe
trimmerlinetomanuallyadvancetheline.
Figure14
1.Button
10

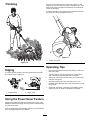
Trimming
G016254
Figure15
Edging
Tousethetrimmerasedger,presstherotatorbuttonandrotate
theheadasshowninFigure16.
1
2
G015660
Figure16
1.Rotatorbutton2.Edgerguide
UsingthePowerSaverFeature
Engagingthepowersaverfeaturewillextendtheruntimeofthe
batterybyshorteningthelengthofthetrimmerlineanddecreasing
theloadonthemotor.
Ifyouareexperiencingreducedbatteryruntime,itisrecommended
thatyouengagethepowersaverfeature.
Pushdownandrotatethepowersaverknob(Figure17)180
degrees(1/2turn)toshortenthelengthofthetrimmerline.This
reducesthepowerconsumptionofthetrimmerandextendsthe
runtimeofthebattery.
Toresumeoperationintheregularmode,pushdownandrotate
thepowersaverknob180degrees(1/2turn).
g017455
1
Figure17
1.Powersaverknob
OperatingTips
•Keepthetrimmertiltedtowardtheareabeingcut;thisisthe
bestcuttingarea.
•Thestringtrimmercutswhenpassingtheunitfromleftto
right.Thiswillavoidthrowingdebrisattheoperator.
•Usethetipofthestringtodothecutting;donotforcestring
headintouncutgrass.
•Wireandpicketfencescauseextrastringwear,even
breakage.Stoneandbrickwalls,curbs,andwoodmaywear
stringrapidly.
•Avoidtreesandshrubs.Treebark,woodmoldings,siding,
andfencepostscaneasilybedamagedbythestrings.
11

Figure18
1.Directionofrotation3.Stringpath
2.Idealcuttingrange
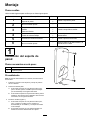
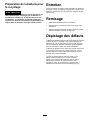
Maintenance
Aftereachuseofthetrimmer,completethefollowing:
1.Removethebatteryfromthetrimmer.
2.Wipethetrimmercleanwithadampcloth.Donothosethe
trimmerdownorsubmergeitinwater.
CAUTION
Thelinecut-offbladeonthedeectorissharpand
cancutyou.Donotuseyourhandstocleanthe
deectorshieldandblade.
3.Wipeorscrapecleanthecuttingheadareaanytimethereis
anaccumulationofdebris.
4.Checkandtightenallfasteners.Ifanypartisdamagedor
lost,repairorreplaceit.
5.Brushdebrisawayfromairintakeventsonthebackofthe
shafttopreventthemotorfromoverheating.
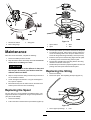
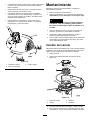
ReplacingtheSpool
Useonly.065inch(1.6mm)diametermonolamentstring.Use
originalmanufacturer’sreplacementstringforbestperformance
(Toropartnumber88532).
1.Removethebattery.
2.Pushinthetabsonthesideofthespoolretainer(Figure19).
1
2
3
4
G015663
Figure19
1.Spoolretainer3.Slots
2.Spool4.Tabs
3.Pullthespoolretaineruptoremoveitandremovethespool.
4.Toinstallthenewspool,makesurethestringiscapturedin
oneoftheretainingslotsonthenewspool.Makesurethe
endofthestringextendsapproximately6inches(152mm).
5.Installthenewspoolsothatthestringalignswiththeeyelet
inthestringhead.Threadthestringintotheeyelet.
6.Pullthestringextendingfromthestringheadsothestring
releasesfromtheslotinthespool.
7.Reinstallthespoolretainerbydepressingtabsintoslotsand
pushingdownuntilspoolretainerclicksintoplace.
ReplacingtheString
1.Removethebattery.
2.Removethespool.SeeReplacingtheSpool(Figure19).
1
2
G015662
Figure20
1.Slotinupperspoolange2.Hole
12

Note:Removeanyoldstringremainingonthespool.
3.Thespoolwillacceptupto15feet(4.5m)ofstring.Use
only.065inch(1.6mm)diametermonolamentstring.
Note:Donotuseanyothergaugeortypeofstring,asthis
coulddamagethetrimmer.
4.Insertthestringintotheanchorholeintheupperpartof
thespool(Figure20).Windthestringontothespoolinthe
directionshownbythearrowsonthespool.
5.Placethestringintheslotontheupperspoolange,leaving
about6inches(152mm)extendedbeyondtheslot.
Note:Donotoverll.Afterwindingthestring,thereshould
beatleast1/4inch(6mm)betweenthewoundstringand
theoutsideedgeofthespool.
6.Replacethespoolandthespoolretainer.RefertoSpool
Replacementearlierinthismanual.
BatteryPackPreparationFor
Recycling
WARNING
Uponremoval,coverthebatterypack'sterminalswith
heavy-dutyadhesivetape.Donotattempttodestroy
ordisassemblethebatterypackorremoveanyofits
components.Lithium-ionbatteriesmustberecycledor
disposedofproperlyatthenearestbatteryrecycling
facility.
Service
Shouldthisitemneedservice,taketheproducttoyourAuthorized
ToroServiceDealer.YourToroDealerisspeciallytrainedtorepair
ToroproductsandwillensurethatyourTorostays“All”Toro.
Storage
•Cleanallforeignmaterialfromtheproduct.
•Storeitinawell-ventilatedplacethatisinaccessibleto
children.
•Keepawayfromcorrosiveagentssuchasgardenchemicals
andde-icingsalts.
Troubleshooting
Usingthebatterywhenitishotcanreducetheoperatingtime.
Thebatterywillautomaticallystopworkingwhenitisoverheated
topreventdamagetoit.Removethebatteryfromthechargerand
allowittocoolbeforeplacingitbackintothetrimmer.
Usingthebatterywhenthereismoistureontheleadscancause
thetrimmertomalfunction.Allowthebatterytodryorwipeitdry
beforeplacingitbackintothetrimmer.
Usingthetrimmertocutthickgrassintemperaturesabove90
Fahrenheit(32Celsius)mayreducetheruntime.Engagethe
powersavingfeaturetohelpincreasetheoperatingtime.Referto
UsingthePowerSaverFeature(page11).
13

Notes:
14

Notes:
15

TheToroPromise-ElectricProducts
ATwo-YearFullWarrantyforResidentialUsefortheUnitedStatesandCanada
TheToroCompanyanditsafliate,ToroWarrantyCompany,pursuanttoanagreementbetweenthem,jointlywarrantthisproductfortwoyearsagainst
defectsinmaterialorworkmanshipwhenusedfornormalresidentialpurposes.*
IfyouthinkyourToroProductcontainsadefectinmaterialsorworkmanship,ifyouhavequestionsorproblems,andbeforereturningthisproductcall
tollfree:
Trimmers:Blowers:Snowthrowers:
1-800-237-2654(US)
1-800-248-3258(Canada)1-888-367-6631(US)
1-888-430-1687(Canada)
1-800-574-3312(Mexico)
1-800-808-2963(US)
1-800-808-3072(Canada)
Toreceiveareplacementorrepair,atouroption,returnthecompleteunittotheseller.UnitedStatesandCanadacustomersmayreturntheirproduct,
withproofofpurchase,toanyAuthorizedServiceDealer.UnitedStatescustomersmayalsoreturntheirproduct,withproofofpurchase,postage
prepaid,totheToroServiceCenter,5500SEDelaware,Ankeny,IA50021.
Thiswarrantycoversproductdefectsonly.NeitherTheToroCompanynorToroWarrantyCompanyisliableforindirect,incidental,or
consequentialdamagesinconnectionwiththeuseoftheToroProductscoveredbythiswarranty,includinganycostorexpenseofproviding
substituteequipmentorserviceduringreasonableperiodsofmalfunctionornon-usependingcompletionofrepairsunderthiswarranty.
Somestatesdonotallowexclusionsofincidentalorconsequentialdamages,sotheaboveexclusionsmaynotapplytoyou.Thiswarranty
givesyouspeciclegalrights,andyoumayalsohaveotherrightswhichvaryfromstatetostate.
CountriesOtherthantheUnitedStatesandCanada
CustomerswhohavepurchasedToroproductsexportedfromtheUnitedStatesorCanadashouldcontacttheirToroDistributor(Dealer)toobtain
guaranteepoliciesforyourcountry,province,orstate.IfforanyreasonyouaredissatisedwithyourDistributor’sserviceorhavedifcultyobtaining
guaranteeinformation,contacttheToroimporter.Ifallotherremediesfail,youmaycontactusatT oroWarrantyCompany.
AustralianConsumerLaw
AustraliancustomerswillnddetailsrelatingtotheAustralianConsumerLaweitherinsidetheboxoratyourlocalToroDealer.
*Residentialusemeansuseoftheproductonthesamelotasyourhome.PartNumber374-0262Rev.D
374-0262RevD

FormNo.3375-32RevB
Desbrozadorainalámbricade30cm(12pulgadas)
Nºdemodelo51487—Nºdeserie313000001ysuperiores
Manualdeloperador
Siustedtienealgunapreguntaoalgúnproblema,contáctenosen
www.Toro.comollamealteléfonogratuito1-800-237-2654(EE.UU.)o
1-800-248-3258(Canadá)antesdedevolveresteproducto.
Normasgeneralesde
seguridad
ADVERTENCIA:Cuandoseutilizanaparatosdejardinería
eléctricos,esnecesarioobservarunasnormasbásicasde
seguridad,incluyendolassiguientes,andereducirelriesgode
incendio,descargaeléctricaylesionespersonales:
Leatodaslasinstrucciones.
Eltérmino"herramientaeléctrica"queapareceenlasadvertencias
sereeresiempreaunaherramientaaccionadaporelsuministro
eléctricodelared(concable)ounaherramientaeléctrica
accionadaporbatería(sincable).
1.Seguridaddelazonadetrabajo
A.Mantengalazonadetrabajolimpiaybieniluminada.
Laszonasdesordenadasuoscurassonunainvitación
alaccidente
B.Noutiliceherramientaseléctricasenatmósferas
explosivas,comoporejemploenpresencia
delíquidosinamables,gasesopolvo.Las
herramientaseléctricascreanchispasquepueden
inamarelpolvoolosvapores.
C.Mantengaalejadosaniñosyotraspersonas
mientrasutilizaunaherramientaeléctrica.Las
distraccionespuedenhacerquepierdaelcontrol.
2.Seguridadeléctrica
A.Laclavijadelaherramientaeléctricadebeserdel
tipocorrectoparaelenchufe.Nuncamodiqueel
enchufeenmodoalguno.Noutiliceadaptadoresde
enchufeconherramientaseléctricascontomade
tierra.Elusodeclavijassinmodicaryenchufescon
tomadetierrareduciráelriesgodedescargaeléctrica.
B.Evitetocarsuperciesconectadasatierra,tales
comotuberías,radiadores,cocinasyrefrigeradores.
Hayunmayorriesgodedescargaeléctricasisucuerpo
hacetierra.
C.Noexpongalasherramientaseléctricasalalluvia
oacondicioneshúmedas.Sientraaguaenuna
herramientaeléctrica,elriesgodedescargaeléctrica
aumenta.
D.Nomaltrateelcable.Noutiliceelcablenuncapara
transportar,arrastrarodesenchufarlaherramienta
eléctrica.Mantengaelcablealejadodelcalor,del
aceite,debordescortantesydepiezasmóviles.
Loscablesdañadosoenredadosaumentanelriesgo
dedescargaeléctrica.
E.Siutilizaunaherramientaeléctricaenelexterior,
utiliceuncablealargadoradecuadoparaelusoen
exteriores.Elusodeuncableapropiadoparaeluso
enexterioresreduceelriesgodedescargaeléctrica.
F.Sinoesposibleevitarelusodeunaherramienta
eléctricaenunlugarhúmedo,utiliceunsuministro
eléctricoprotegidoporundispositivodecorriente
residual(RCD).ElusodeunRCDreduceelriesgode
descargaeléctrica.
3.Seguridadpersonal
A.Manténgasealerta,estéatentoaloqueestá
haciendoyutiliceelsentidocomúnmientrasutiliza
unaherramientaeléctrica.Noutiliceunherramienta
eléctricasiestácansadoobajolainuenciade
drogas,alcoholomedicamentos.Unabrevefalta
deatenciónmientrasutilizaunaherramientaeléctrica
puedeprovocarlesionespersonalesgraves.
B.UtiliceequiposdeprotecciónpersonalLleve
protecciónocularsiempre.Elusodeequiposde
protecciónpersonalcomomascarillas,calzadode
seguridadantideslizante,cascoyprotecciónauditiva,
encondicionesapropiadas,reduciráelriesgode
lesionespersonales.
C.Eviteelencendidoaccidental.Asegúresedequeel
interruptorestáenlaposicióndeapagadoantes
deconectarlaherramientaalatomadecorriente
y/oalabatería,yantesdelevantarotransportarla
herramienta.Transportarlasherramientaseléctricas
coneldedosobreelinterruptoroenchufarherramientas
eléctricasconelinterruptorenlaposicióndeencendido
esunainvitaciónalaccidente.
D.Retirecualquierllavedeajusteantesdeencender
laherramientaeléctrica.Unallaveolvidadaenun
componentegiratoriodeunaherramientaeléctrica
puededarlugaralesionespersonales.
E.Nointentealcanzarzonasdemasiadoalejadas.Pise
rmeymantengaelequilibrioentodomomento.
Estopermiteunmayorcontroldelaherramientaen
situacionesimprevistas.
F.Utilicelaropaadecuada.Nolleveropasojoyas
sueltas.Mantengaelpelo,laropaylosguantes
alejadosdelaspiezasmóviles.Laropasuelta,las
joyasyelpelolargopuedenquedaratrapadosen
piezasmóviles.
G.Siexistendispositivosparalaconexióndesistemas
derecogidayextraccióndepolvo,asegúresede
conectarlosyusarloscorrectamente.Elusode
estosdispositivospuedereducirlosriesgosasociados
conelpolvo.
©2012—TheToro®Company
8111LyndaleAvenueSouth
Bloomington,MN55420
Registresuproductoenwww.Toro.com.Traduccióndeloriginal(ES)
ImpresoenChina.
Reservadostodoslosderechos*3375-32*B

H.Mantengalasmanosylospiesalejadosdelazona
decorte.
4.Usoycuidadodelasherramientaseléctricas
A.Nofuercelaherramientaeléctrica.Utilicela
herramientaeléctricaadecuadaparaeltrabajoa
realizar.Laherramientaeléctricacorrectarealizaráel
trabajomejoryconmayorseguridadalavelocidad
paralaquefuediseñada.
B.Noutilicelaherramientaeléctricasielinterruptor
nolaenciendeyapaga.Cualquierherramienta
eléctricaquenopuedasercontroladaconelinterruptor
espeligrosaydebeserreparada.
C.Desconectelaclavijadelenchufey/odesconecte
labateríadelaherramientaeléctricaantesde
realizarcualquierajuste,cambiardeaccesorio
oalmacenarlaherramienta.Estasmedidasde
seguridadpreventivasreducenelriesgodeunarranque
accidentaldelaherramientaeléctrica.
D.Sinolaestáusando,guardelaherramientaeléctrica
fueradelalcancedelosniños,ynopermita
quelautilicenpersonasnofamiliarizadasconla
herramientaeléctricaoconestasinstruccionesde
usodelaherramientaeléctrica.Lasherramientas
eléctricassonpeligrosasenmanosdeusuarios
inexpertos.
E.Guardebajotecholosaparatosquenoseestán
utilizando.Cuandonoseestánutilizando,losaparatos
debenguardarseenunlugarseco,enaltoobajollave,
yfueradelalcancedelosniños.
F.Mantenimientodelasherramientaseléctricas.
Compruebequelaspiezasmóvilesestán
correctamentealineadasyquesemueven
librementesinagarrotarse,quenohaypiezasrotas,
yquenohayotrascircunstanciasquepodrían
afectaralusodelaherramientaeléctrica.Si
existendaños,hagarepararlaherramientaeléctrica
antesdeusarla.Muchosaccidentessedebena
unmantenimientodecientedelasherramientas
eléctricas.
G.Mantengalasherramientasdecortealadasy
limpias.Unaherramientadecortebienmantenidacon
losbienaladosesmásfácildecontrolaryhaymenos
probabilidadesdequeseagarrote.
H.Utilicelaherramienta,losaccesorios,lasbrocas,
etc.,segúnloindicadoenestasinstruccionesyde
lamaneraprevistaparacadatipodeherramienta
eléctrica,teniendoencuentalascondicionesde
trabajoyeltrabajoarealizar.Elusodelaherramienta
eléctricaparaoperacionesdiferentesdelasprevistas
podríadarlugaraunasituacióndepeligro.
I.Mantengalosprotectorescolocadosyenbuen
estadodefuncionamiento.
5.Mantenimiento
Elmantenimientodesuherramientaeléctricadebeser
realizadoporuntécnicodereparacionesdebidamente
cualicado,utilizandoúnicamentepiezasderepuesto
idénticas.Sólodeestamanerasegarantizael
mantenimientodelaseguridaddelaherramientaeléctrica.
6.Seguridaddelasbaterías
A.Nocargueelaparatobajolalluviaoenlugares
húmedos.
B.Noutiliceaparatosalimentadosporbateríabajola
lluvia.
C.Utiliceúnicamentebateríasdelsiguientetipoytamaño:
bateríaToromodelo88504o88506ycargadorde
bateríamodelo88503.
D.Retireodesconectelabateríaantesderealizar
tareasdemantenimientoolimpieza,yantesderetirar
materialesdelaparatodejardinería.
E.Notirelabateríausadaalfuego.Lasceldaspueden
explosionar.Compruebesilanormativalocalcontiene
algunainstrucciónespecialsobrelaeliminacióndelas
baterías.
F.Noabranimutilelabatería.Elelectrolitoliberadoes
corrosivoypuedecausardañosenlosojosolapiel.
Puedesertóxicosiesingerido.
G.Almanejarlasbaterías,tengacuidadodenohacer
cortacircuitoconmaterialesconductores,talescomo
anillos,pulserasollaves.Labateríaoelconductor
puedenrecalentarseycausarquemaduras.
H.Eltiempodecargadelabateríaserámayorsila
temperaturanoestáenelintervalode5a40°C(41a
104°F)durantelacarga.
GUARDEESTASINSTRUCCIONES
2

Pegatinasdeseguridadeinstrucciones
Laspegatinaseinstruccionesdeseguridadestánalavistadeloperadoryestánubicadascercadecualquierzona
depeligropotencial.Sustituyacualquierpegatinaqueestédañadaoquefalte.
SímboloNombreDesignación/explicación
CCCorrientecontinuaTipodecorriente
VVoltiosVoltaje(Tensión)
121–7615
121–7614
125–3227
1.Advertencia–leaelManualdeloperador;noutilicela
máquinaencondicioneshúmedas;lleveprotecciónocular.
125–3291
121–7602
125–3226
3

121–7606
4
La page est en cours de chargement...
La page est en cours de chargement...
La page est en cours de chargement...
La page est en cours de chargement...
La page est en cours de chargement...
La page est en cours de chargement...
La page est en cours de chargement...
La page est en cours de chargement...
La page est en cours de chargement...
La page est en cours de chargement...
La page est en cours de chargement...
La page est en cours de chargement...
La page est en cours de chargement...
La page est en cours de chargement...
La page est en cours de chargement...
La page est en cours de chargement...
La page est en cours de chargement...
La page est en cours de chargement...
La page est en cours de chargement...
La page est en cours de chargement...
La page est en cours de chargement...
La page est en cours de chargement...
La page est en cours de chargement...
La page est en cours de chargement...
-
 1
1
-
 2
2
-
 3
3
-
 4
4
-
 5
5
-
 6
6
-
 7
7
-
 8
8
-
 9
9
-
 10
10
-
 11
11
-
 12
12
-
 13
13
-
 14
14
-
 15
15
-
 16
16
-
 17
17
-
 18
18
-
 19
19
-
 20
20
-
 21
21
-
 22
22
-
 23
23
-
 24
24
-
 25
25
-
 26
26
-
 27
27
-
 28
28
-
 29
29
-
 30
30
-
 31
31
-
 32
32
-
 33
33
-
 34
34
-
 35
35
-
 36
36
-
 37
37
-
 38
38
-
 39
39
-
 40
40
-
 41
41
-
 42
42
-
 43
43
-
 44
44


