
Questions, problems, missing parts? Before returning to the store,
call Home Decorators Collection Customer Service
8 a.m. – 6 p.m., EST, Monday – Friday
1-800-986-3460
www.homedepot.com/homedecorators
USE AND CARE GUIDE
____________________________________
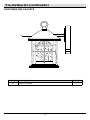
EXTERIOR LED WALL LANTERN
THANK YOU
We appreciate the trust and confidence you have placed in Home Decorators Collection through the purchase of this
exterior LED wall lantern. We strive to continually create quality products designed to enhance your home. Visit us
online to see our full line of products available for your home improvement needs. Thank you for choosing Home
Decorators Collection!
Item:
Model:
1000640161
HB48023PALED-292

Before starting installation of this fixture or
removal of a previous fixture, disconnect
the power by turning off the circuit breaker
or by removing the fuse at the fuse box.
Consult a qualified electrician if you have
any electrical questions or need to replace
the driver.
If you have any non-electrical questions
about this fixture, please contact our
Customer Service Team at 1-800-986-3460
or www.homedepot.com/homedecorators.
WARNING: Disconnect the power prior to
removing or installing a light fixture.
Table of Contents
Safety Information
Warranty
WHAT IS COVERED
The manufacturer warrants this lighting fixture to be free from defects in materials and workmanship
for a period of three (3) years from date of purchase. This warranty applies only to the original
consumer purchaser and only to products used in normal use and service. If this product is found to
be defective, the manufacturer’s only obligation, and your exclusive remedy, is the repair or
replacement of the product at the manufacturer’s discretion, provided that the product has not been
damaged through misuse, abuse, accident, modifications, alterations, neglect or mishandling.
WHAT IS NOT COVERED
This warranty shall not apply to any product that is found to have been improperly installed, set-up,
or used in any way not in accordance with the instructions supplied with the product. This warranty
shall not apply to a failure of the product as a result of an accident, misuse, abuse, negligence,
alteration, or faulty installation, or any other failure not relating to faulty material or workmanship.
This warranty shall not apply to the finish on any portion of the product, such as surface and/or
weathering, as this is considered normal wear and tear.
The manufacturer does not warrant and specially disclaims any warranty, whether expressed or
implied, of fitness for a particular purpose, other than the warranty contained herein. The
manufacturer specifically disclaims any liability and shall not be liable for any consequential or
incidental loss or damage, including but not limited to any labor/expense costs involved in the
replacement or repair of said product.
Contact the Customer Service Team at 1-800-986-3460 or visit
www.homedepot.com/homedecorators.
2
Installation 5
Operation 6
Care and Cleaning 6
Exterior Maintenance 6
Interior Maintenance 6
Driver Replacement 7
FCC Notice 7
Troubleshooting 7
Table of Contents 2
Safety Information 2
Warranty 2
Pre-Installation 3
Planning the Installation 3
Tools 3
Hardware 3
Package Contents 4

Pre-Installation
PLANNING THE INSTALLATION
Read all instructions before assembly and installation. Before starting installation of the fixture or
removal of a previous fixture, disconnect the power by turning off the circuit breaker or by removing
the fuse at the fuse box. To avoid damaging this product, assemble it on a soft, non-abrasive
surface such as carpet or cardboard.
NOTE: Keep your receipt and these instructions
for Proof of Purchase.
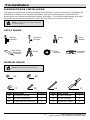
TOOLS REQUIRED
HARDWARE REQUIRED
NOTE: Hardware not shown to actual size.
www.homedepot.com/homedecorators
Please contact 1-800-986-3460 for further assistance.
3
Phillips
Screwdriver
Wire
Cutter
Wire
Stripper
Flathead
Screwdriver
Ladder
Safety
Goggles
Electrical
Tape
Silicone Rubber
Sealant for
exterior use
Part
Description
Quantity
DD
Bracket Mounting Screw
2
EE
Fixture Mounting Screw
2
FF
Mounting Bracket
1
Part
Description
Quantity
AA
Lock Nut
2
BB
Hex Nut
2
CC
Wire Nut
3
AA
BB
DD
CC
FF
EE

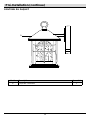
Pre-Installation (continued)
PACKAGE CONTENTS
4
Part
Description
Quantity
A
Fixture Body
1
A

www.homedepot.com/homedecorators
Please contact 1-800-986-3460 for further assistance.
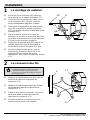
1
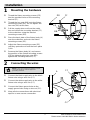
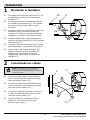
Mounting the hardware
Thread the fixture mounting screws (EE)
into the provided holes of the mounting
bracket (FF).
Thread the hex nuts (BB) onto the fixture
mounting screws (EE). Do not tighten the
hex nuts (BB) at this time.
Pull the supply wires out from the outlet
box and mount the mounting bracket (FF)
to the outlet box using the bracket
mounting screws (DD).
Place the back plate of the fixture body (A)
over the outlet box and onto the fixture
mounting screws (EE).
Adjust the fixture mounting screws (EE)
until they protrude out from the back plate
1/4 in.
Remove the fixture body (A) and secure
the position of the fixture mounting screws
(EE) by tightening the hex nuts (BB)
against the mounting bracket (FF).
2
Connecting the wires
Connect the black supply wire to the black
fixture wire using a wire nut (CC).
Connect the white supply wire to the white
fixture wire using a wire nut (CC).
Connect the fixture ground wire to the
supply ground wire using a wire nut (CC).
Wrap all wire connections with electrical
tape for a more secure connection.
Installation
5
NOTE: If you have electrical questions consult
your local electrical code for approved
grounding methods.
DD
FF
EE
BB
CC
FF
A

Operation
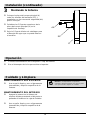
3
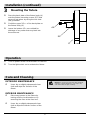
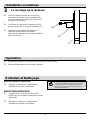
Mounting the fixture
Place the back plate of the fixture body (A)
onto the fixture mounting screws (EE) and
secure it into place by using the lock nuts
(AA) provided.
Caulk the upper 2/3
rds
of the back plate on
the fixture body (A).
Leave the bottom 1/3
rd
un-caulked for
drainage of any water that may leak into
the enclosure.
Installation (continued)
6
Turn on power at the circuit breaker or fuse box.
Turn the light switch on to activate the fixture.
Care and Cleaning
EXTERIOR MAINTENANCE
Use a dry or slightly dampened clean
cloth and wipe the surface of the
fixture.
INTERIOR MAINTENANCE
Disconnect power to the fixture by
turning off the circuit breaker or by
removing the fuse at the fuse box.
Use a dry or slightly dampened clean
cloth to wipe the interior surface of the
fixture.
NOTE: Do not use any cleaners with chemicals,
solvents, or harsh abrasives. Use only a dry
soft cloth to dust or wipe carefully.
Installation (continued)
A
AA
EE

www.homedepot.com/homedecorators
Please contact 1-800-986-3460 for further assistance.
Driver Replacement
This product is ENERGY STAR ® listed. The driver can be replaced without having to cut wires.
Please contact a qualified electrician if driver replacement is needed.
FCC Notice
NOTICE: This device has been tested and found to comply with the limits for a Class B digital device,
pursuant to part 15 of the FCC Rules. These limits are designed to provide reasonable protection
against harmful interference in a residential installation. This equipment generates, uses and can
radiate radio frequency energy and, if not installed and used in accordance with the instruction
manual, may cause harmful interference to radio communications. However, there is no guarantee
that interference can be determined by turning the equipment off and on, the user is encouraged to
try to correct the interface by one or more of the following measures:
Reorient or relocate the receiving antenna.
Increase the separation between the device and receiver.
Connect the equipment into an outlet on a circuit different from that to which the receiver is
connected.
Consult the dealer or an experienced radio/TV technician for help.
Troubleshooting
7
Problem
Solution
The light will not turn on.
Make sure the power supply is on.
Test or replace the switch.
Check the wiring.
Replace the driver.
The fuse blows or circuit breaker trips
when light is turned on.
Check the wire connections.

Questions, problems, missing parts? Before returning to the store,
call Home Decorators Collection Customer Service
8 a.m. – 6 p.m., EST, Monday-Friday
1-800-986-3460
www.homedepot.com/homedecorators
Retain this manual for future use.

Preguntas, problemas, o piezas faltantes? Antes de regresar a la tienda,
llama al Servicio al Cliente de Home Decorators Collection
8 a.m. – 6 p.m., Hora del Este, Lunes – Viernes
1-800-986-3460
www.homedepot.com/homedecorators
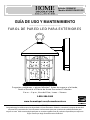
GUÍA DE USO Y MANTENIMIENTO
____________________________________
FAROL DE PARED LED PARA EXTERIORES
GRACIAS
Le agradecemos la confianza que han depositado en Home Decorators Collection a través de la compra de este farol
de pared LED para exteriores. Nos esforzamos continuamente para crear productos de calidad diseñados para
mejorar su casa. Visite nuestra página web para ver nuestra completa línea de productos disponibles para mejorar tu
hogar. Gracias por elegir Home Decorators Collection!
Artículo:
Modelo:
1000640161
HB48023PALED-292

Antes de iniciar la instalación de este
aparato o la eliminación de un accesorio
anterior, desconecte la alimentación
apagando el disyuntor o quitando el fusible
en la caja de fusibles.
Consulte a un electricista calificado si tiene
alguna pregunta eléctrica o la necesidad de
reemplazar el controlador.
Si usted tiene alguna pregunta que no sea
eléctrica sobre este accesorio, póngase en
contacto con nuestro equipo de Servicio al
Cliente al 1-800-986-3460 o
www.homedepot.com/homedecorators.
ADVERTENCIA: Desconecte la alimentación
antes de extraer o instalar una lámpara.
Tabla de Contenidos
Información de Seguridad
Garantía
10
LO QUÉ ESTÁ CUBIERTO
El fabricante garantiza que este accesorio de iluminación está libre de defectos en materiales y
mano de obra por un período de tres (3) años a partir de la fecha de compra. Esta garantía se aplica
sólo al comprador original y únicamente a los productos utilizados en condiciones normales de uso y
servicio. Si el producto se encuentra defectuoso, la única obligación del fabricante, y su solución
exclusiva, es la reparación o sustitución del producto, a discreción del fabricante, siempre que el
producto no ha sido dañado por mal uso, abuso, accidente, modificaciones, alteraciones ,
negligencia o mal manejo.
LO QUE NO ESTÁ CUBIERTO
Esta garantía no se aplicará a cualquier producto que haya sido instalado de forma incorrecta o
usado de manera que no conforme con las instrucciones suministradas con el producto. Esta
garantía no se aplicará a una falla del producto como resultado de un accidente, mal uso, abuso,
negligencia, alteración o instalación defectuosa, o cualquier otra falla no relacionada con defectos
de material o mano de obra. Esta garantía no se aplicará a el acabado de cualquier parte del
producto, tal como la superficie y / o la intemperie, ya que esto se considera como uso normal.
El fabricante no garantiza y especialmente niega cualquier garantía, ya sea expresa o implícita, de
aptitud para un fin en particular, que no sea la garantía contenida en el presente documento. El
fabricante declina específicamente cualquier responsabilidad y no será responsable por cualquier
pérdida o daño consecuente o incidental, incluyendo pero no limitado a cualquier coste laboral /
gastos involucrados en la sustitución o reparación de dicho producto.
Comuníquese con el Equipo de Servicio al Cliente al 1-800-986-3460 o visite
www.homedepot.com/homedecorators.
Instalación 13
Operación 14
Cuidado y Limpieza 14
Mantenimiento Exterior 14
Mantenimiento Interior 14
Reemplazo del Controlador 15
Aviso de FCC 15
Solución de Problemas 15
Tabla de Contenidos 10
Información de Seguridad 10
Garantía 10
Pre-Instalación 11
Planificación de la Instalación 11
Herramienta 11
Ferretería 11
Contenido del Paquete 12

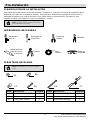
Pre-Instalación
PLANIFICACIÓN DE LA INSTALACIÓN
Lea todas las instrucciones antes del montaje e instalación. Antes de comenzar la instalación de la
luminaria o el retiro de un artefacto anterior, desconecte la alimentación apagando el disyuntor o
quitando el fusible en la caja de fusibles. Para evitar daños a este producto, montarlo en una
superficie suave y no abrasiva, como una alfombra o cartón.
NOTA: Guarde su recibo y estas instrucciones
para comprobante de compra.
HERRAMIENTA NECESARIAS
FERRETERÍA NECESARIA
NOTA: La ferretería no se muestra a tamaño
actual.
www.homedepot.com/homedecorators
Para obtener asistencia llama al 1-800-986-3460.
11
Parte
Descripción
Cantidad
DD
Tornillo de la Ménsula
2
EE
Tornillo del Luminario
2
FF
Ménsula de Montaje
1
Parte
Descripción
Cantidad
AA
Tuerca de Seguridad
2
BB
Tuerca Hexagonal
2
CC
Tureca para Cables
3
Sellador de Goma
Sillicona para uso
en exteriores
Escalera
Gafas de
Seguridad
Cinta
Aislante
Desarmador
de Cruz
Cortador de
Alambre
Desarmador de
Punta Plana
Pelacables
AA
BB
DD
CC
FF
EE

Pre-Instalación (continuado)
CONTENIDO DEL PAQUETE
12
Parte
Descripción
Cantidad
A
Cuerpo Principal
1
A

www.homedepot.com/homedecorators
Para obtener asistencia llama al 1-800-986-3460.
1
Montando la ferretería
Enrosque los tornillos del luminario (EE) en
los agujeros provistos en la ménsula de
montaje (FF).
Enrosque las tuercas hexagonales (BB) en
los tornillos del luminario (EE). No apriete
las tuercas hexagonales (BB) en este
momento.
Saque los cables de alimentación de la caja
de distribución y monte la ménsula de
montaje (FF) sobre la caja de distribución
utilizando los tornillos de la ménsula (DD).
Coloque la placa del cuerpo principal (A)
sobre la caja de distribución y en los tornillos
del luminario (EE).
Ajuste los tornillos del luminario (EE) hasta
que sobresalgan 1/4 pulgadas de la palca.
Quite la placa del cuerpo principal (A) y
asegure la posición de los tornillos del
luminario (EE) al apretar las tuercas
hexagonales (BB) contra la ménsula de
montaje (FF).
2
Conectando los cables
Conecte el cable negro de alimentación
con el cable negro del luminario usando
una tuerca para cables (CC).
Conecte el cable blanco de alimentación
con el cable blanco del luminario usando
una tuerca para cables (CC).
Conecte el cable del luminario a tierra con
el cable de alimentación a tierra usando
una tuerca para cables (CC).
Envuelva todas las conexiones de los
cables con cinta de aislar para una
conexión más segura
Instalación
13
NOTA: Si tiene dudas con las conexiones
eléctricas, consulte el código eléctrico de su
localidad para los métodos aprobados para las
conexiones a tierra
DD
FF
EE
BB
CC
FF
A

3
Montando la linterna
Coloque la placa del curepo principal (A)
sobre los tornillos del luminario (EE) y
asegúrela con las tuercas de seguridad (AA)
que se incluyen.
Calafatee las 2/3 partes superiores de la
placa del curepo principal (A) en la
superficie de montaje.
Deje la 1/3 parte inferior sin calafatear para
el drenaje del agua que se pueda filtrar en
el encierro.
Instalación (continuado)
14
Operación
Conecte la alimentación en el disyuntor o caja de fusibles.
Gire el interruptor de la luz para activar el aparato.
Cuidado y Limpieza
MANTENIMIENTO DEL EXTERIOR
Use un paño limpio y seco o ligeramente
humedecido y limpie la superficie de la
linterna.
MANTENIMIENTO DEL INTERIOR
Apague la potencia a la linterna de
manera de desconectando el disyuntor o
quitando el fusible en la caja de fusibles.
Use un paño limpio y seco o ligeramente
humedecido y limpie la superficie de la
linterna.
NOTA: No use limpiadores con químicos,
solventes o abrasivos fuertes. Use sólo un paño
seco para sacudir o limpiar con cuidado.
A
AA
EE

www.homedepot.com/homedecorators
Para obtener asistencia llama al 1-800-986-3460.
Reemplazo del Controlador
Este producto esta en la lista de ENERGY STAR®. El controlador se puede sustituir sin tener que
cortar cables. Por favor, póngase en contacto con un electricista calificado si el reemplazo del
conductor es necesario.
Aviso de FCC
Este aparato ha sido probado y cumple con los límites para un aparato digital de Clase B, según la
Parte 15 de la normativa FCC. Estos límites están diseñados para proporcionar una protección
razonable contra las interferencias perjudiciales en una instalación residencial. Este aparato genera,
utiliza y puede irradiar energía de radiofrecuencia y, si no se instala y utiliza de acuerdo con las
instrucciones, puede causar interferencias perjudiciales en las comunicaciones de radio. Sin
embargo, no hay garantía de que la interferencia puede determinarse encendiéndolo y apagándolo,
se recomienda al usuario que intente corregir la interfaz en una o más de las siguientes medidas:
Reorientar o reubicar la antena de recepción.
Aumentar la distancia entre el aparato y el receptor.
Conectar el equipo a un enchufe de un circuito diferente de aquel al que está conectado el
receptor.
Consulte al distribuidor o un técnico de radio/televisión para obtener ayuda.
Solución de Problemas
15
Problema
Solución
La luz no se enciende.
Asegúrese de que la energía eléctrica
esté encendida.
Pruebe o cambie el interruptor.
Verifique los cableado.
Reemplace el controlador.
El fusible se funde o el disyuntor de
circuitos se dispara cuando se enciende
la luz.
Verifique las conexiones de los cables.

Preguntas, problemas, o piezas faltantes? Antes de regresar a la tienda,
llama al Servicio al Cliente de Home Decorators Collection
8 a.m. – 6 p.m., Hora del Este, Lunes – Viernes
1-800-986-3460
www.homedepot.com/homedecorators
Conserve este manual para futuras consultas.

Questions, problèmes, pièces manquantes? Avant de retourner au magasin,
appeler Home Decorators Collection Service à la clientèle
8:00 – 18:00, HNE, Lundi – Vendredi
1-800-986-3460
www.homedepot.com/homedecorators
GUIDE D'UTILISATION ET D'ENTRETIEN
____________________________________
LANTERNE MURALE D’EXTÉRIEUR DEL
MERCI
Nous apprécions la confiance que vous avez placée dans Home Decorators Collection grâce à l'achat de cette
Lanterne Murale d’extérieur DEL. Nous nous efforçons de créer continuellement la qualité des produits conçus pour
améliorer votre maison. Rendez-nous visite en ligne pour voir notre gamme complète de produits disponibles pour
votre maison besoin d'amélioration. Merci d'avoir choisi le Home Decorators Collection!
Article:
Modèle:
1000640161
HB48023PALED-292

Avant de commencer l'installation de ce
luminaire ou à la dépose d'un précédent
luminaire, débrancher l'alimentation en
désactivant le disjoncteur ou en retirant le
fusible de la platine de fusibles.
Consulter un électricien qualifié si vous avez
des questions électriques ou si vous avez
besoin de remplacer le pilote.
Si vous avez des non-électriques questions
au sujet de ce luminaire, veuillez contacter
notre équipe de Service Clientèle au
1-800-986-3460 ou
www.homedepot.com/homedecorators.
AVERTISSEMENT : Déconnecter l'alimentation
avant le retrait ou l'installation d'un luminaire
d'éclairage.
Table des Matières
Consignes de Sécurité
Garantie
18
CE QUI EST COUVERT
Le fabricant garantit ce luminaire est exempt de défauts de matériaux et de fabrication pour une
période de trois (3) ans à compter de la date d'achat. Cette garantie s'applique uniquement à
l'acheteur d'origine et uniquement aux produits utilisés dans une utilisation normale. Si le produit
s’avère défectueux, la seule obligation du fabricant, et votre seul recours, consiste à réparer ou à
remplacer le produit, à la discrétion du fabricant, pourvu que le produit n’ait pas fait l’objet d’un usage
inadéquat ou abusif, d’un accident, de modifications, d’altérations, de négligence ou d’une mauvaise
manipulation.
CE QUI N'EST PAS COUVERT
Cette garantie ne s'applique pas à tout produit qui se trouve à avoir été incorrectement installé,
configuré, ou utilisé de quelque façon pas conformément aux instructions fournies avec le produit.
Cette garantie ne s'applique pas à une défaillance du produit à la suite d'un accident, un abus, une
négligence, une modification, ou une mauvaise installation, ou tout autre manquement, non liée à un
défaut de matériau ou de fabrication. Cette garantie ne s'applique pas à la finition d'une partie du
produit, comme la surface et / ou l'altération, car cela est considéré usure normale.
Le fabricant ne garantit pas et décline spécifiquement toute garantie, expresse ou implicite,
d'adéquation à un usage particulier, autre que la garantie contenue dans ce document. Le fabricant
décline expressément toute responsabilité et ne peut être tenu responsable de toute perte ou
dommage indirect ou accessoire, y compris mais sans s'y limiter, les coûts du travail / dépenses
impliqués dans le remplacement ou la réparation dudit produit.
Contactez l‘équipe du Service à la Clientèle au 1-800-986-3460 ou visite
www.homedepot.com/homedecorators.
Installation 21
Opération 22
Entretien et Nettoyage 22
Entretien Extérieur 22
Entretien Intérieur 22
Remplacement de Contrôleur 23
Avis de la FCC 23
Dépannage 23
Table des Matières 18
Consignes de Sécurité 18
Garantie 18
Pré-Installation 19
Planification du l’Installation 19
Outils 19
Matériel 19
Contenu du Paquet 20

Pré-Installation
PLANIFICATION DE L'INSTALLATION
Lire toutes les instructions avant assemblage et l'installation. Avant de commencer l'installation du
luminaire ou la dépose d'un précédent luminaire, débrancher l'alimentation en désactivant le
disjoncteur ou en retirant le fusible de la platine de fusibles. Pour éviter d'endommager le produit,
assembler sur un doux et non abrasif surface tels que tapis ou un morceau de carton.
NOTE: Conservez votre reçu et ces instructions
à la preuve d'achat.
OUTILS REQUIS
MATÉRIEL REQUIS
NOTE: Matériel non illustré à taille réelle.
www.homedepot.com/homedecorators
Veuillez contacter le 1-800-986-3460 pour obtenir plus aide.
19
Partie
Description
Quantité
DD
Vis du Luminaire
2
EE
Vis de Montage
2
FF
Plaque de Fixation
1
Partie
Description
Quantité
AA
Écrous de Serrage
2
BB
Écrous Hexagonaux
2
CC
Capuchons de Connexion
3
Tournevis
Cruciforme
Coupe-
fil
Pince à
Dénuder
Tournevis à
Tête Plate
Mastic Silicone
Rubber pour
l'extérieur
Échelle
Lunettes de
Protection
Ruban
Électrique
AA
BB
DD
CC
FF
EE

Pré-Installation (continue)
CONTENU DU PAQUET
20
Partie
Description
Quantité
A
Corps du Luminaire
1
A
La page est en cours de chargement...
La page est en cours de chargement...
La page est en cours de chargement...
La page est en cours de chargement...
-
 1
1
-
 2
2
-
 3
3
-
 4
4
-
 5
5
-
 6
6
-
 7
7
-
 8
8
-
 9
9
-
 10
10
-
 11
11
-
 12
12
-
 13
13
-
 14
14
-
 15
15
-
 16
16
-
 17
17
-
 18
18
-
 19
19
-
 20
20
-
 21
21
-
 22
22
-
 23
23
-
 24
24


Home Decorators Collection Y37030ALED-292 Mode d'emploi
- Taper
- Mode d'emploi
- Ce manuel convient également à
dans d''autres langues
Documents connexes
-
Home Decorators Collection Y37029ALED-292 Guide d'installation
-
Home Decorators Collection HB7083-35 Guide d'installation
-
-
-
-
-
-
-
-
