
Covers Parts #8084, 8085, 8086, 8087, 8089
LED Light Kit Installation Instructions (fits #8111 or #8112 bodies)
LED Lighting Module Installation (Fig. 1) (#8085 Kit only):
Your model may differ slightly from the one shown in the illustration, but
installation is the same.
1. Install the LED lighting
module (A) on the left
chassis floor pan. Secure
with the 2.5x15mm cap
screws (2).
2. Remove the screws from
the receiver box cover and
wire clamp; remove the
cover and clamp (B).
3. Remove the two 3x10mm
countersunk cap screws
from the battery tray (C).
4. Lift up the battery tray and
route the red wire (male
connector) from the LED
lighting module to the
right side of the chassis
and through the hole in
the receiver box. Plug the
connector into channel 1
of the receiver (D). Note:
The connector can be
plugged into any non-
telemetry channel on the
TQi receiver.
5. Apply an additional bead of silicone grease (Traxxas part #1647, sold
separately) to the wire clamp. The grease will improve sealing. Reinstall the
clamp and screws.
6. Make sure the o-ring is properly seated into the groove in the receiver box so
that the cover will not pinch it or damage it in any way.
7. Install the cover and screws. Inspect the cover to make sure the o-ring seal is
not visible.
8. Reinstall the screws in the battery tray.
9. Connect the black wire (red female connector) from the LED lighting module
to the red wire (male connector) exiting the XL-5 HV electronic speed control.
Body Modification
1. Install the included templates on the body.
Align the arrows with the body lines on the
front grille and the tailgate as shown in Fig.
2 and 3.
2. Using a tapered body reamer, carefully cut
the holes in the truck body for the screw
bosses on the front grille retainer and the
tailgate panel (note the hole diameters
indicated on the templates and the
corresponding diameter measurements on
the body reamer).
3. Using a hobby knife, carefully cut out the holes in the truck body for the
headlight housing and the tail light lens.
Fig. 1
A
B
C
D
Visitez Traxxas.com/manuals pour télécharger
les instructions dans votre langue.
Visite la página Traxxas.com/manuals para
descargar el instrucciones en su idioma.
Auf Traxxas.com/manuals, können Sie
anleitung in Ihrer Sprache downloaden.
#8085 Kit Contents:
• LED lighting module
• Distribution block
• Front grille
• Front grille retainer
• Headlights harness assembly
• Headlight clamps (2)
• Tailgate panel
• Tailgate panel retainer
• Tail lights harness assembly
• Tail light clamps (2)
• Jumper
• 2.5x8mm button-head screws (8)
• 2.6x8mm button-head screws (2)
• 2.5x10mm button-head screws (2)
• 2.5x15mm cap screws (2)
• Zip tie mount (3)
• Zip ties (3)
• Body templates
#8087 Kit Contents (parts #8120 or
#8120X required, sold separately)*:
• LED roof light bar
• 2.5x8mm cap screws (2)
• Zip tie mount (1)
• Zip tie (1)
#8086 Kit Contents (parts #8120 or
#8120X required, sold separately)*:
• Expedition rack scene lights
harness assembly
• 2.5x8mm cap screws (8)
• Zip tie mount (1)
• Zip tie (1)
Tool required:
• Safety glasses
• 2.0mm hex wrench
• 1.5mm hex wrench
• Hobby knife
• Small file (optional)
• Tapered body reamer (part #3433 or #3433X,
sold separately)
• Body scissors (part #3431 (straight tip) or #3132
(curved tip), sold separately)
• Rotary tool (such as Dremel®) (optional)
FRONT
4.5mm
0.177"
4.5mm
0.177"
Fig. 2
REAR
4mm
0.1575"
4mm
0.1575"
Fig. 3
Tapered Body Reamer
Diameter Measurements
CAUTION: RISK OF INJURY!
Always wear eye protection when using motorized tools.
Use care with hobby knives, tapered reamers, and other
cutting tools as they are extremely sharp and can cause
severe injury, deep cuts, and/or punctures.
#8084 Kit Contents
(parts #8116 and #8117 required,
sold separately):
• Headlights harness assembly
• Tail lights harness assembly
TRAXXAS.com
Traxxas, 6250 Traxxas Way, McKinney, TX 75070,
Phone: 972-549-3000, Fax: 972-549-3011, e-mail: [email protected]
HKC18060-R04 Rev 200130
*4-in-2 wire harness (part #8089, sold
separately) required when installing
both the #8086 and #8087 kits.

2617
2.5x8 BCS
2617
2.5x8 BCS
2617
2.5x8 BCS
2617
2.5x8 BCS
2617
2.5x8 BCS
2.5x10 BCS*
2.5x10 BCS*
3965
2.5x8 CS
3965
2.5x8 CS
3965
2.5x8 CS
3965
2.5x8 CS
3965
2.5x8 CS
2617
2.5x8 BCS
B
A
F
C
D
E
F
G
I
J
J
H
K
C
I
J
Tip: If you have a rotary tool (such as Dremel®), then use a small routing bit to
cut out the openings. Start by using the tapered reamer to make a small hole
inside the area to be removed. Insert the routing bit into the hole, and then
follow the cut out lines. CAUTION: Wear your eye protection when using the
motorized tool! Use a hobby knife or a small file to carefully trim the corners
square. When using a hobby knife, score the body material several times with
the knife blade, and then snap it over to break and release. This will provide the
cleanest cuts. Do not try to cut all the way through the body material in one
pass or “saw” it with the knife blade.
4. Using a body reamer, cut a small hole in the front left corner of the roof
of the truck body for the LED roof light bar. The hole needs to be large
enough to pass the connector for the light bar through the body. Note: It
is important to cut the hole in the correct location or the light bar will not
mount correctly (see Wiring Diagram, Fig. 6).
5. Using a hobby knife or rotary tool, cut a slot in the front left corner of the
truck bed for the expedition rack scene lights. The slot needs to be large
enough for the harness connector to pass through (see Wiring Diagram, Fig. 6).
LED Light Installation
Note: While installing the LED lights, install the included zip tie mounts and
use zip ties to secure the wiring to the body in the locations provided. The zip
ties do not need to be tight; allow some slack for wire movement.
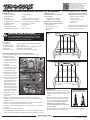
1. Install the front grille (A) with the front grille retainer (B), headlight clamps
(C), tailgate panel (D) with the tailgate panel retainer (E), and tail light clamps
(F) on the truck body using the included hardware.
2. Install the LED light kits; refer to the Assembly Diagram (Fig. 5) and Wiring
Diagram (Fig. 6). The headlights (G) and tail lights (H) snap into the receptacles
of the headlight clamps and tail light clamps.
Note: Installation of the roof LED light bar (I) and/or scene lights (J) requires
the TRX-4 Expedition Rack Kit (K) (part #8120 or #8120X, sold separately).
3. Secure the roof light bar to the expedition rack using the 2.5x8mm cap
screws (2). Secure the scene lights (4) to the expedition rack using the
2.5x8mm cap screws (8). The expedition rack scene lights install as an
assembly using the hardware provided. When installing the scene lights,
note where the light string begins and ends in the Wiring Diagram. Do not
overtighten the screws that fasten the scene lights to the expedition rack.
Hand tighten these screws. Feed the connectors through the holes in the
body; then, install the expedition rack on the vehicle body according to
the kit instructions.
Distribution Block Installation
1. Install the distribution block (L) on the tailgate panel retainer and secure it
with the 2.6x8 mm button-head screws (2) as shown in Fig. 4.
2. Plug the connectors from the LED light wire harnesses into the ports of the
distribution block. Match the color band on the wire harnesses with the
corresponding color of each port indicator on the distribution block (white for
the headlights, red for the tail lights, yellow for the roof LED light bar or the
expedition rack scene lights).
3. Plug the included jumper into the green port of the distribution block.
Note: The jumper will allow the LED lights to go into full power (high beam)
mode. The jumper is not required for the LED lights to function (the lights
will remain in low power (low beam) mode if the jumper is not used).
4. The 4-in-2 wire harness (part #8089, sold separately) is required when installing
both the roof LED light bar and the expedition rack scene light kit. Plug the
roof LED light bar and scene lights into the 4-in-2 wire harness; then, plug the
harness into the yellow and green ports on the distribution block.
Assembly Diagram
Fig. 5
2.6x8 BCS
Fig. 4
L
Rear Tailgate
(looking inside of the
vehicle body)
*Only use the 2.5x10 BCS if installing the #8084 or #8085 LED light kits.

To LED
Lighting Module
BOTTOM VIEW
Expedition Rack
Scene Light Wiring
DISTRIBUTION BLOCK
FRONT
4-in-2 Wire Harness
Connector
GREEN and YELLOW
(4-in-2 Wire Harness)
DISTRIBUTION BLOCK PORTS
BLUE*
RED (Tail Light
Wiring)
WHITE
(Headlight Wiring)
Headlight Wiring
Tail Light Wiring
Roof Light Bar Wiring
Rack Scene Light Wiring
*For use with optional accessories. Not used with this LED light kit.
From Roof
Light Bar
From Expedition
Rack Scene Lights
Through Body
(see Bottom View)
Through Body
(see Bottom View)
GREEN
(Jumper)
Wiring Diagram
Fig. 6

Warranty Information
Traxxas electronic components are warranted to be free from defects
in materials and workmanship for a period of 30 days from the date of
purchase.
Limitations: Any and all warranty coverage does not cover replacement
of parts and components damaged by abuse, neglect, improper or
unreasonable use, crash damage, water or excessive moisture, chemical
damage, improper or infrequent maintenance, accident, unauthorized
alteration or modification or items that are considered consumable.
Traxxas will not pay for the cost of shipping or transportation of a defective
component to us.
Traxxas Lifetime Electronics Warranty
After the expiration date of the warranty period, Traxxas will repair
electronic components for a flat rate. Please visit Traxxas.com/support
for a current schedule of warranty costs and fees. The covered repairs are
limited to non-mechanical components that have NOT been subjected
to abuse, misuse, or neglect. Products damaged by intentional abuse,
misuse, or neglect may be subject to additional charges. Traxxas liability,
in no case, shall be greater than the actual purchase price of this product.
For replacement, product must be returned in brand new condition, with
packaging and itemized sales receipt.
If you have questions or need technical assistance, call Traxxas at
1-888-TRAXXAS
(1-888-872-9927) (U.S. residents only)
TRAXXAS.com
Traxxas, 6250 Traxxas Way, McKinney, TX 75070,
Phone: 972-549-3000, Fax: 972-549-3011, e-mail: [email protected]
-
 1
1
-
 2
2
-
 3
3
-
 4
4


dans d''autres langues
Documents connexes
-
Traxxas TRX-4 Bronco Mode d'emploi
-
Traxxas TRX-4M K10 Mode d'emploi
-
-
Traxxas X-Maxx Mode d'emploi
-
Traxxas Hoss 4X4 VXL Mode d'emploi
-
-
-
-
Traxxas RUSTLER 4X4 LED Light Kit Manuel utilisateur
-