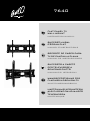
Bell'O 7640 Manuel utilisateur
- Catégorie
- Supports muraux à panneau plat
- Taper
- Manuel utilisateur
Ce manuel convient également à

7640
FLAT PANEL TV
WALL MOUNT
INSTRUCTION MANUAL
SUPPORT MURAL
D'ÉCRAN PLAT
MANUEL D'INSTRUCTIONS
SOPORTE DE PARED PARA
TV DE PANTALLA PLANA
MANUAL DE INSTRUCCIONES
SUPPORTO A PARETE
PER TELEVISORE A
SCHERMO PIATTO
MANUALE DI ISTRUZIONI
WANDBEFESTIGUNG FÜR
FLACHBDILDSCHIRM*TV
ANLEITUNGSHANDBUCH
НАСТЕННЫЙ КРОНШТЕЙН
ДЛЯ ПЛОСКОПАНЕЛЬНОГО
ТЕЛЕВИЗОРА
ИНСТРУКЦИЯ
La page charge ...

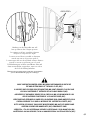
AVERTISSEMENTS
Pour toutes questions concernant les instructions ou pour tout besoin d'assistance, veuillez
communiquer avec Bell’O
®
au : 1-888-235-7646 (USA/Canada) ou +1-732-972-1333
(International) de 9h00 à 17h00 (heure de l'Est).
•
NE JAMAIS DÉPASSER LA CAPACITÉ DE CHARGE MAXIMALE DE 127 KG (280 LBS).
• Ce support de fixation est conçu pour être posé et utilisé UNIQUEMENT comme indiqué dans
ce manuel. Bell’O International Corporation décline toute responsabilité en cas de pose non
conforme aux instructions ou d'assemblage, utilisation ou manipulation incorrects de ce
produit.
• Une pose incorrecte de ce produit peut entraîner des dommages matériels ou des
blessures graves. Bell'O International Corporation ne saurait être tenu responsable de
dommages matériels ou corporels directs ou indirects résultant d'une pose incorrecte,
d'une utilisation incorrecte ou d'un assemblage incorrect.
• Si le support de fixation doit être attaché à un structure autre que celles indiquées dans
ce manuel, la pose doit impérativement être confiée à un entrepreneur/installateur
professionnel agréé. La structure porteuse doit être capable de soutenir, au minimum,
quatre fois le poids combiné du support de fixation et du téléviseur. L'installateur a pour
charge et responsabilité de s'assurer que la structure porteuse convient.
• Ce support utilisé avec la visserie fournie n'est pas homologué UL pour la pose sur des
montants métalliques. Pour connaître la visserie de fixation sur montants métalliques
homologuée UL disponible, la limite de poids d'écran et les instructions de pose, veuillez
consulter www.bello.com, le revendeur ou un installateur professionnel.
• Contrôler avec soin qu'il n'y a aucune pièce manquante ou endommagée. Ne jamais utiliser
de pièces défectueuses. Pour obtenir des pièces de rechange ou manquantes dans le cadre
de cette garantie, veuillez visiter notre site Web à www.bello.com ou appeler notre Service
après-vente au 1-888-779-7781. Veillez à avoir le numéro de modèle, le code de date, les
références des pièces et le reçu de la vente ou autre justificatif d’achat à disposition. Bell’O
expédiera toutes les pièces de rechange nécessaires à ses propres frais aux États-Unis et
au Canada.
• Les caractéristiques sont sujettes à modification sans préavis.
• Le poids maximum du téléviseur ne doit pas dépasser la capacité de charge maximale
du support ni celle de tout adaptateur homologué UL Bell'O
®
vendu séparément
éventuellement fixé au téléviseur.
3
La page charge ...
La page charge ...
La page charge ...
La page charge ...
La page charge ...
La page charge ...
La page charge ...

11
NECESSARY TOOLS
OUTILLAGE NÉCESSAIRE
HERRAMIENTAS NECESARIAS
ATTREZZI NECESSARI
НЕОБХОДИМЫЕ ИНСТРУМЕНТЫ
ERFORDERLICHE WERKZEUGE
Level
Niveau
Nivel
Livella
Nivellierinstrument
Уровень
Phillips-head Screwdriver
Tournevis à tête Phillips
Destornillador philips (cruz)
Cacciavite Phillips
Kreuzschlitzschraubenzieher
Крестообразная отвертка
Drill
Perceuse
Taladro
Trapano
Bohrer
Дрель
Pencil
Crayon
Lápiz
Matita
Bleistift
Карандаш
Tape Measure
Ruban à mesurer
Cinta métrica
Metro
Messband
Рулетка
Masking Tape
Ruban de masquage
Cinta de enmascarar
Nastro adesivo
Abdeckband
Маскировочная лента
Ratchet Set
Clé à cliquet à douilles
Equipo de trinquete
Strumento Del Cricco
Schaltklinke Hilfsmittel
Набор инструментов с храповиком
Drill Bit: Wood:
5/32" (4mm), Masonry: 5/16" (8mm)
Foret Bois : 5/32 po (4 mm), Maçonnerie : 5/16 po (8 mm)
Broca para madera: 5/32" (4 mm), para mampostería: 5/16" (8 mm)
Punte trapano da legno: 4 mm; da muro: 8 mm
Bohrerspitze, Holz: 4 mm; Mauerwerk: 8 mm
Сверло – дерево: 5/32" (4 мм), каменная кладка: 5/16" (8 мм)
Stud Finder
Détecteur de montant
Localizador de montantes
Rilevatore di montanti
Bolzenfinder
Искатель стойки

12
TELEVISION TÉLÉVISEUR TELEVISOR TELEVISORE FERNSEHER
ТЕЛЕВИЗОР
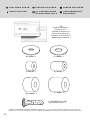
SPACER
DOUILLE D'ESPACEMENT
ESPACIADOR
DISTANZIALI
ABSTANDSHALTER
ПРОМЕЖУТОЧНОЕ
КОЛЬЦО
WASHER
RONDELLE
ARANDELA
RONDELLE
DISTANZSCHEIBE
ШАЙБА
(MA)
(MA)
(MA)
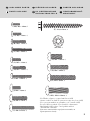
SELECT THE CORRECT SCREW
Before beginning, test several of the screws in your hardware kit to find the correct size and length for
your television.
SÉLECTIONNER LA VIS CORRECTE
Avant de commencer, essayer différentes vis du nécessaire de visserie pour trouver la section et la
longueur correctes pour le téléviseur.
ELIJA EL TORNILLO CORRECTO
Antes de comenzar, pruebe varios tornillos de su kit de accesorios para encontrar el de tamaño y
longitud indicados para su televisor.
SELEZIONARE LE VITI CORRETTE
Prima di iniziare, cercare tra le varie viti nel kit di ferramenta quelle di dimensione e lunghezza
corrette per il vostro televisore.
DIE RICHTIGE SCHRAUBE AUSWÄHLEN
Bevor Sie mit der Installation beginnen, sind mehrere der in Ihrem Eisenteil-Satz enthaltenen
Schrauben auszuprobieren, um die richtige Größe und Länge für Ihr TV zu ermitteln.
ВЫБЕРИТЕ НУЖНЫЙ ВИНТ
Перед тем как начать, проверьте несколько винтов из крепежного комплекта, чтобы выбрать
винт соответствующего размера и длины для вашего телевизора.
ATTACHING THE MONITOR ARMS (AMA/LMA)
FIXER LES BRAS DE MONITEUR (AMA/LMA)
CÓMO FIJAR LOS BRAZOS DE LA PANTALLA (AMA/LMA)
FISSAGGIO DEGLI SNODI DELLO SCHERMO (AMA/LMA)
BEFESTIGUNG DER MONITORARME (AMA/LMA)
ПРИКРЕПЛЕНИЕ КРЕПЕЖНЫХ УЗЛОВ МОНИТОРА (AMA/LMA)
MONITOR ARM (AMA/LMA)
BRAS DE MONITEUR (AMA/LMA)
BRAZO DE LA PANTALLA (AMA/LMA)
SNODO DELLO SCHERMO (AMA/LMA)
MONITORARM (AMA/LMA)
КРЕПЕЖНЫЙ УЗЕЛ МОНИТОРА (
AMA/LMA
)

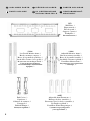
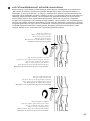
SELECT THE CORRECT MONITOR ARMS TO USE
Two pair of Monitor Arms are included. The Adjustable Monitor Arms (AMA) can tilt
from -5° back to +15° forward. The Low Profile Monitor Arms (LMA) are fixed in a 0°
position, with a shorter distance between the wall and the television.
SÉLECTIONNER LES BRAS DE MONITEUR QUI CONVIENNENT
Deux paires de bras de moniteur sont fournis. Les bras de moniteur ajustables (AMA) s'inclinent
de -5° vers l'arrière à +15° vers l'avant. Les bras de moniteur compacts (LMA) sont dans une
position 0° fixe et présentent une distance plus courte entre le mur et le téléviseur.
ELIJA LOS BRAZOS DE PANTALLA CORRECTOS
Se incluyen dos pares de brazos de la pantalla. Los brazos de la pantalla ajustables (AMA)
se pueden inclinar desde -5° hacia atrás hasta +15° hacia delante. Los brazos de la pantalla
de perfil bajo (LMA) se encuentran fijos en una posición de 0°, con una distancia más
corta entre la pared y el televisor.
SELEZIONARE GLI SNODI APPROPRIATI PER LO SCHERMO
Sono incluse due paia di snodi per lo schermo. Gli snodi regolabili (AMA) possono essere
inclinati da -5° (indietro) a +15° (in avanti). Gli snodi a basso profilo (LMA) sono fissi in
posizione 0 gradi, con una distanza minore dalla parete al televisore.
WÄHLEN SIE DIE RICHTIGEN MONITORARME
Zwei Monitorarme sind im Lieferumfang mit inbegriffen. Die verstellbaren Monitorarme
(AMA) können von -5° nach hingen bis zu +15° nach vorn gekippt werden. Die
Niedrigprofil-Monitorarme (LMA) sind auf einer 0° Stellung festgesetzt und der Abstand
zwischen der Wand und dem Fernseher ist kürzer.
ВЫБЕРИТЕ ПРАВИЛЬНЫЕ УЗЛЫ КРЕПЛЕНИЯ МОНИТОРА
Поставляются две пары узлов крепления монитора. Регулируемые узлы крепления
монитора (АМА) обеспечивают наклон от положения -5° назад до положения +15°
вперед. Узлы крепления монитора, обеспечивающие минимальный профиль,
зафиксированы в положении 0 градусов, так что расстояние между стеной и
телевизором более короткое.
LMA
0°
—
5°/+15°
AMA
13

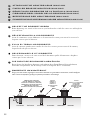
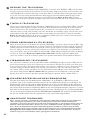
DETERMINE IF YOU NEED THE ARM EXTENSIONS (ME)
If you are installing a large TV, you may need Arm Extensions (ME) to reach the mounting holes on the
back of your television. To determine if these are necessary, hold one of the Adjustable Monitor Arms
(AMA) up to the back of the television cabinet to see whether the Arm can reach the holes. If they do
not (as shown), then attach the Extensions to both Arms.
DÉTERMINER SI LES RALLONGES DE BRAS (ME) SONT NÉCESSAIRES
Si le téléviseur à poser est de grande taille, les rallonges de bras (ME) peuvent être nécessaires pour
atteindre les trous de fixation au dos du téléviseur. Pour déterminer si elles sont requises, tenir les bras de
moniteur ajustables (AMA) contre le dos du téléviseur pour voir s'ils atteignent les trous. Si ce n'est pas le
cas (comme sur l'illustration), attacher les rallonges aux deux bras.
DETERMINE SI NECESITA LAS EXTENSIONES PARA LOS BRAZOS (ME)
Si está instalando un TV grande, podría necesitar las extensiones para los brazos (ME) para alcanzar los
orificios de montaje en la parte trasera de su televisor. Para determinar si los mismos son necesarios,
sostenga uno de los brazos de la pantalla ajustables (AMA) hasta la parte trasera de la caja del televisor
para ver si el brazo puede alcanzar los orificios. Si no los alcanzan (tal como se muestra), fije las
extensiones a ambos brazos.
DETERMINARE SE L'UTILIZZO DELLE PROLUNGHE (ME) È NECESSARIO
L'installazione di un televisore di grandi dimensioni potrebbe richiedere l'utilizzo delle prolunghe (ME)
per raggiungere i fori di montaggio posti sul retro dell'apparecchio. Per determinare se le prolunghe siano o
meno necessarie, avvicinare uno degli snodi (AMA) al retro del mobiletto del televisore e verificare che
lo snodo raggiunga i fori. In caso negativo (come illustrato), collegare le prolunghe a entrambi gli snodi.
BESTIMMEN SIE, OB SIE DIE ARMVERLÄNGERUNGEN BENÖTIGEN (ME)
Wenn Sie einen großen Fernseher installieren, benötigen Sie u.U. Armverlängerungen (ME), um die
Befestigungslöcher auf der Rückseite Ihres Fernsehers erreichen zu können. Um festzulegen, ob dies
erforderlich ist, halten Sie einen der verstellbaren Monitorarme (AMA) zu der Rückseite des
Fernsehschranks hoch, um zu sehen, welcher Arm die Löcher erreichen kann. Sollte dies nicht der Falls
sein (wie angezeigt), sind die Verlängerungen an beiden Armen anzubringen.
ОПРЕДЕЛИТЕ, НУЖНЫ ЛИ ВАМ УДЛИНИТЕЛИ УЗЛОВ КРЕПЛЕНИЯ (ME)
Если вы устанавливаете телевизор большого размера, то вам могут понадобиться удлинители узлов
крепления (МЕ), чтобы добраться до крепежных отверстий на задней стенке телевизора. Чтобы
определить, нужны ли вам удлинители, поднесите один регулируемый узел крепления монитора
(АМА) к задней стенке телевизора и посмотрите, доходит ли узел крепления до этих отверстий.
Если нет (как показано на рисунке), прикрепите удлинители к обоим узлам крепления.
14

ATTACHING THE ARM EXTENSIONS (ME)
If the use of the Arm Extensions (ME) is required,
apply the Arm Extensions to the top and bottom
o
f each Adjustable Monitor Arm (AMA) using two the M8 Nuts (AF) for each. Make sure all four
M8 Nuts are tightened fully before attaching the Monitor Arms to the television.
ATTACHER LES RALLONGES DE BRAS (ME)
Si l'emploi des rallonges de bras (ME) est requis, placer les rallonges de bras sur le dessus et le dessous
de chaque bras de moniteur ajustable (AMA) avec deux écrous M8 (AF) chacun. Vérifier que les
quatre écrous M8 sont complètement serrés avant de fixer les bras de moniteur au téléviseur.
CÓMO FIJAR LAS EXTENSIONES PARA LOS BRAZOS (ME)
Si es necesario el uso de extensiones para los brazos (ME), aplíquelas sobre los las partes superior e inferior
de cada brazo de la pantalla ajustable (AMA) utilizando dos de las tuercas M8 (AF) para cada uno.
Asegúrese de que las cuatro tuercas M8 estén ajustadas por completo antes de fijar los brazos al televisor.
FISSAGGIO DELLE PROLUNGHE (ME)
Quando è necessario utilizzare le prolunghe (ME), collegarle alla parte superiore e inferiore di ogni
snodo regolabile (AMA) utilizzando due dadi M8 (AF) per snodo. Verificare che i quattro dadi M8
siano serrati completamente prima di fissare gli snodi al televisore.
BEFESTIGUNG DER ARMVERLÄNGERUNGEN (ME)
Sollte der Einsatz von Armverlängerungen (ME) erforderlich sein, werden die Armverlängerungen
oben und unten an jedem verstellbaren Monitorarm unter Einsatz der M8 Muttern (AF) für jeden
Arm angebracht. Achten Sie dabei darauf, dass alle vier M8 Muttern vollständig festgezogen
wurden, bevor sie die Monitorarme am Fernseher anbringen.
ПРИКРЕПЛЕНИЕ УДЛИНИТЕЛЕЙ УЗЛОВ КРЕПЛЕНИЯ (ME)
Если нужно использовать удлинители узлов крепления (МЕ), прикрепите их к верху и к низу
каждого регулируемого узла крепления монитора (АМА), используя две гайки М8 (AF) для
каждого удлинителя. Убедитесь, что все четыре гайки М8 затянуты полностью, перед тем
как прикрепить узлы крепления монитора к телевизору.
ME
AMA/
LMA
AF
15

16
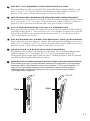
ATTACHING THE MONITOR ARMS (AMA/LMA)
Attach each Monitor Arm (AMA/LMA) to the back of your television as shown. Make sure that
each Washer (R for M4 or M5 screws, or S for M6 or M8 screws) is placed between the Screw
and the Monitor Arm. Don’t place the Washers between the Arms and the television.
FIXER LES BRAS DE MONITEUR (AMA/LMA)
Fixer les deux bras de moniteur (AMA/LMA) au dos du téléviseur comme sur l'illustration.
Veiller à bien placer une rondelle (R pour les vis M4 ou M5, S pour les vis M6 ou M8) entre
chaque vis et le bras de moniteur. Ne pas placer de rondelle entre les bras et le téléviseur.
CÓMO FIJAR LOS BRAZOS DE LA PANTALLA (AMA/LMA)
Conecte cada brazo de la pantalla (
AMA/LMA
) a la parte trasera de su televisor tal como se muestra.
Asegúrese de que cada arandela (R para tornillos M4 o M5 o S para tornillos M6 o M8) esté colocada
entre el tornillo y el brazo de la pantalla. No coloque las arandelas entre los brazos y el televisor.
FISSAGGIO DEGLI SNODI DELLO SCHERMO (AMA/LMA)
Fissare ognuno dei due snodi dello schermo (AMA/LMA) al retro del televisore, come illustrato.
Verificare che ogni rondella (R per le viti M4 o M5, oppure S per le viti M6 o M8) sia posta tra
la vite e lo snodo dello schermo. Non posizionare le rondelle tra lo snodo e il televisore.
BEFESTIGUNG DER MONITORARME (AMA/LMA)
Befestigen Sie jeden Monitorarm (AMA/LMA) an der Rückseite Ihres Fernsehers wie abgebildet.
Achten Sie dabei darauf, dass jede Unterlegscheibe (R für M4- oder M5-Schrauben oder S für
M6- oder M8-Schrauben) zwischen der Schraube und dem Monitorarm liegt. Legen Sie die
Unterlegscheiben nicht zwischen die Arme und den Fernseher.
ПРИКРЕПЛЕНИЕ КРЕПЕЖНЫХ УЗЛОВ МОНИТОРА (AMA/LMA)
Прикрепите каждый крепежный узел монитора к задней стенке телевизора как показано.
Убедитесь, что каждая шайба (R для винтов M4 или M5, или S для винтов M6 или M8)
установлена между винтом и крепежным узлом монитора. Не устанавливайте шайбы
между крепежными узлами и телевизором.

17
Use spacers if Monitor Arms (AMA/LMA) do not fit firmly against the back of the television,
such as when the back of the television is curved, contains larger recessed mounting holes, or
some other obstruction is in the way. Spacers also provide extra room for cables. The Arms must
rest securely on the spacers, and should not be loose.
Utiliser les douilles d'espacement si les bras de moniteur (AMA/LMA) n'appuient pas fermement
contre le dos du téléviseur, comme lorsque le dos du téléviseur est incurvé, qu'il contient de grands
trous de fixation en retrait ou qu'il y a d'autres obstacles. Les douilles d'espacement offrent
également plus d'espace pour les câbles. Les bras doivent appuyer fermement sur les douilles
d'espacement et ne pas avoir de jeu.
Use los espaciadores si los brazos de la pantalla (AMA/LMA) no encajan con firmeza contra la
parte trasera del televisor, como sucede cuando esta parte es curva, contiene orificios de montaje
embutidos más grandes o presenta alguna otra obstrucción. Los espaciadores también ofrecen
espacio adicional para cables. Los brazos deben apoyarse con firmeza sobre los espaciadores y no
deben quedar flojos.
Utilizzare i distanziali quando gli snodi dello schermo (AMA/LMA) non appoggiano perfettamente al
retro del televisore, ad esempio quando la parte posteriore del televisore è ricurva, oppure è dotata
di fori di montaggio infossati e di dimensioni maggiori, o quando è presente qualche tipo di
intralcio. I distanziali offrono anche spazio addizionale per l'alloggiamento dei cavi. Gli snodi
devono aderire fermamente ai distanziali, e non devono risultare allentati.
Verwenden Sie Abstandshalter, wenn die Monitorarme (AMA/LMA) nicht fest gegen die
Rückseite des TVs ansitzen, beispielsweise, wenn die Rückseite des Fernsehers gerundet ist,
größere ausgesparte Befestigungslöcher hat oder falls irgend eine andere Blockierung vorhanden
sein sollte. Die Abstandshalter bieten Ihnen auch zusätzlichen Platz für die Kabel. Die Arme
müssen sicher auf den Abtandshaltern liegen, und dürfen nicht locker sein.
Используйте промежуточные кольца, если крепежные узлы монитора (AMA/LMA) не
прилегают плотно к задней стенке телевизора, например, когда когда задняя панель
телевизора не плоская, с довольно большими глухими отверстиями для установки, или
имеются другие помехи. Промежуточные кольца также обеспечивают дополнительное место
для кабелей. Крепежные узлы монитора должны плотно прилегать к промежуточным
кольцам и не двигаться.

18
INSTALLING THE WALL MOUNT IN WOOD
POSER LE SUPPORT MURAL SUR DU BOIS
CÓMO INSTALAR EL SOPORTE DE PARED EN MADERA
INSTALLAZIONE DEL SUPPORTO A PARETE SU LEGNO
INSTALLATION DER WANDBEFESTIGUNG IN HOLZ
КРЕПЛЕНИЕ НАСТЕННОГО КРОНШТЕЙНА К ДЕРЕВУ
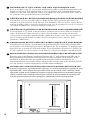
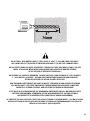
DETERMINE THE CORRECT WIDTH OF THE WALL PLATE (WP)
To determine the correct width of the expandable Wall Plate (WP) for your television, measure the
distance from the outside edges of the Monitor Arms (AMA/LMA) on the back of your television
using a tape measure. The Wall Plate must extend past this measurement and into the “grey zone”
(see illustration). The Wall Plate should not extend past the sides of the TV cabinet.
DÉTERMINER LA LARGEUR DE PLAQUE MURALE (WP) CORRECTE
Pour déterminer la largeur correcte de la plaque murale extensible (WP) pour le téléviseur, mesurer la
distance des bords extérieurs des bras de moniteur (AMA/LMA) sur le dos du téléviseur à l'aide d'un ruban à
mesurer. La plaque murale doit être plus longue que cette distance et être située dans la « zone grise » (voir
l'illustration). Toutefois, la plaque murale ne doit pas dépasser des côtés du boîtier du téléviseur.
DETERMINE EL ANCHO CORRECTO DE LA PLACA DE PARED (WP)
Para determinar el ancho correcto de la placa de pared (WP) extensible para su televisor, mida la
distancia entre los bordes exteriores de los brazos de la pantalla (AMA/LMA) en la parte trasera de
su televisor utilizando una cinta métrica. La placa de la pantalla debe extenderse más allá de esta
medida hasta la “zona gris” (vea la ilustración). La placa de pared no debe prolongarse más allá de
los lados de la caja del TV.
DETERMINARE LA LARGHEZZA APPROPRIATA DEL SUPPORTO A PARETE (WP)
Per determinare la larghezza del supporto a parete (WP) appropriata per il televisore, misurare la
distanza dai lati esterni degli snodi (AMA/LMA) sul retro del televisore. Il supporto deve essere
maggiore della misura rilevata, entro la "zona grigia" (vedi illustrazione). Il supporto a parete non
deve estendersi oltre i lati del mobiletto del televisore.
DETERMINE THE CORRECT WIDTH OF THE WALL PLATE (WP)
Per determinare la larghezza del supporto a parete (WP) appropriata per il televisore, misurare la
distanza dai lati esterni degli snodi (AMA/LMA) sul retro del televisore. Il supporto deve essere
maggiore della misura rilevata, entro la "zona grigia" (vedi illustrazione). Il supporto a parete non
deve estendersi oltre i lati del mobiletto del televisore.
ОПРЕДЕЛИТЕ ПРАВИЛЬНУЮ ШИРИНУ НАСТЕННОЙ ПЛАТЫ (WP)
Для определения правильной ширины раздвижной настенной платы для вашего телевизора,
измерьте расстояние от наружных краев узлов крепления монитора (AMA/LMA) на задней
стенке телевизора, используя рулетку. Настенная плата должна выходить за пределы этих
габаритов в «серую зону» (см. рисунок). Настенная плата не должна выходить за пределы
боковых частей телевизора.
La page charge ...

EXTENDING THE WALL PLATE (WP)
Using the socket wrench, loosen and remove the four M8 Nuts and Washers that secure
the three parts of the Wall Plate (WP) together. Extend the Left and Right Extension
Plates to the necessary width for your TV, then secure all three of the Wall Plate's parts
together again by replacing the four M8 Washers and Nuts as shown. Tighten all four M8
Nuts fully before attempting to install the Wall Plate to the wall.
ALLONGER LA PLAQUE MURALE (WP)
À l'aide d'une clé à douille, desserrer et enlever les quatre écrous et rondelles M8 qui
tiennent ensemble les trois parties de la plaque murale (WP). Tirer les plaques de rallonge
droite et gauche jusqu'à la longueur nécessaire pour le téléviseur, puis rattacher les trois
parties de la plaque murale en remettant les quatre écrous et rondelles M8 en place
comme sur l'illustration. Serrer les quatre écrous M8 avant d'essayer de poser la plaque
murale sur le mur.
CÓMO EXTENDER LA PLACA DE PARED (WP)
Con la llave de cubo, afloje y extraiga las cuatro tuercas y arandelas M8 que aseguran las
tres partes de la placa de pared (WP) juntas. Prolongue las placas de extensión izquierda y
derecha hasta el ancho necesario para su TV, luego fije nuevamente las tres partes juntas
volviendo a colocar las 4 arandelas y tuercas M8 tal como se muestra. Ajuste las cuatro
tuercas M8 por completo antes de intentar instalar la placa en la pared.
ESTENSIONE DEL SUPPORTO A PARETE (WP)
Con una chiave a bussola, allentare e rimuovere le quattro viti M8 e le relative rondelle
che assicurano i tre componenti del supporto a parete (WP). Estendere le piastre di
prolunga sinistra e destra fino a raggiungere la larghezza necessaria per il televisore, quindi
serrare nuovamente le tre parti del supporto riposizionando le quattro viti M8 e relative
rondelle, come illustrato. Serrare le quattro viti M8 prima di fissare il supporto al muro.
ERWEITERUNG DER WANDPLATTE (WP)
Mit Hilfe eines Steckschlüssels werden die vier M8 Mütter und Unterlegscheiben locker
gedreht und abgenommen, die die drei Teile der Wandplatte (WP) zusammenhalten.
Verlängern Sie die linken und rechten Verlängerungsplatten zur erforderlichen Breite
Ihres Fernsehers, und sichern Sie dann alle drei der Wandplattenteile wieder, indem Sie
die vier M8 Unterlegscheiben und Mütter wie abgebildet auswechseln. Ziehen Sie alle
vier M8 Mütter vollständig fest, bevor Sie versuchen, die Wandplatte an der Wand
anzubringen.
КАК РАЗДВИНУТЬ НАСТЕННУЮ ПЛАТУ (WP)
Используя торцевой ключ, ослабьте и вытащите четыре гайки и шайбы М8, которые
скрепляют вместе три части настенной платы (WP). Раздвиньте левую и правую
раздвигаемые платы на ширину, нужную для вашего телевизора, а затем снова
соедините вместе все три части настенной платы, используя четыре гайки и шайбы
М8, как показано. Полностью затяните все четыре гайки М8 перед тем как
устанавливать настенную плату на стену.
20

1
2
4
5
6
3
1
2
4
5
6
3
Pay attention to how far you extend the Wall Plate (WP) — the amount of extension determines whether you will
use four or six Lag Bolts (T) in the next step of the installation process! If you extend the Left and Right Extension
Plates into (or wider than) the third expansion slot (see illustration), you must use six Lag Bolts (three studs for
wood stud installations). If you expand the Left and Right Extension Plates into the first or second expansion slot,
you only need to use four lag bolts (two studs for wood stud installations).
Noter de combien la plaque murale (WP) est allongée ; en fonction de la longueur d'allongement, quatre ou
six tire-fond (T) devront être utilisés à l'étape suivante du processus de pose. Si les plaques de rallonge gauche
et droite sont placées dans le troisième trou de rallonge (ou au-delà) (voir l'illustration), six tire-fond sont
nécessaires (trois montants pour la pose sur des montants en bois). Si les plaques de rallonge gauche et droite
sont placées dans le premier ou second trou de rallonge, quatre tire-fond seulement sont nécessaires (deux
montants pour la pose sur des montants en bois).
Preste atención cuánto extiende la placa de pared (WP): el largo de la extensión determinará si debe utilizar
cuatro o seis tirafondos (T) en el próximo paso del proceso de instalación. Si prolonga las placas de extensión
izquierda y derecha hasta (o más allá) de la tercera ranura de expansión (vea la ilustración), deberá utilizar
seis tirafondos (tres pernos para instalaciones de montantes de madera). Si prolonga las placas de extensión
izquierda y derecha hasta la primera o segunda ranura de expansión, sólo necesitará utilizar cuatro tirafondos
(dos pernos para instalaciones de montantes de madera).
Fare attenzione a quanto viene esteso il supporto a parete (WP) — l'entità dell'estensione determina l'utilizzo
di quattro oppure di sei viti (T) nel prossimo passaggio di questo processo di installazione! Se l'estensione delle
piastre di prolunga sinistra e destra è pari o superiore al terzo slot di espansione (vedi illustrazione),sarà
necessario utilizzare sei viti (su tre montanti, nel caso di installazione su montanti in legno). Se invece
l'estensione delle piastre di prolunga sinistra e destra si limita al primo o secondo slot di espansione, sarà
sufficiente usare quattro viti (su due montanti, nel caso di installazione su montanti in legno).
Achten Sie bitte dabei darauf, wie weit sich die Wandplatte (WP) ausstreckt - die Verlängerungsgröße bestimmt, ob
Sie vier oder sechs Ankerbolzen (T) im nächsten Schritt des Installationsvorgangs verwenden! Falls Sie die linken
oder rechten Verlängerungsplatten in (oder breiter als) den dritten Erweiterungsschlitz (siehe Abbildung) erweitern,
müssen Sie sechs Ankerbolzen (drei Bolzen für Installationen in Holz) verwenden. Wenn Sie die linken und rechten
Verlängerungsplatten in den ersten oder zweiten Erweiterungsschlitz erweitern, brauchen Sie nur vier Ankerbolzen
(zwei Bolzen für Installationen mit Holzdübeln).
Продумайте, насколько вы раздвигаете настенную плату(WP): от того, насколько вы ее раздвинете,
зависит, понадобится ли вам четыре или шесть шурупов (T) с головкой под ключ на следующем этапе
установки! Если вы раздвигаете левую и правую раздвигаемые платы до третьего гнезда расширения или
шире (см. рисунок), вам необходимо использовать шесть шурупов с головкой под ключ (три стойки для
установки на деревянной стойке). Если вы раздвигаете левую и правую раздвигаемые платы до первого или
второго гнезда расширения, вам необходимо использовать только четыре шурупа с головкой под ключ (две
стойки для установки на деревянной стойке).
21

22
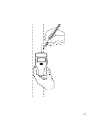
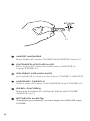
FIND THE WOOD STUDS
Using a stud finder, find the exact location of the studs to which you want to attach
the wall mount. Mark the right and left side to determine the center of each stud.
TROUVER LES MONTANTS EN BOIS
À l'aide d'un détecteur de montant, trouver l'emplacement exact des montants sur
lesquels doit être attaché le support mural. Marquer les bords gauche et droit pour
déterminer le centre de chaque montant.
INDIVIDUARE I MONTANTI DI LEGNO
Con l'ausilio di un rilevatore, individuare la posizione esatta dei montanti ai quali si
intende fissare il supporto a parete. Contrassegnare gli estremi sinistro e destro dei
montanti per determinarne il punto centrale.
FINDEN SIE DIE HOLZBOLZEN
Mit einem Bolzenfinder finden Sie jetzt den genauen Ort des Bolzens, an den Sie
die Wandbefestigung befestigen wollen. Markieren Sie die rechte sowie auch linke
Seite, um die Mitte des Bolzens bestimmen zu können.
НАЙДИТЕ ДЕРЕВЯННЫЕ СТОЙКИ
С помощью искателя стойки найдите точное местоположение стоек, к которым
вы хотите прикрепить кронштейн. Отметьте правую и левую стороны, чтобы
определить центр каждой стойки.
CÓMO ENCONTRAR LOS MONTANTES DE MADERA
Utilizando un localizador de montantes, determine la ubicación exacta de los montantes
sobre los que desea fijar el soporte de pared. Marque los lados derecho e izquierdo para
determinar el centro de cada montante.
La page charge ...

24
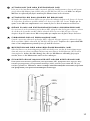
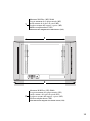
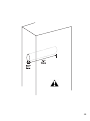
DETERMINE HEIGHT LOCATION OF TELEVISION
Measure the distance from the bracket holes to the top and bottom of the TV to determine
the center mounting position. Measure from the floor up, and make small marks on the wall to
help you determine the desired TV height. Using a level, line up the Installation Template
(IT) with your pencil markings and tape it into place.
DÉTERMINER L'EMPLACEMENT EN HAUTEUR
DU TÉLÉVISEUR
Mesurer la distance des mesurer la distance entre les trous du support et le haut et le bas du
téléviseur pour déterminer la position de pose centrale. Mesurer la hauteur depuis le sol et
tracer de petits repères sur le mur pour marquer la hauteur souhaitée pour le téléviseur. À l'aide
d'un niveau, aligner le gabarit de pose (IT) sur les marquages et l'attacher avec du ruban
adhésif.
DETERMINE LA ALTURA EN LA QUE COLOCARÁ
EL TELEVISOR
Para determinar el centro de la posición de montaje mida la distancia desde los orificios del
soporte hasta las partes superior y trasera del televisor. Mida desde el piso y haga pequeñas
marcas sobre la pared para ayudarse a determinar la altura deseada para el TV. Use un nivel
para alinear la plantilla de instalación (IT) con las marcas del lápiz y sujete con cinta adhesiva
en el lugar.
DETERMINARE LA POSIZIONE IN ALTEZZA
DEL TELEVISORE
Per determinare la posizione centrale di montaggio, misurare la distanza dai fori dei sostegni
alla parte superiore e quella inferiore del televisore. Misurare partendo dal pavimento, e fare un
segno sul muro per indicare l'altezza desiderata. Con l'ausilio di una livella, allineare lo schema
di installazione (IT) al segno sul muro e fissarlo con nastro adesivo.
BESTIMMEN SIE DIE STELLE DER HÖHE
DES FERNSEHERS
Messen Sie den Abstand von den Trägerlöchern zum oberen und unteren Teil des TVs, um die
Mitte festzulegen. Messen Sie vom Fußboden nach oben, und markieren Sie die Wand mit
kleinen Bleistiftmarkierungen, um die gewünschte Höhe des Fernsehers bestimmen zu können.
Mit einem Nivellierinstrument wird die Installationsschablone (IT) mit Ihren
Bleistiftmarkierungen ausgerichtet und mit dem Abdeckband an der richtigen Stelle befestigt.
ОПРЕДЕЛИТЕ ПОЛОЖЕНИЕ ТЕЛЕВИЗОРА ПО ВЫСОТЕ
Измерьте расстояние от отверстий кронштейна до верха и низа телевизора, чтобы
определить центр установочного положения. Измерьте расстояние от пола вверх и
сделайте карандашом пометки на стене, что поможет вам определить желаемую
высоту положения телевизора. Используя уровень, совместите шаблон для
установки (IT) с пометками на стене и закрепите шаблон маскировочной лентой.

25
IT
• Height to bottom of TV
• Hauteur jusqu'au bas du téléviseur
• Altura hasta la parte inferior del TV
• Altezza alla parte inferiore del televisore
• Höhe zum unteren Teil des TVs
•
Высота до низа телевизора

26
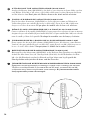
AB
WP
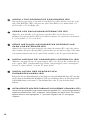
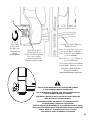
INSTALL THE SECURITY SCREW (AB)
Before you attach the Wall Plate (WP) to the wall, insert the M4 x 10mm Security Screws
(AB) into the locking mechanism on each end of the bracket. Insert them only half way,
so that the locking arm can still be easily rotated.
POSER LA VIS DE SÉCURITÉ (AB)
Avant de fixer la plaque murale (WP) au mur, introduire les vis de sécurité M4 x 10 mm
(AB) dans le mécanisme de verrouillage à chaque extrémité de la plaque. Ne les visser qu'à
moitié, pour permettre au bras de verrouillage de tourner aisément.
CÓMO INSTALAR EL TORNILLO DE SEGURIDAD (AB)
Antes de fijar la placa de pared (WP) a la pared, necesitará insertar los tornillos de
seguridad M4 x 10mm (AB) dentro del mecanismo de cierre en cada extremo del soporte.
Insértelos solamente hasta la mitad para que el brazo de cierre todavía pueda rotarse
fácilmente.
INSTALLAZIONE DELLA VITE DI SICUREZZA (AB)
Prima di fissare il supporto (WP) al muro, inserire le viti di sicurezza M4 x 10 mm (AB) nel
meccanismo di blocco, ad entrambe le estremità della piastra-supporto. Inserire le viti solo
a metà, in modo che lo snodo possa ancora essere ruotato con facilità.
INSTALLATION DER SICHERHEITSSCHRAUBEN (AB)
Bevor Sie die Wandplatte (WP) an der Wand befestigen, fügen Sie die M4 x 10 mm
Sicherheitsschrauben (AB) in den Verriegelungsmechanismus an jedem Ende des Trägers
ein. Führen Sie sie nur zur Hälfte ein, damit der Verriegelungsarm immer noch leicht
gedreht werden kann.
УСТАНОВИТЕ КРЕПЕЖНЫЕ ВИНТЫ (AB)
Перед тем как прикрепить настенную плату (WP) к стене, вставьте крепежные
винты(AB) M4 x 10 мм в фиксирующий механизм на каждом конце кронштейна.
Вставьте их не до конца, чтобы фиксирующий элемент можно было легко
поворачивать.

FOR MASONRY INSTALLATIONS, SEE PAGE 31.
POUR UNE POSE SUR DE LA MAÇONNERIE, VOIR PAGE 31.
PARA INSTALACIONES EN MAMPOSTERÍA CONSULTE LA PÁGINA 31.
PER INSTALLAZIONI A MURO, VEDERE A PAGINA 31.
FÜR INSTALLATIONEN IN MAUERWERK, SIEHE SEITE 31.
КРЕПЛЕНИЕ К КАМЕННОЙ КЛАДКЕ, СМ. СТР. 31.
27
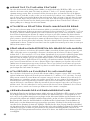
DRILL PILOT HOLES
Follow the directions on the installation template carefully. The number of Lag Bolts (T) you
will need will depend on how wide you expand the Wall Plate (WP). If you expanded into or
past the third expansion slot (as shown on page 21) you need to use six Lag Bolts (T) into three
studs. If the mount is in the first or second expansion hole, use four Lag Bolts into two studs.
Drill all holes 2.5" (64mm) deep using a 5/32" (4mm) size drill bit.
Use lines on Installation Template (IT) to align Template with stud pencil markings.
Se servir des lignes sur le gabarit de pose (IT) pour aligner le gabarit
avec repères de montants au crayon.
Utilice líneas en la plantilla de instalación (IT) para alinear la plantilla
con las marcas de lápiz en el montante.
Utilizzare le linee presenti nello schema di installazione (IT) per allineare
lo schema stesso ai segni fatti in matita.
Verwenden Sie die Linien auf der Installationsschablone (IT),
um die Schablone mit Bolzenbleistiftmarkierungen auszurichten.
Используйте линии на шаблоне для установки (IT), чтобы совместить
шаблон с карандашными пометками на стойке.

28
CÓMO TALADRAR ORIFICIOS GUÍA
Siga cuidadosamente las instrucciones de la plantilla de instalación. La cantidad de tirafondos
(T) que necesitará dependen de cuánto prolongue el ancho de la placa de la pared (WP). Si la
prolongó hasta la tercer ranura de expansión, o más allá de ella (tal como se muestra en la página
21), deberá utilizar seis tirafondos (T) en tres montantes. Si el soporte se encuentra en la primera
o segunda ranura de expansión, utilice cuatro tirafondos en dos montantes. Taladre todos los
orificios de 2,5" (64 mm) de profundidad con una broca de 5/32" (4 mm) de tamaño.
TRAPANARE I FORI PILOTA
Seguire con attenzione le istruzioni contenute sullo schema di installazione . Il numero di viti
(T) necessarie dipende da quanto viene esteso il supporto a parete (WP). Se l'espansione ha
raggiunto o superato il terzo slot di espansione (come illustrato a pagina 21) saranno necessarie
sei viti (T) in tre montanti. Se il montaggio avviene nel primo o secondo foro di espansione,
utilizzare quattro viti in due montanti. Trapanare tutti i fori a una profondità di 64 mm) con una
punta da 4 mm.
FÜHREN SIE VORBOHRUNGEN DURCH
Bitte achten Sie darauf, dass den Anweisungen auf der Installationsschablone sorgfältig gefolgt
wird. Die von Ihnen benötigte Anzahl der Ankerbolzen (T) hängt davon ab, wie weit Sie die
Wandplatte (WP) erweitern möchten. Falls die Erweiterung in oder über den dritten
Erweiterungsschlitz hinausreichte (wie auf Seite 21 abgebildet), werden Sie sechs Ankerbolzen
(T) in drei Bolzen benötigen. Falls die Befestigung im ersten oder zweiten Erweiterungsloch ist,
müssen Sie vier Ankerbolzen in zwei Bolzen benutzen. Bohren Sie alle Löcher 64 mm tief mit
einer 4 mm großen Bohrerspitze.
ПРОСВЕРЛИТЕ УСТАНОВОЧНЫЕ ОТВЕРСТИЯ
Аккуратно и точно следуйте инструкциям, написанным на шаблоне для установки.
Количество шурупов (Т) с головкой под ключ, которое вам понадобится, зависит от того,
как широко вы раздвигаете настенную плату (WP). Если вы раздвигаете до третьего гнезда
расширения или шире (как показано на странице 21), вам понадобится шесть шурупов (Т) с
головкой под ключ для трех стоек. Если расширение доходит до первого или второго гнезда
расширения, используйте четыре шурупа с головкой под ключ для двух стоек. Просверлите
все отверстия глубиной 2,5" (64 мм), используя сверло 5/32" (или 4 мм).
PERCER LES TROUS GUIDES
Suivre avec attention les instructions figurant sur le gabarit de pose. Le nombre de tire-fond (T)
nécessaire dépend de la largeur d'allongement de la plaque murale (WP). Si elle est allongée
jusqu'au troisième trou de rallonge ou au-delà (comme sur l'illustration à la page 21), utiliser six
tire-fond (T) vissés dans trois montants. Si les rallonges sont dans les premiers ou seconds trous
de rallonge, utiliser quatre tire-fond vissés dans deux montants. Percer tous les trous de 64 mm
(2,5 po) de profond avec un foret de 5/32 po (ou 4 mm) de diamètre.
La page charge ...

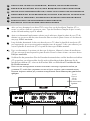
INSTALL THE WALL PLATE (WP)
After you have prepared the holes for mounting the Wall Plate (WP), place the Wall Plate over the holes
and screw in the Lag Bolts (T) about half way.
Use a level to make sure the Wall Plate is level and make
any necessary adjustments. Once straight, tighten all of the Lag Bolts completely (do not over tighten!).
POSER LA PLAQUE MURALE (WP)
Une fois que les trous de fixation de la plaque murale (WP) sont prêts, poser la plaque murale sur les trous
et visser les tire-fond (T) à moitié environ. Utiliser un niveau pour vérifier que la plaque murale est de
niveau et effectuer tout ajustement nécessaire. Une fois la plaque de niveau, serrer complètement les
quatre tire-fond (ne pas forcer !).
CÓMO INSTALAR LA PLACA DE PARED (WP)
Luego de haber preparado los orificios para instalar la placa de pared (WP), colóquela placa sobre los
orificios y atornille los tirafondos (T) hasta la mitad. Utilice un nivel para asegurarse de que la placa de
pared esté nivelada y haga los ajustes necesarios. Una vez que esté derecha, ajuste todos los tirafondos por
completo (no los ajuste demasiado).
INSTALLAZIONE DEL SUPPORTO A PARETE (WP)
Dopo aver preparato i fori per il montaggio del supporto a parete (WP), porre il supporto sopra i fori e
avvitare le viti (T) per circa metà della lunghezza. Utilizzare la livella per verificare che il supporto sia
parallelo al suolo ed effettuare gli aggiustamenti necessari. Una volta determinata la posizione corretta,
finire di avvitare le viti (non serrarle eccessivamente!).
INSTALLIEREN SIE DIE WANDPLATTE (WP)
Nachdem Sie die Löcher zur Befestigung an der Wandplatte (WP) vorbereitet haben, legen Sie die
Wandplatte über die Löcher und schrauben Sie die Ankerbolzen (T) halb ein. Mit dem Nivelliergerät
wird sichergestellt, dass die Wandplatte eben ist; führen Sie erforderlichenfalls Nachstellungen aus. Wenn
die Wandplatte gerade liegt, werden alle Ankerbolzen vollständig festgezogen (bitte nicht zu fest
ziehen!).
УСТАНОВИТЕ НАСТЕННУЮ ПЛАТУ (WP)
После того как вы
просверлили отверстия для
установки настенной платы
(WP), поместите ее на
отверстия и ввинтите шурупы
(T) с головкой под ключ
примерно наполовину.
Используя уровень, убедитесь,
что настенная плата
установлена горизонтально, и
сделайте необходимые
исправления. Когда она
установлена правильно,
полностью затяните все
шурупы (не затягивайте
шурупы слишком сильно!).
WP
T
30

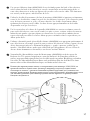
IT
Level
Niveau
Nivel
Livella
Nivellierinstrument
Уровень
31
After you have determined your desired TV location, L
ine up the
Installation Template (IT)
to
ensure you will not drill into any mortar joints. T
ape the Installation Template in place securely
on the wall with masking tape. Use a Level.
Après avoir déterminé l'emplacement souhaité pour le téléviseur, aligner le gabarit de pose (IT) de
manière à ne pas percer dans des joints de mortier. Bien attacher le gabarit au mur avec du ruban de
masquage. Utiliser un niveau.
Luego de haber determinado la ubicación deseada para su TV, alinee la plantilla de instalación (IT)
para asegurarse de que no necesitará perforar ninguna junta de argamasa. Utilice cinta adhesiva para
sujetar la plantilla de instalación (IT) a la pared de forma segura. Utilice un nivel.
Dopo aver determinato la posizione più adatta per il televisore, allineare lo schema di installazione
(IT) per assicurarsi di non trapanare in giunti di malta. Fissare lo schema al muro con nastro adesivo.
Utilizzare una livella.
Nachdem Sie den gewünschten Platz des Fernsehers bestimmt haben, wird die Installationsschablone
(IT) ausgerichtet, um sicherzustellen, dass Sie nicht in Mörtelfugen bohren. Befestigen Sie die
Installattionsschablone (IT) sicher an der Wand mit Hilfe von Abdeckband. Verwenden Sie dazu
Ihr Nivellierinstrument.
После того как вы определили желаемое положение телевизора, выравняйте шаблон для
установки (IT), чтобы быть уверенным, что вы не будете сверлить в швы каменной кладки.
Надежно закрепите шаблон для установки маскировочной лентой. Используйте уровень для
проверки.
MOUNTING TO SOLID CONCRETE, BRICKS, OR CINDER BLOCK
POSE SUR DU BÉTON PLEIN, DES BRIQUES OU DES PARPAINGS
MONTAJE EN CONCRETO SÓLIDO, LADRILLO O LADRILLOS DE ESCORIAS
MONTAGGIO SU CALCESTRUZZO, MATTONI O BLOCCHI IN CEMENTO
MONTAGE AN FESTBETON, MAUERZIEGELN ODER SCHLACKENBETONBLOCK
КРЕПЛЕНИЕ К НЕАРМИРОВАННОМУ БЕТОНУ,
КИРПИЧУ ИЛИ ШЛАКОБЕТОННОМУ БЛОКУ
La page charge ...
La page charge ...
La page charge ...
La page charge ...
La page charge ...
La page charge ...
La page charge ...
La page charge ...
La page charge ...
La page charge ...
La page charge ...
La page charge ...
La page charge ...
La page charge ...
La page charge ...
La page charge ...
La page charge ...
La page charge ...
La page charge ...
La page charge ...
La page charge ...
-
 1
1
-
 2
2
-
 3
3
-
 4
4
-
 5
5
-
 6
6
-
 7
7
-
 8
8
-
 9
9
-
 10
10
-
 11
11
-
 12
12
-
 13
13
-
 14
14
-
 15
15
-
 16
16
-
 17
17
-
 18
18
-
 19
19
-
 20
20
-
 21
21
-
 22
22
-
 23
23
-
 24
24
-
 25
25
-
 26
26
-
 27
27
-
 28
28
-
 29
29
-
 30
30
-
 31
31
-
 32
32
-
 33
33
-
 34
34
-
 35
35
-
 36
36
-
 37
37
-
 38
38
-
 39
39
-
 40
40
-
 41
41
-
 42
42
-
 43
43
-
 44
44
-
 45
45
-
 46
46
-
 47
47
-
 48
48
-
 49
49
-
 50
50
-
 51
51
-
 52
52


Bell'O 7640 Manuel utilisateur
- Catégorie
- Supports muraux à panneau plat
- Taper
- Manuel utilisateur
- Ce manuel convient également à
dans d''autres langues
- italiano: Bell'O 7640 Manuale utente
- English: Bell'O 7640 User manual
- español: Bell'O 7640 Manual de usuario
- Deutsch: Bell'O 7640 Benutzerhandbuch
- русский: Bell'O 7640 Руководство пользователя
