Electrolux ESF66070XR Manuel utilisateur
- Catégorie
- Lave-vaisselle
- Taper
- Manuel utilisateur

user manual
notice d'utilisation
Dishwasher
Lave-vaisselle
ESF 66070

Electrolux. Thinking of you.
Share more of our thinking at www.electrolux.com
CONTENTS
Safety information 2
Product description 4
Control panel 5
Use of the appliance 6
Setting the water softener 7
Use of dishwasher salt 8
Use of detergent and rinse aid 8
Multitab function 9
Loading cutlery and dishes 9
Select and start a washing programme
9
Washing programmes 11
Care and cleaning 12
What to do if… 12
Technical data 15
Environment concerns 15
Installation 15
Subject to change without notice
SAFETY INFORMATION
Before the installation and use, read this
manual carefully:
• For your safety and the safety of your
property.
• To help the environment.
• For the correct operation of the appli-
ance.
Always keep these instructions with the ap-
pliance also if you move or give it to a differ-
ent person.
The manufacturer is not responsible if an in-
correct installation and use causes dam-
age.
Children and vulnerable persons safety
• Do not let persons, children included,
with reduced physical sensory, reduced
mental functions or lack of experience
and knowledge to use the appliance.
They must have supervision or instruction
for the operation of the appliance by a
person who is responsible for their safety.
• Keep all packaging away from children.
There is the risk of suffocation or injury.
• Keep all detergents in a safe area. Do not
let the children touch the detergents.
• Keep children and pets away from the
appliance when the door is open.
General safety
• Do not change the specifications of this
appliance. There is the risk of injury and
damage to the appliance.
• Obey the safety instructions from the de-
tergent manufacturer to prevent burns to
eyes, mouth and throat.
• Do not drink the water from the appli-
ance. Particles of detergent can stay in
your appliance.
• Do not keep the appliance door open
without supervision. This to prevent injury
and to fall on an open door.
• Do not sit or stand on the open door.
Use
• The appliance is only for domestic use.
Do not use the appliance for other uses
to prevent injury to persons and damage
to property.
• Only use the appliance to clean accesso-
ries that are applicable for dishwashers.
• Do not put flammable products or items
that are wet with flammable products in,
near or on the appliance. Risk of explo-
sion or fire.
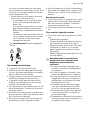
• Put the knives and all items with sharp
points in the cutlery basket with their
points down. If not, put in a horizontal
position in the upper basket or in the
knife basket. (Not all models have the
knife basket).
• Use only specified products for dish-
washers (detergent, salt, rinse aid).
• Types of salt that are not specified for
dishwashers can cause damage to the
water softener.
• Fill the appliance with salt before you
start a washing programme. Remaining
salt in the appliance can cause corrosion
or make a hole in the bottom of the appli-
ance.
2 electrolux

• Do not fill the rinse aid dispenser with
other products than the rinse aid, (dish-
washer cleaning agent, liquid detergent).
This can cause damage to the appliance.
• Make sure that the spray arms can move
freely before you start a washing pro-
gramme.
• The appliance can release hot steam if
you open the door while a washing pro-
gramme operates. There is a risk of skin
burns.
•Do not remove the dishes from the appli-
ance until the washing programme is
completed.
Care and cleaning
• Before you clean the appliance, deacti-
vate it and disconnect the mains plug
from the mains socket.
• Do not use flammable products or prod-
ucts that can cause corrosion.
• Do not use the appliance without the fil-
ters. Make sure that the installation of the
filters is correct. An incorrect installation
causes unsatisfactory washing results
and damage to the appliance.
• Do not use spray water or steam to clean
the appliance. Risk of electrical shock
and damage to the appliance.
Installation
• Make sure that the appliance is not dam-
aged. Do not install or connect a dam-
aged appliance, contact the supplier.
• Remove all packaging before you install
and use the appliance.
• Only a qualified person must do the elec-
trical connection, the plumbing and the
installation of the appliance. This to pre-
vent the risks of structural damage or in-
jury.
• Make sure that the mains plug is discon-
nected from the mains socket during in-
stallation.
• Do not drill into the sides of the appliance
to prevent damage to hydraulic compo-
nents and electrical components.
Frost precautions
• Do not install the appliance where the
temperature is less than 0 °C.
• The manufacturer is not responsible for
frost damage.
Water connection
• Use new hoses to connect the appliance
to the water supply. Do not use used ho-
ses.
• Do not connect the appliance to new
pipes or pipes not used for a long time.
Let the water flow for some minutes, then
connect the inlet hose.
• Make sure not to squash or cause dam-
age to the water hoses when you install
the appliance.
• Make sure that the water couplings are
tight to prevent a water leakage.
• The first time you use the appliance,
make sure that the hoses do not have
water leaks.
• The water inlet hose has a safety valve
and a double sheath with an inner mains
cable. There is pressure in the water inlet
hose only when the water flows. If there
is a leak in the water inlet hose, the safety
valve interrupts the flow of water.
– Be careful when you connect the water
inlet hose:
– Do not put the water inlet hose or
the safety valve in water.
– If the water inlet hose or the safety
valve are damaged, immediately dis-
connect the mains plug from the
mains socket.
– Contact the service centre to replace
the water inlet hose with safety
valve.
Warning! Dangerous voltage.
Electrical connection
• The appliance must be earthed.
• Make sure that the electrical information
on the rating plate agrees with the power
supply.
• Always use a correctly installed shock-
proof socket.
electrolux 3

• Do not use multiple plugs and extension
cables. There is a risk of fire.
• Do not replace or change the mains ca-
ble. Contact the service centre.
• Make sure not to squash or cause dam-
age to the mains plug and cable behind
the appliance.
• Make sure that there is access to the
mains plug after the installation.
• Do not pull the mains cable to disconnect
the appliance. Always pull the mains
plug.
Service centre
• Only a qualified person can repair or work
on the appliance. Contact the service
centre.
• Use only original spare parts.
To discard the appliance
• To prevent the risk of injury or damage:
– Disconnect the mains plug from the
mains socket.
– Cut off the mains cable and discard it.
– Remove the door catch. This prevents
children or pets to be closed in the ap-
pliance. There is a risk of suffocation.
– Discard the appliance at the local
waste disposal centre.
Warning! The dishwasher
detergents are dangerous and can
cause corrosion !
• If an accident occurs with these de-
tergents, contact immediately a
physician.
• If the detergent gets into the mouth,
contact immediately a physician.
• If the detergent gets into the eyes,
contact immediately a physician and
clean the eyes with water.
• Keep dishwasher detergents in a
safe area and out of children touch.
• Do not keep the appliance door
open when there is detergent in the
detergent dispenser.
• Fill the detergent dispenser only be-
fore you start a washing programme.
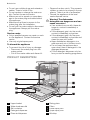
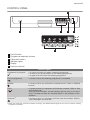
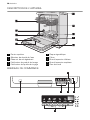
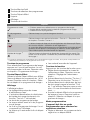
PRODUCT DESCRIPTION
7
1 Upper basket
2 Water hardness dial
3 Salt container
4 Detergent dispenser
5 Rinse aid dispenser
6 Rating plate
7 Filters
8 Lower spray arm
9 Upper spray arm
10 Worktop
4 electrolux

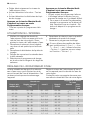
CONTROL PANEL
1
2
3
4
5
6
A
B
C
D
E
1 On/off button
2 Programme selection buttons
3 Delay start button
4 Indicator lights
5 Display
6 Function buttons
Indicator lights
Programme-in-progress • It comes on when you select a washing programme.
• It stays on for all the duration of the washing programme.
• It goes off at the end of the washing programme.
End-of-programme It comes on when the washing programme is completed.
Multitab It comes on when you activate the multitab function. Refer to 'Multitab
function'.
Salt
1)
It comes on when it is necessary to fill the salt container. Refer to 'Use
of dishwasher salt'.
After you fill the container, the salt indicator light can stay on for some
hours. This does not have an unwanted effect on the operation of the
appliance.
Rinse aid
1)
It comes on when it is necessary to fill the rinse aid container. Refer to
'Use of detergent and rinse aid'.
1) When the salt and/or rinse aid containers are empty, the related indicator lights do not come on while a washing
programme operates.
electrolux 5

Programme buttons
Press one of these buttons to set a wash-
ing programme. The related indicator
comes on. Refer to 'Washing programmes'.
Delay start button
Use this button to delay the start of the
washing programme with an interval be-
tween 1 and 24 hours. Refer to 'Select and
start a washing programme'.
Display
The display shows:
• The electronic adjustment of the level of
the water softener.
• Activation/deactivation of the rinse aid
dispenser (only with multitab function on).
• The washing programme duration.
• Remaining time to the end of the washing
programme.
• The end of a washing programme. The
display shows a zero.
• Remaining time to the end of the delay
start.
• Fault codes.
Function buttons
Use the function buttons for these opera-
tions:
• To adjust electronically the level of the
water softener. Refer to 'Setting the wa-
ter softener'.
• To activate/deactivate the multitab func-
tion. Refer to 'Multitab function'.
• To activate/deactivate the rinse aid dis-
penser when the multitab function is on.
Refer to 'What to do if...'.
• To cancel the washing programme in
progress or a delay start in progress. Re-
fer to 'Select and start a washing pro-
gramme'.
Setting mode
The appliance must be in setting mode
for these operations:
• To select and start a washing pro-
gramme and/or a delay start.
• To adjust electronically the level of the
water softener.
• To activate/deactivate the multitab func-
tion.
• To activate/deactivate the rinse aid dis-
penser.
Press the on/off button. The appliance
is in setting mode when:
– All the programme indicator lights come
on.
Press the on/off button. The appliance
is not in setting mode when:
– Only one programme indicator light
comes on.
– The display shows the duration of a
washing programme or a delay start.
– It is necessary to cancel the pro-
gramme or the delay start to go back
to the setting mode. Refer to 'Select
and start a washing programme'.
USE OF THE APPLIANCE
1. Be sure that the set level of the water
softener agrees with the water hardness
in your area. If not, adjust the water
softener.
2. Fill the salt container with dishwasher
salt.
3. Fill the rinse aid dispenser with rinse aid.
4. Load cutlery and dishes into the appli-
ance.
5. Set the correct washing programme for
the type of load and soil.
6. Fill the detergent dispenser with the cor-
rect quantity of detergent.
7. Start the washing programme.
If you use the combi detergent tablets
('3 in 1', '4 in 1', '5 in 1'), use the multi-
tab function (refer to 'Multitab func-
tion').
6 electrolux

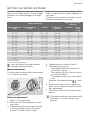
SETTING THE WATER SOFTENER
The water softener removes minerals and
salts from the water supply. These minerals
and salts can cause damage to the appli-
ance.
Adjust the level of the water softener if this
does not agree with the water hardness in
your area.
Contact your local water authority to know
the water hardness in your area.
Water hardness
Water hardness ad-
justment
German degrees
(°dH)
French degrees
(TH°)
mmol/l Clarke de-
grees
manually elec-
troni-
cally
51 - 70 91 - 125 9,1 - 12,5 64 - 88
2
1)
10
43 - 50 76 - 90 7,6 - 9,0 53 - 63
2
1)
9
37 - 42 65 - 75 6,5 - 7,5 46 - 52
2
1)
8
29 - 36 51 - 64 5,1 - 6,4 36 - 45
2
1)
7
23 - 28 40 - 50 4,0 - 5,0 28 - 35
2
1)
6
19 - 22 33 - 39 3,3 - 3,9 23 - 27
2
1)
5
1)
15 - 18 26 - 32 2,6 - 3,2 18 - 22 1 4
11 - 14 19 - 25 1,9 - 2,5 13 - 17 1 3
4 - 10 7 - 18 0,7 - 1,8 5 - 12 1 2
< 4 < 7 < 0,7 < 5
1
2)
1
2)
1) Factory position.
2) Do not use salt at this level.
You must adjust the water softener
manually and electronically.
Manual adjustment
Turn the water hardness dial to the position
1 or 2 (refer to the table).
Electronic adjustment
1. Switch on the appliance.
2. Make sure that the appliance is in set-
ting mode.
3. Press and hold function buttons B and
C until the indicator lights of function
buttons A, B and C start to flash.
4. Release function buttons B and C.
5. Press function button A.
– The indicator lights for function but-
tons B and C go off.
– The indicator light for function button
A continues to flash.
– The display shows the current adjust-
ment.
Example: the display shows
= level
5.
6. Press the function button A again and
again until the display shows the neces-
sary adjustment.
7. Press the on/off button to keep the op-
eration.
If the water softener is set electronically
to the level 1, the salt indicator light
stays off.
electrolux 7

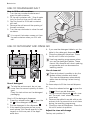
USE OF DISHWASHER SALT
How to fill the salt container:
1. Turn the cap counterclockwise and
open the salt container.
2. Fill the salt container with 1 litre of water
(only for the first time you fill with salt).
3. Use the funnel to fill the salt container
with salt.
4. Remove the salt around the opening of
the salt container.
5. Turn the cap clockwise to close the salt
container.
It is correct that water comes out from
the salt container when you fill it with
salt.
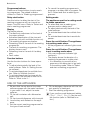
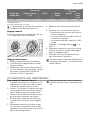
USE OF DETERGENT AND RINSE AID
20
30
M
A
X
1
2
3
4
+
-
1
2
3
4
5
6
7
Use of detergent
To help the environment, do not use
more than the correct quantity of deter-
gent.
Obey the instructions on the detergent
packaging.
How to fill the detergent dispenser:
1.
Press the release button
2
to open the
lid
7
of the detergent dispenser.
2.
Put the detergent in the dispenser
1
.
3. If the washing programme has a pre-
wash phase, put a small quantity of de-
tergent on the inner part of the appli-
ance door.
4. If you use the detergent tablets, put the
tablet in the detergent dispenser
1
.
5. Close the detergent dispenser. Press
the lid until it locks into position.
Use long washing programmes when
you use the detergent tablets. These
cannot fully dissolve with short washing
programmes and can decrease the
washing results.
Use of rinse aid
Rinse aid makes it possible to dry the
dishes without streaks and stains.
The rinse aid dispenser automatically
adds rinse aid during the last rinsing
phase.
Do these steps to fill the rinse aid dispens-
er:
1.
Press the release button
6
to open the
lid
5
of the rinse aid dispenser.
2.
Fill the rinse aid dispenser
3
with rinse
aid. The mark 'max' shows the maxi-
mum level.
3. Remove the spilled rinse aid with an ab-
sorbent cloth to prevent too much foam
during the washing programme.
4. Close the rinse aid dispenser. Press the
lid until it locks into position.
Adjust the rinse aid dosage
Factory set: position 3.
8 electrolux

You can set the rinse aid dosage between
position 1 (lowest dosage) and position 4
(highest dosage).
Turn the rinse aid selector
4
to increase or
decrease the dosage.
MULTITAB FUNCTION
The multitab function is for combi detergent
tablets.
These tablets contain agents as detergent,
rinse aid and dishwasher salt. Some types
of tablets can contain other agents.
Do a check if these tablets are applicable
for the local water hardness. Refer to the in-
structions from the manufacturer.
When you set the multitab function, it stays
on until you deactivate it.
The multitab function deactivates the flow
of rinse aid and salt.
The multitab function deactivates the indi-
cator lights of salt and rinse aid.
The programme duration can increase if
you use the multitab function.
Activate the multitab function before
the start of a washing programme.
You cannot activate the multitab func-
tion when the programme operates.
To activate the multitab function:
1. Switch on the appliance.
2. Make sure that the appliance is in set-
ting mode.
3. Press and hold function buttons D and
E until the multitab indicator light comes
on.
To deactivate the multitab function and use
separately detergent, salt and rinse aid:
1. Switch on the appliance.
2. Make sure that the appliance is in set-
ting mode.
3. Press and hold function buttons D and
E until the multitab indicator light goes
off.
4. Fill the salt container and rinse aid dis-
penser.
5. Adjust the water hardness setting to the
highest level.
6. Do a washing programme without
dishes.
7. Adjust the water softener to the water
hardness in your area.
8. Adjust the rinse aid dosage.
LOADING CUTLERY AND DISHES
Refer to the leaflet 'Examples of Real-
Life loads'.
Hints and tips
• Do not put in the appliance items that
can absorb water (sponges, household
cloths).
• Remove the remaining food from the
items.
• Make soft the remaining burned food on
the items.
• Put hollow items (cups, glasses and
pans) with the opening down.
• Make sure that water does not collect in
containers or in bowls.
• Make sure that cutlery and dishes do not
bond together.
• Make sure that the glasses do not touch
other glasses.
• Put small items in the cutlery basket.
• Mix the spoons with other cutlery to pre-
vent them to bond together.
• When you put the items in the baskets,
make sure that the water can touch all
surfaces.
• Put light items in the upper basket. Make
sure that the items do not move.
• Water droplets can collect on plastic
items and non-stick pans.
SELECT AND START A WASHING PROGRAMME
Select and start a washing programme
without delay start
1. Switch on the appliance.
2. Make sure that the appliance is in set-
ting mode.
electrolux 9

3. Select a washing programme. Refer to
'Washing programmes'.
– The related programme indicator light
comes on.
– All other programme indicator lights
go off.
– The programme duration flashes in
the display.
– The programme-in-progress indicator
light comes on.
4. Close the appliance door. The washing
programme starts automatically.
– The programme-in-progress indicator
light remains on.
You can select the washing pro-
gramme also with the door closed.
When you press a programme button,
you have only 3 seconds to select a
different washing programme. After
these 3 seconds, the washing pro-
gramme start automatically.
Select and start a washing programme
with delay start
1. Switch on the appliance and select a
washing programme.
2. Press the delay start button again and
again until the display shows the neces-
sary number of hours for the delay start.
3. Close the appliance door.
– The countdown starts automatically.
– The programme-in-progress indica-
tor light goes off.
– When the countdown is completed,
the washing programme starts auto-
matically.
– The programme-in-progress indica-
tor light comes on.
The opening of the appliance door in-
terrupts the countdown. When you
close the door, the countdown contin-
ues from the point of interruption.
You can select the delay start also with
the door closed. When you select a
washing programme, you have only 3
seconds to select the delay start. After
these 3 seconds, the washing pro-
gramme starts automatically.
Interruption of a washing programme
• Open the appliance door.
– The washing programme stops.
• Close the appliance door.
– The washing programme continues
from the point of interruption.
How to cancel a washing programme
or a delay start
If a washing programme or a delay
start has not started, you can change
the selection.
When a washing programme or a delay
start are in progress, it is not possible
to change the selection. It is necessary
to cancel the washing programme or
the delay start to make a new selec-
tion.
When you cancel the delay start, this
automatically cancels the selected
washing programme. You have to se-
lect the washing programme again.
1. Press and hold the function buttons B
and C until all the programme lights
come on
2. Make sure that there is detergent in the
detergent dispenser before you start a
new washing programme.
At the end of the washing programme
• The appliance stops automatically.
• The display shows 0.
• The end-of-programme indicator light is
on.
• The programme-in-progress indicator
light goes off.
1. Switch off the appliance.
2. Open the appliance door.
3. For better drying results, keep the door
ajar for some minutes.
• If you do not switch off the appli-
ance, after three minutes from the
end of the washing programme:
– all indicator lights go off,
– the display shows one horizontal
bar,
This helps to decrease energy con-
sumption.
Press one of the buttons (not the on/off
button), the display and the indicator
lights come on again.
Auto Off
The Auto Off function automatically
switches off the appliance 10 minutes after
the end of the washing programme.
10 electrolux

This helps to decrease energy consump-
tion.
Remove the items from the baskets
• Let the dishes become cold before you
remove them from the appliance. Hot
dishes can be easily damaged.
• First remove the items from the lower
basket, then from the upper basket.
• There can be water on the sides and on
the door of the appliance. Stainless steel
becomes cool more quickly than the
dishes.
WASHING PROGRAMMES
Programme Degree of soil Type of load Programme description
Auto
1)
Any Crockery, cutlery,
pots and pans
Prewash
Main wash 45 °C or 70 °C
1 or 2 middle rinses
Last rinse
Dry
Intensive
Heavy soil Crockery, cutlery,
pots and pans
Prewash
Main wash 70 °C
1 middle rinse
Last rinse
Dry
Quick
2)
Normal or light
soil
Crockery and cutlery Main wash 60 °C
Rinse
Eco
3)
Normal soil Crockery and cutlery Prewash
Main wash 50 °C
1 middle rinse
Last rinse
Dry
Rinse
This programme gives dishes a quick
rinse to prevent the remaining food to
bond on the dishes and bad odours to
come out from the appliance.
Do not use detergent with this pro-
gramme.
1 cold rinse
1) The appliance adjusts automatically the temperature and the quantity of the water. This depends if the appliance
has a full load or not and on the degree of soil. The programme duration and the programme consumptions can
change.
2) When you have a light load, this programme gives a timesaving solution with perfect washing results.
3) Test programme for test institutes. Refer to supplied leaflet for test data.
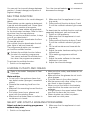
Consumption values
Programme
1)
Energy (kWh) Water (litre)
Auto
0,9 - 1,7 8 - 17
Intensive
1,4 - 1,6 15 - 16
Quick
0,9 9
Eco
1,0 - 1,1 10 - 11
electrolux 11

Programme
1)
Energy (kWh) Water (litre)
Rinse
0,1 4
1) The display shows the programme duration.
The pressure and temperature of the
water, the variations of power supply
and the quantity of dishes can change
these values.
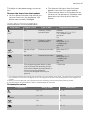
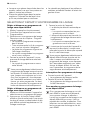
CARE AND CLEANING
To remove and clean the filters
Dirty filters decrease the washing results.
Although the maintenance is very low with
these filters, make a check at intervals and
if necessary, clean them.
1. Turn the filter (A) counterclockwise and
remove it out from filter (B).
A
B
2. Filter (A) has two parts. To disassemble
the filter, pull them apart.
3. Fully clean the parts with water.
4. Put the two parts of the filter (A) togeth-
er and push. Make sure that they as-
semble correctly in each other.
5. Remove the filter (B).
6. Fully clean the filter (B) with water.
7. Put the filter (B) to its initial position.
Make sure that it assembles correctly in
the two guides (C).
C
8. Put the filter (A) into position in filter (B).
Turn the filter (A) clockwise until it locks.
To clean the spray arms
Do not remove the spray arms.
If the holes in the spray arms become clog-
ged, remove remaining parts of soil with a
thin pointed object.
To clean the external surfaces
Clean the external surfaces of the appliance
and control panel with a moist soft cloth.
Only use neutral detergents.
Do not use abrasive products, abrasive
cleaning pads or solvents (acetone).
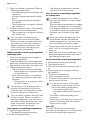
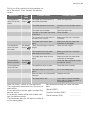
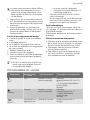
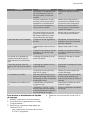
WHAT TO DO IF…
The appliance does not start or stops dur-
ing operation.
12 electrolux

First try to find a solution to the problem (re-
fer to the chart). If not, contact the service
centre.
Malfunction Fault
code
Possible cause Possible solution
The appliance
does not fill with
water.
The display
shows
The water tap is blocked or is
furred with limescale.
Clean the water tap.
The water pressure is too low. Contact your local water author-
ity.
The water tap is closed. Open the water tap.
The filter in the water inlet hose
is blocked.
Clean the filter.
The connection of the water in-
let hose is not correct.
Make sure that the connection
is correct.
The water inlet hose is dam-
aged.
Make sure that the water inlet
hose has no damages.
The appliance
does not drain
the water.
The display
shows
There is a blockage in the sink
spigot.
Clean the sink spigot.
The connection of the water
drain hose is not correct.
Make sure that the connection
is correct.
The water drain hose is dam-
aged.
Make sure that the water drain
hose has no damages.
The anti-flood
device operates.
The display
shows
Close the water tap and contact
the service centre.
The programme
does not start.
The appliance door is open. Close the door correctly.
The mains plug is not connec-
ted in.
Put in the mains plug.
Blow out fuse in the household
fuse box.
Replace the fuse.
The delay start is set. If you want to cancel the delay
start, refer to 'Select and start a
washing programme'.
After the check, switch on the appliance.
The programme continues from the point of
interruption.
If the malfunction shows again, contact the
service centre.
If the display shows other fault codes, con-
tact the service centre.
The necessary data for the service centre is
on the rating plate.
We recommend that you write the data
here:
Model (MOD.) ....................
Product number (PNC) ....................
Serial number (S.N.) ....................
electrolux 13

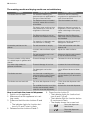
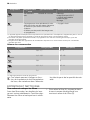
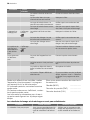
The washing results and drying results are not satisfactory
Problem Possible cause Possible solution
The dishes are not clean. The selected washing pro-
gramme was not applicable for
the type of load and soil.
Make sure that the washing
programme is applicable for the
type of load and soil.
The baskets were not loaded
correctly, water did not touch
all surfaces.
Load the baskets correctly.
The spray arms could not turn
freely because of incorrect ar-
rangement of the load.
Make sure that an incorrect ar-
rangement of the load does not
cause a blockage of the spray
arms.
The filters are dirty or not as-
sembled and installed correctly.
Make sure that the filters are
clean and correctly assembled
and installed.
The quantity of detergent was
not sufficient or missing.
Make sure that the quantity of
detergent is sufficient.
Limescale particles on the
dishes.
The salt container is empty. Fill the salt container with dish-
washer salt.
Incorrect water softener adjust-
ment
Adjust the water softener.
The salt container cap is not
closed correctly.
Make sure that the salt contain-
er cap is closed correctly.
There are streaks, milky stains,
or a bluish layer on glasses and
dishes.
Rinse aid dosage is too high. Decrease the rinse aid dosage.
Dry water drop stains on
glasses and dishes.
Rinse aid dosage is too low. Increase the rinse aid dosage.
The detergent can be the
cause.
Use a different brand of deter-
gent.
The dishes are wet. You have set a washing pro-
gramme without drying phase
or with a decreased drying
phase.
Let the door stay ajar for some
minutes before you remove the
dishes.
The dishes are wet and dull. The rinse aid dispenser is emp-
ty.
Fill the rinse aid dispenser with
rinse aid.
The multitab function is on (this
function automatically deacti-
vates the rinse aid dispenser).
Activate the rinse aid dispense.
How to activate the rinse aid dispenser
1. Switch on the appliance.
2. Make sure that the appliance is in set-
ting mode.
3. Press and hold function buttons B and
C.
– The indicator lights for function but-
tons A, B, and C start to flash.
4. Release function buttons B and C.
5. Press function button B.
– The indicator lights for function but-
tons A and C go off.
– The indicator light for function button
B continues to flash.
– The display shows the current set.
Rinse aid dispenser
deactivated
Rinse aid dispenser
activated
14 electrolux

6. Press function button B again.
– The display shows the new adjust-
ment.
7. Switch off the appliance to keep the op-
eration.
TECHNICAL DATA
Dimensions Width 596 mm
Height 850 mm
Depth 620 mm
Water supply pressure Minimum 0,5 bar (0,05 MPa)
Maximum 8 bar (0,8 MPa)
Water supply
1)
Cold water or hot water maximum 60 °C
Capacity Place settings 12
1) Connect the water inlet hose to a water tap with a 3/4'' thread.
The rating plate on the inner edge of
the appliance door shows the electrical
connection data.
If the hot water comes from alternative
sources of energy, (e.g. solar panels,
photovoltaic panels and aeolian), use a
hot water supply to decrease energy
consumption.
ENVIRONMENT CONCERNS
The symbol on the product or on its
packaging indicates that this product may
not be treated as household waste. Instead
it should be taken to the appropriate
collection point for the recycling of electrical
and electronic equipment. By ensuring this
product is disposed of correctly, you will
help prevent potential negative
consequences for the environment and
human health, which could otherwise be
caused by inappropriate waste handling of
this product. For more detailed information
about recycling of this product, please
contact your local council, your household
waste disposal service or the shop where
you purchased the product.
Recycle the materials with the symbol
.
Put the packaging in applicable containers
to recycle it.
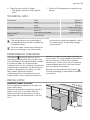
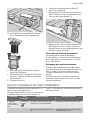
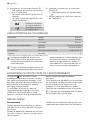
INSTALLATION
Installation under a counter
Put the appliance adjacent to a water tap
and a water drain.
Remove the appliance worktop to install it
under a sink unit or a kitchen worktop.
Make sure that the dimensions of the re-
cess agree with the dimensions in the pic-
ture.
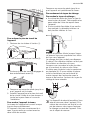
electrolux 15

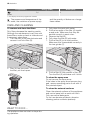
How to remove the appliance worktop
1. Remove the rear screws (1).
2. Pull the worktop from the behind of the
appliance (2).
3. Lift the worktop and move it from the
front slots (3).
4. Use the adjustable feet to adjust the lev-
el of the appliance.
5. Install the appliance under the kitchen
worktop. Do not squash or bend the
water hoses during the installation.
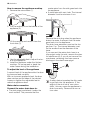
To adjust the level of the appliance
A correct level of the appliance lets the door
to close and seal correctly.
With an incorrect appliance level, the door
does catches on the sides of the cabinet.
Loosen or tighten the adjustable feet to
make the appliance level.
Water drain connection
Connect the water drain hose to:
• The sink spigot and attach it under the
work surface. This prevents that the
waste water from the sink goes back into
the appliance.
• A stand pipe with vent-hole. The internal
diameter must be minimum 4 cm.
max 85 cm
min 40 cm
max 400 cm
Remove the sink plug when the appliance
drains the water to prevent that the water
goes back into the appliance.
The drain hose extension must not be lon-
ger than 2 m. The internal diameter must
not be smaller than the diameter of the
hose.
If you connect the water drain hose to a
trap spigot under the sink, remove the plas-
tic membrane (A). If you do not remove the
membrane, remaining food can cause a
blockage in the drain hose spigot
A safety device impedes the dirty water
to go back into the appliance. If, the
spigot of the sink has a 'non-return
valve', this can cause the appliance to
drain incorrectly. Remove the non-re-
turn valve.
16 electrolux

Electrolux. Thinking of you.
Partagez notre imagination sur www.electrolux.com
SOMMAIRE
Consignes de sécurité 17
Description de l'appareil 20
Bandeau de commande 20
Utilisation de l'appareil 22
Réglage de l'adoucisseur d'eau 22
Utilisation du sel régénérant 23
Utilisation du produit de lavage et du liquide
de rinçage 24
Fonction "Tout en 1" 25
Rangement des couverts et de la vaisselle
25
Sélection et départ d'un programme de
lavage 26
Programmes de lavage 27
Entretien et nettoyage 28
En cas d'anomalie de fonctionnement 29
Caractéristiques techniques 32
En matière de protection de
l'environnement 32
Installation 32
Sous réserve de modifications
CONSIGNES DE SÉCURITÉ
Lire attentivement cette notice d'utilisation
avant l'installation et l'utilisation de l'appa-
reil :
• Pour votre sécurité et la sécurité de votre
appareil.
• Pour protéger l'environnement.
• Pour le bon fonctionnement de l’appareil.
Conservez cette notice d'utilisation avec
l'appareil. Si vous déménagez ou si l'appa-
reil est cédé à une autre personne, assurez-
vous que la notice d'utilisation l'accompa-
gne.
Le fabricant n'est pas responsable des
dommages liés à une mauvaise installation
ou utilisation.
Sécurité des enfants et des personnes
vulnérables
• Cet appareil n'est pas destiné aux en-
fants et aux personnes dont les capaci-
tés physiques, sensorielles ou mentales,
ou le manque d'expérience et de con-
naissance les empêchent d'utiliser l'ap-
pareil sans risque lorsqu'ils sont sans
surveillance, ou en l'absence d'instruc-
tion d'une personne responsable qui
puisse leur assurer une utilisation de l'ap-
pareil sans danger.
• Ne laissez jamais les emballages à la por-
tée des enfants. Risque d'asphyxie ou de
blessure.
• Conservez tous les produits de lavage
dans un endroit sûr. Ne laissez pas les
enfants toucher les produits de lavage.
• Tenez les enfants et les animaux éloignés
de l’appareil lorsque la porte est ouverte.
Consignes générales de sécurité
• Ne modifiez jamais les caractéristiques
de cet appareil. Vous risqueriez de vous
blesser et d'endommager l'appareil.
• Les produits de lavage pour lave-vaisselle
peuvent occasionner des brûlures chimi-
ques au niveau des yeux, de la bouche et
de la gorge. Respectez les instructions
de sécurité du fabricant des produits.
• L'eau de votre lave-vaisselle n'est pas
potable. Des résidus de produits de lava-
ge peuvent subsister dans votre lave-
vaisselle.
• Ne laissez pas la porte de l'appareil ou-
verte sans supervision. Vous éviterez ain-
si les blessures et les chutes sur une por-
te ouverte.
• Ne montez pas ou ne vous asseyez pas
sur la porte ouverte de votre appareil.
Utilisation de l'appareil
• Cet appareil est destiné à un usage do-
mestique normal. Ne l'utilisez jamais à
d'autres fins, pour éviter les dommages
corporels et les dégâts matériels.
electrolux 17

• Ce lave-vaisselle est conçu pour laver la
vaisselle et les ustensiles pouvant être la-
vés en machine.
• Ne placez pas de produits inflammables
ou d'éléments imbibés de produits in-
flammables à l'intérieur, à proximité ou
sur l'appareil. Risque d'explosion ou d'in-
cendie.
• Les couteaux et autres ustensiles pointus
ou tranchants doivent être placés dans le
panier à couverts avec la pointe vers le
bas, ou placez-les en position horizontale
dans le panier supérieur ou dans le pa-
nier à couteaux (tous les modèles ne sont
pas équipés d'un panier à couteaux).
• N'utilisez que des produits (sel, produit
de lavage, liquide de rinçage) spécifiques
pour lave-vaisselle.
• Tout autre type de sel non spécialement
étudié pour être utilisé dans un lave-vais-
selle, en particulier le sel de cuisine, peut
endommager l'adoucisseur d'eau.
• Approvisionnez en sel juste avant de dé-
marrer un programme de lavage. Les
restes de sel dans l'appareil peuvent pro-
voquer de la corrosion ou perforer la cu-
ve de l'appareil.
• Ne remplissez jamais le distributeur de li-
quide de rinçage avec d'autres produits
(agent de nettoyage pour lave-vaisselle,
produit de lavage liquide). Vous risqueriez
d'endommager l'appareil.
• Assurez-vous que les bras d'aspersion
tournent librement avant de lancer le pro-
gramme de lavage.
• De la vapeur chaude peut s'échapper de
l'appareil si vous ouvrez la porte pendant
le déroulement d'un programme de lava-
ge. Risque de brûlures cutanées.
• N'enlevez pas la vaisselle de l'appareil
avant la fin du programme de lavage.
Entretien et nettoyage
• Avant de nettoyer l'appareil, arrêtez-le et
débranchez-le du secteur.
• N'utilisez pas de produits inflammables
ou corrosifs.
• N’utilisez pas l'appareil sans les filtres.
Contrôlez que les filtres sont correcte-
ment installés. Si les filtres ne sont pas
correctement installés, les performances
de lavage pourraient être compromises
et l'appareil endommagé.
• Ne projetez pas d'eau ou de vapeur sur
l'appareil pour son nettoyage. Cela cré-
erait un risque de choc électrique et
pourrait endommager l'appareil.
Installation
• Vérifiez que l'appareil n'a subi aucun
dommage au cours du transport. Ne
branchez jamais un appareil endomma-
gé. Si l'appareil est endommagé, contac-
tez votre magasin vendeur.
• Retirez tous les emballages avant la pre-
mière utilisation.
• Seul un professionnel qualifié doit effec-
tuer l'installation, le raccordement électri-
que et hydraulique, la mise en service et
la maintenance de l'appareil. Vous évite-
rez ainsi des risques mobiliers, immobi-
liers et corporels.
• Pendant l'installation et avant toute inter-
vention sur le lave-vaisselle, il est néces-
saire de débrancher l'appareil.
• Les parois de votre lave-vaisselle ne doi-
vent jamais être percées pour éviter d'en-
dommager les composants hydrauliques
et électriques.
Précautions contre le gel
• N'installez pas l'appareil dans un endroit
où la température ambiante est inférieure
à 0 °C.
• Le fabricant ne pourra être tenu respon-
sable en cas de dommages dus au gel.
Tuyau d’arrivée d’eau
• Utilisez des tuyaux neufs pour raccorder
l'appareil à l'arrivée d'eau. N’utilisez pas
de tuyaux usagés.
• Ne raccordez pas l’appareil à des con-
duites neuves ou qui n’ont pas été utili-
sées depuis longtemps. Laissez couler
l’eau pendant quelques minutes avant de
brancher le tuyau d’arrivée d’eau.
• Veillez à ne pas écraser ou endommager
les tuyaux d'eau lorsque vous installez
l'appareil.
• Assurez-vous que tous les raccords de
tuyaux d’eau sont bien serrés afin d’éviter
les fuites.
• Lorsque vous utilisez l'appareil pour la
première fois, vérifiez que les tuyaux ne
fuient pas.
• Le tuyau d'arrivée d'eau comporte une
soupape de sécurité et une gaine double
comportant un câble électrique interne.
18 electrolux

Le tuyau d'arrivée d'eau est sous pres-
sion uniquement quand l'eau circule. Si le
tuyau fuit, la soupape de sécurité coupe
automatiquement l'eau.
– Faites attention au moment de raccor-
der le tuyau d'arrivée d'eau :
– N'immergez pas le tuyau d'arrivée
d'eau ou la soupape de sécurité
dans l'eau.
– Si le tuyau d'arrivée d'eau ou la sou-
pape de sécurité est endommagé,
débranchez immédiatement la prise
secteur.
– Contactez le service après-vente de
votre magasin vendeur pour rempla-
cer le tuyau d'arrivée d'eau avec
soupape de sécurité.
Avertissement Tension dangereu-
se
Raccordement électrique
• L'appareil doit être relié à la terre.
• Vérifiez que les données électriques figu-
rant sur la plaque signalétique correspon-
dent à celles de votre réseau.
•Utilisez toujours une prise correctement
installée, protégée contre les chocs.
• L'appareil ne doit pas être raccordé à
l'aide d'un prolongateur ou d'une prise
multiple. Risque d'incendie.
• Ne remplacez et ne modifiez jamais le câ-
ble d'alimentation. Contactez votre servi-
ce après-vente.
• Attention à ne pas écraser ou endomma-
ger la prise et le câble d'alimentation situ-
és à l'arrière de l'appareil.
• Assurez-vous que la prise principale est
accessible une fois l'appareil installé.
• Ne tirez jamais sur le câble d'alimentation
électrique pour débrancher l'appareil. Dé-
tachez, pour ce faire, la fiche de la prise
secteur.
Service après-vente
• Toute intervention ou réparation sur votre
appareil doit uniquement être effectuée
par une personne qualifiée. Contactez
votre service après-vente.
• Utilisez exclusivement des pièces d'origi-
ne.
Pour mettre l'appareil au rebut
• Pour éviter tout risque corporel ou maté-
riel :
– Débranchez l'appareil.
– Coupez le câble d'alimentation au ras
de l'appareil et mettez-le au rebut.
– Retirez le loquet de la porte. Ceci évite
d'enfermer un enfant ou un animal
dans l'appareil par accident. Risque
d'asphyxie.
– Mettez l'appareil au rebut dans un cen-
tre local agréé.
Avertissement Les produits de
lavage pour lave-vaisselle sont
dangereux et peuvent être
corrosifs !
• En cas d'accident impliquant ces
produits, contactez immédiatement
un médecin.
• En cas d'ingestion du produit, con-
tactez immédiatement un médecin.
• En cas de projection de produit de
lavage dans les yeux, contactez im-
médiatement un médecin et rincez
abondamment à l'eau.
• Conservez les produits de lavage
pour lave-vaisselle dans un endroit
sûr et hors de portée des enfants.
• Ne laissez pas la porte de l'appareil
ouverte quand celui-ci contient du
produit de lavage.
• Remplissez le distributeur de produit
de lavage juste avant de démarrer un
programme de lavage.
electrolux 19

DESCRIPTION DE L'APPAREIL
7
1 Panier supérieur
2 Sélecteur de dureté de l'eau
3 Réservoir de sel régénérant
4 Distributeur de produit de lavage
5 Distributeur de liquide de rinçage
6 Plaque signalétique
7 Filtres
8 Bras d'aspersion inférieur
9 Bras d'aspersion supérieur
10 Plan de travail
BANDEAU DE COMMANDE
1
2
3
4
5
6
A
B
C
D
E
20 electrolux
La page est en cours de chargement...
La page est en cours de chargement...
La page est en cours de chargement...
La page est en cours de chargement...
La page est en cours de chargement...
La page est en cours de chargement...
La page est en cours de chargement...
La page est en cours de chargement...
La page est en cours de chargement...
La page est en cours de chargement...
La page est en cours de chargement...
La page est en cours de chargement...
La page est en cours de chargement...
La page est en cours de chargement...
La page est en cours de chargement...
La page est en cours de chargement...
-
 1
1
-
 2
2
-
 3
3
-
 4
4
-
 5
5
-
 6
6
-
 7
7
-
 8
8
-
 9
9
-
 10
10
-
 11
11
-
 12
12
-
 13
13
-
 14
14
-
 15
15
-
 16
16
-
 17
17
-
 18
18
-
 19
19
-
 20
20
-
 21
21
-
 22
22
-
 23
23
-
 24
24
-
 25
25
-
 26
26
-
 27
27
-
 28
28
-
 29
29
-
 30
30
-
 31
31
-
 32
32
-
 33
33
-
 34
34
-
 35
35
-
 36
36


Electrolux ESF66070XR Manuel utilisateur
- Catégorie
- Lave-vaisselle
- Taper
- Manuel utilisateur
dans d''autres langues
- English: Electrolux ESF66070XR User manual
Documents connexes
Autres documents
-
Zanussi ZDF6745 Manuel utilisateur
-
-
Aeg-Electrolux F50873M Manuel utilisateur
-
-
Progress PI3570X Manuel utilisateur
-
-
-
AEG F55000W0 Manuel utilisateur