Aeg-Electrolux 2253XXL Le manuel du propriétaire
- Catégorie
- Aspirateurs
- Taper
- Le manuel du propriétaire

Forget bag numbers, s-bag™
is all you need to remember!
s-bag™ is the new standard dustbag especially
created by Electrolux to fit all current Electrolux
cylinder cleaners and virtually all future ones.
s-bag™ is now your password, a simple name that's
so easy to remember you'll get the right bag every
time for your new Electrolux vacuum cleaner. This
unique dustbag offers you a greater level of Hygiene,
thanks to its clever closing system, high filtration and
resistance level.
Beware: use of non original dustbag may adversely
affect your vacuum cleaner.
Choose only original s-bag™ each time!
New! s-bag™ Clinic: ideal for allergy sufferers!
Nouveau! s-bag™ Clinic, idéal pour les personnes
souffrant d’allergies!
Neu! s-bag™ Clinic: ideal für Allergiker!
Nuevo! s-bag™ Clinic: Ideal para personas alérgicas!
Novità! s-bag™ Clinic: ideale per chi soffre di allergie!
Nieuw! s-bag™ Clinic: ideaal voor allergielijders!
Ny! s-bag™ Clinic: idealisk för allergiker!
www.electrolux.com
makes life a little easier

1 2 3 4
11 12 13
14
15 16 17**
18 19
20
5 6 7 8 910
22
21
cordmatic™
s-bag™
ergoshock™

3332
23 24 25 26
27 28
29
30 31
34 35
36 37 38
39 40

2
English 4–5
Thank you for having chosen an Electrolux
Ergospace vacuum cleaner. These Operating
Instructions cover all Ergospace models. This
means that with your specific model, some
accessories/features may not be included. In
order to ensure the best results, always use
original Electrolux accessories. They have been
designed especially for your vacuum cleaner.
Français 6–7
Nous vous remercions d’avoir choisi l’aspi-
rateur Electrolux Ergospace. Ces instructions
d’utilisation portent sur l’ensemble des modè-
les Ergospace. Cela signifie qu’il est possible
que certains accessoires ou fonctions ne soient
pas fournis avec le modèle que vous avez en
votre possession. Afin d’obtenir des performan-
ces optimales, utilisez toujours des accessoires
originaux Electrolux. Ils ont été spécialement
conçus pour votre aspirateur.
Pусский 8–9
Благодарим за покупку пылесоса Electrolux
Ergospace. Данное руководство по
эксплуатации содержит сведения обо
всех моделях серии Ergospace. Поэтому
некоторые функции или принадлежности,
возможно, не входят в комплект
выбранной вами модели. Наилучшие
результаты гарантируются только для
фирменных принадлежностей Electrolux,
разработанных специально для данной
модели пылесоса.
Polski 10–11
Dziękujemy za wybranie odkurzacza Ergospace
firmy Electrolux. Ta instrukcja obsługi dotyczy
wszystkich modeli odkurzacza Ergospace.
Oznacza to, że do konkretnego modelu mogą
nie być dołączone niektóre akcesoria lub
dany model może nie posiadać niektórych
funkcji. Aby uzyskiwać najlepsze rezultaty,
zawsze należy używać oryginalnych akcesoriów
firmy Electrolux. Zostały one zaprojektowane
specjalnie dla tego odkurzacza.
Svenska 12–13
Tack för att du har valt en Electrolux
Ergospace-dammsugare. Den här bruksan-
visningen gäller för alla Ergospace-modeller.
Det innebär att vissa tillbehör eller funktioner
eventuellt inte ingår i just din modell. Se
till att alltid använda originaltillbehör från
Electrolux för att få bästa möjliga resultat.
De har utformats särskilt med avseende på
din dammsugare.
Deutsch 14–15
Vielen Dank, dass Sie sich für einen
Electrolux Ergospace-Staubsauger entschieden
haben. Die Bedienungsanleitung gilt für alle
Ergospace-Modelle. Dies bedeutet, dass Ihr
Modell u. U. bestimmte Zubehörteile nicht
enthält oder bestimmte Eigenschaften nicht
besitzt. Um bestmögliche Ergebnisse zu
erzielen, sollten Sie ausschließlich das speziell
für Ihren Staubsauger entwickelte Original-
Electrolux-Zubehör verwenden.
Español 16–17
Gracias por elegir una aspiradora Electrolux
Ergospace. En este manual de instrucciones
se incluyen todos los modelos Ergospace. Es
posible que su modelo no incluya algunos
accesorios o funciones. Para lograr el mejor
resultado, utilice únicamente los accesorios ori-
ginales de Electrolux que han sido diseñados
específicamente para su aspiradora.
Italiano 18–19
Grazie per avere scelto un aspirapolvere
Electrolux Ergospace. Queste Istruzioni per
l’uso sono valide per tutti i modelli Ergospace.
Questo significa che per il modello specifico
acquistato alcuni accessori o funzionalità
potrebbero non essere inclusi. Per ottenere
sempre i migliori risultati, utilizzare esclusiva-
mente accessori originali Elecrolux, pensati in
modo specifico per questo aspirapolvere.
Português 20–21
Obrigado por ter escolhido um aspirador
Electrolux Ergospace. Estas instruções de
funcionamento abrangem todos os modelos
Ergospace. Isto significa que alguns acessórios/
funções podem não estar incluídos no seu
modelo específico. De modo a assegurar os
melhores resultados utilize sempre acessórios
originais Electrolux. Estes foram concebidos
especialmente para o seu aspirador.
Nederlands 22–23
Dank u dat u gekozen hebt voor een
Ergospace van Electrolux. Deze gebruiksaan-
wijzingen gelden voor alle Ergospace-model-
len. Dit kan betekenen dat uw model niet
beschikt over bepaalde accessoires/functies.
Gebruik voor de beste resultaten altijd origi-
nele Electrolux-accessoires. Deze zijn speciaal
voor uw stofzuiger ontworpen.
Dansk 24–25
Tak, fordi du valgte en Electrolux Ergospace-
støvsuger. Denne brugervejledning gælder for
alle Ergospace-modeller. Det er derfor muligt,
at dele af denne models tilbehør/funktioner
ikke er omhandlet. Brug altid originalt
Electrolux-tilbehør. Så opnår du de bedste
resultater. Tilbehøret er specielt designet til
din støvsuger.
Norsk 26–27
Takk for at du valgte en Electrolux Ergospace-
støvsuger. Denne bruksanvisningen gjelder
alle Ergospace-modeller. Det betyr at ikke alt
tilbehør og alle funksjoner nødvendigvis finnes
på din modell. Bruk alltid orginalt Electrolux-
tilbehør for best resultat. Dette tilbehøret er
konstruert spesielt for din støvsuger.
Suomi 28–29
Kiitos, että olet valinnut Electrolux Ergospace
-pölynimurin. Nämä käyttöohjeet kattavat
kaikki Ergospace-mallit. Tämä tarkoittaa,
että osa lisälaitteista ja toiminnoista ei ehkä
tule ostamasi mallin mukana. Varmista paras
mahdollinen puhdistustulos käyttämällä alku-
peräisiä Electroluxin varusteita. Ne on suun-
niteltu varta vasten tätä imuria varten.
Eesti keeles 30–31
Täname teid Electroluxi Ergospace’i
tolmuimeja valimise eest! Käesolev
kasutusjuhend kehtib kõigi Ergospace’i
mudelite puhul. See tähendab, et teie
konkreetse mudeli puhul ei pruugi kõiki
tarvikuid või funktsioone kaasas olla.
Parimate tulemuste saamiseks kasutage
alati Electroluxi originaaltarvikuid. Need
on loodud just teie tolmuimeja jaoks.
Latviski 32–33
Paldies, ka izvēlējāties putekļsūcēju
Electrolux Ergospace. Šīs ekspluatācijas
instrukcijas attiecas uz visiem Ergospace
modeļiem. Tas nozīmē, ka jūsu iegādātā
modeļa komplektācijā, iespējams, daži
piederumi vai iespējas nav iekļauti. Lai
panāktu optimālu ekspluatāciju, vienmēr
lietojiet oriģinālos Electrolux piederumus.
Tie ir izstrādāti tieši jūsu putekļsūcējam.

3
Lietuviškai 34–35
Dėkojame Jums, kad pasirinkote dulkių
siurblį „Electrolux Ergospace”. Ši
naudojimo instrukcija taikoma visiems
„Ergospace” modeliams. Tai reiškia,
kad konkretaus modelio komplekte
gali nebūti kai kurių priedų. Norėdami
užtikrinti geriausius rezultatus, visada
naudokite tik originalius „Electrolux”
priedus. Jie buvo sukurti specialiai jūsų
dulkių siurbliui.
Български 36–37
Благодарим ви, че избрахте прахосмукачка
Electrolux Ergospace. Настоящите
инструкции за експлоатация се отнасят
за всички модели Ergospace. Това означава,
че за вашия конкретен модел може и да не
намерите описание на някои аксесоари/
опции. Винаги ползвайте оригинални
аксесоари на Electrolux, за да получите
най-добри резултати. Те са разработени
специално за вашата прахосмукачка.
Česky 38–39
Děkujeme, že jste si zvolili vysavač
Electrolux Ergospace. Tyto provozní pokyny
jsou určeny pro všechny modely Ergospace.
To znamená, že některé příslušenství nebo
funkce nemusí být součástí vašeho modelu.
Chcete-li dosahovat nejlepších výsledků,
používejte vždy původní příslušenství značky
Electrolux. Toto příslušenství je určeno
přímo pro váš vysavač.
Hrvatski 40–41
Hvala vam što se odabrali Electrolux
Ergospace usisavač. Ove Upute za rad
odnose se na sve Ergospace modele. To
znači da kod vašeg specifičnog modela
možda nisu uključeni neki dodaci/oprema.
Kako bi osigurali najbolje rezultate, uvijek
koristite originalne Elecrtolux dodatke. Oni
su osmišljeni upravo za vaš usisavač.
Srpski 42–43
Hvala što ste izabrali usisivač Electrolux
Ergospace. Ova uputstva za upotrebu
obuhvataju sve Ergospace modele. To znači
da vaš model možda neće imati neke od
obuhvaćenih funkcija/dodatni pribor. Da
biste obezbedili najbolje rezultate, uvek
koristite originalni Electrolux dodatni
pribor. On je dizajniran specijalno za vaš
usisivač.
Ελληνικά 44–45
Ευχαριστούµε που επιλέξατε την ηλεκτρική
σκούπα Electrolux Ergospace. Οι παρούσες
Οδηγίες Λειτουργίας καλύπτουν όλα τα
µοντέλα Ergospace. Εποµένως, ορισµένα
εξαρτήµατα ή λειτουργίες που αναφέρονται
εδώ ενδέχεται να µη συµπεριλαµβάνονται
στο µοντέλο που διαθέτετε. Για να έχετε
τα καλύτερα δυνατά αποτελέσµατα,
χρησιµοποιείτε πάντα τα γνήσια εξαρτήµατα
Electrolux. Έχουν σχεδιαστεί αποκλειστικά
για τη δική σας ηλεκτρική σκούπα.
Türkçe 46–47
Electrolux Ergospace elektrikli süpürgesini
satın aldığınız için teșekkür ederiz. Bu
Kullanım Talimatları tüm Ergospace
modelleri için geçerlidir. Bu, bahsi geçen
aksesuarların/özelliklerin bazılarının sahip
olduğunuz modelde bulunmayabileceği
anlamına gelmektedir. En iyi sonuçları
elde etmek için daima orijinal Electrolux
aksesuarlarını kullanın. Bu aksesuarlar
elektrikli süpürgeniz için özel olarak
tasarlanmıștır.
Magyar 48–49
Köszönjük, hogy az Electrolux Ergospace
porszívót választotta. Ez az üzemeltetési
tájékoztató az összes Ergospace
típushoz készült. Ez azt jelenti, hogy egy
konkrét típusnál bizonyos tartozékok
hiányozhatnak. A legjobb eredmény
eléréséhez használjon eredeti Electrolux
tartozékokat. Ezeket kimondottan az Ön
porszívótípusához terveztük.
Slovenščina 50–51
Hvala, da ste se odločili za nakup sesalnika
Electrolux Ergospace. Ta navodila služijo
za vse modele Ergospace. Zato ni nujno,
da so k vašemu modelu priloženi prav
vsi deli dodatne opreme. Da bi zagotovili
najboljše rezultate, uporabljajte le
originalne nadomestne dele Electrolux. Ti
so bili narejeni posebej za vaš sesalnik.
Slovensky 52–53
Ďakujeme, že ste si vybrali vysávač
Elektrolux Ergospace. Tento návod na
použitie slúži pre všetky modely vysávačov
Ergospace. To znamená, že váš konkrétny
model nemusí obsahovať všetky doplnky/
funkcie. Najlepšie výsledky dosiahnete pri
používaní originálnych doplnkov Electrolux,
ktoré sú navrhnuté špeciálne pre váš
vysávač.
Română 54–55
Vă mulţumim pentru alegerea unui
aspirator Electrolux Ergospace. Aceste
instrucţiuni de folosire sunt valabile pentru
toate modelele Ergospace. Acest lucru
înseamnă că modelul dumneavoastră
poate să nu cuprindă anumite accesorii
sau funcţii. Pentru a obţine cele mai bune
rezultate, utilizaţi întotdeauna accesorii
originale Electrolux. Acestea au fost
concepute în special pentru aspiratorul
dumneavoastră.

4
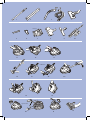
Accessories
1*/** Telescopic tube
2* Extension tubes
3** Hose handle + hose
4** Carpet/hard floor nozzle
5** Crevice nozzle
6 Upholstery nozzle
7 Dust bag, s-bag™
8* Turbo nozzle
9*/** Parquet nozzle
10* Easy clean kit
Safety precautions
Ergospace should only be used by
adults and only for normal vacuuming
in a domestic environment. The vacuum
cleaner features double insulation and
does not need to be earthed.
Never vacuum:
• In wet areas.
• Close to flammable gases etc.
• Without a dust bag s-bag™ to avoid
damaging the cleaner. A safety device
is fitted, which prevents the cover
closing without a s-bag™. Do not
attempt to force the cover shut.
• When housing shows visible signs of
damage
Never vacuum:
• Sharp objects.
• Fluids (this can cause serious damage
to the machine).
• Hot or cold cinders, lit cigarette butts,
etc.
• Fine dust, for example from plaster,
concrete, flour, hot or cold ashes.
The above may cause serious damage to
the motor – damage which is not covered
by the warranty.
Electrical cable precautions:
• A damaged cable should only be
replaced by an authorised Electrolux
service centre.
• Damage to the machine’s cable is not
covered by the warranty.
• Never pull or lift the vacuum cleaner
by the cable.
• Disconnect the plug from the mains
before cleaning or maintenance of the
vacuum cleaner.
• Regularly check that the cable is not
damaged. Never use the vacuum
cleaner if the cable is damaged.
All servicing and repairs must be carried out
by an authorised Electrolux service centre.
Be sure to keep the vacuum cleaner in a dry
place.
Before starting
11 Open the front cover on the machine
and check that the dust bag,
s-bag™, and the motor-/microfilter**
are in place. (See also Replacement
of filter(s))
12* Open the back lid* on the machine
and check that the exhaust filter* is
in place.
13 Insert the hose until the catches
click to engage (press the catches to
release the hose).
3* Insert the hose into the hose handle
until the catches click to engage
(press the catches to release the
hose).
14 Attach the extension tubes* or tel-
escopic tube* to the hose handle
and nozzle by pushing and twisting
together. (Twist and pull apart to dis-
mantle.)
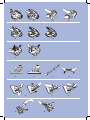
15 Extend the electric cable and connect
it to the mains. The vacuum cleaner
is fitted with a cable winder. Once the
electric cable has been extended, it
stays in that position.
16 To rewind the cable, give it a slight
sharp pull and then release. The
cable will then automatically rewind.
17** Adjust suction power by using the
suction control on the hose handle
17** Models with ON/OFF control: Twist
the control once to the left to start
the vacuum cleaner. Twist the control
once more to the left to turn it off.
17** Models with Power Regulation: Twist
the power control to the right to start
the vacuum cleaner and increase
the suction power. Twist the power
control to the left to decrease suction
power, and further to the left to turn it
off.
18 Practical parking positions (and at
the same time a backsaving feature)
when you pause during cleaning or
when you carry and store the vacuum
cleaner.
19 You can also carry the vacuum clean-
er using the handle on top or on the
lower front edge of the machine.
20* Keep the hose in place while storing
the vacuum cleaner by extending the
elastic bumper cord and placing it
across the hose.
Getting the best results
21 Accessories on board
Upholstery nozzle and crevice nozzle to
be found under foldable cover.
Use the nozzles as follows:
Carpets:
Use the carpet/hard floor nozzle
with the lever* in position (32). Reduce
suction power for small carpets.
Hard floors: Use the carpet/hard floor
nozzle with the lever* in position (33).
Wooden floors: Use the parquet nozzle*
(9).
Upholstered furniture: Use the upholstery
nozzle (6). Curtains, lightweight fabrics,
etc.: Use the upholstery nozzle (6).
Reduce suction power if necessary.
Frames, bookshelves, etc.: Use the Easy
clean kit* (10).
Crevices, corners, etc.: Use the crevice
nozzle (5).
Using the turbo nozzle*
22
Adjust the suction power by opening
or closing the air vent.
Note: Do not use the turbo nozzle on skin
rugs, rugs with long fringes or a pile depth
exceeding 15 mm. To avoid damaging the
carpet, do not keep the nozzle stationary
whilst the brush is rotating. Do not pass the
nozzle across electric cables, and be sure to
switch off the vacuum cleaner immediately
after use.
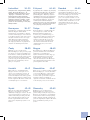
Replacing the dust bag,
s-bag™
23 The dust bag, s-bag™ must be
replaced latest when the indicator
window is completely red. Read with
the nozzle lifted up.
24 Open the front cover and lift out the
insert holding the s-bag™.
25 Pull the cardboard to remove the
s-bag™ from the insert. This automat-
ically seals the s-bag™ and prevents
dust leaking out.
26 Insert a new s-bag™ by pushing the
cardboard right into the end of the
groove in the insert.
27 Put the insert back into the bag
compartment, and close the cover.
Note. Replace the s-bag™ even if it is not
full (it could be obstructed). Also replace after
vacuuming carpet-cleaning powder. Be sure
to use only an original Electrolux dust bags,
s-bag™ Classic, s-bag™ Clinic, s-bag™ long
performance or s-bag™ Anti-odour.
Replacement of the filter(s)
Should be done with every 5th replacement of
the dust bag, s-bag™ Never use the vacuum
cleaner without filter(s).
A Model without exhaust filter has to
be equipped with a combination-filter
(micro-filter + motor-filter, Ref. No.
EF 74).
24 Open the front cover and lift out the
insert holding the s-bag™.
28 Pull the filter(s) holder upwards
until coming away from the groove.
Carefully pull the old, dirty filter(s) out
of the filter holder and replace with a
new filter(s).
29 Reattach the filter holder containing
the new filter(s).
27 Replace the insert holding the
s-bag™ and then close the cover.
B Model with exhaust filter Follow steps
24, 28 and replace old motor-filter
*Certain models only. **Execution depending on model. *** HEPA H12 washable filter can be bought as an option.
English

5
with a new one. Then follow steps
29, 27.
Replacement of the exhaust filter*
There are three types*** of exhaust filter:
• Microfilter* (Ref. No. EF 17)
• Hepa H12* non washable (Ref. No.
EF H12)
• Hepa H12*/*** washable (Ref. No.
EF H12W)
The filters must always be replaced with
new ones and cannot be washed (if not
mentioned).
30 Place your thumbs on the back edge
of the lid and then open the lid by
pulling the handle backwards and
upwards with your index/middle fin-
ger.
31 Lift out the filter. Insert a new filter
and replace the lid as shown.
Cleaning the hose and nozzle
The vacuum cleaner stops automatically if
the nozzle, tube, hose or filters and
s-bag™ becomes blocked. In such cases,
disconnect from mains and allow to cool
for 20-30 minutes. Clear blockage and/or
replace filters and s-bag™ and restart.
Tubes and hoses
34
Use a cleaning strip or similar to clear
the tubes and hose.
3* Hose handle could be dismantled
from hose if cleaning is needed.
35 It may also be possible to remove the
obstruction in the hose by squeez-
ing it. However, be careful in case
the obstruction is caused by glass or
needles caught inside the hose.
Note: The warranty does not cover any dam-
age to the hose caused by cleaning it.
Cleaning the floor nozzle
39
To avoid deterioration of suction
power, frequently clean the carpet/
hard floor nozzle. The easiest way to
clean it is by using the hose handle.
36* Press each wheel-hub and draw away
the wheels. Use the crevice nozzle to
clean the wheel axles. Remove dust-
balls, hair or other objects that may
be entangled. Replace the wheel by
pressing them onto the axles.
37* Larger objects can be accessed by
removing the connection hose from
the nozzle (press the small catches
located on each side and simultane-
ously draw the connection tube out-
wards in an upright position).
38* Remove the object(s) and replace the
connection hose.
Cleaning the turbo nozzle*
40
Disconnect the nozzle from the
vacuum cleaner tube and remove
entangled threads, etc. by snipping
them away with scissors. Use the
hose handle to clean the nozzle.
Troubleshooting
The vacuum cleaner does not start
• Check that the cable is connected to
the mains.
• Check that the plug and cable are not
damaged.
• Check for a blown fuse.
The vacuum cleaner stops
• Check whether the dust bag, s-bag™
is full. If so, replace it with a new one.
• Is the nozzle, tube or hose blocked?
• Are the filters blocked?
Water has entered the vacuum cleaner
It will be necessary to replace the motor
at an authorised Electrolux service cen-
tre. Damage to the motor caused by the
penetration of water is not covered by the
warranty.
Consumer information
Electrolux decline all responsibility for all
damages arising from any improper use
of the appliance or in cases of tampering
with the appliance.
This product is designed with the environ-
ment in mind. All plastic parts are marked
for recycling purposes. For details see our
web site: www.electrolux.com
If you have any comments on the cleaner
or the Instructions for Use booklet please
e-mail us at: floorcar[email protected]
If you can´t find dustbags or accessories to
your Electrolux vacuum cleaner, please visit
our website at www.electrolux.co.uk or call
08706 055 055.
*Certain models only. **Execution depending on model. *** HEPA H12 washable filter can be bought as an option.

6
Accessoires
1*/** Tube télescopique
2* Tubes rigides
3** Poignée du flexible + flexible
4** Suceur pour tapis/sols durs
5** Suceur long pour fentes
6 Petit suceur pour canapés, tentures
7 Sac à poussière s-bag™
8* Turbobrosse
9*/** Brosse pour parquets, sols durs
10* Plumeau électrostatique Easy Clean
Précautions de sécurité
L’aspirateur Ergospace ne doit être utilisé
que par des adultes pour aspirer dans
un environnement domestique normal.
L’aspirateur présente une double isolation
et n’a pas besoin d’être relié à la terre.
Ne jamais aspirer :
• Dans les endroits humides.
• A proximité de gaz inflammables, etc.
• Sans utiliser un sac à poussière
s-bag™ afin de ne pas endommager
l’aspirateur. Un dispositif de sécurité
est intégré afin d’empêcher la
fermeture du couvercle en l’absence
de sac à poussière s-bag™. Surtout
ne pas forcer pour le fermer.
• Lorsque le corps de l’appareil est visi-
blement endommagé.
Ne jamais aspirer :
• D’objets pointus
• Des liquides (cela peut provoquer de
graves dommages à l’appareil).
• Des cendres chaudes ou refroidies,
des mégots de cigarettes incandes-
cents, etc.
• De particules de poussière très fines
issues entre autres du plâtre, du
béton, de la farine ou de cendres.
Les éléments susmentionnés peuvent
provoquer de graves dommages au
moteur. La garantie ne prend pas en
charge ce type de dommages.
Précautions liées au câble électrique :
• Si un câble est endommagé, il ne doit
être remplacé que par un centre ser-
vice agréé Electrolux.
• Les dommages portés au câble de
l’appareil ne sont pas couverts par la
garantie.
• Ne jamais tirer ni soulever l’aspirateur
par le câble.
• Débrancher la prise avant de nettoyer
ou d’entretenir votre aspirateur.
• Vérifier régulièrement que le câble
n’est pas endommagé. Ne jamais
utiliser l’aspirateur si le câble est
endommagé.
Toutes les révisions et réparations doivent être
effectuées par le personnel des centres service
agréés Electrolux. S’assurer de stocker l’aspira-
teur dans un endroit sec.
Avant de commencer
11 Ouvrir le couvercle avant de l’appareil
et vérifier que le sac à poussière
s-bag™ et le filtre moteur /
microfiltre** sont bien en place. (Voir
aussi Remplacement des filtres).
12* Enlever la grille de sortie d’air* et
vérifier que le filtre* est bien en place.
13 Insérer le flexible jusqu’à ce que
les cliquets s’enclenchent (appuyer
sur les cliquets vers l’intérieur pour
dégager le flexible).
3* Introduire le flexible dans la poignée
du flexible jusqu’à ce que les cliquets
s’enclenchent (appuyer sur les
cliquets pour dégager le flexible).
14 Raccorder les tubes rigides* ou le
tube téléscopique* à la poignée du
flexible et au suceur en poussant et
en tournant. (Tourner et tirer en sens
inverse pour les débloquer).
15 Tirer sur le cordon d’alimentation et le
brancher sur le secteur. L’aspirateur
est équipé d’un enrouleur. Une fois
déroulé, le cordon d’alimentation
conserve sa position.
16 Pour enrouler le cordon, exercer
une traction brève et forte, puis
relâcher. Le cordon s’enroule alors
automatiquement.
17** Régler la puissance d’aspiration à
l’aide du réglage de débit d’air sur la
poignée du flexible.
17** Modèles avec commande marche/
arrêt : Tourner la commande vers
la gauche pour mettre en marche
l’aspirateur. Tourner encore la
commande vers la gauche pour
l’arrêter.
17** Modèles avec réglage de puissance :
Tourner le réglage de puissance
vers la droite pour mettre en
marche l’aspirateur et augmenter la
puissance d’aspiration. Tourner le
réglage de puissance vers la gauche
pour réduire la puissance d’aspiration
et continuer à tourner vers la gauche
pour arrêter l’aspirateur.
18 Positions « parking » pratiques (pour
éviter de vous baisser) pour un arrêt
momentané du nettoyage ou pour
faciliter le transport et le rangement
de l’aspirateur.
19 Vous pouvez également transporter
votre aspirateur à l’aide de la poignée
située sur le dessus ou à l’avant de
l’appareil.
20* Immobiliser le flexible pour ranger
l’aspirateur en étirant le cordon
élastique et en le passant sur le
flexible.
Comment obtenir les meilleurs
résultats
21 Accessoires intégrés
Petit suceur pour canapés, tentures et
suceur long pour fentes placés sous le
couvercle.
Utiliser les suceurs de la manière
suivante :
Tapis : Utiliser le suceur tapis/sols durs
avec le levier* en position (32). Il est pré-
férable de réduire la puissance d’aspira-
tion pour les petits tapis.
Sols durs : Utiliser le suceur tapis/sols
durs avec le levier* en position (33).
Sols durs : Utiliser la brosse pour par-
quets, sols durs* (9).
Mobilier recouvert de tissu : Utiliser le
petit suceur (6). Rideaux, tissus légers,
etc. : utiliser le petit suceur (6). Réduire la
puissance d’aspiration si nécessaire.
Cadres, étagères, etc. : Utiliser le plu-
meau éléctrostatique Easy Clean* (10).
Fentes, coins, etc. : Utiliser le suceur pour
fentes (5).
Utiliser la turbobrosse*
22
L’aspiration peut être régulée à partir
de la brosse en ouvrant/fermant la
grille d’aération.
Remarque : ne pas utiliser la turbobrosse sur
des tapis en peau, des tapis avec de longues
franges ou des tapis dont l’épaisseur dépasse
15 mm. Pour éviter d’abîmer le tapis, ne
pas garder le suceur immobile pendant que la
brosse tourne. Ne pas passer le suceur sur les
câbles électriques et veiller à arrêter l’aspirateur
immédiatement après utilisation.
Remplacer le sac à poussière,
s-bag™
23 Le sac à poussière s-bag™ doit
être remplacé au plus tard lorsque
la fenêtre témoin est rouge. La
vérification doit toujours se faire le
suceur soulevé du sol.
24 Ouvrir le couvercle avant et soulever
le support de fixation du sac à
poussière s-bag™.
25 Tirer sur la partie cartonnée pour
retirer le sac à poussière
s-bag™ de son support de fixation.
Le sac à poussière s-bag™ se ferme
alors automatiquement, pour empê-
cher la poussière de se diffuser dans
l’air.
26 Insérer un nouveau sac à poussière
s-bag™ en poussant la partie
cartonnée bien au fond du rail du
support de fixation.
27 Remettre en place le support de
fixation dans le compartiment sac et
fermer le couvercle.
Remarque : remplacer le sac à poussière
s-bag™ même s’il n’est pas plein (il peut
*Suivant les modèles. **Exécution suivant le modèle. *** Filtre lavable HEPA H12 disponible en option.
Français

7
être obstrué). Le remplacer également après
avoir utilisé de la poudre de nettoyage
pour moquettes. S’assurer d’utiliser les sacs
originaux Electrolux s-bag™ Classic, s-bag™
Clinic, s-bag™ Long Performance ou s-bag™
Anti-Odour.
Remplacement des filtres
Effectuer cette opération tous les cinq
remplacements du sac à poussière s-bag™.Ne
jamais utiliser l’aspirateur sans filtre.
1)** Filtre(s) dans le compartiment du
sac à poussière
A
Les modèles sans filtre de sortie
d’air doivent être équipés d’un filtre
combiné (microfiltre + filtre moteur,
Réf. EF 74).
24 Ouvrir le couvercle avant et soulever
le support de fixation du sac à
poussière s-bag™.
28 Tirer vers le haut la grille du filtre pour
le dégager de son logement. Retirer
précautionneusement l’ancien filtre
sale et le remplacer par un filtre neuf.
29 Remettre en place la grille avec le
filtre neuf.
27 Remettre en place le support de
fixation du sac à poussière s-bag™,
puis fermer le couvercle.
B Modèle avec filtre de sortie d’air :
suivre les étapes 24, 28 et remplacer
l’ancien filtre moteur par un nouveau.
Suivre ensuite les étapes 29, 27.
2)* Filtre de sortie d’air
Il existe trois types*** de filtres de sortie
d’air :
• Microfiltre* (Réf. EF17)
• Hepa H12* non lavable (Réf. EF H12)
• Hepa H12*/*** lavable (Réf. EF H12W)
Les filtres doivent toujours être remplacés
par des nouveaux et ne peuvent pas être
lavés (sauf mention contraire).
30 Placer les pouces sur l’extrémité
arrière de la grille de filtre, puis l’ouvrir
à l’aide de l’index ou du majeur en
tirant sur la poignée pour la soulever
vers l’arrière.
31 Soulever le filtre pour l’extraire.
Insérer un filtre neuf et remettre le
couvercle en place comme le montre
le schéma.
Nettoyer le flexible et les
brosses
L’aspirateur s’arrête automatiquement
si le suceur, le tube, le flexible ou les
filtres se bloquent. Si l’un de ces cas se
présente, débrancher l’aspirateur et le
laisser refroidir pendant 20 à 30 minutes.
Retirer ce qui bloque et/ou remplacer les
filtres et le sac à poussière s-bag™, puis
redémarrer.
Tubes et flexibles
34
Utiliser un chiffon pour nettoyer les
tubes et le flexible.
3* Il est possible de démonter la
poignée du flexible pour nettoyage si
nécessaire.
35 Il est également possible d’éliminer
ce qui obstrue le flexible en appuyant
sur ce dernier. Cependant, il faut faire
attention en cas d’obstruction par
du verre ou des aiguilles qui seraient
coincés dans le flexible.
Remarque : La garantie ne couvre pas les
dommages portés au flexible.
Nettoyer le suceur pour sols
39
Pour éviter que la puissance
d’aspiration ne se détériore, nettoyer
régulièrement le suceur tapis/sols
durs. Pour cela, utiliser la poignée du
flexible, comme le montre le schéma.
36* Appuyer sur chaque moyeu et retirer
les roues. Utiliser le suceur pour
fentes pour nettoyer les axes de
roues. Retirer les moutons, boules de
poils ou autres éléments. Remettre les
roues en place en les clipant sur leur
axe.
37* Vous pouvez accéder aux éléments
de plus grande taille en retirant le
coude du suceur (appuyez sur les
petits cliquets situés de chaque
côté tout en tirant sur le tube de
raccordement pour l’extraire, en le
maintenant en position verticale).
38* Retirer le ou les éléments, puis
remettre en place le coude.
Nettoyer la turbobrosse*
40
Enlever la turbobrosse du tube de
l’aspirateur, puis retirer les fils, etc. en
les coupant avec des ciseaux. Utiliser
la poignée du flexible pour nettoyer la
brosse.
Gestion des pannes
L’aspirateur ne se met pas en marche,
vérifier que :
• Le câble est branché.
• La prise et le câble ne sont pas abî-
més.
• Qu’aucun fusible n’a sauté.
L’aspirateur s’arrête, vérifier que :
• Le sac à poussière s-bag™ n’est pas
plein. Si c’est le cas, le remplacer par
un sac à poussière neuf.
• Le suceur, le tube ou le flexible ne
sont pas obstrués.
• Les filtres sont propres.
De l’eau a été aspirée
Il sera nécessaire de remplacer le moteur
auprès d’un Centre Service Agréé
Electrolux. La détérioration du moteur
provoquée par la pénétration d’eau ou de
liquides n’est pas prise en charge par la
garantie.
Informations consommateur
Electrolux décline toute responsabilité
concernant tous les dommages découlant
d’une mauvaise utilisation de l’appareil ou
en cas de modification de l’appareil.
Ce produit est conçu dans le plein respect
de l’environnement. Toutes les pièces en
plastique sont marquées pour faciliter leur
recyclage. Pour plus de détails, visiter
notre site Internet : www.electrolux.fr.
Si vous avez des commentaires ou des
remarques à propos de votre aspirateur,
si vous rencontrez des difficultés pour
l’achat des sacs à poussière ou des
filtres, ou si vous souhaitez connaître
l’adresse du Centre Service Agréé le plus
proche de votre domicile, n’hésitez pas à
nous contacter :
En France :
ELECTROLUX LDA 43, avenue Félix
Louat 60300 SENLIS
www.electrolux.fr
Tél. : 03 44 62 24 24
Télécopieur : 03 44 62 23 94
SNC au capital de 150 000 Euros –
R.C.S. : Senlis B 409 547 585
Si vous rencontrez des difficultés pour l’achat
des sacs à poussière s-bag™, appelez notre
Service Conseil Consommateurs au
03 44 62 24 24 ou connectez-vous :
www.s-bag.net ou www.electrolux.fr
En Belgique :
Service consommateurs :
(B) 02/363.04.44
Service clientèle accessoires et pièces
détachées :
(B) 02/363.05.55
En Suisse :
Electrolux AG, Industriestrasse 10,
5506 Mägenwil
Service consommateurs:
Tél. 0848 / 899 300
Fax 062 / 889 93 10
www.electrolux.ch
Dans le souci d’une constante amélioration
de nos produits, nous nous réservons le droit
d’apporter à leurs caractéristiques toutes
modifications liées à l’évolution technique
(Décret du 24/03/78).
*Suivant les modèles. **Exécution suivant le modèle. *** Filtre lavable HEPA H12 disponible en option.

8
Принадлежности
1*/** Выдвижная трубка
2* Удлинительные трубки
3** Рукоятка шланга + шланг
4** Насадка для ковров/пола
5** Щелевая насадка
6 Насадка для обивки
7 Пылесборник s-bag™
8* Турбонасадка
9*/** Насадка для паркета
10* Комплект универсальных насадок
Правила техники
безопасности
Пылесос Ergospace предназначен
только для обычной уборки жилых
помещений. Не разрешайте детям
пользоваться пылесосом. Пылесос
имеет систему двойной изоляции и не
требует заземления.
Запрещается пользоваться
пылесосом:
• В сырых помещениях;
• Вблизи легковоспламеняющихся
газов и т.п.;
• Без пылесборника s-bag™
во избежание повреждений
пылесоса. Пылесос оснащен
защитным устройством, которое
препятствует закрытию крышки
без пылесборника s-bag™. Не
следует применять силу, закрывая
крышку.
• При уборке помещений,
находящихся в аварийном
состоянии.
Запрещается пользоваться
пылесосом:
• Острых предметов;
• Жидкостей (это может вызвать
серьезные повреждения
устройства);
• Горячей или остывшей золы,
непогашенных окурков и т.п.;
• Тонкодисперсной пыли, например,
от штукатурки, бетона, муки или
золы.
Все это может привести к серьезным
повреждениям двигателя, которые не
подпадают под действие гарантии.
Правила техники безопасности в
отношении кабеля питания
• Замена поврежденного кабеля
должна выполняться только
уполномоченными сервисными
центрами компании Electrolux.
• Повреждения кабеля питания не
подпадают под действие гарантии.
• Не тяните и не поднимайте
пылесос за кабель.
• Отключайте пылесос от сети
питания перед чисткой и
техническим обслуживанием.
• Регулярно проверяйте целостность
кабеля питания. Запрещается
пользоваться пылесосом, если
кабель питания поврежден.
Все работы по обслуживанию и
ремонту должны выполняться только
уполномоченными сервисными центрами
компании Electrolux. Храните пылесос в
сухом месте.
Перед началом работы
11 Откройте переднюю крышку
пылесоса и убедитесь в наличии
пылесборника s-bag™ и
микрофильтра двигателя**. (См.
также раздел «Замена фильтров.)
12* Откройте заднюю крышку*
пылесоса и убедитесь в наличии
выпускного фильтра*.
13 Плотно вставьте шланг до
защелкивания в фиксаторах. (Для
отсоединения шланга следует
нажать на фиксаторы.)
3* Плотно вставьте шланг в рукоятку
шланга до защелкивания
фиксаторов. (Для отсоединения
шланга следует нажать на
фиксаторы.)
14 Подсоедините удлинительные
трубки* или выдвижную трубку*
к рукоятке шланга и наденьте
насадку на трубку. (Для
отсоединения деталей поверните
и потяните их в противоположные
стороны.)
15 Вытяните шнур питания и
подключите его к электросети.
Пылесос оснащен устройством
для сматывания шнура питания.
Шнур, вытянутый на определенную
длину, фиксируется в этом
положении.
16 Для сматывания шнура питания
резко, но не сильно дерните за
него и отпустите. После этого
шнур сматывается автоматически.
17** Отрегулируйте мощность
всасывания с помощью регулятора
всасывания на рукоятке шланга.
17** Модели с переключателем
ON/OFF (ВКЛ./ВЫКЛ.). Чтобы
включить пылесос, отклоните
переключатель в левое
положение. Чтобы выключить
пылесос, повторно отклоните
переключатель в левое
положение.
17** Модели с регулируемой
мощностью. Чтобы включить
пылесос и увеличить мощность
всасывания, поверните регулятор
мощности вправо. Чтобы
уменьшить мощность всасывания
и затем выключить пылесос,
поверните регулятор мощности
влево.
18 При перерывах в работе,
переноске и хранении пылесоса
рекомендуется держать его в
парковочном положении
19 При переноске можно также
воспользоваться ручкой,
расположенной вверху или внизу в
передней части пылесоса.
20* При хранении пылесоса сверните
шланг и зафиксируйте его с
помощью гибкого крепления.
Правила пользования и
рекомендации
21 Принадлежности,
установленные на пылесосе
Насадка для обивки и щелевая насадка
находятся под складной крышкой.
Как пользоваться насадками:
Ковры:
Насадка для ковров/пола,
рукоятка* в положении (32).
При чистке небольших ковров
рекомендуется уменьшить мощность
всасывания.
Пол: Насадка для ковров/пола,
рукоятка* в положении (33).
Паркетный пол: Насадка для паркета*
(9).
Мягкая мебель: Насадка для обивки
(6). Занавески, легкие ткани и т.
п.: насадка для обивки (6). При
необходимости уменьшите мощность
всасывания.
Рамы, книжные полки и т.п.: Комплект
универсальных насадок* (10).
Щели, углы и т.п.: Щелевая насадка
(5).
Как пользоваться турбонасадкой*
22
Отрегулируйте мощность
всасывания путем увеличения
или уменьшения отверстия для
воздуха.
Примечание. Запрещается использовать
турбонасадку для чистки шкур, ковров
с длинной бахромой и ворсом длиннее 15
мм. Во избежание повреждений ковра
при вращении щетки перемещайте
насадку. Запрещается касаться насадкой
электрических проводов. Обязательно
выключайте пылесос сразу по окончании
работы.
Замена пылесборника
s-bag™
23 Замена пылесборника s-bag™
должна выполняться, как только
окно индикатора становится
полностью красным. Показание
индикатора можно проверить,
приподняв насадку.
*Только для отдельных моделей. **Исполнение зависит от модели. ***Моющийся фильтр HEPA H12 можно приобрести отдельно.
Pусский

9
24 Откройте переднюю крышку
и извлеките вставку с
пылесборником s-bag™.
25 Потяните за карман и вытащите
пылесборник s-bag™ из вставки.
При этом пылесборник s-bag™
автоматически запечатывается, а
пыль не разлетается.
26 Вставьте новый пылесборник
s-bag™, протолкнув карман во
вставку до упора.
27 Поместите вставку в отделение для
пылесборника и закройте крышку.
Примечание. Рекомендуется заменять
пылесборник s-bag™, даже если он заполнен
лишь частично (во избежание засорения).
Рекомендуется также заменять
пылесборник после уборки с порошком
для чистки ковров. Пользуйтесь только
фирменными пылесборниками Electrolux:
s-bag™ Classic, s-bag™ Clinic, s-bag™ для
длительного применения или s-bag™
Anti-odour.
Замена фильтров
Должна выполняться при каждой пятой
замене пылесборника s-bag™. Запрещается
пользоваться пылесосом без установленных
фильтров.
A Модели без выпускного фильтра
должны использоваться с
комбинированным фильтром
(микрофильтр + фильтр двигателя,
номер по каталогу EF 74).
24 Откройте переднюю крышку
и извлеките вставку с
пылесборником s-bag™.
28 Потяните держатель фильтров
вверх до извлечения из
паза. Осторожно извлеките
отработанные фильтры из
держателя и установите новые
фильтры.
29 Установите на место держатель с
новыми фильтрами.
27 Установите вставку с
пылесборником s-bag™ и закройте
крышку.
B Для моделей с выпускным
фильтром выполните пункты 24,
28 и замените отработанный
фильтр двигателя на новый. Затем
выполните пункты 29 и 27.
Замена выпускного фильтра*
Предусмотрено три вида*** выпускных
фильтров:
• Microfilter* (Ref. No. EF17)
• Hepa H12* – не предназначенный
для мытья (номер по каталогу
EF H12)
• Hepa H12*/*** – моющийся (номер
по каталогу EF H12W)
Отработанные фильтры должны
заменяться новыми и не
предназначены для мытья (если это не
оговорено).
30 Прижимая большими пальцами
крышку сзади, откройте ее,
потянув ручку назад и вверх
средним или указательным
пальцем.
31 Извлеките фильтр. Вставьте новый
фильтр и закройте крышку как
показано на рисунке.
Чистка шланга и насадок
При засорении насадки, трубки,
шланга, фильтров или пылесборника
s-bag™ пылесос автоматически
прекращает работу. В этом случае
отсоедините пылесос от электросети
на 20-30 минут. Устраните засорение
и/или замените фильтры и
пылесборник s-bag™, а затем снова
включите пылесос.
Трубки и шланги
34
Для чистки трубок и шланга
используйте рейку или подобное
приспособление.
3* Если требуется чистка, рукоятку
можно отсоединить от шланга.
35 Застрявший в шланге мусор
можно также попытаться удалить,
сжимая шланг. Будьте при этом
осторожны, так как засорение
может быть вызвано кусочками
стекла или иголками, застрявшими
внутри шланга.
Примечание. Гарантийное обслуживание
не распространяется на возможные
повреждения шланга при чистке.
Чистка насадки для пола
39
Регулярная чистка насадки
для ковров/пола позволяет
предотвратить снижение
мощности всасывания. Удобнее
всего выполнять чистку насадки с
помощью рукоятки шланга.
36* Снимите колеса, нажав на втулку
колеса. Для чистки колесных осей
воспользуйтесь щелевой насадкой.
Удалите комочки пыли, волосы
и другой запутавшийся мусор.
Установите колеса, с усилием
вставив их на место.
37* Более крупный мусор можно
удалить, сняв насадку с
соединительного шланга (для
этого нажмите на небольшие
защелки, расположенные
с обеих сторон, и потяните
соединительную трубку вверх).
38* Удалите мусор и прикрепите
соединительный шланг.
Чистка турбонасадки*
40
Отсоедините насадку от трубки
пылесоса и удалите запутавшиеся
нити и проч., отрезав их
ножницами. Почистите насадку с
помощью рукоятки шланга.
Устранение неполадок
Пылесос не включается
• Убедитесь в том, что кабель
питания включен в сеть.
• Проверьте, нет ли повреждений
кабеля и штепсельной вилки.
• Проверьте, не перегорел ли
предохранитель.
Пылесос отключился
• Проверьте, не пора ли заменить
пылесборник s-bag™. При
необходимости замените его
новым.
• Не засорилась ли насадка, трубка
или шланг?
• Не засорились ли фильтры?
В пылесос попала вода
В этом случае необходимо обратиться
в уполномоченный сервисный центр
Electrolux для замены двигателя.
Ремонт повреждений двигателя,
вызванных попаданием воды, не
предусматривается условиями
гарантии.
Информация для
потребителя
Фирма Electrolux не несет
ответственности за какие-
либо повреждения, вызванные
неправильным использованием
оборудования или в случае его
подделки.
Настоящее изделие разработано
с мыслью об окружающей среде.
Все пластмассовые части имеют
маркировку с целью их последующей
переработки. Для получения более
подробной информации смотрите наш
Интернет-сайт: www.electrolux.com
Если у Вас есть какие-либо
замечания к данному пылесосу или
Руководству к использованию данной
брошюры, напишите нам по адресу:
Легче всего приобрести пылесборники s-
bag™ и другие принадлежности для Вашего
пылесоса, посетив наш сайт в Интернете:
www.electrolux.com.
*Только для отдельных моделей. **Исполнение зависит от модели. ***Моющийся фильтр HEPA H12 можно приобрести отдельно.

10
Akcesoria
1*/** Rura rozsuwana
2* Rury przedłużające
3** Uchwyt węża i wąż
4** Ssawka do odkurzania dywanów/
twardych powierzchni
5** Ssawka do odkurzania szczelin
6 Ssawka do odkurzania tapicerki
7 Worek na kurz s-bag™
8* Ssawka turbo
9*/** Ssawka do odkurzania twardych
powierzchni
10* Zestaw szczotek do kurzu
Wskazówki dotyczące
bezpieczeństwa
Odkurzacz Ergospace powinien być
używany tylko przez osoby dorosłe
wyłącznie do odkurzania w warunkach
domowych. Odkurzacz ma podwójną
izolację i dlatego nie musi być uziemiony.
Nigdy nie odkurzaj:
• Mokrych powierzchni.
• W pobliżu gazów łatwopalnych itp.
• Bez założenia worka na kurz
s-bag™, co może doprowadzić do
uszkodzenia odkurzacza. Odkurzacz
jest wyposażony w urządzenie
zabezpieczające, które uniemożliwia
jego zamknięcie bez worka na kurz
s-bag™. Nie zamykaj obudowy na
siłę.
• Gdy na obudowie widoczne są ślady
uszkodzeń.
Nigdy nie odkurzaj:
• Przedmiotów z ostrymi krawędziami.
• Płynów (może to spowodować
poważne uszkodzenie odkurzacza).
• Żarzących się lub zimnych popiołów,
tlących się niedopałków itp.
• Drobnego pyłu, np. gipsu, gruzu,
cementu, mąki lub popiołu.
Mogą one poważnie uszkodzić silnik
– uszkodzenie takie nie jest objęte
gwarancją.
Wskazówki dotyczące bezpieczeństwa
w obchodzeniu się z przewodami
elektrycznymi:
• Uszkodzony przewód może zostać
wymieniony tylko przez autoryzowany
serwis firmy Electrolux.
• Uszkodzenie przewodu odkurzacza
nie jest objęte gwarancją.
• Nigdy nie ciągnij ani nie podnoś
odkurzacza, trzymając go za przewód
zasilający.
• Przed czyszczeniem lub konserwacją
odkurzacza należy wyjąć wtyczkę z
gniazdka.
• Regularnie sprawdzaj, czy przewód
zasilający nie jest uszkodzony. Nie
korzystaj z odkurzacza, gdy przewód
zasilający jest uszkodzony.
Naprawy mogą być wykonywane wyłącznie
przez personel autoryzowanych zakładów
serwisowych firmy Electrolux.
Odkurzacz należy przechowywać w suchym
miejscu.
Przed uruchomieniem
odkurzacza
11 Otwórz pokrywę przednią urządzenia
i sprawdź, czy worek na kurz s-bag™
oraz filtr silnika/mikrofiltr** znajdują
się na swoich miejscach (zapoznaj się
też z sekcją Wymiana filtrów).
12* Otwórz pokrywę tylną urządzenia i
sprawdź, czy filtr wylotowy* znajduje
się na swoim miejscu.
13 Włóż wąż, aż usłyszysz odgłos
zatrzaśnięcia zapadki. (Aby go wyjąć
– wciśnij zapadkę.)
3* Włóż wąż do uchwytu, aż usłyszysz
odgłos zatrzaśnięcia zapadki (aby go
wyjąć, wciśnij zapadkę).
14 Podłącz rury przedłużające* lub
rurę rozsuwaną do uchwytu węża
i ssawki, wpychając i przekręcając
je razem. (W celu ich rozłączenia
przekręć je i rozciągnij).
15 Wyciągnij przewód zasilający i
podłącz go do gniazdka. Odkurzacz
jest wyposażony w zwijacz przewodu
zasilającego. Po wyciągnięciu
przewód zasilający pozostaje w tej
pozycji.
16 Aby zwinąć przewód, należy go
lekko szarpnąć, a następnie puścić.
Przewód zostanie automatycznie
zwinięty.
17** Wyreguluj siłę ssania za pomocą
regulatora ssania na uchwycie węża.
17** Modele z pokrętłem ON/OFF:
przekręć pokrętło o jeden obrót w
lewo, aby uruchomić odkurzacz.
Przekręć je o kolejny obrót w lewo,
aby go wyłączyć.
17** Modele z regulacją siły ssania:
przekręć regulator siły w prawo, aby
uruchomić odkurzacz i zwiększyć
siłę ssania. Przekręć regulator w
lewo, aby zmniejszyć siłę ssania;
przekręcenie w lewo o kolejny obrót
spowoduje wyłączenie odkurzacza.
18 Praktyczne pozycje postojowe
(oszczędzające jednocześnie plecy)
podczas przerwy w odkurzaniu
oraz ułatwiające przenoszenie i
przechowywanie odkurzacza.
19 Można także przenosić odkurzacz,
używając uchwytu w górnej lub
dolnej przedniej części urządzenia.
20* Podczas przechowywania
odkurzacza, wąż należy
przymocować elastycznym
przewodem.
Uzyskanie najlepszych
rezultatów
21 Akcesoria dołączone do odkurzacza
Ssawka do odkurzania tapicerki i ssawka
do odkurzania szczelin pod składaną
pokrywą.
Stosuj ssawki takie, jak podano
poniżej:
Dywany: Korzystaj ze ssawki do
odkurzania dywanów/twardych
powierzchni z dźwignią* przestawioną
w położenie (32). W przypadku małych
dywaników zmniejsz siłę ssania.
Podłogi twarde: Korzystaj ze ssawki
do odkurzania dywanów/twardych
powierzchni z dźwignią* przestawioną w
położenie (33).
Podłogi drewniane: Korzystaj ze ssawki
do odkurzania twardych powierzchni* (9).
Meble tapicerowane: Używaj ssawki do
odkurzania tapicerki (6). Zasłony, lekkie
tkaniny itp.: używaj ssawki do odkurzania
tapicerki (6). Zmniejsz siłę ssania w razie
potrzeby.
Ramy, regały itp.: Używaj zestawu
szczotek do kurzu* (10).
Szczeliny, narożniki itp.: Użyj ssawki do
szczelin (5).
Zastosowanie ssawki turbo*
22
Wyreguluj siłę ssania, otwierając lub
zamykając odpowietrznik.
Uwaga: nie stosuj ssawki turbo do
dywanów futrzanych, dywanów z długimi
frędzlami czy z głębokością przekraczającą
15 mm. Aby uniknąć uszkodzenia dywanu,
nie trzymaj ssawki w jednym miejscu przy
obracających się szczotkach. Nie przesuwaj
ssawki po przewodach elektrycznych.
Wyłącz odkurzacz natychmiast po
zakończeniu odkurzania.
Wymiana worka na kurz
s-bag™
23 Worek na kurz s-bag™ powinien
zostać wymieniony najpóźniej,
gdy okienko wskaźnika jest całe
czerwone. Należy to sprawdzać przy
podniesionej ssawce.
24 Otwórz pokrywę przednią urządzenia
i podnieś wkładkę podtrzymującą
worek s-bag™.
25 Aby wyjąć worek na kurz s-bag™
z wkładki, pociągnij za kartonowe
usztywnienie. W ten sposób worek na
kurz s-bag™ zostanie automatycznie
uszczelniony, co zapobiegnie
wydostawaniu się kurzu na zewnątrz.
26 Włóż nowy worek s-bag™, wpychając
kartonowe usztywnienie do
końcowego rowka wkładki.
27 Włóż wkładkę do komory worka i
zamknij pokrywę.
*Tylko niektóre modele. **Wykonanie zależy od modelu. ***Opcjonalnie można kupić filtr zmywalny HEPA H12
Polski

11
Uwaga: wymień worek na kurz s-bag™,
nawet jeżeli nie jest pełny (może być
zablokowany). Wymień go również
po czyszczeniu dywanów środkami
sproszkowanymi. Używaj wyłącznie
oryginalnych worków na kurz - s-bag™
Classic, s-bag™ Clinic, s-bag™ Long
Performance lub s-bag™ Anti-odour.
Wymiana filtrów
Powinna być przeprowadzona po każdej
piątej wymianie worka na kurz s-bag™. Nie
korzystaj z odkurzacza bez filtrów.
A Model bez filtra wylotowego powinien
być wyposażony w filtr kombinowany
(mikrofiltr + filtr silnika, numer części
zamiennej EF 74).
24 Otwórz pokrywę przednią urządzenia
i podnieś wkładkę podtrzymującą
worek s-bag™.
28 Pociągnij uchwyt filtra do góry, aż
wysunie się z prowadnicy. Ostrożnie
wyciągnij stary, brudny filtr z uchwytu
i wymień go na nowy filtr.
29 Zamontuj ponownie uchwyt wraz z
nowym filtrem.
27 Włóż na miejsce wkładkę
podtrzymującą worek s-bag™, a
następnie zamknij pokrywę.
B Model z filtrem wylotowym: wykonaj
kroki 24, 28 i wymień stary filtr silnika
na nowy. Następnie wykonaj kroki 29 i
27.
Wymiana filtra wylotowego*
Istnieją trzy rodzaje*** filtra wylotowego:
• Mikrofiltr* (numer części zamiennej
EF17)
• Filtr niezmywalny Hepa H12* (numer
części zamiennej EF H12)
• Filtr zmywalny Hepa H12*/*** (numer
części zamiennej EF H12W)
Filtry należy zawsze wymieniać na nowe i
nie wolno ich zmywać (jeżeli nie ma takiej
informacji).
30 Umieść kciuki pod dolną krawędzią
pokrywy, a następnie otwórz pokrywę,
pociągając uchwyt do tyłu i w górę
palcem środkowym/wskazującym.
31 Wyjmij filtr. Włóż nowy filtr i załóż z
powrotem pokrywę, jak pokazano na
rysunku.
Czyszczenie węża i ssawek
Odkurzacz zatrzymuje się automatycznie,
jeżeli ssawka, rura, wąż, filtr lub
worek s-bag™ zablokują się. W takich
przypadkach odłącz odkurzacz od
sieci i pozostaw go na 20-30 minut w
celu ostygnięcia. Usuń blokadę oraz/
lub wymień filtr(y) i worek s-bag™, a
następnie uruchom ponownie.
Rury i węże
34
Do czyszczenia rur i węży zastosuj
taśmę czyszczącą lub coś
podobnego.
3* Uchwyt węża można odczepić
od węża, jeżeli potrzebne jest
czyszczenie.
35 Usunięcie blokady węża może być
możliwe przez wyciskanie. Trzeba
jednak zachować ostrożność w
przypadku, gdy blokada może być
spowodowana przez szkło czy szpilki
wessane do środka węża.
Uwaga: Gwarancja nie obejmuje żadnych
uszkodzeń węża spowodowanych jego
czyszczeniem.
Czyszczenie ssawki do odkurzania
twardych powierzchni
39 W celu uniknięcia pogorszenia jakości
ssania, czyść ssawkę do dywanów/
twardych powierzchni tak często jak
to możliwe. Najprostszym sposobem
czyszczenia jest wykorzystanie
uchwytu węża.
36* Naciśnij piastę w każdym z kół i
zdejmij koła. Za pomocą ssawki do
szczelin wyczyść osie kół. Usuń zbitki
kurzu, włosy lub inne przedmioty,
które powodują blokadę. Zamontuj
koła z powrotem, wciskając je na
osie.
37* Dostęp do większych obiektów
można uzyskać, zdejmując ssawkę
z węża przyłączeniowego (naciśnij
małe zapadki umieszczone po obu
stronach i równocześnie pociągnij
rurę przyłączeniową na zewnątrz ku
górze).
38* Usuń przedmiot(y) i włóż z powrotem
wąż przyłączeniowy.
Czyszczenie ssawki turbo*
40
Odłącz ssawkę od rury odkurzacza
oraz usuń splątane nitki itp. za
pomocą nożyczek. Do czyszczenia
ssawki wykorzystaj uchwyt węża.
Usuwanie usterek
Nie można uruchomić odkurzacza
• Sprawdź, czy przewód zasilający jest
podłączony do gniazdka.
• Sprawdź, czy wtyczka lub przewód
zasilający są uszkodzone.
• Sprawdź bezpiecznik.
Odkurzacz zatrzymuje się
• Sprawdź, czy worek na kurz s-bag™
jest pełny. Jeśli tak, wymień go na
nowy.
• Czy ssawka, rura lub wąż są
zablokowane?
• Czy filtry są zablokowane?
Do odkurzacza dostała się woda
Konieczna będzie wymiana silnika w
autoryzowanym zakładzie serwisowym
firmy Electrolux. Uszkodzenie silnika
wywołane dostaniem się do niego wody
nie jest objęte gwarancją.
Informacje dla klienta
Produkt ten został zaprojektowany z myślą
o ochronie środowiska. Wszystkie części
z tworzyw sztucznych są oznakowane dla
celów wtórnego wykorzystania. Bliższe
informacje można znaleźć na naszej
stronie w Internecie: www.electrolux.com
Jeżeli masz jakiekolwiek uwagi na temat
odkurzacza, czy instrukcji użytkowania
zawartych w tej broszurce prosimy wysłać
e-mail na adres: floorcare@electrolux.com
Najłatwiej nabyć worek s-bag™ oraz
inny osprzęt do odkurzacza, składając
wizytę na naszej stronie w Internecie:
www.electrolux.com.
*Tylko niektóre modele. **Wykonanie zależy od modelu. ***Opcjonalnie można kupić filtr zmywalny HEPA H12

56

57

58
För dig som bor
i Sverige
Dammsugarpåsar direkt hem
i brevlådan
Om du har problem att hitta påsar till din
Electrolux dammsugare, kan du prenumerera
på s-bag™ Classic eller s-bag™ Clinic
dammsugarpåsar. De passar nästan alla
nyare dammsugare från Electrolux, Volta.
Prenumerera, så har du alltid fräscha påsar till
hands.
Du väljer själv hur ofta du vill få nya påsar
direkt i brevlådan och vilken typ av påse du
föredrar. Den hygieniska och supereffektiva
Classic. Eller Clinic som filtrerar bort upp till
99 procent av pollen, sporer, damm, katt- och
kvalsterallergener och andra hälsorisker.
Prenumerera för enkelhetens skull
Med vår prenumerationsservice kan du lägga
tid på annat än att leta efter rätt påse till just
din dammsugare.
I varje förpackning finns ett motorfilter och
sex påsar Classic eller fyra påsar Clinic.
Hur ofta?
Hur många påsar ett hushåll förbrukar varierar
förstås. Men några riktmärken är:
Hushåll utan barn 5-7 påsar/år
Barnfamilj, lägenhet 7-10 påsar/år
Barnfamilj, villa 10-14 påsar/år
Har du husdjur? Räkna med ytterligare ett par
påsar per år.
Beställ så här
Ring eller beställ via Internet. Din första
prenumeration kommer ca en vecka från det
att vi fått din beställning.
www.electrolux.se
Telefon: 036-38 79 55
Pour les personnes
résidant en France
Avec Electrolux toutes les facilités
pour faire vos achats
Si vous rencontrez des difficultés pour l’achat
de vos sacs aspirateur s-bag™ ou de vos acces-
soires, Electrolux vous propose de les com-
mander en toute liberté et sans vous déplacer,
en utilisant Internet ou en nous téléphonant…
C’est à vous de choisir.
Ainsi, vous aurez toujours, à disposition, le
sac à poussière d’origine Electrolux, de haute
qualité et parfaitement adapté. Votre com-
mande vous sera livrée directement à votre
domicile sous un délai de 10 jours environ.
s-bag™ et s-bag™ Clinic
Le nouveau standard de sac à poussière.
s-bag™ Clinic est idéal pour les personnes
souffrant d’allergies !
Filtre
Lavable et réutilisable, il arrête les plus fines
particules (99,5 % des particules de 0,06
micron).
Kit animal
Pour venir à bout des poils de chiens
et chats.
Kit Auto
Pour une voiture toujours impeccable.
www.electrolux.fr
Téléphone : 03 44 62 24 24
For those living
in United Kingdom
Electrolux makes it easy to buy
just what you want
If you are experiencing difficulties obtaining
original s-bag™ bag or other Electrolux
accessories, you can purchase our products
direct on the Internet or by telephone. Your
order will be delivered direct to your home in
about a week.
s-bag™ and s-bag™ Clinic
The new standard dust bag especially created
to make your life easier. The s-bag™ Clinic is
ideal for allergy sufferers!
Washable and reusable filter which stops even
the very finest dust particles (99.5% of particles
down to 0.06 micron).
The animal kit
Removes dog and cat hairs from even the
tightest corners.
The car kit
For an immaculate car every time.
www.electrolux.co.uk
Telephone: 08706 055 055

59
Für diejenigen, die in
Deutschland leben
Mit Electrolux wird der Einkauf zur
reinen Spielerei
Sollten Sie Schwierigkeiten haben, s-bag™
und sonstiges original Electrolux-Zubehör zu
erhalten, können Sie unsere Produkte direkt
über das Internet oder telefonisch beziehen.
Die Zustellung Ihrer Bestellung erfolgt innerh-
alb etwa einer Woche zu Ihnen nach Hause.
s-bag™ und s-bag™ Clinic
Der neue, Electrolux Standard Staubsauger-
beutel, der Ihnen den Alltag erleichtert.
s-bag™ Clinic ist der ideale Beutel für jeden,
der unter Allergien leidet!
Das waschbare und wiederverwendbare Filter
hält auch feinste Partikel zurück (99,5 % der
bis zu 0,06 Mikron kleinen Partikel).
Haustier-Set
Entfernt Hunde- und Katzenhaare auch aus
den hintersten Winkeln.
Auto-Set
Damit Ihr Wagen immer blitzsauber ist.
www.electrolux.de
Telefon: 01801 20 30 60
-
 1
1
-
 2
2
-
 3
3
-
 4
4
-
 5
5
-
 6
6
-
 7
7
-
 8
8
-
 9
9
-
 10
10
-
 11
11
-
 12
12
-
 13
13
-
 14
14
-
 15
15
-
 16
16
-
 17
17


Aeg-Electrolux 2253XXL Le manuel du propriétaire
- Catégorie
- Aspirateurs
- Taper
- Le manuel du propriétaire