Iomega Portable Hard Drive Le manuel du propriétaire
- Catégorie
- Disques durs externes
- Taper
- Le manuel du propriétaire

Portable Hard Drive
Quick Start Guide
Guide de démarrage rapide
Schnellstart-Handbuch
Guida di installazione rapida
Guía de instrucciones rápidas
Guia de uso rápido
Snel aan de slag
Snabbstartguide
Introduktion
Hurtigreferanse
Pikaopas
Stručná příručka
Wprowadzenie
Gyors útmutató
Οδηγός γρήγορης εκκίνησης
*

If you have a problem, we can help. Please do NOT return this product to the
store!
Your answer is on the web. Visit our award-winning web support site
www.iomega.com. Select your region, then select Support & Downloads.
Si vous avez un problème, nous pouvons vous aider. NE RENVOYEZ PAS ce
produit au magasin !
Votre réponse est sur le Web. Site Web d’assistance primé www.iomega.com.
Sélectionnez votre région puis Support et téléchargements.
Si tiene algún problema, podemos ayudar. ¡Por favor, NO devuelva este
producto a la tienda!
Su respuesta está en la web. Destacado sitio Web de atención al cliente
www.iomega.com. Elija su región y luego seleccione asistencia y descarga.
Wenn Sie ein Problem haben, können wir Ihnen helfen. Bringen Sie dieses
Produkt NICHT zu Ihrem Händler zurück!
Ihre Antwort steht im Netz. Preisgekrönte Support-Website
www.iomega.com
.
Wählen Sie Ihr Gebiet aus und klicken Sie auf Support und Downloads.
In caso di problemi, noi possiamo fornire assistenza. NON restituire questo
prodotto al rivenditore!
La risposta è sul Web. Sito di supporto sul Web premiato www.iomega.com.
Selezionare la propria regione, quindi scegliere Supporto tecnico e download.

Contents • Matières • Inhalt • Sommario • Contenido • Conteúdo
Inhoudsopgave
• Innehåll • Indhold • Innhold • Sisällys
Tartalom
• Obsah • Spis treści • Περιεχόµενα
Quick Install. . . . . . . . . . . . . . . . . . . . . . . . . . . . . . . . . . . . . . . . . . . . . . . . . . . . . . . . . . . . . . . . . . . . . 4
Installation rapide
. . . . . . . . . . . . . . . . . . . . . . . . . . . . . . . . . . . . . . . . . . . . . . . . . . . . . . . . . . . . . . . . 4
Schnellstart
. . . . . . . . . . . . . . . . . . . . . . . . . . . . . . . . . . . . . . . . . . . . . . . . . . . . . . . . . . . . . . . . . . . . . 5
Installazione rapida . . . . . . . . . . . . . . . . . . . . . . . . . . . . . . . . . . . . . . . . . . . . . . . . . . . . . . . . . . . . . .
5
Instalación rápida
. . . . . . . . . . . . . . . . . . . . . . . . . . . . . . . . . . . . . . . . . . . . . . . . . . . . . . . . . . . . . . . . 5
Instalação rápida . . . . . . . . . . . . . . . . . . . . . . . . . . . . . . . . . . . . . . . . . . . . . . . . . . . . . . . . . . . . . . . .
5
Snelle installatie . . . . . . . . . . . . . . . . . . . . . . . . . . . . . . . . . . . . . . . . . . . . . . . . . . . . . . . . . . . . . . . . .
6
Snabbinstallation . . . . . . . . . . . . . . . . . . . . . . . . . . . . . . . . . . . . . . . . . . . . . . . . . . . . . . . . . . . . . . . .
6
Hurtig installation
. . . . . . . . . . . . . . . . . . . . . . . . . . . . . . . . . . . . . . . . . . . . . . . . . . . . . . . . . . . . . . . . 7
Rask installering . . . . . . . . . . . . . . . . . . . . . . . . . . . . . . . . . . . . . . . . . . . . . . . . . . . . . . . . . . . . . . . . .
7
Pika-asennus
. . . . . . . . . . . . . . . . . . . . . . . . . . . . . . . . . . . . . . . . . . . . . . . . . . . . . . . . . . . . . . . . . . . . 7
Gyors telepítés . . . . . . . . . . . . . . . . . . . . . . . . . . . . . . . . . . . . . . . . . . . . . . . . . . . . . . . . . . . . . . . . . .
7
Rychlá instalace
. . . . . . . . . . . . . . . . . . . . . . . . . . . . . . . . . . . . . . . . . . . . . . . . . . . . . . . . . . . . . . . . . . 8
Skrócona instrukcja insalacji . . . . . . . . . . . . . . . . . . . . . . . . . . . . . . . . . . . . . . . . . . . . . . . . . . . . . . .
8
Γρήγορη
εγκατάσταση . . . . . . . . . . . . . . . . . . . . . . . . . . . . . . . . . . . . . . . . . . . . . . . . . . . . . . . . . . . . 9
Using the Drive . . . . . . . . . . . . . . . . . . . . . . . . . . . . . . . . . . . . . . . . . . . . . . . . . . . . . . . . . . . . . . . . .
10
Utilisation du lecteur
. . . . . . . . . . . . . . . . . . . . . . . . . . . . . . . . . . . . . . . . . . . . . . . . . . . . . . . . . . . . .11
Das Laufwerk verwenden . . . . . . . . . . . . . . . . . . . . . . . . . . . . . . . . . . . . . . . . . . . . . . . . . . . . . . . . .
12
Uso dell’unità . . . . . . . . . . . . . . . . . . . . . . . . . . . . . . . . . . . . . . . . . . . . . . . . . . . . . . . . . . . . . . . . . .
13
Uso de la unidad . . . . . . . . . . . . . . . . . . . . . . . . . . . . . . . . . . . . . . . . . . . . . . . . . . . . . . . . . . . . . . . .
14
Troubleshooting . . . . . . . . . . . . . . . . . . . . . . . . . . . . . . . . . . . . . . . . . . . . . . . . . . . . . . . . . . . . . . . .
10
Dépannage . . . . . . . . . . . . . . . . . . . . . . . . . . . . . . . . . . . . . . . . . . . . . . . . . . . . . . . . . . . . . . . . . . . .
11
Fehlerbehebung . . . . . . . . . . . . . . . . . . . . . . . . . . . . . . . . . . . . . . . . . . . . . . . . . . . . . . . . . . . . . . . .
12
Risoluzione dei problemi . . . . . . . . . . . . . . . . . . . . . . . . . . . . . . . . . . . . . . . . . . . . . . . . . . . . . . . . .
13
Solución de problemas
. . . . . . . . . . . . . . . . . . . . . . . . . . . . . . . . . . . . . . . . . . . . . . . . . . . . . . . . . . .14

4
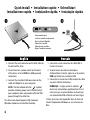
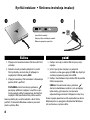
1. Connect the mini connector on the USB cable to
the back of the drive.
2. If your drive has a power switch on the back
of the drive, set it to
USB for a USB-powered
connection
.
3. Connect the standard USB connectors on the
cable to USB ports on your computer.
NOTE: The line labeled with the
symbol
provides auxiliary power and is needed only if
your computer does not provide sufficient USB
power through the other line.
The drive icon should appear in My Computer,
Windows Explorer or on the Mac Desktop.
Quick Install • Installation rapide • Schnellstart
Installazione rapida • Instalación rápida • Instalação rápida
1. Connectez le mini-connecteur du câble USB à
l’arrière du lecteur.
2. Si votre lecteur possède un interrupteur
d’alimentation à l’arrière, réglez-le sur la position
USB
pour établir une connexion USB.
3. Connectez les connecteurs USB standard du câble
aux ports USB de l’ordinateur.
REMARQUE : La ligne portant le symbole
fournit une alimentation supplémentaire et n’est
nécessaire que si votre ordinateur ne fournit pas
une alimentation USB suffisante via l’autre ligne.
L’icône du lecteur doit apparaître dans le Poste de
travail, l’Explorateur Windows ou sur le bureau du
Mac.
Some models only.
Certains modèles uniquement.
Nur bestimmte Modelle.
Solo alcuni modelli.
Sólo algunos modelos.
Alguns modelos somente.

5
1. Collegare il connettore mini al cavo USB situato sul
retro dell’unità.
2. Se l’unità è dotata di interruttore di alimentazione
nella parte posteriore, impostarlo su
USB
per una
connessione alimentata tramite USB.
3. Collegare alle porte USB del computer i connettori
USB standard presenti sul cavo.
NOTA: l’estremità contrassegnata dal simbolo
fornisce un alimentatore ausiliario, il cui
impiego è necessario solo se il computer non
eroga alimentazione USB sufficiente tramite l’altra
estremità a disposizione.
L’icona dell’unità verrà visualizzata in Risorse
del computer, Esplora risorse di Windows o sulla
Scrivania Mac.
1. Schließen Sie den Ministecker des USB-Kabels an
der Rückseite des Laufwerks an.
2. Wenn sich auf der Rückseite Ihres Laufwerks ein
Netzschalter befindet, stellen Sie diesen auf
USB
,
um eine USB-gestützte Verbindung herzustellen.
3. Schließen Sie die Standardstecker des USB-Kabels
an den USB-Anschlüssen des Computers an.
HINWEIS: Der Kabelstrang mit dem Symbol
liefert zusätzlichen Strom. Es wird nur dann benötigt,
wenn der Computer nicht genügend Spannung über
die andere USB-Leitung liefert.
Das Laufwerksymbol wird im Arbeitsplatz, dem
Windows Explorer oder auf dem Mac-Desktop
angezeigt.
1. Conecte el mini conector al cable USB en la parte
posterior de la unidad.
2. Si su unidad tiene un interruptor de alimentación
en la parte posterior, ajústelo en la posición
USB
para la conexión alimentada por USB.
3. Conecte los conectores USB estándar del cable a
los puertos USB del ordenador.
NOTA: La línea etiquetada con el símbolo
proporciona alimentación auxiliar y sólo se
requiere si el ordenador no proporciona suficiente
alimentación USB a través de la otra línea.
El icono de la unidad aparecerá en Mi PC, el
Explorador de Windows o en el escritorio de Mac.
1. Conecte o mini conector no cabo USB na parte
posterior da unidade.
2. Caso haja uma chave de alimentação na parte
traseira da sua unidade, configure-a para
USB
para obter uma conexão com alimentação USB.
3. Conecte os conectores USB padrão do cabo a
portas USB do computador.
NOTA: A linha rotulada com o símbolo fornece
alimentação auxiliar e é necessária somente se
o seu computador não fornecer alimentação USB
suficiente através da outra linha
.
O ícone da unidade aparecerá em Meu computador,
no Windows Explorer ou na mesa do Mac.

6
1. Anslut minikontakten till USB-kabeln på
baksidan av enheten.
2. Ställ in strömbrytaren på baksidan av enheten
till
USB om du vill ha en USB-driven anslutning.
3. Anslut kabelns USB-kontakter till USB-portarna
på datorn.
OBS! Den ledning som är märkt med symbolen
tillför extra elström, och behövs bara om
datorn inte kan tillhandahålla tillräcklig energi
genom USB-ledningen.
Ikonen för drivenheten ska visas i Den här datorn,
Windows Utforskaren eller på skrivbordet på en Mac.
1. Sluit de miniconnector van de USB-kabel aan
op de achterkant van de drive.
2. Als bij uw drive de aan/uit-schakelaar zich aan
de achterkant van de drive bevindt, stelt u deze
in op
USB voor een USB-stroomaansluiting.
3. Sluit de standaard USB-connectoren van de
kabel aan op USB-poorten van de computer.
OPMERKING: De kabel met de symbool
levert hulpstroom en wordt alleen gebruikt als
uw computer onvoldoende USB-stroom levert
via de andere kabel.
Het pictogram van de drive verschijnt normaal in
Deze computer, Windows Verkenner of op het Mac-
bureaublad.
Snelle installatie • Snabbinstallation • Hurtig installation
Rask installering • Pika-asennus • Gyors telepítés
Alleen op bepaalde modellen.
Endast vissa modeller.
Kun for nogle modeller.
Kun enkelte modeller.
Vain tietyissä malleissa.
Csak néhány modell esetében érvényes.

7
1. Tilslut ministikket på USB-kablet på drevets
bagside.
2. Hvis drevet har en afbryder på bagsiden, skal
den indstilles til
USB, hvis du har en USB-
tilslutning
.
3. Slut USB-standardstikkene på kablet til USB-
portene på computeren.
BEMÆRK! Linjen med symbolet giver
ekstra strøm og er kun nødvendigt, hvis
computeren ikke leverer tilstrækkelig USB-
strøm gennem den anden linje.
Drevikonet skulle blive vist i Denne computer,
Windows Stifinder eller på Mac-skrivebordet.
1. Kytke USB-kaapelin miniliitin kiintolevyaseman
takana olevaan liitäntään.
2. Jos aseman takaosassa on virtakytkin, käännä
se
USB-asentoon käyttäessäsi USB-yhteyttä.
3. Kytke kaapelin USB-liittimet tietokoneen USB-
portteihin.
HUOMAUTUS: Symbolilla
merkityn
liitännän kautta laitteessa voi käyttää lisävirtaa.
Sitä tarvitaan vain, jos laite ei saa tietokoneesta
riittävästi USB-virtaa muun liitännän kautta.
Aseman kuvakkeen tulee näkyä Windowsin
Resurssienhallinnan Oma tietokone -ikkunassa tai
Macintosh-tietokoneen työpöydällä.
1. Koble til minikontakten på USB-kabelen på
baksiden av stasjonen.
2. Hvis datamaskinen har en strømbryteren på
baksiden av stasjonen, stiller du den på
USB
for USB-drevne forbindelser.
3. Koble USB-standardkontaktene på kabelen til
USB-porter på datamaskinen.
MERK: Ledningen som er merket med symbolet
sørger for reservestrøm og er bare
nødvendig hvis datamaskinen ikke gir tilstrekkelig
USB-strøm via den andre ledningen.
Stasjonsikonet skal vises i Min datamaskin,
Windows Utforsker eller på Mac-skrivebordet.
1. Csatlakoztassa az USB kábelen lévő mini
csatlakozót a meghajtó hátoldalához.
2. Amennyiben a meghajtójának hátoldalán
egy főkapcsoló található, az USB kapcsolat
érdekében állítsa
USB értékre.
3. A kábel standard USB csatlakozóit illessze
számítógépe USB portjaiba.
MEGJEGYZÉS: A szimbólummal jelölt
csatlakozó segédenergiát (áramot) biztosít, és csak
akkor van rá szükség, ha számítógépe nem ad elég
USB energiát a másik csatlakozón keresztül.
A Sajátgép, Windows Intéző vagy Mac Desktop
ablakban meg kell jelennie a meghajtó ikonjának.

8
Rychlá instalace • Skrócona instrukcja insalacji
1. Připojte mini konektor kabelu USB do zadní části
jednotky.
2.
Pokud má vaše jednotka přepínač na zadní
části jednotky, nastavte ho při připojení s
napájením USB do polohy
USB
.
3. Připojte konektory USB na kabelu k libovolným
portům USB v počítači.
POZNÁMKA:
Vodič označený symbolem
poskytuje přídavné napájení a využívá se jen
tehdy, pokud počítač neposkytuje dostatečné
napájení USB prostřednictvím jiného vodiče.
Ikona jednotky by se měla zobrazit v okně Tento
počítač, Průzkumník Windows nebo na pracovní
ploše systému Mac.
1. Podłącz mini złącze kabla USB do tylnej części
napędu.
2.
Jeśli z tyłu dysku znajduje się włącznik
zasilania, ustaw go w pozycji
USB, aby dysk był
zasilany za pomocą połączenia USB
.
3. Podłącz standardowe złącza kabla USB do portów
USB w komputerze.
UWAGA:
Przewód oznaczony symbolem
dostarcza dodatkowe zasilanie i jest wymagany
tylko wtedy, gdy komputer nie zapewnia
odpowiedniego zasilania USB poprzez inną linię.
Ikona napędu powinna zostać wyświetlona w oknie
Mój komputer, w programie Eksplorator Windows
lub na biurku w systemie Mac.
Jen některé modely.
Dotyczy tylko niektórych modeli.
Μόνο σε ορισµένα µοντέλα.

9
Ελληνικά
1. Συνδέστε το µίνι βύσµα του καλωδίου USB στο πίσω µέρος της µονάδας δίσκου.
2. Αν η συσκευή σας έχει διακόπτη τροφοδοσίας στο πίσω µέρος της, ρυθµίστε τον στη θέση
USB, αν
κάνετε σύνδεση µε τροφοδοσία µέσω USB
.
3. Συνδέστε τα τυπικά βύσµατα USB του καλωδίου σε υποδοχές USB στον υπολογιστή.
ΣΗΜΕΙΩΣΗ: Η γραµµή που επισηµαίνεται µε το σύµβολο παρέχει βοηθητική τροφοδοσία και
η σύνδεσή της είναι απαραίτητη µόνο αν ο υπολογιστής σας δεν παρέχει επαρκή τροφοδοσία
USB
µέσω της άλλης γραµµής.
Το εικονίδιο του δίσκου πρέπει να εµφανίζεται στο φάκελο Ο Υπολογιστής µου (My Computer), στην
Εξερεύνηση των Windows (Windows Explorer) ή στο γραφείο του Mac.
Γρήγορη εγκατάσταση

10
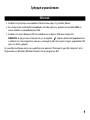
Using the Drive
Disconnecting the Drive
CAUTION! To prevent data loss, do not disconnect the drive during data transfer (activity light flashing).
PC Users: Use the Safely Remove Hardware icon in the Windows taskbar before disconnecting.
Mac Users: Drag the disk icon to the Trash (Eject) icon on the Mac Desktop.
Troubleshooting
Drive not detected
Try the following suggestions if the drive does not appear in My Computer, Windows
®
Explorer, or on the
Mac
®
Desktop.
• Try restarting your computer.
• Make sure you are using the USB cable that came with the drive. Make sure both lines of the USB cable
are connected to the computer.
• Try changing the connections to different USB ports.
• Make sure the switch on the back of the drive is set to
USB. (Some models only.)
See the support area on www.iomega.com for additional troubleshooting help.
Complete User’s Manual
A complete user’s manual in HTML format is available on the Support & Downloads area on
www.iomega.com
.

11
Utilisation du lecteur
Déconnexion du lecteur
ATTENTION ! Pour éviter toute perte de données, ne déconnectez pas le lecteur pendant un transfert de
données (voyant d’activité clignotant).
Utilisateurs de PC : Utilisez l’icône Retirer le périphérique en toute sécurité dans la barre des tâches
Windows avant la déconnexion.
Utilisateurs de Mac : Faites glisser l’icône du disque sur l’icône Corbeille (Ejecter) sur le bureau Mac.
Dépannage
Lecteur non détecté
Effectuez les opérations suivantes si le lecteur ne s’affiche pas dans le Poste de travail, l’Explorateur
Windows
®
ou le bureau Mac
®
.
• Redémarrez votre ordinateur.
• Assurez-vous que vous utilisez le câble USB fourni avec le lecteur. Assurez-vous que les deux lignes du
câble USB sont connectées à l’ordinateur.
• Essayez des modifier les connexions vers des ports USB différents.
• Assurez-vous que l’interrupteur à l’arrière du lecteur est réglé sur
USB. (Certains modèles uniquement.)
Visitez la section d’assistance sur le site www.iomega.com pour une aide supplémentaire au dépannage.
Guide complet de l’utilisateur
Un guide de l’utilisateur complet est disponible au format HTML dans la section Support et Téléchargement
du site www.iomega.com
.

12
Das Laufwerk verwenden
Trennen des Laufwerks vom System
ACHTUNG! Um Datenverluste zu vermeiden, trennen Sie das Laufwerk während der Datenübertragung (wenn
Aktivitätsanzeige blinkt) nicht vom Computer.
PC-Benutzer: Klicken Sie vor dem Herausziehen der Stecker auf das Symbol Hardware sicher entfernen in
der Windows-Taskleiste.
Mac-Benutzer: Ziehen Sie das Datenträgersymbol zum Symbol Papierkorb (Auswerfen) auf dem Mac-
Schreibtisch.
Fehlerbehebung
Laufwerk nicht gefunden
Falls das Laufwerk im Windows
®
Explorer unter Arbeitsplatz oder auf dem Mac
®
-Schreibtisch nicht gefunden
wird, versuchen Sie folgende Lösungsansätze:
• Führen Sie probeweise einen Neustart des Computers durch.
• Vergewissern Sie sich, dass Sie das mit dem Laufwerk gelieferte USB-Kabel verwenden. Stellen Sie
sicher, dass beide Leitungen des USB-Kabels am Computer angeschlossen sind.
• Verwenden Sie andere USB-Anschlüsse, sofern vorhanden.
• Achten Sie darauf, dass der Schalter an der Geräterückseite auf
USB steht. (Nur bestimmte Modelle.)
Weitere Tipps zur Fehlerbehebung erhalten Sie im Supportbereich unter www.iomega.com
.
Benutzerhandbuch (vollständig)
Im Bereich “Support & Downloads” unter www.iomega.com steht Ihnen ein vollständiges
Benutzerhandbuch im HTML-Format zur Verfügung.

13
Uso dell’unità
Scollegamento dell’unità
ATTENZIONE! Per evitare che si verifichino perdite di dati, non scollegare l’unità durante il trasferimento di
informazioni (la spia verde di attività lampeggia).
Utenti PC: Prima di scollegare l’unità, usare l’icona Rimozione sicura dell’hardware nella barra delle
applicazioni di Windows.
Utenti Mac: Trascinare l’icona del disco nel Cestino (Espelli) sulla Scrivania Mac.
Risoluzione dei problemi
Nessuna unità rilevata
Se l’icona dell’unità non compare in Risorse del computer, Esplora risorse di Windows
®
o sulla Scrivania
Mac
®
, procedere come descritto qui di seguito.
• Provare a riavviare il computer.
• Assicurarsi di utilizzare il cavo USB fornito in dotazione con l’unità. Accertarsi che le due estremità del
cavo USB siano collegate al computer.
• Provare a cambiare le connessioni utilizzando le diverse porte USB.
• Assicurarsi che l’interruttore posto sul retro dell’unità sia impostato su
USB. (Solo alcuni modelli.)
Per ulteriore assistenza nella risoluzione dei problemi, visitare l’area del supporto tecnico all’indirizzo
www.iomega.com
.
Manuale completo dell’utente
Il manuale completo dell’utente è disponibile nell’area Assistenza e download all’indirizzo
www.iomega.com
.

14
Uso de la unidad
Desconexión de la unidad
PRECAUCIÓN: Para impedir la pérdida de datos, no desconecte la unidad durante el proceso de
transferencia de datos (la luz de actividad parpadea).
Usuarios de PC: Utilice el icono Quitar hardware con seguridad de la barra de tareas de Windows antes de
proceder a la desconexión.
Usuarios de Mac: Arrastre el icono del disco al icono Papelera (Expulsar) del escritorio de Mac.
Solución de problemas
No se detecta la unidad
Siga las recomendaciones que se muestran a continuación si la unidad no aparece en Mi PC, en el
Explorador de Windows
®
o en el escritorio de Mac
®
.
• Pruebe a reiniciar el ordenador.
• Asegúrese de que está utilizando el cable USB incluido con la unidad y compruebe que las dos líneas
del cable USB están conectadas al ordenador.
• Pruebe a realizar las conexiones en puertos USB distintos.
• Asegúrese de que el interruptor de la parte posterior de la unidad se ha establecido como
USB. (Sólo
algunos modelos.)
Consulte el área de asistencia de www.iomega.com para obtener ayuda adicional sobre la solución de
problemas.
Completo manual del usuario
El manual de usuario completo en formato HTML está disponible en el área de asistencia y descargas del
sitio www.iomega.com
.

15
Limited Warranty • Garantie Limitée
Eingeschränkte Garantie • Garanzia limitata
Garantía limitada • Garantia limitada
Iomega warrants this hardware product to be free from defects in materials and workmanship for the warranty period. This
non-transferable, limited warranty is only to you, the first end-user purchaser. The warranty begins on the date of purchase
and lasts for a period of one (1) year for product purchased in the Americas, the Asia-Pacific region, or non-European
Union nations in Europe, the Middle East, or Africa; ninety (90) days for Iomega reconditioned products purchased in these
regions; or, two (2) years for product purchased by an end-user in member nations of the European Union.
This warranty does not apply to: (a) Iomega software products; (b) expendable components such as fuses or bulbs; or
(c) third party products, hardware or software, supplied with the warranted product. Iomega makes no warranty of any
kind on such products which, if included, are provided “AS IS.” This warranty also excludes damage caused by accident,
misuse, abuse, use of non-Iomega approved media, exposure of media to excessive magnetic fields, or external
environmental causes.
Your sole and exclusive remedy for a covered defect is repair or replacement of the defective product, at Iomega’s sole
option and expense (shipping may be charged), and Iomega may use new or refurbished parts or products to do so. The
replaced part/product will be warranted for the remainder of the original warranty or three (3) months from the date
of shipment of such parts/products, whichever is longer. If Iomega is unable to repair or replace a defective product,
your alternate exclusive remedy shall be a refund of the original purchase price The above is Iomega’s entire obligation
to you under this warranty. IN NO EVENT SHALL IOMEGA BE LIABLE FOR INDIRECT, INCIDENTAL, CONSEQUENTIAL OR
SPECIAL DAMAGES OR LOSSES, INCLUDING LOSS OF DATA, USE, OR PROFITS EVEN IF IOMEGA HAS BEEN ADVISED OF THE
POSSIBILITY OF SUCH DAMAGES. In no event shall Iomega’s liability exceed the original purchase price of the drive or
the media disk. Some jurisdictions do not allow the exclusion or limitation of incidental or consequential damages, so
the above limitation or exclusion may not apply to you.
Obtaining Warranty Service
You must notify Iomega within the warranty period to receive warranty service. Just as technology and market conditions
vary, Iomega’s specific customer support policies (including fees for services) and procedures change over time. To
obtain information about Iomega’s current policies or warranty service, please visit our website at www.iomega.com/
supportpolicy.html or write to: Iomega Customer Service, 4059 South 1900 West, Roy, UT 84067. Contact Information
for Iomega Customer Service in Europe can be obtained on our Support website at www.iomega.com/europe/support. If
your product is eligible for warranty service, you will be required to return it to Iomega, along with proper identification,
a return authorization number obtained from the Iomega website or provided by the Iomega representative, and proof

16
of purchase. Iomega will not protect, recover, or return data during warranty service so you should duplicate your data
before shipment.
Limitations
THE ABOVE WARRANTY IS EXCLUSIVE AND IN LIEU OF ALL OTHER WARRANTIES, EXPRESS OR IMPLIED. To the extent
permitted by applicable law, IOMEGA SPECIFICALLY DISCLAIMS ANY IMPLIED WARRANTIES, INCLUDING ANY IMPLIED
WARRANTY OF MERCHANTABILITY OR FITNESS FOR A PARTICULAR PURPOSE. Any implied warranty required by applicable
law shall be limited in duration to the express warranty term. Some jurisdictions do not allow disclaimers of implied
warranties or limitations on how long an implied warranty lasts, so the above limitation may not apply to you. This
warranty gives you specific legal rights and you may also have other rights that vary from jurisdiction to jurisdiction.
Any suit for breach of any warranty on your Product must be filed within one (1) year of the first date the suit could have
been brought.
Iomega garantit que ce produit est exempt de tout vice de fabrication ou de malfaçon pendant toute la période de garantie.
Cette garantie limitée n’est pas transférable et ne s’applique qu’à l’utilisateur final. La garantie est effective à partir de
la date d’achat et reste ensuite valable pendant une période de un (1) an à compter de cette même date sur le continent
américain, dans la région Asie-Pacifique, dans les pays d’Europe non membres de l’Union Européenne, au Moyen-Orient
ou en Afrique, quatre-vingt dix (90) jours pour les produits remis en état achetés dans les pays ou régions précédemment
cités ou deux (2) ans dans le cadre d’un achat effectué par un utilisateur final au sein de l’Union Européenne.
Cette garantie ne s’applique pas : (a) aux produits logiciels Iomega, (b) aux composants consommables comme les
fusibles ou les ampoules ou (c) aux produits tiers, matériel ou logiciel, fournis avec le produit sous garantie. Iomega
ne garantit en aucun cas ces produits qui, si inclus, sont fournis “EN L’ETAT”. Sont exclus les dommages causés par un
accident, une mauvaise utilisation, un usage abusif, l’utilisation de supports non fournis ou non approuvés par Iomega,
une exposition excessive des supports à un champ magnétique ou tout autre cause externe d’origine naturelle.
Votre seul et unique recours en cas de défaut reconnu est la réparation ou le remplacement du produit défectueux, aux
frais et à la discrétion de Iomega (l’expédition pourra vous être facturée). Iomega se réserve le droit d’utiliser des pièces
ou produits neufs ou remis en état pour procéder à la réparation. L’élément/produit remplacé sera garanti pendant le
reste de la garantie d’origine ou, au maximum, trois (3) mois à dater de l’expédition desdits éléments/produits. S’il
s’avère que Iomega est dans l’impossibilité de réparer ou remplacer un produit défectueux, votre seul recours sera
le remboursement du prix d’achat initial. L’obligation de garantie de Iomega envers vous se limite aux éléments cités
précédemment. EN AUCUN CAS IOMEGA NE POURRA ETRE TENUE POUR RESPONSABLE DES DOMMAGES OU PERTES
INDIRECTS, ACCESSOIRES OU SPECIAUX, Y COMPRIS LA PERTE DE DONNEES, DE L’IMPOSSIBILITE D’UTILISATION OU DE
PROFIT ET CE MEME SI IOMEGA A ETE AVERTIE DE L’EVENTUALITE DE TELS DOMMAGES. En aucun cas la responsabilité
de Iomega ne pourra s’étendre au-delà du prix d’achat initial de l’appareil ou du support. Certaines juridictions ne
reconnaissent pas l’exclusion ou la limitation des dommages accessoires ou indirects. De ce fait, les limitations ou les
exclusions énoncées ci-dessus peuvent ne pas être applicables dans votre cas.

17
Obtention d'une intervention en garantie
Pour bénéficier des services sous garantie, vous devez en avertir Iomega pendant la période de garantie. A l’image des
technologies et des conditions du marché, les procédures et les politiques d’Iomega en matière d’assistance clientèle
(notamment la tarification des services) sont susceptibles de varier dans le temps. Afin d’obtenir des informations
pertinentes sur les politiques actuelles ou sur le service de garantie d’Iomega, veuillez visiter notre site Web www.
iomega.com/supportpolicy.html ou nous écrire à l’adresse suivante : Iomega Customer Service, 4059 South 1900 West,
Roy, UT 84067. Les coordonnées des services d’assistance clientèle d’Iomega en Europe se trouvent sur notre site Web
d’assistance, www.iomega.com/europe/support. Si votre produit peut bénéficier du service sous garantie, vous devrez
le retourner à Iomega, avec son identification détaillée, un numéro d’autorisation de retour obtenu à partir de notre site
Web ou fourni par votre représentant Iomega et une preuve d’achat. Iomega ne protège, ne récupère ni ne retourne des
données pendant le service de garantie ; assurez-vous donc de copier vos données avant d’expédier le matériel.
Limites
LA PRESENTE GARANTIE EST EXCLUSIVE ET TIENT LIEU DE TOUTE AUTRE GARANTIE, EXPRESSE OU IMPLICITE. Dans les
limites de la législation en vigueur, IOMEGA DECLINE TOUTE GARANTIE IMPLICITE, Y COMPRIS TOUTE GARANTIE IMPLICITE
DE COMMERCIALISATION OU D’ADAPTATION A UN USAGE PARTICULIER. Toute garantie implicite requise par la législation
en vigueur sera limitée dans le temps à la durée de la garantie expresse. Certaines juridictions ne reconnaissent pas la
déclaration de non-responsabilité des dommages accessoires ou indirects. De ce fait, les limitations ou les exclusions
énoncées ci-dessus peuvent ne pas être applicables dans votre cas. Cette garantie vous donne certains droits
spécifiques, mais vous pouvez également bénéficier de droits supplémentaires en fonction de la législation de votre
état. Toute poursuite pour défaut de garantie sur votre produit devra être déposée dans un délai d’un an à compter du
premier jour à partir duquel la poursuite peut être engagée.
Iomega garantiert, dass dieses Hardwareprodukt während des Garantiezeitraums keine Material- oder
Herstellungsfehler aufweist. Diese nicht übertragbare, eingeschränkte Garantie gilt ausschließlich für Sie als ersten
Käufer sowie Endnutzer dieses Produkts. Der Garantiezeitraum beginnt mit dem Erwerbsdatum und hat für folgenden
Zeitraum Gültigkeit: ein (1) Jahr für Produkte, die in Nord-/Süd-/Mittelamerika, im asiatisch-pazifischen Raum oder
nicht-EU-Ländern innerhalb Europas, dem Nahen Osten oder Afrika erworben wurden; neunzig (90) Tage für alle
bei Iomega überholten Produkte, die in diesen Regionen erworben wurden; zwei (2) Jahre für Produkte, die von
Endverbrauchern in EU-Mitgliedsstaaten erworben wurden.
Von dieser Garantie sind ausgenommen: (a) Iomega-Softwareprodukte; (b) Verschleißteile wie Sicherungen oder
Glühbirnen; bzw. (c) Drittanbieterprodukte, -Hardware oder -Software, die im Lieferumfang des Produkts enthalten
waren, auf das sich die Garantie bezieht. Iomega übernimmt hinsichtlich dieser Art von Produkten keinerlei Garantie.
Falls diese im Lieferumfang enthalten sind, werden sie mit Abbedingen der Haftung für einen bestimmten Zweck zur
Verfügung gestellt. Ausgenommen sind Schäden, die durch Unfall, Zweckentfremdung, unsachgemäße Verwendung,
Verwendung von Medien, die nicht von Iomega zur Verfügung gestellt oder anerkannt wurden, Kontakt der Medien mit
übermäßig starken Magnetfeldern oder Umwelteinflüssen verursacht wurden.

18
Ihr einziges und ausschließliches Rechtsmittel im Falle eines abgedeckten Defekts ist die Reparatur bzw. der Ersatz
des defekten Produkts; die diesbezügliche Entscheidung sowie die anfallenden Kosten liegen ausschließlich bei
Iomega (abgesehen von evtl. anfallenden Frachtkosten). Iomega kann hierzu neue oder gebrauchte Teile oder
Produkte verwenden. Für das ersetzte Teil/Produkt wird für den Rest der ursprünglichen Garantiefrist oder für
drei (3) Monate ab Versanddatum solcher Teile/Produkte Garantie geleistet, je nachdem, welcher Zeitraum länger
ist. Falls die Reparatur bzw. der Ersatz eines defekten Produkts durch Iomega nicht möglich ist, ist Ihr einziges
alternatives Rechtsmittel die Erstattung des ursprünglichen Kaufpreises. Die obigen Angaben stellen sämtliche
Verpflichtungen dar, die Iomega Ihnen gegenüber im Rahmen dieser Garantie hat. IOMEGA IST UNTER KEINEN
UMSTÄNDEN HAFTBAR FÜR MITTELBARE SCHÄDEN, SCHADENSERSATZ FÜR AUFWENDUNGEN BEI VERTRAGSERFÜLLUNG,
FOLGESCHÄDEN ODER SPEZIELLE SCHÄDEN BZW. VERLUSTE, EINSCHLIESSLICH DATENVERLUST, NUTZUNGSAUSFALL
SOWIE BETRIEBSUNTERBRECHUNG, SELBST WENN IOMEGA AUF DIE MÖGLICHKEIT SOLCHER SCHÄDEN HINGEWIESEN
WURDE. Die Haftung von Iomega übersteigt keinesfalls den ursprünglichen Kaufpreis des jeweiligen Laufwerks oder
Datenträgers. Gemäß einiger Rechtsprechungen ist der Ausschluss bzw. die Einschränkung von Schadensersatz für
Aufwendungen bei Vertragserfüllung bzw. Folgeschäden nicht zulässig, sodass die oben genannten Ausschluss- bzw.
Einschränkungsklauseln für Sie möglicherweise nicht relevant sind.
Inanspruchnahme des Garantieservice
Um den Garantieservice in Anspruch nehmen zu können, müssen Sie Iomega innerhalb der Garantiefrist
benachrichtigen. Die spezifischen Kundendienstrichtlinien von Iomega (einschließlich der Servicegebühren) sowie
die entsprechenden Vorgehensweisen können sich aufgrund der veränderlichen Technologie und Marktbedingungen
ändern. Wenn Sie gerne mehr über die aktuellen Kundendienstangebote oder Garantieleistungen von Iomega erfahren
möchten, besuchen Sie unsere Website unter www.iomega.com/supportpolicy.html. Sie können sich auch unter
folgender Adresse schriftlich mit Iomega in Verbindung setzen: Iomega Customer Service, 4059 South 1900 West, Roy,
UT 84067. Informationen zur Kontaktaufnahme mit dem Kundendienst von Iomega finden Sie auf unserer Kundendienst-
Website unter www.iomega.com/europe/support. Wenn für Ihr Produkt Garantieanspruch besteht, müssen Sie es mit
ordnungsgemäßer Identifikation, der über die Iomega Website oder vom Vertreter zur Verfügung gestellten Nummer der
Rückgabeberechtigung sowie dem Kaufnachweis an Iomega zurück senden. Im Rahmen des Garantieservice werden
Daten von Iomega weder geschützt noch wiederhergestellt oder zurückgegeben, weshalb es sich empfiehlt, Ihre Daten
vor dem Versand zu duplizieren.
Einschränkungen
BEI DER OBIGEN GARANTIE HANDELT ES SICH UM EINE AUSSCHLIESSLICHE GARANTIE, DIE ANSTELLE ALLER WEITEREN
GARANTIEN, AUSDRÜCKLICHER ODER STILLSCHWEIGENDER NATUR, GÜLTIGKEIT HAT. Innerhalb des gesetzlich zulässigen
Rahmens SCHLIESST IOMEGA AUSDRÜCKLICH JEGLICHE STILLSCHWEIGENDEN GARANTIEN AUS, EINSCHLIESSLICH
JEGLICHER STILLSCHWEIGENDER GARANTIE HINSICHTLICH DER MARKTGÄNGIGKEIT BZW. DER EIGNUNG FÜR EINEN
BESTIMMTEN ZWECK. Sämtliche stillschweigenden Garantien, die laut geltendem Recht gewährt werden müssen, sind
auf die Laufzeit der ausdrücklichen Garantie beschränkt. Gemäß einiger Rechtsprechungen ist der Haftungsausschluss
stillschweigender Garantien oder die Einschränkung bezüglich der Laufzeit stillschweigender Garantien nicht zulässig,
sodass die obigen Einschränkungsklauseln für Sie möglicherweise nicht relevant sind. Durch diese Garantie werden

19
Ihnen gewisse subjektive Rechte verliehen, und Sie verfügen u. U. über weitere Rechte, die je nach Rechtsprechung
variieren. Sämtliche Klagen hinsichtlich Garantieverletzungen in Bezug auf Ihr Produkt müssen innerhalb 1 Jahres
erhoben werden. Ausschlaggebend hierfür ist das Datum, zu dem die Klageerhebung erstmalig möglich war.
Iomega garantisce che questo prodotto hardware è privo di difetti di fabbricazione e dei materiali durante l’intero
periodo di validità della garanzia. La presente garanzia limitata, non trasferibile, è da considerarsi valida per il solo
utente finale e non può quindi essere ceduta a terze parti. La garanzia decorre a partire dalla data di acquisto del
prodotto e ha validità di un (1) anno per i prodotti acquistati nelle Americhe, nella regione Estremo Oriente e Oceania
o nei paesi non membri dell’Unione Europea, in Medio Oriente o in Africa; la garanzia ha una validità di novanta (90)
giorni per i prodotti Iomega ricondizionati acquistati in tali regioni; oppure di due (2) anni per i prodotti acquistati
dall’utente finale in uno dei paesi membri dell’Unione Europea.
La presente garanzia non è da ritenersi valida per: (a) i prodotti software Iomega; (b) i materiali di consumo, come ad
esempio i fusibili o le lampadine; o (c) i prodotti di terze parti, hardware o software, forniti in dotazione con il prodotto
coperto da garanzia. Iomega non fornisce alcun tipo di garanzia su tali prodotti che, se inclusi, vengono forniti “COSÌ
COME SONO”. Si considera escluso da garanzia il danno causato da incidente, l’uso improprio, l’abuso, l’utilizzo di
supporti non approvati da Iomega, l’esposizione dei supporti a campi magnetici particolarmente intensi o a cause
ambientali esterne.
L’unico ed esclusivo diritto risarcitorio esercitabile in caso di difetto di un prodotto coperto da garanzia è la riparazione
o la sostituzione del prodotto difettoso, a sola discrezione e interamente a carico di Iomega; Iomega ha inoltre la
facoltà di utilizzare componenti o prodotti nuovi o rimessi a nuovo. È prevista la copertura del componente/prodotto
sostituito per tutto il periodo di validità della garanzia stipulata originariamente o per i tre (3) mesi successivi alla
data di spedizione di tale componente/prodotto, quale che sia la situazione temporale che risulti più conveniente per
garantire l’estendibilità della garanzia. Nell’eventualità in cui Iomega non sia in grado di riparare o sostituire il prodotto
difettoso, l’unico diritto risarcitorio alternativo esercitabile dall’acquirente consiste nella restituzione del prezzo di
acquisto del prodotto originale. Quanto sopra enunciato costituisce l’obbligo contrattuale cui attenersi ai sensi della
presente garanzia. IN NESSUN CASO IOMEGA DOVRÀ ESSERE RITENUTA RESPONSABILE DI EVENTUALI DANNI INDIRETTI,
INCIDENTALI, CONSEGUENZIALI O SPECIALI O DI ALTRI DANNI TRA CUI LE PERDITE DI DATI, UTILIZZO O DI PROFITTO,
INDIPENDENTEMENTE DAL FATTO CHE IOMEGA FOSSE AL CORRENTE DELLA POSSIBILITÀ CHE SI POTESSERO VERIFICARE
TALI DANNI. In nessun caso la responsabilità di Iomega potrà superare il prezzo di acquisto originale dell’unità o del
supporto. Poiché alcune giurisdizioni non prevedono l’esclusione o la limitazione di danni incidentali o conseguenziali,
la limitazione o l’esclusione di cui sopra potrebbe non avere alcuna validità giuridica.
Come ottenere servizi di assistenza durante il periodo di validità della garanzia
Per ricevere assistenza durante il periodo di validità della garanzia, è necessario inviare opportuna notifica a Iomega
entro detto periodo. Le politiche di assistenza clienti Iomega (compresi i servizi a pagamento) e le relative procedure
variano in base alle esigenze di mercato e alle tecnologie emergenti. Per ottenere informazioni sulle procedure Iomega

20
in vigore, visitare il sito Web all’indirizzo www.iomega.com/supportpolicy.html o scrivere a Iomega Customer Service,
4059 South 1900 West, Roy, UT 84067. Le informazioni sui contatti dell’Assistenza clienti di Iomega in Europe sono
disponibili sul sito Web del Supporto tecnico all’indirizzo www.iomega.com/europe/support. Nel caso in cui il prodotto
sia idoneo a ricevere gli interventi manutentivi previsti dalla garanzia, sarà necessario restituire il prodotto a Iomega
unitamente al relativo codice, al numero di autorizzazione per la restituzione disponibile sul sito Web di Iomega
o fornito dal rivenditore Iomega e la prova di acquisto. Poiché Iomega non prevede la protezione, il ripristino o la
restituzione dei dati durante l’esecuzione degli interventi di manutenzione, si consiglia sempre di duplicarli prima di
procedere alla spedizione del prodotto.
Limitazioni
LA PRESENTE GARANZIA HA NATURA ESCLUSIVA, PERTANTO SOSTITUISCE QUALUNQUE ALTRA GARANZIA ESPLICITA O
IMPLICITA. Nella misura in cui sia consentito dalle leggi in vigore, IOMEGA DISCONOSCE ESPRESSAMENTE EVENTUALI
GARANZIE IMPLICITE, COMPRESE QUELLE IMPLICITE DI COMMERCIABILITÀ O DI IDONEITÀ A FINI SPECIFICI. Eventuali
garanzie implicite previste dalla legislazione vigente devono essere limitate nel tempo in base a quanto sancito dai
termini della garanzia esplicita. Poiché alcune giurisdizioni non prevedono il ricorso a formule di diniego di garanzie
implicite o limitazioni sulla durata di validità di tale garanzia, è possibile che la limitazione di cui sopra non abbia
alcuna validità nel caso specifico. La presente garanzia concede particolari diritti legali, nonché eventuali altri diritti
suscettibili di variazione in base alla giurisdizione specifica. Eventuali risarcimenti per violazione dei termini contenuti
nella garanzia devono essere richiesti entro 1 anno dalla data in cui è possibile intraprendere un’azione legale.
Iomega garantiza que este producto de hardware está libre de defectos de materiales y mano de obra durante el
período de garantía. Esta garantía limitada e intransferible es sólo para usted, el primer comprador usuario final. El
período de garantía comienza en la fecha de compra y tiene una duración de un (1) año para productos adquiridos en
el continente americano, la región Asia-Pacífico, países europeos no pertenecientes a la UE, Oriente Medio o África;
noventa (90) días para productos reacondicionados de Iomega adquiridos en estas regiones; o dos (2) años para
productos adquiridos por un usuario final en a algún país miembro de la Unión Europea.
Esta garantía no se aplica a: (a) productos de software de Iomega, (b) consumibles como fusibles o lámparas, o (c)
productos, hardware o software, de terceros incluidos con el producto en garantía. Iomega no ofrece ningún tipo de
garantía para dichos productos que, si están incluidos, se proporcionan “TAL CUAL”. Se excluyen de esta garantía los
daños provocados por accidente, uso incorrecto, abuso, uso de discos no suministrados o no autorizados por Iomega,
exposición excesiva de los discos a campos magnéticos o por causas ambientales externas al producto.
Su única y exclusiva compensación por un defecto cubierto es la reparación o sustitución del producto defectuoso, a elección
y cargo de Iomega (el porte puede ser cobrado); Iomega puede utilizar piezas o productos nuevos o reparados para tal fin. La
garantía de la pieza o producto repuesto tendrá la validez del resto de la garantía original o tres (3) meses desde la fecha de
envío de dichas piezas o productos, sea cual sea su duración. Si Iomega no puede reparar o sustituir un producto defectuoso,
su única compensación alternativa será un reembolso del precio de compra original. Lo expuesto anteriormente es la única
La page est en cours de chargement...
La page est en cours de chargement...
La page est en cours de chargement...
La page est en cours de chargement...
La page est en cours de chargement...
La page est en cours de chargement...
La page est en cours de chargement...
La page est en cours de chargement...
-
 1
1
-
 2
2
-
 3
3
-
 4
4
-
 5
5
-
 6
6
-
 7
7
-
 8
8
-
 9
9
-
 10
10
-
 11
11
-
 12
12
-
 13
13
-
 14
14
-
 15
15
-
 16
16
-
 17
17
-
 18
18
-
 19
19
-
 20
20
-
 21
21
-
 22
22
-
 23
23
-
 24
24
-
 25
25
-
 26
26
-
 27
27
-
 28
28


Iomega Portable Hard Drive Le manuel du propriétaire
- Catégorie
- Disques durs externes
- Taper
- Le manuel du propriétaire
dans d''autres langues
Documents connexes
-
Iomega eGo Portable Guide de démarrage rapide
-
-
Iomega USB 2.0 Manuel utilisateur
-
-
-
-