Kichler Lighting 9703OZ Manuel utilisateur
- Taper
- Manuel utilisateur

1) Tourner la crosse en position verticale et en glisser l’ex-
trémité dans la boucle.
REMARQUE: L’écrou hexagonal situé a l’intérieur du cou-
vercle doit parfois être dévissé afin de faciliter la rotation de
la crosse et d’éviter tout endomagement au couvercle.
2) Bloquer la volute avec la vis à oreilles.
3) Couper le courant d’alimentation.
4) Fixer la patte de montage à la boîte de jonction (vis non
fournies).
5) Visser le boulon hexagonal sur le tube fileté en laissant
dépasser 5 filetages. Visser cette extrémité du tube fileté à
la patte de montage et serrer le boulon.
6) Attacher la chaine, qio est à l’intérieur de cache, à la fente
de la pate de Montage.
7) Connecter les fils (connecteurs non fournis). Se reporter au
tableau ci-dessous pour faire les connexions.
8) Pousser l’élément au plafond en passant avec précaution le
tube fileté dans le trou.
9) Fixer en place avec la rondelle d’arrét et le capuchon fileté.
Connecter le fil noir ou
rouge de la boite
Connecter le fil blanc de la boîte
A Noir A Blanc
*Au cordon parallèle (rond et lisse)
*Au cordon parallele (à angles droits el strié)
Au bransparent, doré, marron, ou
noir sans fil distinctif
Au transparent, doré, marron, ou
noir avec un til distinctif
Fil isolé (sauf fil vert) avec
conducteur en cuivre
Fil isolé (sauf fil vert) avec
conducteur en argent
*Remarque: Avec emploi d’un fil paralléle
(SPT I et SPT II). Le fil neutre est á angles
droits ou strié et l’autre fil doit étre rond ou
lisse (Voir le schéma).
Fil Neutre
1) Turn scroll to upright position and slip end of scroll into
loop.
NOTE: It may be necessary to loosen hexnut inside canopy
to ease turning of scroll, and to avoid damage to canopy.
2) Secure scroll in place using thumbscrew.
3) Turn off power.
4) Attach mounting strap to outlet box. (Screws not provided)
5) Thread hexnut onto threaded pipe so that 5 threads are
exposed above hexnut. Thread that end of threaded pipe
into mounting strap and tighten hexnut against mounting
strap.
6) Attach chain that is assembled to inside of canopy, to slot in
mounting strap.
7) Make wire connections (connectors not provided.) Reference
chart below for correct connections and wire accordingly.
8) Push fixture to wall, carefully passing threaded pipe through
hole.
9) Secure fixture to wall with lockwasher and threaded cap.
Connect Black or
Red Supply Wire to:
Connect
White Supply Wire to:
Black White
*Parallel cord (round & smooth) *Parallel cord (square & ridged)
Clear, Brown, Gold or Black
without tracer
Clear, Brown, Gold or Black
with tracer
Insulated wire (other than green)
with copper conductor
Insulated wire (other than green)
with silver conductor
*Note: When parallel wires (SPT I & SPT II)
are used. The neutral wire is square shaped
or ridged and the other wire will be round in
shape or smooth (see illus.)
Neutral Wire
Date Issued 11/21/97
IS-9703-CB
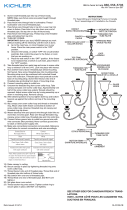
HEXNUT
ECROU A SIX
PANS
MOUNTING SCREW
VIS DE MONTAGE
CHAIN
CHAINE
LOCKWASHER
RONDELLE FREIN
OUTLET BOX
BOITE DE JONCTION
MOUNTING STRAP
COLLIER DE FIXATION
CANOPY
ABAT JOUR
THUMBSCREW
VIS À OREILLES
THREADED CAP
BOUCHON FILETE
SCROLL
SPIRALE
INSTRUCTIONS
For Assembling and Installing Fixtures in Canada
Pour L’assemblage et L’installation Au Canada
-
 1
1
Kichler Lighting 9703OZ Manuel utilisateur
- Taper
- Manuel utilisateur
dans d''autres langues
- English: Kichler Lighting 9703OZ User manual
Documents connexes
-
 Kichler Lighting 9788BK Manuel utilisateur
-
 Kichler Lighting 3502NI Manuel utilisateur
-
 Kichler Lighting 9719PR Manuel utilisateur
-
 Kichler Lighting 43457CLP Manuel utilisateur
-
 Kichler Lighting 9718PR Manuel utilisateur
-
 Kichler Lighting 43767OZ Manuel utilisateur
-
 Kichler Lighting 43506NI Manuel utilisateur
-
 Kichler Lighting 2771NI Manuel utilisateur
-
 Kichler Lighting 2021NI Manuel utilisateur
-
 Kichler Lighting 43159NI Manuel utilisateur


