Impecca CM-1396ST Mode d'emploi
- Catégorie
- Micro-ondes
- Taper
- Mode d'emploi

1.3 CU FT Microwave Oven - User Guide
Horno Micro-ondas de 1.3 Pies Cúbicos - Manual de usuario
Le Four à Micro-ondes 1.3 Pieds Cubes - Manuel de l’utilisateur
Model: CM-1396
www.impecca.com
V 1.0

2
ENGLISH ESPAÑOL FRANÇAIS
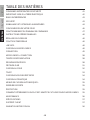
TABLE OF CONTENTS
IMPORTANT SAFETY INSTRUCTIONS 3
IMPORTANT: ELECTRICAL GROUNDING 4
RADIO INTERFERENCE 4
SAFETY 5
FOOD PACKAGING & UTENSILS 5
SETTING UP YOUR OVEN 7
USING YOUR MICROWAVE OVEN 8
OPERATIONAL INSTRUCTIONS 9
SETTING THE CLOCK 9
TIME FUNCTION 9
+30 SEC. 9
MICROWAVE COOKING 9
CONVECTION 10
MICROWAVE + CONVECTION 10
TIME DEFROST 11
WEIGHT DEFROST 11
AIR FRY 12
BAKE 13
ROAST 14
MULTI-STAGE COOKING 15
AUTO COOK 15
DOOR LOCK 15
PROTECTION 16
HOW TO TEST FOR A MICROWAVE-SAFE DISH 16
MAINTENANCE & TROUBLESHOOTING 17
TECHNICAL SPECIFICATIONS 18
CUSTOMER SUPPORT 18
ONE-YEAR LIMITED APPLIANCE WARRANTY (US) 19
FUNCIONAMIENTO DEL PANEL DE CONTROL 27
HORNEAR 32

3
ENGLISH
FRANÇAIS ESPAÑOL
IMPORTANT SAFETY INSTRUCTIONS
WARNING: BEWARE OF EXPOSURE TO EXCESSIVE
MICROWAVE ENERGY
Do not attempt to operate this oven with the door
open; this can result in harmful exposure to micro-
wave energy. Do not override or tamper with the
internal safety protections.
Do not place any object between the oven front face
and the door or allow dirt or other residues accumu-
late on the sealing surfaces.
Do not operate the oven if it is damaged. It is im-
portant that the oven door closes properly and that
there is no damage to the: DOOR (bent), HINGES
AND LATCHES (broken or loosened), or DOOR SEALS
AND SEALING SURFACE.
The oven should not be adjusted or repaired by any-
one except properly qualified service personnel.
WARNING: To reduce the risk of burns, electric
shock, fire, injury to persons (yourself or others) or
exposure to excessive micro- wave energy when us-
ing your appliance, follow basic safety precautions,
including the following:
• Read all instructions before using the appli-
ance.
• Read and follow the specific microwave ener-
gy precautions listed above.
• As with most cooking appliances, closely
supervise use to reduce the risk of a fire in the
oven.
To reduce the risk of fire while cooking, be sure to
take the following additional pre- cautions:
• Do not overcook food. Carefully monitor the
appliance when paper, plastic, or other com-
bustible materials are placed inside the oven
to facilitate cooking.
• Remove wire twist-ties and metal handles
from paper or plastic containers/ bags before
placing them in the oven.
• If materials inside the oven ignite, keep the
oven door closed. Turn the oven o, and
unplug the appliance. Disconnect the pow-
er cord, shut o power at the fuse or circuit
breaker panel.
• Do not use the oven cavity for storage pur-
poses. Do not leave paper products, cooking
utensils, or food in the oven when not in use.
This oven must be grounded with a properly
grounded outlet. See the section “GROUND- ING
INSTRUCTIONS”.
Install or place this oven in strict accordance with
the installation instructions provided. Some prod-
ucts, such as whole eggs, and sealed containers
such as a glass jars, are able to explode and should
not be heated in the oven.
Use this appliance only for its intended uses as de-
scribed in this manual. Do not use corrosive chemi-
cals or vapors in or near the appliance. This oven is
specifically designed to heat or cook or dry food in a
home consumer setting. It is not designed for indus-
trial or laboratory use.
As with any appliance, close supervision is neces-
sary when used by children. Do not operate this
oven if it has a damaged cord or plug, if it is not
working properly, or if it has been dropped or dam-
aged.
This appliance should only be serviced by qualified
service technicians. Contact technical support for
information regarding your closest authorized ser-
vice center for further examination, repair, or adjust-
ment to your appliance.
Do not cover or block any openings on the oven.
Do not store or use this appliance outdoors.
Do not use this oven near water, for example, near
a kitchen sink, in a wet basement, near a swimming
pool, or similar locations.
Do not immerse cord or plug in water. Keep cord
away from heated surfaces.
Do not let cord hang over edge of a table or counter.
When cleaning the oven door and surfaces, use only
mild, non-abrasive soaps or detergents applied with
a damp sponge or cloth. Liquids, such as water,
coee, or tea can be overheated beyond the boiling
point with- out appearing to boil. Visible bubbling
or boiling when the container is removed from the
microwave oven is not always present.
THIS CAN RESULT IN SCALDING LIQUIDS SUDDEN-

4
ENGLISH ESPAÑOL FRANÇAIS
LY BOILING OVER WHEN THE CONTAINER IS DIS-
TURBED OR A SPOON OR OTHER UTENSIL IS IN-
SERTED INTO THE LIQUID.
1. Do not overheat the liquid.
2. Stir the liquid both before and halfway
through heating it.
3. Do not use straight-sided containers with
narrow necks.
4. Aer heating, allow the container to stand in
the microwave oven for a short time before
removing the container.
5. Use extreme care when inserting a spoon or
other utensil into the container.
IMPORTANT: ELECTRICAL GROUNDING
Touching the internal components of this oven can cause serious personal injury or even death. Do not
disassemble this appliance.
Improper use of the grounding can result in electric shock. Do not plug the oven into an outlet unless the
outlet is properly installed and grounded.
DANGER: Electrical Shock Hazard
This appliance must be grounded. In the event of an electrical short circuit, grounding reduces the risk
of electric shock by providing an escape wire for the electric current. This appliance is equipped with a
grounding-wire cord with the third, round grounding plug. The plug must be plugged into an outlet that is
properly installed and grounded. Consult a qualified electrician or serviceman if the grounding instructions
are not completely understood or if doubt exists as to whether the appliance is properly grounded. If it is
necessary to use an extension cord, use only a 3-wire extension cord that has a 3-pronged grounding plug,
and a 3-slot receptacle that will accept the plug on the appliance. The marked rating of the extension cord
shall be equal to or greater than the electrical rating of the appliance.
1. A short power-supply cord is provided to reduce the risks resulting from becoming entangled in or
tripping over a longer cord.
2. Longer cord sets or extension cords are available and may be used if done so with great care.
3. If a long cord set or extension cord is used:
• The marked electrical rating of the cord set or extension marked electrical rating of the cord set or ex-
tension cord should be at least as great as the electrical rating of the appliance.
• The extension cord must be a grounding-type 3-wire cord; and
• The longer cord should be arranged so that it will not drape over the countertop or tabletop where it
can be pulled on by children or tripped over unintentionally.
RADIO INTERFERENCE
1. Operation of the microwave oven may cause interference to your radio, TV or similar equipment.
2. When there is interference, it may be reduced or eliminated by taking the following measures:
• Clean door and sealing surface of the oven.
• Reorient the receiving antenna of radio or television.
• Relocate the microwave oven with respect to the receiver.
• Move the microwave oven away from the receiver.
• Plug the microwave oven into a dierent outlet so that microwave oven and receiver are on dierent
branch circuits.

5
ENGLISH
FRANÇAIS ESPAÑOL
SAFETY
1. The oven must be on a leveled surface.
2. The turntable and turntable roller rest must be in the oven during cooking. Place the cookware gen-
tly on the turntable and handle it carefully to avoid possible breakage.
3. Incorrect use of browning dish may cause the turntable to break.
4. Use only the specified bag size when using Direct Access Popcorn.
5. The oven has several built-in safety switches to ensure that the power remains o when the door is
open. Do not tamper with these switches.
6. Do not operate the microwave oven empty. Operating the oven with no food or food that is extreme-
ly low in moisture can cause fire, charring or sparking.
7. Do not cook bacon directly on the turntable. Excessive local heating of the turntable may cause the
turntable to break.
8. Do not heat baby bottles or baby food in the microwave oven. Uneven heating may occur and could
cause physical injury.
9. Do not heat narrow-necked containers, such as syrup bottles.
10. Do not attempt to deep-fry in your microwave oven.
11. Do not attempt home canning in this microwave oven, as it is impossible to be sure all con-
tents of the jar have reached boiling temperature.
12. Do not use this microwave oven for commercial purpose. This microwave oven is made for
household use only.
13. To prevent delayed eruptive boiling of hot liquids and beverages or scalding yourself, stir
liquid before placing the container in the oven and again halfway through cooking time. Let stand in
the oven for a short time and stir again before removing the contain- er.
14. Use carefully when cooking food in the microwave oven to avoid burning due to excessive
cooking.
15. When the appliance is operated in the combination mode, children should only use the oven
under adult supervision due to the temperatures generated.
16. Failure to maintain the oven in a clean condition could lead to deterioration that could ad-
versely aect the life of the appliance and possibly result in a hazardous situation.
FOOD PACKAGING & UTENSILS
Please closely follow these guidelines regarding packaging materials and items placed into the microwave.
Tightly-closed utensils could explode. Closed containers should be opened and plastic pouches should be
pierced before cooking.
See the instructions on “Materials you can use in microwave oven” and "Do not use these materials in the
microwave oven". There may be certain non-metallic utensils that are not safe to use for microwaving. If in
doubt, test the questionable utensil using the following the procedure below.

6
ENGLISH ESPAÑOL FRANÇAIS
Container Test:
1. Fill a microwave-safe container with 1 cup
of cold water (250ml) along with the utensil
in question.
2. Cook on maximum power for 1 minute.
3. Carefully feel the container. If the empty
container is warm, do not use it for micro-
wave cooking.
4. Do not exceed 1 minute cooking time.
Materials you can use in the microwave oven
BROWNING DISH
Follow manufacturer’s instructions. The
bottom of browning dish must be at least 3/16 inch
(5mm) above the turntable. Incorrect usage may
cause the turntable to break.
GLASS JARS
Always remove lid. Use only to heat food
until just warm. Most glass jars are not heat resistant
and may break.
OVEN COOKING BAGS
Follow manufacturer’s instructions. Do not
close with metal tie. Make slits to allow steam to
escape.
PAPER PLATES AND CUPS
Use for short–term cooking/warming only.
Do not leave oven unattended while cook- ing.
ALUMINUM FOIL
Shielding only. Small smooth pieces can
be used to cover thin parts of meat or poultry to
prevent overcooking. Arcing can occur if foil is too
close to oven walls. The foil should be at least 1 inch
(2.5cm) away from oven walls.
PAPER TOWELS
Use to cover food for reheating and ab- sorb-
ing fat. Use with supervision for a short-term cook-
ing only.
PARCHMENT OR WAX PAPER
Use as a cover to prevent splattering or a
wrap for steaming.
DINNERWARE
Microwave-safe only. Follow manufacturer’s
instructions. Do not use cracked or chipped dishes.
PLASTIC
Microwave-safe plastic only. Follow the man-
ufacturer’s instructions — dishes should be labeled
“Microwave Safe”. Some plastic containers soen
as the food inside heats. “Boiling bags” and tightly
closed plastic bags should be slit, pierced or vent-
ed as directed by package.
PLASTIC WRAP
Microwave-safe only. Use to cover food
during cooking to retain moisture. Do not allow
plastic wrap to touch food.
THERMOMETERS
Microwave-safe only (meat and candy ther-
mometers).
Do not use these materials in the microwave oven
ALUMINUM FOIL AND TRAYS
May cause arcing. Transfer food into micro-
wave-safe dish.
FOOD CARTONS WITH METAL HANDLES
May cause arcing. Transfer food into micro-
wave-safe dish.
METAL OR METALLIC UTENSILS
May cause arcing. Transfer food into micro-
wave-safe dish.
METALLIC WIRE
May cause arcing and fire!
PAPER BAGS
May cause fire!
STYROFOAM OR PLASTIC FOAM
Plastic foam may melt or contaminate the
liquid inside when exposed to high tem- perature.
WOOD
Wood will dry out when used in the micro-
wave oven and may split or crack. Risk of fire.

7
ENGLISH
FRANÇAIS ESPAÑOL
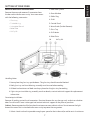
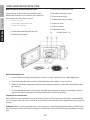
SETTING UP YOUR OVEN
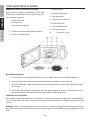
Names of Oven Parts and Accessories
Remove the oven and remove all accessories from
the box and inside the oven cavity. Your oven comes
with the following accessories:
• Glass tray
• Turntable ring
• Instruction Manual
• Bake Plate
• Air Fry Kit
1. Door Lock System
2. Oven Window
3. Roller Ring
4. Sha
5. Control Panel
6. Wave Guide (Do Not Remove)
7. Glass Tray
8. Grill Heater
9. Bake Plate
10. Air Fry Kit
Handling Notes
1. Never place the glass tray upside down. The glass tray should never be blocked.
2. Both glass tray and turntable ring assembly must be used when cooking.
3. All food and containers of food are always placed on the glass tray for cooking.
4. If glass tray or turntable ring assembly cracks or breaks, contact technical support for replacement
information.
Countertop Installation
Remove all packing material and accessories. Examine the oven for any damage such as dents or a broken
door. Do not install if oven is damaged and contact technical support or the place of purchase.
Cabinet: Remove protective film found on the microwave oven cabinet surface. Do not remove the light
brown Mica cover that is attached to the oven cavity to protect the magnetron.
1. Select a level surface that provide enough open space for the intake and/or outlet vents. A minimum

8
ENGLISH ESPAÑOL FRANÇAIS
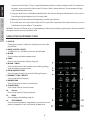
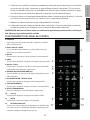
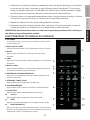
Control Panel Operation
1. DISPLAY
Cooking time, power, indicators and present time are dis-
played here.
2. BAKE / AIR FRY / ROAST
Use Bake, Air Fry, and Roast functions to cook food.
3. MICRO.
Press to select microwave power level.
4. CONV.
Press to set Convection Cooking Program.
5. MICRO. + CONV.
Press to select one of four combination cooking settings
with microwave and convection.
6. AUTO COOK BUTTONS
Press the menu buttons to set Auto Cooking Program.
7. DEFROST / TIME / WEIGHT
Press to set Defrost Program.
8. NUMBER PAD
Press to set times or access functionality.
9. CLOCK/TIMER
Press to set Clock or Timer function.
10. +30 Sec.
Press to set Express Cooking Program.
11. START
Press to begin the cooking program.
12. STOP/CANCEL
Press once to temporarily stop cooking, or twice to cancel
cooking altogether. Press and hold to set door lock.
USING YOUR MICROWAVE OVEN
clearance of 3.0 inches (7.5cm) is required between the oven and any adjacent walls. One side must
be open. Leave a minimum clearance of 12 inches (30cm) above the oven. Do not remove the legs
from the bottom of the oven.
2. Plug your oven into a standard household outlet. Be sure the voltage & the frequency is the same as
the voltage and the frequency on the rating label.
3. Blocking the intake and/or outlet openings can damage the oven.
4. Place the oven as far away from radios and TV as possible. Operation of microwave oven may cause
interference to your radio or TV reception.
WARNING: Do not install oven over a range cooktop or other heat-producing appliance or the oven could be
damaged and the warranty would be void.

9
ENGLISH
FRANÇAIS ESPAÑOL
OPERATIONAL INSTRUCTIONS
• When the oven is first plugged in, the unit will beep and the display will show “CLOCK” and “12:00”.
• While cooking, press the STOP/CANCEL button to pause the program, then press the START button to
resume. Press STOP/CANCEL twice to cancel program
• If the cooking time is 2 minutes or more, aer cooking ends, the screen will display “Fan” for 1 minute,
then display “End”. But if the cooking time is less than 2 minutes, aer cooking ends, the screen will dis-
play “End” and sound every two minutes. Aer pressing the STOP/CANCEL button or opening the door,
the oven returns to standby mode.
• The electronic control system of the microwave oven has an automatic cooling feature. If using micro-
wave, convection or combination cooking mode longer than two minutes, the oven fan will automati-
cally operate to cool the oven post cooking time. This is normal.
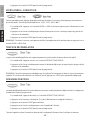
SETTING THE CLOCK
The clock can be set to either 12-hour or 24-hour time. By pressing the CLOCK/TIMER button for 3 seconds
to choose the 24-hour clock, press it again to choose the 12-hour clock. Use the keypad to enter the current
time. Then press CLOCK/TIMER again, or the START button, to confirm the current time.
TIME FUNCTION
In standby mode or during cooking, press the CLOCK/TIMER button once. Use the keypad to enter desired
duration, max duration is 99 minutes and 99 seconds. Press START or CLOCK/TIMER to begin the timer.
While cooking, and during countdown, press CLOCK/TIMER to display time. When the timer ends, the unit
will finish with a buzzer. Press STOP/CANCEL anytime during countdown to cancel the timer.
+30 SEC.
The +30 Sec. feature is designed for convenience by immediately starting the microwave at 100% power for
30 seconds for easy quick cooking and food warm up. Pressing +30 Sec. successively will add 30 seconds of
cooking time for each press.
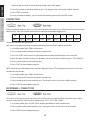
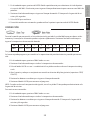
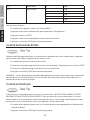
MICROWAVE COOKING
1. In standby mode, press the MICRO. button repeatedly to select the power level beginning at 100%.
Level 10 9 8 7 6 5 4 3 2 1
Power 100% 90% 80% 70% 60% 50% 40% 30% 20% 10%
Display P100 P90 P80 P70 P60 P50 P40 P30 P20 P10

10
ENGLISH ESPAÑOL FRANÇAIS
Skip this step and enter the time directly to begin with 100% power.
2. Press the number pad to enter cooking time. The longest time is 99 minutes and 99 seconds.
3. Press START to confirm.
4. During microwave cooking, you can check the power by pressing the MICRO. button.
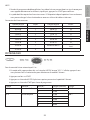
CONVECTION
During convection cooking, hot air is circulated throughout the oven cavity to brown evenly and make crisp
foods quickly. Press the number pad to enter the desired convection temperature.
10 9 8 7 6 5 4 3 2 1
400°F 375°F 350°F 335°F 325°F 300°F 275°F 250°F 225°F 180°F
To preheat and cook with convection:
Your oven can be programmed to combine preheating and convection cooking operations
1. In standby mode, press CONV. button once.
2. Press number pad to indicate convection temperature.
3. Press the START button once. Unit will beep when the designated temperature is reached.
4. Open the door and place a container of food at the center of the turntable (or press STOP/CANCEL).
5. Press number pads to enter cooking time.
6. Press START button to begin program.
NOTE: When designated temperature is reached, beep will sound. The longest preheat time is 30 minutes.
To cook with convection:
1. In standby mode, press CONV. button once.
2. Press number pad to indicate convection temperature.
3. Press number pads to enter cooking time. The longest time is 99 minutes and 99 seconds.
4. Press START button to begin program.
MICROWAVE + CONVECTION
This oven has four pre-programmed settings that make it easy to cook with both convection heat and mi-
crowave automatically. There are four temperatures: 225°F, 275°F, 350°F, 400°F.
1. In standby mode, press MICRO.+CONV. button repeatedly to select temperature.
2. Press number pad to enter cooking time. The longest time is 99 minutes and 99 seconds.
3. Press START button to begin program.

11
ENGLISH
FRANÇAIS ESPAÑOL
NOTE: During cooking, you can check combination temperature by pressing MICRO.+CONV. Pad.
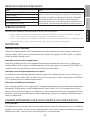
TIME DEFROST
The defrosting power is adjusted automatically once the cooking time is programmed.
1. In standby mode, Press DEFROST/TIME/WEIGHT button once.
2. Press number pad to enter defrosting time. The longest time is 99 minutes and 99 seconds.
3. Press START button to begin program.
NOTE: During defrost program, the system will pause and sound beeps to remind the user to turn food over,
and then press START to resume the defrosting.
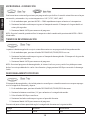
WEIGHT DEFROST
The defrosting time and power level are automatically set once the food category and the weight are pro-
grammed.
1. In standby mode, press DEFROST/TIME/WEIGHT button twice.
2. Press number buttons (1-3) to select food category.
3. Press START button to confirm.
4. Press number pad to enter food weight.
5. Press START button to begin program.
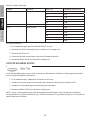
Find the maximum allowable weight according to the category of food in the table below.
Code Food Maximum Weight
dEF1 Meat 48 oz.
dEF2 Poultry 48 oz.
dEF3 Seafood 32 oz.
NOTE:
1. During defrost program, the system will pause and sound to remind you to turn over the food, aer
that, press START to resume.
2. Weight must be in pounds and ounces. If the label gives weight in pounds only, you can change the
fractional pound to ounces by using the chart below.
Converting pounds to ounces.
Fraction of a Pound Ounces Fraction of a Pound Ounces
Less than .03 0 .54 to .59 9
.03 to .09 1 .60 to .65 10
.10 to .15 2 .66 to .71 11

12
ENGLISH ESPAÑOL FRANÇAIS
.16 to .21 3 .72 to .78 12
.22 to .27 4 .79 to .84 13
.28 to .34 5 .85 to .90 14
.35 to .40 6 .91 to .97 15
.41 to .46 7 Above .97 Round poundage up
.47 to .53 8
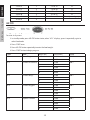
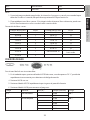
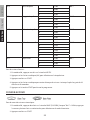
AIR FRY
For auto air fry menu:
3. In standby mode, press AIR FRY button twice, when “AF-1” displays, press it repeatedly again to
select food code.
4. Press START once.
5. Press AIR FRY button repeatedly to enter the food weight.
6. Press START button to begin program.
Code Food Weight (oz.) Time (mins) Power
AF-1 Onion Rings 8 18:00 400°F
12 21:00
AF-2 Chicken Drumsticks 8 27:00 400°F
16 30:00
24 33:00
32 36:00
40 40:00
AF-3 Chicken Wings 8 27:00 400°F
16 30:00
24 33:00
32 36:00
AF-4 Chicken Nuggets 8 17:00 400°F
10 18:00
12 19:00
16 21:00
20 23:00
AF-5 Popcorn Chicken 8 18:00 400°F
10 19:00
12 20:00
16 22:00
20 25:00

13
ENGLISH
FRANÇAIS ESPAÑOL
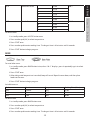
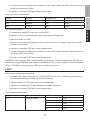
AF-6 Mozzarella Sticks 8 12:00 400°F
10 12:30
12 13:00
14 13:30
16 14:00
18 15:00
AF-7 French Fries 8 22:00 400°F
10 24:00
12 26:00
14 28:00
For other foods:
1. In standby mode, press AIR FRY button once.
2. Press number pad (0-9) to select temperature.
3. Press START once.
4. Press number pad to enter cooking time. The longest time is 99 minutes and 99 seconds.
5. Press START button to begin program.
BAKE
For auto bake menu:
1. In standby mode, press BAKE button twice, when “Ab-1” displays, press it repeatedly again to select
food code.
2. Press START once.
3. When designated temperature is reached, beep will sound. Open the oven door, and then place
food into the oven.
4. Press START button to begin program.
Auto bake menus:
Code Food Temperature Cooking Time (Mins.)
Ab-1 Cookies 350°F 13:00
Ab-2 Brownies 350°F 45:00
Ab-3 Cake 350°F 20:00
For other food:
1. In standby mode, press BAKE button once.
2. Press number pad (0-9) to select temperature.
3. Press START once.
4. Press number pad to enter cooking time. The longest time is 99 minutes and 99 seconds.

14
ENGLISH ESPAÑOL FRANÇAIS
5. Press START button to begin program.
6. When designated temperature is reached, beep will sound. Open the oven door, and then place
food into the oven.
7. Press START button to begin program.
NOTE: For BAKE function, preheat is required. When the designated temperature is reached, “Add Food”
and temperature will show on the screen. Open the oven door and put the food inside, then press START to
start cooking
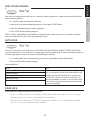
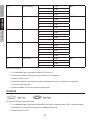
ROAST
For auto roast menu:
1. In standby mode, press ROAST button twice, when “Ar-1” displays, press it repeatedly to select food
code.
2. Press START once to confirm food code.
3. Press ROAST button to select food weight.
4. Press START button to begin program.
Auto roast menu:
Code Food Weight (oz.) Cooking Time (mins)
Ar-1 Salmon Filet 4 21:00
8 24:00
12 27:00
16 30:00
20 33:00
Ar-2 Whole Chicken 4 60:00
Ar-5 Roast Potatoes 4 23:00
6 24:00
8 25:00
10 26:00
12 27:00
16 30:00
For other foods:
1. In standby mode, press ROAST button once.
2. Press number pad (0-9) to select temperature.
3. Press START once.
4. Press number pad to enter cooking time.
5. Press START button to begin program.

15
ENGLISH
FRANÇAIS ESPAÑOL
MULTI-STAGE COOKING
Your oven can be programmed for up to 2 automatic cooking sequences. Suppose you want to set the fol-
lowing cooking program.
1. In standby mode, place food into the oven.
2. Input the first microwave cooking program. Do not press START button.
3. Input the second microwave cooking program.
4. Press START button to begin program.
NOTE: +30 Sec., weight defrost, time defrost, auto cook menus, bake function, air fry function and toast
function cannot be set in the multi-stage cooking function.
AUTO COOK
There are 5 microwave auto cook menus: POPCORN, POTATO, BEVERAGE, REHEAT, FROZEN DINNER. For
any auto cook menus, it is not necessary to input power level or cooking tie. The oven will automatically set
the cooking program based on the menus and food weight selected.
1. In standby mode, press corresponding menu button repeatedly to select food weight.
2. Press START button to begin program.
Auto cook menus:
Menu Note
Popcorn (1.75/ 3/ 3.5 oz.) The result of sensor cooking depends on factors
such as voltage fluctuation, the shape and the size
of food, your personal preference as to the done-
ness of certain foods and even how well you hap-
pen to space food in the oven. If you find the result
at any rate not satisfactory, please adjust the cook-
ing time accordingly.
Potato (8-24 oz.)
Beverage (8/ 10. 12 oz.)
Reheat (8-24 oz.)
Frozen Dinner (8-24 oz.)
DOOR LOCK
Use to prevent unsupervised operation of the oven.
• To set: In standby mode, press and hold the STOP/CANCEL button for 5 seconds. The unit will beep,
lock indicator light will turn on, and microwave will be locked.
• To cancel: Press and hold the STOP/CANCEL button for 5 seconds. The unit will beep, lock indicator
light will turn o, and microwave will be unlocked.

16
ENGLISH ESPAÑOL FRANÇAIS
PROTECTION
Overheating Protection
When the system enters into super high temperature protection status, the digital display shows “E03” and
continues to beep. Aer pressing STOP/CANCEL, the system comes back to normal standby mode.
Low Temperature Protection
When the system enters into super low temperature protection status, the digital display shows “E04” and
continues to beep. Aer pressing STOP/CANCEL, the system comes back to normal standby mode (except
microwave function).
Sensor Malfunction Protection
The system enters into protection mode when the system sensor is open circuited or short circuited. The
display shows “E05” or “E06” and buzzer will sound. Aer pressing STOP/CANCEL, the system comes back
to normal standby mode.
Button Adhesion Protection
In any state, if any button on the control panel is depressed for 60 seconds, the program stops working
immediately, the display will show “FAIL” and the system will sound a beep. If the button continues to be
depressed, beep will sound every one minute. During this time, no button will operate. Aer troubleshoot-
ing, press the STOP/CANCEL button to return standby mode.
HOW TO TEST FOR A MICROWAVE-SAFE DISH
To determine if a dish is microwave-safe, place the dish in the microwave along with a glass measuring cup
filled with one cup of water. Microwave for one minute on high and then carefully feel the dish. If it is warm,
it is not microwave-safe.

17
ENGLISH
FRANÇAIS ESPAÑOL
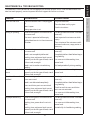
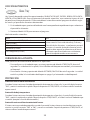
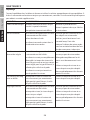
MAINTENANCE & TROUBLESHOOTING
Find problem in chart below and use the appropriate solution for each issue. If the microwave oven still
does not work properly, contact Impecca technical support for further assistance.
PROBLEM POSSIBLE CAUSE POSSIBLE REMEDY
Oven will not start Electrical cord for oven is not plugged
in.
Door is open.
Wrong operation is set.
Plug into the outlet.
Close the door and try again.
Check instructions.
Arcing or sparking Materials dangerous in microwave ov-
ens were used.
The oven is operated while empty.
Spilled food remains in the microwave
chamber.
Use designated microwave-safe cook-
ware only.
Never operate the microwave while
empty.
Clean interior of the microwave with
wet towel and warm, soapy water as
necessary.
Food cooked unevenly Materials dangerous in microwave ov-
ens were used.
Food is not completely defrosted.
Cooking time and power level are not
correctly set for the type of food, size of
dishes used, or weight.
Food is not turned or stirred during
cooking.
Use designated microwave-safe cook-
ware only.
Completely defrost food before begin-
ning cooking.
Use a more suitable cooking time,
power level.
Stir food periodically during cooking.
Food is overcooked or
burnt
Cooking time and power level are not
correctly set for the type of food, size of
dishes used, or weight.
Use a more suitable cooking time,
power level.
Food is cold or under-
cooked
Materials dangerous in micro- wave
ovens were used.
Food is not defrosted completely.
Oven ventilation ports are restricted.
Cooking time and power level are not
correctly set for the type of food, size of
dishes used, or weight.
Use designated microwave-safe cook-
ware only.
Completely defrost food before begin-
ning cooking.
Check to see that oven ventilation
ports are not restricted.
Use a more suitable cooking time,
power level
Improper defrosting Materials dangerous in microwave ov-
ens were used.
Cooking time, power level is not suit-
able.
Cooking time and power level are not
correctly set for the type of food, size of
dishes used, or weight.
Use designated microwave-safe cook-
ware only.
Use a more suitable cooking time,
power level.
Periodically stir food during cooking.

18
ENGLISH ESPAÑOL FRANÇAIS
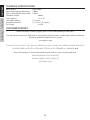
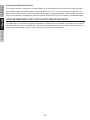
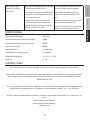
TECHNICAL SPECIFICATIONS
Power Source: 120V~60Hz
Power Consumption (Microwave): 1500W
Power Consumption (Convection): 1450W
Maximum Output: 1000W
Oven Capacity: 1.3 cu. Ft.
Turntable Diameter: 12.8 inches
External Dimensions: 11.8 x 21.2 x 19.9 inches
Net Weight: 41.2 lbs
CUSTOMER SUPPORT
Before contacting customer support, please see the troubleshooting section above.
Visit our website to contact us, nd answers to Frequently Asked Questions, and for other resources which may
include an updated version of this user's guide.
www.impecca.com
If you wish to contact us by phone, please be sure to have your model number and serial
number ready and call us between 9:00am and 6:00pm ET, at +1 866-954-4440.
Keep tabs on Impecca's newest innovations & enter contests via our social network feeds:
www.facebook.com/Impecca/
www.instagram.com/impecca/
@impeccausa

19
ENGLISH
FRANÇAIS ESPAÑOL
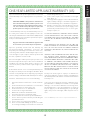
Impecca™ warrants this product against defects in material
and workmanship to the original purchaser as specified be-
low.
PARTS AND LABOR– if the product is determined to
have a manufacturing defect, within a period of one
year from the date of the original purchase, Impec-
ca™, at its own discretion, will repair or replace the
product parts at no charge to you in the U.S.A.
To obtain warranty service by an authorized Impecca™ ser-
vice center, please email us at: service@impecca.com to ob-
tain a Repair and Maintenance Authorization (RMA) number
and received instructions on how the repair and/or replace-
ment procedure will take place.
Any glass materials included with the appliance will
be covered for a period of 60 days from purchase.
Impecca™ specifically excludes from this warranty any
non-electric/mechanical attachments, accessories and
disposable parts including but not limited to outside case,
connecting cables, batteries and AC adapters. Impecca™ re-
serves the right to repair or replace defective products with
the same, equivalent or newer models.
We reserve the right to either repair or replace product at our
discretion. Replacement may be either new or refurbished
and while every endeavor will be made to ensure it is the
same model, if not possible it will be equal or higher spec-
ification.
Normal “Wear and Tear” is not covered by this warranty. Fur-
ther, Impecca™ hereby reserves the right to determine “Wear
and Tear” on any and all products. Tampering or opening the
product casting or shell will void this warranty in its entirety.
Exclusions: This warranty does not cover the following:
1. Any product that has a defaced or covered serial num-
ber.
2. Products that have been transferred to a second owner.
3. Rust on the interior or exterior of the unit.
4. Products listed as “As-Is” or “Refurbished.”
5. Food loss due to any product failure.
6. Window air conditioners installed in a wall.
7. The product if used in a commercial setting.
8. Service calls that do not involve product malfunction.
9. Service calls for a product ruined by not following the
provided instructions.
10. Service calls to correct improper installation.
11. Costs associated with making the product accessible
for servicing (including but not limited to removal of
trim/molding/cabinetry, etc.)
12. Service calls to replace any consumables such as light
bulbs, filters, etc.
13. Surcharges that may apply to service calls on weekends,
nights, holidays. Damages to the finish of appliance or
household furnishings due to installation of appliance.
14. Damages caused by any of the following: Acts of God;
fires; misuse; accidents; incorrect power supply; service
performed by unauthorized persons; use of non-genu-
ine Impecca parts, etc.
ALL IMPLIED WARRANTIES, INCLUDING IMPLIED WARRAN-
TIES OF MERCHANTABILITY AND FITNESS FOR A PARTICU-
LAR PURPOSE ARE LIMITED IN DURATION TO 1 YEAR FROM
THE DATE OF THE ORIGINAL RETAIL PURCHASE OF THIS
PRODUCT.
THESE WARRANTIES AND REMEDIES ARE THE SOLE AND
EXCLUSIVE WARRANTIES AND REMEDIES IN CONNECTION
WITH THE SALE AND USE OF THE PRODUCT. NO OTHER
WARRANTIES, ORAL OR WRITTEN, EXPRESSED OR IMPLIED,
ARE GIVEN.
IMPECCA™ IS NOT RESPONSIBLE OR LIABLE FOR ANY DAM-
AGE, WHETHER SPECIAL, INCIDENTAL, CONSEQUENTIAL,
DIRECT OR OTHERWISE, OR WHETHER KNOWN OR SHOULD
HAVE BEEN KNOWN TO IMPECCA™, INCLUDING LOST PROF-
ITS, GOODWILL, AND PROPERTY AND PERSONAL INJURY RE-
SULTING FROM ANY BREACH OF WARRANTY, THE INABILITY
TO USE THE PRODUCT OR UNDER ANY LEGAL THEORY IN
CONTRACT OR TORT. IMPECCA LIABILITY IS LIMITED TO THE
ACTUAL PURCHASE PRICE PAID TO THE RETAIL SELLER OF
THE DEFECTIVE PRODUCT.
No Impecca™ dealer, agent or employee is authorized to
make any modification, extension, change or amendment to
this warranty without the written consent and authorization
from Impecca™.
Some states do not allow the exclusion or limitation of im-
plied warranties or liability for incidental or consequential
damages, or do not allow a limitation on how long an im-
plied warranty lasts, so the above limitations or exclusions
may not apply to you. This warranty gives you specific legal
rights, and you have other rights, which vary from state to
state.
Note: Our Warranty center services only to Continental U.S.A.
ONE-YEAR LIMITED APPLIANCE WARRANTY (US)

20
ENGLISH ESPAÑOL FRANÇAIS
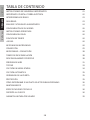
TABLA DE CONTENIDO
INSTRUCCIONES DE SEGURIDAD IMPORTANTES 21
IMPORTANTE: PUESTA A TIERRA ELÉCTRICA 22
INTERFERENCIA DE RADIO 23
SEGURIDAD 23
ENVASES Y UTENSILIOS ALIMENTARIOS 24
CONFIGURACIÓN DE SU HORNO 26
INSTRUCCIONES OPERATIVAS 28
CONFIGURAR EL RELOJ 28
FUNCIÓN DE TIEMPO 28
+30 SEG. 28
MCOCINAR EN MICROONDAS 28
CONVECCIÓN 29
MICROONDAS + CONVECCIÓN 30
TIEMPO DE DESCONGELACIÓN 30
DESCONGELAMIENTO POR PESO 30
FREIDORA DE AIRE 31
TOSTAR 33
COCCIÓN EN VARIAS ETAPAS 34
COCCIÓN AUTOMÁTICA 35
CERRADURA DE LA PUERTA 35
PROTECCIÓN 35
CÓMO DETERMINAR SI UN PLATO ES APTO PARA MICROONDAS 36
MANTENIMIENTO 37
ESPECIFICACIONES TECNICAS 38
SOPORTE AL CLIENTE 38
GARANTÍA LIMITADA POR UN AÑO 39
La page charge ...
La page charge ...
La page charge ...
La page charge ...
La page charge ...
La page charge ...
La page charge ...
La page charge ...
La page charge ...
La page charge ...
La page charge ...
La page charge ...
La page charge ...
La page charge ...
La page charge ...
La page charge ...
La page charge ...
La page charge ...
La page charge ...
La page charge ...
La page charge ...
La page charge ...
La page charge ...
La page charge ...
La page charge ...
La page charge ...
La page charge ...
La page charge ...
La page charge ...
La page charge ...
La page charge ...
La page charge ...
La page charge ...
La page charge ...
La page charge ...
La page charge ...
La page charge ...
La page charge ...
-
 1
1
-
 2
2
-
 3
3
-
 4
4
-
 5
5
-
 6
6
-
 7
7
-
 8
8
-
 9
9
-
 10
10
-
 11
11
-
 12
12
-
 13
13
-
 14
14
-
 15
15
-
 16
16
-
 17
17
-
 18
18
-
 19
19
-
 20
20
-
 21
21
-
 22
22
-
 23
23
-
 24
24
-
 25
25
-
 26
26
-
 27
27
-
 28
28
-
 29
29
-
 30
30
-
 31
31
-
 32
32
-
 33
33
-
 34
34
-
 35
35
-
 36
36
-
 37
37
-
 38
38
-
 39
39
-
 40
40
-
 41
41
-
 42
42
-
 43
43
-
 44
44
-
 45
45
-
 46
46
-
 47
47
-
 48
48
-
 49
49
-
 50
50
-
 51
51
-
 52
52
-
 53
53
-
 54
54
-
 55
55
-
 56
56
-
 57
57
-
 58
58


Impecca CM-1396ST Mode d'emploi
- Catégorie
- Micro-ondes
- Taper
- Mode d'emploi
dans d''autres langues
- English: Impecca CM-1396ST User guide
- español: Impecca CM-1396ST Guía del usuario