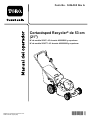
Toro Flex-Force Power System 60V MAX 21in Recycler Lawn Mower Manuel utilisateur
- Catégorie
- Tondeuses à gazon
- Taper
- Manuel utilisateur

FormNo.3434-597RevA
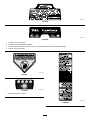
21inRecycler®LawnMower
20367and20367T
CortacéspedRecycler®de53cm(21")
20367and20367T
TondeuseRecycler®de53cm(21po)
20367and20367T
www.T oro.com.
*3434-597*A


FormNo.3434-488RevA
21inRecycler
®
LawnMower
ModelNo.20367—SerialNo.400000000andUp
ModelNo.20367T—SerialNo.400000000andUp
Registeratwww.Toro.com.
OriginalInstructions(EN)
*3434-488*A

Forassistance,pleasesee
www.Toro.com/support
forinstructionalvideos
orcontact1-888-384-9939
beforereturningthis
product.
WARNING
CALIFORNIA
Proposition65Warning
Thepowercordonthisproductcontains
lead,achemicalknowntotheState
ofCaliforniatocausebirthdefects
orotherreproductiveharm.Wash
handsafterhandling.
Useofthisproductmaycauseexposure
tochemicalsknowntotheStateof
Californiatocausecancer,birthdefects,
orotherreproductiveharm.
Introduction
Thisrotary-blade,walk-behindlawnmowerisintended
tobeusedbyresidentialhomeowners.Itisdesigned
primarilyforcuttinggrassonwell-maintainedlawns
onresidentialproperties.Itisnotdesignedforcutting
brushorforagriculturaluses.Itisdesignedprimarily
touselithium-ionbatterypackModel88640(provided
withModel20367)and88660or88675.Usingthese
productsforpurposesotherthantheirintendeduse
couldprovedangeroustoyouandbystanders.
Model20367Tdoesnotincludeabatteryora
charger.
Readthisinformationcarefullytolearnhowtooperate
andmaintainyourproductproperlyandtoavoid
injuryandproductdamage.Youareresponsiblefor
operatingtheproductproperlyandsafely.
Visitwww.T oro.comformoreinformation,including
safetytips,trainingmaterials,accessoryinformation,
helpndingadealer,ortoregisteryourproduct.
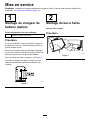
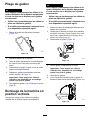
Wheneveryouneedservice,genuineToroparts,or
additionalinformation,contactanAuthorizedService
DealerorT oroCustomerServiceandhavethemodel
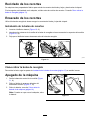
andserialnumbersofyourproductready.Figure1
identiesthelocationofthemodelandserialnumbers
ontheproduct.Writethenumbersinthespace
provided.
Important:Withyourmobiledevice,youcan
scantheQRcodeontheserialnumberdecal(if
equipped)toaccesswarranty,parts,andother
productinformation.
g275230
Figure1
1.Modelandserialnumberlocation
Contents
Safety.......................................................................3
SafetyandInstructionalDecals..........................5
Setup........................................................................7
1MountingtheBatteryCharger
(Optional)........................................................7
2AssemblingtheGrassBag...............................7
3UnfoldingtheHandle.......................................8
ProductOverview.....................................................9
Specications....................................................9
BeforeOperation.................................................10
InstallingtheBatteryPack................................10
AdjustingtheCuttingHeight..............................11
DuringOperation..................................................11
StartingtheMachine..........................................11
RecyclingtheClippings....................................12
BaggingtheClippings.......................................12
ShuttingOfftheMachine..................................12
RemovingtheBatteryPackfromthe
Machine........................................................12
OperatingTips.................................................13
AfterOperation....................................................13
ChargingtheBatteryPack................................13
CleaningundertheMachine.............................14
FoldingtheHandle...........................................14
StoringtheMachineintheVertical-Stow
Position.........................................................14
Maintenance...........................................................16
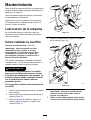
LubricatingtheMachine....................................16
ReplacingtheBlade..........................................16
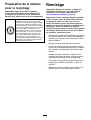
PreparingtheBatteryPackfor
Recycling......................................................17
Storage...................................................................17
Troubleshooting......................................................18
©2019—TheToro®Company
8111LyndaleAvenueSouth
Bloomington,MN55420
2
Contactusatwww.Toro.com.
PrintedinChina
AllRightsReserved

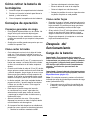
Safety
IMPORTANTSAFETY
INSTRUCTIONS
WARNING—Whenusinganelectricmachine,always
readandfollowbasicsafetywarningsandinstructions
toreducetheriskofre,electricshock,orinjury,
includingthefollowing:
I.Training
1.Theoperatorofthemachineisresponsiblefor
anyaccidentsorhazardsoccurringtoothersor
theirproperty.
2.Donotallowchildrentouseorplaywiththe
machine,batterypack,orthebatterycharger;
localregulationsmayrestricttheageofthe
operator.
3.Donotallowpeoplewithreducedphysical,
sensory,ormentalcapabilitiesorwithout
experienceandknowledgetousethemachine,
batterypack,orbatterychargerunlessthey
receiveinstructionorsupervisiononusingit
safelyandunderstandthehazardsinvolved
whileusingit.
4.Beforeusingthemachine,batterypack,and
batterycharger,readalltheinstructionsand
cautionarymarkingsontheseproducts.
5.Becomefamiliarwiththecontrolsandproper
useofthemachine,batterypack,andbattery
charger.
II.Preparation
1.Keepbystanders,especiallychildrenandpets,
outoftheoperatingarea.
2.Donotoperatethemachinewithoutallguards
andsafetydevices,suchasdeectorsandgrass
catchers,inplaceandfunctioningproperlyon
themachine.
3.Inspecttheareawhereyouwillusethemachine
andremoveallobjectsthatcouldinterferewith
theoperationofthemachineorthatthemachine
couldthrow.
4.Beforeusingthemachine,ensurethattheblade,
bladebolt,andbladeassemblyarenotwornor
damaged.Replaceanydamagedorunreadable
labels.
5.UseonlythebatterypackspeciedbyToro.
Usingotheraccessoriesandattachmentsmay
increasetheriskofinjuryandre.
6.Pluggingthebatterychargerintoanoutletthat
isnot100to240Vcancauseareorelectric
shock.Donotplugthebatterychargerintoan
outletotherthan100to240V.Foradifferent
styleofconnection,useanattachmentplug
adapterofthepropercongurationforthepower
outletifneeded.
7.Donotuseadamagedormodiedbattery
packorbatterycharger,whichmayexhibit
unpredictablebehaviorthatresultsinre,
explosion,orriskofinjury.
8.Ifthesupplycordtothebatterychargeris
damaged,contactanAuthorizedServiceDealer
toreplaceit.
9.Donotusenon-rechargeablebatteries.
10.Chargethebatterypackwithonlythebattery
chargerspeciedbyToro.Achargersuitablefor
1typeofbatterypackmaycreateariskofre
whenusedwithanotherbatterypack.
11.Chargethebatterypackinawell-ventilatedarea
only.
12.Donotexposeabatterypackorbatterycharger
toreortotemperatureshigherthan68°C
(154°F).
13.Followallcharginginstructionsanddo
notchargethebatterypackoutsideofthe
temperaturerangespeciedintheinstructions.
Otherwise,youmaydamagethebatterypack
andincreasetheriskofre.
14.Dressproperly—Wearappropriateclothing,
includingeyeprotection;longpants;substantial,
slip-resistantfootwear(notbarefootorwearing
sandals);andhearingprotection.Tiebacklong
hairanddonotwearloosejewelrythatcanget
caughtinmovingparts.Wearadustmaskin
dustyoperatingconditions.Useofrubbergloves
isrecommended.
III.Operation
1.Contactwiththemovingbladewillcauseserious
injury.Keepyourhandsorfeetnearawayfrom
thecuttingareaandallmovingpartsofthe
machine.Keepclearofanydischargeopening.
2.Usingthismachineforpurposesotheranits
intendedusecouldprovedangeroustoyouand
bystanders.
3.Disengagetheself-propeldrive(ifequipped)
beforestartingthemachine.
4.Donottilttheappliancewhenstartingthemotor.
5.Preventunintentionalstarting—Ensurethatthe
electric-startbuttonisremovedfromtheignition
beforeconnectingthebatterypackandhandling
themachine.
6.Useyourfullattentionwhileoperatingthe
machine.Donotengageinanyactivitythat
causesdistractions;otherwise,injuryorproperty
damagemayoccur.
3

7.Stopthemachine,removetheelectric-start
button,removethebatterypackfromthe
machine,andwaitforallmovementtostop
beforeadjusting,servicing,cleaning,orstoring
themachine.
8.Removethebatterypackandelectric-start
buttonfromthemachinewheneveryouleaveit
unattendedorbeforechangingaccessories.
9.Donotforcethemachine—Allowthemachineto
dothejobbetterandsaferattherateforwhichit
wasdesigned.
10.Stayalert—Watchwhatyouaredoinganduse
commonsensewhenoperatingthemachine.
Donotusethemachinewhileill,tired,orunder
theinuenceofalcoholordrugs.
11.Operatethemachineonlyingoodvisibilityand
appropriateweatherconditions.Donotoperate
themachinewhenthereistheriskoflightning.
12.Useextremecautionwhenreversingorpulling
themachinetowardyou.
13.Keepproperfootingandbalanceatalltimes,
especiallyonslopes.Mowacrosstheface
ofslopes,neverupanddown.Useextreme
cautionwhenchangingdirectionsonslopes.Do
notmowexceedinglysteepslopes.Walk,never
runwiththemachine.
14.Donotdirectthedischargematerialtoward
anyone.Avoiddischargingmaterialagainsta
wallorobstruction;materialmayricochettoward
you.Stoptheblade(s)whencrossinggravel
surfaces.
15.Watchforholes,ruts,bumps,rocks,orother
hiddenobjects.Uneventerraincouldcauseyou
toloseyourbalanceorfooting.
16.Wetgrassorleavescancauseseriousinjuryif
youslipandcontacttheblade.Avoidmowingin
wetconditionsorwhenitisraining.
17.Ifthemachinestrikesanobjectorstartsto
vibrate,immediatelyshutoffthemachine,
removetheelectric-startbutton,removethe
batterypack,andwaitforallmovementtostop
beforeexaminingthemachinefordamage.
Makeallnecessaryrepairsbeforeresuming
operation.
18.Stopthemachineandremovetheelectric-start
buttonbeforeloadingthemachineforhauling.
19.Underabusiveconditions,thebatterypackmay
ejectliquid;avoidcontact.Ifyouaccidently
comeintocontactwiththeliquid,ushwith
water.Iftheliquidcontactsyoureyes,seek
medicalhelp.Liquidejectedfromthebattery
packmaycauseirritationorburns.
IV.MaintenanceandStorage
1.Stopthemachine,removetheelectric-start
button,removethebatterypackfromthe
machine,andwaitforallmovementtostop
beforeadjusting,servicing,cleaning,orstoring
themachine.
2.Donotattempttorepairthemachineexceptas
indicatedintheinstructions.HaveanAuthorized
ServiceDealerperformserviceonthemachine
usingidenticalreplacementparts.
3.Wearglovesandeyeprotectionwhenservicing
themachine.
4.Sharpenadullbladeonbothsidestomaintain
balance.Cleanthebladeandensurethatitis
balanced.
5.Replacethebladeifitisbent,worn,orcracked.
Anunbalancedbladecausesvibration,which
coulddamagethemotororcausepersonal
injury.
6.Whenservicingtheblade,beawarethatthe
bladecanstillmoveeventhoughthepower
sourceisoff.
7.Checkthegrasscollectionbagfrequentlyfor
deteriorationorwear,andreplaceawornbag
withaT oro[replacement]bag.
8.Forbestperformance,useonlygenuineToro
replacementpartsandaccessories.Other
replacementpartsandaccessoriescouldbe
dangerous,andsuchusecouldvoidtheproduct
warranty.
9.Maintainthemachine—Keepcuttingedges
sharpandcleanforthebestandsafest
performance.Keephandlesdry,clean,andfree
fromoilandgrease.Keepguardsinplaceandin
workingorder.Keepbladessharp.Useidentical
replacementbladesonly.
10.Checkthemachinefordamagedparts—Ifthere
aredamagedguardsorotherparts,determine
whetherthemachinewilloperateproperly.
Checkformisalignedandbindingmovingparts,
brokenparts,mounting,andanyothercondition
thatmayaffectitsoperation.Unlessindicated
intheinstructions,haveanAuthorizedService
Dealerrepairorreplaceadamagedguardor
part.
11.Whenthebatterypackisnotinuse,keepit
awayfrommetalobjectssuchaspaperclips,
coins,keys,nails,andscrewsthatcanmakea
connectionfrom1terminaltoanother.Shorting
thebatteryterminalsmaycauseburnsorare.
12.Checkthebladeandmotormountingbolts
frequentlyfortightness.
13.Whenyouarenotusingthemachine,storeit
indoorsinadry,secureplaceoutofthereach
ofchildren.
4

14.CAUTION—Amistreatedbatterypackmay
presentariskofreorchemicalburn.Donot
disassemblethebatterypack.Donotheatthe
batterypackabove68°C(154°F)orincinerate
it.ReplacethebatterypackwithagenuineToro
batterypackonly;usinganothertypeofbattery
packmaycauseareorexplosion.Keep
batterypacksoutofthereachofchildrenand
intheoriginalpackaginguntilyouarereadyto
usethem.
15.Donotdisposeofthebatteryinare.The
cellmayexplode.Checkwithlocalcodesfor
possiblespecialdisposalinstructions.
SAVETHESE
INSTRUCTIONS
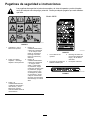
SafetyandInstructionalDecals
Safetydecalsandinstructionsareeasilyvisibletotheoperatorandarelocatednearanyarea
ofpotentialdanger.Replaceanydecalthatisdamagedormissing.
decal140-3811
140-3811
1.Warning—readthe
Operator'sManual.
4.Cutting/dismember
hazard,mower
blade—stayawayfrom
movingparts;keepall
guardsandshieldsin
place.
2.Thrownobject
hazard—keepbystanders
away.
5.Cutting/dismember
hazard,mowerblade—do
notmowupordown
slopes;onlymowacross
slopes;shutofftheengine,
waitformovingpartsto
stop,andpickupdebris
beforemowing;look
behindyouwhenmowing
inreverse.
3.Cutting/dismember
hazard,mower
blade—removethekey
andreadtheOperator’s
Manualbeforeperforming
maintenance.
Model88640
decal140-2155
140-2155
1.ReadtheOperator’s
Manual.
3.KeeptheLithiumIon
batteryawayfromopen
reorames.
2.Call2Recycle
®
battery
recyclingprogram
4.Donotexposetorain.
decal133-8061
133-8061
5

decal137-9462
137-9462
decal137-9463
137-9463
1.Thebatterypackischarging.
2.Thebatterypackisfullycharged.
3.Thebatterypackisoverorundertheappropriatetemperaturerange.
4.Batterypackchargingfault
decal94-8072
94-8072
decal137-9461
137-9461
1.Batterychargestatus
decal139-8986
139-8986
6

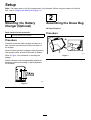
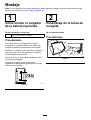
Setup
Note:Thebatterypackisnotfullychargedwhenitispurchased.Beforeusingthemachinefortherst
time,refertoChargingtheBatteryPack(page13).
1
MountingtheBattery
Charger(Optional)
Partsneededforthisprocedure:
2
Mountinghardware(notincluded)
Procedure
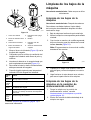
Ifdesired,mountthebatterychargersecurelyona
wallusingthewall-mountkeyholesonthebackof
thecharger.
Mountitindoors(suchasagarageorotherdryplace),
nearapoweroutlet,andoutofthereachofchildren.
RefertoFigure2forassistanceinmountingthe
charger.
Slidethechargerovertheappropriatelypositioned
hardwaretosecurethechargerinplace(hardware
notincluded).
g290534
Figure2
2
AssemblingtheGrassBag
NoPartsRequired
Procedure
g235791
Figure3
7

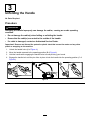
3
UnfoldingtheHandle
NoPartsRequired
Procedure
WARNING
Unfoldingthehandleimproperlycandamagethecables,causinganunsafeoperating
condition.
•Donotdamagethecable(s)whenfoldingorunfoldingthehandle.
•Ensurethatthecable(s)areroutedtotheoutsideofthehandle.
•Ifacableisdamaged,contactanAuthorizedServiceDealer.
Important:Removeanddiscardtheprotectiveplasticsheetthatcoversthemotorandanyother
plasticorwrappingonthemachine.
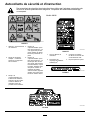
1.Unlockthehandlelocks(AofFigure4).
2.Movethehandlerearwardtotheoperatingposition(BofFigure4).
3.Holdthehandlewhileengagingthehandlelockstoavoidpinchingyourhands.
4.Engagethehandlelockuntilthepinclicksinplacetolockthehandleintotheoperatingposition(Cof
Figure4).
g304886
Figure4
8

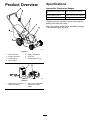
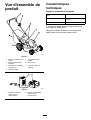
ProductOverview
g296936
Figure5
1.Blade-controlbar5.Batterycompartment
2.Electric-startbutton
6.Grassbag
3.Handlelock(2)7.Cutting-heightlever(2)
4.Reardeector
g292995
Figure6
1.Batterycharger(included
withModel20367)
2.Batterypackmodel88640
(includedwithModel
20367)
Specications
AppropriateTemperatureRanges
Charge/storethebatterypack
at
5°C(41°F)to40°C(104°F)*
Usethebatterypackat
-30°C(-22°F)to49°C(120°F)*
Usethemachineat
0°C(32°F)to49°C(120°F)*
*Chargingtimewillincreaseifyoudonotchargethe
batterypackwithinthisrange.
Storethemachine,batterypack,andbatterycharger
inanenclosedclean,dryarea.
9

Operation
BeforeOperation
InstallingtheBatteryPack
Important:Operatethebatterypackonlyintemperaturesthatarewithintheappropriaterange;referto
Specications(page9).
1.Makesurethattheventsonthebatteryareclearofanydustanddebris.
2.Liftupthebattery-compartmentlid(AofFigure7).
3.Lineupthecavityinthebatterypackwiththetongueonthemachineandslidethebatterypackintothe
compartmentuntilitlocksintoplace(BofFigure7).
4.Closethebattery-compartmentlid(CofFigure7).
g251221
Figure7
10

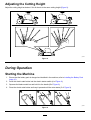
AdjustingtheCuttingHeight
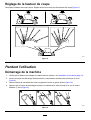
Adjustthecuttingheightasdesired.Setallwheelstothesamecuttingheight(Figure8).
g304633
Figure8
DuringOperation
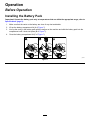
StartingtheMachine
1.Ensurethatthebatterypackischargedandinstalledinthemachine;refertoInstallingtheBatteryPack
(page10).
2.Inserttheelectric-startbuttonintotheelectricstarterswitch(AofFigure9).
3.Squeezetheblade-controlbarandholdittothehandle(BofFigure9).
4.Presstheelectric-startbuttonandkeepitpresseduntilthemotorstarts(CofFigure9).
g296941
Figure9
11

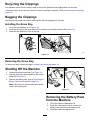
RecyclingtheClippings
Yourmachinecomesfromthefactoryreadytorecyclethegrassandleafclippingsbackintothelawn.
Ifthegrassbagisonthemachine,removeitbeforerecyclingtheclippings.RefertoRemovingtheGrassBag
(page12).
BaggingtheClippings
Usethegrassbagwhenyouwanttocollectgrassandleafclippingsfromthelawn.
InstallingtheGrassBag
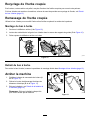
1.Liftupthereardeector(AofFigure10).
2.Inserttherodendsofthegrassbagintothenotchesinthehandlebrackets(BofFigure10).
3.Allowthereardeectortorestonthebag.
g240796
Figure10
RemovingtheGrassBag
Toremovethebag,reversethestepsinInstallingtheGrassBag(page12).
ShuttingOfftheMachine
1.Releasetheblade-controlbar(AofFigure11).
2.Removetheelectric-startbuttonfromtheelectric
starter(BofFigure11).
3.Removethebatterypack;refertoRemovingthe
BatteryPackfromtheMachine(page12).
Note:Wheneveryouarenotusingthemachine,
removethebatterypack.
g296945
Figure11
RemovingtheBatteryPack
fromtheMachine
1.Liftupthebattery-compartmentlid.
2.Pressthebattery-packlatchtoreleasethe
batterypackandremovethebatterypack.
3.Closethebattery-compartmentlid.
12

OperatingTips
GeneralMowingTips
•Avoidstrikingsolidobjectswiththeblade.Never
deliberatelymowoveranyobject.
•Forbestperformance,installanewbladebefore
thecuttingseasonbegins.
•ReplacethebladewhennecessarywithaT oro
replacementblade.
CuttingGrass
•Cutonlyaboutathirdofthegrassbladeatatime.
Forimprovedqualityofcut,runtime,andbagging,
cutgrassatahigherheightofcut.
•Donotcutbelow51mm(2inches)unlessthe
grassissparseoritislatefallwhengrassgrowth
beginstoslowdown.
•Whencuttinggrassover15cm(6inches)tall,
mowatthehighestcuttingheightsettingandwalk
slower;thenmowagainatalowersettingforthe
bestlawnappearance.Ifthegrassistoolong,the
machinemayplugandcausethemotortostall.
•Wetgrassandleavestendtoclumpontheyard
andcancausethemachinetoplugorthemotorto
stall.Avoidmowinginwetconditions.
•Beawareofapotentialrehazardinverydry
conditions,followalllocalrewarnings,andkeep
themachinefreeofdrygrassandleafdebris.
•Alternatethemowingdirection.Thishelps
dispersetheclippingsoverthelawnforeven
fertilization.
•Ifthenishedlawnappearanceisunsatisfactory,
try1ormoreofthefollowing:
–Replacethebladeorhaveitsharpened.
–Walkataslowerpacewhilemowing.
–Raisethecuttingheightonyourmachine.
–Cutthegrassmorefrequently.
–Overlapcuttingswathsinsteadofcuttingafull
swathwitheachpass.
CuttingLeaves
•Aftercuttingthelawn,ensurethathalfofthelawn
showsthroughthecutleafcover.Youmayneed
tomakemorethanasinglepassovertheleaves.
•Iftherearemorethan13cm(5inches)ofleaves
onthelawn,mowatahighercuttingheightand
thenagainatthedesiredcuttingheight.
•Slowdownyourmowingspeedifthemachine
doesnotcuttheleavesnelyenough.
AfterOperation
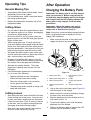
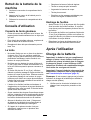
ChargingtheBatteryPack
Important:Thebatterypackisnotfullycharged
whenyoupurchaseit.Beforeusingthetoolfor
thersttime,placethebatterypackinthecharger
andchargeituntiltheLEDdisplayindicatesthe
batterypackisfullycharged.Readallsafety
precautions.
Important:Chargethebatterypackonlyin
temperaturesthatarewithintheappropriate
range;refertoSpecications(page9).
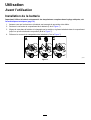
Note:Atanytime,pressthebattery-charge-indicator
buttononthebatterypacktodisplaythecurrent
charge(LEDindicators).
1.Makesurethattheventsonthebatteryand
chargerareclearofanydustanddebris.
g290533
Figure12
1.Batterypackcavity
5.LEDindicators(current
charge)
2.Batterypackventingareas6.Handle
3.Batterypackterminals
7.ChargerLEDindicator
light
4.Battery-charge-indicator
button
8.Chargerventingareas
2.Lineupthecavityinthebatterypack(Figure12)
withthetongueonthecharger.
3.Makesurethattheventsonthebatterycharger
areclearofanydustanddebris.
4.Slidethebatterypackintothechargeruntilitis
fullyseated(Figure12).
5.Toremovethebatterypack,slidethebattery
backwardoutofthecharger.
6.RefertothefollowingtabletointerprettheLED
indicatorlightonthebatterycharger.
13

Indicator
light
Indicates
Off
Nobatterypackinserted
Green
blinking
Batterypackischarging
Green
Batterypackischarged
Red
Batterypackand/orbatterychargerisoverorunder
theappropriatetemperaturerange
Red
blinking
Batterypackchargingfault*
*RefertoTroubleshooting(page18)formore
information.
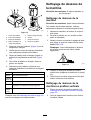
CleaningundertheMachine
ServiceInterval:Beforeeachuseordaily
CleaningundertheMachine
ServiceInterval:Aftereachuse
Forbestresults,cleanunderthemachinesoonafter
youhavecompletedmowing.
1.Lowerthemachinetoitslowestcutting-height
setting.
2.Movethemachineontoapavedlevelsurface.
3.Withthemotorrunningandthebladeengaged,
sprayastreamofwaterinfrontoftheright,rear
wheel(Figure13).
Note:Thewaterwillsplashintothepathofthe
blade,cleaningouttheclippings.
g002600
Figure13
4.Whennomoreclippingscomeout,stopthe
waterandmovethemachinetoadryarea.
5.Runthemotorforafewminutestodrythe
undersideofthemachine.
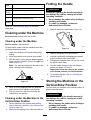
CleaningundertheMachineinthe
Vertical-StowPosition
1.Setthemachineinthevertical-stowposition;
refertoStoringtheMachineintheVertical-Stow
Position(page14).
2.Washouttheclippingsfromunderthemachine.
FoldingtheHandle
WARNING
Foldingorunfoldingthehandleimproperly
candamagethecables,causinganunsafe
operatingcondition.
•Donotdamagethecableswhenfoldingor
unfoldingthehandle.
•Ifacableisdamaged,contactan
AuthorizedServiceDealer.
1.Removetheelectric-startbutton(Figure14).
g296946
Figure14
2.Removethebatteryfromthemachine.
3.Holdthehandlewhiledisengagingthehandle
lockstoavoidpinchingyourhands.
4.Disengagethehandlelocksuntilyoucanmove
theupperhandlefreely.
5.Foldthehandleforwardtothefullyforward
positionasshowninFigure16.
Important:Routethecablestotheoutside
ofthehandlelocksasyoufoldthehandle.
6.Tounfoldthehandle,referto3Unfoldingthe
Handle(page8).
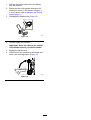
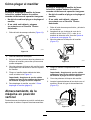
StoringtheMachineinthe
Vertical-StowPosition
Youcanstoreyourmachineintheverticalpositionto
minimizestoragespace.
WARNING
Foldingorunfoldingthehandleimproperly
candamagethecables,causinganunsafe
operatingcondition.
•Donotdamagethecableswhenfoldingor
unfoldingthehandle.
•Ifacableisdamaged,contactan
AuthorizedServiceDealer.
14

1.Removetheelectric-startbuttonandbattery
fromthemachine.
2.Ensurethatthecutting-heightsettingonthe
machineis44mm(1-3/4inches)orhigher;if
itisnot,raiseit;refertoAdjustingtheCutting
Height(page11).
3.Disengagethehandlelocks(Figure15).
g297000
Figure15
4.Foldthehandlefullyforward.
Important:Routethecablestotheoutside
ofthehandlelocksasyoufoldthehandle.
5.Engagethehandlelocks.
6.Liftthefrontofthemachinebythehandleand
moveitintoastoragespace(Figure16).
g297023
Figure16
15

Maintenance
Removetheelectric-startbuttonandbatterypack
fromthemachinebeforemaintainingorcleaningthe
machine.
Useonlythemanufacturer’srecommended
replacementpartsandaccessories.
Inspectandmaintainthemachineregularly.Have
themachinerepairedonlybyanAuthorizedService
Dealer.
LubricatingtheMachine
Youdonotneedtolubricatethemachine;allthe
bearingshavebeenlubricatedatthefactoryforthe
lifeofthemachine.
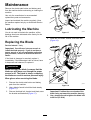
ReplacingtheBlade
ServiceInterval:Yearly
Important:Youwillneedatorquewrenchto
installthebladeproperly.Ifyoudonothavea
torquewrenchorareuncomfortableperforming
thisprocedure,contactanAuthorizedService
Dealer.
Ifthebladeisdamagedorcracked,replaceit
immediately.Ifthebladeedgeisdullornicked,have
itsharpenedandbalanced,orreplaceit.
WARNING
Whenservicingtheblade,beawarethatthe
bladecanstillmoveeventhoughthepower
sourceisoff.Thebladeissharp;contacting
thebladecanresultinseriouspersonalinjury.
Weargloveswhenservicingtheblade.
1.Removetheelectric-startbuttonandbattery
packfromthemachine.
2.Useablockofwoodtoholdthebladesteady
(Figure17).
3.Removethebladebolt,bracket,andblade;save
thebracketandbladebolt(Figure17).
g231389
Figure17
4.Installthenewblade,bracket,andbladebolt
(Figure18).
g231390
Figure18
Important:Positionthecurvedendsofthe
bladefacinguptowardthemachinehousing.
5.Useatorquewrenchtotightenthebladebolt
to68N∙m(50ft-lb).
16

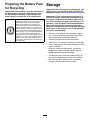
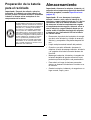
PreparingtheBatteryPack
forRecycling
Important:Uponremoval,covertheterminalsof
thebatterypackwithheavy-dutyadhesivetape.
Donotattempttodestroyordisassemblethe
batterypackorremoveanyofitscomponents.
Lithium-ionbatterypackslabeledwiththe
Call2Recyclesealcanberecycledatany
participatingretailerorbatteryrecycling
facilityintheCall2Recycleprogram(US
andCanadaonly).Tolocateaparticipating
retailerorfacilityclosesttoyou,pleasecall
1-800-822-8837orvisitwww.call2recycle.org.
Ifyoucannotlocateaparticipatingretaileror
facilitynearby,orifyourrechargeablebattery
isnotlabeledwiththeCall2Recycleseal,
pleasecontactyourlocalmunicipalityformore
informationonhowtoresponsiblyrecyclethe
battery.IfyouarelocatedoutsideoftheUS
andCanada,pleasecontactyourauthorized
Torodistributor.
Storage
Important:Storethemachine,batterypack,and
chargeronlyintemperaturesthatarewithinthe
appropriaterange;refertoSpecications(page9).
Important:Ifyouarestoringthemachinefor3
monthsorlonger,removethebatterypackfrom
themachineandchargethebatterypackuntil2
or3LEDindicatorsturngreenonthebattery.Do
notstoreafullychargedorfullydepletedbattery.
Whenyouarereadytousethemachineagain,
chargethebatterypackuntiltheleftindicatorlight
turnsgreenonthechargerorall4LEDindicators
turngreenonthebattery.
•Disconnecttheproductfromthepowersupply
(i.e.,removethebatterypackandelectric-start
button)andcheckfordamageafteruse.
•Cleanallforeignmaterialfromtheproduct.
•Whennotinuse,storethemachine,electric-start
button,batterypack,andbatterychargeroutofthe
reachofchildren.
•Keepthemachine,batterypack,andbattery
chargerawayfromcorrosiveagents,suchas
gardenchemicalsandde-icingsalts.
•T oreducetheriskofseriouspersonalinjury,do
notstorethebatterypackoutsideorinvehicles.
•Storethemachine,batterypack,andbattery
chargerinanenclosedclean,dryarea.
17

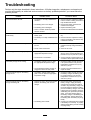
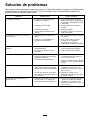
Troubleshooting
Performonlythestepsdescribedintheseinstructions.Allfurtherinspection,maintenance,andrepairwork
mustbeperformedbyanauthorizedservicecenterorasimilarlyqualiedspecialistifyoucannotsolvethe
problemyourself.
Problem
PossibleCauseCorrectiveAction
1.Thebatteryisnotfullyinstalledinthe
machine.
1.Removeandthenreplacethebattery
intothemachine,makingsurethatitis
fullyinstalledandlatched.
2.Thebatterypackisnotcharged.
2.Removethebatterypackfromthe
machineandchargeit.
3.Thebatterypackisdamaged.3.Replacethebatterypack.
Themachinedoesnotstart.
4.Thereisanotherelectricalproblem
withthemachine.
4.ContactanAuthorizedServiceDealer.
1.Thereismoistureontheleadsofthe
batterypack.
1.Allowthebatterypacktodryorwipeit
dry.
Themachinedoesnotrunordoesnotrun
continuously.
2.Thebatteryisnotfullyinstalledintothe
tool.
2.Removeandthenreplacethebattery
intothetoolmakingsurethatitisfully
installedandlatched.
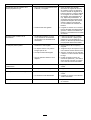
1.Thebatterypackchargecapacityis
toolow.
1.Removethebatterypackfromthe
machineandfullychargethebattery
pack.
Themachinedoesnotreachfullpower.
2.Theairventsareblocked.
2.Cleantheairvents.
1.Thebatterypackisoverorunderthe
appropriatetemperaturerange.
1.Movethebatterypacktoaplace
whereitisdryandthetemperatureis
between5°C(41°F)and40°C(104°F).
Thebatterypackloseschargequickly.
2.Themachineisoverloaded
2.Cutthegrassatahigherheightofcut
orwalkataslowerpacewhilemowing.
1.Thebatterychargerisoverorunder
theappropriatetemperaturerange.
1.Unplugthebatterychargerandmove
ittoaplacewhereitisdryandthe
temperatureisbetween5°C(41°F)
and40°C(104°F).
Thebatterychargerisnotworking.
2.Theoutletthatthebatterychargeris
pluggedintodoesnothavepower.
2.Contactyourlicensedelectricianto
repairtheoutlet.
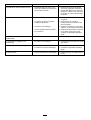
TheLEDindicatorlightonthebattery
chargerisred.
1.Thebatterychargerand/orbattery
packisoverorundertheappropriate
temperaturerange.
1.Unplugthebatterychargerandmove
thebatterychargerandbatterypack
toaplacewhereitisdryandthe
temperatureisbetween5°C(41°F)
and40°C(104°F).
1.Thereisanerrorinthecommunication
betweenthebatterypackandthe
charger.
1.Removethebatterypackfromthe
batterycharger,unplugthebattery
chargerfromtheoutlet,andwait10
seconds.Plugthebatterychargerinto
theoutletagainandplacethebattery
packonthebatterycharger.IftheLED
indicatorlightonthebatterychargeris
stillblinkingred,repeatthisprocedure
again.IftheLEDindicatorlighton
thebatterychargerisstillblinkingred
after2attempts,properlydisposeof
thebatterypackatabatteryrecycling
facility.
TheLEDindicatorlightonthebattery
chargerisblinkingred.
2.Thebatterypackisweak.
2.Contactyourauthorizedservicedealer
ifthebatteryisinwarranty,orproperly
disposeofthebatterypackatabattery
recyclingfacility.
18
La page est en cours de chargement...
La page est en cours de chargement...
La page est en cours de chargement...
La page est en cours de chargement...
La page est en cours de chargement...
La page est en cours de chargement...
La page est en cours de chargement...
La page est en cours de chargement...
La page est en cours de chargement...
La page est en cours de chargement...
La page est en cours de chargement...
La page est en cours de chargement...
La page est en cours de chargement...
La page est en cours de chargement...
La page est en cours de chargement...
La page est en cours de chargement...
La page est en cours de chargement...
La page est en cours de chargement...
La page est en cours de chargement...
La page est en cours de chargement...
La page est en cours de chargement...
La page est en cours de chargement...
La page est en cours de chargement...
La page est en cours de chargement...
La page est en cours de chargement...
La page est en cours de chargement...
La page est en cours de chargement...
La page est en cours de chargement...
La page est en cours de chargement...
La page est en cours de chargement...
La page est en cours de chargement...
La page est en cours de chargement...
La page est en cours de chargement...
La page est en cours de chargement...
La page est en cours de chargement...
La page est en cours de chargement...
La page est en cours de chargement...
La page est en cours de chargement...
La page est en cours de chargement...
La page est en cours de chargement...
La page est en cours de chargement...
La page est en cours de chargement...
La page est en cours de chargement...
La page est en cours de chargement...
-
 1
1
-
 2
2
-
 3
3
-
 4
4
-
 5
5
-
 6
6
-
 7
7
-
 8
8
-
 9
9
-
 10
10
-
 11
11
-
 12
12
-
 13
13
-
 14
14
-
 15
15
-
 16
16
-
 17
17
-
 18
18
-
 19
19
-
 20
20
-
 21
21
-
 22
22
-
 23
23
-
 24
24
-
 25
25
-
 26
26
-
 27
27
-
 28
28
-
 29
29
-
 30
30
-
 31
31
-
 32
32
-
 33
33
-
 34
34
-
 35
35
-
 36
36
-
 37
37
-
 38
38
-
 39
39
-
 40
40
-
 41
41
-
 42
42
-
 43
43
-
 44
44
-
 45
45
-
 46
46
-
 47
47
-
 48
48
-
 49
49
-
 50
50
-
 51
51
-
 52
52
-
 53
53
-
 54
54
-
 55
55
-
 56
56
-
 57
57
-
 58
58
-
 59
59
-
 60
60
-
 61
61
-
 62
62
-
 63
63
-
 64
64


Toro Flex-Force Power System 60V MAX 21in Recycler Lawn Mower Manuel utilisateur
- Catégorie
- Tondeuses à gazon
- Taper
- Manuel utilisateur
dans d''autres langues
Documents connexes
-
Toro Flex-Force Power System 60V MAX 21in Recycler Lawn Mower Manuel utilisateur
-
-
-
-
-
Toro Flex-Force Power System 60V MAX 22in Recycler Lawn Mower Manuel utilisateur
-
-