REOLINK Duo Floodlight WiFi Mode d'emploi
- Taper
- Mode d'emploi

November 2022
QSG1_A_EN
Apply to: Reolink Duo Floodlight WiFi
Quick Start Guide
@ReolinkTech https://reolink.com
58.03.001.0287

English English1 2
What's in the Box 2
Camera Introduction 3
Connection Diagram 5
Set up the Camera 6
Mount the Camera 7
Specication 12
NoticationofCompliance 12
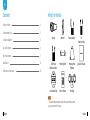
What's in the Box
Pack of Screws
Camera
Mounting Plate
Antenna * Power Adapter *
4.5M Power
Extension Cable *
1M
Ethernet Cable
Surveillance Sign
Quick Start GuideMounting Hole
Template
Floodlight
EN
Contents
NOTE:
*Thepoweradapter,antennas,and4.5mpowerextensioncable
onlycomewiththeWiFiversion.

English English3 4
RST RST
RST
21
RST
RST
LED LAN DC
LED LAN DC
RST
RST
RST
RST
2
1
21
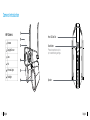
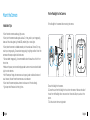
Camera Introduction
Lens
Daylight Sensor
Antenna
WiFi Camera
Speaker
Micro SD Card Slot
Reset Button
*Press the reset button with a
pintorestorefactorysettings.
Mic
Infrared Lights
Floodlight
11
11
22
22
33
33
44
44
55
55
66
66

English English5 6
RST RST
RST
21
RST
RST
LED LAN DC
LED LAN DC
Connection Diagram
Beforeinitialsetup,followthestepsbelowtoconnectyourcamera.
1.ConnectthecameratoaLANportonyourrouterwithanEthernetcable.
2. Use the power adapter to power on the camera.
Camera
PowerCable
Router
NetworkCable
PowerAdapter
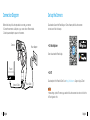
Set up the Camera
• On Smartphone
• On PC
ScantodownloadtheReolinkApp.
DownloadpathoftheReolinkClient:Gotohttps://reolink.com>Support>App&Client.
DownloadandLaunchtheReolinkApporClientsoftware,andfollowtheonscreen
instructionstonishinitialsetup.
NOTE:
•WhensettinguptheWiFicamera,youneedtofollowtheonscreeninstructionstonishthe
WiFicongurationrst.

English English7 8
Mount the Camera
•Donotfacethecameratowardsanylightsources.
•Donotpointthecameratowardsaglasswindow.Or,itmayresultinpoorimagequality
becauseofthewindowglarebyinfraredLEDs,ambientlightsorstatuslights.
•Donotplacethecamerainashadedareaandpointittowardsawell-litarea.Or,itmay
resultinpoorimagequality.Toensurebestimagequality,thelightingconditionforboththe
cameraandthecaptureobjectshallbethesame.
•Toensurebetterimagequality,it’srecommendedtocleanthelenswithasoftclothfrom
time to time.
•Makesurethepowerportsarenotdirectlyexposedtowaterormoistureandnotblocked
bydirtorotherelements.
•WithIPwaterproofratings,thecameracanworkproperlyunderconditionslikerainand
snow.However,itdoesn'tmeanthecameracanworkunderwater.
•Donotinstallthecameraatplaceswhererainandsnowcanhitthelensdirectly.
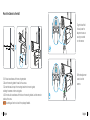
•Trytokeeptheleftlenslevelwiththerightlens. 1.Screwtheoodlighttothecamera.
2.Connectthewirefromtheoodlighttothewirefromthecamera.Makesurethesideof
thewirefromtheoodlightwithanarrowmarkonitfacestheLANport,asshowninthe
picture.
3.Tuck the wires into the mounting bracket.
Fixtheoodlighttothecamerabeforemountingthecamera.
Installation Tips
Fixthe Floodlight to the Camera
RST RST
RST
21
RST
RST
LED LAN DC
LED LAN DC
RST RST
RST
21
RST
RST
LED LAN DC
LED LAN DC
RST RST
RST
21
RST
RST
LED LAN DC
LED LAN DC

English English9 10
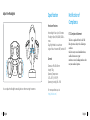
1. Drillholesinaccordancewiththemountingtemplate.
2. Securethemountingplatetothewallwithtwoscrews.
3. Connectthesteelwireropeinthemountingbrackettothemountingplate,
andhangthecameraonthemountingplate.
4. Drillintothewallinaccordancewiththeholeonthemountingbracket.Lockthecamerain
position with a screw.
Mount the Camera to the Wall
NOTE: Usethedrywallanchorsincluedinthepackageifneeded.
RST RST
RST
21
RST
RST
LED LAN DC
LED LAN DC
RST RST
RST
21
RST
RST
LED LAN DC
LED LAN DC
RST RST
RST
21
RST
RST
LED LAN DC
LED LAN DC
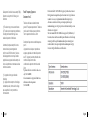
Togetthebesteld
ofview,loosenthe
adjustment screw on
securitymountand
turn the camera.
Stientheadjustment
screwtolockthe
camera.
RST RST
RST
21
RST
RST
LED LAN DC
LED LAN DC
RST RST
RST
21
RST
RST
LED LAN DC
LED LAN DC

English English11 12
Adjust the Floodlights
Youcanadjusttheoodlightsmanuallybeforeoraftermountingthecamera.
RST RST
RST
21
RST
RST
LED LAN DC
LED LAN DC
Dimension:195x103x56mm
Weight:700g
OperatingTemperature:
-10°C~+55°C(14°F~131°F)
OperatingHumidity:10%~90%
Formorespecications,visit
https://reolink.com/.
Notication of
Compliance
FCC Compliance Statement
This device complies with Part 15 of the FCC
Rules. Operation is subject to the following two
conditions:
this device may not cause harmful interference,
and this device must accept any
interference received, including interference that
may cause undesired operation.
Specication
InfraredNightVision:Upto30meters
Floodlight:40pcs/15W/4200K/2000lu-
mens
Day/NightMode:Autoswitchover
AngleofView:Horizontal:180°,vertical:60°
Hardware Features
General

English English
1314
• Reorient or relocate the receiving antenna.
• Increase the separation between the
equipment and receiver.
• Connect the equipment into an outlet on a
NOTE: This equipment has been tested and
found to comply with the limits for a Class B
digital device, pursuant to part 15 of the FCC
Rules. These limits are designed to provide
reasonable protection against harmful
interference in a residential installation.
This equipment generates uses and can
radiate radio frequency energy and, if not
installed and used in accordance with the
instructions, may cause harmful interference
to radio communications. However, there is no
guarantee that interference will not occur in a
particular installation. If this equipment does
cause harmful interference to radio or
television reception, which can be determined
byturningtheequipmentoffandon,theuser
is encouraged to try to correct the
interference by one or more of the following
measures:
circuitdierentfromthattowhichthereceiver
is connected.
• Consult the dealer or an experienced radio/
TV technician for help.
Changesormodicationsnotexpressly
approved by the party responsible for
compliance could void the user’s authority to
operate the equipment.
ReolinkdeclaresthattheWiFioodlightisin
compliance with the essential requirements
and other relevant provisions of Directive
Simplied EU Declaration
of Conformity
This equipment complies with FCC radiation
exposure limits set forth for an uncontrolled
environment. This equipment shall be installed
and operated with minimum distance 20cm
between the radiator & body.
FCC RF Exposure Warning Statements
2014/53/EU,thePoEoodlightisincompliance
with Directive 2014/30/EU.
This product comes with a 2-year limited
warranty that is valid only if purchased from
ReolinkOcialStoreoraReolinkauthorized
reseller. Learn more:
https://reolink.com/warranty-and-return/.
Limited Warranty
This marking indicates that this product should
not be disposed with other household wastes.
throughout the EU. To prevent possible harm to
the environment or human health from
uncontrolled waste disposal, recycle it
responsibly to promote the sustainable reuse
of material resources. To return your used
device, please use the return and collection
systems or contact the retailer where the
product was purchased. They can take this
product for environmentally safe recycling.
Correct Disposal of This Product
NOTE: We hope that you enjoy the new
purchase.Butifyouarenotsatisedwith
the product and plan to return, we strongly
suggestthatyouresettheoodlighttofactory
default settings before returning.
Use of the product is subject to your
agreement to the Terms of Service and Privacy
Policy at reolink.com. Keep out of reach of
children.
Terms and Privacy
This device contains licence-exempt
transmitter(s)/re ceiver(s) that comply
with Innovation, Science and Economic
ISED Statements
By using the Product Software that is
embedded on the Reolink product, you
agree to the terms of this End User License
Agreement (“EULA”) between you and Reolink.
Learn more: https://reolink.com/eula/.
End User License Agreement

English English
1516
Development Canada’s licence-exempt RSS(s).
Operation is subject to the following two
conditions:
(1) This device may not cause interference.
(2) This device must accept any interference,
including interference that may cause
undesired operation of the device.
L’émetteur/récepteur exempt de licence
contenu dans le présent appareil est
conforme aux CNR d’Innovation, Sciences
et Développement économique Canada
applicables aux appareils radio exempts de
licence. L’exploitation est autorisée aux deux
conditions suivantes:
(1) L’ appareil ne doit pas produire de
brouillage;
(2) L’ appareil doit accepter tout brouillage
radioélectrique subi, même si le brouillage
est susceptible d’ en compromettre le
fonctionnement.
Radio Frequency Exposure
Statement for IC
The device has been evaluated to meet
general RF exposure requirements. The device
can be used in mobile exposure conditions.
The min separation distance is 20cm.
Déclaration d’exposition aux radiofréquences
pour IC
L’appareil a été évalué pour répondre aux
exigences générales en matière d’exposition
aux RF. L’appareil peut être utilisé dans des
conditions d’exposition mobiles.
La distance de séparation minimale est de
20cm.
Operation of this device is restricted to indoor use
only. (5180-5240MHz)
Le fonctionnement de cet appareil est limité à une
utilisation en intérieur uniquement.
(5180-5240MHz)
Cet émetteur radio IC : 26839-2208B a été approuvé par Innovation, Sciences et
Développement économique Canada pour fonctionner avec les types d'antenne
énumérés ci-dessous, avec le gain maximal admissible indiqué. Les types
d'antenne non inclus dans cette liste qui ont un gain supérieur au gain
maximum indiqué pour tout type répertorié sont strictement interdits pour une
utilisation avec cet appareil.
The radio transmitter IC: 26839-2208B has been approved by The Ministry of
Innovation, Science and Economic Development of Canada to use the following
antenna types with the specified maximum allowed gain. Antenna types not
included in this list, whose gain is higher than the maximum gain of any type
listed, are strictly prohibited from use with this device.

-
 1
1
-
 2
2
-
 3
3
-
 4
4
-
 5
5
-
 6
6
-
 7
7
-
 8
8
-
 9
9
-
 10
10


REOLINK Duo Floodlight WiFi Mode d'emploi
- Taper
- Mode d'emploi
dans d''autres langues
Documents connexes
-
REOLINK B0B7JBQW8C Mode d'emploi
-
REOLINK F1 Mode d'emploi
-
REOLINK Video Doorbell PoE Video Doorbell WiFi Manuel utilisateur
-
REOLINK RLC-523WA Mode d'emploi
-
REOLINK Argus 3 Series Mode d'emploi
-
REOLINK WiFi IP Camera Mode d'emploi
-
REOLINK Duo 2 Dual-Lens Panoramic Security Camera Mode d'emploi
-
-
-
