Electrolux EN3488MOX Manuel utilisateur
- Catégorie
- Congélateurs
- Taper
- Manuel utilisateur


CONTENTS
1. SAFETY INFORMATION....................................................................................3
2. SAFETY INSTRUCTIONS..................................................................................4
3. OPERATION.......................................................................................................6
4. DAILY USE......................................................................................................... 7
5. CARE AND CLEANING......................................................................................9
6. TROUBLESHOOTING........................................................................................9
7. INSTALLATION................................................................................................ 12
8. TECHNICAL INFORMATION........................................................................... 12
WE’RE THINKING OF YOU
Thank you for purchasing an Electrolux appliance. You’ve chosen a product that
brings with it decades of professional experience and innovation. Ingenious and
stylish, it has been designed with you in mind. So whenever you use it, you can
be safe in the knowledge that you’ll get great results every time.
Welcome to Electrolux.
Visit our website for:
Get usage advice, brochures, trouble shooter, service information:
www.electrolux.com/webselfservice
Register your product for better service:
www.registerelectrolux.com
Buy Accessories, Consumables and Original spare parts for your appliance:
www.electrolux.com/shop
CUSTOMER CARE AND SERVICE
Always use original spare parts.
When contacting our Authorised Service Centre, ensure that you have the
following data available: Model, PNC, Serial Number.
The information can be found on the rating plate.
Warning / Caution-Safety information
General information and tips
Environmental information
Subject to change without notice.
www.electrolux.com2

1. SAFETY INFORMATION
Before the installation and use of the appliance, carefully
read the supplied instructions. The manufacturer is not
responsible if an incorrect installation and use causes
injuries and damages. Always keep the instructions with
the appliance for future reference.
1.1 Children and vulnerable people safety
• This appliance can be used by children aged from 8
years and above and persons with reduced physical,
sensory or mental capabilities or lack of experience
and knowledge if they have been given supervision or
instruction concerning use of the appliance in a safe
way and understand the hazards involved.
• Do not let children play with the appliance.
• Cleaning and user maintenance shall not be made by
children without supervision.
• Keep all packaging away from children.
1.2 General Safety
• This appliance is intended to be used in household
and similar applications such as:
– Farm houses; staff kitchen areas in shops, offices
and other working environments
– By clients in hotels, motels, bed and breakfast and
other residential type environments
• Keep ventilation openings, in the appliance enclosure
or in the built-in structure, clear of obstruction.
• Do not use mechanical devices or other means to
accelerate the defrosting process, other than those
recommended by the manufacturer.
• Do not damage the refrigerant circuit.
• Do not use electrical appliances inside the food
storage compartments of the appliance, unless they
are of the type recommended by the manufacturer.
ENGLISH 3

• Do not use water spray and steam to clean the
appliance.
• Clean the appliance with a moist soft cloth. Only use
neutral detergents. Do not use abrasive products,
abrasive cleaning pads, solvents or metal objects.
• Do not store explosive substances such as aerosol
cans with a flammable propellant in this appliance.
• If the supply cord is damaged, it must be replaced by
the manufacturer, its Authorised Service Centre or
similarly qualified persons in order to avoid a hazard.
2. SAFETY INSTRUCTIONS
2.1 Installation
WARNING!
Only a qualified person must
install this appliance.
• Remove all the packaging.
• Do not install or use a damaged
appliance.
• Obey the installation instruction
supplied with the appliance.
• Always be careful when you move the
appliance because it is heavy. Always
wear safety gloves.
• Make sure the air can circulate
around the appliance.
• Wait at least 4 hours before
connecting the appliance to the power
supply. This is to allow the oil to flow
back in the compressor.
• Do not install the appliance close to
radiators or cookers, oven or hobs.
• The rear of the appliance must stand
against the wall.
• Do not install the appliance where
there is direct sunlight.
• Do not install this appliance in areas
that are too humid or too colds, such
as the construction appendices,
garages or wine cellars.
• When you move the appliance, lift it
by the front edge to avoid scratching
the floor.
2.2 Electrical connection
WARNING!
Risk of fire and electrical
shock.
• The appliance must be earthed.
• Make sure that the electrical
information on the rating plate agrees
with the power supply. If not, contact
an electrician.
• Always use a correctly installed
shockproof socket.
• Do not use multi-plug adapters and
extension cables.
• Make sure not to cause damage to
the electrical components (e.g. mains
plug, mains cable, compressor).
Contact the Authorised Service
Centre or an electrician to change the
electrical components.
• The mains cable must stay below the
level of the mains plug.
• Connect the mains plug to the mains
socket only at the end of the
installation. Make sure that there is
access to the mains plug after the
installation.
• Do not pull the mains cable to
disconnect the appliance. Always pull
the mains plug.
2.3 Use
WARNING!
Risk of injury, burns,
electrical shock or fire.
www.electrolux.com4

• Do not change the specification of this
appliance.
• Do not put electrical appliances (e.g.
ice cream makers) in the appliance
unless they are stated applicable by
the manufacturer.
• Be careful not to cause damage to the
refrigerant circuit. It contains
isobutane (R600a), a natural gas with
a high level of environmental
compatibility. This gas is flammable.
• If damage occurs to the refrigerant
circuit, make sure that there are no
flames and sources of ignition in the
room. Ventilate the room.
• Do not let hot items to touch the
plastic parts of the appliance.
• Do not put soft drinks in the freezer
compartment. This will create
pressure on the drink container.
• Do not store flammable gas and liquid
in the appliance.
• Do not put flammable products or
items that are wet with flammable
products in, near or on the appliance.
• Do not touch the compressor or the
condenser. They are hot.
• Do not remove or touch items from
the freezer compartment if your hands
are wet or damp.
• Do not freeze again food that has
been thawed.
• Obey the storage instructions on the
packaging of frozen food.
2.4 Care and cleaning
WARNING!
Risk of injury or damage to
the appliance.
• Before maintenance, deactivate the
appliance and disconnect the mains
plug from the mains socket.
• This appliance contains hydrocarbons
in the cooling unit. Only a qualified
person must do the maintenance and
the recharging of the unit.
• Regularly examine the drain of the
appliance and if necessary, clean it. If
the drain is blocked, defrosted water
collects in the bottom of the
appliance.
2.5 Disposal
WARNING!
Risk of injury or suffocation.
• Disconnect the appliance from the
mains supply.
• Cut off the mains cable and discard it.
• Remove the door to prevent children
and pets to be closed inside of the
appliance.
• The refrigerant circuit and the
insulation materials of this appliance
are ozone-friendly.
• The insulation foam contains
flammable gas. Contact your
municipal authority for information on
how to discard the appliance
correctly.
• Do not cause damage to the part of
the cooling unit that is near the heat
exchanger.
ENGLISH 5

3. OPERATION
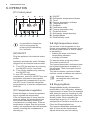
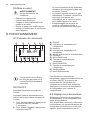
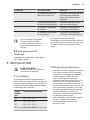
3.1 Control panel
A B C
GHIJKL
D FE
A) ON/OFF
B) Refrigerator temperature indicator
C) Timer
D) Freezer temperature indicator
E) Temperature bars
F) EcoMode
G) FastFreeze mode
H) Freezer temperature key
I) DrinksChill mode
J) Refrigerator temperature key
K) ShoppingMode
L) ExtraHumidity mode
It is possible to change the
click to beep sound by
pressing the EcoMode key
for 5 seconds.
3.2 ON/OFF
Plug the appliance into electrical mains
socket.
Appliance automatically turns ON when
plugged into an electrical mains socket.
1. Turn OFF the appliance by pressing
the ON/OFF key for 3 seconds.
2. Turn ON the appliance by pressing
the ON/OFF key.
To turn OFF the refrigerator
compartment, press the ON/OFF key and
refrigerator temperature key together.
This causes the compartment to go into
soft OFF mode. Press the refrigerator
temperature key to turn the compartment
back ON.
3.3 Temperature regulation
Press the fridge or freezer temperature
key to regulate the temperature.
If the set temperature is lower than the
previous setting, the temperature bars
will animate downward, showing the
compartment is cooling down. If the set
temperature is higher than the previous
setting, the temperature bars will animate
upward, showing the compartment is
warming up.
3.4 High temperature alarm
An increase in the temperature in the
freezer compartment (for example due to
an earlier power failure or door is open)
is indicated by:
• flashing the alarm and freezer
temperature indicators;
• sounding of buzzer.
To reset the alarm press any button.
The buzzer switches off.
The freezer temperature indicator shows
the highest temperature reached for a
few seconds. Then show again the set
temperature.
The alarm indicator continues to flash
until the normal conditions are restored.
When the alarm has
returned the alarm indicator
goes off.
3.5 ShoppingMode
ShoppingMode rapidly decreases the
temperature in the refrigerator, allowing
large amounts of warm food (for example
after doing the grocery shopping) to chill
quickly and to avoid warming other food
already inside. When activated, the
temperature drops to +2°C and (if
equipped) the FreeStore mode turns on.
Press the ShoppingMode key.
The function deactivates automatically
after 6 hours and the temperature
adjusts back to its previous setting.
www.electrolux.com6

3.6 EcoMode
EcoMode automatically sets the optimal
temperature in refrigerator (+4°) and
freezer (-18°) compartments. This setting
guarantees minimum energy
consumption and proper food
preservation characteristics.
Press the EcoMode key.
To deactivate, change the refrigerator or
freezer temperature setting.
3.7 FastFreeze mode
FastFreeze mode rapidly decreases the
temperature in the freezer, allowing fresh
food to freeze quickly. When activated, a
timer countdown (52 hours) will be
shown instead of the freezer
temperature. It counts down in 1 hour
intervals. When the FastFreeze mode
has timed out (after 52 hours) the
temperature in the freezer adjusts back
to the previous setting.
Press the FastFreeze mode key.
A timer countdown activates.
Press the FastFreeze mode key to
deactivate the mode earlier.
3.8 DrinksChill mode
The DrinksChill mode is a safety warning
timer used when placing bottles in the
freezer compartment for rapid chilling. By
default, the timer is set to 30 min and it
counts down in one minute intervals.
Press the DrinksChill key.
A timer activates.
Press the DrinksChill key to deactivate
the alarm.
3.9 Holiday mode
Holiday mode saves energy when the
refrigerator is not used for a long period
(for example when on vacation), and
prevents mould and bad odours from
forming inside the appliance.
Set the refrigerator compartment
temperature to +14°C.
The freezer compartment will continue to
operate at the set temperature.
4. DAILY USE
WARNING!
Refer to Safety chapters.
4.1 Initial power on
CAUTION!
Before inserting the power
plug in to the outlet and
switching on the cabinet for
the first time, leave the
appliance standing upright
for at least 4 hours. This will
assure a sufficient amount of
time for the oil to return to
the compressor. Otherwise
the compressor or electronic
components may sustain
damage.
4.2 Storage of frozen food
When first starting-up or after a period
out of use, before putting the products in
the compartment let the appliance run at
least 2 hours with the FastFreeze
function turned on. The freezer drawers
ensure that it is quick and easy to find
the food package you want. If large
quantities of food are to be stored,
remove all drawers except for the bottom
drawer which needs to be in place to
provide good air circulation. On all
shelves it is possible to place food that
protrude until 15 mm from the door.
4.3 Freezing fresh food
The freezer compartment is suitable for
freezing fresh food and storing frozen
and deep-frozen food for a long time.
To freeze small amount of fresh foods it
is not necessary to change the present
setting.
To freeze fresh food activate the
FastFreeze function at least 24 hours
before placing the food to be frozen in
the freezer compartment.
ENGLISH 7

Place the food to be frozen in the top
compartment.
The maximum amount of food that can
be frozen in 24 hours is specified on the
rating plate, a label located on the inside
of the appliance.
The freezing process lasts 24 hours:
during this period do not add other food
to be frozen.
When the freezing process is completed,
return to the required temperature (see
"FastFreeze Function").
In this condition, the
refrigerator compartment
temperature might drop
below 0°C. If this occurs
reset the temperature
regulator to a warmer
setting.
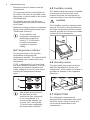
4.4 Temperature indicator
For proper storage of the food the
refrigeration is equipped with
temperature indicator. The symbol at the
side indicates the coldest area in the
refrigeration.
If “OK” is displayed (A), put fresh food
into area indicated by symbol, if not (B),
adjust the temperature controller to a
colder setting and wait 12 hours before
checking the temperature indicator
again.
OK
OK
A
B
After putting fresh food into
the appliance or after
opening the door repeatedly
or for a long period, it is
normal for the indicator not
to show "OK"; wait at least
12 hours before readjusting
the temperature controller.
4.5 FreshBox module
The drawer inside the module is suitable
for storing fresh food like fish, meat,
seafood, because the temperature is
lower here than in the rest of the fridge.
CAUTION!
The FreshBox module is equipped with
runners. At the time of its removal from
the fridge compartment pull the module
towards yourself and remove the basket
by tilting its front downwards.
4.6 Humidity control
The glass shelf incorporates a device
with slits (adjustable by means of a
sliding lever), which makes it possible to
regulate the humidity in the vegetable
drawer(s).
4.7 FREESTORE
The refrigerator compartment is
equipped with an automatic device that
allows for rapid cooling of foods and
more uniform temperature in the
compartment.
www.electrolux.com8

5. CARE AND CLEANING
WARNING!
Refer to Safety chapters.
5.1 Cleaning the interior
Before using the appliance for the first
time, the interior and all internal
accessories should be washed with
lukewarm water and some neutral soap
to remove the typical smell of a brand-
new product, then dried thoroughly.
CAUTION!
Do not use detergents or
abrasive powders, as these
will damage the finish.
5.2 Periodic cleaning
CAUTION!
Do not pull, move or damage
any pipes and/or cables
inside the cabinet.
CAUTION!
Take care of not to damage
the cooling system.
CAUTION!
When moving the cabinet, lift
it by the front edge to avoid
scratching the floor.
The equipment has to be cleaned
regularly:
1. Clean the inside and accessories
with lukewarm water and some
neutral soap.
2. Regularly check the door seals and
wipe clean to ensure they are clean
and free from debris.
3. Rinse and dry thoroughly.
4. If accessible, clean the condenser
and the compressor at the back of
the appliance with a brush.
This operation will improve the
performance of the appliance and
save electricity consumption.
The lowest shelf, dividing the cooler
compartment from the compartment can
be removed only for cleaning. To remove
pull out the shelf straight.
To make sure fully
functionality of the
FreshZone compartment the
lowest shelf and cover plates
must be put back in their
original position after
cleaning.
The cover plates above the drawers in
the compartment can be taken out for
cleaning.
5.3 Defrosting
Your appliance is frost free. This means
that there is no build up of frost when it is
in operation, neither on the internal walls
nor on the foods. The absence of frost is
due to the continuous circulation of cold
air inside the compartment, driven by an
automatically controlled fan. The defrost
water drains out through a trough into a
special container at the back of the
appliance, over the motor compressor,
where it evaporates.
5.4 Periods of non-operation
When the appliance is not in use for long
periods, take the following precautions:
1. Disconnect the appliance from
electricity supply.
2. Remove all food.
3. Clean the appliance and all
accessories.
4. Leave the door/doors open to
prevent unpleasant smells.
6. TROUBLESHOOTING
WARNING!
Refer to Safety chapters.
ENGLISH 9

6.1 What to do if...
Problem Possible cause Solution
The appliance is noisy. The appliance is not sup‐
ported properly.
Check if the appliance
stands stable.
Audible or visual alarm is
on.
The cabinet has been re‐
cently switched on or the
temperature is still too
high.
Refer to "Door Open
Alarm"or "High Temperature
Alarm".
The temperature in the
appliance is too high.
Refer to "Door Open
Alarm"or "High Temperature
Alarm".
A square symbol is shown
instead of numbers on the
Temperature Display.
Temperature sensor prob‐
lem.
Contact the nearest Author‐
ised Service Centre (the
cooling system will continue
to keep food products cold,
but temperature adjustment
will not be possible).
The lamp does not work. The lamp is in stand-by. Close and open the door.
The lamp does not work. The lamp is defective. Contact the nearest Author‐
ised Service Centre.
The compressor operates
continually.
Temperature is set incor‐
rectly.
Refer to "Operation" chapter.
Many food products were
put in at the same time.
Wait some hours and then
check the temperature
again.
The room temperature is
too high.
Refer to climate class chart
on the rating plate.
Food products placed in
the appliance were too
warm.
Allow food products to cool
to room temperature before
storing.
The FastFreeze function
is switched on.
Refer to "FastFreeze func‐
tion".
The ShoppingMode func‐
tion is switched on.
Refer to "ShoppingMode
function".
The compressor does not
start immediately after
pressing the FastFreeze,
or after changing the tem‐
perature.
This is normal, no error
has occurred.
The compressor starts after
a period of time.
www.electrolux.com10

Problem Possible cause Solution
The compressor does not
start immediately after
pressing the Shopping‐
Mode, or after changing
the temperature.
This is normal, no error
has occurred.
The compressor starts after
a period of time.
Water flows inside the re‐
frigerator.
The water outlet is clog‐
ged.
Clean the water outlet.
Food products prevent
that water flows into the
water collector.
Make sure that food prod‐
ucts do not touch the rear
plate.
Water flows on the floor. The melting water outlet
is not connected to the
evaporative tray above
the compressor.
Attach the melting water out‐
let to the evaporative tray.
Temperature cannot be
set.
The FastFreeze or Shop‐
pingMode function is
switched on.
Switch off FastFreeze or
ShoppingMode manually, or
wait until the function resets
automatically to set the tem‐
perature. Refer to "Fast‐
Freeze or ShoppingMode
function".
DEMO appears on the
display.
The appliance is in dem‐
onstration mode.
Keep the refrigerator temper‐
ature key pressed for ap‐
proximately 10 seconds until
a long sound is heard and
display shuts off for a short
time.
The temperature in the
appliance is too low/too
high.
The temperature regulator
is not set correctly.
Set a higher/lower tempera‐
ture.
The food products' tem‐
perature is too high.
Let the food products tem‐
perature decrease to room
temperature before storage.
Many food products are
stored at the same time.
Store less food products at
the same time.
The FastFreeze function
is switched on.
Refer to "FastFreeze func‐
tion".
The ShoppingMode func‐
tion is switched on.
Refer to "ShoppingMode
function".
If the advice does not lead to
the desired result, contact
the nearest Authorised
Service Centre.
6.2 Replacing the lamp
The appliance is equipped with a longlife
LED interior light.
ENGLISH 11

Only service is allowed to replace the
lighting device. Contact your Authorised
Service Centre.
7. INSTALLATION
WARNING!
Refer to Safety chapters.
7.1 Positioning
This appliance can be installed in a dry,
well ventilated indoor where the ambient
temperature corresponds to the climate
class indicated on the rating plate of the
appliance:
Climate
class
Ambient temperature
SN +10°C to + 32°C
N +16°C to + 32°C
ST +16°C to + 38°C
T +16°C to + 43°C
7.2 Electrical connection
• Before plugging in, ensure that the
voltage and frequency shown on the
rating plate correspond to your
domestic power supply.
• The appliance must be earthed. The
power supply cable plug is provided
with a contact for this purpose. If the
domestic power supply socket is not
earthed, connect the appliance to a
separate earth in compliance with
current regulations, consulting a
qualified electrician.
• The manufacturer declines all
responsibility if the above safety
precautions are not observed.
• This appliance complies with the
E.E.C. Directives.
7.3 Installation of the appliance
and door reversal
Please refer to separate
instructions on installation
(ventilation requirements,
levelling) and door reversal.
7.4 Installation and replacing of
the TASTEGUARD filter
On delivery the carbon filter is in a plastic
bag to preserve performance. The filter
should be placed in the drawer before
the appliance is turned on.
1. Open the drawer.
2. Take the filter out of the plastic bag.
3. Insert the filter in the drawer.
4. Close the drawer.
To get the best performance the carbon
air filter should be changed once every
year.
New active air filters can be purchased
from your local dealer.
The air filter is a consumable
accessory and as such is not
covered by the guarantee.
8. TECHNICAL INFORMATION
8.1 Technical data
Height 1840 mm
Width 595 mm
Depth 642 mm
www.electrolux.com12

Rising time 17 h
Voltage 230 - 240 V
Frequency 50 Hz
The technical information are situated in
the rating plate, on the external or
internal side of the appliance and in the
energy label.
9. ENVIRONMENT CONCERNS
Recycle the materials with the symbol
. Put the packaging in applicable
containers to recycle it. Help protect the
environment and human health and to
recycle waste of electrical and electronic
appliances. Do not dispose appliances
marked with the symbol with the
household waste. Return the product to
your local recycling facility or contact
your municipal office.
ENGLISH 13

TABLE DES MATIÈRES
1. CONSIGNES DE SÉCURITÉ........................................................................... 15
2. INSTRUCTIONS DE SÉCURITÉ......................................................................16
3. FONCTIONNEMENT........................................................................................18
4. UTILISATION QUOTIDIENNE..........................................................................20
5. ENTRETIEN ET NETTOYAGE.........................................................................21
6. EN CAS D'ANOMALIE DE FONCTIONNEMENT.............................................22
7. INSTALLATION................................................................................................ 25
8. CARACTÉRISTIQUES TECHNIQUES.............................................................26
NOUS PENSONS À VOUS
Merci d'avoir choisi ce produit Electrolux. Avec ce produit, vous bénéficiez de
dizaines d'années d'expérience professionnelle et d'innovation. Ingénieux et
élégant, il a été conçu sur mesure pour vous. Grâce à cet appareil, vous savez
que chaque utilisation vous apportera satisfaction.
Bienvenue chez Electrolux.
Visitez notre site Internet pour :
Obtenir des conseils d'utilisation, des brochures, de l'aide, des informations :
www.electrolux.com/webselfservice
Enregistrer votre produit pour obtenir un meilleur service :
www.registerelectrolux.com
Acheter des accessoires, consommables et pièces de rechange d'origine pour
votre appareil :
www.electrolux.com/shop
SERVICE APRÈS-VENTE
N'utilisez que des pièces de rechange d'origine.
Avant de contacter le service, assurez-vous de disposer des informations
suivantes : Modèle, PNC, numéro de série.
Vous trouverez ces informations sur la plaque signalétique.
Avertissement/Attention : consignes de sécurité.
Informations générales et conseils.
Informations en matière de protection de l'environnement.
Sous réserve de modifications.
www.electrolux.com14

1. CONSIGNES DE SÉCURITÉ
Avant d'installer et d'utiliser cet appareil, lisez
soigneusement les instructions fournies. Le fabricant ne
peut être tenu pour responsable des dommages et
blessures liés à une mauvaise installation ou utilisation.
Conservez toujours cette notice avec votre appareil pour
vous y référer ultérieurement.
1.1 Sécurité des enfants et des personnes
vulnérables
• Cet appareil peut être utilisé par des enfants âgés
d'au moins 8 ans et par des personnes ayant des
capacités physiques, sensorielles ou mentales
réduites ou dénuées d’expérience ou de
connaissance, s’ils (si elles) sont correctement
surveillé(e)s ou si des instructions relatives à
l’utilisation de l'appareil en toute sécurité leur ont été
données et si les risques encourus ont été
appréhendées.
• Les enfants ne doivent pas jouer avec l’appareil.
• Le nettoyage et l’entretien par l'usager ne doivent pas
être effectués par des enfants sans surveillance.
• Ne laissez pas les emballages à la portée des enfants.
1.2 Consignes générales de sécurité
• Cet appareil est conçu uniquement pour un usage
domestique et des utilisations telles que :
– dans les bâtiments de ferme, dans des cuisines
réservées aux employés dans des magasins,
bureaux et autres lieux de travail ;
– pour une utilisation privée, par les clients, dans des
hôtels et autres lieux de séjour.
• Veillez à ce que les orifices de ventilation, situés dans
l'enceinte de l'appareil ou dans la structure intégrée,
ne soient pas obstrués.
FRANÇAIS 15

• N'utilisez aucun dispositif mécanique ou autre appareil
pour accélérer le processus de dégivrage que ceux
recommandés par le fabricant.
• N'endommagez pas le circuit frigorifique.
• N'utilisez pas d'appareils électriques à l'intérieur des
compartiments de conservation des aliments de
l'appareil, sauf s'ils sont du type recommandé par le
fabricant.
• Ne pulvérisez pas d'eau ni de vapeur pour nettoyer
l'appareil.
• Nettoyez l'appareil avec un chiffon doux humide.
Utilisez uniquement des produits de nettoyage
neutres. N'utilisez pas de produits abrasifs, de
tampons à récurer, de solvants ni d'objets métalliques.
• Ne conservez aucune substance explosive dans cet
appareil, comme des aérosols contenant un produit
inflammable.
• Si le câble d'alimentation est endommagé, il doit être
remplacé par le fabricant, son service après-vente ou
des personnes de qualification similaire afin d'éviter
un danger.
2. INSTRUCTIONS DE SÉCURITÉ
2.1 Installation
AVERTISSEMENT!
L'appareil doit être installé
uniquement par un
professionnel qualifié.
• Retirez l'intégralité de l'emballage
• N'installez pas et ne branchez pas un
appareil endommagé.
• Suivez scrupuleusement les
instructions d'installation fournies
avec l'appareil.
• Soyez toujours vigilants lorsque vous
déplacez l'appareil car il est lourd.
Portez toujours des gants de sécurité.
• Assurez-vous que l'air circule autour
de l'appareil.
• Attendez au moins 4 heures avant de
brancher l'appareil sur le secteur.
Cela permet à l'huile de refouler dans
le compresseur.
• N'installez pas l'appareil à proximité
d'un radiateur, d'une cuisinière, d'un
four ou d'une table de cuisson.
• La surface arrière de l'appareil doit
être positionnée contre un mur.
• N'installez pas l'appareil dans un
endroit exposé à la lumière directe du
soleil.
• N'installez pas l'appareil dans un
endroit trop humide ou trop froid,
comme une dépendance extérieure,
un garage ou une cave.
• Lorsque vous déplacez l'appareil,
veillez à le soulever par l'avant pour
éviter de rayer le sol.
www.electrolux.com16

2.2 Connexion électrique
AVERTISSEMENT!
Risque d'incendie ou
d'électrocution.
• L'appareil doit être relié à la terre.
• Vérifiez que les données électriques
figurant sur la plaque signalétique
correspondent à celles de votre
réseau. Si ce n'est pas le cas,
contactez un électricien.
• Utilisez toujours une prise de courant
de sécurité correctement installée.
• N'utilisez pas d'adaptateurs
multiprises ni de rallonges.
• Veillez à ne pas endommager les
composants électriques tels que la
fiche secteur, le câble d'alimentation
ou le compresseur. Contactez le
service après-vente agréé ou un
électricien pour changer les
composants électriques.
• Le câble d'alimentation doit rester en
dessous du niveau de la fiche
secteur.
• Ne connectez la fiche d'alimentation
secteur à la prise de courant secteur
qu'à la fin de l'installation. Assurez-
vous que la fiche d'alimentation est
accessible une fois l'appareil installé.
• Ne tirez jamais sur le câble
d'alimentation électrique pour
débrancher l'appareil. Tirez toujours
sur la fiche.
2.3 Usage
AVERTISSEMENT!
Risque de blessures, de
brûlures, d'électrocution ou
d'incendie.
• Ne modifiez pas les caractéristiques
de cet appareil.
• Ne placez aucun appareil électrique
(sorbetière, etc.) dans l'appareil, en
l'absence d'indications du fabricant.
• Veillez à ne pas endommager le
circuit frigorifique. Il contient de
l'isobutane (R600a), un gaz naturel
ayant un niveau élevé de compatibilité
environnementale. Ce gaz est
inflammable.
• Si le circuit frigorifique est
endommagé, assurez-vous de
l'absence de flammes et de sources
d'ignition dans la pièce. Aérez la
pièce.
• Évitez tout contact d'éléments chauds
avec les parties en plastique de
l'appareil.
• Ne placez jamais de boissons
gazeuses dans le congélateur. Cela
engendrerait une pression sur le
récipient de la boisson.
• Ne stockez jamais de gaz ou de
liquide inflammable dans l'appareil.
• Ne placez pas de produits
inflammables ou d'éléments imbibés
de produits inflammables à l'intérieur
ou à proximité de l'appareil, ni sur
celui-ci.
• Ne touchez pas le compresseur ni le
condenseur. Ils sont chauds.
• Ne retirez pas et ne touchez pas les
éléments du compartiment
congélateur avec les mains mouillées
ou humides.
• Ne recongelez jamais un aliment qui a
été décongelé.
• Respectez les instructions de
stockage figurant sur l'emballage des
aliments surgelés.
2.4 Entretien et nettoyage
AVERTISSEMENT!
Risque de blessure
corporelle ou de dommages
matériels.
• Avant toute opération d'entretien,
éteignez l'appareil et débranchez la
fiche de la prise secteur.
• Cet appareil contient des
hydrocarbures dans son circuit de
réfrigération. L'entretien et la recharge
du circuit de réfrigération doivent être
effectués par un professionnel
qualifié.
• Examinez régulièrement l'écoulement
de l'appareil et si nécessaire,
nettoyez-le. Si l'orifice est bouché,
l'eau provenant du dégivrage
s'écoulera en bas de l'appareil.
FRANÇAIS 17

2.5 Mise au rebut
AVERTISSEMENT!
Risque de blessure ou
d'asphyxie.
• Débranchez l'appareil de
l'alimentation électrique.
• Coupez le câble d'alimentation et
mettez-le au rebut.
• Retirez la porte pour empêcher les
enfants et les animaux de s'enfermer
dans l'appareil.
• Le circuit frigorifique et les matériaux
d'isolation de cet appareil préservent
la couche d'ozone.
• La mousse isolante contient un gaz
inflammable. Contactez votre service
municipal pour obtenir des
informations sur la marche à suivre
pour mettre l'appareil au rebut.
• N'endommagez pas la partie du
circuit de réfrigération située à
proximité du condenseur thermique.
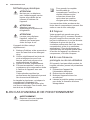
3. FONCTIONNEMENT
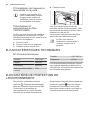
3.1 Panneau de commande
A B C
GHIJKL
D FE
A) ON/OFF
B) Indicateur de température du
réfrigérateur
C) Minuteur
D) Indicateur de température du
congélateur
E) Barres indicatrices de la température
F) EcoMode
G) Mode FastFreeze
H) Touche de température du
congélateur
I) Mode DrinksChill
J) Touche de température du
réfrigérateur
K) ShoppingMode
L) Mode ExtraHumidity
Il est possible de modifier le
bip émis en appuyant sur la
touche EcoMode pendant 5
secondes.
3.2 ON/OFF
Branchez l'appareil à une prise de
courant.
L'appareil s'allume automatiquement
lorsqu'il est branché dans une prise de
courant.
1. Pour éteindre l'appareil, appuyez sur
la touche ON/OFF pendant
3 secondes.
2. Pour allumer l'appareil, appuyez sur
la touche ON/OFF.
Pour éteindre le compartiment
réfrigérateur, appuyez simultanément sur
la touche ON/OFF et la touche de
température du réfrigérateur. Le
compartiment s'éteint alors lentement.
Appuyez sur la touche de température
du réfrigérateur pour rallumer le
compartiment.
3.3 Réglage de la température
Appuyez sur la touche de température
du réfrigérateur ou du congélateur pour
régler la température.
Si la température choisie est inférieure à
la précédente, les barres indicatrices de
température s'animent vers le bas pour
signaler que le compartiment est en
www.electrolux.com18

cours de refroidissement. Si la
température choisie est supérieure à la
précédente, les flèches de température
s'animent vers le haut pour signaler que
le compartiment se réchauffe.
3.4 Alarme haute température
Une augmentation de la température
dans le compartiment congélateur (par
exemple à cause d'une coupure de
courant ou si la porte est ouverte trop
longtemps) est indiquée par :
• le clignotement des voyants d'alarme
et de température du congélateur ;
• Le déclenchement d'une alarme
sonore.
Pour réinitialiser l'alarme, appuyez sur
n'importe quelle touche.
L'alarme s'éteint.
L'indicateur de température du
congélateur affiche pendant quelques
secondes la température la plus élevée
atteinte. La température programmée
s'affiche ensuite de nouveau.
Le voyant d'alarme continue de clignoter
jusqu'à ce que les conditions normales
soient restaurées.
Lorsque l'alarme est
terminée, l'indicateur
s'éteint.
3.5 ShoppingMode
Le mode ShoppingMode abaisse
rapidement la température du
réfrigérateur de manière que de grandes
quantités d'aliments (par exemple après
l'achat de plusieurs légumes) puissent
être rapidement refroidies et ne risquent
pas de réchauffer des aliments déjà
présents dans le réfrigérateur. Lorsque
ce mode est activé, la température
descend à +2°C et le mode FreeStore
est mis en service (si l'appareil en est
doté).
Appuyez sur la touche ShoppingMode.
Ce mode est automatiquement désactivé
après 6 heures de fonctionnement et la
température est réglée sur la valeur
précédente.
3.6 EcoMode
Le mode EcoMode choisit
automatiquement la température
optimale dans le réfrigérateur (+4°) et
dans le congélateur (-18°). Ces réglages
garantissent une consommation
minimale d'énergie et une bonne
conversation des aliments.
Appuyez sur la touche EcoMode.
Pour désactiver, modifiez les réglages de
température du réfrigérateur et du
congélateur.
3.7 Mode FastFreeze
Le mode FastFreeze diminue rapidement
la température dans le congélateur pour
permettre la congélation rapide des
aliments frais. Lorsque ce mode est
activé, une minuterie (52 heures)
remplace l'indication de la température
du congélateur et décompte la durée.
L'intervalle de décompte est de 1 heure.
Lorsque la durée de fonctionnement du
mode FastFreeze a été atteinte (52
heures), la température du congélateur
reprend le réglage précédent.
Appuyez sur la touche FastFreeze.
La minuterie est activée et le décompte
commence.
Appuyez sur la touche FastFreeze pour
désactiver ce mode de fonctionnement
plus tôt que prévu.
3.8 Mode DrinksChill
Le mode DrinksChill est une minuterie de
sécurité avec alarme qui agit lorsque
vous placez une bouteille dans le
congélateur pour qu'elle soit rapidement
rafraîchie. Par défaut, cette minuterie est
réglée sur 30 minutes et décompte la
durée par intervalles d'une minute.
Appuyez sur la touche DrinksChill.
La minuterie est activée.
Appuyez sur la touche DrinksChill pour
désactiver l'alarme.
FRANÇAIS 19

3.9 Mode Holiday
Le mode Holiday permet d'économiser
l'énergie quand le réfirgérateur ne doit
pas être utilisé pendant une longue
période (par exemple, durant des
vacances) tout en évitant que des
moisissures et de mauvaises odeurs ne
se forment à l'intérieur de l'appareil.
Réglez la température du compartiment
de réfrigération à +14°C.
Le compartiment de congélation continue
de fonctionner à la température réglée.
4. UTILISATION QUOTIDIENNE
AVERTISSEMENT!
Reportez-vous aux chapitres
concernant la sécurité.
4.1 Première mise sous tension
ATTENTION!
Avant d'insérer la fiche
d'alimentation dans la prise
murale et d'allumer l'appareil
pour la première fois, laissez
l'appareil en position
verticale pendant au moins
4 heures. Cela laissera
suffisamment de temps à
l'huile de retourner jusqu'au
compresseur. Sans cela, le
compresseur et les
composants électroniques
pourraient être
endommagés.
4.2 Conservation d'aliments
congelés et surgelés
Lors de la mise en service ou après un
arrêt prolongé, laissez l'appareil
fonctionner au moins pendant 2 heures
environ avec la fonction FastFreeze
activée avant d'introduire les produits
dans le compartiment. Les tiroirs de
congélation vous permettent de trouver
facilement et rapidement les aliments
dont vous avez besoin. Si vous devez
stocker une grande quantité d'aliments,
retirez tous les tiroirs et le bac à glaçons,
sauf le bac inférieur qui doit être en place
afin de permettre une circulation d'air
optimale. Vous pouvez ranger des
aliments sur toutes les clayettes en
respectant un espace de 15 mm avec la
porte.
4.3 Congeler les aliments frais
Le compartiment congélateur est idéal
pour congeler des aliments frais et
conserver à long terme des aliments
congelés ou surgelés.
Pour congeler de petites quantités
d'aliments frais, il n'est pas nécessaire
de modifier le réglage actuel.
Activez la fonction FastFreeze au moins
24 heures avant d'introduire des aliments
frais à congeler dans le compartiment
congélateur.
Placez les denrées à congeler dans le
compartiment supérieur.
La quantité maximale de denrées que
vous pouvez congeler par tranche de
24 heures figure sur la plaque
signalétique, située à l'intérieur de
l'appareil.
Le processus de congélation dure
24 heures : vous ne devez ajouter aucun
autre aliment à congeler pendant cette
période.
Une fois le processus de congélation
terminé, revenez à la température
souhaitée (voir « Fonction FastFreeze »).
Dans ce cas, la température
du compartiment
réfrigérateur est susceptible
de descendre en dessous de
0 °C. Si cela se produit,
repositionnez le thermostat
sur une position inférieure
pour obtenir moins de froid.
4.4 Indicateur de température
Pour la bonne conservation des denrées,
le réfrigérateur est équipé d'un indicateur
de température. Le symbole sur le côté
www.electrolux.com20
La page charge ...
La page charge ...
La page charge ...
La page charge ...
La page charge ...
La page charge ...
La page charge ...
La page charge ...
-
 1
1
-
 2
2
-
 3
3
-
 4
4
-
 5
5
-
 6
6
-
 7
7
-
 8
8
-
 9
9
-
 10
10
-
 11
11
-
 12
12
-
 13
13
-
 14
14
-
 15
15
-
 16
16
-
 17
17
-
 18
18
-
 19
19
-
 20
20
-
 21
21
-
 22
22
-
 23
23
-
 24
24
-
 25
25
-
 26
26
-
 27
27
-
 28
28


Electrolux EN3488MOX Manuel utilisateur
- Catégorie
- Congélateurs
- Taper
- Manuel utilisateur
dans d''autres langues
- English: Electrolux EN3488MOX User manual
Documents connexes
-
Electrolux EUF2040AOW Manuel utilisateur
-
-
-
-
Electrolux ENN2852AOW Manuel utilisateur
-
-
-
-
Electrolux EN3889MFX Manuel utilisateur
-