
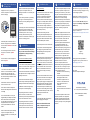
LED & Sound Behaviors:
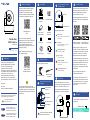
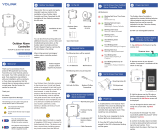
Get to Know Your Uno
Camera
E
Get to Know Your Uno
Camera, Cont.
E
Photosensitive
Detector
Status LED
Microphone
MicroSD Card Slot
Reset Button
The camera supports a MicroSD
card that is up to 128 GB.
Speaker
USB Power Port
In the Box
C
YoLink Uno WiFi
Camera
Screws (3)
AC/DC Power
Supply Adapter
Anchors (3)
Quick Start Guide
Red LED On
Camera Start-Up or WiFi Connec-
tion Failure
One Beep
Start-Up Complete or Camera
Received QR Code
Flashing Green LED
Connecting to WiFi
Green LED On
Camera is Online
Flashing Red LED
Waiting for WiFi Connection
Information
Slow Flashing Red LED
Camera Updating
USB Cable
(Micro B)
Mounting Base Template
Power Up
F
Plug in the USB cable to connect the
camera and power supply. When the red
LED is on, it means the device is on.
Install your MicroSD memory card, if
applicable, in the camera at this time.
You may require these items:
Medium Phillips
Screwdriver
Required Items
D
Drill with Drill Bits
The Uno WiFi Camera has a MicroSD
memory card slot, and supports cards up
to 128GB in capacity. It is recommended
to install a memory card (not included) in
your camera.
Before You Begin
B
Installation & User
Guide
Product Support
Support produit
Soporte de producto
You can also find all guides and
additional resources, such as videos and
troubleshooting instructions, on the
YoLink Uno WiFi Camera Product
Support page by scanning the QR code
below or by visiting:
https://shop.yosmart.com/pages/
uno-product-support
Please note: this is a quick start guide,
intended to get you started on the
installation of your YoLink Uno WiFi
Camera. Download the full Installation &
User Guide by scanning this QR code:
Open the app and tap Sign up for an
account. You will be required to provide
a username and a password. Follow the
instructions, to set up a new account.
Allow notifications, when prompted.
You will immediately receive a welcome
email from [email protected] with
some helpful information. Please mark
the yosmart.com domain as safe, to
ensure you receive important messages
in the future.
Log in to the app using your new
username and password.
The app opens to the Favorite screen.
This is where your favorite devices and
scenes will be shown. You can organize
your devices by room, in the Rooms
screen, later.
Install the App
G
If you are new to YoLink, please install
the app on your phone or tablet, if you
have not already. Otherwise, please
proceed to the next section
Scan the appropriate QR code below or
find the “YoLink app” on the appropriate
app store.
Apple phone/tablet
iOS 9.0 or higher
Android phone or
tablet 4.4 or higher
Add Your Uno Camera to
the App
H
1. Tap Add Device (if shown) or tap the
scanner icon:
Scanner icon
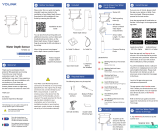
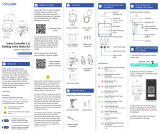
Drilling Position
Quick Start Guide
YS1B01-UN
YoLink Uno
WiFi Camera
Revision Mar. 23, 2023
Welcome!
A
Thank you for purchasing YoLink
products! We appreciate you trusting
YoLink for your smart home &
automation needs. Your 100%
satisfaction is our goal. If you experience
any problems with your installation, with
our products or if you have any
questions that this manual does not
answer, please contact us right away.
See the Contact Us section for more info.
Thank you!
Eric Vanzo
Customer Experience Manager
Pour des instructions en
français, scannez les codes
QR dans la section suivante.
Para obtener instrucciones en
español, escanee los códigos
QR en la siguiente sección.
The following icons are used in this guide to
convey specific types of information:
Very important information
(can save you time!)
Fr
Es

Contact Us
L
We are here for you, if you ever need any
assistance installing, setting up or using
a YoLink app or product!
Need help? For fastest service, please
email us 24/7 at [email protected]
Or call us at 831-292-4831 (US phone
support hours: Monday - Friday, 9AM to
5PM Pacific)
You can also find additional support and
ways to contact us at:
www.yosmart.com/support-and-service
Or scan the QR code:
Finally, if you have any feedback or
suggestions for us, please email us at
Thank you for trusting YoLink!
Eric Vanzo
Customer Experience Manager
Support
Home Page
15375 Barranca Parkway
Ste. J-107 | Irvine, California 92618
© 2023 YOSMART, INC IRVINE,
CALIFORNIA
Installation, Cont.
JFCC WARNING
K
5. Do not disassemble, open or attempt
to repair or modify the camera, as
damage sustained is not covered by the
warranty.
6. The camera pan & tilt is operated by
the app. Do not manually rotate the
camera, as this may damage the motor
or gearing.
7. Cleaning of the camera should only be
done with a soft or microfiber cloth,
damped with water or a mild cleaner
suitable for plastics. Do not spray
cleaning chemicals directly on the
camera. Do not allow the camera to get
wet in the cleaning process.
1. The camera must not be installed
outdoors or in environmental conditions
outside of the range specified. The
camera is not water resistant. Refer to
the environmental specifications on the
product support page.
2. Ensure the camera is not exposed to
excessive smoke or dust.
3. The camera should not be placed
where it will be subjected to intense heat
or sunlight
4. It is recommended to use only the
supplied USB power adapter and cable,
but if either or both must be replaced,
use only USB power supplies (do not use
unregulated and/or non-USB power
sources) and USB Micro B connector
cables.
5. Do not disassemble, open or attempt
to repair or modify the camera, as
damage sustained is not covered by the
warranty.
This device complies with part 15 of the
FCC Rules. Operation is subject to the
following two conditions: (1) this device
may not cause harmful interference, and
(2) this device must accept any
interference received, including
interference that may cause undesired
operation. Any changes or modifications
not expressly approved by the party
responsible for compliance could void
the user's authority to operate the
equipment.
NOTE: This equipment has been tested
and found to comply with the limits for a
Class B digital device, pursuant to Part
15 of the FCC Rules. These limits are
designed to provide reasonable
protection against harmful interference
in a residential installation. This
equipment generates, uses and can
radiate radio frequency energy and, if not
installed and used in accordance with
the instructions, may cause harmful
interference to radio communications.
However, there is no guarantee that
interference will not occur in a particular
installation.If this equipment does cause
harmful interference to radio or
television reception,which can be
determined by turning the equipment off
and on, the user is encouraged to try to
correct the interference by one or more
of the following measures:
- Reorient or relocate the receiving
antenna.
- Increase the separation between
the equipment and receiver.
- Connect the equipment into an
outlet on a circuit different from
that to which the receiver is
connected.
- Consult the dealer or an
experienced radio/TV technician for
help.
To maintain compliance with FCC’s RF
Exposure guidelines, This equipment
should be installed and operated with
minimum distance between 20cm the
radiator your body: Use only the supplied
antenna.
Installation
J
It is recommended that you setup and
test your new camera before installing it
(if applicable; for ceiling-mounting
applications, etc.)
Location considerations (finding a
suitable location for the camera):
1. The camera can be placed on a stable
surface, or mounted on the ceiling. It can
not be directly mounted to a wall.
2. Avoid locations where the camera will
be subjected to direct sunlight or intense
lighting or reflections.
3. Avoid locations where the objects
viewed may be intensely backlit (intense
lighting from behind the viewed object).
4. While the camera has night vision,
ideally there is ambient lighting.
5. If placing the camera on a table or
other low surface, consider small
children or pets that may disturb, tamper
with, or knock down the camera.
6. If placing the camera on a shelf or
location higher than the objects to be
viewed, please note the camera’s tilt
below the camera ‘horizon’ is limited.
Ceiling-mounting:
1. Determine the location for the camera.
Before permanently installing the
camera, you may wish to temporarily
place the camera at the intended
location, and check the video images in
the app. For example, hold the camera in
position on the ceiling, while you or a
helper checks the images and field of
view and range of motion (by testing the
pan and tilt positions).
2. Remove the backing from the
mounting base template and place it at
the desired camera location. Select an
appropriate drill bit and drill three holes
for the included plastic anchors.
3. Insert the plastic anchors in the holes.
4. Secure the camera mounting base to
the ceiling, using the included screws,
and tightening them securely with a
Phillips screwdriver.
5. Place the bottom of the camera on the
mounting base, and snap it into place
with a clockwise twisting motion. Twist
the base of the camera, not the camera
lens assembly. Check that the camera is
secure and that it does not move from
the base, and that the base does not
move from the ceiling or mounting
surface.
6. Connect the USB cable to the camera,
then secure the cable to the ceiling and
to the wall, over its course from the
plug-in power supply. An unsupported or
dangling USB cable will apply a slightly
downward force on the camera, which,
combined with a poor installation, may
lead to the camera falling off the ceiling.
Use a suitable technique for this, such as
cable staples intended for the
application.
7. Plug the USB cable into the plug-in
power supply/power adapter.
Refer to the full Installation & User
Guide, to complete the setup and
configuration of the camera.
Warnings, Cont.
I
Warnings
I
Add Your Uno Camera to
the App, Cont.
H
2. Approve access to your phone’s
camera, if requested. A viewfinder will be
shown on the app.
3. Hold the phone over the QR code so
that the code appears in the viewfinder.
If successful, the Add Device screen will
be displayed.
You can change the device name and
assign it to a room later. Tap Bind
device.
If successful, the screen will appear as
shown. Tap Done.
-
 1
1
-
 2
2


dans d''autres langues
- English: YoLink YS1B01-UN User guide
Documents connexes
-
YoLink YS1B01-UN Mode d'emploi
-
 YoLink YS1B01-UN Uno WiFi Camera Mode d'emploi
-
 YoLink YS7905S-UC Mode d'emploi
-
YoLink YS8003-UC Mode d'emploi
-
 YoLink YS7104-UC Outdoor Alarm Controller Mode d'emploi
-
 YoLink X3 Outdoor Alarm Controller Mode d'emploi
-
 YoLink YS5003-UC Valve Controller 2 and Bulldog Valve Robot Kit Mode d'emploi
-
YoLink YS5003-UC Mode d'emploi
-
-
YoLink YS7804-EC Mode d'emploi


