Jack Wolfskin diamond tarp xt Manuel utilisateur
- Taper
- Manuel utilisateur


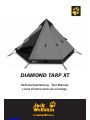
diamond Tarp xT
JACK WOLFSKIN entwickelt seine Produkte ständig weiter. Wir behalten uns vor, einzelne Komponenten zu verändern.
Abbildungen der Aufbauanleitung können vom aktuellen Produkt abweichen.
At JACK WOLFSKIN we are continually improving and upgrading our products. We therefore reserve the right to make
changes to individual components. Diagrams used for the pitching instructions may differ slightly from the actual product.
JACK WOLFSKIN développe et améliore ses produits en permanence. De ce fait nous nous réservons la possibilité de modi-
fier certains composants. Les illustrations du mode de montage peuvent différer légèrement de celles du produit actuel.
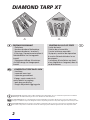
ZELTpaCKSaCKinHaLT
· 1 Zeltplane
· 1 herausnehmbare Bodenplane
· 1 herausnehmbares Innenzelt
· 14 Heringe, Reparaturmaterialien &
Nahtabdichter im Heringspack-
beutel
· 1 längenverstellbare Aluminium-
Aufstellstange im Stangenpack-
beutel
ConTEnU dU SaC dE TEnTE
· 1 toile de tente
· 1 bâche de sol amovible
· 1 tente intérieure amovible
· 14 piquets, matériel de réparation
& mastic d’étanchéité dans le sac
des piquets
· 1 armature d’installation en alumi-
nium (réglable en longueur) dans le
sac d’armatures
ConTEnTS oF TEnT paCK SaCK
· 1 tent/tarp
· 1 separate inner tent
· 1 separate groundsheet
· 14 pegs, repair materials &
seam sealant in peg bag
· 1 pole bag containing
· 1 length adjustable rigging pole
2

3
BELÜFTUnG
Ihr Zelt ist mit ausreichenden Belüftungsmög-
lichkeiten ausgestattet. Sorgen Sie immer für
eine gute Luftzirkulation um die Gefahr der
Kondenswasserbildung zu vermindern. Den-
noch ist Kondenswasserbildung unvermeidbar.
Verwechseln Sie Kondenswasser bitte nicht mit
eindringender Feuchtigkeit.
pFLEGE
Reinigen Sie Ihr Zelt in aufgebautem Zustand
ausschließlich mit Wasser und wenig Seife. Be-
freien Sie vor allem die Reißverschlüsse regel-
mäßig von Schmutz und Sand. Auf keinen Fall
in die Waschmaschine oder Reinigung geben,
da hier die Beschichtung irreversibel zerstört
werden kann. Geeignete Silikonschmiermittel
schützen Stangen vor Korrosion und Reißver-
schlüsse vor dem Einfrieren.
FEUEr
Offenes Feuer und Flammen sind eine Gefahr
für Zeltgewebe. Vermeiden Sie offenes Feuer
in unmittelbarer Nähe des Zeltes.
VEnTiLaTion
Votre tente est suffisamment équipée
d’options pour une bonne ventilation. Assurez-
vous de toujours avoir une bonne circulation
d’air dans la tente pour réduire la condensa-
tion. Malgré tout il est impossible de prévenir
totalement la formation d’eau de conden-
sation. Ne confondez pas cependant eau de
condensation et pénétration d’eau au travers
de la toile de tente.
EnTrETiEn
Nettoyez votre tente montée, uniquement
à l’eau un peu savonneuse. Les fermetures à
glissière doivent être nettoyées régulièrement
pour les débarrasser de la saleté et du sable.
Ne surtout pas laver la tente à la machine, ne
pas faire à nettoyer à sec, ces types de nettoy-
age causeraient une altération irréversible de
l’enduit protecteur de la toile. Des lubrifiants
appropriés à base de silicone, protègent les
arceaux de la corrosion et les fermetures à
glissière du gel.
FEU
Le feu confiné et toute flamme en général
représentent un risque pour la toile. Évitez
d’approcher toute flamme nue de la toile.
VEnTiLaTon
Your tent is equipped with sufficient ventilati-
on options. Try to ensure that there is always
a good flow of air through the tent to reduce
the risk of condensation build-up. However,
condensation cannot completely be avoided.
Please do not confuse condensation with
actual water penetration through the fabric of
the tent.
CarE and mainTEnanCE
Clean your tent when pitched, using only a litt-
le soap and water. Zips in particular should be
cleaned regularly to remove dirt and grit. On
no account should the tent be machine washed
or dry cleaned, since this could cause irrever-
sible damage to the protective coating on the
tent fabric. Suitable silicone-based lubricants
protect poles from corrosion and prevent zips
freezing.
FirE prEVEnTion
Open fires and flames are a hazard for tent
materials. Avoid naked flames in the immedia-
te vicinity of the tent.

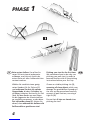
pHaSE 1
4
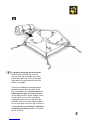
Beim ersten Aufbau: Sie sollten Ihr
neues Zelt erst einmal probeweise
aufbauen, und sich vor Antritt der
ersten Reise mit allen Aufbauschritten
vertraut machen.
Wählen Sie zunächst einen geeig-
neten Standort für Ihr Zelt aus (1)
und entfernen Sie dort alle spitzen
Gegenstände, die den Zeltboden be-
schädigen könnten. Breiten Sie Ihr Zelt
flach auf dem Boden aus und fügen
Sie die Segmente der Aluminiumstan-
ge sorgfältig zusammen, so dass diese
fest ineinander sitzen (2). Achten Sie
darauf, dass während des Aufbaus alle
Reißverschlüsse geschlossen sind.
Pitching your tent for the first time:
We recommend you to do a dry run
pitching your new tent, in order to
become familiar with all the pitching
instructions before your first trip.
Choose a suitable pitching site (1),
removing all sharp objects which may
damage the groundsheet. Spread out
the tent on the ground and carefully
connect all pole sections, ensuring a
tight fit (2).
Ensure that all zips are closed when
pitching the tent.

5
Le premier montage de votre tente:
Afin de vous familiariser avec les
instruc-tions de montage nous vous
conseillons de faire un essai de mon-
tage de votre tente neuve avant de
partir en voyage.
Choisissez d’abord un emplacement
approprié pour dresser votre tente
(1), en prenant soin d’enlever tous les
objets pointus pouvant endommager
le tapis de sol de la tente. Étalez votre
tente à plat sur le sol et assemblez
soigneuse-ment tous les arceaux, de
manière à ce qu’ils soient bien emboî-
tés les uns dans les autres (2). Assurez à
ce que toutes les fermetures à glissière
soient bien fermées pendant le monta-
ge de la tente.

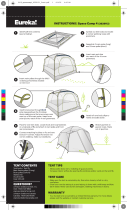
pHaSE 2
6
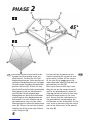
Schließen Sie die Reißverschlüsse des
kompletten Zeltzugangs (auch am
Moskitonetz). Fixieren Sie alle fünf
Bodeneckpunkte des Zeltes an den ver-
stellbaren Bandschlaufen mit Heringen
(1) und ziehen Sie dabei die Bodeneck-
punkte straff aus (2). Öffnen Sie nun
die die Reißverschlüsse des kompletten
Zeltzugangs (auch am Moskitonetz)
und fixieren Sie die mitgelieferte
Bodenplane mit den Kunststoffhaken
in die Ringe in allen Bodenecken des
Zeltinneren. Die rote Markierung an
der Bodenplane muss mit der roten
Markierung am Außenzelt übereinstim-
men (3). Fixieren sie auch die Aufstell-
stäbchen am Klett in den drei Lüftern
in der Zeltspitze (4).
Ensure that the entrance zips are
closed (including the zip on the mos-
quito mesh). Anchor all five corners
of the tent fly by pegging out the
adjustable tape loops (1) and pull the
groundsheet out flat (2).
Next, open the entrance zips (inclu-
ding the zip on the mosquito mesh)
and fix the groundsheet in place by
clipping the plastic hooks to the rings
located at each corner of the inner
tent. Ensure that the red markers on
the groundsheet correspond to the
red markers on the flysheet (3). Fix the
vent struts in position using the velcro
tabs in the three vents in the apex of
the tent (4).

7
Fermez complètement les fermetures à
glissière de l’entrée de la tente (et éga-
lement celles de la moustiquaire). Fixez
avec les piquets les tirants flexibles de
chacun des cinq coins du sol de la tente
intérieure (1) et tirez la bâche de sol en
même temps (2). Ouvrez ensuite complè-
tement la fermeture à glissière de l’entrée
et celle de la moustiquaire puis fixez la
bâche de sol (qui fait partie de la livraison
de la tente) avec les clips en plastiques
dans les boucles à chaque coin du sol de
la tente intérieure. Le marquage rouge
de bâche de sol doit correspondre au mar-
quage rouge de la tente extérieure (3).
Fixez aussi les petits arceaux d‘installation
aux velcros des trois chatières de ventilati-
on au sommet de la tente (4).

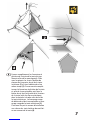
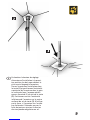
Rasten Sie den Einstellknopf der
Aufstellstange in der ersten, unteren
Position ein um die kürzeste Länge der
Stange zu erreichen.
Führen Sie die Aufstellstange nun in
das Zelt ein (1) und positionieren Sie
das obere Stangenende (mit dem D-
förmigen Metallring) in die verstärkte
Dachspitze (2). Stellen Sie nun das un-
tere Ende der Stange auf die Verstär-
kung in der Mitte des Zeltbodens (3).
Bitte wenden Sie keine Gewalt an, falls
Sie die Stange nicht aufstellen können.
Lösen Sie die Spannung der Zelthaut
etwas über die 5 verstellbaren Boden-
eckbänder.
pHaSE 3
8
Set the rigging pole to its shortest
length, with the adjuster mechanism
locked in the first (lower) position).
Introduce the rigging pole into the
tent (1) and position the top end of
the pole (with the D-shaped metal
ring) in the reinforced roof apex (2).
Then place the bottom end of the
pole on the reinforced patch in the
middle of the groundsheet (3).
Please do not use force. If the rigging
pole can not be positioned upright,
release the tension on the tent fabric
by slackening off the 5 adjustable
corner tapes.

9
Enclenchez le bouton de réglage
d’armature d’installation à la premi-
ère position (en bas) pour obtenir la
plus courte longueur d’armature.
Passez l´armature d´installation dans
la tente (1) et positionnez l’extrémité
supérieure de l´armature dans la poin-
te renforcée (avec l’anneau métalli-
que en forme de D) du toit de la tente
(2). Positionner ensuite l’extrémité
inférieure de l´armature sur le centre
renforcé du sol de tente (3). N’utilisez
pas la force, si l´armature ne s´installe
pas facilement. Détendez un peu la
toile de tente en ajustant la tension
des cinq bandes angulaires au sol.

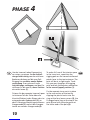
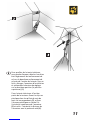
pHaSE 4
10
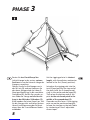
Um das Innenzelt ohne Raumverlust
zu nutzen, versetzen Sie die Aufstell-
stange leicht schräg von der mittleren
Bodenverstärkung auf die zum Zelt-
Eingang hin versetzte zweite Boden-
verstärkung. Dazu müssen Sie die
Aufstellstange verlängern und den Ein-
stellknopf in die zweite, obere Position
einrasten lassen (1).
Fixieren Sie das separate Innenzelt quer
im hinteren Teil des Zeltes über die
Kunststoffhaken in den Ringen der vier
entsprechenden Bodenecken (2), an
dem D-förmigen Metallring am oberen
Stangenende (3) und mit der Stangen-
tasche am unteren Stangenende (4).
To make full use of the interior space
in the inner tent, reposition the
rigging pole on the second reinforced
patch closer to the tent entrance. The
pole will be at a slight angle. To do
this you must lengthen the rigging
pole and lock the adjuster mechanism
in the second (upper) position (1).
Fix the separate inner canin in place
in the rear section of the tent by
clipping the plastic hooks into the
rings at the four lower corners (2), the
D-shaped metal ring at the top of the
pole (3) and with the pole pouch at
the lower end of the pole (4).

11
Pour profiter de la tente intérieure
sans perdre d’espace, décalez le mât en
biais légèrement du renforcement de
sol vers le deuxième renforcement de
sol près de l’entrée de la tente. Pour ce
faire, allongez l’armature d’installation
et enclenchez le bouton de réglage
sur la deuxième position (la position
supérieure) (1).
Fixez la tente intérieure à l’arrière
partie de la tente en fixant les clips en
plastique dans les œillets de coin du
tapis sol correspondants (2), et fixer
l’anneau métallique en forme D à
l’extrémité supérieure de l‘armature
(3) et enfin l’extrémité inférieure de
l‘armature avec la poche du mât (4).

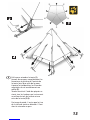
pHaSE 5
12
Zum finalen Abspannen (1) schließen
Sie wieder die Reißverschlüsse des
kompletten Zeltzugangs (auch am Mos-
kitonetz) und spannen sie die 5 Boden-
eckbänder an den Metallstäbchen straff
ab (2).
Spannen Sie nachfolgend alle Abspann-
leinen in der Mitte der Zeltdachseiten
und an den Zeltecken mit den restli-
chen Heringen ab (3/4).
Bei Nässe kann sich das Zeltmaterial
dehnen. Es muss dann etwas nachge-
spannt werden.
For the final guying procedure (1), en-
sure that all of the entrance zips are
closed (including the zip on the mos-
quito screen) and tension the 5 corner
tapes on the metal struts tightly (2).
Next, tension all of the guy lines in
the middle of the side walls of the
tarp by pegging them out (3/4) with
the remaining pegs.
When wet the fabric of the tent may
stretch. Re-guy where necessary.

13
Enfin pour retendre la tente (1),
fermez de nouveau complètement les
fermetures à glissière de l’entrée de
la tente (ainsi que celle de la mous-
tiquaire) et tendez bien les 5 bandes
angulaires du sol aux bâtonnets en
métal (2).
Tendez ensuite à l’aide des piquets re-
stants tous les haubans qui se trouvent
au milieu du toit de la tente et aux
coins de la tente (3/4).
Par temps humide, il arrive que le tissu
de la toile de tente se détende. Il faut
alors la retendre un peu.

rEparaTUrEn
Reparaturmaterialien für kleine
Reparaturen unterwegs liegen bei.
Produktionsfehler werden im
Rahmen der Garantieleistungen repariert.
Andere Reparaturen führen wir gegen eine Ge-
bühr gerne aus. Schicken Sie das gereinigte Zelt
mit klarer Reparaturkennzeichnung/-anweisung
und Ihrem Kaufbeleg über Ihren Fachhändler
ein.
LaGErUnG
Bevor Sie Ihr Zelt längere Zeit lagern, muss es
vollkommen durchgetrocknet sein, sonst besteht
Gefahr von Schimmel- und Stockfleckenbildung.
UV STraHLUnG
Ultraviolette (UV) Strahlung zerstört mit der Zeit
alle modernen Zeltmaterialien. Das spezielle
Polyester-Zeltmaterial erhöht die Lebensdauer
gegenüber herkömmlichen Nylon-Zeltmateria-
lien, kann aber auch auf Dauer der Natur nicht
trotzen. Bitte vermeiden Sie deshalb dauerhafte
intensive Sonneneinwirkung. Jack Wolfskin
übernimmt keine Garantie für Schäden durch
UV Strahlung.
rEpairS
Repair materials for minor repairs during usage
are provided. Production faults will be repaired
under the terms of our guarantee. Our service
department will be pleased to perform other
repairs for a small charge. Please send in your
cleaned tent via your nearest dealer, enclosing
clear repair instructions and proof of purchase.
SToraGE
Allow your tent to dry thoroughly while still
assembled before storing it for any longer
period. This will prevent mildew and damp
stains forming.
UV LiGHT
Ultraviolet (UV) radiation reduces the tear-
strength of all tent materials in the course
of time. The special polyester tent material
increases the service life in comparison with
conventional nylon materials. Tent materials,
however, cannot permanently defy the effects
of nature. Therefore, please avoid subjecting
the tent to intensive sunlight for extended pe-
riods of time. JACK WOLFSKIN will not assume
any liability for damage caused by ultraviolet
light.
rÉparaTionS
Le matériel pour les petites réparations en cours
de voyage est fourni avec la tente. Tout défaut
de fabrication est couvert par la garantie. Nous
effectuons volontiers les autres réparations
contre paiement à un tarif raisonnable. Veuillez
nous envoyer la tente nettoyée, en joignant
le ticket de caisse, par l’intermédiaire de votre
magasin spécialisé le plus proche, avec de claires
instructions de réparation.
SToCKaGE
Avant d’être stockée pendant une durée prolon-
gée, la tente doit être entièrement sèche, afin
de prévenir la formation de moisissures et de
tâches d‘humidité.
raYonnEmEnT ULTraVioLET
Avec le temps, les rayons ultraviolets réduisent la
résistance de toutes les toiles de tente. La toile
spéciale en polyester accroît la longévité de la
tente par rapport à celles en Nylon tradition-
nelles, mais à la longue, elle ne peut résister de
manière permanente aux effets de la nature.
De ce fait nous vous prions donc d’éviter toute
exposition intensive de longue durée au soleil.
JACK WOLSKIN n’assume aucune garantie pour
les dommages causés par les rayons ultraviolets.
inFo
14

15
WEiTErE TippS
Die stramme Grundspannung der Stangen, des
Überzeltes und der Abspannleinen sind die
Vorraussetzung für besten Stand und Sturmsta-
bilität Ihres Zeltes.
Überprüfen Sie den Sitz der Stangen und
spannen Sie Überzelt und Abspannleinen
immer straff aus. Investieren Sie sich beim
Aufbau ruhig ein paar Minuten mehr an Zeit
und Mühe, dann können Sie beim nächsten
Wettereinbruch ganz „entspannt“ sein.
naHTdiCHTEr
Die wichtigsten Nähte sind mit einer spe-
ziellen Nahtbandversiegelung versehen. Es
empfiehlt sich Nahtstellen, in die Bänder oder
Gummilitzen mit eingefasst sind und die so
die Bandabklebung unterbrechen von innen
und außen zusätzlich mit beiliegendem PU
Nahtdichter abzudichten. Eine Garantie für die
Verklebung ist ausgeschlossen.
FUrTHEr TipS
Correct initial tensioning of the poles, the
flysheet and the guy lines are the prerequisites
for a secure pitch and optimum wind stability.
Check that the poles are correctly positioned
and seated and always tension the flysheet
and the guylines correctly. Take your time; a
few minutes spent checking the tent during
pitching will mean that you can relax when the
weather next turns bad!
SEam SEaLanT
The important seams are specially tape sealed.
However we do recommend additional sealing
with the PU seam sealant provided, particularly
at those points of the seam where tapes or
rubber tensioning loops are integrated into
seam and thus interrupt the continuity of the
tape seal. We offer no guarantee on the seam
taping of the seams.
aUTrES ConSEiLS
Afin que votre tente soit bien montée et offre
une résistance maximale au vent assurez vous
que les armatures, le double toit et le hauba-
nage soient correctement tendus.
Vérifiez que les armatures soient correctement
positionnées et à leur place, et que le double
toit et le haubanage soient toujours bien
tendus. Prenez votre temps; quelques minutes
de plus passer à bien vérifier votre tente pen-
dant le montage vous assurera d’être détendu
quand le temps passe au mauvais!
CoLLE impErmEaBiLiSanTE
Les coutures importantes ont été recouvertes
d’une bande scellée spéciale. Mais nous vous
recommandons de traiter de nouveau avec la
colle imperméabilisante PU fournie, spéciale-
ment sur les endroits où les bandes et cordons
en caoutchouc sont insérés dans la couture
et interrompent donc le collage des bandes.
Le collage des bandes scellées est exclu de la
garantie.

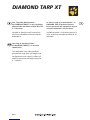
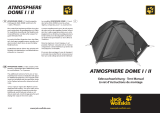
Tent, tarp or mosquito shelter –
the DIAMOND TARP XT is a versatile
combination.
The removable inner cabing and the
groundsheet tarp allow the weight and
configuration to be varied. It offers full
weather protection and ample room for
4 - 5 persons.
Zelt, Tarp oder Moskitoschutz –
das DIAMOND TARP XT ist ein vielseitiger
Wetterschutz und bietet reichlich Platz für
4 - 5 Personen.
Variabel im Gewicht und Einsatz durch
das herausnehmbare Innenzelt und die
Bodenplane.
La tente, le tarp ou la moustiquaire – le
DIAMOND TARP XT présente une très
bonne résistance aux intempéries et peut
accueillir facilement 4 à 5 personnes.
Variable en poids à l’utilisation grâce à la
tente intérieure amovible et bâche de sol
amovible.
diamond Tarp xT
08/11
-
 1
1
-
 2
2
-
 3
3
-
 4
4
-
 5
5
-
 6
6
-
 7
7
-
 8
8
-
 9
9
-
 10
10
-
 11
11
-
 12
12
-
 13
13
-
 14
14
-
 15
15
-
 16
16


Jack Wolfskin diamond tarp xt Manuel utilisateur
- Taper
- Manuel utilisateur
dans d''autres langues
Documents connexes


Autres documents
-
Eureka 2629112 Mode d'emploi
-
 Eureka! Space Camp 4 Le manuel du propriétaire
-
 Easy Camp Dayout Le manuel du propriétaire
-
Outwell Classic Indian Lake Zelt Le manuel du propriétaire
-
Robens Osprey 3EX Zelt Le manuel du propriétaire
-
-
-
 Easy Camp Explorer Quasar 300 Le manuel du propriétaire
-
Exped 7640445457118 Mode d'emploi


