Royal Sovereign ARP-2208 Manuel utilisateur
- Catégorie
- Climatiseurs mobiles
- Taper
- Manuel utilisateur

Portable
Air Conditioner
3 in 1
ARP-2208
Page en Français
Read and retain these instructions for future reference.
For any Customer Support needs, please choose the Support tab on
www.royalsovereign.com (USA)
www.royalsovereign.ca (Canada)
Royal Sovereign International Inc

CONTENTS
SAFETY INSTRUCTIONS ----------------------------------------------------- 2-3
PRODUCT VIEW ----------------------------------------------------------------- 4
INSTALLATION ------------------------------------------------------------------ 6
OPERATION ---------------------------------------------------------------------- 7-10
MAINTAINANCE AND SELF DRAINAGE ----------------------------------- 11-12
TROUBLESHOOTING ---------------------------------------------------------- 13
SPECIFICATIONS --------------------------------------------------------------- 14
WARRANTY ---------------------------------------------------------------------- 15
-1-

ARP-2208
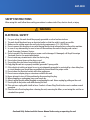
SAFETY INSTRUCTIONS
When using this unit follow these safety precautions to reduce risk of re, electric shock, or injury.
ELECTRICAL SAFETY
1. For your safety, this unit should be properly grounded on a level surface indoors.
2. The unit should be placed near an electrical outlet so that the outlet is easily accessible.
3. Make sure the voltage meets the unit’s electricity requirements (115-120V/60Hz).
4. Do not connect this machine to an outlet having the electrical ratings below or above this machine.
5. In case of any abnormality, be sure to turn off the machine, disconnect the plug, and contact
Royal Sovereign Customer Service.
6. Do not operate if the electrical plug or power cord is damaged. If damaged, call Royal Sovereign
Customer Service for repair/replacement.
7. Do not under any circumstances alter the electric plug.
8. Do not place heavy items on the plug or cord.
9. Do not plug this cord into a loose electrical outlet.
10. Only plug the unit into a properly installed, grounded 3 prong outlet.
11. If the electrical outlet you intend to use is not adequately grounded or protected by a time delay fuse
or circuit breaker, you should have a qualied electrician install the proper outlet.
12. Do not share the electrical socket with other appliances.
13. Do not use an adapter plug or extension cord with this unit.
14. Never attempt to turn off this machine by disconnecting the plug.
15. When plugging or unplugging, keep your hands dry.
16. Always grasp the plug when plugging or unplugging the unit. Never unplug by pulling on the cord.
17. Do not pull on the power cord while moving the unit.
18. This unit uses a plug with a built-in fuse. Conduct a Power Plug Check before use to conrm normal
operation.
19. Turn the unit off and unplug when: cleaning the unit, removing the lters, or not using the unit for an
extended time period.
-2-
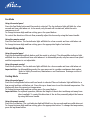
Read and Fully Understand this Owners Manual before using or operating the unit
WARNING

-3-
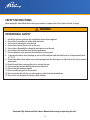
SAFETY INSTRUCTIONS
When using this unit follow these safety precautions to reduce risk of re, electric shock, or injury.
OPERATIONAL SAFETY
1. Install the unit according to the installation instructions supplied.
2. Do not block air outlets or intake with obstacles.
3. Do not insert any objects into the unit.
4. Do not place heavy items or sit on the unit.
5. Do not place flammable or chemical substances near the unit.
6. Do not place this machine near heating appliances.
7. Do not splash or pour water on the housing or control panel.
8. To prevent the water from freezing, do not use this machine and the drain hose at a temperature below
41° (5°C).
9. Ensure the rubber drain plugs are securely plugged into the drain ports on the back of the unit to prevent
water leaks.
10. Drain the unit before moving the unit or storing the unit.
11. Do not operate the unit with the back cover removed.
12. Do not use this machine outside.
13. Do not modify any part of this product.
14. Do not operate this unit for any other purpose other than its intended use.
15. This unit is not designed for use by young children.
WARNING
Read and Fully Understand this Owners Manual before using or operating the unit

ARP-2208
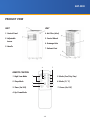
PRODUCT VIEW
-4-
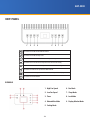
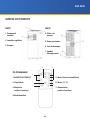
UNIT
1. Control Panel
2. Adjustable
Louver
3. Handle
UNIT
4. Air Filter (Inlet)
5. Caster Wheels
6. Drainage Hole
7. Exhaust Duct
REMOTE CONTROL
1. High/ Low Mode 5. Mode (Cool/ Dry/ Fan)
2. Sleep Mode 6. Mode (°C/ °F)
3. Timer (On/ Off) 7. Power (On/ Off)
4. Up/ Down Mode
1
2
3
45
6
7

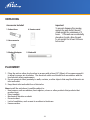
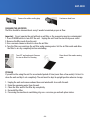
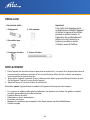
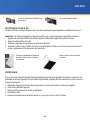
Accessories Included:
1. Exhaust hose 4. Remote control
2. Hose connector
3. Window kit adapter 5. Window Kit
UNPACKING
PLACEMENT
1. Place the unit on a rm, level surface in an area with at least 20” (50cm) of free space around it
to allow for proper air circulation. The electrical outlet used should be in accordance with the
local electric safety requirements.
2. Do not operate in close proximity to walls, curtains, or other objects that may block the units air
inlet and outlet.
3. Keep the air inlet and outlet free of obstacles.
Never install the unit where it could be subject to:
• Heat sources such as radiators, heat registers, stoves or other products that products that
produce heat.
• Direct sunlight
• Mechanical vibration or shock
• Excessive dust
• Lack of ventilation, such as next to a cabinet or bookcase
• Uneven surface
Important:
To prevent damage after moving,
unpack the unit and let the unit
stand upright for a minimum of 2
hours. If the unit was accidentally
placed on its side, allow the unit
to set upright for at least 24 hours
before use.
-5-

ARP-2208
-6-
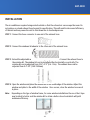
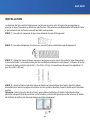
INSTALLATION
The air conditioner requires being vented outside so that the exhaust air can escape the room. Do
not replace or extend exhaust hose beyond its specication. This will result in decreased efciency
of the unit and may cause the unit to shut down due to low backpressure.
STEP 1: Connect the hose connector to one end of the exhaust hose
STEP 2: Connect the windows kit adapter to the other end of the exhaust hose.
STEP 3: Extend the adjustable window kit the length of your window. Connect the exhaust hose to
the window kit. The window kit can be installed either horizontally or vertically. The
window kit can be adjusted from 23.6”-47.2” (0.6-1.2m). The exhaust hose can be
adjusted from 9.4”-59”. (240-1500mm)
STEP 4: Open the window and place the window kit on the inside edge of the window. Adjust the
window seal plate to the width of the window. Once secure, close the window to secure it
in place.
Note : Depending on the type of window frame, for some window installations the use of duct tape
may be ideal to better seal the window kit to attain a better closed seal which will yield
maximum efciency.

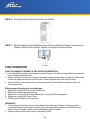
STEP 5: Attach the hose connector to the exhaust air outlet of unit.
STEP 6: Adjust the length of the flexible exhaust hose. Avoid bends in the hose and ensure that the
unit is near the electrical outlet.
-7-
OPERATION
BEFORE PLUGGING IN THE UNIT TO A POWER SOURCE:
1. Let the unit stand upright for a minimum of 2 hours. This will reduce the chance of malfunction
in the cooling system.
2. Ensure the rubber drain plugs are securely plugged into the drain ports on the back of the unit to
prevent any possible water leaks.
3. Ensure the exhaust hose and window kit installation has been installed properly and properly
vented.
Conduct a Power Plug Check:
1. Press the RESET button on the power cord.
2. Plug the cord into an electrical outlet.
3. Press the TEST button on the power cord. The RESET button should pop up.
4. Press the RESET button for use.
5. Do not use the air conditioner if the test fails.
NOTE:
1. If you turn the air conditioner off and immediately restart it, allow up to 3 minutes for the
compressor to restart cooling. In the event of a power failure, wait 3 minutes before restarting
the unit.
2. The unit sold in the United States is preset to Fahrenheit. the unit sold in Canada is preset to
Celsius.

ARP-2208
-8-
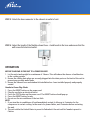
Press button to turn ON/ OFF the child lock function
Press button to turn ON/ OFF sleep mode.
Press button to set a time for the unit to automatically start or stop.
Press button to increase the desired temperature and/or used for timer setting.
Press button to decrease the desired temperature and/or used for timer setting.
Press button to switch the fan speed between HIGH and LOW.
Press button to switch the operation mode between fan, cooling and dehumidifying mode.
Press button to turn unit ON/ OFF.
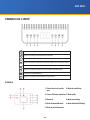
UNIT PANEL
1 2 3 4 5 6 7 8
SYMBOLS
1. High Fan Speed
2. Low Fan Speed
3. Timer
4. Dehumidier Mode
5. Cooling Mode
6. Fan Mode
7. Sleep Mode
8. Lock Mode
9. Display Window Mode

-9-
Fan Mode
Using the control panel
Press the Fan Mode button until fan mode is selected. The fan indicator light will blink for a few
second and turn solid when set. In fan mode, only the unit will circulate air, while the units
compressor is off.
To change between high and low setting, press the speed button.
To control the direction of the air flow, manually adjust the louvres by using the louvre handle.
Using the remote control
Press the Fan button. The fan indicator light will blink for a few seconds and turn solid when set.
To change between high and low setting, press the appropriate high or low button.
Dehumidifying Mode
Using the control panel
Press the Dehumidifying Mode button until fan mode is selected. The dehumidier indicator light
will blink for a few second and turn solid when set. In dehumidify mode, only fan runs at low speed
and the temperature is not adjustable.
Using the remote control
Press the Dry button. The fan indicator light will blink for a few seconds and turn solid when set.
Important Note: In dehumidifying mode, the user may want to consider continuous drain option.
Refer to Safety Precautions, Maintenance and Continuous Drainage section of
this manual.
Cooling Mode
Using the control panel
Press the Cooling Mode button until cool mode is selected.The cool indicator light will blink for a
few second and turn solid when set. Press the up or down icons to set the desired temperature. The
display will show the current set temperature
To change between high and low setting, press the speed button.
Important Note: For optimal operation, shorten the length of the air duct and keep unit away from
direct sunlight. To control the direction of the air flow, manually adjust the louvres
by using the louvre handle.
Using the remote control
Press the Cool button. The cool indicator light will blink for a few seconds and turn solid when set.
To change between high and low setting, press the appropriate button. To change the temperature,
press the up/down button.

ARP-2208
-10-
Child Lock Function
This button is on the unit itself. When pressed, this function locks the air conditioner into the mode
it is currently operating in. When in lock mode you cannot change modes from the display or
remote control until it is unlocked. To operate, press and hold the Child Lock button. The lock icon
LED light on the control panel will turn on to indicate that the unit is in lock mode. To turn off Child
Lock feature, press and hold the Child Lock button. The Child Lock icon will turn off on the control
panel.
Sleep Mode
Using the control panel
Press the sleep icon to switch to sleep mode. Sleep mode can only be used when the unit is in
cooling mode. In sleep mode the fan runs at low speed. During sleep mode after 1 hour the preset
temperature will increase by 1°C ad again every hour by 1°C.
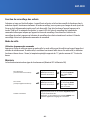
Timer
The timer function has two sets of operation (Timer OFF and Timer ON)
Press Timer key to
turn on the timer
function.
Press Timer key to
turn on the timer
function.
Press Up /Down
repeatedly to set the
delay OFF time.
Press Up /Down
repeatedly to set the
delay ON time.
Press Up /Down repeatedly until the LED shows ‘00’.
Note: when press POWER will also exit the timer setting.
To turn off
(When power on)
To turn on
(When power off)
Cancel timer

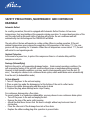
SAFETY PRECAUTIONS, MAINTENANCE AND CONTINUOUS
DRAINAGE
Automatic Defrost
As a safety precaution, this unit is equipped with Automatic Defrost Feature. At low room
temperatures, frost may buildup at the evaporator during operation. To ensure ideal operation of the
unit, the units built in Automatic defrost function will activate. the air conditioner unit will
automatically start defrosting and the POWER LED will blink.
The auto defrost feature will operate in cooling setting. When in cooling operation, if the unit
ambient temperature sensor senses the evaporator coil temperature to be below -1°C, the com-
pressor will stop operating for 10 minutes. When the coil temperature sensor detect 7 °C, the unit
will restart to cool operating mode
Overload Protection
In the event of a powerloss,to protect the compressor there is a 3-minute delay until the
compressor restarts.
Drainage (Dehumidfying)
Built into this unit is self-evaporating drainage feature. Under normal operating conditions, the
self-evaporative feature of the unit will operate without issue or maintenance being required.
However, in high humidity conditions, you may need to drain manually water from the unit. (Ft
error) You may also choose to do continuous drain option, which would drain water automatically
from the unit. (in dehumidier mode)
To Drain Manually
1. Turn off the power to the unit and unplug
2. Place a water tray under the drainage port at the bottom of the unit to collect water
3. Remove the rubber drainage plug and allow water to drain
4. Replace the plug, when drainage water stops flowing
For continuous drainage into a floor drain
To operate similar to a stand alone dehumidier, you may choose to use continuous drain option:
• Turn off the power to the unit and unplug the unit.
• Remove the plug of the water outlet opening.
• Attach the drain hose. Ensure that the hose is straight without any knots and clear of
obstruction.
• Place the other end of the drainage hose into a floor drain.
• Replace the rubber sealing plug after operation to prevent leaks.
-11-

ARP-2208
Remove the rubber sealing plug. Continuous drain hose.
CLEANING THE AIR FILTER
The lter should be cleaned about every 2 weeks to maintain proper air flow
Important : Do not operate the unit without an air lter, or the evaporator may be contaminated.
1. Press POWER button to turn OFF the unit. Unplug the unit from the electrical power outlet.
2. Remove the lter mesh from the unit.
3. Use a vacuum cleaner or brush to clean the air lter.
4. Turn the lter over and rinse the air lter under running water. Set the air lter aside and allow
thelterto air dry completely beforereinstalling.
Turn OFF and unplug unit. Remove
the two air lters for cleaning
Rinse the air lter under running
water.
STORAGE
If you will not be using the unit for an extended period of time (more than a few weeks) it is best to
clean the unit and dry it out completely. The unit must be kept in upright position when in storage.
1. Unplug the unit and remove exhaust hose and window kit store with the unit.
2. Drain the remaining water from the unit.
3. Clean the lter and let the lter dry completely.
4. Re-install the lter.
5. Preserving the machine in ventilating, dry, non- corrosive gas and safe place indoor.
-12-

-13-
TROUBLESHOOTING
Symtom Check Solution
The unit is not operating.
Check the power connection. Insert the power cord securely into the wall outlet.
Check if the water level indicator lights up. Empty the drain pan by removing the rubber plug..
Refer to self evaporating drainage section of this
manual.
Check the room temperature. The range of operating temperature is 5-35°C.
(41-95°F)
The unit works with reduced
capacity.
Check the air lter to see if it needs
cleaning. Clean the air lter.
Check if the air duct is blocked. Clear the obstacle.
Check if a room door or window is open
where unit is operating. Keep the door and windows closed.
Check if the desired operating mode is
selected and the temperature is properly
set.
Set the mode and temperature to proper setting.
The exhaust hose is detached. Ensure the exhaust hose is securely attached.
Water Leakage
Overflow while moving the unit. Empty the water tank before transport. Refer to
self evaporating drainage section of manual.
Check if the drain hose is kinked or bends. Straighten the hose to avoid a trap existing.
Excessive Noise
Check if the unit is securely positioned. Ensure the unit is on a flat, rm surface
Check if any loose, vibrating parts. Secure and tighten any parts.
Noise sounds like water flowing. Noise comes from flowing refrigerant. This is
normal.
Error Codes
E0 Communication faults between main PCB
and display PCB. Check the wire harness of the display PCB for
damage.
Ambient temperature sensor failure. Check connection or replace it. Clean or replace
the temperature sensor. Contact Royal Sovereign
customer service .
E1
Coil temperature sensor failures. Check connection or replace it. Clean or replace
the temperature sensor. Contact Royal Sovereign
customer service.
E2
Ft Condensate water high level alarm. Empty the drain pan by removal the rubber plug.
Refer to self evaporating drainage section of
manual.

ARP-2208
-14-
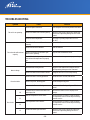
SPECIFICATIONS
Attributes
BTU: 8000 BTU ASHRAE (5300 BTU SACC)
Room Size: 27.8m2 (300 sq. ft.)
Functions: Cool, Fan, Dehumidify
LED Digital Display: Yes
Remote Control Included: Yes
4-Way Manual Louvres: Yes
Fan Speeds: 2
24 Hour Timer: Yes
Sleep Mode: Yes
Auto Restart: Yes
Thermostat Range: 16-32°C /61-90°F
Selectable °C/°F Setting: Yes
Temperature Display: Yes
Airflow Volume: 300 m3/h
Water Removal: Self-evaporative
Dehumidify Capacity /Day: 19.8L/ 41.8 Pints
Sound: Low <52dB, High <54dB
Window Kit Included: Yes Kit frame adjustable from
23.6”-47.2” (0.6-1.2m), Hose 9.4”-59”
(240-1500mm)
Refrigerant: R410A
Power Supply: 120V/60 Hz
Power Consumption: 800W, 7.1A
Dimensions and Weights
Unit Dimensions (w x d x h)
315 x 310 x 700mm (12.4” x 12.2” x 27.6”)
Unit Weight: 20.5kg (45.1 lbs)
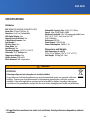
DISPOSAL
Releasing refrigerant into atmosphere is strictly forbidden!
Do not dispose of electrical appliances as unsorted municipal waste, use separate collection
facilities. Contact your local government for information regarding the collection systems
available. If electrical appliances are disposed of in land lls or dumps, hazardous substances
can leak into the groundwater and get into the food chain, damaging your health and well-being.
WARNING
* All specications mentioned are under test conditions, Actual performance depends on ambient
conditions

ONE YEAR LIMITED WARRANTY
Royal Sovereign International, Inc. warranties this product to be free from defects in material and
workmanship to the original purchaser only as outlined below.
Parts : Replacement of defective parts for 1 year from the date of customer purchase.
Compressor : 3-year warranty from the date of customer purchase. Royal Sovereign will supply
a replacement compressor (parts only), free of charge.
Labour : 1 year from the date of end user purchase.
This warranty only covers products that are properly installed, properly maintained, and properly
operated in accordance with the instructions provided. This limited warranty does not cover any failures
or operating difculties due to normal wear and tear, accident, abuse, misuse, alteration, misapplication,
improper installation, or improper maintenance and service by you or any third party.
Returned product will not be accepted without a Return Authorization number. To request a Return
Authorization number, please visit us at www.royalsovereign.com. All transportation costs for the return
of damaged product or parts will be the responsibility of the purchaser. Return defective product, in
original packaging, to the address below.
Royal Sovereign International, Inc. (and its afliated companies) requires reasonable proof of your date
of purchase from an authorized retailer or distributor. Therefore, you should keep your receipt, invoice, or
canceled check from the original purchase. The limited warranty shall be limited to the repair or
replacement of parts which prove defective under normal use and service within the warranty period.
Royal Sovereign International, Inc. (and its afliated companies) SHALL HAVE NO LIABILITY
WHATSOEVER TO PURCHASER OR ANY THIRD PARTY FOR ANY SPECIAL, INDIRECT, PUNITIVE,
INCIDENTAL,OR CONSEQUENTIAL DAMAGES. Some states do not allow the exclusion or limitation of
incidental or consequential damages so the above exclusion and limitations may not apply to you.
ROYAL SOVEREIGN INTERNATIONAL, INC.
2 Volvo Drive Rockleigh, NJ 07647 USA
TEL : (201) 750-1020
www.royalsovereign.com
RS INTERNATIONAL CANADA INC.
191 Superior Blvd., Mississauga, ON L5T 2L6 CANADA
TEL: (905) 461-1095
e-mail: ca.suppor[email protected]
www.royalsovereign.ca
For product support and warranty questions, please visit us at
www.royalsovereign.com/customer-support.html
-16-

Climatiseur
Portable
3 in 1
ARP-2208
Page en français
Lisez et conservez ces instructions pour toute référence ultérieure.
Pour tout besoin de support client, veuillez choisir l’onglet Support sur
www.royalsovereign.com (USA)
www.royalsovereign.ca (Canada)
Royal Sovereign International Inc

CONTENU
INSTRUCTIONS DE SÉCURITÉ --------------------------------------------- 18-19
SURVOL DU PRODUIT--------------------------------------------------------- 20
INSTALLATION ----------------------------------------------------------------- 22
FONCTIONNEMENT ----------------------------------------------------------- 23-26
ENTRETIEN ET VIDANGE AUTOMATIQUE -------------------------------- 27-28
DÉPANNAGE ------------------------------------------------------------------- 29
SPÉCIFICATIONS -------------------------------------------------------------- 30
GATANTIE ----------------------------------------------------------------------- 31
-17-

ARP-2208
SÉCURITÉ ÉLECTRIQUET
1. Pour votre sécurité, cet appareil doit être correctement mis à la terre sur une surface plane à l’intérieur.
2. L’appareil doit être placé à proximité d’une prise électrique de manière à ce que celle-ci soit facilement accessible.
3. Assurez-vous que la tension correspond aux exigences électriques de l’appareil (115-120 V/60 Hz).
4. Ne connectez pas cette machine à une prise dont les caractéristiques électriques sont inférieures ou supérieures à
celles de cette machine.
5. En cas d’anomalie, veillez à éteindre l’appareil, à débrancher la prise et à contacter le service clientèle de Royal
Sovereign.
6. Ne pas utiliser l’appareil si la che électrique ou le cordon d’alimentation est endommagé. S’il est endommagé, appelez
le service clientèle de Royal Sovereign pour le faire réparer ou le remplacer.
7. Ne modiez en aucun cas la che électrique.
8. Ne placez pas d’objets lourds sur la che ou le cordon.
9. Ne branchez pas ce cordon dans une prise électrique non raccordée.
10. Ne branchez l’appareil que sur une prise à 3 broches correctement installée et reliée à la terre.
11. Si la prise électrique que vous avez l’intention d’utiliser n’est pas correctement mise à la terre ou protégée par un fusible
à retardement ou un disjoncteur, vous devez demander à un électricien qualié d’installer la prise appropriée.
12. Ne partagez pas la prise électrique avec d’autres appareils.
13. N’utilisez pas de che adaptatrice ou de rallonge avec cet appareil.
14. N’essayez jamais d’éteindre cet appareil en débranchant la che.
15. Lorsque vous branchez ou débranchez l’appareil, gardez vos mains sèches.
16. Saisissez toujours la che lors du branchement ou du débranchement de l’appareil. Ne débranchez jamais en tirant sur
le cordon.
17. Ne tirez pas sur le cordon d’alimentation lorsque vous déplacez l’appareil.
18. Cet appareil utilise une che avec un fusible intégré. Effectuez une vérication de la che d’alimentation avant de l’uti
liser pour conrmer un fonctionnement normal.
19. Éteignez l’appareil et débranchez-le lorsque vous nettoyez l’appareil, retirez les ltres ou n’utilisez pas l’appareil pendant
une période prolongée.
-18-
Lisez et comprenez entièrement ce guide d’utilisation avant d’utiliser ou de faire fonctionner l’appareil.
AVERTISSEMENT
CONSIGNES DE SÉCURITÉ
Lorsque vous utilisez cet appareil, suivez ces consignes de sécurité pour réduire les risques d’incendie,
d’électrocution ou de blessure.

-19-
CONSIGNES DE SÉCURITÉ
Lorsque vous utilisez cet appareil, suivez ces consignes de sécurité pour réduire les risques d’incendie,
d’électrocution ou de blessure.
SÉCURITÉ DE FONCTIONNEMENT
1. Installez l’appareil conformément aux instructions d’installation fournies.
2. Ne bloquez pas les sorties ou l’entrée d’air avec des obstacles.
3. N’insérez pas d’objets dans l’appareil.
4. Ne posez pas d’objets lourds et ne vous asseyez pas sur l’appareil.
5. Ne pas placer de substances inflammables ou chimiques à proximité de l’appareil.
6. Ne placez pas cet appareil à proximité d’appareils de chauffage.
7. Ne pas éclabousser ou verser de l’eau sur le boîtier ou le panneau de commande.
8. Pour éviter que l’eau ne gèle, n’utilisez pas cet appareil et le tuyau d’évacuation à une température inférieure à 41° (5°C).
41° (5°C).
9. Assurez-vous que les bouchons de vidange en caoutchouc sont bien enfoncés dans les orices de vidange situés à
l’arrière de l’appareil an d’éviter toute fuite d’eau. fuites d’eau.
10. Vidangez l’appareil avant de le déplacer ou de le ranger.
11. Ne faites pas fonctionner l’appareil si le couvercle arrière est retiré.
12. N’utilisez pas cette machine à l’extérieur.
13. Ne modiez aucune partie de ce produit.
14. N’utilisez pas cet appareil à d’autres ns que celles pour lesquelles il a été conçu.
15. Cette unité n’est pas conçue pour être utilisée par de jeunes enfants.18. Cet appareil utilise une che avec un fusible
intégré. Effectuez une vérication de la che d’alimentation avant de l’utiliser pour conrmer un fonctionnement normal.
AVERTISSEMENT
Lisez et comprenez entièrement ce guide d’utilisation avant d’utiliser ou de faire fonctionner l’appareil.
La page charge ...
La page charge ...
La page charge ...
La page charge ...
La page charge ...
La page charge ...
La page charge ...
La page charge ...
La page charge ...
La page charge ...
La page charge ...
La page charge ...
-
 1
1
-
 2
2
-
 3
3
-
 4
4
-
 5
5
-
 6
6
-
 7
7
-
 8
8
-
 9
9
-
 10
10
-
 11
11
-
 12
12
-
 13
13
-
 14
14
-
 15
15
-
 16
16
-
 17
17
-
 18
18
-
 19
19
-
 20
20
-
 21
21
-
 22
22
-
 23
23
-
 24
24
-
 25
25
-
 26
26
-
 27
27
-
 28
28
-
 29
29
-
 30
30
-
 31
31
-
 32
32


Royal Sovereign ARP-2208 Manuel utilisateur
- Catégorie
- Climatiseurs mobiles
- Taper
- Manuel utilisateur
dans d''autres langues
- English: Royal Sovereign ARP-2208 User manual
Documents connexes
-
 Royal Sovereign International ARP-910 Le manuel du propriétaire
-
Royal Sovereign ARP-9407CA Le manuel du propriétaire
-
Royal Sovereign ARP-914 Mode d'emploi
-
-
-
-
-
-