SUHNER ABRASIVE LSB 90-TOP Mode d'emploi
- Taper
- Mode d'emploi

操作说明
译自 «Original-betriebsanleitung»
CN
Instrukcja obsługi
Tłumaczenie «Original-betriebsanleitung»
PL
Návod k používání
P�eklad «Original-betriebsanleitung»
CZ
Käyttöohje
Käännös «original-betriebsanleitung»
FI
AnvändeArhAndbok
Översättning Av den «originAl-betriebsAnleitung»
SE
Bedieningshandleiding
Vertaling Van de «Original-BetrieBsanleitung»
NL
Manual de Instruções
tradução do «orIgInal-BetrIeBsanleItung»
PT
Documentación técnica
traDucción Del «original-BetrieBsanleitung»
ES
Manuale tecnico
traduzione delle «original-BetrieBsanleitung»
IT
Technical DocumenT
TranslaTions of The «original-BeTrieBsanleiTung»
EN
Dossier technique
traDuction Du «original-BetrieBsanleitung»
FR
Original-BetrieBsanleitung
DE
LSB 90-TOPLSB 90-TOP

2

3

SymbolS
EngliSh
Attention!
Make sure to read!
This information is very important
for ensuring correct operation of
the product. Failure to observe this
information can result in a defect.
Note on safety / Warning
This information serves to achieve
safe operation. Failure to observe
this information may compromise
the operator‘s safety.
Information
This information serves for a good
understanding of the operation of
the product, thereby permitting full
exploitation of the operational po-
tential of the product.
Technical Document
Read the technical document prior
to commissioning.
Safety glasses and ear protection
Wear safety glasses and ear pro-
tection.
Compressed air
Before any work is carried out on
the machine disconnect the com-
pressed air supply.
Français
symboles
Attention !
A lire impérativement!
Cette information est très impor-
tante pour la garantie de fonc-
tionnement du produit. La non
observation peut entraîner une
défectuosité.
Indication relative à la sécurité /
Avertissement
Cette information sert à permettre
une utilisation sûre. En cas de non
observation, la sécurité de l’utilisa-
teur n’est pas garantie.
Information
Cette information sert à la com-
préhension du fonctionnement du
produit. Par cela, la pleine capa-
cité de fonctionnement du produit
pourra être exploitée.
Dossier technique
Lire le dossier technique avant la
mise en service.
Lunettes de protection et protec-
tion de l’ouïle
Porter des lunettes de protection et
une protection de l’ouïe.
Alimenttion en air comprimé
Avant chaque utilisation de la ma-
chine interrompre l‘alimentation en
air comprimé.
Deutsch
symbole
Achtung!
Unbedingt lesen!
Diese Information ist sehr wichtig
für die Funktionsgewährleistung
des Produktes. Bei Nichtbeachten
kann ein Defekt die Folge sein.
Sicherheitshinweis / Warnung
Diese Information dient zum Erlan-
gen eines sicheren Betriebes. Bei
Nichtbeachten ist die Sicherheit für
den Bediener nicht gewährleistet.
Information
Diese Information dient zum gu-
ten Verständnis der Funktion des
Produktes. Dadurch lässt sich die
volle Leistungsfähigkeit des Pro-
duktes ausschöpfen.
Betriebsanleitung
Vor Inbetriebnahme des Produktes
Betriebsanleitung lesen.
Schutzbrille und Gehörschutz
Schutzbrille und Gehörschutz tra-
gen.
Druckluftversorgung
Vor jedem Arbeiten an der Maschi-
ne Druckluftversorgung unterbre-
chen.
4

Portugúes
símbolos
Atenção!
A ler impreterivelmente!
Esta informação é extremamente impor-
tante para a garantia de funcionamento
do produto. A sua não observância pode
ocasionar uma avaria.
Indicações relativas à Segurança / Aviso
Esta informação serve para alcançar
uma operação segura. A sua não obser-
vância pode comprometer a segurança
do operador.
Informação
Esta informação permite a boa com-
preensão do funcionamento do produto
de modo a que se possa explorar à sua
plena capacidade de funcionamento.
Manual de Instruções
Ler o manual de Instruções antes de pro-
ceder ao arranque inicial.
Protecção visual e acústica
Usar óculos e dispositivos de protecção
acústica.
Alimentação de ar comprimido
Antes de qualiquer trabalho a executar
na máquina, cortar a alimentação de ar
comprimido.
Español
símbolos
¡Atención!
¡Léase imprescindiblemente!
Esta información es muy importante para
garantizar el funcionamiento del produc-
to. Si no se tiene en cuenta se pueden
producir defectos o averías.
Indicación relativa a la seguridad / Ad-
vertenica
Esta información es muy importante
para garantizar un uso seguro del pro-
ducto. Si se ignora, no está garantizada
la seguridad del usuario.
Información
Esta información sirve para comprender
el funcionamiento del producto. Ello per-
mite aprovechar al máximo sus presta-
ciones.
Documentación técnica
Leer la documentación técnica antes de
poner en servicio el producto.
Protección visual y acústica
Usar gafas y protección acústica.
Suministro de aire comprimido
Antes de ejecutar cualquier trabajo en
la máquina, interrumpir el suministro de
aire comprimido.
ItalIano
sImbolI
Attenzione!
Da leggere assolutamente!
Questa informazione è molto importante
per il mantenimento della funzionalità del
prodotto. In caso di non osservanza pos-
sono prodursi dei difetti.
Indicazione relativa alla sicurezza / Av-
vertimento
Questa informazione serve al raggi-
ungimento di un esercizio sicuro. In
caso di inosservanza, la sicurezza
dell‘utilizzatore non è garantita.
Informazione
Questa informazione serve ad una cor-
retta comprensione delle funzioni del
prodotto. In questo modo è possibile
sfruttare pienamente le potenzialità del
prodotto.
Manuale tecnico
Prima della messa in funzione del pro-
dotto, leggere il manuale tecnico.
Occhiali di protezione e protezione
dell‘udito
Portare gli occhiali di protezione e la pro-
tezione dell‘udito.
Alimentazione dell‘aria compressa
Prima di ogni lavoro sulla macchina,
deve essere interrotta l‘alimentazione
d‘aria compressa
5

Symbolit
Suomi
Huomio!
Luettava ehdottomasti!
Nämä tiedot ovat erittäin tärkeitä
tuotteen asianmukaisen toiminnan
varmistamiseksi. Jos näitä tietoja
ei huomioida, seurauksena voi olla
vikoja.
Turvallisuusohje / varoitus
Nämä tiedot on laadittu käyttötur-
vallisuuden takaamiseksi. Jos nä-
itä tietoja ei huomioida, käyttäjän
turvallisuutta ei voida taata.
Tiedot
Nämä tiedot on laadittu edistä-
mään tuotteen toimintaan perehty-
mistä. Näin tuotteen kaikkia ominai-
suuksia voidaan täysimääräisesti
hyödyntää.
Käyttöohje
Lue käyttöohje ennen tuotteen
käyttöönottoa.
Suojalasit ja kuulosuojaimet
Käytä suojalaseja ja kuulosuojai-
mia.
Paineilman syöttö
Katkaise paineilman syöttö ennen
kaikkia koneelle tehtäviä töitä.
SvenSka
Symboler
Obs!
Det är mycket viktigt att du läser
följande information!
Denna information är mycket viktig
för att säkerställa produktens funk-
tionsgaranti. Om du inte iakttar in-
formationen kan detta leda till en
defekt.
Säkerhetsinformation / Varning
Denna information säkerställer en
säker drift av produkten. Om du
inte följer den är operatörens sä-
kerhet inte garanterad.
Information
Denna information hjälper dig att
få en bra förståelse angående pro-
duktens funktion. På det sättet får
du möjligheten att ta vara på alla
prestationsmöjligheter som pro-
dukten erbjuder.
Användarhandbok
Före idrifttagningen av produkten
bör du läsa användarhandboken.
Skyddsglasögon och hörselskydd
Ta på dig skyddsglasögon och
hörselskydd.
Tryckluftsförsörjning
Innan arbeten genomförs vid mas-
kinen måste tryckluftsförsörjnin-
gen avbrytas.
NederlaNds
symboleN
Let op!
Absoluut lezen!
Deze informatie is zeer belangrijk
voor een gegarandeerde werking
van het product. Het niet in acht
nemen van deze informatie kan
een defect tot gevolg hebben.
Veiligheidsinstructie/waarschuw-
ing
Deze informatie dient voor een vei-
lige werking. Indien deze informa-
tie niet in acht wordt genomen, kan
de veiligheid van de bediener niet
worden gegarandeerd.
Informatie
Deze informatie dient voor een
goed begrip van de werking van
het product. Hierdoor kan de vol-
ledige capaciteit van het product
optimaal worden benut.
Handleiding
Lees voor de inbedrijfstelling van
het product de handleiding door.
Veiligheidsbril en gehoorbescher-
ming
Draag een veiligheidsbril en ge-
hoorbescherming.
Persluchtvoorziening
Voor alle werkzaamheden aan de
machine moet de persluchtvoorzi-
ening worden onderbroken.
6

中国
符号
注意!
请务必阅读!
本信息对于保证产品功能正常十分重要。
若 不 遵 守 ,可 导 致 失 灵 。
安全提示 / 警告
本 信 息 用 于 确 保 安 全 运 行 。若 不 遵 守 ,恐
无法保证使用者安全。
信息
本 信 息 有 助 于 透 彻 理 解 产 品 功 能 。由 此 可
充分发挥产品的性能。
操作说明
试运行产品前,请阅读操作说明书。
护目镜及听力防护装置
请佩戴护目镜及听力防护装置
压缩空气供气
每次在机器上进行作业前,请断开压缩空
气供气。
Polski
symbole
Uwaga!
bezpiecznego sposobu pracy. W ra-
-
torowi.
Informacja
powietrzem.
Česky
symboly
Pozor!
-
du.
Informace
-
-
PortugúesEspañol
ItalIano
7

English
ContEnts
Page
1.1 General notes on safety .......16
1.2 Use of the machine for
pUrposes for which it is
intended ..................................16
1.3 incorrect Use .........................16
1.4 ec declaration of conformity
................................................16
2.1 prior to takinG the machine into
service ....................................16
2.2 takinG the machine into service
................................................16
2.3 ratinG data ..............................16
2.4 operatinG conditions .............16
3.1 tools .......................................16
3.2 workinG instrUctions .............17
4.1 preventive maintenance ..........17
Table des maTières
Français
Page
1.1 instrUctions Générales de
sécUrité...................................14
1.2 Utilisation conforme à la desti-
nation ......................................14
1.3 Utilisation contraire à la desti-
nation ......................................14
1.4 déclaration de conformité ce
................................................14
2.1 avant la mise en service .........14
2.2 mise en service .......................14
2.3 performances .........................14
2.4 conditions d’exploitation .......14
3.1 oUtils......................................14
3.2 indications de travail ..............15
4.1 maintenance préventive..........15
Deutsch
InhaltsverzeIchnIs
Seite
1.1 allGemeiner sicherheitstech-
nischer hinweis .......................12
1.2 BestimmUnGsGemässe
verwendUnG ............................12
1.3 nicht BestimmUnGsGemässe
verwendUnG ............................12
1.4 eG-konformitätserklärUnG
(oriGinal) ................................12
2.1 vor der inBetrieBnahme ..........12
2.2 inBetrieBnahme ........................12
2.3 leistUnGsdaten .......................12
2.4 BetrieBsBedinGUnGen ..............12
3.1 werkzeUGe ..............................12
3.2 arBeitshinweise .......................13
4.1 vorBeUGende instandhaltUnG .13
8

Índice
Portugúes
Página
1.1 indicações Gerais soBre a
técnica de seGUrança .............22
1.2 Utilização correcta para os fins
previstos .................................22
1.3 Utilização incorrecta .............22
1.4 declaração ce de conformida-
de ............................................22
2.1 antes do arranqUe inicial ......22
2.2 arranqUe inicial......................22
2.3 características técnicas ........22
2.4 condições de operação ..........22
3.1 ferramentas ...........................22
3.2 indicações para o traBalho ....23
4.1 manUtenção preventiva ..........23
Índice
español
Página
1.1 indicación General relativa a
seGUridad ................................20
1.2 Uso conforme al pre-visto .....20
1.3 Uso no conforme al previsto .20
1.4 declaración de conformidad
ce ...........................................20
2.1 antes de la pUesta en servicio
................................................20
2.2 pUesta en servicio ..................20
2.3 datos de rendimiento ..............20
2.4 condiciones de Uso ................20
3.1 Útiles ......................................20
3.2 instrUcciones de traBajo .......21
4.1 mantenimiento preventivo ......21
IndIce
ItalIano
Pagina
1.1 informazioni Generali sUlla
sicUrezza.................................18
1.2 impieGo conforme della
macchina .................................18
1.3 impieGo non conforme ...........18
1.4 dichiarazione di conformità ce
................................................18
2.1 prima della messa in sevicio ...18
2.2 messa in servizio .....................18
2.3 dati sUlle prestazioni .............18
2.4 condizioni di impieGo ...............18
3.1 Utensili ..................................18
3.2 modalità di lavaro ..................19
4.1 manUtenzione preventiva ........19
9

1.1 yleinen tUrvaterkninen ohje ..28
1.2 määräystenmUkainen käyttö ..28
1.3 määräystenvastainen käyttö ..28
1.4 ey-vaatimUstenmUkaisUUsvakUU-
tUs ...........................................28
2.1 ennen käyttöönottoa .............28
2.2 käyttöönotto .........................28
2.3 sUoritUskykytiedot ................28
2.4 käyttöolosUhteet ..................28
3.1 työkalUt ..................................28
3.2 työskentelyohjeet ..................29
4.1 ennaltaehkäisevä kUnnossapito
................................................29
1.1 allmän säkerhetsinformation 26
1.2 ändamålsenliG användninG .....26
1.3 ike ändamålsenliG användninG 26
1.4 eG-konformitetsförklarinG ..26
2.1 före idrifttaGninGen ..............26
2.2 idrifttaGninG ...........................26
2.3 prestandadata .........................26
2.4 driftsvillkor ..........................26
3.1 verktyG ...................................26
3.2 arBetsanvisninGar ..................27
4.1 föreByGGande Underhåll .......27
1.1 alGemene veiliGheidstechnische
nstrUcties ...............................24
1.2 voorGeschreven GeBrUik ........24
1.3 niet-voorGeschreven GeBrUik 24
1.4 eG-conformiteitsverklarinG ..24
2.1 voor de inBedrijfstellinG .......24
2.2 inBedrijfstellinG .....................24
2.3 capaciteitGeGevens .................24
2.4 Bedrijfsvoorwaarden .............24
3.1 werktUiGen .............................24
3.2 werkinstrUcties .....................25
4.1 preventief onderhoUd ............25
10

目录
中国
页
1.1 一般安全技术提示 ���������������������������34
1.2 合规用途 ���������������������������������������������34
1.3 非合规用途 �����������������������������������������34
1.4 欧盟一致性声明 �������������������������������34
2.1 试运行前 ���������������������������������������������34
2.2 试运行 �������������������������������������������������34
2.3 性能数据 ���������������������������������������������34
2.4 运行条件 ���������������������������������������������34
3.1 磨具 ������������������������������������������������������34
3.2 工作提示 ���������������������������������������������35
4.1 预防性维护 ����������������������������������������35
Spis treści
Polski
Strona
.
-
......................................
........................
.......
..............
...........................
.......................
...............
..................................
...
...
Obsah
Česky
Strana
...................................................
...
...
.............
.....
.................
...............
..................
....................................
.......................
........................
11

CN PL CZ FI SE NL PT ES IT EN FR
1.1 Allgemeiner sicherheitstechnischer hin-
weis
Diese Betriebsanleitung gilt für die Maschine LSB 90-TOP.
Nur qualifiziertes Personal darf die Maschine
handhaben.
1.2 Bestimmungsgemässe Verwendung
Die Maschine ist bestimmt zum Schleifen, Fräsen und
Entgraten von Metall, Stein und Kunststoff mit Fräsern
und Schleifwerkzeugen.
1.3 nicht Bestimmungsgemässe Verwendung
Alle andern als unter Pkt. 1.2 beschriebenen Ver-
wendungen gelten als nicht bestimmungsgemäs-
se Verwendung und sind deshalb nicht zulässig.
1.4 eg-KonformitätserKlärung (originAl)
Otto Suhner GmbH, Trottäcker 50, D-79713 Bad Säckingen
erklärt hiermit in alleiniger Verantwortung, dass das
Produkt mit der Serien- oder Chargen-Nr. (siehe Rück-
seite) den Anforderungen der Richtlinie 2006/42/EG
entspricht. Angewandte Normen: EN ISO 12100, EN
ISO 11148. Dokumentbevollmächtigter: T. Fischer.
D-Bad Säckingen 10/2019. T.Fischer/Divisionsleiter
2. INbETRIEbNahmE
2.1 Vor der inBetrieBnAhme
Geölte Druckluft wird empfohlen (siehe auch Luft-
qualität unter Pkt. 2.3). Länderspezifische Vor-
schriften sind zu beachten.
2.2 inBetrieBnAhme
Bevor die Maschine mit der Druckluftver-
sorgung verbunden wird, Drehventil auf
Position «Aus» stellen!
Die Maschine darf nur mit korrekt montiertem Verschluss
und Werkzeug eingeschaltet werden.
1. SIChERhEITShINwEIS
2.2.1 einschAlten/AusschAlten
Einschalten der Maschine durch Drehen in Pfeilrichtung
«I». Ausschalten durch Drehen in Pfeilrichtung «O». Vor
dem Unterbrechen der Druckluftversorgung Drehventil
immer auf Position «O» stellen, um ein unbeabsichtigtes
Einschalten zu verhindern. Immer bis zum Anschlag dre-
hen. Keine Zwischenpositionen wählen!
2.3 leistungsdAten
Druck max. 6.3bar
Leistung 220W
Luftverbrauch bei max. Leistung 0.66m3/min
Luftverbrauch im Leerlauf 0.29m3/min
Einstellung Öler im Leerlauf ca. 1 Tropfen/min
Leerlaufdrehzahl 92‘000min-1
Max. Werkzeug-Ø 10mm
Spannzangen Ø 3mm / 1/8"
Schalldruckpegel ISO 15744 68dB(A), K=3dB(A)
Vibration EN ISO 28927-12 2.4m/s2, K=1.0m/s2
Luftqualität DIN ISO 8573-1 2/4/4
Gewicht mit Schlauch 0.450kg
2.4 BetrieBsBedingungen
Temperaturbereich Betrieb: -7 bis +50°C
Relative Luftfeuchtigkeit: 95% bei +10°C nicht kondensie-
rend.
3. haNDhabuNg / bETRIEb
3.1 werKzeuge
Die Hinweise des Werkzeug-Herstellers sind zu beachten!
Es dürfen nur Werkzeuge mit einem Durchmesser kleiner
als 10mm verwendet werden.
12
DE

CN PL CZ FI SE NL PT ES IT EN FR
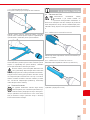
3.1.1 wechsel/montAge der werKzeuge
Es stehen zwei Möglichkeiten zur Verfügung, das Werk-
zeug zu wechseln:
Spindel mit Arretierstift festhalten und Spannmutter lösen.
Spannschaft des Werkzeugs möglichst weit in die Spann-
zange stecken. Spannzange festziehen.
Verschluss demontieren. Spindel mit Einmaulschlüs-
sel festhalten und Spannmutter lösen. Spannschaft des
Werkzeugs möglichst weit in die Spannzange stecken.
Spannzange festziehen. Verschluss montieren.
Das Schleifwerkzeug muss einwandfrei rund lau-
fen. Unrunde Schleifwerkzeuge nicht weiterver-
wenden! Probelauf! Schleifwerkzeug vor Ge-
brauch überprüfen. Das Schleifwerkzeug muss
einwandfrei montiert sein und frei drehen können. Probe-
lauf min. 30 Sekunden ohne Belastung durchführen. Be-
schädigtes, unrundes oder vibrierendes Schleifwerkzeug
nicht verwenden!
3.2 ArBeitshinweise
Bei Druckluftausfall das Drehventil auf Position
«0» stellen. Um ein optimales Schleifergebnis zu
erreichen, Schleifkörper mit leichtem Druck
gleichmässig hin und her bewegen. Zu starker Schleif-
druck verringert die Leistungsfähigkeit der Maschine und
die Lebensdauer des Schleifkörpers.
4.1 VorBeugende instAndhAltung
Leerlaufdrehzahl periodisch und nach je-
der Wartung kontrollieren. Bei ungeölter
Druckluft besteht Rostgefahr. Alle 20 Be-
triebsstunden einige Tropfen Druckluftöl in den Luftein-
lass geben um u.a. der Korrosion entgegenzuwirken.
4.1.1 ersetzen des ABluftschlAuchs
Abluftschlauch vom Drehring demontieren und ersetzen.
4.1.2 ersetzen des zuluftschlAuchs
Abluftschlauch entfernen (siehe Pkt. 4.1.1).
Schlauchklemme lösen und Zuluftschlauch vom An-
schlussnippel ziehen.
4. INSTaNDhaLTuNg/waRTuNg
13
DE

CN PL CZ FI SE NL PT ES IT EN
1. INDICaTIoN RELaTIvE à
SéCuRITé
1.1 instructions générAles de sécurité
Ce dossier technique est valable pour la machine LSB
9 0 -TO P.
Seul le personnel qualifié peut opérer sur la ma-
chine.
1.2 utilisAtion conforme à lA destinAtion
La machine est destinée au meulage, au fraisage et à
l’ébavurage du métal, de la pierre et du plastique à l’aide
de fraises et d’outils abrasifs.
1.3 utilisAtion contrAire à lA destinAtion
Toutes les applications autres que celles décrites
au point 1.2 sont à considérer comme contraires à
la destination et ne sont donc pas admissibles.
1.4 déclArAtion de conformité ce
Traduction du «EG-Konformitätserklärung (Original)».
Otto Suhner GmbH, Trottäcker 50, D-79713 Bad Säckin-
gen déclare par la présente, sous sa seule responsabi-
lité, que le produit portant le numéro de série ou de lot
(voir verso) est conforme aux exigences des directives
2006/42/EG. Normes appliquées : EN ISO 12100, EN ISO
11148. Fondé de pouvoir : T. Fischer. D-Bad Säckingen,
10/2019. T. Fischer/Chef de division
2. mISE EN SERvICE
2.1 AVAnt lA mise en serVice
Air comprimé huilé est recommandé (voir égale-
ment qualité de l’air au point 2.3). Respecter les
prescriptions spécifiques au pays.
2.2 mise en serVice
Avant de raccorder la machine à l’alimen-
tation en air comprimé, positionner la
vanne rotative sur « Arrêt » !
La machine ne doit être enclenchée que si la fermeture et
l’outil sont correctement montés.
2.2.1 enclenchement/déclenchement
Mise en circuit de la machine par rotation dans le sens
de la flèche « I ». Mise hors circuit de la machine par rota-
tion dans le sens de la flèche « 0 ». Avant d’interrompre
l’alimentation en air comprimé, toujours positionner la
valve rotative sur « Arrêt » afin d’empêcher toute remise
en marche inopinée. Toujours tourner jusqu’à la butée. Ne
pas sélectionner de position intermédiaire !
2.3 PerformAnces
Pression max. 6.3bar
Puissance 220W
Consommation d‘air à puisasance max. 0.66m3/min
Consommation d‘air au jeu mort 0.29m3/min
Réglage graisseur ralenti env. 1 gouttes/min
Vitesse à vide 92’000min-1
Outil Ø max. 10mm
Ø prince de serrage 3mm / 1/8"
Niveau de pression acoustique
EN ISO 15744 68dB(A), K=3dB(A)
Vibrations EN ISO 28927-12 2.4m/s2, K=1.0m/s2
Qualité de l’air DIN ISO 8573-1 2/4/4
Poids avec tuyau 0.450kg
2.4 conditions d’exPloitAtion
Plage de températres en exploitation: 0 à +50°C
Humidité de l‘air relative: 95% à +10°C sans condensation
3. uTILISaTIoN/ExPLoITaTIoN
3.1 outils
Les indications des fabricants d’outillage sont à observer!
N’utiliser que des outils d’un diamètre maximal de 10 mm.
DE
14
FR

CN PL CZ FI SE NL PT ES IT EN
3.1.1 chAngement/montAge de l’outillAge
Pour changer l’outil, il existe deux possibilités :
Maintenir la broche à l’aide de la goupille de sécurité et
desserrer l’écrou de serrage. Insérer la tige de serrage de
l’outil le plus loin possible dans la pince de serrage. Serrer
la pince de serrage.
Démonter le verrouillage. Maintenir la broche à l’aide
d’une clé à fourche simple et desserrer l’écrou de ser-
rage. Insérer la tige de serrage de l’outil le plus loin pos-
sible dans la pince de serrage. Serrer la pince de serrage.
Monter le verrouillage.
L’outil abrasif doit avoir une rotation parfaitement
circulaire. Ne pas continuer à utiliser les outils qui
ne tournent plus de manière circulaire ! Marche
d’essai ! Contrôler les outils abrasifs avant utilisation.
L’outil abrasif doit être parfaitement monté et pouvoir tour-
ner librement. Effectuer un essai de 30 secondes mini-
mum hors sollicitation. Ne pas utiliser les outils abrasifs
endommagés, non circulaires ou vibrants !
3.2 indicAtions de trAVAil
En cas d’interruption de l’air comprimé, positionner la
vanne rotative sur « 0 ». Afin d’obtenir un polissage opti-
mal, déplacer le corps de polissage en mouvement de va
et vient en maintenant une légère pression d’appui. Une
pression d’appui trop élevée diminue la capacité de per-
formance de la machine et la durée de vie de l’outil de
polissage.
4.1 mAintenAnce PréVentiVe
Contrôler périodiquement la vitesse de
rotation à vide sans introduction d’outil de
même qu’après chaque opération de
maintenance. Risque de rouille en cas d’air comprimé
non lubrifié. Injecter quelques gouttes d’huile d’air com-
primé dans l’ouverture d’air toutes les 20 heures de ser-
vice afin de protéger l’appareil, entre autres, de la corro-
sion.
4.1.1 remPlAcement du tuyAu d‘échAPPement d‘Air
Démonter le tuyau d’évchappement d’air de la bague
rotative et le remplacer.
4.1.2 remPlAcement du tuyAu d’Amenée d’Air
Retirer le tuyau d’échappement d’air (voir point 4.1.1).
Desserrer le pince à tuyau et retirer le tuyau d’amenée
d’air du bague de raccordementt.
4. maINTENaNCE/ENTRETIEN
DE
15
FR

CN PL CZ FI SE NL PT ES IT
1.1 generAl notes on sAfety
This operation manual is applicable for the machine LSB
9 0 -TO P.
The machine may only be handled by personnel
who are qualified.
1.2 use of the mAchine for PurPoses for
which it is intended
The tool is designed for grinding, milling, and deburring
metal, stone, and plastic with milling cutters and grinding
attachments.
1.3 incorrect use
All uses other than those described under section
1.2 are regarded as incorrect use and are there-
fore not admissible.
1.4 ec declArAtion of conformity
Translations of the «EG-Koformitätserklärung (Original)».
Otto Suhner GmbH, Trottäcker 50, D-79713 Bad Säckin-
gen, hereby declares under sole responsibility that the
product with the serial or batch no. (see reverse side) com-
plies with the requirements under the Directive 2006/42/
EG. Applied standards: EN ISO 12100, EN ISO 11148.
Document Agent: T. Fischer. D-Bad Säckingen, 10/2019.
T. Fischer/Managing Division manager
2. CommISSIoNINg
2.1 Prior to tAKing the mAchine into serVice
Oiled compressed air is recommended (see also
air quality under section 2.3). Observe national
regulations.
2.2 tAKing the mAchine into serVice
Before connecting the tool to the com-
pressed air supply set the rotary valve to
the «OFF» position!
The tool may be switched on only when the lock and at-
tachment have been installed correctly.
1. NoTES oN SaFETy
2.2.1 turn on/turn off
Switch the tool on by turning in the direction of the arrow
to “I”. Switch the tool off by turning in the direction of the
arrow to “O”. Before cutting off the compressed air sup-
ply, always set the rotary valve to the “O” position so that
the tool cannot be reactivated inadvertently. Always turn
until the limit stop is reached. Do not set the tool to any
positions between those specified!
2.3 rAting dAtA
Pressure max. 6.3bar
Power output 220W
Air consumption full load EN ISO 15744 0.66m3/min
Air consumption at idling EN ISO 15744 0.29m3/min
Setting oiler idle about 1 drops/min
No-load speed 92’000min-1
Max. wheel diameter 10mm
Collet chuck Ø 3mm / 1/8"
Sound pressure level EN ISO 15744 68dB(A), K=3dB(A)
Vibration EN ISO 28927-12 2.4m/s2, K=1.0m/s2
Air quality DIN ISO 8573-1 2/4/4
Weight with hose 0.450kg
2.4 oPerAting conditions
Temperature range during operation: 0 to +50°C
Relative air humidity: 95% at +10°C not condensed
3. haNDLINg/oPERaTIoN
3.1 tools
Observe the tool manufacturers instructions!
Only tools with a diameter of smaller than 10 mm may be
used.
FR DE
16
EN

CN PL CZ FI SE NL PT ES IT
3.1.1 chAnging/fitting tools
There are two options for changing the attachment:
Hold the spindle firmly in place with the locking pin and
loosen the clamping nut. Insert the attachment’s clamp
shaft as far as it can go into the chuck. Tighten the chuck.
Remove the lock. Hold the spindle firmly in place with a
single open-ended spanner and loosen the clamping nut.
Insert the attachment’s clamp shaft as far as it can go into
the chuck. Tighten the chuck. Fit the lock.
The grinding attachment must rotate perfectly,
with no hindrances. If a grinding attachment is ir-
regular or out of center, stop using it and do not
use it again. Trial run! Check the grinding attachment over
before using it. The grinding attachment must be fitted
correctly and be able to rotate freely. Let the tool run with-
out load for at least thirty seconds. Damaged, out of cent-
er or vibrating grinding attachments cannot be used!
3.2 worKing instructions
On compressed air failure set the rotary valve to the «0»
position. To achieve an optimum grinding result, move
grinding wheel uniformly back and forth with light pres-
sure. Excessive pressure lessens the working capability
of the machine, as well as the life of the grinding wheel.
4.1 PreVentiVe mAintenAnce
Without a tool clamped in check no-load
speed periodically and after each mainte-
nance. If non-lubricated compressed air is
used, there is a risk that the tool may rust. Every 20 hours
of operation, put a few drops of compressed air lubricant
into the air inlet to prevent corrosion and other issues.
4.1.1 rePlAcement of the exhAust Air hose
Detach the exhaust air hose from the swivel ring, and re-
place it.
4.1.2 rePlAcement of the suPPly hose
Remove the exhaust air hose (see 4.1.1).
Detach the hose clip, and pull the supply hose off the
connection nipple.
4. SERvICE/maINTENaNCE
FR DE
17
EN

CN PL CZ FI SE NL PT ES
1.1 informAzioni generAli sullA sicurezzA
Questo manuale tecnico si riferisce alla seguente macchi-
na LSB 90-TOP.
È autorizzato a manipolare la macchina esclusiva-
mente personale qualificato.
1.2 imPiego conforme dellA mAcchinA
La macchina è destinata alla levigatura, alla fresatura e
alla sbavatura di metallo, pietra e plastica con frese e
utensili abrasivi.
1.3 imPiego non conforme
Tutti gli ulteriori impieghi, non indicati al prece-
dente punto 1.2 sono da considerare come non
conformi alle prescrizioni e sono pertanto vietati.
1.4 dichiArAzione di conformità ce
Traduzione delle «EG-Konformitätserklärung (Original)».
Con la presente, la Otto Suhner GmbH, Trottäcker 50,
D-79713 Bad Säckingen dichiara sotto la propria esclusiva
responsabilità che il prodotto contrassegnato con il nume-
ro di serie o con il numero di lotto (vedi retro) è conforme
alle specifiche delle direttive 2006/42/EG. Norme appli-
cate: EN ISO 12100, EN ISO 11148. Responsabile della
documentazione: T. Fischer. D-Bad Säckingen, 10/2019.
T. Fischer/Presidente di divisione
2. mESSa IN SERvIZIo
2.1 PrimA dellA messA in seVicio
Si raccomanda aria compressa oleosa(vedi an-
che qualità dell‘aria al seguente punto 2.3). Res-
peitar as normas nacionais e locais.
2.2 messA in serVizio
Prima di collegare la macchina
all’alimentazione di aria compressa,
portare la valvola rotante nella posizione
«OFF».
La macchina può essere inserita solo con la chiusura e
l’utensile montati correttamente.
1. PRESCRIZIoNI DI SICuREZZa
2.2.1 Accesione/sPegnimento
Accensione della macchina mediante rotazione nella di-
rezione indicata dalla freccia su «I». Spegnimento medi-
ante rotazione in direzione della freccia su «O». Prima di
interrompere l’alimentazione di aria compressa portare
sempre la valvola rotante nella posizione «0» per evi-
tare un’accensione involontaria. Ruotare sempre fino
all’arresto. Non selezionare posizioni intermedie!
2.3 dAti sulle PrestAzioni
Pressione massimo 6.3bar
Potenza 220W
Consumo d‘aria alla potenza max. 0.66m3/min
Consumo d‘aria in minimo 0.29m3/min
Impostazione oiler inattività ca. 1 gocce/min
Regime minimo 92‘000min-1
Ø massimo utensile 10mm
Ø pinza di serraggio 3mm / 1/8"
Emissione fonica EN ISO 15744 68dB(A), K=3dB(A)
Vibrazione EN ISO 28927-12 2.4m/s2, K=1.0m/s2
Qualità dell‘aria DIN ISO 8573-1 2/4/4
Peso con tubo flessibile 0.450kg
2.4 condizioni di imPiego
Temperatura d‘esercizio: 0 a +50 ° C
Umidità relativa: 95% a + 10 ° C senza condensa
3. maNIPoLaZIoNE/ImPIEgo
3.1 utensili
Devono essere osservate le indicazioni del fabbricante di
utensili!
Non possono essere utilizzati utensili con un diametro mi-
nore a 10 mm.
EN FR DE
18
IT

CN PL CZ FI SE NL PT ES
3.1.1 sostituzione/montAggio dell‘utensile
Vi sono due possibilità di effettuare il cambio utensile:
Tenere fermo il mandrino con la spina di arresto e allen-
tare il dado di bloccaggio. Inserire il gambo di serraggio
dell’utensile il più possibile nella pinza portautensili. Ser-
rare la pinza portautensili.
Smontare la chiusura. Tenere fermo il mandrino con una
chiave semplice e allentare il dado di bloccaggio. Inse-
rire il gambo di serraggio dell’utensile il più possibile nella
pinza portautensili. Serrare la pinza portautensili. Montare
la chiusura.
L’utensile abrasivo deve ruotare liberamente. Non
continuare ad utilizzare utensili abrasivi non uni-
formi. Test di funzionamento Controllare l’utensile
abrasivo prima dell’uso. L’utensile abrasivo deve essere
montato in modo corretto e deve poter ruotare libera-
mente. Eseguire un test di funzionamento per almeno 30
sec. senza carico. Non utilizzare utensili abrasivi danneg-
giati, non uniformi o che vibrano.
3.2 modAlità di lAVAro
In caso di calo dell‘aria compressa portare la valvola ro-
tante nella posizione «0». Al fine di ottenere un risultato di
lavoro ottimale, muovere il corpo abrasivo con una legge-
ra pressione in avanti e indietro. Una pressione eccessiva
diminuisce l‘efficienza della macchina e la durata di vita
del corpo abrasivo.
4.1 mAnutenzione PreVentiVA
Controllare periodicamente e dopo ogni
lavoro di manutenzione il regime minimo
senza inserire utensili. Se si utilizza aria
compressa non arricchita con olio può formarsi ruggine.
Ogni 20 ore di esercizio versare alcune gocce di olio per
aria compressa nell’ingresso dell’aria per evitare, tra
l’altro, la corrosione.
4.1.1 sostituzione del tu
Smontare il tubo di espulsione dell‘aria di scarico
dall‘anello rotante e sostituirlo.
4.1.2 sostituzione del tuBo di AlimentAzione dell‘AriA
Togliere il flessibile per l’aria di scarico (vedere punto
4.1.1).
Staccare la fascetta stringitubo e sfilare il tubo di aliment-
azione dell‘aria di nipplo di raccordo.
4. SERvIZIo/maNuTENZIoNE
EN FR DE
19
IT

CN PL CZ FI SE NL PT
1.1 indicAción generAl relAtiVA A seguridAd
La presente documentación técnica es válida para la
siguiente máquina LSB 90-TOP.
La máquina debe ser manejada únicamente por
personal cualificado.
1.2 uso conforme Al Pre-Visto
Esta máquina está diseñada para el rectificado, fresado
y desbarbado de metales, piedra y plásticos con fresas y
útiles abrasivos.
1.3 uso no conforme Al PreVisto
Todo uso distinto a lo descrito en el punto 1.2 se
considera no conforme al previsto, por lo que no
está permitido.
1.4 declArAción de conformidAd ce
Traducción del «EG-Konformitätserklärung (Original)».
Otto Suhner GmbH, Trottäcker 50, D-79713 Bad Säc-
kingen declara bajo su única responsabilidad que
el producto con el Nº de serie o Nº de lote (véase
la parte posterior) se halla en conformidad con la
Directiva 2006/42/EG. Normas técnicas armoniz-
adas: EN ISO 12100, EN ISO 11148. Representan-
te autorizado: T. Fischer. D-Bad Säckingen, 10/2019.
T. Fischer/Director de División
2. PuESTa EN SERvICIo
2.1 Antes de lA PuestA en serVicio
Se recomienda aire comprimido lubricado (ver
también la calidad del aire en el Punto 2.3). Ob-
servar las disposiciones legales específicas del
país.
2.2 PuestA en serVicio
Antes de conectar la máquina con la ali-
mentación de aire a presión, ajustar la vál-
vula rotatoria en la posición «Desconecta-
do».
La máquina sólo se puede conectar con el cierre y la her-
ramienta montados correctamente.
1. INDICaCIoNES RELaTIvaS a
SEguRIDaD
2.2.1 conectAr/desconectAr
Conectar la máquina girando en el sentido de la flecha
«I». Desconectarla girando en el sentido de la fecha «O».
Antes de la interrupción de la alimentación de aire com-
primido se debe ajustar siempre la válvula rotatoria a la
posición «O» para evitar que se conecte involuntaria-
mente. Girar siempre hasta el tope. ¡No seleccionar una
posición intermedia!
2.3 dAtos de rendimiento
Presión máx. 6.3bar
Potencia 220W
Consumo de aire con potencia máxima 0.66m3/min
Consumo de aire al ratentí 0.29m3/min
Ajuste de ralentí con engrasador
alrededor de 1 gotas/min
Velocidad en vacio 92‘000min-1
Diámetro máx. del útil 10mm
Ø pinza de apriete 3mm / 1/8"
Nivel de presión sonora
EN ISO 15744 68dB(A), K=3dB(A)
Vibracíon EN ISO 28927-12 2.4m/s2, K=1.0m/s2
Calidad del aire DIN ISO 8573-1 2/4/4
Peso con tubo flexible 0.450kg
2.4 condiciones de uso
Gama de temperaturas en servicio: 0 a 50 ° C
Humedad relativa del aire: 95% a + 10 ° C sin conden-
sación
3. maNEjo/oPERaCIóN
3.1 Útiles
¡Respetar las recomendaciones del fabricante de las her-
ramientas!
Utilizar solamente herramientas con diámetros inferiores
a 10 mm.
IT EN FR DE
20
ES
La page est en cours de chargement...
La page est en cours de chargement...
La page est en cours de chargement...
La page est en cours de chargement...
La page est en cours de chargement...
La page est en cours de chargement...
La page est en cours de chargement...
La page est en cours de chargement...
La page est en cours de chargement...
La page est en cours de chargement...
La page est en cours de chargement...
La page est en cours de chargement...
La page est en cours de chargement...
La page est en cours de chargement...
La page est en cours de chargement...
La page est en cours de chargement...
-
 1
1
-
 2
2
-
 3
3
-
 4
4
-
 5
5
-
 6
6
-
 7
7
-
 8
8
-
 9
9
-
 10
10
-
 11
11
-
 12
12
-
 13
13
-
 14
14
-
 15
15
-
 16
16
-
 17
17
-
 18
18
-
 19
19
-
 20
20
-
 21
21
-
 22
22
-
 23
23
-
 24
24
-
 25
25
-
 26
26
-
 27
27
-
 28
28
-
 29
29
-
 30
30
-
 31
31
-
 32
32
-
 33
33
-
 34
34
-
 35
35
-
 36
36


SUHNER ABRASIVE LSB 90-TOP Mode d'emploi
- Taper
- Mode d'emploi
dans d''autres langues
- italiano: SUHNER ABRASIVE LSB 90-TOP Guida utente
- español: SUHNER ABRASIVE LSB 90-TOP Guía del usuario
- Deutsch: SUHNER ABRASIVE LSB 90-TOP Benutzerhandbuch
- Nederlands: SUHNER ABRASIVE LSB 90-TOP Gebruikershandleiding
- português: SUHNER ABRASIVE LSB 90-TOP Guia de usuario
- polski: SUHNER ABRASIVE LSB 90-TOP instrukcja
- svenska: SUHNER ABRASIVE LSB 90-TOP Användarguide


