
Version: JAK-UM-V1.0
Model: JE-3000A
Contact us:
USER MANUAL
Jackery Explorer 3000 Pro


FR Français 20-28
DE Deutsch 11-19
IT Italiano 29-37
ES Español 38-46
CONTENTS
GB English 02-10

02
Congratulations on your new Jackery Explorer 3000 Pro. Please read this manual carefully before
using the product, particularly the relevant precautions to ensure proper use. Keep this manual in an
accessible place for frequent reference.
In compliance with laws and regulations, the right of final interpretation of this document and all
related documents of this product resides with the Company.
Please kindly notice that no further notifications will be given in case of any update, revision or
termination.
USB Type-C and USB-C are registered trademarks of USB Implementers Forum.
Qualcomm Quick Charge is a product of Qualcomm Technologles,Inc. and/or its subsidiaries.
Qualcomm and Quick Charge are trademarks or registered trademarks of Qualcomm Incorporated.
® ®
GB Model: JE-3000A
English
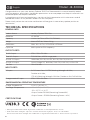
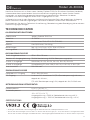
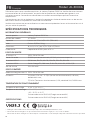
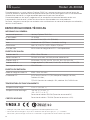
TECHNICAL SPECIFICATIONS
CERTIFICATIONS
3x AC Output
Total AC Output
2x USB-C Output
2x USB-A Output
Car Port
230V~ 50Hz 13A Max
3000W Max, 6000W surge peak
100W Max, 5V⎓3A, 9V⎓3A, 12V⎓3A, 15V⎓3A, 20V⎓5A
Quick Charge 3.0, 18W Max, 5-6V⎓3A, 6-9V⎓2A, 9-12V⎓1.5A
12V⎓10A Max
GENERAL INFO
Product Name
Model No.
Capacity
Weight
Dimensions
Cycle Life
Jackery Explorer 3000 Pro
JE-3000A
Lithium-ion 70Ah/43.2V DC (3024Wh)
About 63.93 lbs/ About 29 kg
18.6 x 14.1 x 14.7 in/ 47.3 x 35.94 x 37.36 cm
2000 cycles to 70%+ capacity
OUTPUT PORTS
INPUT PORTS
DC input
Charge mode AC input
2x DC 8mm Ports: 11-17.5V (Working Voltage)⎓8A Max,
Double to 8A Max;
17.5-60V (Working Voltage)⎓12A Max ,Double to 24A/1400W Max
230V~ 50Hz 10A Max
0~40 °C (32~104 ℉)
-20~40 °C (-4~104 ℉)
ENVIRONMENTAL OPERATING TEMPERATURE
Charge Temperature
Discharge Temperature
-20~-10 °C (-4~14 ℉)
Output Power=3000W (Remaining Power≥60%)
Output Power3000W (Remaining Power60%)

PACKAGE LIST
03
Jackery Explorer
3000 Pro
1
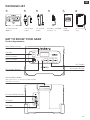
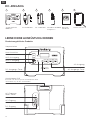
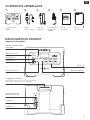
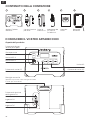
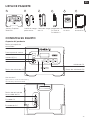
GET TO KNOW YOUR GEAR
Product Appearance
AC Output
AC Output Button
DC Output Button
Main Power Button
USB-C Output
USB-A Output
DC Input
AC Input
AC Input Reset Button
Car Port
GB
Retractable Handle
(Press the button on the retractable handle
and pull to extend)
Version: JAK-UM-V1.0
Model: JE-3000A
Contact us:
1-888-502-2236(US)
USER MANUAL
Jackery Explorer 3000 Pro
USER
MANUAL
Accessories
Bag
56
AC Charge
Cable
32
Car Charge
Cable
DC7909 to DC8020
Adaptor x 2
4

04
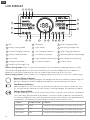
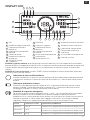
Battery Power Indicator
When the product is being charged, the orange circle around the battery percentage will
light up in sequence. When charging other devices, the orange circle will stay on.
Battery Saving Mode: When this feature is enabled, it limits the battery charging capacity to 85%
and the discharging capacity to 15%, and the battery will only be charged when the capacity is
below 80% to extend the battery life. Use the Jackery App for settings of this function.
Quiet Charging Mode: noise ≤ 30dB in this charging mode, you can set this function in Jackery App.
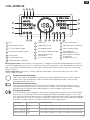
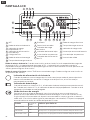
LCD DISPLAY
7
1
4
WiFi
Solar Charging Indicator
Remaining Charge Time
Battery Saving Mode
10
13
Remaining Battery Percentage
AC Wall Charging Indicator
Bluetooth
Battery Power Indicator
2
5
8
11
14
Error Code
16
Low Temperature Warning
17
Energy Saving Mode
19
Output Power
Remaining Discharge Time
18
AC Power Indicator
3
6
9
12
15
Quiet Charging Mode
Input Power
Car Charging Indicator
Low Battery Indicator
High Temperature Warning
12
5
7
13 16
17
18
6
10
1 2
19
11914 15
8
3 4
GB
Output Output Power Defaults
AC Output The device will automatically shut down after 12 hours
The device will automatically shut down after 12 hours
The device will automatically shut down after 12 hours
≤25W
≤2W
≤2W
USB Output
Car Output
Low Battery Indicator
When the battery is less than 20%, the Low Battery Indicator will stay on. When less than
5%, the Low Battery Indicator will flash. When it is being charged, the Indicator will be o.
Energy Saving Mode
To avoid forgetting to turn othe output which results in battery consumption, the product
turns the Energy Saving Mode on by default. This occurs when no device is connected or
the connected device is less than or equal to a certain value. (Refer to the table below for
more details), the device will automatically turn o all outputs after 12 hours.

05
GB
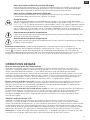
BASIC OPERATIONS
Power On/O
Main power on/o: Press the "Main Power Button" and the working indicator lights up and the LCD
display is illuminated. When this product does not have any operation for 2 minutes, the product will
enter the hibernation state and the display will turn o automatically. If you need to turn o the main
power, please press and hold the "Main Power Button" until the working indicator turns o. The default
standby time of this product is 2 hours. If the other power output switch is not turned on, and the
product does not have any load input, the product will automatically shut down after 2 hours. The
automatic shutdown time can be set on the Jackery App.
To turn o the Energy Saving Mode
Long press the AC Button and Main Power Button until the Energy Saving Mode icon
disappears. In Non-Energy Saving Mode, please remember to turn o the products to
avoid battery consumption.
To turn on the Energy Saving Mode
Long press the AC Button and Main Power Button until the Low Power Mode icon lights up
on the screen.
High-temperature warning
If it appears on the screen, do not worry, the battery will restore automatically after cooling.
Low-temperature Warning
If it is displayed on the screen, do not worry. It will automatically restore after the ambient
temperature is restored.
Fault code
In order to quickly solve the user’s feedback, we set up common fault codes F0-F9 in the
system: if you find any fault code of F0F1F2F3F4 F5F6F7F8F9 on the
display screen, please contact us for after-sales treatment; If F6 code appears, please
remove the load or unplug the charging plug, the product can restore by itself, if not,
please contact after-sales treatment; If F9 fault code appears, please remove the load
and the product can recover by itself, if not, please contact after-sales service.
Low Temperature Mode: Low temperature mode: This product can be used in low temperature
environment of -20 ~ -10. The blinking of the icon on the screen indicates that the device is in
low temperature mode. The maximum discharge power in low temperature mode is 3000W when
the remaining power is ≥60%, 2000W when the remaining power is 30%~60%, and 800W when the
power is <30%.
Press the "Main Power Button" and the working indicator lights up and the LCD display is illuminated.
When this product does not have any operation for 2 minutes, the product will enter the hibernation
state and the display will turn o automatically. If you want the LCD display to be always on when
charging or discharging, you can press the "Main Power Button" twice after the display is on, and the
display will enter the Steady On mode. To turn o Steady On mode of the LCD display: press the
"Main Power Button" and the LCD display will be turned o.
Note: In the Steady On mode, if the device is not charging or connected to a load, the display will
automatically turn o after 2 hours.
LCD Screen On/O
AC Output On/O: Ensure that the main power supply is turned on. Press the AC Button, the AC
Output operation indicator lights up. Then you can connect the equipment that needs AC charging.
Press the AC Button again to turn o the AC Output.
USB/Car Port Output On/O: Ensure that the main power supply is turned on. Press the DC Button,
the DC Output operation indicator lights up. Then USB/Car Port Output Ports can be connected to
external load devices. Press the DC Button again to turn o the USB/ Car Port Output.

06
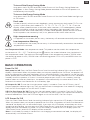
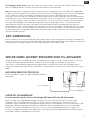
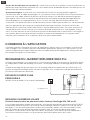
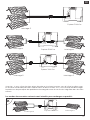
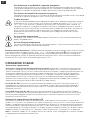
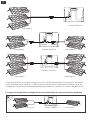
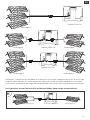
SOLAR ENERGY CHARGING
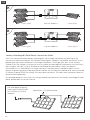
If one or two solar panels are connected, you can directly connect the DC8020 port of the solar
panel to theDC8020 port of Jackery Explorer 3000 Pro for charging. If three or four solar panels are
connected,
please refer to the method shown in the following figure to charge through the solar series connector
(Note: The solar series connector is not in standard configuration, so you need to purchase it
separately. Please refer to the detailed operation instructions of the solar series connector before
using it.)
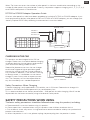
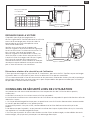
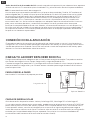
CHARGING FROM THE WALL
Please use the AC cable included in the package.
Explorer 3000 Pro
AC Charger
Jackery SolarSaga 200 or 100 or 60 Solar Panel Connection Guide
GB
EPS: Emergency Power System. Once you have connected the mains and the AC input port of the
EPS via the AC charger cable, you can use the AC output port of the EPS to power your unit (at this
point the AC power comes from the mains, not the EPS battery). In the event of a sudden loss of
mains power, the EPS can automatically switch to battery mode within 20ms. Since this is a
non-professional UPS function, it does not support 0ms switching. Do not connect to equipment with
high uninterruptible power requirements such as data servers and workstations. Please test several
times to confirm compatibility before use and it is recommended to connect to only one device. Do
not use more than one unit at a time to avoid triggering the overload protection. Failure to follow
these instructions may result in equipment failure or loss of data for which we cannot be held
responsible.
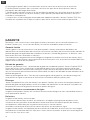
This product supports the connection of Jackery App for intelligent control and operation. Users can
download the Jackery App through App Store or Android application markets. Please refer to the
User Manual for Jackery App for detailed connection instructions.
APP CONNECTION
CHARGING YOUR JACKERY EXPLORER 3000 Pro
Green energy first: We advocate to use the green energy first. This product supports two modes of
charging at the same time: solar charging and AC wall charging.
When AC wall charging and solar charging are turned on at the same time, the product will give
priority to solar charging and both methods will be used to charge the battery at the maximum
permissible power.
AC Input Reset Button: When the Reset Button pops up, you need to remove AC charge cable and
press the Reset Button to reset.

07
Caution: When the two inputs are used at the same time, please make sure to use the same typeof
solar panel and the number of solar panels in the two inputs must be the same to avoiddamage or
charging problems of the equipment due to inconsistent voltages of the twochannels.
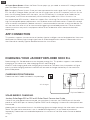
The following way of connections are prohibited to charge this product:
SolarSaga×2 SolarSaga×1Explorer 3000 Pro
GB
SolarSaga×3 SolarSaga ×3
Explorer 3000 Pro
SolarSaga ×3
Explorer 3000 Pro
SolarSaga×2 SolarSaga×2Explorer 3000 Pro

08
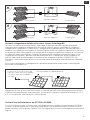
Parallel portDC 8020 female
The solar panel charging
output port(DC8020 male,
with DC8020 to DC7909
Adaptor)
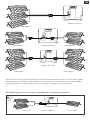
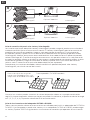
Users who have purchased Jackery SolarSaga 80 can charge the product by referring to the
connection mode shown below. The Jackery SolarSaga 80 supports the parallel connection or the
parallel and then series connections to charge the product. The single input port of the Jackery
Explorer 3000 Pro supports the input of up to six pieces of SolarSaga 80 solar panels, and two input
ports support the input to up to 12 pieces of SolarSaga 80 solar panels. (When the power is
connected with six solar panels in a single input port, the solar panels shall be divided into two
groups, and each group of three solar panels shall be self-connected in parallel and then connected
to Jackery Explorer 3000 Pro through the solar series connector. The solar series connector needs to
be purchased separately.)
For detailed operation instructions on the self-parallel connection of the Jackery SolarSaga 80 solar
panel, please refer to the user manual.
Jackery SolarSaga 80 Solar Panel Connection Guide
GB
SolarSaga×3 SolarSaga×1Explorer 3000 Pro
SolarSaga×3 SolarSaga×2
Explorer 3000 Pro

09
The basic safety precautions should be followed when using this product, including:
a. Please read all instructions before using this product.
b. Close supervision is required when using this product near children to reduce the risk.
c. Risk of electric shock may occur if using accessories recommended or sold by non-professional
product manufacturers.
d. When the product is not in use, please unplug the power plug from the product's socket.
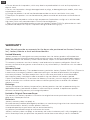
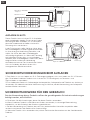
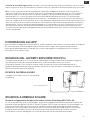
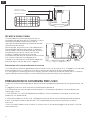
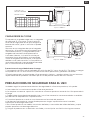
CHARGING IN THE CAR
This product can be charged with a 12V car
charger. Please start the vehicle before charging
to prevent draining the car battery and prevent
your vehicle from being unable to start.
Meanwhile, please ensure that the car charger
and the car cigarette lighter provide a good
connection, and ensure that the car charger is
fully inserted. In addition, if the vehicle is running
on bumpy roads, it is forbidden to use the car
charger in case it burns due to a poor connec-
tion. The Company will not be responsible for
any loss caused by non-standard operation.
1) Vehicle charging is only applicable in 12V vehicles, not in 24V ones. Please do not charge this
product in 24V vehicle to avoid personal injury and property loss.
2) It is recommended to use Jackery accessories - solar panels for solar charging. We will not be
responsible for the losses caused by using other brands’ solar panels.
Safety Precautions When Charging
Vehicle
Explorer 3000 Pro
1 3 5
24 6
R
A/C
AUTO
DC7909 male
DC8020 female
Explorer 3000 Pro
DC7909 to
DC8020 Adaptor
All of our solar panels on sale have been upgraded to include a DC7909 to DC8020 adapter. If you
have purchased a Jackery solar panel without a DC7909 to DC8020 adapter, you can charge your
Jackery Explorer 3000 Pro by following the connection instructions below.
DC7909 to DC8020 Adaptor Operation Guide
Warm Tip: Users can enter the number of solar panels in their own combination according to the
number of solar panels they purchased. Currently, the product supports charging with 1, 2, 3, 4, 5, 6, 8,
and 12 80W solar panels in combination.
SAFETY PRECAUTIONS WHEN USING
GBGB

Warranty Period
Exchange
Exclusions
WARRANTY
Note: We only provide our warranty for the buyer who purchased on Amazon (Jackery
Inc), Jackery website or local authorized dealers.
Jackery warrants to the original consumer purchaser that the Jackery product will be free from
defects in workmanship and material under normal consumer use during the applicable warranty
period identified in the 'Warranty Period' section below, subject to the exclusions set forth below.
This warranty statement sets forth Jackery's total and exclusive warranty obligation. We will not
assume, nor authorize any person to assume for us, any other liability in connection with the sale of
our products.
3 Years Standard Warranty: The standard warranty period for Jackery Explorer 3000 Pro is 36 months.
In each case, the warranty period is measured starting on the date of purchase by the original
consumer purchaser. The sales receipt from the first consumer purchase, or other reasonable
documentary proof, is required in order to establish the start date of the warranty period.
2 Years Extended Warranty: To activate the Warranty Extension, you must register your product
online or contact our customer service team at hello.eu@jackery.com to extend the standard
warranty runtime.
Jackery will replace (at Jackery's expense) any Jackery product that fails to operate during the
applicable warranty period due to defect in workmanship or material. A replacement product
assumes the remaining warranty of the original product.
Jackery's warranty does not apply to:
Misused, abused, modified, damaged by accident, or used for anything other than normal consumer
use as authorized in Jackery's current product literature.
Attempted repair by anyone other than an authorized facility.
Any product purchased through an online auction house.
Jackery's warranty does not apply to the battery cell unless the battery cell is fully charged by you
within seven days after you purchase the product and at least once every 6 months thereafter.
Limited Warranty
The warranty on Jackery's product is limited to the original consumer purchaser and is not transfer-
able to any subsequent owner.
Limited to Original Consumer Buyer
10
GB
e. Do not dismantle the product, which may lead to unpredictable risks such as fire, explosion or
electric shock.
f. Do not use the product through damaged cords or plugs, or damaged output cables, which may
cause electric shock.
g. Charge the product in a well ventilated area and do not restrict ventilation in any way.
h. Please put the product in a ventilated and dry place to avoid rain and water to cause electric
shock.
i. Do not expose the product to fire or high temperature (under direct sunlight or in vehicle under
high heat), which may cause accidents such as fire and explosion.
j. When using the retractable handle to move the Jackery Explorer 3000 Pro, please do not stack
or place other objects on top of it to prevent falling o and causing injury.

Herzlichen Glückwunsch zu Ihrem neuen Jackery Explorer 3000 Pro. Bitte lesen Sie dieses Handbuch,
insbesondere die entsprechenden Vorsichtsmaßnahmen sorgfältig durch, bevor Sie das Produkt
verwenden, um eine ordnungsgemäße Verwendung zu gewährleisten. Bewahren Sie dieses
Handbuch zum Nachschlagen an einem leicht zugänglichen Ort auf.
In Übereinstimmung mit den Gesetzen und Vorschriften liegt das Recht der endgültigen Auslegung
dieses Dokuments und aller zugehörigen Dokumente zu diesem Produkt beim Unternehmen.
Bitte beachten Sie, dass im Falle einer Aktualisierung, Überarbeitung oder Beendigung keine weiteren
Benachrichtigungen erfolgen.
TECHNISCHE DATEN
11
USB Type-C und USB-C sind eingetragene Warenzeichen des USB Implementers Forum
Qualcomm Quick Charge ist ein Produkt von Qualcomm Technologies, Inc. und/oder seinen Tochtergesellschaften.
Qualcomm und Quick Charge sind Warenzeichen oder eingetragene Warenzeichen von Qualcomm Incorporated.
®®
CERTIFICATIONS
3x AC Ausgabeanschluss
Gesamt-AC-Ausgangsleistung
2x USB-C-Ausgänge
2x USB-A-Ausgänge
Auto-Anschluss
230V~ 50Hz 13A max
3000W Nennleistung, 6000W Überspannungsspitze
100W Max, 5V⎓3A, 9V⎓3A, 12V⎓3A, 15V⎓3A, 20V⎓5A
Schnellladung 3.0, max. 18W, 5–6V⎓3A, 6–9V⎓2A, 9–12V⎓1,5A
12V⎓10A max
ALLGEMEINE INFORMATIONEN
Produktname
Modell-Nr.
Kapazität
Gewicht
Abmessungen
Nutzungsdauer
Jackery Explorer 3000 Pro
JE-3000A
Lithium-Ionen 70Ah/43.2V DC (3024Wh)
Ca. 63,93 Pfund / Ca. 29 kg
18,6 x 14,1 x 14,7 Inch/ 47,3 x 35,94 x 37,36 cm
2000 Zyklen bis 70%+ Kapazität
AUSGANGSANSCHLÜSSE
EINGANGSANSCHLÜSSE
Lademodus AC-Eingang
DC-Eingang
230V~ 50Hz 10A max
2 x 8-mm-DC-Anschlüsse: 11–17,5 V (Betriebsspannung)⎓8A max.,
doppelt bis 8A max.;
17,5–60V (Betriebsspannung)⎓12A, doppelt bis 24A/1400W max.
0~40 °C (32~104 ℉)
-20~40 °C (-4~104 ℉)
BETRIEBSUMGEBUNGSTEMPERATUR
Ladetemperatur
Entladetemperatur
DE Model: JE-3000A
Deutsch
-20~-10 °C(-4~14 ℉)
Ausgangsleistung = 3000 W (Verbleibende Leistung ≥ 60 %)
Ausgangsleistung 3000 W (Verbleibende Leistung 60 %)

DC-EINGANG
12
Jackery Explorer
3000 Pro
1 5
AC-Ladekabel
32
Autoladekabel DC7909 zu DC8020
Adapter x 2
4
LERNE DEINE AUSRÜSTUNG KENNEN
Erscheinungsbild des Produkts
AC-Ausgang
AC-Ausgangs-Taste
DC-Ausgangs-Taste
Hauptschalter
USB-C-Ausgang
USB-A-Ausgang
DC-Eingang
AC-Eingang
AC-Eingangs-
Reset-Taste
Auto-Anschluss
DE
Benutzer-
handbuch
Version: JAK-UM-V1.0
Model: JE-3000A
Contact us:
USER MANUAL
Jackery Explorer 3000 Pro
Ausziehbarer Gri
(Drücken Sie den Knopf am ausziehbaren Gri
und ziehen Sie, um ihn auszufahren)
Zubehörtasche
6

WiFi
Solar-Ladeanzeige
Verbleibende Aufladezeit
Batteriesparmodus
Verbleibender
Batterieprozentsatz
AC-Netzladeanzeige
Bluetooth
Batteriezustandsanzeige
Fehlercode Warnung bei niedriger
Temperatur
Energiesparmodus Ausgangsleistung
Verbleibende Entladezeit
AC-Stromanzeige
Leiser Lademodus
Eingangsleistung
Autoladeanzeige
Batterietiefstandsanzeige
Warnung bei hoher
Temperatur
13
LCD-ANZEIGE
7
1
4
10
13
2
5
8
11
14
16 17
19
18
3
6
9
12
15
DE
Batteriezustandsanzeige
Wenn das Produkt aufgeladen wird, leuchtet der orangefarbene Kreis um den Batterie-
prozentsatz nacheinander auf. Wenn andere Geräte geladen werden, leuchtet der
orangefarbene Kreis weiter.
Ausgang Ausgangsleistung Standardwerte
AC-Ausgang Das Gerät schaltet sich nach 12 Stunden automatisch ab
Das Gerät schaltet sich nach 12 Stunden automatisch ab
Das Gerät schaltet sich nach 12 Stunden automatisch ab
≤25W
≤2W
≤2W
USB-Ausgang
Pkw-Leistung
Batteriesparmodus: Wenn diese Funktion aktiviert ist, begrenzt sie die Batterieladekapazität auf 85 %
und die Entladekapazität auf 15 %, und die Batterie wird nur geladen, wenn die Kapazität unter 80 %
liegt, um die Batterielebensdauer zu verlängern. Verwenden Sie die Jackery App für Einstellungen
dieser Funktion.
Leiser Lademodus: Rauschen ≤ 30 dB in diesem Lademodus, Sie können diese Funktion in der
Jackery App einstellen.
Batterietiefstandsanzeige
Wenn der Batterieladestatus weniger als 20% beträgt, leuchtet die Anzeige für einen
niedrigen Batteriestand weiter. Bei weniger als 5% blinkt die Anzeige für einen niedrigen
Batteriezustand. Während des Ladevorgangs ist die Anzeige ausgeschaltet.
Energiesparmodus
Um zu vermeiden, dass vergessen wird, einen Ausgang auszuschalten, was zu Batteriever-
brauch führt, schaltet das Gerät den Energiesparmodus standardmäßig ein. Dies ist der
Fall, wenn kein Gerät angeschlossen ist oder das angeschlossene Gerät kleiner oder gleich
einem bestimmten Wert ist. (Weitere Einzelheiten finden Sie in der nachstehenden Tabelle),
das Gerät schaltet nach 12 Stunden automatisch alle Ausgänge aus.
12
5
7
13 16
17
18
6
10
1 2
19
11914 158
3 4

Drücken Sie den „Hauptschalter“ und die Betriebsanzeige leuchtet auf und das LCD-Display schaltet sich
ein. Wenn dieses Gerät 2 Minuten lang nicht bedient wird, wechselt es in den Ruhezustand und das Display
schaltet sich automatisch aus. Wenn Sie möchten, dass das LCD-Display beim Laden oder Entladen
immer eingeschaltet ist, können Sie nach dem Einschalten des Displays zweimal die „Haupt-Ein/Aus-Taste“
drücken, und das Display wechselt in den Dauerbetrieb-Modus. Um den Dauerbetrieb-Modus des
Displays zu deaktivieren: Drücken Sie die „Haupt-Ein/Aus-Taste“ und das LCD-Display wird ausgeschaltet.
Hinweis: Wenn der Dauerbetrieb-Modus aktiviert ist und das Gerät weder aufgeladen wird noch an eine
Last angeschlossen ist, schaltet sich das Display nach 2 Stunden automatisch aus.
LCD-Bildschirm EIN/AUS
14
AC-Ausgang Ein/Aus: Stellen Sie sicher, dass die Hauptstromversorgung eingeschaltet ist. Drücken Sie die
AC-Taste, die AC-Ausgangsbetriebsanzeige leuchtet auf. Dann können Sie die Geräte anschließen, die mit
Wechselstrom aufgeladen werden sollen. Drücken Sie die AC-Taste erneut, um den AC-Ausgang
auszuschalten.
USB/Autoanschluss-Ausgang Ein/Aus: Stellen Sie sicher, dass die Hauptstromversorgung eingeschaltet ist.
Drücken Sie die DC-Taste, die DC-Ausgangsbetriebsanzeige leuchtet auf. Dann können externe Geräte an
die USB/Autoanschluss-Ausgangs-Ports angeschlossen werden. Drücken Sie die DC-Taste erneut, um den
USB-/Autoanschluss-Ausgang auszuschalten.
Den Energiesparmodus deaktivieren
Halten Sie die AC-Taste und die Haupt-Ein/Aus-Taste lange gedrückt, bis das Symbol für den
Energiesparmodus erlischt. Denken Sie im Nicht-Energiesparmodus daran, die Geräte
auszuschalten, um Batterieverbrauch zu vermeiden.
Den Energiesparmodus aktivieren
Halten Sie die AC-Taste und die Haupt-Ein/Aus-Taste lange gedrückt, bis das Symbol für den
Energiesparmodus auf dem Bildschirm aufleuchtet.
Warnung bei hoher Temperatur
Wenn das Symbol auf dem Bildschirm erscheint, machen Sie sich keine Sorgen, die Batterie
erholt sich automatisch nach Abkühlen des Geräts.
Um eventuelle Probleme schnell zu lösen, ist das System mit den allgemeinen Fehlercodes
F0-F9 ausgestattet: Wenn der Fehlercode F0, F1, F2, F3, F4, F5, F6, F7, F8, oder F9 auf dem
Bildschirm erscheint, kontaktieren Sie bitte unseren Kundendienst; Wenn der Fehlercode F6
erscheint, entfernen Sie die Solarpanele oder unterbrechen Sie den Ladevorgang. Das Gerät
erholt sich von selbst. Wenn nicht, wenden Sie sich bitte an den Kundendienst. Wenn der
Fehlercode F9 erscheint, entfernen Sie die Solarpanele und das Gerät erholt sich von selbst,
wenn nicht, wenden Sie sich bitte an den Kundendienst.
Warnung vor niedriger Temperatur
Wenn das Warn-Symbol auf dem Bildschirm erscheint, machen Sie sich keine Sorgen. Sobald
die Umgebungstemperatur wieder angeglichen ist, erholt sich die Batterie automatisch.
Fehlermeldung
GRUNDLEGENDE OPERATIONEN
Ein/Ausschalten
Hauptstrom Ein/Aus: Drücken Sie den „Hauptschalter“ und die Betriebsanzeige leuchtet auf und das
LCD-Display schaltet sich ein. Wenn dieses Gerät 2 Minuten lang nicht bedient wird, wechselt es in den
Ruhezustand und das Display schaltet sich automatisch aus. Wenn Sie den Hauptstrom ausschalten
müssen, halten Sie bitte den "Hauptschalter" gedrückt, bis die Betriebsanzeige erlischt. Die
Standard-Standby-Zeit dieses Geräts beträgt 2 Stunden. Wenn der andere Leistungsausgangsschalter
nicht eingeschaltet ist und das Gerät keinen Lasteingang hat, schaltet es sich nach 2 Stunden automa-
tisch ab. Die automatische Abschaltzeit kann in der Jackery App eingestellt werden.
Niedrigtemperaturmodus: Niedrigtemperaturmodus: Dieses Gerät kann in einer Umgebung mit niedriger
Temperatur von -20 ~ -10 verwendet werden. Das Blinken des Symbols auf dem Bildschirm zeigt an,
dass sich das Gerät im Niedertemperaturmodus befindet. Die maximale Entladeleistung im Niedertem-
peraturmodus beträgt 3000 W, wenn die verbleibende Leistung ≥60 % beträgt, 2000 W bei einer
Restleistung von 30 % bis 60 % und 800 W bei einer Restleistung von < 30 %.
DE

15
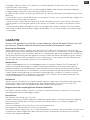
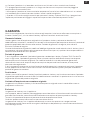
LADEN MIT SOLARENERGIE
Wenn ein oder zwei Solarpanele angeschlossen sind, können Sie den DC8020-Anschluss des
Solarpanels zum Aufladen direkt mit dem DC8020-Anschluss des Jackery Explorer 3000 Pro
verbinden. Wenn drei oder vier Solarpanele angeschlossen sind, beziehen Sie sich bitte auf die in der
folgenden Abbildung gezeigte Methode, um über den Jackery Solarpanel-Anschluss aufzuladen
(Hinweis: Der Jackery Solarpanel-Anschluss ist nicht in der Standardkonfiguration enthalten, Sie
müssen ihn separat erwerben. Bitte beachten Sie vor der Verwendung die detaillierte Bedienungsan-
leitung des Jackery Solarpanel-Anschlusses.)
AUFLADEN ÜBER DIE STECKDOSE
Bitte verwenden Sie das im Lieferumfang enthaltene
Netzkabel.
Explorer 3000 Pro
AC-Ladegerät
Anschlussanleitung für Jackery SolarSaga 200 oder 100 oder 60 Solarpanel.
Dieses Produkt unterstützt die Verbindung der Jackery App für eine intelligente Steuerung und Bedienung.
Benutzer können die Jackery App über den App Store oder Android App Market herunterladen. Detaillierte
Verbindungsanweisungen finden Sie im Benutzerhandbuch für die Jackery App.
WIE SIE IHREN JACKERY EXPLORER 3000 Pro AUFLADEN
Grüne Energie zuerst: Wir plädieren dafür, vorrangig grüne Energie zu nutzen. Dieses Produkt unterstützt
zwei gleichzeitige Lade-Betriebsarten: Aufladen mit Solarenergie und Aufladen mit Netzstrom.
Wenn Netz- und Solarladung gleichzeitig eingeschaltet sind, gibt das Produkt der Solarladung den
Vorrang und beide Methoden werden verwendet, um die Batterie mit der maximal zulässigen Leistung zu
laden.
APP-VERBINDUNG
DE
NSS: Notstromsystem. Sobald Sie das NSS über den AC-Eingangsanschluss mit dem AC-Ladekabel
an das Stromnetz angeschlossen haben, können Sie den AC-Ausgangsanschluss des NSS verwenden,
um Ihr Gerät mit Strom zu versorgen (zu diesem Zeitpunkt kommt der Wechselstrom aus dem
Stromnetz, nicht aus der NSS-Batterie). Bei einem plötzlichen Stromausfall kann das NSS automatisch
innerhalb von 20 ms in den Batteriemodus umschalten. Da es sich hierbei nicht um eine professionelle
USV-Funktion handelt, unterstützt das System keine 0-ms-Umschaltung. Schließen Sie keine Geräte
mit hoher Abhängigkeit von unterbrechungsfreier Stromversorgung an, wie z. B. Datenserver und
Arbeitsplatzrechner. Bitte testen Sie angeschlossene Geräte vor der Verwendung mehrmals auf
Kompatibilität und es wird empfohlen, nur ein Gerät zur Zeit anzuschließen. Verwenden Sie nicht mehr
als ein Gerät zur Zeit, um ein Auslösen des Überlastschutzes zu vermeiden. Die Nichtbeachtung dieser
Anweisungen kann zu Geräteausfällen oder Datenverlusten führen, für die wir nicht verantwortlich
gemacht werden können.
AC-Eingangs-Reset-Taste: Wenn der Überstromschutz auftritt, erscheint die Reset-Taste,Sie müssen
das AC-Kabel entfernen und zum Zurücksetzen die Reset-Taste drücken.

16
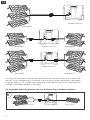
Achtung: Wenn die beiden Eingänge gleichzeitig verwendet werden, achten Sie bitte darauf, den
gleichen Typ von Solarpanelen zu verwenden und dass die Anzahl der Solarpanele in den beiden
Eingängen gleich ist, um Schäden oder Ladeprobleme des Geräts aufgrund von Spannungsunter-
schieden in den beiden Kanälen zu vermeiden.
Die folgenden Verbindungsarten sind zum Aufladen dieses Produkts verboten:
SolarSaga×2 SolarSaga×1
Explorer 3000 Pro
SolarSaga×3 SolarSaga ×3
Explorer 3000 Pro
SolarSaga ×3
Explorer 3000 Pro
SolarSaga×2 SolarSaga×2Explorer 3000 Pro
DE

17
Alle unsere aktuell verkäuflichen Solarpanele sind mit einem DC7909-zu-DC8020-Adapter ausges-
tattet. Wenn Sie ein Jackery-Solarpanel ohne DC7909-zu-DC8020-Adapter gekauft haben, können
Sie Ihren Jackery Explorer 3000 Pro aufladen, indem Sie die nachstehenden Anweisungen befolgen.
DC7909-zu-DC8020-Adapter-Bedienungsanleitung
Heißer Tipp: Sie können Ihre eigene Kombination entsprechend der Solarpanele, die Sie gekauft
haben, eingeben. Derzeit unterstützt das Gerät das Laden in Kombination mit 1, 2, 3, 4, 5, 6, 8 und 12
80-W-Solarpanelen.
DE
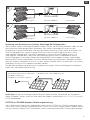
Wenn Sie das Jackery SolarSaga 80 gekauft haben, können Sie das Gerät aufladen, indem Sie den
nachstehenden Verbindungsmodus verwenden. Das Jackery SolarSaga 80 unterstützt die
Parallelschaltung oder die Parallel- und dann die Reihenschaltung, um das Gerät aufzuladen. Der
Einzel-Eingangsport des Jackery Explorer 3000 Pro unterstützt den Eingang von bis zu sechs
SolarSaga 80-Solarpanelen, und zwei Eingangsports unterstützen den Eingang von bis zu 12
SolarSaga 80-Solarpanelen. (Wenn die Stromversorgung durch sechs Solarpanele an einem
Einzel-Eingangsport stattfindet, werden die Solarpanele in zwei Gruppen unterteilt, jede Gruppe
bestehend aus je drei Solarpanelen wird durch Parallelschaltung miteinander verbunden und dann
über den Jackery Solarpanel-Anschluss mit dem Jackery Explorer 3000 Pro verbunden. Der Jackery
Solarpanel-Anschluss muss separat erworben werden.)
Eine detaillierte Bedienungsanleitung zur Parallelschaltung des Jackery SolarSaga 80 Solarpanels
finden Sie in der Bedienungsanleitung.
Anleitung zum Anschluss von Jackery SolarSaga 80-Solarpanelen
SolarSaga×3 SolarSaga×1
Explorer 3000 Pro
SolarSaga×3 SolarSaga×2
Explorer 3000 Pro
Parallelanschluss (DC 8020 Buchse)
Der Ladeausgang des Solarpanels
(DC8020-Stecker, mit
DC8020-zu-DC7909-Adapter)

18
a. Bitte lesen Sie alle Anweisungen, bevor Sie dieses Produkt verwenden.
b. Wenn Sie dieses Produkt in der Nähe von Kindern verwenden, ist eine enge Überwachung
erforderlich, um die Sicherheit der Kinder zu gewährleisten.
c. Bei der Verwendung von Zubehör, das von nicht professionellen Herstellern empfohlen oder
verkauft wird, besteht die Gefahr eines Stromschlags.
d. Wenn das Produkt nicht verwendet wird, ziehen Sie bitte den Netzstecker aus der Steckdose des
Produkts.
Bei der Verwendung dieses Produkts sollten die grundlegenden Sicherheitsvorkehrungen
befolgt werden, einschließlich:
AUFLADEN IM AUTO
Dieses Produkt kann mit einem 12-V-Autolade-
gerät aufgeladen werden. Bitte starten Sie das
Fahrzeug vor dem Aufladen, um zu verhindern,
dass die Autobatterie entladen wird und Ihr
Fahrzeug nicht starten kann.
In der Zwischenzeit stellen Sie bitte sicher, dass
das Autoladegerät und der Zigarettenanzünder
im Auto eine gute Verbindung herstellen, und
stellen Sie sicher, dass das Autoladegerät
vollständig eingesteckt ist. Wenn das Fahrzeug
auf holprigen Straßen fährt, ist es außerdem
verboten, das Autoladegerät zu benutzen, da es
aufgrund einer schlechten Verbindung
durchbrennen könnte. Das Unternehmen haftet
nicht für Schäden, die durch einen nicht
normgerechten Betrieb entstehen.
1) Das Gerät ist nur zum Laden von 12-V-Fahrzeugen geeignet, nicht zum Laden von 24-V-Fahrzeu-
gen. Bitte laden Sie dieses Produkt nicht in einem 24-V-Fahrzeug auf, um Personen- und
Sachschäden zu vermeiden.
2) Zum Laden des Geräts mit Solarenergie wird empfohlen, Solarpanele und Zubehör von Jackery zu
verwenden. Wir übernehmen keine Verantwortung für Verluste, die die Verwendung von Solarpanel
anderer Marken verursacht.
SICHERHEITSVORKEHRUNGEN BEIM AUFLADEN
Fahrzeug
Explorer 3000 Pro
1 3 5
24 6
R
A/C
AUTO
DC7909 Stecker
DC8020 Buchse
Explorer 3000 Pro
DC7909-zu-DC8020
-Adapter
SICHERHEITSHINWEISE FÜR DEN GEBRAUCH
DE
La page est en cours de chargement...
La page est en cours de chargement...
La page est en cours de chargement...
La page est en cours de chargement...
La page est en cours de chargement...
La page est en cours de chargement...
La page est en cours de chargement...
La page est en cours de chargement...
La page est en cours de chargement...
La page est en cours de chargement...
La page est en cours de chargement...
La page est en cours de chargement...
La page est en cours de chargement...
La page est en cours de chargement...
La page est en cours de chargement...
La page est en cours de chargement...
La page est en cours de chargement...
La page est en cours de chargement...
La page est en cours de chargement...
La page est en cours de chargement...
La page est en cours de chargement...
La page est en cours de chargement...
La page est en cours de chargement...
La page est en cours de chargement...
La page est en cours de chargement...
La page est en cours de chargement...
La page est en cours de chargement...
La page est en cours de chargement...
La page est en cours de chargement...
La page est en cours de chargement...
-
 1
1
-
 2
2
-
 3
3
-
 4
4
-
 5
5
-
 6
6
-
 7
7
-
 8
8
-
 9
9
-
 10
10
-
 11
11
-
 12
12
-
 13
13
-
 14
14
-
 15
15
-
 16
16
-
 17
17
-
 18
18
-
 19
19
-
 20
20
-
 21
21
-
 22
22
-
 23
23
-
 24
24
-
 25
25
-
 26
26
-
 27
27
-
 28
28
-
 29
29
-
 30
30
-
 31
31
-
 32
32
-
 33
33
-
 34
34
-
 35
35
-
 36
36
-
 37
37
-
 38
38
-
 39
39
-
 40
40
-
 41
41
-
 42
42
-
 43
43
-
 44
44
-
 45
45
-
 46
46
-
 47
47
-
 48
48
-
 49
49
-
 50
50


dans d''autres langues
- italiano: Jackery JE-3000A Manuale utente
- English: Jackery JE-3000A User manual
- español: Jackery JE-3000A Manual de usuario
- Deutsch: Jackery JE-3000A Benutzerhandbuch
Documents connexes
-
 Jackery JE-100A Manuel utilisateur
-
Jackery JE-1000B Manuel utilisateur
-
Jackery JE-1000C Manuel utilisateur
-
Jackery JE-300B Manuel utilisateur
-
Jackery Explorer 1000 Pro Manuel utilisateur
-
-
 Jackery Explorer 1500 Pro Portable Power Station Manuel utilisateur
-
Jackery JS-100C Mode d'emploi
-
Jackery JS-80A Mode d'emploi
-


