
Instructions for use
Directives d’utilisation


- 3 -
ENGLISH Instructions for use Page 4
FRANÇAIS Consignes d’utilisation Page 15
Инструкция по эксплуатации Стр. 26
Инструкции за използване Страница 37
Інструкції з використання стор.48
70
SPIW409LL/2
SPIW412LL/2
SPIW418LL/2
SPIW422LL/2
SPIW409LL
SPIW412LL
SPIW418LL
SPIW422LL
SPOW407
SPOW409
SPOW412
SPOW418

- 4 -
IMPORTANT TO BE READ AND OBSERVED
• Download the complete instruction manual on docs.whirlpool.eu or call the phone
number shown on the warranty booklet.
• Before using the appliance, read these safety instructions. Keep them nearby for future
reference.
• These instructions and the appliance itself provide important safety warnings, to be
observed at all times. The manufacturer declines any liability for failure to observe these
safety instructions, for inappropriate use of the appliance or incorrect setting of controls.
•
Very young children (0-3 years) should be kept away from the appliance. Young
children (3-8 years) should be kept away from the appliance unless continuously
supervised. Children from 8 years old and above and persons with reduced physical,
sensory or mental capabilities or lack of experience and knowledge can use this
appliance only if they are supervised or have been given instructions on safe use and
understand the hazards involved. Children must not play with the appliance. Cleaning
and user maintenance must not be carried out by children without supervision.
PERMITTED USE
•
CAUTION: the appliance is not intended to be operated by means of an external
switching device, such as a timer, or separate remote controlled system.
•
This appliance is intended to be used in household and similar applications such as:
hotels and working oces.
•
This appliance is not for professional use.
•
Always turn o the air conditioner by remote control rst. Do not use the power
supply circuit breaker or pull o the plug to turn it o. Disconnect the air conditioner
from the power supply if it is to be left unused for a long period of time or during a
thunder/lightning storm.
•
Never insert obstacle in the air outlet-risk of injury. Keep ventilation openings clear of
any obstruction.
•
Do not place any other electrical products or household belongings under indoor
unit or outdoor unit. Condensation dripping from the unit might get them wet, and may
cause damage or malfunction of your property.
INSTALLATION
•
The appliance must be handled and installed by two or more persons - risk of injury.
Use protective gloves to unpack and install - risk of cuts.
•
Installation, including electrical connections, and repairs must be carried out by a
qualied technician according to national wiring rules. Do not repair or replace any
part of the appliance unless specically stated in the user manual. Keep children away
from the installation site. After unpacking the appliance, make sure that it has not
been damaged during transport. In the event of problems, contact the dealer or your
nearest After-sales Service. Once installed, packaging waste (plastic, styrofoam parts
etc.) must be stored out of reach of children - risk of suocation. The appliance must be
disconnected from all remote power supply before any installation operation - risk of
electric shock. During installation, make sure the appliance does not damage the power
cable - risk of re or electric shock. Only activate the appliance when the installation has
been completed.
SAFETY INSTRUCTIONS

- 5 -
• When moving or relocating the air conditioner, consult experienced service
technicians for disconnection and reinstallation of the unit.
•
The appliance shall not be installed in the laundry.
•
Appliance shall be installed, operated and stored in a room with a oor area larger
than 10m
2
. Mount the indoor unit at least 2.5m above oor or grade level.
•
The installation of pipe-work shall be kept in a room with a oor area larger than
10m
2
in compliance with national gas regulations.
ELECTRICAL WARNINGS
•
The power supply must be of rated voltage with special circuitry for the appliance.
The diameter of the power cord must comply with requirements.
•
A multi-pole switch shall be installed in the xed wiring in accordance with the wiring
rules and the appliance must be earthed in conformity with national electrical safety
standards.
•
An all-pole disconnection switch having a contact separation of at least 3mm in all
poles should be connected in xed wiring in accordance national with wiring rules, and
the appliance must be earthed in conformity with national electrical safety standards.
•
Do not use extension leads, multiple sockets or adapters. The electrical components
must not be accessible to the user after installation. Do not use the appliance when you
are wet or barefoot. Do not operate this appliance if it has a damaged power cable or
plug, if it is not working properly, or if it has been damaged or dropped.
•
If the supply cord is damaged, it must be replaced with an identical one by the
manufacturer, its service agent or similarly qualied persons in order to avoid a hazard -
risk of electric shock.
•
A residual current device (RCD) having rated residual operation current not exceeding
30mA shall be incorporated in xed wiring according to national law.
•
The temperature of refrigerant circuit will be high, please keep the interconnection
cable away from the copper tube.
•
Ensure safe grounding and a grounding wire connected with the special grounding
system of the building, installed by professionals. The appliance must be tted with
electrical leakage protection switch and an auxiliary circuit breaker with sucient
capacity. The circuit breaker must also have a magnetic and a thermal tripping function
to ensure protection in case of short-circuit and overload.
Model 9K & 12K 18K 24K
Required capacity of circuit breaker 16A 20A 25A
•
For the connection of power cord and cable connection between indoor and outdoor
units, please see the wiring diagram on the appliance.
CLEANING AND MAINTENANCE
•
WARNING: Ensure that the appliance is switched o and disconnected from the
power supply before performing any maintenance operation; never use steam cleaning
equipment - risk of electric shock.
SAFETY INSTRUCTIONS

- 6 -
DISPOSAL OF PACKAGING MATERIALS
The packaging material is 100% recyclable and is marked with the recycle symbol ( ). The various parts of the
packaging must therefore be disposed of responsibly and in full compliance with local authority regulations
governing waste disposal.
DISPOSAL OF HOUSEHOLD APPLIANCES
This appliance is manufactured with recyclable or reusable materials. Dispose of it in accordance with local waste
disposal regulations. For further information on the treatment, recovery and recycling of household electrical
appliances, contact your local authority, the collection service for household waste or the store where you purchased
the appliance. This appliance is marked in compliance with European Directive 2012/19/EU, Waste Electrical and
Electronic Equipment (WEEE). By ensuring this product is disposed of correctly, you will help prevent negative
consequences for the environment and human health.
The (
) symbol on the product or on the accompanying documentation indicates that it should not be treated as
domestic waste but must be taken to an appropriate collection center for the recycling of electrical and electronic
equipment.
DECLARATIONS OF CONFORMITY
This product contains Fluorinated Greenhouse Gases covered by the Kyoto Protocol, the refrigerant gas being in a
hermetically sealed system. (R410a, GWP 2088). The maximum refrigerant charge amount is 2.5 kg. Please refer to the
rating label for detailed information.
SAFETY INSTRUCTIONS

- 7 -
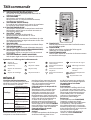
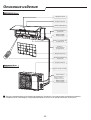
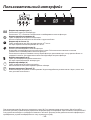
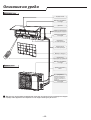
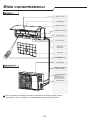
Product description
Indoor unit
Outdoor unit
Front panel
Air Intake
Display Panel
Emergency Panel
Air Outlet
Vertical Adjustment
Louver
Horizontal
Adjustment Louver
Air Filter
Remote Controller
Air Intake
Drain Hose
Air Outlet
Pipes and Power
Connection Cord
Note: Condensate water drains
at COOLING or DRY operation.
The gures in this manual are based on the external view of a standard model.
Consequently, the shape may dier from that of the air conditioner you have selected.

- 8 -
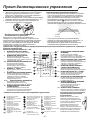
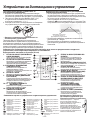
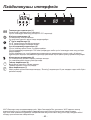
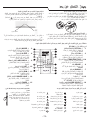
User Interface
64 127
5
Temperature indicator (1)
Displays set temperature.
It shows “FC” as a reminder to clean the lter.
Running indicator (2)
It lights up during operation.
It ashes during outside unit defrosting.
6
th
Sence indicator (3)
It lights up when 6
th
sense is on.
It goes o when 6
th
sense ends.
Filter monitor indicator (4)
It ashes when the lter needs to be cleaned.
Filter monitor indicator ashes after 720 hours of usage as reminder to clean the lter.
After lter cleaning, press the lter reset button located on the indoor unit behind the front panel in order to
interrupt the ashing of the lter monitor indicator.
Humidity indicator (5)
It lights up when showing the humility level.
It goes o when showing the temperature.
Timer indicator (6)
It lights up during the set time.
It goes o when timer operation ends.
Sleep indicator (7)
It lights up once sleep mode is set, “Running” indicator will ash for 10 times then the whole display will light
o.
For air conditioners without Wi-Fi control, we recommend the Wpro SmartClim: a smart device to control via Wi-Fi
the main settings of your appliance from your smartphone.
This accessory is not included inside the product packaging. Please contact our After-Sales Service for more details
and purchase.

- 9 -
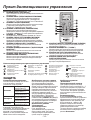
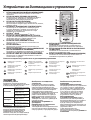
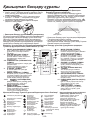
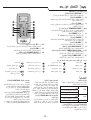
Remote controller
Insert the batteries into RC
1. Insert a pin and gently press down on the battery
cover and push in the direction of the arrow to
remove, as shown.
2. Insert 2 AAA batteries (1.5V) into the compartment.
Ensure that “+” and “-” polarity is correctly positioned.
3. Close the battery cover on the remote control.
•
Remote Control presetting
Each time the batteries are replaced in the remote
controller, the remote controller pre-set at Heat Pump
mode. The heat pump AC remote controller can be used
to control the cool only AC models.
Use RC to control the appliance
• To operate the appliance by remote control, point the
remote control at the receiving device on the indoor
unit, to ensure receiving sensibility.
• To send a message from remote control, the symbol
will ash for 1 second. On receipt of the message,
the appliance will emit a beep.
•
Signal receptor
The remote control will operate the air conditioner at a
distance of up to 7m.
• Each time the batteries are replaced in the remote
control, the remote control is pre-set at Heat Pump mode.
Note: please follow the intruction which matches to the remote controller you receive for Air Conditioner operation.
Function description of buttons (P1-04)
1. ON/OFF BUTTON
Starts or Stops the appliance by
pressing this button.
3. FAN BUTTON
Used to select fan speed in sequence
auto, high, medium or low.
4-5. TEMPERATURE BUTTON
Used to select the room
temperature.
Used to set the time in timer mode.
6. 6
th
SENSE BUTTON
Sets or cancels 6
th
sense operation.
7. SWING BUTTON
Stops or starts horizontal adjustment
louver swinging and sets the desired
up/down airow direction.
10-11. HUMIDITY BUTTON
Used to set desired humidity level,
they areonly available under 6
th
SENSE mode.
16. SUPER SILENT BUTTON
Used to start or stop the super
silent operation to have a low noise
environment.
2. MODE BUTTON
Used to select the operation mode
in sequence Cooling, hearing or
fan.
8. SLEEP BUTTON
Used to select the sleep mode in
sequence of sleep 1, sleep 2, sleep
3 sleep 4 and sleep o.
9. AROUND U BUTTON
Used to set or cancel Around U
function.
12. JET BUTTON
Used to start or stop the fast
cooling or heating.
13. DIM BUTTON
Used to turn on or turn o display
light on indoor unit.
14. POWER SAVE BUTTON
Used to start or stop the power
save operation.
15. TIMER BUTTON
Used to set the time for turn on or
turn o the appliance.
Symbols on RC display
Active RC by pressing UNLOCK button
Cooling indicator Auto fan speed Sleep indicator 1 Press the button, the backlight
will be lighted up and function
buttons will be activated for
use. Press again to lock remote
controller. If no operation on
remote controller for 10s, the
remote controller will be locked
automatically.
PRESS
Humidity plus indicator High fan speed Sleep indicator 2
Humidity minus indicator
Medium fan speed Sleep indicator 3
Fan only indicator Low fan speed Sleep indicator 4
Heating indicator
Super silent indicator Display set temperature
Around U indicator 6
th
SENSE indicator
ON
OF F
Display set timer
Jet indicator Power save indicator Signal transmission

- 10 -
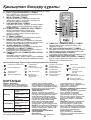
Remote controller
Function description of buttons (J1-39)
1. ON/OFF BUTTON
Starts or Stops the appliance by pressing this button.
2. MODE BUTTON
Used to select the operation mode in sequence of
Cooling, dry, fan only or heating.
3. FAN BUTTON
Used to select fan speed in sequence auto, high,
medium or low.
4-5. TEMPERATURE BUTTON
Used to select the room temperature. Used to set
time in timer mode and real time clock.
6. 6
TH
SENSE BUTTON
Sets or cancels 6
th
sense operation.
7. SWING BUTTON
Stops or starts horizontal adjustment louver swinging
and sets the desired up/down airow direction.
8. SLEEP BUTTON
Sets or cancels Sleep Mode operation.
9. AROUND U BUTTON
Used to set or cancel Around U function.
10. TIMER ON/CLOCK BUTTON
Used to set the current time.
Used to set or cancel the timer on operation.
11. TIMER OFF BUTTON
Used to set or cancel the timer o operation.
12. JET BUTTON
Used to start or stop the fast cooling or heating mode.
13. DIM BUTTON
Used to turn on or turn o display light on indoor
unit.
14. POWER SAVE BUTTON
Used to start or stop the power save operation.
Symbols on RC display
Cooling indicator Jet indicator Auto fan speed Signal transmission
Dry indicator 6
th
Sense indicator High fan speed
ON
OF F
Display set timer
Fan only indicator Sleep indicator Medium fan speed Display current time
Heating indicator Around U indicator Low fan speed Display set temperature
Power save indicator
PROTECTION
Operating condition
The protective device maybe trip
and stop the appliance in the cases
listed below.
Heating
Outdoor air temperature
is over 24°C
Outdoor air temperature
is below -7°C
Room temperature is
over 27°C
Cooling
Outdoor air temperature
is over 43°C
Room temperature is
below 21°C
Dehumidifying
Room temperature is
below 18°C
If the air conditioner runs in
COOLING or DRY mode with door
or window opened for a long time
when relative humidity is above 80%,
dew may drip down from the outlet.
Features of protection device
Wait at least 3 minutes before
restarting the unit after operation
stops or changing mode during
operation. After connecting to
power supply and turning on the
appliance immediately, a delay of 20
seconds may occur before it starts to
operate. If all operation has stopped,
press ON/OFF button again to
restart. Timer should be set again if
it has been cancelled.
Features of COOLING mode
Anti-freezing
When the temperature of the indoor
heat exchanger drops to 0° or
below, compressor will stop working
to protect the appliance.
Features of HEATING mode
Preheating
In order to prevent cool air blowing,
2-5 minutes are necessary to
preheat the indoor unit at HEATING
operation start. The indoor fan will
not work during preheating.
Defrosting
In HEATING operation the appliance
will defrost (de-ice) automatically
to raise eciency. This procedure
usually lasts 6-10 minutes. During
defrosting, fan stops running and
running indicator ashes.
After defrosting is completeed,
it returns to HEATING mode
automatically.

- 11 -
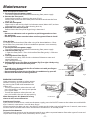
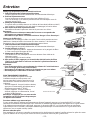
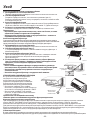
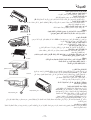
Maintenance
Clean front panel of Indoor Unit
1. Disconnect from the power supply
Turn o the appliance rst before disconnecting from power supply.
2. Remove the front panel
Open the front panel as shown by the arrow (Fig. A).
Pull the slots at the side of the front panel with force to take out the front
panel (Fig. B).
3. Clean the front panel
Wipe it with a soft and dry cloth. Use lukewarm water (below 40°C) to clean
if the appliance is very dirty. After cleaning let it dry.
4. Ret and close the front panel
Ret and close the front panel by pushing it downward.
Note:
• Do not use substances such as gasoline or polishing powder to clean
the appliance.
• Do not sprinkle water onto the indoor unit Dangerous! Electric shock!
Clean Air lter
It is necessary to clean the air lter after using it for about 200 hours. Clean
the air lter every two weeks if the air conditioner operates in an extremely
dusty environment.
1. Disconnect from the power supply
Turn o the appliance rst before disconnecting from power supply.
2. Take out air lter (Fig. C).
1. Open the front panel. 2. Press the handle of the lter gently. 3. Slide out
the lter.
3. Cleaning the air lter (Fig. D)
If the lter is very dirty, clean it with a solution of lukewarm water and
neutral detergent.
After cleaning let it dry.
4. Ret the lter, press the lter reset button (Fig.E) at right side by using
a cylinder pin and close the front panel.
Note:
• To avoid injury, do not touch the ns of indoor unit with your ngers
after removing the lter.
• Do not attempt to clean the inside of the air conditioner by yourself.
• Do not clean the lter in washing machine.
EMERGENCY OPERATION
Under emergency situation or when remote
control is missing, you can control the unit
by pressing the on/o swith located on the
indoor unit.
• Turn on the appliance: when the unit is o,
press this button, it will start up and operate
in 6
th
SENSE mode.
• Turn o the appliance: when the unit is on,
press this button, the unit will stop working.
Note: Do not press this button for a long
time as it will cause malfunction.
Auto-Restart Function
If you want to set auto-restart, switch on the power supply, press the ON/OFF button on the indoor unit and hold for
over 5 seconds, auto-restart is set with buzz sound.
If the auto-restart has been set, press the ON/OFF button on the indoor unit and hold for over 5 seconds, auto-restart
function will be cancelled with a buzz sound and air conditioner is on standby mode.
Disposal of the batteries
To protect natural resources and to promote material reuse, please separate batteries from other types of waste and
recycle them through your local, free battery return system.
Fig. A
Fig. B
Filter Reset button
Fig. E
Fig. C
Fig. D
on/o switch
on/o switch

- 12 -
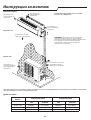
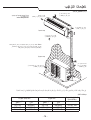
Installation instruction
Installation diagram
Distance from wall
should be over 50mm
Indoor unit
Outdoor unit
Distance from ceiling
should be over 200mm
Distance from the wall
should be over 50mm
Distance from oor
should be over 2500mm
Air intake distance from
the wall should be over
250mm
Air intake distance from
the wall should be over
250mm
Air outlet distance from the
wall should be over 500mm
Over 250mm
NOTE: The gure is only a simple presentation of the
unit, it may not match the external appearance of the
product you purchased. Installation must be performed
in accordance with the national wiring standard by
authurized service people only.
To get detail installation information, please go to:
docs.whirlpool.eu
Distance from the wall
should be over 50mm
When install interconnection cord, make sure that the color of wires and the terminal No. of outdoor unit shall be
same as those in indoor unit.
Cable Specications
Capacity (Btu/h) Power cord Power connecting cord
Type
Normal cross -
sectional area
Type
Normal cross -
sectional area
7K, 9K, 12K H07RN-F 1.0mm
2
X3 H07RN-F 1.0mm
2
X5
18K H07RN-F 1.5mm
2
X3 H07RN-F 1.5mm
2
X5
24 K H07RN-F 2.5mm
2
X3 H07RN-F 2.5mm
2
X5

- 13 -
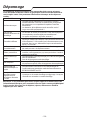
Troubleshooting
Operation problems are often due to minor causes, please check and refer
to the following chart before contacting the service. This may save time and
unnecessary expenses.
Trouble Analysis
Does not run
• Is the protection device or fuse blown?
• Please wait for 3 minutes and start again, protection
device may be preventing unit to work.
• Are the remote control batteries low?
• Is the plug not properly plugged?
No cooling or
heating air
• Is the air lter dirty?
• Are the intakes and outlets of the air conditioner blocked?
• Is the temperature set properly?
• Are doors or windows open?
Ineective control
• Has there been a strong interference (from excessive
static electricity discharge, power supply voltage
abnormality)? Note that operation will be abnormal, in
this case unplug from the power supply and re-plug after
2-3 seconds.
Does not operate
immediately
• 3 minute delay will occur when changing mode during
operation.
Peculiar smell
• This smell may come from another source such as
furniture, cigarette etc, which is sucked in the unit and
blown out with the air.
A sound of running
water
• Normal behaviour caused by the ow of refrigerant in the
air conditioner.
• Defrosting sound in heating mode.
Cracking sound
• The sound may be generated by the expansion or
contraction of the front panel due to temperature
changes.
Mist sprays from
the outlet
• Mist is present in the room with low temperature? Normal
behaviour due to cool air discharged from indoor unit
during COOLING or DRY operation mode.
Running indicator
ashes but indoor
fan stops
• The unit is shifting from heating mode to defrost. The
indicator will light o and return to heating mode.
Note: If the problems still have, turn o the appliance and disconnect from
power supply, then contact the nearest Whirlpool Authorized Service Center. Do
not attempt to move, repair, disassemble, or modify the appliance by yourself.

- 14 -
AFTER SALES SERVICE
Before contacting the Customer Care Centre:
1. Try to solve the problem yourself based on the
descriptions given in the “Troubleshooting”.
2. Turn the appliance o and restart it to see if the fault
persists.
If after carrying out the above checks, the fault
persists, contact the Customer Care Centre.
Please give:
• a short description of the fault;
• the exact model of the air conditioner;
• the service number (this is the number found below
the word Service on service sticker which is located on
the side or on the bottom of the indoor unit).
The service number can also be found in the warranty
booklet;
• your full address;
• your telephone number.
If repair work has to be carried out, contact the
Customer Care Centre (Use of original spare parts and a
proper repair is guarenteed).
You will need to present the original invoice.
Failure to comply with these instructions could
compromise the safety and quality of your product.
Note: if you want the full manual for your appliance, please help to download it from websit throught below
link: docs.whirlpool.eu using QR code

- 15 -
IMPORTANT - À LIRE ET À RESPECTER
• Téléchargez le manuel d'instruction complet sur docs.whirlpool.eu ou appelez au
numéro de téléphone indiqué sur le livret de garantie.
• Avant d’utiliser l’appareil, lire attentivement les consignes de sécurité. Conservez-les à
portée pour consultation ultérieure.
• Le présent manuel et l'appareil en question contiennent des consignes de sécurité
importantes qui doivent être lues et observées en tout temps. Le Fabricant décline toute
responsabilité si les consignes de sécurité ne sont pas respectées, en cas de mauvaise
utilisation de l’appareil, ou d'un mauvais réglage des commandes.
•
Les enfants en bas âge (0-3 ans) doivent être tenus à l'écart de l'appareil. Les jeunes
enfants (3-8 ans) doivent être tenus à l'écart de l'appareil sauf s'ils se trouvent sous
surveillance constante. Les enfants âgés de 8 ans et plus, ainsi que les personnes
présentant des capacités physiques, sensorielles ou mentales réduites, ou ne possédant
ni l'expérience ni les connaissances requises, peuvent utiliser cet appareil seulement
s'ils sont supervisés, ou si une personne responsable leur a expliqué l'utilisation
sécuritaire et les dangers potentiels de l'appareil. Les enfants ne doivent pas jouer avec
l'appareil. Les enfants ne doivent pas nettoyer, ni procéder à l'entretien de l'appareil sans
surveillance.
UTILISATION AUTORISÉE
•
ATTENTION : Cet appareil n’est pas conçu pour être utilisé avec un dispositif de mise
en marche externe comme une minuterie ou un système de contrôle à distance.
•
Cet appareil est destiné à un usage domestique et peut aussi être utilisé dans les
endroits suivants : hôtels et bureaux.
•
Cet appareil n'est pas conçu pour une utilisation professionnelle.
•
Coupez toujours le climatiseur par le biais de la télécommande en premier lieu.
N'utilisez pas le disjoncteur d'alimentation ou ne tirez pas sur la prise pour le couper.
Débranchez le climatiseur de l'alimentation électrique s'il reste inutilisé pendant un long
laps de temps ou pendant un orage avec du tonnerre/de la foudre.
•
N'insérez jamais d'obstacle dans la sortie d'air - risque de lésion. Maintenez les
ouvertures de ventilation dénuées de toute obstruction.
•
Ne placez pas d'autres produits électriques ou éléments domestiques sous l'unité
intérieure ou l'unité extérieure. La condensation qui s'égoutte depuis l'unité pourrait les
mouiller, et provoquer des dommages ou dysfonctionnements de vos biens.
INSTALLATION
•
L'appareil doit être manipulé et installé par au moins deux personnes - vous pourriez
vous blesser. Utilisez des gants de protection pour le déballage et l'installation - vous
pourriez vous couper.
•
L'installation, y compris les branchements électriques, et les réparations doivent être
eectuées par un technicien qualié conformément aux règles de câblage nationales.
Pour toute réparation ou tout remplacement de pièces, procédez uniquement aux
opérations spéciées dans le manuel en utilisant les pièces expressément indiquées.
Gardez les enfants à l'écart du site d'installation. Après avoir déballé l'appareil, assurez-
vous qu'il n'a pas été endommagé pendant le transport. En cas de problème, contactez
votre revendeur ou le Service Après-Vente le plus proche. Une fois installé, gardez
CONSIGNES DE SÉCURITÉ

- 16 -
le matériel d'emballage (sacs en plastique, parties en polystyrène, etc.) hors de la
portée des enfants - ils pourraient s'étouer. L'appareil doit être débranché de toute
alimentation électrique distante avant toute opération d'installation - risque de choc
électrique. Au moment de l'installation, assurez-vous que le câble d'alimentation n'est
pas endommagé par l'appareil - risque d'incendie ou de choc électrique. Branchez
l'appareil uniquement lorsque l'installation est terminée.
•
Lors du déplacement ou du replacement du climatiseur, consultez des techniciens de
maintenance expérimentés pour le débranchement et la réinstallation de l'unité.
•
L'appareil ne doit pas être installé dans la buanderie.
•
L'appareil doit être installé, actionné et stocké dans une salle ayant une supercie au
sol supérieure à 10 m
2
. Montez l'unité intérieure à au moins 2,5 m au-dessus du niveau
du sol ou du palier.
•
L'installation de conduits doit être maintenue dans une pièce dont la supercie au
sol est supérieure à 10 m
2
conformément aux réglementations nationales en matière de
gaz.
AVERTISSEMENTS ÉLECTRIQUES
•
L'alimentation électrique doit être de tension nominale avec un circuit spécial pour
l'appareil. Le diamètre du câble électrique doit être conforme aux conditions requises.
•
Un commutateur multipolaire doit être installé dans le câblage xe conformément
aux règles de câblage et l'appareil doit être mis à la terre conformément aux normes de
sécurité électrique nationales.
•
Un commutateur de déconnexion omnipolaire ayant une séparation de contact d'au
moins 3 mm dans tous les pôles doit être branché en câblage xe conformément aux
règles de câblage nationales, et l'appareil doit être mis à la terre conformément aux
normes de sécurité nationales en matière d'électricité.
•
N'utilisez pas de rallonge, de prises multiples ou d'adaptateurs. Une fois l'installation
terminée, l'utilisateur ne devra plus pouvoir accéder aux composantes électriques.
N'utilisez pas l'appareil si vous êtes mouillé ou si vous êtes pieds nus. N'utilisez pas cet
appareil si le câble d'alimentation ou la prise de courant sont endommagés, si l'appareil
ne fonctionne pas correctement, ou s'il a été endommagé ou échappé.
•
Si le câble d’alimentation est endommagé, remplacez-le avec un câble identique par
le fabricant ou un de ces techniciens autorisée, ou un technicien qualié pour éviter les
dangers d'électrocution.
•
Un dispositif d'intensité résiduelle (RCD) ayant une intensité de fonctionnement
résiduelle ne dépassant pas 30mA doit être incorporé dans le câblage xe selon la loi
nationale.
•
La température du circuit de réfrigérant sera élevée, il convient donc de garder le
câble d'interconnexion éloigné du tube en cuivre.
•
Assurez-vous que la mise à la terre est sûre et qu'un câble de mise à la terre
est branché au système de mise à la terre spécique du bâtiment, installé par des
professionnels. L'appareil doit être équipé d'un commutateur de protection contre
les fuites électriques et d'un commutateur auxiliaire ayant une capacité susante.
L'interrupteur doit également avoir une fonction de déclenchement magnétique et
thermique pour assurer la protection en cas de court-circuit et de surcharge.
CONSIGNES DE SÉCURITÉ

- 17 -
Conguration 9K & 12K 18K 24K
Capacité requise du disjoncteur 16A 20A 25A
•
Pour la connexion du câble électrique et de la connexion de câble entre les unités
intérieures et extérieures, consultez le diagramme de câblage sur l'appareil.
NETTOYAGE ET ENTRETIEN
•
AVERTISSEMENT : Assurez- vous que l'appareil est éteint et débranché du réseau
électrique avant d'eectuer l'entretien - vous pourriez vous électrocuter ; n'utilisez
jamais d'équipement de nettoyage à vapeur - risque de choc électrique.
ÉLIMINATION DES MATÉRIAUX D'EMBALLAGE
Les matériaux d'emballage sont entièrement recyclables comme l'indique le symbole de recyclage ( ). Les
diérentes parties de l'emballage doivent donc être jetées de manière responsable et en totale conformité avec la
réglementation des autorités locales régissant la mise au rebut de déchets.
MISE AU REBUT DES APPAREILS ÉLECTROMÉNAGERS
Cet appareil est fabriqué avec des matériaux recyclables ou pouvant être réutilisés. Mettez-le au rebut en vous
conformant à la réglementation locale en matière d'élimination des déchets. Pour toute information supplémentaire
sur le traitement et le recyclage des appareils électroménagers, contactez le service local compétent, le service de
collecte des déchets ménagers ou le magasin où vous avez acheté l'appareil. Cet appareil est certié conforme à
la Directive européenne 2012/19/UE relative aux déchets d'équipements électriques et électroniques (DEEE). En
s'assurant que ce produit est correctement mis au rebut, vous contribuerez à empêcher toute conséquence nuisible
pour l'environnement et la santé.
Le symbole (
) sur le produit ou sur la documentation qui l'accompagne indique qu'il ne doit pas être traité
comme un déchet domestique, mais doit être remis à un centre de collecte spécialisé pour le recyclage des appareils
électriques et électroniques.
DÉCLARATIONS DE CONFORMITÉ
Ce produit contient des gaz à eet de serre uorés couverts par le Protocole de Kyoto, le gaz réfrigérant étant dans
un système hermétiquement scellé. (R410a, GWP 2088). La quantité de charge maximale de réfrigérant est de 2,5 kg.
Veuillez vous référer à l'étiquette nominative pour des informations détaillées.
CONSIGNES DE SÉCURITÉ

- 18 -
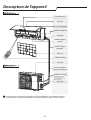
Description de l'appareil
Unité intérieure
Unité extérieure
Panneau avant
Prise d'air
Panneau d'achage
Panneau d'urgence
Sortie d'air
Volet de réglage
vertical
Volet de réglage
horizontal
Filtre à air
Télécommande
Prise d'air
Flexible de vidange
Sortie d'air
Conduits et câble de
branchement électrique
Remarque: Évacuation de
l'eau condensée lors du
fonctionnement à SEC ou du
REFROIDISSEMENT.
Les gures dans ce manuel sont basées sur la vue extérieure d'un modèle standard.
Par conséquent, la forme peut diérer de celle du climatiseur que vous avez choisi.

- 19 -
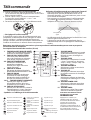
Interface utilisateur
64 127
5
Voyant de température (1)
Il ache la température prévue.
Il indique « FC » pour rappeler de nettoyer le ltre.
Voyant de fonctionnement (2)
Il s'allume pendant le fonctionnement.
Il clignote pendant le dégel de l'unité extérieure.
Voyant 6
th
Sense (3)
Il s'allume quand la fonction 6
th
sense est activée.
Il s'éteint quand la fonction 6
th
sense se termine.
Voyant de surveillance de ltre (4)
Il clignote quand le ltre doit être nettoyé.
Le témoin de surveillance de ltre clignote après 720 heures d'utilisation pour rappeler de nettoyer le ltre.
Après le nettoyage du ltre, appuyez sur la touche de réinitialisation situé sur l'unité intérieure derrière le
panneau avant an d'interrompre le clignotement du voyant de surveillance du ltre.
Voyant d'humidité (5)
Il s'allume lorsqu'il indique le niveau d'humidité.
Il s'éteint lorsqu'il indique la température.
Voyant Minuterie (6)
Il s'allume pendant le temps établi.
Il s'éteint lorsque la minuterie se termine.
Voyant Sleep (7)
Il s'allume une fois le mode « sleep » activé, le voyant « Running » (fonctionnement) clignotera 10 fois puis
l'écran complet s'éteindra.
Pour les climatiseurs sans commande Wi-Fi, nous recommandons le Wpro SmartClim : un dispositif intelligent pour
contrôler par Wi-Fi les principaux réglages de votre appareil à partir de votre smartphone.
Cet accessoire n'est pas inclus à l'intérieur de l'emballage du produit. Merci de contacter notre service après-vente
pour plus de détails et pour tout achat.

- 20 -
Télécommande
Insérez les batteries dans la télécommande
1. Insérez une che et appuyez lentement vers le bas
sur le couvercle des piles et poussez dans le sens de la
èche, comme indiqué.
2. Insérez 2 piles AAA (1,5V) dans le compartiment.
Assurez-vous que la polarité « + » et « - » est
correctement positionnée.
3. Fermez le couvercle des piles sur la télécommande.
•
Préréglage de la télécommande
À chaque fois que les piles de la télécommande sont
remplacées, la télécommande est préréglée en mode
Pompe à chaleur. La télécommande de climatiseur -
pompe à chaleur peut être utilisée pour commander les
modèles de climatiseur à refroidissement uniquement.
Utilisation de la télécommande pour commander l'appareil
• Pour faire fonctionner l'appareil par le biais de la
télécommande, pointez la télécommande vers le
dispositif récepteur sur l'unité intérieure, pour assurer
la sensibilité de réception.
• Pour envoyer un message depuis la télécommande,
le symbole clignotera pendant 1 seconde. Dès
réception du message, l'appareil émettra un bip.
•
Récepteur de
signal
La télécommande fera fonctionner le climatiseur à une
distance pouvant atteindre 7 m.
• À chaque fois que les piles sont remplacées dans la
télécommande, celle-ci est préréglée en mode Pompe à
chaleur.
Remarque: merci de suivre les instructions qui correspondent à la télécommande que vous avez reçue pour le
fonctionnement du Climatiseur.
Description fonctionnelle des touches (P1-04)
1. TOUCHE ON/OFF (MARCHE/ARRÊT)
La pression sur cette touche permet
d'allumer ou d'éteindre l'appareil.
3. TOUCHE FAN (VENTILATEUR)
Il est utilisé pour sélectionner la
vitesse du ventilateur en séquence
auto, élevée, moyenne ou basse.
4-5. TOUCHE TEMPERATURE
Utilisée pour sélectionner la
température ambiante.
Utilisée pour régler l'heure en
mode minuterie.
6. TOUCHE 6
th
SENSE
Elle permet de régler ou d'annuler le
fonctionnement de la fonction 6
th
sense.
7. TOUCHE SWING
Permet d'arrêter ou de démarrer
l'oscillation du volet de réglage
horizontal et règle la direction du
ux d'air vers le haut/vers le bas.
10-11. TOUCHE HUMIDITY (HUMIDITÉ)
Utilisée pour régler le niveau
d'humidité souhaité, elle n'est
disponible qu'en mode 6
th
SENSE.
16. TOUCHE SUPER SILENT
Utilisée pour démarrer ou arrêter le
fonctionnement « super silencieux
» an d'atténuer le bruit ambiant.
2. TOUCHE MODE
Utilisée pour sélectionner le mode
de fonctionnement, en séquence
Refroidissement, chauage ou
ventilation.
8. TOUCHE SLEEP
Utilisée pour sélectionner le mode
« sleep » (sommeil) en séquence
sleep 1, sleep 2, sleep 3 sleep 4 et
extinction « sleep ».
9. TOUCHE AROUND U
Utilisée pour régler ou annuler la
fonction Around U.
12. TOUCHE JET
Utilisée pour démarrer ou arrêter
le refroidissement ou le chauage
rapide.
13. TOUCHE DIM
Utilisée pour allumer ou éteindre
l'éclairage de l'achage sur l'unité
intérieure.
14. TOUCHE POWER SAVE
Utilisée pour démarrer ou arrêter
le fonctionnement en économie
d'énergie.
15. TOUCHE TIMER
Utilisée pour régler l'heure pour
allumer ou éteindre l'appareil.
Symboles sur l'achage de la télécommande
Activation de la télécommande
en appuyant sur la touche
DÉVERROUILLAGE
Voyant de refroidissement Vitesse de ventilateur
automatique
Voyant Sleep 1
Appuyez sur la touche, le
rétroéclairage sera activé et
les touches de fonction seront
activées pour utilisation.
Appuyez à nouveau pour
verrouiller la télécommande. Si
la télécommande ne fonctionne
pas pendant 10s, elle sera
automatiquement verrouillée.
PRESS
Voyant d'humidité plus Vitesse de ventilateur
élevée
Voyant Sleep 2
Indicateur d'humidité moins
Vitesse de ventilateur
moyenne
Voyant Sleep 3
Voyant de ventilateur seul Vitesse de ventilateur
basse
Voyant Sleep 4
Voyant de chauage
Voyant Super silent Achage température
établie
Voyant Around U Voyant 6
th
SENSE
ON
OF F
Achage minuterie
Voyant Jet Voyant Power save Transmission de signal
La page est en cours de chargement...
La page est en cours de chargement...
La page est en cours de chargement...
La page est en cours de chargement...
La page est en cours de chargement...
La page est en cours de chargement...
La page est en cours de chargement...
La page est en cours de chargement...
La page est en cours de chargement...
La page est en cours de chargement...
La page est en cours de chargement...
La page est en cours de chargement...
La page est en cours de chargement...
La page est en cours de chargement...
La page est en cours de chargement...
La page est en cours de chargement...
La page est en cours de chargement...
La page est en cours de chargement...
La page est en cours de chargement...
La page est en cours de chargement...
La page est en cours de chargement...
La page est en cours de chargement...
La page est en cours de chargement...
La page est en cours de chargement...
La page est en cours de chargement...
La page est en cours de chargement...
La page est en cours de chargement...
La page est en cours de chargement...
La page est en cours de chargement...
La page est en cours de chargement...
La page est en cours de chargement...
La page est en cours de chargement...
La page est en cours de chargement...
La page est en cours de chargement...
La page est en cours de chargement...
La page est en cours de chargement...
La page est en cours de chargement...
La page est en cours de chargement...
La page est en cours de chargement...
La page est en cours de chargement...
La page est en cours de chargement...
La page est en cours de chargement...
La page est en cours de chargement...
La page est en cours de chargement...
La page est en cours de chargement...
La page est en cours de chargement...
La page est en cours de chargement...
La page est en cours de chargement...
La page est en cours de chargement...
La page est en cours de chargement...
La page est en cours de chargement...
La page est en cours de chargement...
La page est en cours de chargement...
La page est en cours de chargement...
La page est en cours de chargement...
La page est en cours de chargement...
La page est en cours de chargement...
La page est en cours de chargement...
La page est en cours de chargement...
La page est en cours de chargement...
La page est en cours de chargement...
La page est en cours de chargement...
La page est en cours de chargement...
La page est en cours de chargement...
-
 1
1
-
 2
2
-
 3
3
-
 4
4
-
 5
5
-
 6
6
-
 7
7
-
 8
8
-
 9
9
-
 10
10
-
 11
11
-
 12
12
-
 13
13
-
 14
14
-
 15
15
-
 16
16
-
 17
17
-
 18
18
-
 19
19
-
 20
20
-
 21
21
-
 22
22
-
 23
23
-
 24
24
-
 25
25
-
 26
26
-
 27
27
-
 28
28
-
 29
29
-
 30
30
-
 31
31
-
 32
32
-
 33
33
-
 34
34
-
 35
35
-
 36
36
-
 37
37
-
 38
38
-
 39
39
-
 40
40
-
 41
41
-
 42
42
-
 43
43
-
 44
44
-
 45
45
-
 46
46
-
 47
47
-
 48
48
-
 49
49
-
 50
50
-
 51
51
-
 52
52
-
 53
53
-
 54
54
-
 55
55
-
 56
56
-
 57
57
-
 58
58
-
 59
59
-
 60
60
-
 61
61
-
 62
62
-
 63
63
-
 64
64
-
 65
65
-
 66
66
-
 67
67
-
 68
68
-
 69
69
-
 70
70
-
 71
71
-
 72
72
-
 73
73
-
 74
74
-
 75
75
-
 76
76
-
 77
77
-
 78
78
-
 79
79
-
 80
80
-
 81
81
-
 82
82
-
 83
83
-
 84
84


Documents connexes
-
Whirlpool SPIW418LL/2 Mode d'emploi
-
Whirlpool AMD 323 Mode d'emploi
-
-
Ariston EG600P (T) Mode d'emploi
-
-
Whirlpool AMD 019 Mode d'emploi
-
Whirlpool SPOW 407 Mode d'emploi
-
Whirlpool AMD 054 Mode d'emploi
-
Whirlpool ACB 2000 AA F C O3 Mode d'emploi