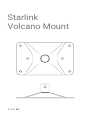
SpaceX Starlink Volcano Mount Guide d'installation
- Taper
- Guide d'installation

Starlink
Volcano Mount

If you are uncomfortable with any part of the installation process,
do not attempt - contact a professional to install your Starlink.
Starlink is not responsible for damage to property caused by the
installation process.
Please be aware that inclement weather (e.g., heavy rain, snow,
or wind) can affect your satellite internet connection, potentially
leading to slower speeds or a rare outage.
The Starlink will detect and melt snow that falls directly on it;
however, accumulating snow around the Starlink may block the
field of view. We recommend installing Starlink in a location that
avoids snow build-up and other obstructions from blocking the
field of view.
If your Starlink App displays a “Motor’s Stuck” alert, your Starlink
may be mounted in a way that it cannot reach its optimal angle
to connect with the satellites. We advise mounting your Starlink
within 40 degrees of vertical. Mounting your Starlink in a
horizontal position (i.e., on the side of your chimney), will not
allow it to operate.
©2020. Space Exploration Technologies Corp.
WARNING! The power supply and router are restricted to
indoor use only.
WARNING! Mounts are not designed for hurricane/tornado
wind loads. Tethering should be used in all cases to prevent
failure in an unexpected wind event.
INSTALLATION CONDITIONS
WARNING! To reduce the risk of injury, electric shock, or
fire, follow basic safety precautions, including:
• Make sure the product’s power is disconnected before
accessing, moving, or installing the Starlink (aka “Dishy
McFlatface”). Starlink contains moving parts when
powered on.
• Plug the power cord into an AC outlet that is easily
accessible at all times. If the power cord has a 3-pin
attachment, plug the cord into a grounded (earthed)
3-pin outlet.
• Only use the AC adapter and power cord provided with
the system or purchased from SpaceX.
• Do not operate this product with a damaged power
cord set. If the power cord is damaged, replace before
using this product.
• During operation, do not allow the AC adapter to
contact skin or a soft surface, such as carpet/rug or
clothing. The product and the AC adapter comply with
the user-accessible surface temperature limits defined
by applicable safety standards.
Do not operate this product if you notice crackling, hissing,
popping sounds, a strong odor, or smoke coming from any
parts of the system. Turn off the system, disconnect from power
source, and contact Starlink technical support for assistance.
WARNING! To avoid injury to persons and damage to property
when drilling, take caution and follow basic safety procedures,
including:
• Wear appropriate eye, hand, and face protection.
• Avoid studs, electrical wiring, and water lines when
drilling. Drilling into any of these can lead to fire, shock,
injury, or death.
• Drill at a slight downward angle from the home interior
to the home exterior and thoroughly apply sealant.
Improper drilling and sealing may lead to water and/or
bug intrusion and/or damage.
For more safety, regulatory, labeling, and disposal information,
refer to the Regulatory Notices in the main internet kit.
The information contained herein is subject to change without
notice. SpaceX shall not be liable for technical or editorial errors
or omissions contained herein.
SAFETY NOTICES
Si vous n’êtes pas à l’aise avec l’une ou l’autre des étapes
d’installation de votre antenne Starlink, demandez l’aide d’un
professionnel. Starlink n'est pas responsable des dommages
à votre propriété causés par l'installation du produit.
Notez que le mauvais temps (par exemple, la pluie ou le vent fort
et les accumulations de neige) peut ralentir la connexion Internet
de votre satellite et parfois causer une panne.
L’antenne Starlink détectera et fera fondre la neige qui tombe
directement sur sa surface, cependant, les accumulations de
neige autour de l’appareil peuvent entraver son champ de vision.
Nous recommandons d’installer Starlink dans un endroit peu
propice aux accumulations de neige et où aucune autre
obstruction ne viendra bloquer son champ visuel.
Si votre application Starlink affiche l’alerte « Moteur bloqué »,
votre antenne Starlink est possiblement installée d’une façon qui
l’empêche d’atteindre l’angle parfait pour se connecter avec les
satellites. Nous recommandons d’installer votre Starlink dans les
40 degrés de la position verticale. Si vous installez votre antenne
Starlink dans une position horizontale (par exemple, sur le côté
de votre cheminée), elle ne fonctionnera pas.
AVERTISSEMENT! L’alimentation et le routeur doivent
uniquement être utilisés à l'intérieur.
AVERTISSEMENT! Ces fixations ne sont pas conçues pour
résister aux vents provoqués par une tornade ou un ouragan.
Le partage de connexion devrait être utilisé dans tous les cas
pour prévenir toute panne en cas de temps venteux inattendus.
CONDITIONS D’INSTALLATION
AVERTISSEMENT! Pour réduire les risques de blessure, de
décharge électrique ou de feu, veuillez prendre les précautions
de batse, notamment :
• Assurez-vous que l’alimentation soit coupée avant de tenter
d’installer ou de déplacer l’antenne Starlink, ou d’accéder à cette
dernière (alias « Dishy McFlatface ». Lorsqu’elle est alimentée,
l’antenne Starlink contient des pièces mobiles.
• Branchez le cordon d'alimentation à une prise secteur facilement
accessible en tout temps. Si le cordon d'alimentation est muni
d'une fiche à trois broches, branchez le cordon d'alimentation dans
une prise de courant mise à la terre (à trois broches).
• Utilisez uniquement l'adaptateur secteur et le cordon d'alimen-
tation fournis avec le système ou qui ont été achetés de SpaceX.
• N’utilisez pas ce produit avec un cordon d'alimentation endom-
magé d'une quelconque manière. Si le cordon d’alimentation est
endommagé, remplacez-le avant d’utiliser le produit.
• Ne laissez pas l’adaptateur secteur entrer en contact avec la peau
ou une surface souple, comme un tapis ou des vêtements, pendant
le fonctionnement. Le produit et l'adaptateur secteur sont
conformes aux limites de température des surfaces accessibles
aux utilisateurs définies par les normes de sécurité applicables.
N’utilisez pas ce produit si vous remarquez tout craquement,
sifflement, claquement ou odeur intense ou si vous voyez de la fumée
émergeant du système. Éteignez le système, débranchez-le de la
source d’alimentation et communiquez avec le soutien technique de
Starlink pour obtenir de l’aide.
AVERTISSEMENT! Pour éviter de causer des blessures ou des
dommages à la propriété lors du perçage, prenez les précautions de
base, notamment :
• Protégez adéquatement vos yeux, vos mains et votre visage.
• En perçant, prenez soin d’éviter les clous, les fils électriques et les
conduites d’eau.. Percer un de ces éléments peut causer un feu, une
décharge électrique, des blessures et même la mort.
• Assurez-vous de bien percer à un angle légèrement descendant de
l’intérieur à l’extérieur de la maison et appliquez méticuleusement le
scellant. Un perçage inapproprié et un scellage inadéquat peuvent
causer des infiltrations d'eau ou d'insectes ou autre dommage.
Pour en savoir plus à propos de la sécurité, de la réglementation, de
l'étiquetage et de la mise au rebut, consultez les Avis réglementaires
dans la trousse Internet principale.
Les informations contenues ici peuvent changer sans préavis. SpaceX
ne pourra être tenue responsable de toute erreur technique ou
éditoriale ou de toute omission trouvées dans les présentes.
AVIS CONCERNANT LA SÉCURITÉ

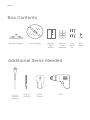
Box Contents
Additional Items Needed
Volcano Mount
Lag
Bolts
6x
Carrying Bag
Wall
Clips
Sealing
Tape
Strips
Sealing
Tape
Squares
1/2 in.
Socket
Wrench
5/32 in.
Drill Bit
Stud
Finder
Drill
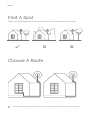
SETUP

Find A Spot
Clear view (100 degrees) of the northern sky over the perimeter of rooftop.
Choose A Route
Avoid placing the Starlink above livable areas. The Starlink should be mounted on an overhang.
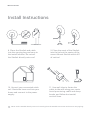
SETUP

Install Instructions
1. Find stud on roof using a
stud finder.
2. Place mount over stud
and mark six circles on roof.
3. Drill pilot holes into the six
marked circles.
4. Create six oversized balls from the
sealing tape squares and press over
each hole, overlapping the edges.
6. Line the six holes on the
mount over the six pre-drilled
holes. Starting with the center
holes, drive lag bolts ~90% in.
7. Use the socket wrench to
tighten lag bolts to be snug
plus 1/4 turn.
5. Set the two sealing tape
strips over the si
x holes where
the volcano mount will sit.
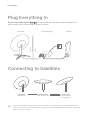
INSTALLATION

Install Instructions
Never set the Starlink directly onto roof. Directly place the Starlink into mount and remove carrying bag.
8. Place the Starlink and cable
into the carrying bag and carry to
the install location. Do not set
the Starlink directly onto roof.
9. Place the mast of the Starlink
into the hole at the center of the
mount. Mount Starlink within 40°
of vertical.
10. Unravel your connected cable
coil. Route the loose end into your
home and connect to the power
supply.
11. Use wall clips to fasten the
cable to the wall along your route.
Avoid puncturing cable and sharp
bends, and follow horizontal/
vertical lines.
INSTALLATION

Auto-Level
Sky Searching
Auto-Tilt
Connected to
the Internet
Plug Everything In
Do not manually tilt the Starlink, it will automatically point itself towards the
sky shortly after connecting to power source.
Starlink Power Supply
Router
Stowed
Initializing
Connecting to Satellites
Ensure your hands and other objects are out of the way of the Starlink. If the Starlink does not
connect to the internet within 30 minutes, power cycle by unplugging and reconnecting the black
cable to the power supply.
Outdoors
Indoors
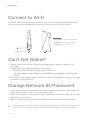
GET ONLINE

Connect to Wi-Fi
Once the LED is glowing solid white or red, use your Wi-Fi enabled device to
connect using the Network ID printed on the back of the Wi-Fi router.
Can’t Get Online?
Change Network ID/Password
1. If you already have a network ID/password set up, press the reset button at
the bottom of your router. If not, skip this step.
2. When connected to the network, open a browser window on any device and
follow the instructions.
3. Wait ~2 minutes and rejoin network with your personalized credentials.
AUX
Pulsing White: Connecting/Updating
Solid White: Connected to Internet
Solid Red: Not Connected
1. Power cycle the Starlink/router by unplugging the power supply for 30
seconds.
2. Check that your mounting location is correct:
• Does the Starlink have a clear view of the sky?
• Are you installing your Starlink at the address you used when placing your
order?
3. If none of these work, contact Starlink Customer Support by logging into your
account on starlink.com.
Prefer a hardline connection over Wi-Fi? Connect by plugging your computer directly into the upper
port of the Wi-Fi router (ethernet cable not included) or into the white port on the power supply.
01448719-007
Reset
Default Network ID
GET ONLINE
-
 1
1
-
 2
2
-
 3
3
-
 4
4
-
 5
5
-
 6
6
-
 7
7
-
 8
8


SpaceX Starlink Volcano Mount Guide d'installation
- Taper
- Guide d'installation
dans d''autres langues
Autres documents
-
STARLINK Flashing Mount Kit Mode d'emploi
-
STARLINK 210716 Manuel utilisateur
-
STARLINK Pipe Adapter Manuel utilisateur
-
Winegard G2 Manuel utilisateur
-
LG 43UH6500 Le manuel du propriétaire
-
LG OLED65W8PUA Le manuel du propriétaire
-
LG MV-187S Mode d'emploi
-
Bosch HMV9303/01 Guide d'installation
-
LG 32LH600B-SB Le manuel du propriétaire
-
Harris XL-185M Guide d'installation