
HG654421 EN User manual 2
FR Notice d'utilisation 16
DE Benutzerinformation 31
IT Istruzioni per l’uso 46
ES Manual de instrucciones 61

CONTENTS
1. SAFETY INFORMATION . . . . . . . . . . . . . . . . . . . . . . . . . . . . . . . . . . . . . . . . . . . . . . . . . . . . . . 3
2. SAFETY INSTRUCTIONS . . . . . . . . . . . . . . . . . . . . . . . . . . . . . . . . . . . . . . . . . . . . . . . . . . . . . . 4
3. PRODUCT DESCRIPTION . . . . . . . . . . . . . . . . . . . . . . . . . . . . . . . . . . . . . . . . . . . . . . . . . . . . . 7
4. DAILY USE . . . . . . . . . . . . . . . . . . . . . . . . . . . . . . . . . . . . . . . . . . . . . . . . . . . . . . . . . . . . . . . . . 7
5. HELPFUL HINTS AND TIPS . . . . . . . . . . . . . . . . . . . . . . . . . . . . . . . . . . . . . . . . . . . . . . . . . . . . 8
6. CARE AND CLEANING . . . . . . . . . . . . . . . . . . . . . . . . . . . . . . . . . . . . . . . . . . . . . . . . . . . . . . . 9
7. TROUBLESHOOTING . . . . . . . . . . . . . . . . . . . . . . . . . . . . . . . . . . . . . . . . . . . . . . . . . . . . . . . 10
8. INSTALLATION . . . . . . . . . . . . . . . . . . . . . . . . . . . . . . . . . . . . . . . . . . . . . . . . . . . . . . . . . . . . 11
9. TECHNICAL INFORMATION . . . . . . . . . . . . . . . . . . . . . . . . . . . . . . . . . . . . . . . . . . . . . . . . . 14
FOR PERFECT RESULTS
Thank you for choosing this AEG product. We have created it to give you impeccable
performance for many years, with innovative technologies that help make life simpler –
features you might not find on ordinary appliances. Please spend a few minutes reading to get
the very best from it.
Visit our website for:
Get usage advice, brochures, trouble shooter, service information:
www.aeg.com
Register your product for better service:
www.aeg.com/productregistration
Buy Accessories, Consumables and Original spare parts for your appliance:
www.aeg.com/shop
CUSTOMER CARE AND SERVICE
We recommend the use of original spare parts.
When contacting Service, ensure that you have the following data available.
The information can be found on the rating plate. Model, PNC, Serial Number.
Warning / Caution-Safety information
General information and tips
Environmental information
Subject to change without notice.
2
www.aeg.com

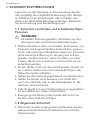
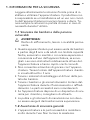
1. SAFETY INFORMATION
Before the installation and use of the appliance, careful-
ly read the supplied instructions. The manufacturer is
not responsible if an incorrect installation and use cau-
ses injuries and damages. Always keep the instructions
with the appliance for future reference.
1.1 Children and vulnerable people safety
WARNING!
Risk of suffocation, injury or permanent disability.
• This appliance can be used by children aged from 8
years and above and persons with reduced physical,
sensory or mental capabilities or lack of experience
and knowledge if they are supervised by an adult or a
person who is responsible for their safety.
• Do not let children play with the appliance. Children
under 3 years must not be left unsupervised in the vi-
cinity of the appliance.
• Keep all packaging away from children.
• Keep children and pets away from the appliance
when it operates or when it cools down. Accessible
parts are hot.
• If the appliance has a child safety device, we recom-
mend that you activate it.
• Cleaning and user maintenance shall not be made by
children without supervision.
1.2 General Safety
• The appliance and its accessible parts become hot
during use. Do not touch the heating elements.
• Do not operate the appliance by means of an exter-
nal timer or separate remote-control system.
• Unattended cooking on a hob with fat or oil can be
dangerous and may result in fire.
ENGLISH 3

• Never try to extinguish a fire with water, but switch off
the appliance and then cover flame e.g. with a lid or a
fire blanket.
• Do not store items on the cooking surfaces.
• Do not use a steam cleaner to clean the appliance.
• Metallic objects such as knives, forks, spoons and lids
should not be placed on the hob surface since they
can get hot.
• If the supply cord is damaged, it must be replaced by
the manufacturer, an authorized Service or similarly
qualified persons in order to avoid a hazard.
• Where the appliance is directly connected to the
power supply, an all-pole isolating switch with a con-
tact gap is required. Complete disconnection in com-
pliance with the conditions specified in overvoltage
category III must be guaranteed. The earth cable is
excluded from this.
• When you route the mains cable, make sure that the
cable doesn't come into direct contact (for example
using insulating sleeving) with parts that can reach
temperatures of more than 50°C above room temper-
ature.
2.
SAFETY INSTRUCTIONS
This appliance is suitable for the
following markets: FR
IT
2.1 Installation
WARNING!
Only a qualified person must in-
stall this appliance.
• Remove all the packaging.
• Do not install or use a damaged appli-
ance.
• Obey the installation instruction sup-
plied with the appliance.
• Keep the minimum distance from the
other appliances and units.
• Always be careful when you move the
appliance because it is heavy. Always
wear safety gloves.
• Seal the cut surfaces with a sealant to
prevent moisture to cause swelling.
• Protect the bottom of the appliance
from steam and moisture.
• Do not install the appliance adjacent
to a door or under a window. This pre-
vents hot cookware to fall from the ap-
pliance when the door or the window
is opened.
4
www.aeg.com

• If the appliance is installed above
drawers make sure that the space, be-
tween the bottom of the appliance
and the upper drawer, is sufficient for
air circulation.
• The bottom of the appliance can get
hot. We recommend to install a non-
combustile separation panel under the
appliance to prevent access to the
bottom.
Electrical connection
WARNING!
Risk of fire and electrical shock.
• All electrical connections must be
made by a qualified electrician.
• The appliance must be earthed.
• Before carrying out any operation
make sure that the appliance is dis-
connected from the power supply.
• Use the correct electricity mains cable.
• Do not let the electricity mains cable
tangle.
• Make sure the mains cable or plug (if
applicable) does not touch the hot ap-
pliance or hot cookware, when you
connect the appliance to the near
sockets
• Make sure the appliance is installed
correctly. Loose and incorrect electrici-
ty mains cable or plug (if applicable)
can make the terminal become too
hot.
• Make sure that a shock protection is
installed.
• Use the strain relief clamp on cable.
• Make sure not to cause damage to the
mains plug (if applicable) or to the
mains cable. Contact the Service or an
electrician to change a damaged
mains cable.
• The electrical installation must have an
isolation device which lets you discon-
nect the appliance from the mains at
all poles. The isolation device must
have a contact opening width of mini-
mum 3 mm.
• Use only correct isolation devices: line
protecting cut-outs, fuses (screw type
fuses removed from the holder), earth
leakage trips and contactors.
Gas connection
• All gas connections should be made
by a qualified person.
• Before installation, make sure that the
local distribution conditions (nature of
the gas and gas pressure) and the ad-
justment of the appliance are compat-
ible.
• Make sure that there is air circulation
around the appliance.
• The information about the gas supply
is on the rating plate.
• This appliance is not connected to a
device, which evacuates the products
of combustion. Make sure to connect
the appliance according to current in-
stallation regulations. Pay attention to
requirements regarding adequate
ventilation.
2.2 Use
WARNING!
Risk of injury, burns or electric
shock.
• Remove all the packaging, labelling
and protective film (if applicable) be-
fore first use.
• Use this appliance in a household en-
vironment
• Do not change the specification of this
appliance.
• Do not let the appliance stay unatten-
ded during operation.
• Do not operate the appliance with wet
hands or when it has contact with wa-
ter.
• Do not put cutlery or saucepan lids on
the cooking zones. They can become
hot.
• Set the cooking zone to “off” after
use.
• Do not use the appliance as a work or
as a storage surface.
• When you place food into hot oil, it
may splash.
WARNING!
Risk of fire or explosion.
• Fats and oil when heated can release
flammable vapours. Keep flames or
ENGLISH 5

heated objects away from fats and oils
when you cook with them.
• The vapours that very hot oil releases
can cause spontaneous combustion.
• Used oil, that can contain food rem-
nants, can cause fire at a lower tem-
perature than oil used for the first
time.
• Do not put flammable products or
items that are wet with flammable
products in, near or on the appliance.
WARNING!
Risk of damage to the appliance.
• Do not keep hot cookware on the con-
trol panel.
• Do not let cookware to boil dry.
• Be careful not to let objects or cook-
ware fall on the appliance. The surface
can be damaged.
• Do not activate the cooking zones
with empty cookware or without cook-
ware.
• Do not put aluminium foil on the ap-
pliance.
• Do not let acid liquids, for example
vinegar, lemon juice or limescale re-
mover, touch the hob. This can cause
matt patches.
• This appliance is for cooking purposes
only. Do not use the appliance for oth-
er purposes, as for example room
heating.
• The use of a gas cooking appliance re-
sults in the production of heat and
moisture. Provide good ventilation in
the room where the appliance is instal-
led.
• Make sure that the ventilation open-
ings are not blocked.
• Prolonged intensive use of the appli-
ance may call for additional ventila-
tion, for example opening of a win-
dow, or more effective ventilation, for
example increasing the level of me-
chanical ventilation where present.
• Use only stable cookware with the cor-
rect shape and diameter larger than
the dimensions of the burners. There
is a risk of overheating and rupture of
the glass plate (if applicable).
• Make sure the flame does not go out
when you quickly turn the knob from
the maximum to the minimum posi-
tion.
• Make sure pots are centrally posi-
tioned on the rings and do not stick
out over edges of the cooking surface.
• Use only the accessories supplied with
the appliance.
• Do not install a flame diffuser on the
burner.
2.3 Care and Cleaning
WARNING!
Risk of damage to the appliance.
• Clean regularly the appliance to pre-
vent the deterioration of the surface
material.
• Do not use water spray and steam to
clean the appliance.
• Do not clean the burners in the dish-
washer.
• Clean the appliance with a moist soft
cloth. Only use neutral detergents. Do
not use abrasive products, abrasive
cleaning pads, solvents or metal ob-
jects.
2.4 Disposal
WARNING!
Risk of injury or suffocation.
• Contact your municipal authority for
information on how to discard the ap-
pliance correctly.
• Disconnect the appliance from the
mains supply.
• Cut off the mains cable and discard it.
• Flat the external gas pipes.
6
www.aeg.com

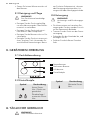
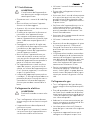
3. PRODUCT DESCRIPTION
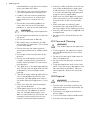
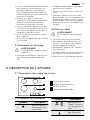
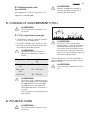
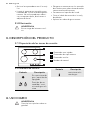
3.1 Cooking surface layout
3
4
2
1
1
Semi-rapid burner
2
Triple Crown burner
3
Auxiliary burner
4
Control knobs
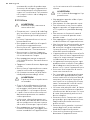
3.2 Control knobs
Symbol Description
no gas supply /
off position
ignition posi-
tion / maximum
gas supply
Symbol Description
minimum gas
supply
4. DAILY USE
WARNING!
Refer to the Safety chapters.
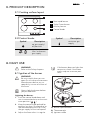
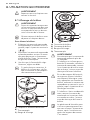
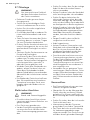
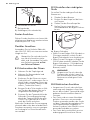
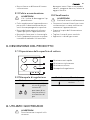
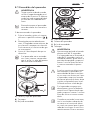
4.1 Ignition of the burner
WARNING!
Be very careful when you use
open fire in kitchen environment.
Manufacturer decline any re-
sponsibility in case of misuse of
the flame
Always light the burner before
you put cookware.
Lightning the burner:
1.
Push the control knob down and
turn it counterclockwise to the maxi-
mum position (
).
2.
Keep the control knob pushed for
equal or less than 10 seconds to let
the thermocouple warm up. If not,
the gas supply will be interrupted.
3.
Adjust the flame after it is regular.
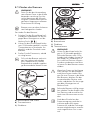
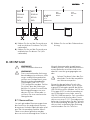
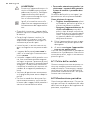
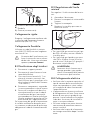
If the burner does not light after
some tries, check if the crown
and its cap are in correct posi-
tions.
A
B
C
A)
Burner cap and crown
B)
Thermocouple
C)
Ignition candle
ENGLISH 7

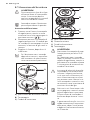
C
D
B
A
A)
Burner cap
B)
Burner crown
C)
Ignition candle
D)
Thermocouple
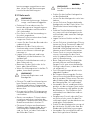
WARNING!
Do not keep the control knob
pushed for more than 15 sec-
onds.
If the burner does not light after
15 seconds, release the control
knob, turn it into off position and
try to light the burner again after
minimum 1 minute.
In the absence of electricity you
can ignite the burner without
electrical device; in this case ap-
proach the burner with a flame,
push the relevant knob down
and turn it counter-clockwise to
maximum gas release position.
If the burner accidentally goes
out, turn the control knob to the
off position and try to light the
burner again after minimum 1 mi-
nute.
The spark generator can start au-
tomatically when you switch on
the mains, after installation or a
power cut. It is normal.
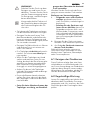
4.2 Turning the burner off
To put the flame out, turn the knob to
the symbol
.
WARNING!
Always turn the flame down or
switch it off before you remove
the pans from the burner.
5. HELPFUL HINTS AND TIPS
WARNING!
Refer to the Safety chapters.
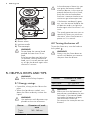
5.1 Energy savings
• If possible, always put the lids on the
pans.
• When the liquid starts to boil, turn
down the flame to barely simmer the
liquid.
WARNING!
Use cookware with diameters ap-
plicable to the size of burners.
Burner Diameters of cook-
ware
Triple
Crown
180 - 260 mm
Burner Diameters of cook-
ware
Semi-rapid 120 - 220 mm
Auxiliary 80 - 180 mm
WARNING!
Make sure that the bottoms of
pots do not stand above the con-
trol knobs. If the control knobs
are under the bottoms of pots,
the flame heats them up.
Do not put the same pan on two
burners.
8
www.aeg.com

WARNING!
Make sure that pot handles is not
above the front edge of the
cooktop. Make sure that pots are
centrally put on the rings in order
to get maximum stability and to
get lower gas consumption.
Do not put unstable or damaged pots
on the rings to prevent from spill and in-
jury.
WARNING!
Do not use a flame diffuser.
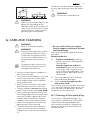
6. CARE AND CLEANING
WARNING!
Refer to the Safety chapters.
WARNING!
Deactivate the appliance and let
it cool down before you clean it.
Disconnect the appliance from
the electrical supply before you
do cleaning or maintenance
work.
Scratches or dark stains on the
surface have no effect on how
the appliance operates.
• You can remove the pan supports to
easily clean the hob.
• To clean the enamelled parts, cap and
crown, wash them with warm soapy
water and dry them carefully before
you put them back.
• Wash stainless steel parts with water,
and then dry them with a soft cloth.
•The pan supports are not dishwasher
proof. They must be washed by hand.
• The enamel coating occasionally can
have rough edges, so be careful when
you wash the pan supports by hand
and dry them. If necessary, remove
stubborn stains with a paste cleaner.
• Make sure you position the pan sup-
ports correctly after cleaning.
• To make the burners work correctly,
make sure that the arms of the pan
supports are in the centre of the burn-
er.
• Be very careful when you replace
the pan supports to prevent the hob
top from damage.
After cleaning, dry the appliance with a
soft cloth.
Removing the dirt:
1.
– Remove immediately: melting
plastic, plastic foil, and food con-
taining sugar.
– Stop the appliance and let it
cool down before you clean: lime-
scale rings, water rings, fat stains,
shiny metallic discolorations. Use a
special cleaner applicable for sur-
face of hob.
2.
Clean the appliance with a damp
cloth and some detergent.
3.
At the end rub the appliance dry
with a clean cloth.
The stainless steel can become tarnished
if it is too much heated. Refer to this you
must not cook with potstones, earthen-
ware pans or cast iron plates.
6.1 Cleaning of the spark plug
This feature is obtained through a ce-
ramic ignition candle with a metal elec-
trode. Keep these components well
clean to prevent difficult lighting and
check that the burner crown holes are
not obstructed.
ENGLISH 9

6.2 Periodic maintenance
Periodically speak your local Service
Force Centre to check the conditions of
the gas supply pipe and the pressure ad-
juster, if fitted.
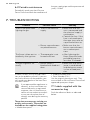
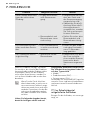
7. TROUBLESHOOTING
Problem Possible cause Remedy
There is no spark when
lighting the gas
• There is no electrical
supply
• Make sure that the
unit is connected and
the electrical supply is
switched on.
• Control the fuse. If the
fuse is released more
than one time, refer to
a qualified electrician.
•Burner cap and crown
are placed uneven
• Make sure that the
burner cap and crown
are in correct posi-
tions.
The flame is blow out im-
mediately after ignition
• Thermocouple is not
heated sufficient
• After lightning the
flame, keep the knob
pushed for equal or
less than 10 seconds.
The gas ring burns un-
evenly
• Burner crown is
blocked with food resi-
dues
• Make sure that the in-
jector is not blocked
and the burner crown
is clear of food parti-
cles.
If there is a fault, first try to find a solu-
tion to the problem yourself. If you can-
not find a solution to the problem your-
self, speak your dealer or the local Serv-
ice Force Centre.
If you operated the appliance in-
correctly, or the installation was
not carried out by a registered
engineer, the visit from the cus-
tomer service technician or deal-
er may not take place free of
charge, even during the warranty
period.
These data are necessary to help you
quickly and correctly. These data are
available on the supplied rating plate.
• Model description .................
• Product number (PNC) .................
• Serial Number (S.N.) .................
Use the original spare parts only. They
are available at Service Force Centre and
approved spare parts shops.
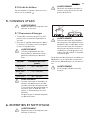
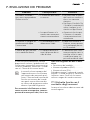
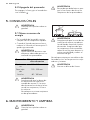
7.1 Labels supplied with the
accessories bag
Stick the adhesive labels as indicated
below:
10
www.aeg.com

MOD.
PROD.NO.
SER.NO
DATA
MOD.
PROD.NO.
SER.NO
DATA
MODELMODEL
MOD.
PROD.NO.
SER.NO.
03 IT
MADE IN ITALY
TYPE
230V-50Hz
IP20
0049
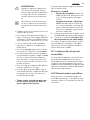
A B C
A)
Stick it on Guarantee Card and send
this part (if applicable)
B)
Stick it on Guarantee Card and keep
this part (if applicable)
C)
Stick it on instruction booklet
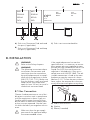
8. INSTALLATION
WARNING!
Refer to the Safety chapters.
WARNING!
The following instructions about
installation, maintenance and
ventilation must be carried out
by qualified personnel in compli-
ance with the regulation in force
(UNI-CIG 7129 - 7131). Make sure
that the kitchen is well ventilated:
keep natural ventilation holes
open (at least 100 cm²) or install a
mechanical extractor hood.
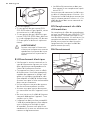
8.1 Gas Connection
Choose fixed connections or use a flexi-
ble pipe in stainless steel in compliance
with the regulation in force. If you use
flexible metallic pipes, be careful they
do not come in touch with mobile parts
or they are not squeezed. Also be care-
ful when the hob is put together with an
oven.
Make sure that the gas supply
pressure of the appliance obeys
the recommended values.
If the supplied pressure has not the
specified value, it is necessary to assem-
ble a proper pressure regulator in com-
pliance with the standard UNI EN 88. For
Liquid Gas (LPG) the use of pressure
regulator is allowed only if they are in
compliance with UNI EN 12864. The ad-
justable connection is fixed to the com-
prehensive ramp by means of a threa-
ded nut G 1/2". Screw the parts without
force, adjust the connection in the nec-
essary direction and tighten everything.
ABC
A)
End of shaft with nut
B)
Washer
C)
Elbow (if needed)
ENGLISH 11

Rigid connection:
Carry out connection by using metal rig-
id pipes (copper with mechanical end)
(UNI-CIG 7129).
Flexible connection:
Use a flexible pipe in stainless steel
(UNI-CIG 9891) with a maximum length 2
m.
When installation is complete,
make sure that the seal of each
pipe fitting is correct. Use a
soapy solution, not a flame!
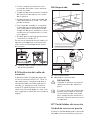
8.2 Injectors replacement
1.
Remove the pan supports.
2.
Remove the caps and crowns of the
burner.
3.
With a socket spanner 7 remove the
injectors and replace them with the
ones which are necessary for the
type of gas you use (see table in
"Technical Information" chapter).
4.
Assemble the parts, follow the same
procedure backwards.
5.
Replace the rating plate (it is near
the gas supply pipe) with the one for
the new type of gas supply. You can
find this plate in the package sup-
plied with the appliance.
If the supply gas pressure is changeable
or different from the necessary pressure,
you must fit an applicable pressure ad-
juster on the gas supply pipe.
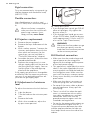
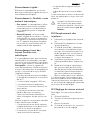
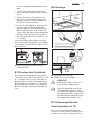
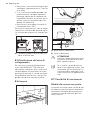
8.3 Adjustment of minimum
level
To adjust the minimum level of the burn-
ers:
1.
Light the burner.
2.
Turn the knob on the minimum posi-
tion.
3.
Remove the knob.
4.
With a thin screwdriver, adjust the
by-pass screw position.
A
A)
The by-pass screw
• If you change from natural gas G20 20
mbar to liquid gas, fully tighten the
by-pass screw in.
• If you change from liquid gas to natu-
ral gas G20 20 mbar, undo the by-pass
screw approximately 1/4 of a turn (1/2
of a turn for Triple Crown burner).
WARNING!
Make sure the flame does not go
out when you quickly turn the
knob from the maximum position
to the minimum position.
8.4 Electrical connection
• Make sure that the rated voltage and
type of power on the rating plate
agree with the voltage and the power
of the local power supply.
• This appliance is supplied with a mains
cable. It has to be supplied with a cor-
rect plug which can hold the load that
the rating plate rates. Make sure that
you install the plug in a correct socket.
• Always use a correctly installed shock-
proof socket.
• Make sure that there is an access to
the mains plug after the installation.
• Do not pull the mains cable to discon-
nect the appliance. Always pull the
mains plug.
• There is a risk of fire when the appli-
ance is in connection with an exten-
sion cable, an adapter or a multiple
connection. Make sure that the
ground connection agrees with the
standards and regulations.
• Do not let the power cable to heat up
to a temperature higher than 90° C.
To prevent contact between the cable
and the appliance below the hob use
the clamps which are on the side of the
cabinet.
12
www.aeg.com

A
A)
Rigid copper pipe or flexible pipe of
stainless steel
8.5 Replacement of the
connection cable
To replace the connection cable use on-
ly H05V2V2-F T90 or equivalent type.
Make sure that the cable section is appli-
cable to the voltage and the working
temperature. The yellow/green earth
wire must be approximately 2 cm longer
than the brown (or black) phase wire.
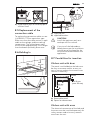
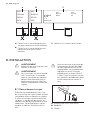
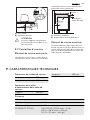
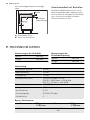
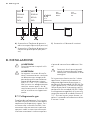
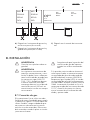
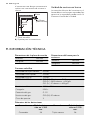
8.6 Building In
min.
55 mm
min.
650 mm
560 mm
480 mm
min.
200 mm
30 mm
B
A
A)
supplied seal
B)
supplied brackets
CAUTION!
Install the appliance only on a
worktop with flat surface.
If you install the hob under a
hood, please see the installation
instructions of the hood for the
minimum distance between the
appliances.
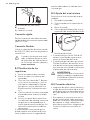
8.7 Possibilities for insertion
Kitchen unit with door
The panel installed below the hob must
be easy to remove and let an easy ac-
cess in case a technical assistance inter-
vention is necessary.
min 20 mm
(max 150 mm)
30 mm
60 mm
B
A
A)
Removable panel
B)
Space for connections
Kitchen unit with oven
The electrical connection of the hob and
the oven must be installed separately for
safety reasons and to let easy remove
oven from the unit.
ENGLISH 13

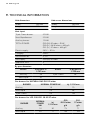
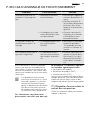
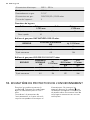
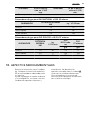
9. TECHNICAL INFORMATION
Hob dimensions
Width: 595 mm
Length: 525 mm
Hob recess dimensions
Width: 560 mm
Length: 480 mm
Heat input
Triple Crown burner: 4.0 kW
Semi-Rapid burner: 2.0 kW
Auxiliary burner: 1.0 kW
TOTAL POWER: G20 (2H) 20 mbar = 9 kW
G30 (3+) 28–30 mbar = 654 g/h
G31 (3+) 37 mbar = 643 g/h
Electric supply: 230 V ~ 50 Hz
Category: II2H3+
Gas connection: G 1/2
Gas supply: G20 (2H) 20 mbar
Appliance class: 3
By-pass diameters
Burner Ø By-pass in
1/100 mm
Burner Ø By-pass in
1/100 mm
Auxiliary 28 Triple Crown 56
Semi-rapid 32
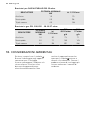
Gas burners for NATURAL GAS G20 20 mbar
BURNER NORMAL POWER kW inj. 1/100 mm
Auxiliary 1.0 70
Semi-rapid 2.0 96
Triple Crown 4.0 146
Gas burners for LPG G30/G31 28-30/37 mbar
BURNER
NORMAL
POWER
kW
inj.
1/100 mm
G30
28-30 mbar
G31
37 mbar
g/h g/h
Auxiliary 1.0 50 73 71
Semi-rapid 2.0 71 145 143
14
www.aeg.com

BURNER
NORMAL
POWER
kW
inj.
1/100 mm
G30
28-30 mbar
G31
37 mbar
g/h g/h
Triple Crown 4.0 98 291 286
10. ENVIRONMENT CONCERNS
Recycle the materials with the
symbol
. Put the packaging in
applicable containers to recycle it.
Help protect the environment and
human health and to recycle waste
of electrical and electronic
appliances. Do not dispose
appliances marked with the symbol
with the household waste. Return the
product to your local recycling
facility or contact your municipal
office.
ENGLISH 15

SOMMAIRE
1. CONSIGNES DE SÉCURITÉ . . . . . . . . . . . . . . . . . . . . . . . . . . . . . . . . . . . . . . . . . . . . . . . . . . 17
2. INSTRUCTIONS DE SÉCURITÉ . . . . . . . . . . . . . . . . . . . . . . . . . . . . . . . . . . . . . . . . . . . . . . . . 19
3. DESCRIPTION DE L'APPAREIL . . . . . . . . . . . . . . . . . . . . . . . . . . . . . . . . . . . . . . . . . . . . . . . . 21
4. UTILISATION QUOTIDIENNE . . . . . . . . . . . . . . . . . . . . . . . . . . . . . . . . . . . . . . . . . . . . . . . . 22
5. CONSEILS UTILES . . . . . . . . . . . . . . . . . . . . . . . . . . . . . . . . . . . . . . . . . . . . . . . . . . . . . . . . . . 23
6. ENTRETIEN ET NETTOYAGE . . . . . . . . . . . . . . . . . . . . . . . . . . . . . . . . . . . . . . . . . . . . . . . . . 23
7. EN CAS D'ANOMALIE DE FONCTIONNEMENT . . . . . . . . . . . . . . . . . . . . . . . . . . . . . . . . . 25
8. INSTALLATION . . . . . . . . . . . . . . . . . . . . . . . . . . . . . . . . . . . . . . . . . . . . . . . . . . . . . . . . . . . . 26
9. CARACTERISTIQUES TECHNIQUES . . . . . . . . . . . . . . . . . . . . . . . . . . . . . . . . . . . . . . . . . . . 29
POUR DES RÉSULTATS PARFAITS
Merci d'avoir choisi ce produit AEG. Nous l'avons conçu pour qu'il vous offre des
performances irréprochables pour longtemps, en intégrant des technologies innovantes qui
vous simplifient la vie grâce à des caractéristiques que vous ne trouverez pas forcément sur
des appareils ordinaires. Veuillez prendre quelques instants pour lire cette notice afin d'utiliser
au mieux votre appareil.
Visitez notre site Internet pour :
Obtenir des conseils d'utilisation, des brochures, de l'aide, des informations :
www.aeg.com
Enregistrer votre produit pour obtenir un meilleur service :
www.aeg.com/productregistration
Acheter des accessoires, consommables et pièces de rechange d'origine pour votre
appareil :
www.aeg.com/shop
SERVICE APRÈS-VENTE
N'utilisez que des pièces de rechange d'origine.
Avant de contacter le service, assurez-vous de disposer des informations suivantes :
Vous trouverez ces informations sur la plaque signalétique. Modèle, PNC, numéro de série.
Avertissement/Attention : consignes de sécurité.
Informations générales et conseils
Informations écologiques
Sous réserve de modifications.
16
www.aeg.com

1. CONSIGNES DE SÉCURITÉ
Avant d'installer et d'utiliser cet appareil, lisez soigneu-
sement les instructions fournies. Le fabricant ne peut
être tenu pour responsable des dommages et blessures
liés à une mauvaise installation ou utilisation. Conservez
toujours cette notice avec votre appareil pour vous y ré-
férer ultérieurement.
1.1 Sécurité des enfants et des personnes
vulnérables
AVERTISSEMENT
Risque d'asphyxie, de blessure ou d'invalidité per-
manente.
• Cet appareil peut être utilisé par des enfants de plus
de 8 ans, ainsi que des personnes dont les capacités
physiques, sensorielles et mentales sont réduites ou
dont les connaissances et l'expérience sont insuffi-
santes, à condition d'être surveillés par une personne
responsable de leur sécurité.
• Ne laissez pas les enfants jouer avec l'appareil. Les
enfants de moins de 3 ans ne doivent pas être laissés
sans surveillance à proximité de l'appareil.
• Ne laissez pas les emballages à la portée des enfants.
• Tenez les enfants et les animaux éloignés de l'appa-
reil lorsqu'il est en cours de fonctionnement ou lors-
qu'il refroidit. Les parties accessibles sont chaudes.
• Si l'appareil est équipé d'un dispositif de sécurité en-
fants, nous vous recommandons de l'activer.
• Les enfants ne doivent pas nettoyer ni entreprendre
une opération de maintenance sur l'appareil sans sur-
veillance.
FRANÇAIS 17

1.2 Sécurité générale
• L'appareil et ses parties accessibles deviennent
chauds pendant son fonctionnement. Ne touchez pas
les éléments chauffants.
• Ne faites pas fonctionner l'appareil avec un minuteur
externe ou un système de commande à distance.
• Il peut être dangereux de laisser chauffer de la grais-
se ou de l'huile sans surveillance sur une table de
cuisson car cela pourrait provoquer un incendie.
• N'essayez jamais d'éteindre un feu avec de l'eau.
Mettez à l'arrêt l'appareil puis couvrez les flammes,
par exemple avec un couvercle ou une couverture
ignifuge.
• N'entreposez rien sur les surfaces de cuisson.
• N’utilisez pas de nettoyeur vapeur pour nettoyer l'ap-
pareil.
• Ne posez pas d'objets métalliques tels que couteaux,
fourchettes, cuillères ou couvercles sur la table de
cuisson car ils pourraient chauffer.
• Si le câble d'alimentation est endommagé, il ne doit
être remplacé que par un professionnel qualifié afin
d'éviter tout danger.
• Si l'appareil est relié directement à l'alimentation
électrique, installez un sectionneur avec une ouvertu-
re de contact. Il est indispensable de garantir une dé-
connexion complète conformément aux conditions
de surtension de catégorie III. Le fil de terre n'est pas
concerné.
• Lorsque vous acheminez le câble d'alimentation, as-
surez-vous qu'il n'entre pas en contact direct (par
exemple, à l'aide d'un manchon isolant) avec des par-
ties pouvant atteindre des températures supérieures
de 50 °C à la température ambiante.
18
www.aeg.com

2.
INSTRUCTIONS DE SÉCURITÉ
Cet appareil est adapté aux marchés
suivants : FR
IT
2.1 Installation
AVERTISSEMENT
L'appareil doit être installé uni-
quement par un professionnel
qualifié.
• Retirez l'intégralité de l'emballage.
• N'installez pas et ne branchez pas un
appareil endommagé.
• Suivez scrupuleusement les instruc-
tions d'installation fournies avec l'ap-
pareil.
• Respectez la distance minimale requi-
se avec les autres appareils et élé-
ments.
• Soyez toujours vigilants lorsque vous
déplacez l'appareil car il est lourd.
Portez toujours des gants de sécurité.
• Isolez les surfaces découpées à l'aide
d'un matériau d'étanchéité pour éviter
que la moisissure ne provoque de
gonflements.
• Protégez la partie inférieure de l'appa-
reil de la vapeur et de l'humidité.
• N'installez pas l'appareil près d'une
porte ou sous une fenêtre. Les réci-
pients chauds risqueraient de tomber
de l'appareil lors de l'ouverture de cel-
les-ci.
• Si l'appareil est installé au-dessus de
tiroirs, assurez-vous qu'il y a suffisam-
ment d'espace entre le fond de l'ap-
pareil et le tiroir supérieur pour que
l'air puisse circuler.
• Le dessous de l'appareil peut devenir
très chaud. Nous vous recommandons
d'installer un panneau de séparation
ignifuge sous l'appareil pour en blo-
quer l'accès.
Branchement électrique
AVERTISSEMENT
Risque d'incendie ou d'électro-
cution.
• L'ensemble des branchements électri-
ques doit être effectué par un techni-
cien qualifié.
• L'appareil doit être relié à la terre.
• Avant toute intervention, assurez-vous
que l'appareil est débranché.
• Utilisez le câble d'alimentation électri-
que approprié.
• Ne laissez pas le câble d'alimentation
s'emmêler.
• Assurez-vous que le câble d'alimenta-
tion ou la fiche (si présente) n'entrent
pas en contact avec les surfaces brû-
lantes de l'appareil ou les récipients
brûlants lorsque vous branchez l'appa-
reil à des prises électriques situées à
proximité.
• Assurez-vous que l'appareil est bien
installé. Un câble d'alimentation lâche
et inapproprié ou une fiche (si présen-
te) non serrée peuvent être à l'origine
d'une surchauffe des bornes.
• Assurez-vous qu'une protection anti-
électrocution est installée.
• Utilisez un collier anti-traction sur le
câble.
• Veillez à ne pas endommager la fiche
secteur (si présente) ni le câble d'ali-
mentation. Contactez le service après-
vente ou un électricien pour remplacer
le câble d'alimentation s'il est endom-
magé.
• L'installation électrique doit être équi-
pée d'un dispositif d'isolement à cou-
pure omnipolaire. Le dispositif d'isole-
ment doit présenter une distance
d'ouverture des contacts d'au moins
3 mm.
• N'utilisez que des systèmes d'isolation
appropriés : des coupe-circuits, des
fusibles (les fusibles à visser doivent
être retirés du support), un disjoncteur
différentiel et des contacteurs.
Raccordement au gaz
• Tout raccordement au gaz doit être
effectué par une personne qualifiée.
• Avant l'installation, vérifiez que les
conditions de distribution locales (na-
ture et pression du gaz) sont compati-
bles avec le réglage de l'appareil.
FRANÇAIS 19

• Assurez-vous que l'air circule autour
de l'appareil.
• Les informations relatives à l'alimenta-
tion en gaz se trouvent sur la plaque
signalétique.
• Cet appareil n'est pas raccordé à un
dispositif d'évacuation des produits
de combustion. Veillez à brancher
l'appareil en conformité avec les ré-
glementations d'installation en vi-
gueur. Veillez à respecter les exigen-
ces en matière d'aération.
2.2 Utilisation
AVERTISSEMENT
Risque de blessures, de brûlures
ou d'électrocution.
• Avant la première utilisation, retirez
les emballages, les étiquettes et les
films de protection (si présents).
• Utilisez cet appareil dans un environ-
nement domestique.
• Ne modifiez pas les caractéristiques
de cet appareil.
• Ne laissez jamais l'appareil sans sur-
veillance pendant son fonctionne-
ment.
• N'utilisez jamais cet appareil avec les
mains mouillées ou lorsqu'il est en
contact avec de l'eau.
• Ne posez pas de couverts ou de cou-
vercles sur les zones de cuisson. Elles
sont chaudes.
• Éteignez les zones de cuisson après
chaque utilisation.
• N'utilisez jamais l'appareil comme
plan de travail ni comme plan de stoc-
kage.
• Lorsque vous versez un aliment dans
de l'huile chaude, elle peut éclabous-
ser.
AVERTISSEMENT
Risque d'explosion ou d'incen-
die.
• Les graisses et l'huile chaudes peu-
vent dégager des vapeurs inflamma-
bles. Tenez les flammes ou les objets
chauds éloignés des graisses et de
l'huile lorsque vous vous en servez
pour cuisiner.
• Les vapeurs dégagées par l'huile très
chaude peuvent provoquer une com-
bustion spontanée.
• L'huile qui a servi contient des restes
d'aliments pouvant provoquer un in-
cendie à température plus faible que
l'huile n'ayant jamais servi.
• Ne placez pas de produits inflamma-
bles ou d'éléments imbibés de pro-
duits inflammables à l'intérieur ou à
proximité de l'appareil, ni sur celui-ci.
AVERTISSEMENT
Risque d'endommagement de
l'appareil.
• Ne laissez pas de récipients chauds
sur le bandeau de commande.
• Ne laissez pas le contenu des réci-
pients de cuisson s'évaporer complè-
tement.
• Prenez soin de ne pas laisser tomber
d'objets ou de récipients sur l'appa-
reil. Sa surface risque d'être endom-
magée.
• Ne faites jamais fonctionner les zones
de cuisson avec des récipients de cuis-
son vides ou sans aucun récipient de
cuisson.
• Ne placez jamais de papier aluminium
sur l'appareil.
• Ne laissez pas de liquides acides, tels
que du vinaigre, du jus de citron ou du
produit détartrant, entrer en contact
avec la table de cuisson. Cela peut
provoquer l'apparition de taches ma-
tes.
• Cet appareil est exclusivement destiné
à un usage culinaire. Ne l'utilisez pas
pour des usages autres que celui pour
lequel il a été conçu, à des fins de
chauffage par exemple.
• L'utilisation d'un appareil de cuisson
au gaz génère de la chaleur et de l'hu-
midité. Veillez à ce que la pièce où est
installé l'appareil soit bien aérée.
• Assurez-vous que les orifices de venti-
lation ne sont pas bouchés.
• L'utilisation intensive et prolongée de
l'appareil peut nécessiter une ventila-
tion supplémentaire comme l'ouvertu-
re d'une fenêtre, ou une aération plus
efficace en augmentant par exemple
la puissance de la ventilation mécani-
que si la pièce en est dotée.
20
www.aeg.com
La page est en cours de chargement...
La page est en cours de chargement...
La page est en cours de chargement...
La page est en cours de chargement...
La page est en cours de chargement...
La page est en cours de chargement...
La page est en cours de chargement...
La page est en cours de chargement...
La page est en cours de chargement...
La page est en cours de chargement...
La page est en cours de chargement...
La page est en cours de chargement...
La page est en cours de chargement...
La page est en cours de chargement...
La page est en cours de chargement...
La page est en cours de chargement...
La page est en cours de chargement...
La page est en cours de chargement...
La page est en cours de chargement...
La page est en cours de chargement...
La page est en cours de chargement...
La page est en cours de chargement...
La page est en cours de chargement...
La page est en cours de chargement...
La page est en cours de chargement...
La page est en cours de chargement...
La page est en cours de chargement...
La page est en cours de chargement...
La page est en cours de chargement...
La page est en cours de chargement...
La page est en cours de chargement...
La page est en cours de chargement...
La page est en cours de chargement...
La page est en cours de chargement...
La page est en cours de chargement...
La page est en cours de chargement...
La page est en cours de chargement...
La page est en cours de chargement...
La page est en cours de chargement...
La page est en cours de chargement...
La page est en cours de chargement...
La page est en cours de chargement...
La page est en cours de chargement...
La page est en cours de chargement...
La page est en cours de chargement...
La page est en cours de chargement...
La page est en cours de chargement...
La page est en cours de chargement...
La page est en cours de chargement...
La page est en cours de chargement...
La page est en cours de chargement...
La page est en cours de chargement...
La page est en cours de chargement...
La page est en cours de chargement...
La page est en cours de chargement...
La page est en cours de chargement...
-
 1
1
-
 2
2
-
 3
3
-
 4
4
-
 5
5
-
 6
6
-
 7
7
-
 8
8
-
 9
9
-
 10
10
-
 11
11
-
 12
12
-
 13
13
-
 14
14
-
 15
15
-
 16
16
-
 17
17
-
 18
18
-
 19
19
-
 20
20
-
 21
21
-
 22
22
-
 23
23
-
 24
24
-
 25
25
-
 26
26
-
 27
27
-
 28
28
-
 29
29
-
 30
30
-
 31
31
-
 32
32
-
 33
33
-
 34
34
-
 35
35
-
 36
36
-
 37
37
-
 38
38
-
 39
39
-
 40
40
-
 41
41
-
 42
42
-
 43
43
-
 44
44
-
 45
45
-
 46
46
-
 47
47
-
 48
48
-
 49
49
-
 50
50
-
 51
51
-
 52
52
-
 53
53
-
 54
54
-
 55
55
-
 56
56
-
 57
57
-
 58
58
-
 59
59
-
 60
60
-
 61
61
-
 62
62
-
 63
63
-
 64
64
-
 65
65
-
 66
66
-
 67
67
-
 68
68
-
 69
69
-
 70
70
-
 71
71
-
 72
72
-
 73
73
-
 74
74
-
 75
75
-
 76
76


dans d''autres langues
- italiano: AEG HG654421UM Manuale utente
- español: AEG HG654421UM Manual de usuario
- Deutsch: AEG HG654421UM Benutzerhandbuch