NewAge Products 60004 Manuel utilisateur
- Catégorie
- Boissons glacées
- Taper
- Manuel utilisateur

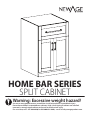
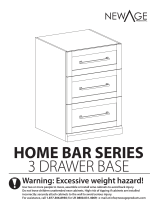
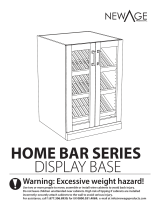
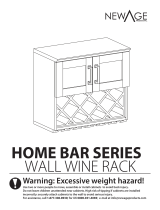
HOME BAR SERIES
SPLIT CABINET
Warning: Excessive weight hazard!
Use two or more people to move, assemble or install wine cabinets to avoid back injury.
Do not leave children unattended near cabinets. High risk of tipping if cabinets are installed
incorrectly: securely attach cabinets to the wall to avoid serious injury.

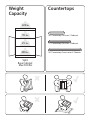
48” Countertop. Fits over 2 Cabinets
72” Countertop. Fits over 3 Cabinets
96” Countertop. Covers over 4 Cabinets
CountertopsWeight
Capacity
200 lbs.
25 lbs.
55 lbs.
220 lbs.
Split
Base Cabinet
Max 500 lbs.

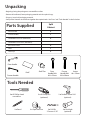
Unpacking
• Begin by placing the package on a covered at surface.
• Remove all cardboard, foam packaging material and clear plastic bags.
• Dispose / recycle all packaging materials.
• Verify all the contents in the box and gather the required tools. See “Parts” and “Tools Needed” in the list below.
Door Handles
Drawer Handles
Shelf Clips
Shelf
Handle Bolts for Doors (M4x22mm)
Handle Bolts for Drawers (M4x30mm)
#8 x 25mm Screws
2
2
1
1
4
6
6
Split
Cabinet
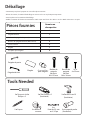
Parts Supplied
Door Handle
Tools Needed
1 x Tape Measure
1 x #2 Phillips Bit
(opitional)
1 x Pencil
1 x Cordless Power Drill
(optional)
1 x #2 Phillips head
screwdriver
1 x Flashlight
(optional)
1 x Drill Bit
2.5mm or 3/32”
Drawer Handle
Shelf Pins
Door
Handle Bolt
M4 x 22mm
Drawer
Handle Bolt
M4 x 30mm
Screws
#8 x 25mm
Shelf

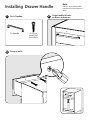
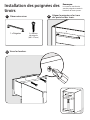
Installing Drawer Handle
Parts Needed.
Align handle to holes
on doors or drawers.
Screw in bolts.
1
2
3
1x Handle
2x Drawer
Handle Bolt
M4 x 30mm
Note:
Cabinets come with handles
installed on inside of drawers/
doors.

Installing the Handles
Parts Needed.
Align handle to holes
on doors or drawers.
Screw in bolts.
2 x Handles
4 5
6
4 x Door
Handle Bolt
M4 x 22mm

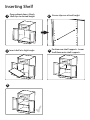
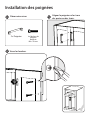
Inserting Shelf
1
Position over shelf supports . Lower
shelf down onto shelf supports.
Insert shelf at a slight angle.
Open cabinet doors. Attach
shelf clips to desired height.
Ensure clips are at level height.
2
3
4
5

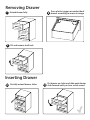
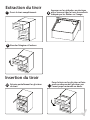
Extend drawer fully.
Removing Drawer
Press plastic triggers on underside of
drawer according to arrows in image.
Tilt and remove shelf rack.
Partially extend drawer slides.
Put drawer on slides and slide each drawer
slide forward until you hear a click sound.
3
Inserting Drawer
7
8
9
10
11

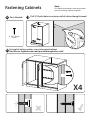
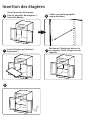
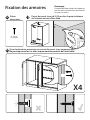
Fastening Cabinets
Note:
All shelves and drawers must be removed
prior to fastening cabinets together.
X4
Using pilot hole as guides, screw into second cabinet.
Do not over-tighten screws and punch through other side!
Drill 3/32 pilot holes on interior wall of cabinet being fastened.
Parts Needed.
12
13
14
4 - #8 x 25mm
screws

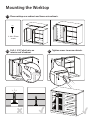
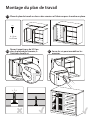
Mounting the Worktop
Place worktop over cabinets and lower onto cabinets.
Drill 4, 3/32” pilot holes on
interior roof of cabinet.
Tighten screws to secure cabinets.
3
15
16
17
4 - #8 x 25mm
screws

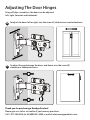
Adjusting The Door Hinges
A
Using a Philips screwdriver, the doors can be adjusted:
Left, right, forwards and backwards.
To adjust the doors left or right, turn the screw (A) clockwise or counterclockwise.
To adjust the gap between the doors and frame, turn the screw (B)
clockwise or counterclockwise.
Thank you for purchasing a NewAge Product!
Please give us a call or visit online if you have any questions.
Call 1.877.306.8930; for UK 0800.031.4069; e-mail at info@newageproducts.com
B
18
19

Manufacturer One Year Limited Warranty
1. Service calls to correct the installation of any NewAge products or to instruct you how to use or install them.
2. Damage resulting from products damaged by accident, misuse, abuse, re, ood, improper installatinion, acts of God, neglect,
modication or mishandling.
3. Products damaged by improperly loading beyond the specied maximum weight capacity outlined in the instrutions provided
with the product.
4. Repairs or replacement when your product is used in other than normal, single-family household use, such as a commerical
environment, or handled in anyway inconsistent with the installation instructions included with the product.
5. Surfaces damaged due to chemcal interaction.
6. Replacement parts for NewAge products outside Canada, The United States, or the UK.
7. Loss of product contents due to theft, re, ood, accident or acts of God.
8. Shipping or freight fees to deliver replacement products or to return defective products.
9. Any labor costs during the limited warranty period.
When this product is installed, operated and maintained according to the instructions attached to or furnished
with the product, NewAge Products Inc. will replace the defective product or parts if the part fails as a result of
defective materials or workmanship for a period of One Year from the purchase date of the product.
NEWAGE PRODUCTS INC. WILL NOT PAY FOR:
IMPLIED WARRANTIES, INCLUDING TO THE EXTENT APPLICABLE WARRANTIES OF MERCHANTABILITY OR
FITNESS FOR A PARTICULAR PURPOSE, ARE EXCLUDED TO THE EXTENT LEGALLY PERMISSIBLE. ANY IMPLIED
WARRANTIES THAT MAY BE IMPOSED BY LAW ARE LIMITED TO ONE YEAR, OR THE SHORTEST PERIOD
ALLOWED BY LAW. SOME STATES AND PROVINCES DO NOT ALLOW LIMITATIONS OR EXCLUSIONS ON HOW
LONG AN IMPLIED WARRANTY OF MERCHANTABILITY OR FITNESS LASTS, SO THE ABOVE LIMITATIONS OR
EXCLUSIONS MAY NOT APPLY TO YOU. THIS WARRANTY GIVES YOU SPECIFIC LEGAL RIGHTS, AND YOU MAY
ALSO HAVE OTHER RIGHTS WHICH VARY FROM STATE TO STATE OR PROVINCE TO PROVINCE
DISCLAIMER OF IMPLIED WARRANTIES; LIMITATION OF REMEDIES
Thank you for purchasing a NewAge Product!
Please give us a call or visit online if you have any questions.
Call 1.877.306.8930; for UK 0800.031.4069; e-mail at info@newageproducts.com

SÉRIE VIN ET BAR
Armoire en deux parties
Avertissement : Risque de poids excessif!
Travailler à deux ou plus lors du déplacement, de l’assemblage ou de l’installation des armoires à vin pour éviter de vous blesser au niveau du dos.
Ne pas laisser d’enfant sans surveillance à proximité des armoires.
Les armoires risquent très fortement de basculer si elles ne sont pasinstallées correctement : bien attacher les armoires au mur pour éviter toute blessure grave.
Pour obtenir de l’aide, composer le 1.877.306.8930; au R.-U., composer le 0800.031.4069; ou envoyer un courriel à l’adresse inf[email protected].

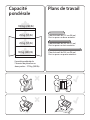
25 kg (55 lb)
25 kg (55 lb)
90 kg (200 lb)
100 kg (220 lb)
Capacité pondérale de
l’armoire de plancher en
deux parties : 272 kg (500 lb).
Plan de travail de 122 cm (48 po).
Peut se poser sur deux armoires.
Plan de travail de 183 cm (72 po).
Peut se poser sur trois armoires.
Plan de travail de 244 cm (96 po).
Peut se poser sur quatre armoires
Plans de travailCapacité
pondérale

Déballage
• Commencer par placer le paquet sur une surface plane couverte.
• Enlever les cartons, le matériel d’emballage en mousse et les sacs en plastique transparents.
• Jeter/recycler tous les matériaux d’emballage.
• Vérier le contenu de la boîte et rassembler les outils requis. Voir la liste des « Pièces » et des « Outils nécessaires » ci-après.
Poignées de porte
Poignées de tiroir
Groupilles pour étagères
Étagère
Boulons des poignées de porte (M4 x 22 mm)
Boulons des poignées de tiroir (M4 x 30 mm)
Vis n 8 x 25 mm
2
2
1
1
4
6
6
Armoire en
deux parties
Pièces fournies
Poignée de porte
Tools Needed
1 x Ruban à
mesurer
1 x Tête Phillips n 2
(facultative)
1 x Crayon
1 x Perceuse sans l
(facultative)
1 x Tournevis à tête
Phillips n 2
1 x Lampe de poche
(facultative)
1 x
Foret de 2,5 mm
ou 3/32 po
Poignée de tiroir
Boulon de
poignée
de porte
M4 x 22 mm
Boulon de
poignée
de tiroir
M4 x 30 mm
Vis n
o
8 x 25 mm
Groupilles
pour étagères
Étagère

Installation des poignées des
tiroirs
Pièces nécessaires.
Aligner la poignée sur les trous
des portes ou des tiroirs.
Visser les boulons.
1
2
3
1 x Poignées
2 x Boulons
de poignée
(M4 x 22 mm)
Remarque :
Les armoires sont fournies
avec des poignées montées à
l’intérieur des tiroirs/portes.

Installation des poignées
Pièces nécessaires.
Aligner la poignée sur les trous
des portes ou des tiroirs.
Visser les boulons.
2 x Poignées
4 5
6
4 x Boulons de
poignée
de porte
M4 x 22 mm

Insertion des étagères
1
Insérer l’étagère en l’inclinant
légèrement.
Ouvrir les portes de l’armoire.
Fixer les goupilles des étagères à
la hauteur désirée.
2
3
4
5
Veiller à ce que les goupilles
soient de niveau.
Positionner l’étagère au-dessus de
ses supports. Poser l’étagère sur ses
supports.

Ouvrir le tiroir complètement.
Extraction du tiroir
Appuyer sur les gâchettes en plastique
qui se trouvent sous le tiroir aux endroits
indiqués par les èches sur l’image.
Basculer l’étagère et l’enlever.
Extraire partiellement les glissières
du tiroir.
Poser le tiroir sur les glissières et faire
coulisser chacune des glissières vers
l’avant jusqu’à entendre un déclic.
3
Insertion du tiroir
7
8
9
10
11

Fixation des armoires
Remarque :
Il importe d’enlever toutes les étagères et
tous les tiroirs avant de xer des armoires
les unes aux autres.
X4
Visser la deuxième armoire en se servant des avant-trous comme guides.
Ne pas trop serrer les vis, elles risqueraient de ressortir de l’autre côté!
Percer des avant-trous de 3/32 po dans la paroi intérieure
de l’armoire en train d’être xée.
Pièces
nécessaires.
12
13
14
4 – Vis n
o
8 x 25 mm

Montage du plan de travail
Placer le plan de travail au-dessus des armoires et l’abaisser pour le mettre en place.
Percer 4 avant-trous de 3/32 po
dans le plafond de l’armoire, à
l’intérieur de celle-ci.
Serrer les vis pour immobiliser les
armoires.
3
15
16
17
4 – Vis n
o
8 x 25 mm
La page est en cours de chargement...
La page est en cours de chargement...
-
 1
1
-
 2
2
-
 3
3
-
 4
4
-
 5
5
-
 6
6
-
 7
7
-
 8
8
-
 9
9
-
 10
10
-
 11
11
-
 12
12
-
 13
13
-
 14
14
-
 15
15
-
 16
16
-
 17
17
-
 18
18
-
 19
19
-
 20
20
-
 21
21
-
 22
22


NewAge Products 60004 Manuel utilisateur
- Catégorie
- Boissons glacées
- Taper
- Manuel utilisateur
dans d''autres langues
- English: NewAge Products 60004 User manual
Documents connexes
-
 NewAge Products 60005 Mode d'emploi
-
 NewAge Products 60003 Mode d'emploi
-
NewAge Products 63245 Mode d'emploi
-
 NewAge Products 60010 Mode d'emploi
-
 NewAge Products 65400 Guide d'installation
-
 NewAge Products 65001 Guide d'installation
-
 NewAge Products 60011 Mode d'emploi
-
 NewAge Products 66655 Mode d'emploi
-
 NewAge Products 66456 Guide d'installation
-
 NewAge Products 60000 Manuel utilisateur


