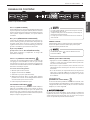
LG LDF7774BD Le manuel du propriétaire
- Catégorie
- Lave-vaisselle
- Taper
- Le manuel du propriétaire

ENGLISH
www.lg.com
OWNER’S MANUAL
DISHWASHER
Please read this owner's manual thoroughly before
operating and keep it handy for reference at all times.
LDT9965BD
LDF7774BD
FRANÇAIS
MFL68741436

2
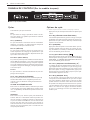
TABLE OF CONTENTS
TABLE OF CONTENTS
3 IMPORTANT SAFETY INFORMATION
3 Basic Safety Precautions
4 Electrical Safety
5 Before Using the Dishwasher
5 Specifications
6 PARTS AND FEATURES
6 Features
7 Parts
8 Control Panel
12 Cycle Option Chart
12 Icons
14 Cycle Selection Chart
16 OPERATING INSTRUCTIONS
16 Quick Start
17 Loading the Lower Rack
18 Folding Down the Lower Tines
19 Loading the Silverware Basket
20 Loading the Upper Rack
20 Folding Down the Upper Tines
21 Height Adjustable Upper Rack
22 Loading the Cutlery Rack (on some model)
22 Height Adjustable Tray (on some model )
23 Adding Detergent to the Dispenser
24 Adding Rinse Aid to the Dispenser
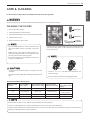
25 CARE AND CLEANING
25 Cleaning the Filters
26 Cleaning Metallic Parts
26 Cleaning the Lower Spray Arm
26 Cleaning the Upper Spray Arm
27 Cleaning the Top Spray Arm
27 Seasonal Maintenance and Storage
28 FAQS
THANK YOU
Congratulations on your purchase and
welcome to the LG family. Your new LG
Dishwasher combines quiet, ecient
operation with advanced cleaning
technology. By following the operating
and care instructions in this manual,
your dishwasher will provide you with
many years of reliable service.
30 TROUBLESHOOTING
30 Before Calling for Service
32 SMART DIAGNOSIS™ SYSTEM
32 SMART DIAGNOSIS™ SYSTEM
33 WARRANTY
33 Product Registration Information

ENGLISH
IMPORTANT SAFETY INFORMATION
3
IMPORTANT SAFETY IMFORMATION
READ ALL INSTRUCTIONS BEFORE USE
Your safety and the safety of others is very important.
We have provided many important safety messages in this manual and on your appliance. Always read and follow all safety messages.
This is the safety alert symbol. This symbol alerts you to potential hazards that can result in property damage or serious bodily
harm, even death.
The safety alert symbol will be followed by either the word “WARNING” or “CAUTION” then an important safety message. These
words mean:
WARNING
Indicates the possibility of serious bodily harm or death.
CAUTION
Indicates the possibility of injury or damage to property.
BASIC SAFETY PRECAUTIONS
WARNING
To reduce the risk of re, electric shock, or injury to persons when using this appliance, follow basic
precautions, including the following:
• Read all instructions carefully before using the dishwasher.
• Use the dishwasher only for its intended function.
• Only use detergents or rinse agents recommended for use in a
dishwasher. Keep all dishwasher detergents and additives out
of the reach of children.
• This appliance is not intended for use by young children.
• When loading items to be washed:
1) Load sharp items so that they are not likely to damage the
door seal.
2) Load sharp knives with the handles up to reduce the risk of
injury when reaching into the dishwasher.
y Do not wash plastic items in the dishwasher unless they are
labeled “dishwasher safe” or the equivalent. For plastic items
that are not so labeled, check the manufacturer’s recommen-
dations.
• Do not operate the dishwasher unless all enclosure panels are
properly in place.
• Do not tamper with the controls.
• Do not abuse, sit on, or stand on the door or dish racks of the
dishwasher.
• To reduce the risk of injury, do not allow children to play in or
around the dishwasher.
• Under certain conditions, hydrogen gas may be produced in
a hot water system that has not been used for two weeks or
more. HYDROGEN GAS IS EXPLOSIVE. If the hot water system
has not been used for such a period of time, turn on all hot
water faucets and let the water ow for several minutes. This
will release any accumulated hydrogen gas. Since hydrogen
gas is ammable, do not smoke or use an open ame during
this time.
• Remove the door to the wash compartment when disposing of
an old dishwasher.
• The installer must ensure that the dishwasher is completely
enclosed at the time of installation.
• WARNING : This product contains chemicals known to the
State of California to cause cancer and birth defects or other
reproductive harm. Wash hands after handling.
This manual contains very important information regarding the installation, use, and maintenance of your dishwasher. The manufacturer
cannot be responsible for injuries or damage caused by failure to follow these safety and caution instructions.

4
IMPORTANT SAFETY INFORMATION
BASIC SAFETY PRECAUTIONS
WARNING
To reduce the risk of re, electric shock, or injury to persons when using this appliance, follow basic precautions,
including the following:
For a permanently connected dishwasher:
This appliance must be connected to a grounded metal, perma-
nent wiring system, or an equipment grounding conductor must
be run with the circuit conductors and connected to the equip-
ment grounding terminal or lead on the appliance. Consult with a
qualied electrician.
Tip Hazard
Do not put excessive downward force on the open dishwasher
door prior to installation, as this could cause damage to the unit
or cause it to tip over. Do not use the dishwasher before installa-
tion has been completed in accordance with the Installation In-
structions.
ELECTRICAL SAFETY
WARNING
Electrical Shock Hazard
Failure to follow these instructions can result in death, re, or electrical shock.
• The dishwasher MUST be grounded. Connect the ground wire to the green ground connector in the terminal box.
• Do not use an extension cord with this appliance.
• The dishwasher is designed to be used with standard household current (120 Volts AC, 60Hz.). Before connecting the dishwasher, ensure
that the outlet or cable is properly grounded and polarized by circuit breakers or fuses. Failure to provide adequate grounding of this
appliance may cause electrical shock or malfunction of the appliance. Consult with a qualied electrician.
• Do not install or store the dishwasher where it will be exposed to weather conditions. Failure to observe this precaution may result in
electrical shock, re, malfunction, and/or deformation of the dishwasher.
• Do not damage or place heavy items on the power cord of the appliance. Do not use the dishwasher if it has a damaged power cord.
Power cord damage may cause re and electrical shock. Consult with a qualied electrician.
• Do not grasp the power cord or touch the dishwasher controls with wet hands. Do not use the dishwasher if it has a damaged power
cord or plug, and do not plug the dishwasher into a damaged outlet. Failure to observe these instructions may result in electrical shock.
• Disassembly or repair must be performed by experienced service persons. Improper disassembly or repair could lead to product failure
or electrical shock.

ENGLISH
IMPORTANT SAFETY INFORMATION
5
BEFORE USING THE DISHWASHER
Before using the dishwasher, please read the Important Safety
Instructions.
Water supply temperature should be a minimum of 120 °F (49 °C)
for better washing and reasonable cycle time.
For this reason, use the hot water supply only. It is also important
that the dishwasher is loaded according to instructions for eec-
tive cleaning. When loading the dishwasher, make sure that in-
soluble items such as bones, toothpicks, and pieces of paper have
been removed.
SAVE THESE INSTRUCTIONS
When loading the dishwasher, observe the following general
guidelines:
1. Place items with deep dish bottoms at an angle to help water
run o and speed the drying process.
2. Remove solid, burned-on scraps from dishes prior to loading
in the dishwasher.
3. Only load items that are dishwasher-safe.
Do not load utensils that are not heat-resistant, have
decorative metal trim, etc.
NOTE
SPECIFICATIONS
• Power Supply: 120 V, 60 Hz AC only, minimum 15 A circuit breaker
• Water Pressure: 20–120 psi (140–830 kPa)
• Size (WxDxH): 23
3
/4" x 24
5
/8"x 33
1
/2" (603 mm x 625 mm x 851 mm)
• Inlet Water Temperature: 120 °F (49 °C) minimum
• Product Weight : - LDT9965BD : 100.5 lbs.(45.6 kg)
- LDF7774BD : 96.6 lbs.(43.8 kg)
• The appearance and specications are subject to change without notice.

6
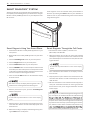
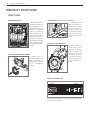
PARTS AND FEATURES
PARTS AND FEATURES
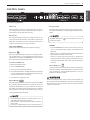
FEATURES
LARGE CAPACITY
LG dishwashers allow
you to load very large
items in both the upper
and lower racks. The
tall tub provides extra
overall capacity and the
clearance to accommo-
date large dishes. Extra
large items (max. 14 in.)
may be loaded in the
lower rack by raising the
upper rack.
HYBRID DRYING SYSTEM
This system eectively
dries dishes without the
use of a heating element
that would increase en-
ergy consumption.
STEAM WASHING (not available on all models)
Steam technology pro-
vides better cleaning
performance than regu-
lar wash systems. Steam
is the most energy ef-
cient gentle care for
your nest china and
stemware.
VARIABLE SPRAY SYSTEM
Because the water spray
alternates between the
upper and lower racks,
all of the power from
the motor is directed
to one rack at a time.
This concentrates all the
cleaning power of the
motor on each rack in
turn.
LIGHT TOUCH BUTTONS
The light touch buttons on the control panel make selections
easy and convenient.

ENGLISH
PARTS AND FEATURES
7
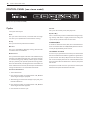
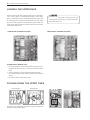
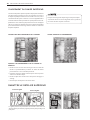
PARTS
1. CONTROL PANEL
2. DOOR HANDLE
3. FRONT COVER
4. LOWER COVER
5. LEVELING FEET
6. FRONT DISPLAY SIGNALIGHT™
7. BASE
8. TOP SPRAY ARM
9. UPPER SPRAY ARM
10. STEAM NOZZLE on steam model)
11. LOWER SPRAY ARM
12. DETERGENT AND RINSE AID DISPENSER
13. DRYING VENT COVER
14. CUTLERY RACK some model)
15. UPPER RACK
16. SILVERWARE BASKET
17. LOWER RACK
18. TOP DISPLAY
19. POWER BUTTON
20. FILTRATION SYSTEM
SignaLight (front display)
When a cycle is running, the SignaLight will illuminate for the
active stage.
• Modelwith4LEDs:WASH–RINSE–DRY–CLEAN
• Modelswith2LEDs:OPERATING-CLEAN
• Modelswith1LED:OPERATING(Flickering)/CLEAN
(Lighting)
Once the cycle is complete, the CLEAN light will illuminate for
four minutes.
To keep the CLEAN light on until the door is open, turn the
power on, and then press and hold the Extra dry and Half load
buttons on the control panel simultaneously until Off or On
appears in the display. The dishwasher will remember this set-
ting until manually changed.
Meshlter
Outerlter
Stainless
SteelFilter

8
PARTS AND FEATURES
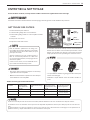
CONTROL PANEL (Steam Model)
Steam Model (LDT9965BD)
Cycles
Select your desired cycle.
Auto
This cycle senses the load size, soil amount and soil tough-
ness. This cycle is optimized to achieve the best cleaning.
Heavy
This cycle is for heavily and hard soiled dishes. Heavy defaults
to the highest spray intensity and uses the power of steam to
wash heavily soiled dishes.
Delicate
This cycle adds the gentle power of steam to boost the clean-
ing power of the delicate cycle. The cycle is intended for ef-
fectively cleaning delicate items such as ne china and stem-
ware.
Dual Wash
This cycle washes the upper and lower racks at dierent spray
intensities. The default setting for this cycle washes the lower
rack with strong spray intensity and the upper rack with soft
spray intensity. This provides optimum cleaning performance
for mixed loads, including ne china and stemware.
Normal
This cycle is for normally soiled, everyday loads.
Quick & Dry
This is a shortened cycle that is intended for washing and dry-
ing recently used dishes or lightly soiled loads. During this
cycle, both spray arms will run at the same time.
CHIME ON/OFF
To enable or disable the chime, rst, turn on the dishwasher.
Press and hold the Delicate and Quick&Dry Buttons simulta-
neously for approximately three seconds.
TO CANCEL A CYCLE
To cancel a cycle, open the door and then press and hold the
Delicate and Dual Wash Buttons together for approximately
three seconds. The drain pump will activate and the cycle
will cancel. The display will show “dr” and the dishwasher will
drain the water. After the dishwasher is drained, the power
will turn o.
If the power is turned on and no cycle has been selected, the
dishwasher will power o within four minutes.
Cycle Options
(Refer to the control panel on the next page)
Press the desired cycle and then select the options for that
cycle.
Extra Dry
Select the Extra Dry option for better drying performance.
This option adds 60 minutes of extra drying time to the cycle.
The Extra Dry button will illuminate when the option has
been selected.
Rinse
Repeated pressing of the Rinse button will select the desired
Rinse option. The Sanitary, Extra Rinse, or Sanitary and Extra
Rinse lights will show in the bottom left portion of the dis-
play.
Sanitary ( )
This high-temperature rinse sanitizes dishes and glassware in
accordance with NSF/ANSI Standard 184 for residential dish-
washers. Certied dishwashers are not intended for licensed
food establishments.
Extra Rinse ( R
+
)
The Extra Rinse symbol indicates that an extra rinse has been
added to the cycle. An extra rinse can help reduce hard water
spotting on dishes. To add an extra rinse, press the Rinse but-
ton repeatedly until the Extra Rinse symbol appears in the
display.
Rinse Only
This cycle is a quick rinse for dishes that will not be washed
immediately. This cycle will rinse dishes that have excess soil
to soften dried on residue. Rinsing the dishes will help pre-
vent odors in the dishwasher. No detergent should be used.
To select the Rinse Only cycle, turn the dishwasher on, and
press the Rinse button once without pressing any other cycle
buttons.
The Rinse Only cycle is not available with any other
cycles.

ENGLISH
PARTS AND FEATURES
9
Steam Model (LDT9965BD)
CONTROL PANEL
Half Load
For small loads, you may use just the upper or lower rack to
save energy. Each press of the Half Load button cycles be-
tween upper rack only and lower rack only.
Delay Start
The Delay Start feature allows you to delay the start of a se-
lected cycle. Each time the Delay Start button is pressed, the
delay time will increase an hour. The delay start time can be
set from 1 to 19 hours, in one-hour increments.
High Temp ON/OFF
Raises the main wash temperature to improve cleaning.
Child Lock
The Child Lock feature helps prevent your settings from be-
ing changed during a cycle. Selecting this feature locks all
of the buttons, except for the POWER button, on the control
panel. This feature does not lock the door.
ToactivatetheChildLock:
1. Open the dishwasher door.
2. Press the POWER button.
3. Select the cycle (and desired options).
4. Press and hold the Rinse and High Temp buttons for three
seconds. The Child Lock indicator will illuminate in the dis-
play once the Child Lock is activated.
5. Close the door to begin the cycle.
Digital Display
The Digital Display on the control panel shows the ESTIMAT-
ED cycle time. When the dishwasher is powered up, the dis-
play will be blank. When the cycle and options are selected,
the display will show the total estimated time to complete
those selections. During operation, the display shows the re-
maining estimated operating time.
• The estimated time shown in the display does not in-
clude delay times for heating water, etc.
• If Delay Start is selected, the display shows the delay
time in hours.
• Time may vary depending on the soil level of your load.
NOTE
Energy Saving
The Energy Saving option saves energy by using less water.
This option should only be used with light to medium soiled
dishes.
The RINSE AID symbol
indicates that the rinse aid
needs to be relled.
NOTE
POWER
• Press the POWER button to turn on the control panel. If no
cycle is selected within four minutes, the dishwasher will
power o.
• After the cycle is complete, the power automatically turns
o for purposes of safety and economy.
• If there is a power surge, power outage, or disruption of
any kind, the PF indicator will display and power will be au-
tomatically turned o for safety. The cycle will need to be
restarted.
Smart Diagnosis
Should you experience any problems with your dishwasher,
it has the capability of transmitting data to your Smart Phone
using the LG Smart Laundry & DW Application or via your
telephone to the LG call center.
WARNING
Steam can cause burns. Use caution in the area of the steam noz-
zle, on the left side of the dishwasher, if the door is opened during
the steam portion of a cycle. Contact with the steam or the steam
nozzle can cause burns.

Cycles
Select your desired cycle.
Auto
This cycle senses the load size, soil amount and soil tough-
ness. This cycle is optimized to achieve the best cleaning.
Heavy
This cycle is for heavily and hard soiled dishes.
Delicate
The cycle is intended for eectively cleaning delicate items
such as ne china and stemware.
Dual Control
This cycle washes the upper and lower racks at dierent spray
intensities. The default setting for this cycle washes the low-
er rack with strong spray intensity and the upper rack with
soft spray intensity. This provides optimum cleaning perfor-
mance for mixed loads, including ne china and stemware. If
other combinations are desired, use the steps listed below to
change the intensities or to use the Half Load feature.
HowToUseDualControl:
1. Select Dual Control.
2. Press the Spray button to toggle between Soft, Medium
and Strong for the upper spray arm.
3. After making your selection for the upper spray arm, press
the Half Load button.
4. Press the Spray button to toggle between Soft, Medium
and Strong for the lower spray arm.
5. Close the door to start the cycle.
Normal
This cycle is for normally soiled, everyday loads.
Quick & Dry
This is a shortened cycle that is intended for washing and dry-
ing recently used dishes or lightly soiled loads. During this
cycle, both spray arms will run at the same time.
CHIME ON/OFF
To enable or disable the chime, rst, turn on the dishwasher.
Press and hold the Delicate and Quick&Dry Buttons simulta-
neously for approximately three seconds.
TO CANCEL A CYCLE
To cancel a cycle, open the door and then press and hold the
Delicate and Dual Control Buttons together for approximate-
ly three seconds. The drain pump will activate and the cycle
will cancel. The display will show “dr” and the dishwasher will
drain the water. After the dishwasher is drained, the power
will turn o.
If the power is turned on and no cycle has been selected, the
dishwasher will power o within four minutes.
10
PARTS AND FEATURES
CONTROL PANEL (non-steam model)
Display varies by model (LDF7774BD)
<ZI][M:MNZM[P;\MIUၦხཅ૬ᅰ
<ZI][M:MNZM[P6WV[\MIUၦხཅ૬ᅰ

ENGLISH
Spray (INTENSITY)
First, select the desired cycle. Press the Spray button repeat-
edly until the desired spray intensity is selected.
Soft ( ), Medium ( ), Strong ( )
Half Load
For small loads, you may use just the upper or lower rack to
save energy. Each press of the Half Load button cycles be-
tween upper rack only and lower rack only.
Delay Start
The Delay Start feature allows you to delay the start of a se-
lected cycle. Each time the Delay Start button is pressed, the
delay time will increase an hour. The delay start time can be
set from 1 to 19 hours, in one-hour increments.
High Temp ON/OFF
Raises the main wash temperature to improve cleaning.
Press and hold the Extra Dry and Rinse buttons simultane-
ously for approximately three seconds.
Child Lock
The Child Lock feature helps prevent your settings from be-
ing changed during a cycle. Selecting this feature locks all
of the buttons, except for the POWER button, on the control
panel. This feature does not lock the door.
ToactivatetheChildLock:
1. Open the dishwasher door.
2. Press the POWER button.
3. Select the cycle (and desired options).
4. Press and hold the Rinse and Spray buttons for three sec-
onds. The Child Lock indicator will illuminate in the display
once the Child Lock is activated.
5. Close the door to begin the cycle.
Digital Display
The Digital Display on the control panel shows the ESTIMAT-
ED cycle time. When the dishwasher is powered up, the dis-
play will be blank. When the cycle and options are selected,
the display will show the total estimated time to complete
those selections. During operation, the display shows the re-
maining estimated operating time.
• The estimated time shown in the display does not in-
clude delay times for heating water, etc.
• If Delay Start is selected, the display shows the delay
time in hours.
• Time may vary depending on the soil level of your load.
NOTE
Energy Saving
The Energy Saving option saves energy by using less water.
This option should only be used with light to medium soiled
dishes.
The RINSE AID symbol
indicates that the rinse aid
needs to be relled.
NOTE
POWER
• Press the POWER button to turn on the control panel. If no
cycle is selected within four minutes, the dishwasher will
power o.
• After the cycle is complete, the power automatically turns
o for purposes of safety and economy.
• If there is a power surge, power outage, or disruption of
any kind, the PF indicator will display and power will be au-
tomatically turned o for safety. The cycle will need to be
restarted.
Smart Diagnosis
Should you experience any problems with your dishwasher,
it has the capability of transmitting data to your Smart Phone
using the LG Smart Laundry & DW Application or via your
telephone to the LG call center.
WARNING
Steam can cause burns. Use caution in the area of the steam noz-
zle, on the left side of the dishwasher, if the door is opened during
the steam portion of a cycle. Contact with the steam or the steam
nozzle can cause burns.
PARTS AND FEATURES
11
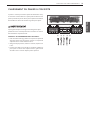
CONTROL PANEL
Display varies by model (LDF7774BD)
<ZI][M:MNZM[P;\MIUၦხཅ૬ᅰ
<ZI][M:MNZM[P6WV[\MIUၦხཅ૬ᅰ

Cycle ExtraDry
Sanitary
Rinse
ExtraRinse
Sanitary/
ExtraRinse
HalfLoad DelayStart
Energy
Saving
HighTemp
Auto
Heavy
Delicate
DualWash
Normal
Quick&Dry
RinseOnly
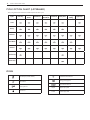
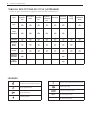
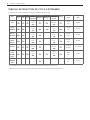
CYCLE OPTION CHART (LDT9965BD)
The cycle guide below shows the available options for each cycle.
Steam Cycle (steam model)
Extra Rinse
Sanitary Rinse
Child Lock
ICONS
Low Rinse Aid Indicator
Energy Saving Cycle
Cycle Time Indicator
Upper Upper Spray Arm
Lower Lower Spray Arm
12
PARTS AND FEATURES

ENGLISH
PARTS AND FEATURES
13
Cycle
Available
SprayLevel
(defaultbold)
ExtraDry
Sanitary
Rinse
ExtraRinse
Sanitary/
ExtraRinse
HalfLoad DelayStart
Energy
Saving
High
Temp
Auto
Soft
Medium
Strong
Heavy Strong
Delicate
Soft
Medium
Dual
Control
Soft
(upper arm)
Medium
Strong
(lower arm)
Normal
Soft
Medium
Strong
Quick&Dry Strong
RinseOnly
Medium
Strong
CYCLE OPTION CHART (LDF7774BD)
The cycle guide below shows the available options for each cycle.
Extra Rinse
Sanitary Rinse
Low, Medium, High Spray, Intensity
Child Lock
ICONS
Low Rinse Aid Indicator
Energy Saving Cycle
Cycle Time Indicator
Upper Upper Spray Arm
Lower Lower Spray Arm

Cycle
Wash Rinse
Dry *WaterUsage **CycleTime
Pre1 Pre2 Pre3
Main
Wash
Rinse1 Rinse2
Heated
Rinse
Auto
122 F
50 C
149~158 F
65~70 C
6.1 gal.
23 L
135 Min.
Heavy
140 F
60 C
158 F
70 C
6.1 gal.
23.0 L
166 Min.
Delicate
122 F
50 C
154 F
68 C
4.6 gal.
17. 5 L
141 Min.
DualWash
154 F
68 C
158 F
70 C
4.6 gal.
17. 5 L
147 Min.
Normal
86–122 F
30–50 C
149–158 F
65–70 C
1.7–6.4 gal.
6.5–20.5 L
110~139 Min.
Quick
&Dry
122 F
50 C
162 F
72 C
7.6 gal.
29 L
79 Min.
Rinse
Only
1.0 gal.
4 L
22 Min.
* Actual water consumption will vary depending on soil level and water hardness.
** Actual cycle times may vary depending on soil level, water temperature and water hardness
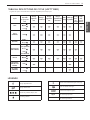
CYCLE SELECTION CHART (LDT9965BD)
The cycle guide below shows the default settings for each cycle.
14
PARTS AND FEATURES

ENGLISH
PARTS AND FEATURES
15
Cycle
Wash Rinse
Dry
*WaterUs-
age
**Cycle
Time
SprayInten-
sity
Pre1 Pre2 Pre3
Main
Wash
Rinse1 Rinse2
Heated
Rinse
Auto
122 F
50 C
149~158 F
65~70 C
6.1 gal.
23 L
135 Min. Medium
Heavy
140 F
60 C
158 F
70 C
6.1 gal.
23.0 L
166 Min. Strong
Delicate
122 F
50 C
154 F
68 C
4.6 gal.
17. 5 L
141 Min. Soft
Dual
Control
154 F
68 C
158 F
70 C
4.6 gal.
17. 5 L
147 Min.
U: Strong
L: Soft
Normal
86–122 F
30–50 C
149–158 F
65–70 C
1.7–6.4 gal.
6.5–20.5 L
110 ~139
Min.
Medium
Quick
&Dry
122 F
50 C
162 F
72 C
7.6 gal.
29 L
79 Min. Strong
Rinse
Only
1.0 gal.
4 L
22 Min. Medium
* Actual water consumption will vary depending on soil level and water hardness.
** Actual cycle times may vary depending on soil level, water temperature and water hardness
CYCLE SELECTION CHART (LDF7774BD)
The cycle guide below shows the default settings for each cycle.

QUICK START
1. LOAD THE DISHES
Scrape the dishes free of excess food, bones, and any other
hard, non-soluble residue. Pull each rack out and load the
dishes as described in this manual.
2. MEASURE THE DETERGENT
Using the guidelines in this manual, ll the detergent cup
with the recommended amount of detergent and close the
lid. If a prewash is desired, the recess on top of the lid should
also be lled with detergent.
3. TURN ON THE DISHWASHER
To turn on the display panel, press the POWER button.
4. CHECK THE RINSE AID
The Rinse Aid indicator light will illuminate if the level of rinse
aid in the dishwasher is low. Add rinse aid if the level is low to
maintain the eectiveness of the dry cycle.
5. SELECT THE CYCLE AND OPTIONS
Select the cycle and options that best t the load by referring
to the Cycle Selection Chart. The display will show the esti-
mated time for the cycle and options selected.
6. CLOSE THE DOOR
The dishwasher will start automatically, after a slight delay,
when the door is closed and latched. During the cycle, the
display will indicate the estimated time remaining for the
cycle and options selected. If the door is opened during the
cycle, the dishwasher will stop. When the door is closed, the
cycle will resume from the point where it was stopped.
7. END OF CYCLE
When the cycle is complete, a chime will sound and the dis-
play will show “END.” After a short time, the display and con-
trols will shut o for safety and energy conservation.
CAUTION
Empty the lower rack rst and then the upper rack. This will avoid
water dripping from the upper rack onto dishes in the lower rack.
WARNING
In general, it is not advisable to open the door while the dish-
washer is in operation. If the door is opened, a safety device stops
the dishwasher. Care should be taken when opening the door im-
mediately following the cycle, as steam may escape.
AUTO-OFF
The dishwasher will automatically turn o if a cycle is not selected
or if the door is not closed within four minutes.
OPERATING INSTRUCTIONS
16
OPERATING INSTRUCTIONS

ENGLISH
CAUTION
NON-DISHWASHER SAFE ITEMS
The combination of high water temperature and dishwasher
detergents may damage certain items. LG does not recommend
washing the following items in the dishwasher:
• Hand painted silver or gold leaf dishes
• Wood or bone handled utensils
• Iron or other rust prone utensils
• Plastic items that are not dishwasher safe
When in doubt, check the manufacturers’ recommendations.
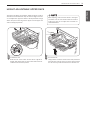
LOADING THE LOWER RACK
The lower rack should not be used for small items such as cups,
wine glasses, or small plates. These items should be loaded in the
upper rack.
For models with steam, load heavily soiled or stained dishes in the
front left side of the lower rack with the dirty side facing down.
This is the area that the stream enters the dishwasher. The use of
hot steam maximizes the dishwasher’s cleaning performance.
The extra tall tub allows loading of dishes, pans, or other utensils
up to 14 inches high.
The lower rack is recommended for dinner plates, soup bowls,
dishes, pots, pans, lids, and grill trays. Plates should be positioned
vertically and facing the center of the rack. Pots, pans, and large
bowls must be turned so that the inside faces downward. The sil-
verware basket may be used in either the lower or upper rack.
SUGGESTED LOADING PATTERN
ADDITIONAL LOADING PATTERN
y Load plates, soup bowls etc. between the tines.
y Load cookie sheets, cake pans and other large items on the
sides or back of the rack. Loading these items in the front of
the dishwasher can prevent the water spray from reaching the
detergent dispenser.
y Make sure that pot handles and other large items do not stop
the rotation of the spray arms.
Make sure that large items do not interfere with the
rotation of the spray arms, and do not prevent the
detergent dispenser from opening.
NOTE
RACK LOADING TIPS
OPERATING INSTRUCTIONS
17

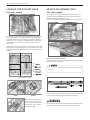
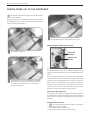
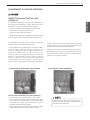
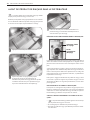
FOLDING DOWN THE LOWER TINES
DIFFICULT TO REMOVE FOOD ON
DISHES (ON SOME MODEL)
Load items with dicult to remove or baked-on food near the
steam spray arms, towards the left side of the lower rack, facing
down. The dishes will benet from the direct steam spray and the
lower spray arm wash action.
LOADING DISHES & POTS
LOADING POTS & BOWLS
The tines are adjustable to t dishes of various sizes.
Rear
Front
18
OPERATING INSTRUCTIONS

ENGLISH
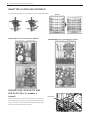
LOADING THE SILVERWARE BASKET
The silverware basket has separators to avoid scratching and tar-
nishing of delicate silverware. The basket can be separated into
three separate baskets that can be used individually in both the
upper and lower racks. Unlock the tabs above the left and right
sides to separate.
WARNING
Be careful when loading and unloading sharp items. Load sharp
knives with the handles up to reduce the risk of personal injury.
SILVERWARE LOADING TIPS:
y For best cleaning results, use the top separators in the basket
when loading silverware. The separators will prevent nesting
of silverware.
y Load sharp items, such as knives, pointing down.
y When unloading the dishwasher, it is best to start with the sil-
verware basket. Doing so will prevent water droplets from fall-
ing on your silverware from the upper rack.
1 1 1 1 1 1
1 1 1 1 1 1
2 2 2 2 2 2 2 2 2 2 2 2 2 2
5 5 5 5
4 4
4
4 4 4 4 4
4 4 4 4 4 4
3 3 3 3 3 3 3 3
3 3
3 3 S S
5 5 5 5 5 5 5 5 5 5
S S S S S S
S
S
1 1
3 3
① ③ ④ ⑤②
OPERATING INSTRUCTIONS
19

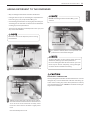
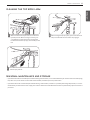
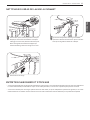
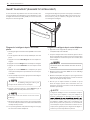
FOLDING DOWN THE UPPER TINES
LOADING THE UPPER RACK
SUGGESTED LOADING PATTERN
Use the upper rack for small or delicate items such as small plates,
cups, saucers, glasses, and dishwasher-safe plastic items. Cups,
glasses, and bowls must be positioned upside down. Extra cups
or cooking utensils can be laid on the fold down cup racks, which
may also provide support for long stemmed glasses. Make sure
items do not interfere with the rotation of the spray arms above
and below the upper rack.
When loading larger items in the upper rack, such
as wine glasses or taller cups, it may be necessary to
remove the cutlery rack.
NOTE
ADDITIONAL LOADING PATTERN
Pull up the tine
Rotate the tine
The tines can be adjusted up or down. The right side tines have
handles for wider or small dishes.
UPPER RACK LOADING TIPS:
y Place cups and glasses in the rows between the rack tines. Plac-
ing them over the rack tines can lead to breakage and water
spots.
y To avoid chipping, do not let stem ware touch other items.
y Place items so that the open end faces down for cleaning and
drying.
y Do not stack items on top of each other.
20
OPERATING INSTRUCTIONS
La page est en cours de chargement...
La page est en cours de chargement...
La page est en cours de chargement...
La page est en cours de chargement...
La page est en cours de chargement...
La page est en cours de chargement...
La page est en cours de chargement...
La page est en cours de chargement...
La page est en cours de chargement...
La page est en cours de chargement...
La page est en cours de chargement...
La page est en cours de chargement...
La page est en cours de chargement...
La page est en cours de chargement...
La page est en cours de chargement...
La page est en cours de chargement...
La page est en cours de chargement...
La page est en cours de chargement...
La page est en cours de chargement...
La page est en cours de chargement...
La page est en cours de chargement...
La page est en cours de chargement...
La page est en cours de chargement...
La page est en cours de chargement...
La page est en cours de chargement...
La page est en cours de chargement...
La page est en cours de chargement...
La page est en cours de chargement...
La page est en cours de chargement...
La page est en cours de chargement...
La page est en cours de chargement...
La page est en cours de chargement...
La page est en cours de chargement...
La page est en cours de chargement...
La page est en cours de chargement...
La page est en cours de chargement...
La page est en cours de chargement...
La page est en cours de chargement...
La page est en cours de chargement...
La page est en cours de chargement...
La page est en cours de chargement...
La page est en cours de chargement...
La page est en cours de chargement...
La page est en cours de chargement...
La page est en cours de chargement...
La page est en cours de chargement...
La page est en cours de chargement...
La page est en cours de chargement...
-
 1
1
-
 2
2
-
 3
3
-
 4
4
-
 5
5
-
 6
6
-
 7
7
-
 8
8
-
 9
9
-
 10
10
-
 11
11
-
 12
12
-
 13
13
-
 14
14
-
 15
15
-
 16
16
-
 17
17
-
 18
18
-
 19
19
-
 20
20
-
 21
21
-
 22
22
-
 23
23
-
 24
24
-
 25
25
-
 26
26
-
 27
27
-
 28
28
-
 29
29
-
 30
30
-
 31
31
-
 32
32
-
 33
33
-
 34
34
-
 35
35
-
 36
36
-
 37
37
-
 38
38
-
 39
39
-
 40
40
-
 41
41
-
 42
42
-
 43
43
-
 44
44
-
 45
45
-
 46
46
-
 47
47
-
 48
48
-
 49
49
-
 50
50
-
 51
51
-
 52
52
-
 53
53
-
 54
54
-
 55
55
-
 56
56
-
 57
57
-
 58
58
-
 59
59
-
 60
60
-
 61
61
-
 62
62
-
 63
63
-
 64
64
-
 65
65
-
 66
66
-
 67
67
-
 68
68


LG LDF7774BD Le manuel du propriétaire
- Catégorie
- Lave-vaisselle
- Taper
- Le manuel du propriétaire
dans d''autres langues
- English: LG LDF7774BD Owner's manual
Documents connexes
-
LG LDS5560ST Le manuel du propriétaire
-
LG LDS5040WW Le manuel du propriétaire
-
LG LSDF9962ST Le manuel du propriétaire
-
LG LDF7774WW Le manuel du propriétaire
-
LG LDF7561ST Le manuel du propriétaire
-
LG LDS6040ST Le manuel du propriétaire
-
-
-
LG LDF7810ST Le manuel du propriétaire
-