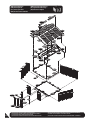
Duramax Building Products 50214 Guide d'installation
- Taper
- Guide d'installation
La page est en cours de chargement...

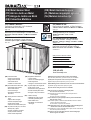
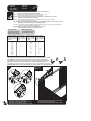
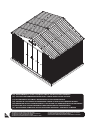
(EN) Building Dimensions :
Approximate
Size
Storage
Exterior Dimension Interior Dimension
10 Ft x 8 Ft
73 Sq. Ft
398 Cu.Ft
Roof Edge to Edge
Base Dimension
Door Opening
3.2 m x 2.4 m
6.8 Sq.m
11.3 Cu.m
Width
Depth
Height
inch cm
122 7/8 312
inch cm
91 1/4
231.7
126 1/2
321.3
95 3/8
242.2
82 7/8
210.5
inch cm
121 1/8 307.6
inch
cm
86 3/4
220.3
51 1/8
129.8
63
160
65 1/2
166.3
Wall to Wall
Area Volume
(PL) Wymiary budowlane:
Przybliżone
wymiary
Magazynowa
Wymiary zewnętrzne
Wymiary wewnętrzne
10 Stopy x
8 Stopy
73 Stopy
kwadratowy
398 Stopy
sześcienny
Dachu od krawędzi do krawędzi
Wymiary fundamentów
Otwieranie drzwi
3.2 Metr x
2.4 Metr
6.8 Metr
kwadratowy
11.3 Metr
sześcienny
Szerokość
Głębokość
Wysokość
Cal
cm
122 7/8 312
inch
cm
91 1/4
231.7
126 1/2
321.3
95 3/8
242.2
82 7/8
210.5
inch
cm
121 1/8 307.6
inch
cm
86 3/4
220.3
51 1/8
129.8
63
160
65 1/2
166.3
od ściany do ściany
Powierzchnia
Kubatura
(FR)Dimensions du bâtiment :
Taille
approximative
Stockage
Dimension extérieure
Dimension intérieure
10 Pieds x
8 Pieds
73
Carré
pieds
398 Pieds
cube
Toit de bord au bord
Dimension de base
Ouverture de
porte
3.2 Mètre x
2.4 Mètre
6.8 Mètre
carré
11.3 Mètre
cube
Largeur
Profondeur
Hauteur
pouce
cm
122 7/8 312
cm
231.7
126 1/2
321.3
242.2
82 7/8
210.5
cm
121 1/8 307.6
cm
86 3/4
220.3
51 1/8
129.8
63
160166.3
Mur à mur
Secteur
Volume
95 3/8
65 1/2
91 1/4
Dimensión interior
10 Pies x 8Pies
73 Pies
cuadrados
398 Pies
Cúbicos
3.2 Metros x
2.4 Metros
6.8 Metros
cuadrados
11.3 Metros
Cúbicos
cm
122 7/8 312
cm
91 1/4
231.7
126 1/2
321.3
95 3/8
242.2
82 7/8
210.5
cm
121 1/8 307.6
cm
86 3/4
220.3
51 1/8
129.8
63
160
65 1/2
166.3
pared a pared
Área Volume
El Tamaño a
proximado
Área de almacenaje
Dimensión de la base
Borde de la azotea al borde
Abertura de la
puerta
Anchura
Profundidad
Altura
Pulgada Pulgada
Pulgada Pulgada
Dimensión exterior
(ES) Dimensiones del edificio:
(PT) Área de Construção:
Dimensão
aproximada
Área de Arrumação
Dimensão Exterior
Dimensão Interior
10 pés x 8 pés
73 Pies
quadrado
398 Pies
cúbico
Amplitude do Telhado
Dimensão da base
Abertura da Porta
3.2 Metro x
2.4 Metro
6.8 Metro
quadrado
11.3 Metro
cúbico
Comprimento
Profundidade
Altura
Polegada
122 7/8 312
Polegada
91 1/4
231.7
126 1/2
321.3
95 3/8
242.2
82 7/8
210.5
Polegada
121 1/8 307.6
Polegada
86 3/4
220.3
51 1/8
129.8
63
160
65 1/2
166.3
(Parede a Parede)
Área Volume
centímetro centímetro
centímetro centímetro
(DE) Gebäude Abmessung:
Ungefähre
Größe
Innen Abmessung
10 Ft x 8 Ft
73 Sq. Ft
398 Cu.Ft
Dach Kante bis Kante
Fundament Abmessung
Türöffnung
3.2 m x 2.4 m
6.8 Sq.m
11.3 Cu.m
Breite
Tiefe
Höhe
inch
cm
122 7/8 312
inch
cm
91 1/4
231.7
126 1/2
321.3
95 3/8
242.2
82 7/8
210.5
inch
cm
121 1/8 307.6
inch
cm
86 3/4
220.3
51 1/8
129.8
63
160
65 1/2
166.3
( von Wand zu Wand )
Außen Abmessung
(NL) Gebouw afmeting:
Benadering
Maat
Opslag
Buitenkant afmeting
Binnenkant afmeting
10 Voet x 8 Voet
73 Vierkante
voet
398 Kubieke
voet
Dakrand tot rand
Basis afmeting
Deur opening
3.2 m x 2.4 m
6.8 Vierkante
meter
11.3 Kubieke
meter
Wijdte
Diepte
Hoogte
inch
cm
122 7/8 312
inch
cm
91 1/4
231.7
126 1/2
321.3
95 3/8
242.2
82 7/8
210.5
inch
cm
121 1/8 307.6
inch
cm
86 3/4
220.3
51 1/8
129.8
63
160
65 1/2
166.3
Muur tot muur
Gebied
Volume
pouce
pouce pouce
Speicher
Bereich Volumen
La page est en cours de chargement...
La page est en cours de chargement...

(EN) SAFETY & PRECAUTIONS
(FR) SÉCURITÉ ET PRÉCAUTIONS
(PT) SEGURANÇA E CUIDADOS
(ES) SEGURIDAD Y PRECAUCIONES
(DE) SICHERHEITS U.- VORSICHTSMASSNAHMEN
(PL) ŚRODKÓW OSTROŻNOŚCI
(NL) VEILIGHEIDSVOORSCHRIFTEN
(EN) Before You Begin...
(FR) Avant de commencer...
(PT) Antes de iniciar a montagem...
(ES) Antes de comenzar ...
(DE) Bevor Sie anfangen......
(PL) Przed rozpoczęciem montażu...
(NL) Voordat u begint...
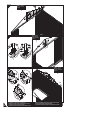
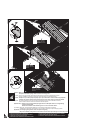
CAUTION
Sharp
Edges
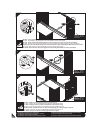
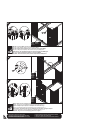
1. Check your local building codes regarding footings, location, etc.
2. Select a site that allows enough working space around the shed.
3. Determine building foundation and anchor system.
4. Read and understand the Owner’s manual enclosed in the package.
5. Follow all directions and dimensions thoroughly.
6. Follow the steps given in the manual carefully for correct assembly.
7. Make sure all parts are present before you start assembling.
8. BE SAFE : Follow safety instructions and avoid injury.
(See inside page).
9. GROUND MUST BE EVEN : Make sure the foundation frame lies flat on the ground. If the earth bed is uneven,
remove sod and other debris and level it with a flat shoval.
10. Separate contents of the carton by the part number and review the list. Be sure you have all the necessary
parts for your shed. Refer Owner’s manual for part list.
(EN)
ATTENTION
Bords
pointus
1. Vérifiez vos codes de bâtiment locaux concernant des poses, la position, etc.
2. Choisissez un site qui laisse assez d'espace de travail autour du hangar.
3. Déterminez la base de bâtiment et ancrez le système.
4. Lisez et comprenez le manuel du propriétaire inséré dans le paquet.
5. Suivez toutes les consignes et dimensions complètement.
6. Suivez les étapes du manuel soigneusement pour l'assemblée correcte.
7. Assurez-vous que toutes les pièces sont présentes avant que vous commenciez avec le montage.
8. SOYEZ SÛR : Suivez les consignes de sécurité et évitez les dommages.
(Voir la page intérieure).
9. LA TERRE DOIT ÊTRE UNIFORME : Assurez-vous que la charpente de la fondation est plate sur la terre. Si le
lit de la terre est inégal, enlevez le gazon et d'autres débris et nivelez-la avec une pelle platel.
10. Séparez le contenu du carton par le numéro de la pièce et révisez la liste. Soyez sûr que vous avez toutes les
pièces nécessaires pour votre hangar. Référez-vous au manuel du propriétaire pour la liste des pièces.
(FR)
CUIDADO
Arestas
1. Cheque os detalhes da construção local relacionados à fundação, localização, etc.
2. Escolha um local espaçoso que permita a realização de trabalho ao redor do galpão.
3. Defina o sistema de fixação e fundação da construção.
4. Leia e entenda o Manual do Proprietário incluso nesta embalagem.
5. Siga atentamente todas as instruções e dimensões.
6. Siga cuidadosamente os passos descritos neste manual para correta montagem.
7. Certifique-se de que todas as peças estejam presentes antes de iniciar a montagem.
8. FIQUE SEGURO : Siga as instruções de segurança e evite ferimentos.
(Veja na pagina).
9. O TERRENO DEVE ESTAR PLANO : Certifique-se de que a base assenta-se de forma plana ao solo. Se o
mesmo estiver irregular, remova protuberâncias e detritos e nivele-o com uma pá.
10. Separe o conteúdo da caixa pelo número da peça e revise a lista. Certifique-se de que você tem todas as
peças necessárias para o seu galpão. Consulte o Manual do Proprietário para lista de peças.
(PT)
3
La page est en cours de chargement...

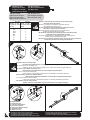
(EN) Be cautious with the tools used for the assembly of the shed.
Familiarize yourself with the operation of all the power tools.
(FR) Soyez prudent avec les outils utilisés pour le montage du hangar.
Familiarisez-vous avec le fonctionnement de toutes machines-outils.
(PT) Use as ferramentas para a instalação do galpão com cuidado.
Familiarize-se com o uso e funcionamento de todas as ferramentas elétricas.
(ES) Tenga cuidado con las herramientas utilizadas para el montaje de la nave.
Familiarícese con el funcionamiento de todas las herramientas eléctricas.
(DE) Bitte seien Sie vorsichtig, hinsichtlich der Benutzung der Werkzeuge während des
Aubaus des Gerätehauses. Befolgen Sie die Bedienungsanleitungen aller Elektrowerkzeuge.
(PL) W trakcie montażu magazynka ostrożnie używaj narzędzi. Zapoznaj się z obsługą narzędzi elektrycznych.
(NL) Wees voorzichtig met het gereedschap die gebruikt word voor de bouw van het schuurtje. Maak uw zelf vertrouwd met het
gebruik van alle elektrische gereedschappen
5
(EN) For your own safety, please read and follow these instructions during the shed assembly.
(FR) Pour votre propre sûreté, svp lisez et suivez ces instructions pendant le montage.
(PT) Para sua própria segurança, leia e siga as instruções durante a instalação do galpão.
(ES) Para su propia seguridad, lea y siga las instrucciones durante el ensamblaje del cobertizo.
(DE) Um für Ihre eigene Sicherheit zu sorgen, bitte lesen Sie die folgenden Anweisungen durch und befolgen Sie siewährend
der Schuppenmontage.
(PL) Dla własnego bezpieczeństwa przeczytaj poniższe instrukcje i podczas montażu magazynka postępuj zgodnie z nimi.
(NL) Voor uw eigen veiligheid, lees en volg deze instructies gedurende de bouw van het schuurtje.
(EN) SAFETY & PRECAUTIONS
(FR) SÉCURITÉ ET PRÉCAUTIONS
(PT) SEGURANÇA E CUIDADOS
(ES) SEGURIDAD Y PRECAUCIONES
(DE) SICHERHEITS U.- VORSICHTSMASSNAHMEN
(PL) ŚRODKÓW OSTROŻNOŚCI
(NL) VEILIGHEIDSVOORSCHRIFTEN
1.
2.
(EN) Children and pets should be kept away from the assembly site to avoid any distractions and accidents.
(FR) Des enfants et des animaux de compagnie ne devraient pas être permis au site de montage afin d’éviter tous les distractions et
accidents.
(PT) Crianças e animais de estimação devem ser mantidos afastados do local de instalação para
evitar distrações e possíveis acidentes.
(ES) Los niños y los animales domésticos deben mantenerse alejados de las instalaciones de
ensamblaje para evitar cualquier distracción o accidente.
(DE) Kinder und Haustiere müssen vom Standort der Montage ferngehalten werden, um
jegliche Ablenkungen und Verletzungen zu vermeiden.
(PL) Aby zapobiec wypadkom nie należy dopuszczać dzieci ani zwierząt domowych w pobliże miejsca montażu.
(NL) Kinderen en dieren moeten worden weggehouden van het bouwterrein om afleiding en ongelukken
te voorkomen.
3.
(EN) When using a step ladder, make sure it is on even ground and fully open with the safety
latch in place. Never concentrate your full weight on the roof or any part of the shed.
(FR) En utilisant une échelle, assurez-vous qu'il est sur la terre égale et s'ouvre entièrement avec le verrou de sûreté
en place. Ne concentrez jamais votre plein poids sur le toit ou n'importe quelle partie du hangar.
(PT) Ao utilizar escadas, certifique-se de que o local seja espaçoso, que o chão seja plano e que a trava de
segurança esteja acionada. Nunca concentre todo o peso do seu corpo no telhado ou em qualquer outra
parte do galpão.
(ES) Cuando se utiliza una escalera de tijera , asegúrese de que este sobre un fondo plano y completamente abierto
con el pasador de seguridad en su lugar. Nunca concentre todo su peso sobre el techo o cualquier parte de la
nave .
(DE) Wenn eine Trittleiter benutzt wird, stellen Sie sicher, dass sie auf ebenem Boden steht und völlig geöffnet
ist und gesperrt. Bitte niemals mit vollem Gewicht auf irgendein Teil des Dachs oder Schuppens stehen.
(PL) Korzystając z drabiny, upewnij się, że stoi na równym podłożu i jest całkowicie rozłożona i zamknięta na zatrzask.
Pod żadnym pozorem nie należy opierać całego ciężaru ciała na dachu lub innej części magazynka.
(NL) Als u een ladder gebruikt, zorg er dan voor dat deze op gelijke grond staat en dat de
veiligheidsklink helemaal openstaat.
4.
(EN) Always wear work gloves, long sleeves and eye protection during assembly of the shed. Some pieces of the
shed contain sharp edges and can cause injury.
(FR) Portez toujours les gants de travail, les longues manches et la protection d'œil pendant le montage du hangar.
Quelques morceaux du hangar contiennent le dièse les bords et peuvent causer des dommages.
(PT) Utilize sempre luvas, roupas de mangas compridas e proteção para os olhos durante
a instalação do abrigo. Algumas peças contêm arestas que podem causar ferimentos.
(ES) Use siempre guantes de trabajo, mangas largas protección ocular durante el montaje de
la nave . Algunas piezas de la nave tienen bordes afilados y pueden causar lesiones.
(DE) Bitte tragen Sie immer Sicherheitshandschuhe, lange Ärmel und Augenschutz während derSchuppenmontage.
Einige Teile des Schuppens können möglicherweise scharfe Kanten besitzen,und können Verletzungen verursachen.
(PL) Podczas montażu magazynka zawsze miej na sobie rękawice ochronne, długie rękawy i okulary ochronne. Niektóre części
magazynka mają ostre krawędzie i mogą spowodować zranienia.
(NL) Draag werk handschoenen. Sommige stukken van de schuur kunnen scherpe randjes bevatten en voor ongelukken
zorgen.

(EN) Do not attempt to assemble the shed on a windy day. Shed panels can be whipped
across by the wind making the worksite difficult and dangerous.
(FR) N'essayez pas d'assembler le hangar un jour venteux. Des panneaux de hangar peuvent
être fouettés par le vent rendant le chantier difficile et dangereux.
(PT) Não monte o galpão num dia de muito vento. Partes do mesmo poderão ser levadas
pelo vento tornando o local de trabalho difícil e perigoso.
(ES) No intente montar el cobertizo durante un día ventoso. Los paneles de cobertizo pueden
ser azotados a través por el viento que hace las obras difíciles y peligrosas.
(DE) Bitte vermeiden Sie, den Schuppen an einem windigen Tag zusamenzustellen. Die
Schuppenpaneele können durch den Wind weggeschleudert werden, wodurch die
Arbeit erschwert und gefährlich wird.
(PL) Nie należy montować magazynka, gdy wieje silny wiatr. Panele magazynka mogą zostać
porozrzucane po całym miejscu budowy, czyniąc je trudnym do opanowania i niebezpiecznym.
(NL) Probeer het schuurtje niet op een winderige dag te bouwen. Schuur panelen kunnen
worden weggewaaid welke het bouwen moeilijk en gevaarlijk maken.
6
5.
(EN) IMPORTANT
(FR) IMPORTANT
(PT) IMPORTANTE
(ES) IMPORTANTE
(DE) WICHTIG
(PL) WAŻNE
(NL) BELANGRIJK
(EN) Wear eye protection when using any form of power tools. Do not use voltage power tools in a wet or damp
enviornment to avoid electric shock.
(FR) Portez la protection d'œil en employant n'importe quelle forme de machines-outils. N'employez pas les machines-outils de
tension dans un environnement humide afin d’éviter le choc électrique.
(PT) Use óculos de proteção ao utilizar qualquer ferramenta elétrica. Não use ferramentas elétricas em ambiente
molhado ou úmido para evitar choque elétrico.
(ES) Use protección ocular cuando utilice cualquier tipo de herramientas eléctricas. No utilice herramientas de tensión en un
ambiente húmedo o mojado para evitar descargas eléctricas.
(DE) Bitte tragen Sie einen Augenschutz, während Sie die Elektrowerkzeuge benutzen. Bitte verwenden Sie die
elektrischen Werkzeuge nicht in einer nassen oder feuchten Umgebung, um einen Stromschlag zu vermeiden.
(PL) Używając elektronarzędzi zawsze zakładaj okulary ochronne. Aby uniknąć porażenia, nie używaj elektronarzędzi
zasilanych z sieci, gdy jest mokro.
(NL) Gebruik veiligheidsbril wanneer u breek of elektrische gereedschap gebruikt. Gebruik geen voltage elektrische
gereedschap in een vochtige omgeving, dit om elektrische schokken te voorkomen.
(EN) Do not use any part of the shed as a means of personal support while attaching components during assembly.
(FR) N'employez pas toute partie du hangar en tant que des moyens d'appui personnel tout en attachant des composants
lors du montage.
(PT) Não utilize qualquer parte do galpão como um meio de suporte para o corpo durante a montagem.
(ES) No utilice ninguna parte de la nave como un medio de apoyo personal mientras coloca los componentes durante el montaje.
(DE) Bitte benutzen Sie kein Teil des Schuppens als Hilfsmittel für den Zusammenbau der Komponenten.
(PL) Nie używaj żadnej części magazynka jako oparcia podczas składania elementów.
(NL) Gebruik geen enkele kant van de schuur als persoonlijke leuning tijdens het aanbrengen van onderdelen
tijdens de bouw.
(EN) The shed must be constructed on a solid base foundation. A concrete pad or a large size concrete patio stone
squares is recommended for suitable floor base. Make sure it is firm and level and will allow drainage away from the
site. The base foundation should be at least 4 inches (100mm) larger than the shed dimensions. Please refer to the
front page of your owner’s manual for the exterior dimensions of the shed. Manufacturer is not responsible for the
choice and construction of the foundation.
(FR) Le hangar doit être construit sur une fondation de base solide. Une garniture en béton armé ou une pierre de patio en béton
armé de grande taille est recommandée pour une base appropriée du plancher. S'assurer qu'elle est ferme et de niveau
et permettra le drainage à partir de l'emplacement. La fondation de base devrait être au moins de 4 pouces (100mm) plus
grande que les dimensions du hangar. Veuillez vous référer à la première page de votre manuel de propriétaire pour les
dimensions extérieures du hangar. Le fabricant n'est pas responsable du choix et de la construction de la fondation.
(PT) A vertente deve ser construída em uma fundação baixa contínua. Uma almofada concreta ou uns quadrados concretos
de uma pedra do patio do tamanho grande são recomendados para a base apropriada do assoalho. Certifique-se que é
empresa e nível e permitirá a drenagem longe do local. A fundação baixa deve ter pelo menos 4 polegadas (100mm)
maior do que as dimensões da vertente. Consulte por favor à página dianteira do manual do seu proprietário para as
dimensões exteriores da vertente. O fabricante não é responsável para a escolha e a construção da nota
(ES) La vertiente se debe construir en una fundación sólida Un cojín concreto o los cuadrados concretos del tamaño grande de
una piedra del patio se recomiendan para la base conveniente para el suelo. Asegúrese de que sea firme y llana y que permita
drenaje lejos del sitio. La fundación baja debe ser por lo menos de 4 pulgadas (100m m) más grande que las dimensiones de
la vertiente. Refiera por favor a la página delantera del manual de su dueño para las dimensiones exteriores de la vertiente. El
fabricante no es responsable de la opción y de la construcción de la fundación.
(DE) Das Gerätehaus muss auf einem festen Fundament errichtet werden. Eine Betonauflage oder grosse quadratische
Betonhofsteine werden als Bodenkonstruktion empfohlen. Stellen Sie sicher, dass das Fundament fest und waagerecht
ausgerichtet ist und die Entwaesserung weg vom Aufstellungsort ermoeglicht. Die Abmessung des Fundamentes sollte
mindestens 4 Zoll (100 mm) grösser sein als die Abmessung des Gerätehauses. Beachten Sie bitte die
Aussenabmessungen des Gerätehauses (siehe Vorderseite Ihres Bedienerhandbuches). Der Hersteller des
Grätehauses ist nicht fuer die Wahl und den Aufbau des Fundamentes verantwortlich.
La page est en cours de chargement...
La page est en cours de chargement...
La page est en cours de chargement...

(EN) Note : Use screws with plastic washers on top of prepainted surface only.
(FR) Note -Utilisez des vis avec des rondelles en plastique sur le dessus de la surface pré peinte seulement
(PT) Nota - Utilize parafusos com anilhas plásticas em cima da superfície prepainted apenas.
(ES) Nota - Use los tornillos con las arandelas plásticas encima pre pintadas en la superficie solamente.
(DE) Anmerkung : Benutzen Sie bei lackierten Oberflaechen nur Schrauben mit Plastikunterlegscheiben.
(PL)Uwaga : Używaj śrub z plastikowymi uszczelkami wyłącznie na wcześniej pomalowanej powierzchni.
(NL)Notitie: Gebruik schroeven met plastieken ring aan de bovenkant of voor gelakt ondergrond.
(EN) Note :1. Before starting installation, please refer Safety & Precautions.
2. Maximum no. of Extension can be build upto 10' x 10',10' x 12' (ie. 2 Extension).
(FR) Note: 1. Avant de commencer l'installation, référez-vous svp à Sécurité et Précautions.
2. Nombre maximum de la prolongation peut être construit jusqu'à 10' x 10',10' x 12' (c.-à-d. 2 prolongation).
(PT) Nota: 1. Antes de iniciar a instalação, cheque item “Segurança e Cuidados”.
2. Extensão máxima que pode ser construída: ate 10' x 10',10' x 12' (i.e. 2 extensão)
(ES) Nota: 1. Antes de comenzar la instalación, consulte Seguridad y Precauciones.
2. No. de extensiones máximos que se pueden construir hasta 10' x 10',10' x 12' ( 2 extensión).
(DE) Anmerkung:1. Lesen Sie vor dem Aufbau die Sicherheitsanweisungen.
2. Maximale Anzahl der Erweiterung kann bauen bis 10' x 10',10' x 12' (d.h. 2 Erweiterung).
(PL) Uwaga: 1. Przed rozpoczęciem instalacji należy przeczytać rozdział Bezpieczeństwo i środki ostrożności.
2. Maksymalny rozmiar przybudówki może wynieść 10' x 10',10' x 12' (tj. 2 przybudówka)
(NL) Notitie: 1. Voordat u begint met installeren, verwijzing naar veiligheid voorschriften.
2. Maximaal aantal uitbreidingen kunnen worden aangebracht tot en met 10' x 10',10' x 12'(2 éénuitbreiding).
10
(EN) IMPORTANT: USE HAND GLOVES TO PREVENT INJURY.
(FR) IMPORTANT: UTILISER LES GANTS POUR PREVENIR LES ACCIDENTS.
(PT) IMPORTANTE: USAR LUVAS PARA EVITAR LESÕES.
(ES) IMPORTANTE: GUANTES DE MANO DE USO PARA PREVENIR LA HERIDA.
(DE) WICHTIG: BENUTZEN SIE HANDSCHUHE, UM VERLETZUNGEN ZU VERMEIDEN.
(PL) WAŻNE: UŻYWAJ RĘKAWIC, ABY ZAPOBIEC URAZOM.
(NL) BELANGRIJK: GEBRUIK HANDSCHOENEN OM VERWONDINGEN TE VERMIJDEN.
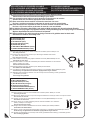
Hand Gloves
Cordless Drill - Philips Head
Screw driver - Philips Head
Carpenter’s Square
Eye Protector
8’ Step Ladder
Adjustable pliers
Level - 3ft.
Tape Measure
(EN) Tools You Will Need
Gants
Perceuse sans fil – Tête Philips
Tournevis - Tête Philips
Équerre du Menuisier
Protecteur des Yeux
Escabeau 8'
Pince réglable
Niveau - 3ft.
Ruban à mesurer
(FR) Outils dont vous aurez besoin
Entregue Guantes el Taladro
Inalámbrico - conductor de
Tornillo de Cabeza de Philips -
Protector de Ojo de Cuadrado de
Cabeza de Philips CarpenterOs
8' Paso Escalera
alicates Ajustables
Nivelan - 3 p.
Grabe la Medida
(ES) Equipar con herramienta Usted Necesitará
Rękawice ochronne
Bezprzewodowa wkrętarka – krzyżakowa
Śrubokręt krzyżakowy
Kątownik stolarski
Okulary ochronne
8’ Drabina składana
Kombinerki nastawne
Poziomica – 91,4 cm
Taśma miernicza
(PL) Potrzebne narzędzia
Handschoenen
Snoerloze boormachine met gekruiste kop
Snoerloze schroevendraaier met gekruiste kop
Winkelhaak
Oogbescherming
Ladder met acht treden
Verstelbare tang
Waterpas
Meetlint
(NL) Gereedschappen die u nodig zult hebben
Handschuhe
Akku-Bohrschrauber - Kreuzschlitzbit
Kreuzschlitz-Schraubenzieher
Winkelmaß
Schutzbrille
8’ Leiter
Verstellbare Zange
Wasserwaage – 1 m
Maßband
(DE) Benötigte Werkzeuge
Luvas Escadote 8”
Berbequim de bateria Alicate ajustável
Chave de fenda – cabeça estrela 3ft. Nível
Esquadro de carpinteiro Fita Métrica
Protector Ocular
(PT) Ferramentas que irá necessitar
La page est en cours de chargement...

12
(EN) IMPORTANT: USE HAND GLOVES TO PREVENT INJURY.
(FR) IMPORTANT: UTILISER LES GANTS POUR PREVENIR LES ACCIDENTS.
(PT) IMPORTANTE: USAR LUVAS PARA EVITAR LESÕES.
(ES) IMPORTANTE: GUANTES DE MANO DE USO PARA PREVENIR LA HERIDA.
(DE) WICHTIG: BENUTZEN SIE HANDSCHUHE, UM VERLETZUNGEN ZU VERMEIDEN.
(PL) WAŻNE: UŻYWAJ RĘKAWIC, ABY ZAPOBIEC URAZOM.
(NL) BELANGRIJK: GEBRUIK HANDSCHOENEN OM VERWONDINGEN TE VERMIJDEN.
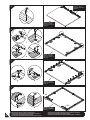
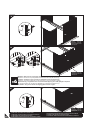
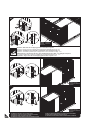
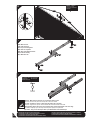
A. (EN) Foundation (DE) Fundament
(FR) Fondation (PL) Podstawa
(PT) Fundação (NL) Fundering
(ES) La base
(EN) DuraMax must be installed on a level wooden platform or a level
concrete foundation.
(FR) DuraMax doit être installé sur une plate-forme en bois ou une
fondation de béton.
(PT) Duramax deve ser instalado em uma plataforma de madeira o
numa fundação de betão nívelada.
(ES) DuraMax se debe instalar en una plataforma de madera plana o una
base concreta plana.
(DE) DuraMax ist auf einer ebenen Holzplattform oder einem ebenen
Betonfundament zu installieren.
(PL) DuraMax powinien być zainstalowany na poziomej platformie
drewnianej lub na poziomej ławie fundamentowej.
(NL) Een DuraMax schuur moet worden geïnstalleerd op een vlak
houten platform of op een vlakke betonnen fundering.
(EN) Lay 2 x 4 Flat
(Actual size 2”x 3 1/2”, 50mm x 88.9mm)
(FR) Aire Plate 2” x 4”mm
(taille réelle 2”x 3 1/2”, 50mm x 88.9mm)
(PT) Deitare 2” x 4”mm Plano
(tamanho atual 2”x 3 1/2”, 50mm x 88.9mm)
(ES) Colocar 50 x 88.9 mm en llano
(Tamaño real 2” x 3 1/2”, 50mm x 88.9mm)
(DE) 2 x 4 Latten flachlegen
(Aktuelle Größe 2”x 3 1/2”,50 x 88.9)
(PL) Połóż płasko słupki 2x4
(Rzeczywisty rozmiar 2”x 3 1/2”, 50mm x 88,9mm)
(NL) Laag 2 x 4 Vlak
(Precieze maat 2 x 3 ½, 50 mm x 88.9 mm)
50
88.9
(EN)Note
(FR)Note
(PT)Nota
(ES)Nota
(DE)Anmerkung
(PL)Uwaga
(NL)Notitie
(EN) Use pressure treated wood studs 2 x 4 (Actual size 2”x 3 1/2”, 50mm x 88.9mm) to create a platform frame that has
an outside dimension of 94”x125” (2387.6mm x 3175mm).
Using exterior grade CDX 3/4” (19mm) plywood, cut and fit together the sheets to form solid foundation as shown.
Foundation must be square and level.
Wooden Platform (Not Included)
The following are the list of lumber and sizes you will need.
Pressure Treated - Wood Studs:
2ea 2” x 3 1/2” x 125” (50mm x 88.9mm x 3175 mm)
6ea 2” x 3 1/2” x 87” (50mm x 88.9mm x 2209.8 mm)
Exterior Grade (CDX) - 3/4” (19mm) plywood
2ea 3/4” x 48” x 94” (19mm x 1219.2mm x 2387.6mm)
1ea 3/4” x 29” x 94” (19mm x 736.6mm x 2387.6mm)
L-Brackets: 4ea
(FR) Utilisez les étalons de bois traité sous pression de 2"x 4" (Taille réelle 2“ x 3 1/2” 50mm x 88.9mm) pour créer un cadre de
plate-forme qui a une dimension extérieure de 94" x 125" (2387.6mm x 3175mm).
Utilisant du contre-plaqué de calibre extérieur CDX 3/4" (19mm), couper et fixer les feuilles ensemble pour former une
fondation solide, comme illustré. La fondation doit être de forme carrée et nivelée.
Plate-forme en bois (non incluse)
Voici une liste de bois et de tailles que vous aurez besoin.
Étalon de bois -Traité sous pression :
2ea 2"x 3 1/2" x 125" (50mm x 88.9mm x 3175mm)
6ea 2"x 31/2" x 87" (50mm x 88.9mm x 2209.8mm)
Contre-plaqué Calibre Extérieur (CDX) - 3/4" (19mm)
2ea 3/4 "x 48" x 94" (19mm x 1219.2mm x 2387.6mm)
1ea 3/4 "x 29" x 94" (19mm x 736.6mm x 2387.6mm)
Crochets L: 4EA
(PT) Use madeira compresada e tratada, pregos 2” x 4” (Tamanho atual 2“ x 3 1/2” 50mm x 88.9mm) para criar uma plataforma
que tem uma moldura com dimenção extrior de 94” x 125” (2387.6mm x 3175mm).
Usando superior Qualidade CDX 3/4” (19mm) Playwood (Madeira compressada), cortar as placas para formar uma
fundação sólida como mostra a figura. A Fundação deve ser bem esquadrada e nivelada.
Plataforma de madeira (Não incluida)
As seguites, são uma lista do número e tamanho do material que vosê irá precisar.
Pressão tratada – Pregos de madeira:
2ea 2” x 3 1/2” x 125” (50mm x 88.9mm x 3175 mm)
6ea 2” x 3 1/2” x 87” (50mm x 88.9mm x 2209.8 mm)
Qualidade extrior (CDX) – 3/4” (19mm) Playwood (Madeira compressada)
2ea 3/4” x 48” x 94” (19mm x 1219.2mm x 2387.6mm)
1ea 3/4” x 29” x 94” (19mm x 736.6mm x 2387.6mm)
L-Suportes: 4ea
(ES) El uso presiona madera tratada tachona 2" X 4" (50 mm X 88.9mm) crear un marco de la plataforma que tiene una
dimensión exterior de 94" X 125" (2387.6mm X 3175mm).
Usando el grado del exterior CDX 3/4" (19 mm) contrachapado, cortó y queda junto las hojas para formar la base sólida
como mostrado. La base debe ser cuadrada y plana.
La Plataforma de madera (no Incluyó)
El siguiente es una lista de madera y lo calibra necesitará.
Presione Tratado - Madera Tachona:
2ea 2" x 3 1/2" x 125" (50mm x 88.9mm x 3175 mm)
6ea 2" x 3 1/2" x 87" (50mm x 88.9mm x 2209.8 mm)
El Grado (CDX) exterior - 3/4' (19 mm) contrachapado
2ea 3/4" x 48" x 94" (19mm x 1219.2mm x 2387.6mm)
1ea 3/4" x 29" x 94" (19mm x 736.6mm x 2387.6mm)
L-Brackets: 4ea
La page est en cours de chargement...

14
The shed must be constructed on a solid base foundation. A concrete pad or a large size concrete patio stone squares is
recommended for suitable floor base. Make sure it is firm and level and will allow drainage away from the site. The base foundation should be at
least 4 inches(100mm)larger than the shed dimensions. Please refer to the front page of your owner’s manual for the exterior dimensions of the
shed. Manufacturer is not responsible for the choice and construction of the foundation
Note: For a concrete pad base, prepare a level bed for a firm footing layer of crushed stone. The concrete pad should then be poured
to a thickness of 4 inches (100mm) to 5 inches (125mm). Allow to dry thoroughly for at least 48 hours
(EN) Concrete Platform
Le hangar doit être construit sur une fondation de base solide. Une garniture en béton armé ou une pierre de patio en béton armé de
grande taille est recommandée pour une base appropriée du plancher. S'assurer qu'elle est ferme et de niveau
et permettra le drainage à partir de l'emplacement. La fondation de base devrait être au moins de 4 pouces (100mm) plus
grande que les dimensions du hangar. Veuillez vous référer à la première page de votre manuel de propriétaire pour les
dimensions extérieures du hangar. Le fabricant n'est pas responsable du choix et de la construction de la fondation.
Note: Pour une base de garniture en béton armé, préparer un lit de niveau pour une couche de pied ferme en pierre écrasée. La
garniture en béton armé devrait alors être versée à une épaisseur de 4 pouces (100mm) à 5 pouces (125mm). Permettre le séchage
complètement pendant au moins 48 heures.
(FR)Plate-forme en béton armé
A vertente deve ser construída em uma fundação baixa contínua. Uma almofada concreta ou uns quadrados concretos de uma
pedra do patio do tamanho grande são recomendados para a base apropriada do assoalho. Certifique-se que é empresa e nível e permitirá a
drenagem longe do local. A fundação baixa deve ter pelo menos 4 polegadas (100mm) maior do que as dimensões da vertente. Consulte por
favor à página dianteira do manual do seu proprietário para as dimensões exteriores da vertente. O fabricante não é responsável para a escolha
e a construção da nota
Note: Para uma base concreta da almofada, prepare uma cama do nível para uma camada de fundamento da empresa de pedra
esmagada. A almofada concreta deve então ser derramada a uma espessura de 4 polegadas (100mm) a 5 polegadas (125mm).
Reserve para secar completamente no mínimo 48 horas
(PT)Plataforma concreta
La vertiente se debe construir en una fundación sólida Un cojín concreto o los cuadrados concretos del tamaño grande de una
piedra del patio se recomiendan para la base conveniente para el suelo. Asegúrese de que sea firme y llana y que permita drenaje lejos del
sitio. La fundación baja debe ser por lo menos de 4 pulgadas (100m m) más grande que las dimensiones de la vertiente. Refiera por favor a
la página delantera del manual de su dueño para las dimensiones exteriores de la vertiente. El fabricante no es responsable de la opción y de
la construcción de la fundación
Nota: Para una base concreta del cojín, prepare una cama llana para una capa de pie firme de la piedra machacada. El cojín
concreto se debe entonces verter a un grueso de 4 pulgadas (100m m) a 5 pulgadas (125m m). Permita secarse a fondo por lo
menos 48 horas
(ES) Plataforma Concreta
Das Gerätehaus muss auf einem festen Fundament errichtet werden. Eine Betonauflage oder grosse quadratische Betonhofsteine
werden als Bodenkonstruktion empfohlen. Stellen Sie sicher, dass das Fundament fest und waagerecht ausgerichtet ist und die Entwaesserung
weg vom Aufstellungsort ermoeglicht. Die Abmessung des Fundamentes sollte mindestens 4 Zoll (100 mm) groesser sein als die Abmessung
des Gerätehauses. Beachten Sie bitte die Aussenabmessungen des Gerätehauses (siehe Vorderseite Ihres Bedienerhandbuches). Der
Hersteller des Gerätehauses ist nicht fuer die Wahl und den Aufbau des Fundamentes verantwortlich.
Anmerkung: Fuer eine Betonauflage bereiten Sie ein waagerecht ausgerichtetes Bett vor. Die Betonauflage sollte eine Staerke von 4
Zoll (100mm) bis 5 Zoll (125 mm) aufweisen. Darunter sollten Sie fuer eine frostfeste Kiesschicht nach ortsueblichen Vorgaben
sorgen.
(DE) Betonauflage plattform
Magazynek należy zbudować na trwałej podstawie. Ława fundamentowa lub duża betonowa płyta tarasowa w kształcie kwadratu to
odpowiednie materiały na jego fundamenty. Upewnij się, że są one stabilne i wyrównane oraz że umożliwią odpływ wody z miejsca budowy.
Wymiary podstawy powinny być co najmniej o 100 mm większe niż wymiary magazynka. W celu zapoznania się z zewnętrznymi wymiarami
magazynka zajrzyj na pierwszą stronę podręcznika użytkownika. Producent nie odpowiada za wybór i budowę podstawy.
Uwaga: W przypadku wylewania ławy fundamentowej przygotuj podłoże z warstwy kamiennego tłucznia. Następnie wylej ławę
fundamentową na grubość od 100 do 125 mm i zostaw do związania na co najmniej 48 godzin
( PL) Platforma betonowa
De schuur moet gebouwd worden op een sterke basis fundering. Een betonnen blok of een grote betonnen patio vierkante steen is
aanbevolen voor de geschikte vloer basis. Zorg ervoor dat het stevig en vlak en het goede afwatering toelaat vanuit de plaats. De basis fundering
moet zeker 4 inches ( 100 mm) groter zijn dan de afmeting van het schuurtje. Verwijzing naar de voorpagina van uw beschrijving voor afmeting
buitenkant van het schuurtje. De bouwer is niet verantwoordelijk voor de keuze van constructie van de fundering.
Let op: voor betonnen blok basis, bereid een gelijke vlakte voor een vlak ondergrondslaag van keistenen. De betonnen blok moet dan
worden gegoten tot een dikte van 4 inches (100 mm) tot 5 inches ( 125 mm). Laat het drogen tenminste 48 uren.
( NL) Betonnen plaat
(EN) IMPORTANT: USE HAND GLOVES TO PREVENT INJURY.
(FR) IMPORTANT: UTILISER LES GANTS POUR PREVENIR LES ACCIDENTS.
(PT) IMPORTANTE: USAR LUVAS PARA EVITAR LESÕES.
(ES) IMPORTANTE: GUANTES DE MANO DE USO PARA PREVENIR LA HERIDA.
(DE) WICHTIG: BENUTZEN SIE HANDSCHUHE, UM VERLETZUNGEN ZU VERMEIDEN.
(PL) WAŻNE: UŻYWAJ RĘKAWIC, ABY ZAPOBIEC URAZOM.
(NL) BELANGRIJK: GEBRUIK HANDSCHOENEN OM VERWONDINGEN TE VERMIJDEN.
La page est en cours de chargement...
La page est en cours de chargement...

17
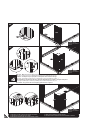
S2
7
BBF
BBF
2
S2
1
ECA
BBF
8
1 & 2
BBF
BBF
ECA
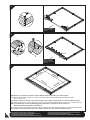
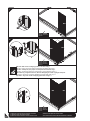
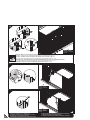
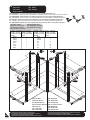
(EN) Measure in all direction as shown in figure. Make the base bar assembly in a perfect square.
(FR) Mesurer dans toutes les directions, comme montré dans la figure. Faites l’assemblage de la base de la barre
dans un parfait carré.
(PT) Messa em todas as direções, como mostra a figura. Faça a barra de montagem em uma base quadrada perfeita.
(ES) Mida en total dirección como mostrado en la figura. Haga la asamblea despreciable de la barra en un cuadrado perfecto.
(DE) In alle Richtungen wie auf der Abbildung gezeigt vermessen. Vergewissern Sie sich, dass die
Bodenrahmenmontage perfekt rechtwinklig ist.
(PL) Wykonaj pomiary we wszystkich kierunkach, tak jak pokazano na rysunku. Wykonaj podstawę w formie idealnego kwadratu.
(NL) Uitmeten zoals geïllustreerd. Zorg ervoor dat de ondersteunen een perfecte rechthoek vormen.
(
3037mm
)
(2170mm)
(
3037mm
)
(2170mm)
9
(EN) Front
(FR) Avant
(PT) Frente
(ES) Frente
(DE) Vorne
(PL) Przód
(NL)
Vooraan
(EN) IMPORTANT: USE HAND GLOVES TO PREVENT INJURY.
(FR) IMPORTANT: UTILISER LES GANTS POUR PREVENIR LES ACCIDENTS.
(PT) IMPORTANTE: USAR LUVAS PARA EVITAR LESÕES.
(ES) IMPORTANTE: GUANTES DE MANO DE USO PARA PREVENIR LA HERIDA.
(DE) WICHTIG: BENUTZEN SIE HANDSCHUHE, UM VERLETZUNGEN ZU VERMEIDEN.
(PL) WAŻNE: UŻYWAJ RĘKAWIC, ABY ZAPOBIEC URAZOM.
(NL) BELANGRIJK: GEBRUIK HANDSCHOENEN OM VERWONDINGEN TE VERMIJDEN.
(EN) Front
(FR) Avant
(PT) Frente
(ES) Frente
(DE) Vorne
(PL) Przód
(NL)
Vooraan

18
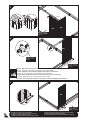
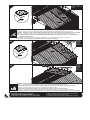
Using a carpenter square, line up corners. Align Base bars, mark the concrete at the holes in the base and drill concrete
with 1/4” (dia. 6mm) concrete bit to accept anchor bolts to a 1 3/4” (44mm) depth. Replace base and secure with 1/4” x 1 3/8” (M6 x 35mm)
anchor bolts (not provided).
Utilisant l’équerre du menuisier, aligner les coins. Aligner la base de barres, marquer le béton dans les trous à la base et forer le
béton avec mèche à béton de 1/4 "(dia. 6mm) pour accepter des boulons d’ancrage à une augmentation de 1 3/4" (44mm) de profondeur.
Remplacer la base et fixez-le avec des boulons d'ancrage (non fourni) 1/4 "x 1 3/8" (M6 x 35 mm).
Usando um esquadro de carpinteiro para alinhar os cantos. Alinhe a barra base e marque no cimento os buracos, perfure o
cimento com uma broca 1/4” (6mm) de betão para acentar uma âncora com parafusos 1 3/4” (44mm) de perfundidade. Substituia a base e
segure com parafusos 1/4” X 1 3/8”mm (M6 X 35mm) Anchor bolts (não fornecidos).
Usar un cuadrado de carpintero, forma fila rincones. Alinee las barras Despreciablees, marcan el cemento en los hoyos en el cemento de
la base y el taladro con 1/4" (dia. 6 Mm) el pedacito de cemento para aceptar cerrojos de ancla a un 1 3/4" (44 Mm) la profundidad.
Reemplace la base y asegure con 1/4" X 1 3/8" (M6 X 35 Mm) cerrojos de ancla (no proporcionado).
(Betonfundament). Die Ecken mit einem Winkelmaß ausrichten. Den Bodenrahmen ausrichten, die Bohrlöcher des Bodens auf dem
Beton markieren und mit einem Betonbohrer Ø 6 mm (1/4“) vorbohren, wo die Ankerbolzen auf 44 mm Tiefe (1 3/4“) eingesetzt werden.
Boden wieder aufsetzen und mit 1/4“ x 1 3/8“ (M6 x 35 mm) Ankerbolzen (nicht einbegriffen) befestigen.
Używając kątownika stolarskiego, wyrównaj kąty. Wyrównaj profile podstawy, zaznacz na betonie miejsca na otwory w podstawie i
wywierć w betonie otwory przy pomocy wiertła do betonu 1/4” (śr. 6mm) pasujące do śrub kotwiących o długości 1 3/4” (44 mm). Zamocuj
ponownie podstawę i zabezpiecz przy pomocy śrub kotwiących 1/4” x 1 3/8” (M6 x 35 mm) (nie są dołączone).
(EN) Assembly on concrete Foundation
9a
(FR) Générale sur les fondations en béton
(PT) Assembléia em betão Foundation
(ES) Asamblea sobre bases concretas
(DE) Betonfundament
(PL) Montaż na betonowej podstawie
(EN)
IMPORTANT
: Use screws with plastic washers on top of prepainted surface only.
(FR)
IMPORTANT
: Utilisez des vis avec des rondelles en plastique sur le dessus de la surface pré peinte seulement.
(PT)
IMPORTANTE
Utilize parafusos com anilhas plásticas em cima da superfície prepainted apenas.
(ES)
IMPORTANTE
: Use los tornillos con las arandelas plásticas encima pre pintadas en la superficie solamente.
(DE)
WICHTIG
: Benutzen Sie bei lackierten Oberflaechen nur Schrauben mit Plastikunterlegscheiben.
(PL)
WAŻNE
: Używaj śrub z plastikowymi uszczelkami wyłącznie na wcześniej pomalowanej powierzchni.
(NL)
BELANGRIJK:
Gebruik schroeven met plastieken ring aan de bovenkant of voor gelakt ondergrond.
S3
PW
S1
S2
PW
(EN) Note: All panels are clearly marked and care should be taken to use the correct one.
(FR) Note: Toutes les parois sont clairement identifiées et il faut veiller à utiliser la bonne.
(PT) Nota: Todos os painéis estão claramente marcados, um cuidado deve ser tomado para o uso correcto.
(ES) Nota: Todo pone panel son marcados claramente y cuidan debe ser tomado para usar el corrige uno.
(DE) Anmerkung: Alle Platten sind deutlich gekennzeichnet, und es sind unbedingt jeweils die richtigen Platte zu verwenden.
(PL) Uwaga: Wszystkie panele ścienne są dokładnie oznakowane i należy zwrócić uwagę, aby używać właściwych elementów.
(NL) Notitie: Markeer alle panelen zorgvuldig en gebruik altijd de juiste panelen.
Gebruik een winkelhaak om de hoeken recht te zetten. Zorg ervoor dat de ondersteunen goed aansluiten, markeer de gaten in de
ondersteunen en boor gaten in de betonnen fundering met een 6 mm boor om de ondersteunen met 44 mm bouten in de fundering vast te
zetten. Leg de ondersteunen weer op de juiste plaats en zet ze vast met M6 x 35 mm bouten (niet bijgeleverd).
(NL) Vergadering over concrete stichting
(EN) Parts needed
(FR) Pièces nécessaires
(PT) Peças Necessárias
(ES) Las partes necesitaron
(DE) Benötigte Teile
(PL) Niezbędne elementy
(NL) Onderdelen nodig
AS2A 2
SSA 1
SCA 2
TS 4
DCL 1
DCR 1
S1 117
S3 14
PW 107
WFR 1
WFL 1
WCF 2
WCB 2
WS 9
SRA 1
SLA 1
ABLA 1
ABRA 1
AS1A 2
(EN)
CODE
(FR)
CODE
(PT)
CÒDIGO
(ES)
CODE
(DE)
CODE
(PL)
KOD
(NL)
CODE
(EN)
QTY
(FR)
QTÉ
(PT)
QTDE
(ES)
QTY
(DE)
STCK
(PL)
ILOŚĆ
(NL)
AANTAL
(EN)
CODE
(FR)
CODE
(PT)
CÒDIGO
(ES)
CODE
(DE)
CODE
(PL)
KOD
(NL)
CODE
(EN)
QTY
(FR)
QTÉ
(PT)
QTDE
(ES)
QTY
(DE)
STCK
(PL)
ILOŚĆ
(NL)
AANTAL
(EN) IMPORTANT: USE HAND GLOVES TO PREVENT INJURY.
(FR) IMPORTANT: UTILISER LES GANTS POUR PREVENIR LES ACCIDENTS.
(PT) IMPORTANTE: USAR LUVAS PARA EVITAR LESÕES.
(ES) IMPORTANTE: GUANTES DE MANO DE USO PARA PREVENIR LA HERIDA.
(DE) WICHTIG: BENUTZEN SIE HANDSCHUHE, UM VERLETZUNGEN ZU VERMEIDEN.
(PL) WAŻNE: UŻYWAJ RĘKAWIC, ABY ZAPOBIEC URAZOM.
(NL) BELANGRIJK: GEBRUIK HANDSCHOENEN OM VERWONDINGEN TE VERMIJDEN.
c. (EN) Walls & Columns (DE) Wände und Säulen
(FR) Murs et colonnes (PL) Ściany I Kolumy
(PT) Paredes e Colunas (NL) Panelen en stijlen
(ES) Las paredes & las Columnas
La page est en cours de chargement...
La page est en cours de chargement...

21
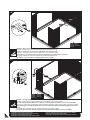
1
SLA
WFL
WCF
2
S1
PW
WFL
WCF
9
WFL
SLA
1 & 2
S3
PW
WCF
WFL
8
1
WCF
WFL
S1
2
BS1A
BBF
PW
WCF
WFL
BS1A
1
2
7
(EN) Note: Make sure the overlapping position is as shown in fig.1.
(FR) Note: Assurez-vous que la position chevauchement est indiquée dans la Fig 1.
(PT) Nota: Certifique-se que a posição se sobrepõem como mostrado na fig.1.
(ES) Nota: Cerciórese la posición que se superpone es como mostrada en el higo. 1.
(DE) Anmerkung: Vergewissern Sie sich, dass die Überlappung der in Abb. 1 gezeigten entspricht.
(PL) Uwaga: Upewnij się, że elementy nakładają się na siebie tak jak widać na rys. 1.
(NL) Notitie: Zorg ervoor dat de overlapping gebeurt zoals in figuur 1.
(EN) Front
(FR) Avant
(PT) Frente
(ES) Frente
(DE) Vorne
(PL) Przód
(NL)
Vooraan
(EN) Front
(FR) Avant
(PT) Frente
(ES) Frente
(DE) Vorne
(PL) Przód
(NL)
Vooraan
(EN) IMPORTANT: USE HAND GLOVES TO PREVENT INJURY.
(FR) IMPORTANT: UTILISER LES GANTS POUR PREVENIR LES ACCIDENTS.
(PT) IMPORTANTE: USAR LUVAS PARA EVITAR LESÕES.
(ES) IMPORTANTE: GUANTES DE MANO DE USO PARA PREVENIR LA HERIDA.
(DE) WICHTIG: BENUTZEN SIE HANDSCHUHE, UM VERLETZUNGEN ZU VERMEIDEN.
(PL) WAŻNE: UŻYWAJ RĘKAWIC, ABY ZAPOBIEC URAZOM.
(NL) BELANGRIJK: GEBRUIK HANDSCHOENEN OM VERWONDINGEN TE VERMIJDEN.
(EN) Front
(FR) Avant
(PT) Frente
(ES) Frente
(DE) Vorne
(PL) Przód
(NL)
Vooraan
La page est en cours de chargement...
La page est en cours de chargement...

24
AS1A
SLA
WCF
16
S1
AS1A
AS2A
AS2A
AS1A
17
WCF
AS1A
SLA
S1
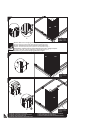
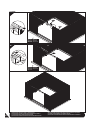
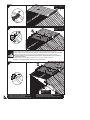
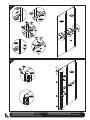
(EN) Note: Top angle (AS1A) must slide in-between the sliding channel (SLA) and wall panel (WCF).
(FR) Note: Angle supérieur (AS1a) doit glisser entre le canal glisseur (SLA) et la paroi (WCF).
(PT) Nota: Ângulo superior (AS1A) têm que deslizar no meio do perfilio círio (SLA) e do painel de parede (WCF).
(ES) Nota: El ángulo primero (AS1A) debe deslizar intermedio el entrepaño (WCF) del canal (SLA) y la pared que desliza.
(DE)Anmerkung: Der obere Winkel (AS1A) muss zwischen Gleitschiene (SLA) und Wandplatte (WCF) eingeschoben werden.
(PL)
Uwaga:
Górny kąt (AS1A) musi wejść pomiędzy szynę (SLA) a panel ścienny (WCF).
(NL)
Notitie:
Boven uiteinden ( AS1A) moet glijden tussen de geleidingskanaal(SLA) en de muur paneel(WCF).
AS1A
WCF
WS
S1
PW
WS
WCF
18
(EN) Note: Make sure the overlapping position is as shown in fig.
(FR) Note: Assurez-vous que la position chevauchement est indiquée dans la Fig.
(PT) Nota: Certifique-se que a posição se sobrepõem como mostrado na fig.
(ES) Nota: Cerciórese la posición que se superpone es como mostrada en el higo.
(DE) Anmerkung: Vergewissern Sie sich, dass die Überlappung der in Abb. gezeigten entspricht.
(PL) Uwaga: Upewnij się, że elementy nakładają się na siebie tak jak widać na rys.
(NL) Notitie: Zorg ervoor dat de overlapping gebeurt zoals in figuur.
(EN) Left
(FR) Gauche
(PT) Esquerda
(ES) Izquierda
(DE) Links
(PL) Lewa
(NL) Linker
(EN) IMPORTANT: USE HAND GLOVES TO PREVENT INJURY.
(FR) IMPORTANT: UTILISER LES GANTS POUR PREVENIR LES ACCIDENTS.
(PT) IMPORTANTE: USAR LUVAS PARA EVITAR LESÕES.
(ES) IMPORTANTE: GUANTES DE MANO DE USO PARA PREVENIR LA HERIDA.
(DE) WICHTIG: BENUTZEN SIE HANDSCHUHE, UM VERLETZUNGEN ZU VERMEIDEN.
(PL) WAŻNE: UŻYWAJ RĘKAWIC, ABY ZAPOBIEC URAZOM.
(NL) BELANGRIJK: GEBRUIK HANDSCHOENEN OM VERWONDINGEN TE VERMIJDEN.
(EN) Left
(FR) Gauche
(PT) Esquerda
(ES) Izquierda
(DE) Links
(PL) Lewa
(NL) Linker
(EN) Left
(FR) Gauche
(PT) Esquerda
(ES) Izquierda
(DE) Links
(PL) Lewa
(NL) Linker
PW

25
WS
S3
PW
19
(EN) Left
(FR) Gauche
(PT) Esquerda
(ES) Izquierda
(DE) Links
(PL) Lewa
(NL) Linker
WS
WS
S1
2
PW
WS
1
2
20
(EN) Note: Make sure the overlapping position is as shown in fig.
(FR) Note: Assurez-vous que la position chevauchement est indiquée dans la Fig
(PT) Nota: Certifique-se que a posição se sobrepõem como mostrado na fig.
(ES) Nota: Cerciórese la posición que se superpone es como mostrada en el higo.
(DE) Anmerkung: Vergewissern Sie sich, dass die Überlappung der in Abb.gezeigten entspricht.
(PL) Uwaga: Upewnij się, że elementy nakładają się na siebie tak jak widać na rys.
(NL) Notitie: Zorg ervoor dat de overlapping gebeurt zoals in figuur.
WS
WCB
1
PW
S1
(EN) Left
(FR) Gauche
(PT) Esquerda
(ES) Izquierda
(DE) Links
(PL) Lewa
(NL) Linker
S3
PW
21
WS
(EN) Left
(FR) Gauche
(PT) Esquerda
(ES) Izquierda
(DE) Links
(PL) Lewa
(NL) Linker
(EN) IMPORTANT: USE HAND GLOVES TO PREVENT INJURY.
(FR) IMPORTANT: UTILISER LES GANTS POUR PREVENIR LES ACCIDENTS.
(PT) IMPORTANTE: USAR LUVAS PARA EVITAR LESÕES.
(ES) IMPORTANTE: GUANTES DE MANO DE USO PARA PREVENIR LA HERIDA.
(DE) WICHTIG: BENUTZEN SIE HANDSCHUHE, UM VERLETZUNGEN ZU VERMEIDEN.
(PL) WAŻNE: UŻYWAJ RĘKAWIC, ABY ZAPOBIEC URAZOM.
(NL) BELANGRIJK: GEBRUIK HANDSCHOENEN OM VERWONDINGEN TE VERMIJDEN.

S1
PW
22
BS2A
BS1A
WCB
(EN) IMPORTANT: USE HAND GLOVES TO PREVENT INJURY.
(FR) IMPORTANT: UTILISER LES GANTS POUR PREVENIR LES ACCIDENTS.
(PT) IMPORTANTE: USAR LUVAS PARA EVITAR LESÕES.
(ES) IMPORTANTE: GUANTES DE MANO DE USO PARA PREVENIR LA HERIDA.
(DE) WICHTIG: BENUTZEN SIE HANDSCHUHE, UM VERLETZUNGEN ZU VERMEIDEN.
(PL) WAŻNE: UŻYWAJ RĘKAWIC, ABY ZAPOBIEC URAZOM.
(NL) BELANGRIJK: GEBRUIK HANDSCHOENEN OM VERWONDINGEN TE VERMIJDEN.
WCB
WS
BRA
1
3
2
26
(EN) Back
(FR) Arrière
(PT) Traseira
(ES) Detrás
(DE) Hinten
(PL) Tył
(NL)
Achteraan
WS
1
WCB
3
PW
S3
2
PW
S1
23
(EN) Note: Make sure the overlapping position is as shown in fig.1.
(FR) Note: Assurez-vous que la position chevauchement est indiquée dans la Fig 1.
(PT) Nota: Certifique-se que a posição se sobrepõem como mostrado na fig.1.
(ES) Nota: Cerciórese la posición que se superpone es como mostrada en el higo. 1.
(DE) Anmerkung: Vergewissern Sie sich, dass die Überlappung der in Abb. 1 gezeigten entspricht.
(PL) Uwaga: Upewnij się, że elementy nakładają się na siebie tak jak widać na rys. 1.
(NL) Notitie: Zorg ervoor dat de overlapping gebeurt zoals in figuur 1.
(EN) Back
(FR) Arrière
(PT) Traseira
(ES) Detrás
(DE) Hinten
(PL) Tył
(NL)
Achteraan
24
WS
WCB
1 & 2
ABRA
(EN) Back
(FR) Arrière
(PT) Traseira
(ES) Detrás
(DE) Hinten
(PL) Tył
(NL)
Achteraan
ABRA
WCB
WS
1
2
WS
ABRA
WCB
PW
S1

27
S1
ABLA
ABRA
ABRA
ABLA
25
(EN) Note: Make sure the overlapping position is as shown in fig.
(FR) Note: Assurez-vous que la position chevauchement est indiquée dans la Fig.
(PT) Nota: Certifique-se que a posição se sobrepõem como mostrado na fig.
(ES) Nota: Cerciórese la posición que se superpone es como mostrada en el higo.
(DE) Anmerkung: Vergewissern Sie sich, dass die Überlappung der in Abb.gezeigten entspricht.
(PL) Uwaga: Upewnij się, że elementy nakładają się na siebie tak jak widać na rys.
(NL) Notitie: Zorg ervoor dat de overlapping gebeurt zoals in figuur.
(EN) Back
(FR) Arrière
(PT) Traseira
(ES) Detrás
(DE) Hinten
(PL) Tył
(NL)
Achteraan
AS2A
SRA
WCF
AS2A
WCF
S1
26
(EN) Note: Top angle (AS2A) must slide in-between the sliding channel (SRA) and wall panel (WCF).
(FR) Note: Angle supérieur (AS2A) doit glisser entre le canal glisseur (SRA) et la paroi (WCF).
(PT) Nota: Ângulo superior (AS2A) têm que deslizar no meio do perfilio círio (SRA) e do painel de parede (WCF).
(ES) Nota: El ángulo primero (AS2A) debe deslizar intermedio el entrepaño (WCF) del canal (SRA) y la pared que desliza.
(DE)Anmerkung: Der obere Winkel (AS2A) muss zwischen Gleitschiene (SRA) und Wandplatte (WCF) eingeschoben
werden.
(PL)
Uwaga:
Górny kąt (AS2A) musi wejść pomiędzy szynę (SRA) a panel ścienny (WCF).
(NL)
Notitie:
Boven uiteinden ( AS2A) moet glijden tussen de geleidingskanaal(SRA) en de muur paneel(WCF).
(EN) Right
(FR) Droite
(PT) Direita
(ES) Correcta
(DE) Rechts
(PL) Prawa
(NL) Rechter
(EN) IMPORTANT: USE HAND GLOVES TO PREVENT INJURY.
(FR) IMPORTANT: UTILISER LES GANTS POUR PREVENIR LES ACCIDENTS.
(PT) IMPORTANTE: USAR LUVAS PARA EVITAR LESÕES.
(ES) IMPORTANTE: GUANTES DE MANO DE USO PARA PREVENIR LA HERIDA.
(DE) WICHTIG: BENUTZEN SIE HANDSCHUHE, UM VERLETZUNGEN ZU VERMEIDEN.
(PL) WAŻNE: UŻYWAJ RĘKAWIC, ABY ZAPOBIEC URAZOM.
(NL) BELANGRIJK: GEBRUIK HANDSCHOENEN OM VERWONDINGEN TE VERMIJDEN.
PW
La page est en cours de chargement...
La page est en cours de chargement...

30
1
WS
PW
S1
2
WS
PW
S1
3
PW
S3
1
2
3
3
WS
33
DCL
BBF
ECA
1
DCL
2
1
2
DCL
34
S1
DCL
DCR
35
(EN) Back
(FR) Arrière
(PT) Traseira
(ES) Detrás
(DE) Hinten
(PL) Tył
(NL)
Achteraan
(EN) Front
(FR) Avant
(PT) Frente
(ES) Frente
(DE) Vorne
(PL) Przód
(NL)
Vooraan
(EN) Front
(FR) Avant
(PT) Frente
(ES) Frente
(DE) Vorne
(PL) Przód
(NL)
Vooraan
(EN) IMPORTANT: USE HAND GLOVES TO PREVENT INJURY.
(FR) IMPORTANT: UTILISER LES GANTS POUR PREVENIR LES ACCIDENTS.
(PT) IMPORTANTE: USAR LUVAS PARA EVITAR LESÕES.
(ES) IMPORTANTE: GUANTES DE MANO DE USO PARA PREVENIR LA HERIDA.
(DE) WICHTIG: BENUTZEN SIE HANDSCHUHE, UM VERLETZUNGEN ZU VERMEIDEN.
(PL) WAŻNE: UŻYWAJ RĘKAWIC, ABY ZAPOBIEC URAZOM.
(NL) BELANGRIJK: GEBRUIK HANDSCHOENEN OM VERWONDINGEN TE VERMIJDEN.
(EN) Note: Make sure the overlapping position is as shown in fig.1
& 2
(FR) Note: Assurez-vous que la position chevauchement est indiquée dans la Fig 1
et 2
(PT) Nota: Certifique-se que a posição se sobrepõem como mostrado na fig.1
e 2
(ES) Nota: Cerciórese la posición que se superpone es como mostrada en el higo. 1
& 2
.
(DE) Anmerkung: Vergewissern Sie sich, dass die Überlappung der in Abb. 1
& 2
gezeigten entspricht.
(PL) Uwaga: Upewnij się, że elementy nakładają się na siebie tak jak widać na rys. 1
i 2
.
(NL) Notitie: Zorg ervoor dat de overlapping gebeurt zoals in figuur 1
en 2
.
La page est en cours de chargement...

32
S3
PW
S1
PW
S2
(EN) Note: All parts are clearly marked and care should be taken to use the correct one.
Remove the polyethylene film before start assembling.
(FR) Note: Toutes les pièces sont clairement identifiées et il faut veiller à utiliser la bonne.
Retirer le film de polyéthylène avant de commencer l’assemblage.
(PT) Nota: Todos os peças estão claramente marcados, um cuidado deve ser tomado para o uso correcto.
Remover o film Polyethylene antes da montagem.
(ES) Nota: Todo pone piezas son marcados claramente y cuidan debe ser tomado para usar el corrige uno.
Quite la Película de Polietileno antes de armar.
(DE) Anmerkung: Alle Teile sind deutlich gekennzeichnet, und es sind unbedingt jeweils die richtigen Teile zu verwenden.
Entfernen Sie die Schutzfolie, bevor Sie mit der Montage anfangen.
(PL) Uwaga: Wszystkie części ścienne są dokładnie oznakowane i należy zwrócić uwagę, aby używać właściwych elementów.
Przed rozpoczęciem montażu zdejmij folię polietylenową.
(NL) Notitie: Markeer alle delen zorgvuldig en gebruik altijd de juiste panelen.
Verwijder de polyethyleen film voor u begint te monteren.
GPRA
SRA
1
AS2A
S1
3
AS2A
GPRA
SRA
GPRA
AS2A
2
SRA
GPRA
1,2&3
1
(EN) IMPORTANT: Use screws with plastic washers on top of prepainted surface only.
(FR) IMPORTANT: Utilisez des vis avec des rondelles en plastique sur le dessus de la surface pré peinte seulement.
(PT) IMPORTANTE: Utilize parafusos com anilhas plásticas em cima da superfície prepainted apenas.
(ES) IMPORTANTE: Use los tornillos con las arandelas plásticas encima pre pintadas en la superficie solamente.
(DE) WICHTIG: Benutzen Sie bei lackierten Oberflaechen nur Schrauben mit Plastikunterlegscheiben.
(PL) WAŻNE:
Używaj śrub z plastikowymi uszczelkami wyłącznie na wcześniej pomalowanej powierzchni.
(NL) BELANGRIJK
:
Gebruik schroeven met plastieken ring aan de bovenkant of voor gelakt ondergrond.
GPLA 2
GPRA 2
SB1A 2
SB2A 2
RS1A 4
GPS 2
RS2A 4
RP1A 2
RP2A 2
RP3A 2
RP4A 2
RF1A 2
RF2A 2
RFSA 4
RFCA 2
FC 2
VC 4
TC 4
WST 3.4 Mtrs
S1 128
S2 4
S3 64
PW 128
(EN) Parts needed
(FR) Pièces nécessaires
(PT) Peças Necessárias
(ES) Las partes necesitaron
(DE) Benötigte Teile
(PL) Niezbędne elementy
(NL) Onderdelen nodig
(EN) Roof
(FR) Toit
(PT) Telhado
(ES) El techo
(DE) Dach
(PL) Dach
D.
(NL) Dak
(EN)
CODE
(FR)
CODE
(PT)
CÒDIGO
(ES)
CODE
(DE)
CODE
(PL)
KOD
(NL)
CODE
(EN)
QTY
(FR)
QTÉ
(PT)
QTDE
(ES)
QTY
(DE)
STCK
(PL)
ILOŚĆ
(NL)
AANTAL
(EN)
CODE
(FR)
CODE
(PT)
CÒDIGO
(ES)
CODE
(DE)
CODE
(PL)
KOD
(NL)
CODE
(EN)
QTY
(FR)
QTÉ
(PT)
QTDE
(ES)
QTY
(DE)
STCK
(PL)
ILOŚĆ
(NL)
AANTAL
(EN) IMPORTANT: USE HAND GLOVES TO PREVENT INJURY.
(FR) IMPORTANT: UTILISER LES GANTS POUR PREVENIR LES ACCIDENTS.
(PT) IMPORTANTE: USAR LUVAS PARA EVITAR LESÕES.
(ES) IMPORTANTE: GUANTES DE MANO DE USO PARA PREVENIR LA HERIDA.
(DE) WICHTIG: BENUTZEN SIE HANDSCHUHE, UM VERLETZUNGEN ZU VERMEIDEN.
(PL) WAŻNE: UŻYWAJ RĘKAWIC, ABY ZAPOBIEC URAZOM.
(NL) BELANGRIJK: GEBRUIK HANDSCHOENEN OM VERWONDINGEN TE VERMIJDEN.
(EN) Front
(FR) Avant
(PT) Frente
(ES) Frente
(DE) Vorne
(PL) Przód
(NL)
Vooraan
La page est en cours de chargement...

34
(EN) Make two sets.
(FR) Faites deux jeux.
(PT) Faça duas montagemes.
(ES) Hace dos conjuntos.
(DE) Zwei solche Sätze herstellen.
(PL) Zrób dwa zestawy.
(NL) Maak twee sets.
6
RS2A
RS2A
RS1A
RS1A
S3
7
RS2A
RS1A
SB2A
S3
SB1A
S3
S3
GPLA
GPRA
S3
GPLA
GPRA
5
(EN) Back
(FR) Arrière
(PT) Traseira
(ES) Detrás
(DE) Hinten
(PL) Tył
(NL)
Achteraan
(EN) IMPORTANT: USE HAND GLOVES TO PREVENT INJURY.
(FR) IMPORTANT: UTILISER LES GANTS POUR PREVENIR LES ACCIDENTS.
(PT) IMPORTANTE: USAR LUVAS PARA EVITAR LESÕES.
(ES) IMPORTANTE: GUANTES DE MANO DE USO PARA PREVENIR LA HERIDA.
(DE) WICHTIG: BENUTZEN SIE HANDSCHUHE, UM VERLETZUNGEN ZU VERMEIDEN.
(PL) WAŻNE: UŻYWAJ RĘKAWIC, ABY ZAPOBIEC URAZOM.
(NL) BELANGRIJK: GEBRUIK HANDSCHOENEN OM VERWONDINGEN TE VERMIJDEN.
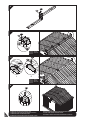
(EN) Taper side (DE) Spitzes Ende
(FR) l’inclinaison latérale (PL) Pochyła część
(PT) Lado Taper (NL) Tapse zijde
(ES) Estréchese el lado
(EN) Note: Make sure the taper side on roof structure must be same.
(FR) Note: Assurez-vous que le côté conique de se trouve au-dessus.
(PT) Nota: Certifique-se de que os lados taper do perfilio são os mesmos.
(ES) Nota: Asegúrese de que los cantos inclinados de la estructura están hacia arriba.
(DE) Anmerkung: Stellen Sie sicher, dass die Konus-Seite auf der Dach-Struktur nach oben zeigt.
(PL) UWAGA : Upewnij się, że elementy konstrukcji dachu połączone są właściwie.
(NL) Notitie : Zorg ervoor dat de tapse kant op het dakstructuur moet hetzelfde zijim.

35
1
S3
GPRA
RS2A
SB1A
PW
PW
S3
RS1A
RS2A
RS2A
RS1A
2
1
1
2
8
(EN) Taper side
(FR) l’inclinaison latérale
(PT) Lado Taper
(NL) Tapse zijde
(ES) Estréchese el lado
(PL) Pochyła część
(DE) Spitzes Ende
2
S3
RS2A
RS1A
1
9
1 & 2
1 & 2
(EN) Taper side
(FR) l’inclinaison latérale
(PT) Lado Taper
(NL) Tapse zijde
(ES) Estréchese el lado
(PL) Pochyła część
(DE) Spitzes Ende
(EN) Front
(FR) Avant
(PT) Frente
(ES) Frente
(DE) Vorne
(PL) Przód
(NL)
Vooraan
2
GPLA
RS1A
S3
SB2A
PW
PW
S3
(EN) Front
(FR) Avant
(PT) Frente
(ES) Frente
(DE) Vorne
(PL) Przód
(NL)
Vooraan
(EN) IMPORTANT: USE HAND GLOVES TO PREVENT INJURY.
(FR) IMPORTANT: UTILISER LES GANTS POUR PREVENIR LES ACCIDENTS.
(PT) IMPORTANTE: USAR LUVAS PARA EVITAR LESÕES.
(ES) IMPORTANTE: GUANTES DE MANO DE USO PARA PREVENIR LA HERIDA.
(DE) WICHTIG: BENUTZEN SIE HANDSCHUHE, UM VERLETZUNGEN ZU VERMEIDEN.
(PL) WAŻNE: UŻYWAJ RĘKAWIC, ABY ZAPOBIEC URAZOM.
(NL) BELANGRIJK: GEBRUIK HANDSCHOENEN OM VERWONDINGEN TE VERMIJDEN.
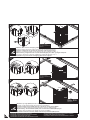
(EN) Note: Make sure the taper side on roof structure (RS1A) & (RS2A) must be up.
(FR) Note: Assurez-vous que l’inclinaison latérale sur la structure (RS1A) et (RS2A) du toit est à l’envers.
(PT) Nota: Certifique-se de que o lado taper do perfilio de estrutura (RS1A) e (RS2A) do telhado está invertido.
(ES) Nota: Cerciórese el lado de estrechamiento en la estructura (RS1A) & (RS2A) de techo debe estar arriba el lado.
(DE) Anmerkung: Achten Sie darauf, dass das spitze Ende von (RS1A) und (RS2A) nach oben zeigt.
(PL) UWAGA : Upewnij się, że pochyła część konstrukcji dachu (RS1A) i (RS2A) znajduje się z części bocznej
(NL) Notitie : Zorg ervoor dat de tapse kant van dakstructuur (RS1A) en (RS2A) zich bovenaan bevindt.

36
RP4A
GPRA
S3
PW
RP4A
10
11
RP4A
S1
PW
RP4A
RP3A
12
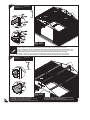
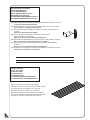
(EN) Note: Make sure the overlapping position for roof panel is as shown in blowup.
Roof panel installation by using ladder from inside at missing panels.
(FR) Note: Assurez-vous que la position chevauchement des parois de toit est telle qu’indiquée dans l’exposé.
Couvrez l'installation de panneau en employant l'échelle de l'intérieur aux panneaux absents.
(PT) Nota: Certifique-se que a sobreposição de posição para o painel do telhado é como mostrado na fig. Explodida.
Instalação do painel do telhado usando escada pelo lado interior pelos painéis que estiverem faltando.
(ES) Nota: Cerciórese la posición que se superpone para el entrepaño de techo es como mostrada en el blowup.
Para la instalación del techo interior use escalera donde falten paneles .
(DE) Anmerkung: Stellen Sie sicher, daß die Überlappungsposition für die Dachplatte mit der in der Vergrößerung
gezeigten übereinstimmt.
Dach Panel Installation mit der Benutzung Leiter von innen auf fehlende Panels.
(PL) Uwaga: Upewnij się, że panel dachowy nakłada się na inne elementy tak jak widać na schemacie.
Instalacja panelu dachowego od wewnątrz przy użyciu drabiny ustawionej w miejscu brakujących paneli.
(NL) Notitie: De overlapping moet gebeuren zoals u ziet op de uitvergroting.
Dak paneel installatie, maak gebruik van een ladder aan de binnenkant bij aanbrengen van missende panelen.
RP4A
RP3A
S1
PW
(EN) Front
(FR) Avant
(PT) Frente
(ES) Frente
(DE) Vorne
(PL) Przód
(NL)
Vooraan
GPRA
(EN) Front
(FR) Avant
(PT) Frente
(ES) Frente
(DE) Vorne
(PL) Przód
(NL)
Vooraan
(EN) Front
(FR) Avant
(PT) Frente
(ES) Frente
(DE) Vorne
(PL) Przód
(NL)
Vooraan
(EN) IMPORTANT: USE HAND GLOVES TO PREVENT INJURY.
(FR) IMPORTANT: UTILISER LES GANTS POUR PREVENIR LES ACCIDENTS.
(PT) IMPORTANTE: USAR LUVAS PARA EVITAR LESÕES.
(ES) IMPORTANTE: GUANTES DE MANO DE USO PARA PREVENIR LA HERIDA.
(DE) WICHTIG: BENUTZEN SIE HANDSCHUHE, UM VERLETZUNGEN ZU VERMEIDEN.
(PL) WAŻNE: UŻYWAJ RĘKAWIC, ABY ZAPOBIEC URAZOM.
(NL) BELANGRIJK: GEBRUIK HANDSCHOENEN OM VERWONDINGEN TE VERMIJDEN.
La page est en cours de chargement...

38
16
RP3A
RP4A
17
RP2A
RP3A
PW
S1
RP2A
RP3A
WST
18
WST
(EN) Note: Make sure the overlapping position for roof panel is as shown in blowup.
(FR) Note: Assurez-vous que la position chevauchement des parois de toit est telle qu’indiquée dans l’exposé.
(PT) Nota: Certifique-se que a sobreposição de posição para o painel do telhado é como mostrado na fig. Explodida.
(ES) Nota: Cerciórese la posición que se superpone para el entrepaño de techo es como mostrada en el blowup.
(DE) Anmerkung: Stellen Sie sicher, daß die Überlappungsposition für die Dachplatte mit der in der Vergrößerung
gezeigten übereinstimmt.
(PL) Uwaga:
Upewnij się, że panel dachowy nakłada się na inne elementy tak jak widać na schemacie.
(NL) Notitie: De overlapping moet gebeuren zoals u ziet op de uitvergroting.
(EN) Back
(FR) Arrière
(PT) Traseira
(ES) Detrás
(DE) Hinten
(PL) Tył
(NL)
Achteraan
(EN) Front
(FR) Avant
(PT) Frente
(ES) Frente
(DE) Vorne
(PL) Przód
(NL)
Vooraan
(EN) IMPORTANT: USE HAND GLOVES TO PREVENT INJURY.
(FR) IMPORTANT: UTILISER LES GANTS POUR PREVENIR LES ACCIDENTS.
(PT) IMPORTANTE: USAR LUVAS PARA EVITAR LESÕES.
(ES) IMPORTANTE: GUANTES DE MANO DE USO PARA PREVENIR LA HERIDA.
(DE) WICHTIG: BENUTZEN SIE HANDSCHUHE, UM VERLETZUNGEN ZU VERMEIDEN.
(PL) WAŻNE: UŻYWAJ RĘKAWIC, ABY ZAPOBIEC URAZOM.
(NL) BELANGRIJK: GEBRUIK HANDSCHOENEN OM VERWONDINGEN TE VERMIJDEN.
(EN) Back
(FR) Arrière
(PT) Traseira
(ES) Detrás
(DE) Hinten
(PL) Tył
(NL)
Achteraan
WST
RP4A
S1
PW
S1
RP3A
RP4A
WST
La page est en cours de chargement...
La page est en cours de chargement...
La page est en cours de chargement...
La page est en cours de chargement...
La page est en cours de chargement...
La page est en cours de chargement...
La page est en cours de chargement...
La page est en cours de chargement...
La page est en cours de chargement...
La page est en cours de chargement...
La page est en cours de chargement...
La page est en cours de chargement...
La page est en cours de chargement...
La page est en cours de chargement...
La page est en cours de chargement...
-
 1
1
-
 2
2
-
 3
3
-
 4
4
-
 5
5
-
 6
6
-
 7
7
-
 8
8
-
 9
9
-
 10
10
-
 11
11
-
 12
12
-
 13
13
-
 14
14
-
 15
15
-
 16
16
-
 17
17
-
 18
18
-
 19
19
-
 20
20
-
 21
21
-
 22
22
-
 23
23
-
 24
24
-
 25
25
-
 26
26
-
 27
27
-
 28
28
-
 29
29
-
 30
30
-
 31
31
-
 32
32
-
 33
33
-
 34
34
-
 35
35
-
 36
36
-
 37
37
-
 38
38
-
 39
39
-
 40
40
-
 41
41
-
 42
42
-
 43
43
-
 44
44
-
 45
45
-
 46
46
-
 47
47
-
 48
48
-
 49
49
-
 50
50
-
 51
51
-
 52
52
-
 53
53
-
 54
54
-
 55
55


Duramax Building Products 50214 Guide d'installation
- Taper
- Guide d'installation
dans d''autres langues
- English: Duramax Building Products 50214 Installation guide
- español: Duramax Building Products 50214 Guía de instalación
- Deutsch: Duramax Building Products 50214 Installationsanleitung
- Nederlands: Duramax Building Products 50214 Installatie gids
- português: Duramax Building Products 50214 Guia de instalação
Documents connexes
-
Duramax Building Products 50651 Mode d'emploi
-
-
DuraMax Palladium Le manuel du propriétaire
-
-
-
Duramax Building Products 30115 Guide d'installation
-
-
-
-


