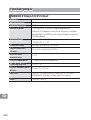
Nikon NIKKOR Z 58mm f/0.95 S Noct Manuel utilisateur
- Catégorie
- Lentilles de caméra
- Taper
- Manuel utilisateur

1
NIKKOR Z 58mm f/0.95 S Noct
En
User’s Manual (with Warranty)
De
Benutzerhandbuch (inkl. Garantiebeleg)
Fr
Manuel d’utilisation (avec garantie)
Nl
Gebruikshandleiding (met garantie)
It
Manuale d’uso (con garanzia)
Es
Manual del usuario (con garantía)
Pt
Manual do Utilizador (com Garantia)
Pl
Instrukcja obsługi (wraz z gwarancją)
Hu
Használati útmutató (jótállási jeggyel)
Gr
Εγχειρίδιο οδηγιών χρήσης (με Εγγύηση)
Ro
Manualul utilizatorului (cu garanţie)

2

3
En
A
A
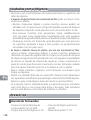
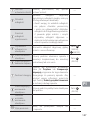
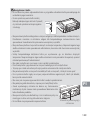
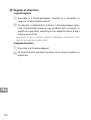
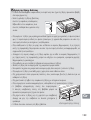
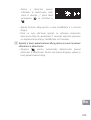
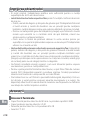
Care and Handling
Care and Handling
The lens is a high-precision optical instrument. To ensure contin-
ued performance, avoid subjecting the product to physical shocks
during handling.
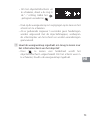
Before using this product, please read these instructions carefully. You
will also need to consult the camera manual.
• This lens is intended exclusively for use with mirrorless cameras featuring
a Nikon Z mount.
• This is a manual focus lens. Regardless of the focus mode selected
with the camera, focus must be adjusted manually while this lens is
attached.
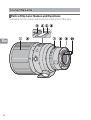
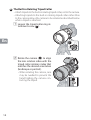
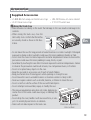
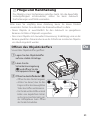
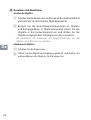
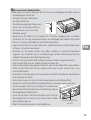
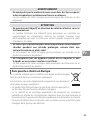
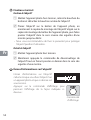
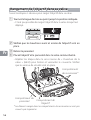
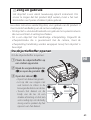
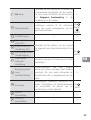
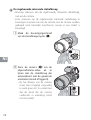
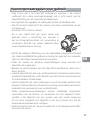
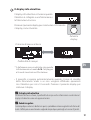
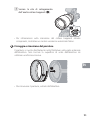
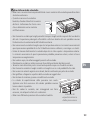
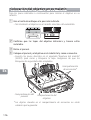
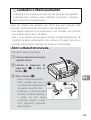
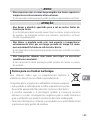
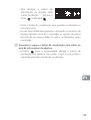
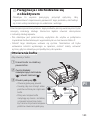
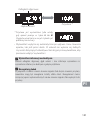
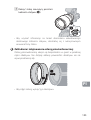
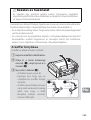
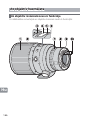
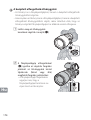
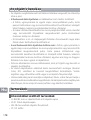
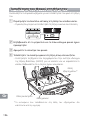
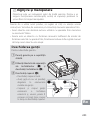
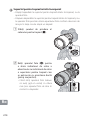
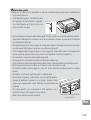
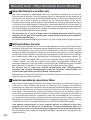
Opening the Trunk Case
Opening the Trunk Case
To open the trunk case:
z Place the trunk case on a
stable surface.
x Release the latch safety locks
(
q
) and open the latches
(
w
).
c Open the lid (
e
).
• Open the lid slowly.
• Take care that your fi ngers
don’t get caught in the
case’s moving parts.
• The lid and body of the case
form a tight seal, and it may
sometimes be necessary to
grip the body securely while
opening the lid.

4
En
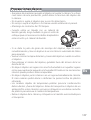
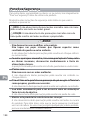
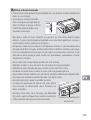
For Your Safety
For Your Safety
To prevent damage to property or injury to yourself or to others, read
“For Your Safety” in its entirety before using this product.
Keep these safety instructions where all those who use this product
will read them.
A WARNING: Failure to observe the precautions marked with this
icon could result in death or severe injury.
A CAUTION: Failure to observe the precautions marked with this
icon could result in injury or property damage.
A
A
WARNING
WARNING
•
•
Do not disassemble or modify this product.
Do not disassemble or modify this product.
Do not touch internal parts that become exposed as the result
Do not touch internal parts that become exposed as the result
of a fall or other accident.
of a fall or other accident.
Failure to observe these precautions could result in electric shock or
other injury.
•
•
Should you notice any abnormalities such as the product
Should you notice any abnormalities such as the product
producing smoke, heat, or unusual odors, immediately
producing smoke, heat, or unusual odors, immediately
disconnect the camera power source.
disconnect the camera power source.
Continued operation could result in fi re, burns or other injury.
•
•
Keep dry.
Keep dry.
Do not handle with wet hands.
Do not handle with wet hands.
Failure to observe these precautions could result in fi re or electric shock.
•
•
Do not use this product in the presence of fl ammable dust or
Do not use this product in the presence of fl ammable dust or
gas such as propane, gasoline or aerosols.
gas such as propane, gasoline or aerosols.
Failure to observe this precaution could result in explosion or fi re.
•
•
Do not directly view the sun or other bright light source through the lens.
Do not directly view the sun or other bright light source through the lens.
Failure to observe this precaution could result in visual impairment.
•
•
Keep this product out of reach of children.
Keep this product out of reach of children.
Failure to observe this precaution could result in injury or product
malfunction. In addition, note that small parts constitute a choking
hazard. Should a child swallow any part of this product, seek
immediate medical attention.

5
En
A
A
WARNING
WARNING
•
•
Do not handle with bare hands in locations exposed to
Do not handle with bare hands in locations exposed to
extremely high or low temperatures.
extremely high or low temperatures.
Failure to observe this precaution could result in burns or frostbite.
A
A
CAUTION
CAUTION
•
•
Do not leave the lens pointed at the sun or other strong light sources.
Do not leave the lens pointed at the sun or other strong light sources.
Light focused by the lens could cause fi re or damage to product’s
internal parts. When shooting backlit subjects, keep the sun well out
of the frame.
•
•
Do not leave the product where it will be exposed to extremely
Do not leave the product where it will be exposed to extremely
high temperatures, for an extended period such as in an
high temperatures, for an extended period such as in an
enclosed automobile or in direct sunlight.
enclosed automobile or in direct sunlight.
Failure to observe this precaution could result in fi re or product malfunction.
•
•
Do not transport cameras or lenses with tripods or similar
Do not transport cameras or lenses with tripods or similar
accessories attached.
accessories attached.
Failure to observe this precaution could result in injury or product
malfunction.
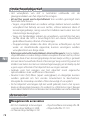
Notices for Customers in Europe
Notices for Customers in Europe
This symbol indicates that electrical and electronic equip-
ment is to be collected separately.
The following apply only to users in European countries:
• This product is designated for separate collection at an ap-
propriate collection point. Do not dispose of as household
waste.
• Separate collection and recycling helps conserve natural resources
and prevent negative consequences for human health and the envi-
ronment that might result from incorrect disposal.
• For more information, contact the retailer or the local authorities in
charge of waste management.

6
En
Using the Lens
Using the Lens
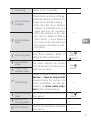
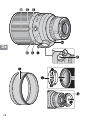
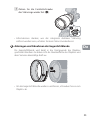
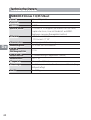
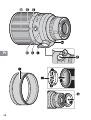
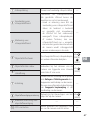
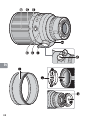
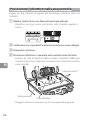
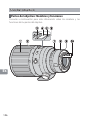
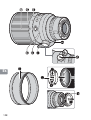
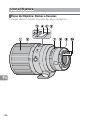
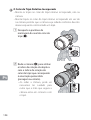
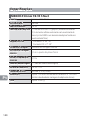
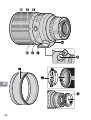
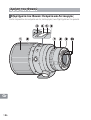
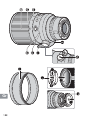
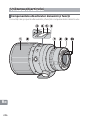
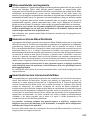
Parts of the Lens: Names and Functions
Parts of the Lens: Names and Functions
See below for the names and functions of the parts of the lens.

7
En
q
Focus ring Rotate to focus manually. —
w
Focus distance
indicator
Check the focus distance (the ap-
proximate distance between the
image sensor and the subject).
• Note that the focus distance
indicator is intended only as a
guide and may not accurately
refl ect the distance to the sub-
ject. Due to depth of fi eld or
other factors, a focus distance
of ∞ may not be selected when
the camera is focused on a dis-
tant object.
—
e
Focus distance
mark
r
Lens info panel
View focus distance, depth of
fi eld, and other information.
See
B
(011),
C
(012)
t
Lens rotation
index
Use when rotating the camera
from landscape to portrait orien-
tation or vice versa.
See
D
(014)
y
Tripod collar
rotation index
u
Control ring
Rotate to adjust a setting such as
Aperture or Exposure compensation
assigned using the camera. For
more information, see the de-
scription of Custom control assign-
ment in the camera manual.
—
i
Lens mounting
mark
Use when mounting the lens on
the camera.
See
A
(010)
o
Rubber lens-
mount gasket
——
!0
CPU contacts
Used to transfer data to and from
the camera.
—

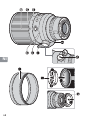
8
En

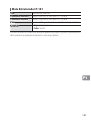
9
En
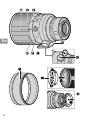
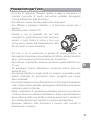
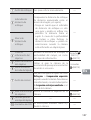
!1
L-Fn button
Press to perform a function as-
signed using the camera. For
more information, see the de-
scription of Custom control assign-
ment in the camera manual.
—
!2
Display button
Save settings or choose the in-
formation shown in the lens info
panel.
See
B
(011),
C
(012)
!3
Tripod collar
ring
——
!4
Lens rotation
index (90°)
Use when rotating the camera
from landscape to portrait orien-
tation or vice versa.
See
D
(014)
!5
Tripod collar
rotation index
(90°)
!6
Tripod collar
ring attach-
ment screw
!7
Built-in
rotating tripod
collar
Use when the camera is mount-
ed on a tripod.
!8
Security slot
(for anti-theft
cable)
Third-party anti-theft cables can
be attached to this slot. For more
information, see the documen-
tation provided with the cable.
—
!9
Lens hood
Lens hoods block stray light that
would otherwise cause fl are or
ghosting. They also serve to pro-
tect the lens.
See
E
(015)
@0
Front lens cap — —
@1
Rear lens cap — —

10
En
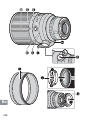
A
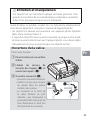
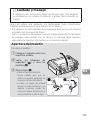
Attachment and Removal
Attachment and Removal
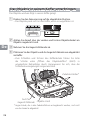
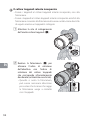
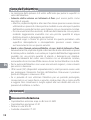
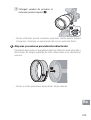
Attaching the Lens
z
Turn the camera off , remove the body cap, and detach the rear
lens cap.
x
Position the lens on the camera body, keeping the mount-
ing mark on the lens aligned with the mounting mark on
the camera body, and then rotate the lens counterclockwise
until it clicks into place.
• We recommend attaching the lens hood to protect the lens dur-
ing use.
Removing the Lens
z
Turn the camera off .
x
Press and hold the lens release button while turning the lens
clockwise.

11
En
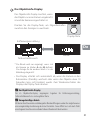
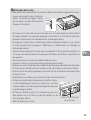
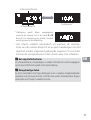
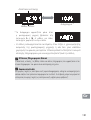
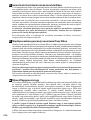
B
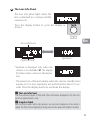
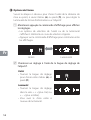
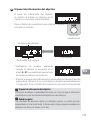
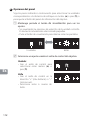
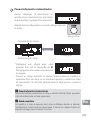
The Lens Info Panel
The Lens Info Panel
The lens info panel lights when the
lens is attached to a camera and the
camera is on.
Press the display button to cycle the display as
shown
:
Display
button
Depth of eld
Aperture *
Focus distance
* Aperture is displayed only when the
camera is in mode A or M. The display
for other modes is shown in the illustra-
tion.
• The panel turns off automatically when the camera standby timer
expires or if no lens operations are performed for about 10 sec-
onds. Press the display button to reactivate the display.
A
The Lens Info Panel
The focus distance, depth of eld, and other information displayed in the lens info
panel are approximations only.
A
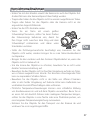
Irregular Bokeh
With fast shutter speeds and/or wide apertures, you may notice irregularities in how bokeh is
shaped. The e ect can be mitigated by choosing slower shutter speeds and/or higher f-numbers.

12
En
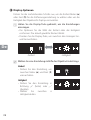
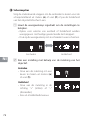
C
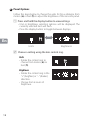
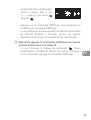
Panel Options
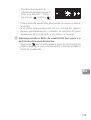
Panel Options
Follow the steps below to choose the units for focus distance from
meters (m) or feet (ft) or adjust the brightness of the lens info panel.
z
Press and hold the display button to view settings.
• Unit or brightness selection options will be displayed. The
currently selected item will fl ash.
• Press the display button to toggle between displays.
Units Brightness
x
Choose a setting using the lens control ring.
Units
- Rotate the control ring to
choose from meters (m) or
feet (ft).
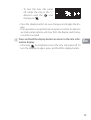
Brightness
- Rotate the control ring in the
“+” (brighter) or “−” (darker)
direction.
- Choose from 6 levels of
brightness.

13
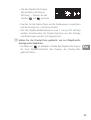
En
- To turn the lens info panel
off , rotate the ring in the “−”
direction until the icon
changes to .
• Press the display button to save changes and toggle the dis-
play.
• If no operations are performed using lens controls for about 5
seconds, panel options will clear from the display and chang-
es will be canceled.
c
Press and hold the display button to return to the lens infor-
mation display.
• Choosing for brightness turns the lens info panel off . To
turn the display on again, press and hold the display button.

14
En
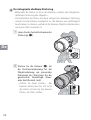
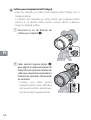
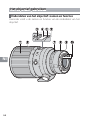
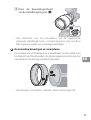
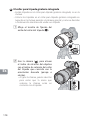
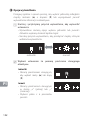
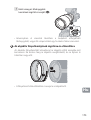
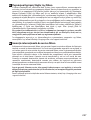
D
The Built-in Rotating Tripod Collar
The Built-in Rotating Tripod Collar
• Attach tripods to the built-in rotating tripod collar, not to the camera.
• Attaching tripods to the built-in rotating tripod collar rather than
to the camera allows the camera to be rotated as described below
while a tripod is attached.
z Loosen the tripod collar ring at-
tachment screw (
q
).
x Rotate the camera (
w
) to align
the lens rotation index with the
tripod collar rotation index that
matches the desired orientation
(landscape or portrait).
• When rotating the camera, care
may be needed to prevent the
hand holding the camera con-
tacting the tripod.

15
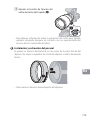
En
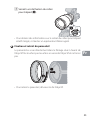
c Tighten the tripod collar ring at-
tachment screw (
e
).
• For information on removing the built-in rotating tripod collar,
contact a Nikon-authorized service representative.
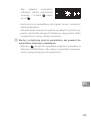
E
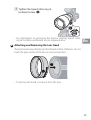
Attaching and Removing the Lens Hood
Attaching and Removing the Lens Hood
The lens hood screws directly into the threads in front of the lens. Do not
touch the glass surface of the lens or use excessive force.
• To remove the hood, unscrew it from the lens.

16
En
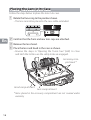
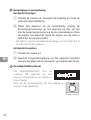
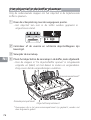
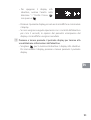
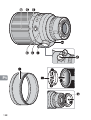
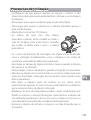
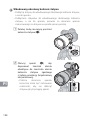
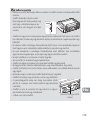
Placing the Lens in Its Case
Placing the Lens in Its Case
Follow the steps below to place the lens in its case.
z
Rotate the focus ring to the position shown.
• The lens cannot be placed in the case while extended.
x Confi rm that the front and rear lens caps are attached.
c Remove the lens hood.
v Place the lens and hood in the case as shown.
• Reverse the steps in “Opening the Trunk Case” (03) to close
and latch the lid. Be sure the safety locks are engaged.
Hood compartment
Lens compartment
Accessory com-
partment*
* Items placed in the accessory compartment are not covered under
warranty.

17
En
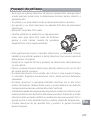
Precautions for Use
Precautions for Use
• Be sure to support the lens when holding the camera. Failure to ob-
serve this precaution could damage the camera lens mount.
• Do not pick up or hold the lens by its telescoping section.
• Do not pick up or hold the lens or camera using only the lens hood.
• Keep the CPU contacts clean.
• When using a tripod with a large pan head, be
careful when rotating the focus ring to avoid
injury caused by your fi ngers getting caught
between the ring and the pan head.
• Should the rubber lens-mount gasket be damaged, cease use immedi-
ately and take the lens to a Nikon-authorized service center for repair.
• Replace the front and rear lens caps when the lens is not in use.
• To protect the interior of the lens, store it out of direct sunlight.
• Do not leave the lens in humid locations or in locations in which it may
be exposed to moisture. Rusting of the internal mechanism can cause
irreparable damage.
• Do not leave the lens next to open fl ames or in other extremely hot
locations. Extreme heat could damage or warp exterior parts made
from reinforced plastic.
• Rapid changes in temperature may cause damaging condensation in-
side and outside the lens. Before taking the lens from a warm to a cold
environment or vice versa, place it in a bag or plastic case to slow the
change in temperature.
• Remove the lens from the camera and place it in the supplied case
for transport.

18
En
Lens Care
Lens Care
• Removing dust is normally suffi cient to clean the glass surfaces of the lens.
• The uorine-coated front lens element can be cleaned as described below.
- Smudges, fi ngerprints, and other oily stains can be removed using a
soft, clean cotton cloth or lens cleaning tissue; clean from the center
outwards using a circular motion.
- To remove stubborn stains, wipe gently using a soft cloth lightly
dampened with a small amount of distilled water, ethanol, or lens
cleaner.
- Any drop-shaped marks left from this process on the water- and oil-
repellent surface can subsequently be removed with a dry cloth.
• When cleaning the rear lens element, which is not uorine-coated, remove
smudges, fi ngerprints, and other oily stains using a soft, clean cotton
cloth or lens cleaning tissue lightly dampened with a small amount
of ethanol or lens cleaner. Wipe gently from the center outwards in a
circular motion, taking care not to leave smears or touch the lens with
your fi ngers.
• Never use organic solvents such as paint thinner or benzene to clean
the lens.
• Neutral Color (NC) fi lters (available separately) and the like can be used
to protect the front lens element. Remove the lens hood before at-
taching or removing fi lters.
• If the lens will not be used for an extended period, store it in a cool,
dry location to prevent mold and rust. Do not store in direct sunlight
or with naphtha or camphor moth balls.

19
En
Accessories
Accessories
Supplied Accessories
Supplied Accessories
• LC-82B 82 mm snap-on Front Lens Cap
• LF-N1 Rear Lens Cap
• HN-38 Screw-on Lens Hood
• CT-101 Trunk Case
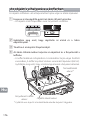
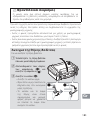
D
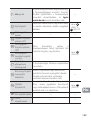
Using the Trunk Case
• Nikon assumes no liability in the event that damage to the case results in damage to its
contents.
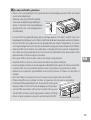
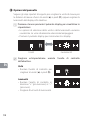
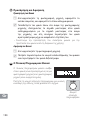
• When storing the trunk case, close the
latch safety locks. Con rm that the latches
are securely closed as shown in the illus-
tration.
• Do not leave the case for long periods in humid locations or in direct sunlight. Prolonged
exposure to damp or direct sunlight could cause the inner padding to harden or fade.
• Do not store the case in locations exposed to extreme temperatures. Failure to observe this
precaution could cause the inner padding to warp, shrink, or peel.
• Avoid directly touching the case after it has been exposed to extreme temperatures. Failure
to observe this precaution could result in burns, low-temperature burns, or frostbite.
• Do not sit or place heavy objects on the case.
• Keep the case and its accessories out of reach of small children.
• Keep your hands clear of moving parts when opening or closing the case.
• Do not leave the case in unstable locations or locations where it is likely to fall.
• Never use organic solvents such as alcohol, benzine, or thinner to clean the case.
• Do not scratch or rub the surface of the case with hard objects.
• Do not attempt to disassemble, repair, or modify the case.
• The pressure equalization valve does not rotate. Applying ex-
cessive force to the valve could cause injury or damage the
product.
• Do not drop the case, handle it with excessive force, or sub-
ject it to violent physical shocks or vibration.
• Nikon will not make repairs to the trunk case.
Pressure equaliza-
tion valve

20
En
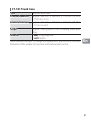
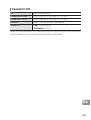
Speci cations
Speci cations
NIKKOR Z 58mm f/0.95 S Noct
NIKKOR Z 58mm f/0.95 S Noct
Mount
Mount Nikon Z mount
Focal length
Focal length 58 mm
Maximum aperture
Maximum aperture f/0.95
Lens construction
Lens construction 17 elements in 10 groups (including 4 ED elements,
3 aspherical elements, and elements with Nano Crystal and
ARNEO coats, and a uorine-coated front lens element)
Angle of view
Angle of view • FX format: 40°50c
• DX format: 27°20c
Focusing system
Focusing system Front focusing system
Minimum focus
Minimum focus
distance
distance
0.5 m (1.64 ft) from focal plane
Maximum reproduc-
Maximum reproduc-
tion ratio
tion ratio
0.19×
Diaphragm blades
Diaphragm blades 11 (rounded diaphragm opening)
Aperture range
Aperture range f/0.95 – 16
Filter-attachment size
Filter-attachment size 82 mm (P = 0.75 mm)
Dimensions
Dimensions Approx. 102 mm/4.1 in. maximum diam-
eter × 153 mm/6.1 in.
(distance from camera lens mount ange)
Weight
Weight Approx. 2000 g (4 lb 6.6 oz)
La page est en cours de chargement...
La page est en cours de chargement...
La page est en cours de chargement...
La page est en cours de chargement...
La page est en cours de chargement...
La page est en cours de chargement...
La page est en cours de chargement...
La page est en cours de chargement...
La page est en cours de chargement...
La page est en cours de chargement...
La page est en cours de chargement...
La page est en cours de chargement...
La page est en cours de chargement...
La page est en cours de chargement...
La page est en cours de chargement...
La page est en cours de chargement...
La page est en cours de chargement...
La page est en cours de chargement...
La page est en cours de chargement...
La page est en cours de chargement...
La page est en cours de chargement...
La page est en cours de chargement...
La page est en cours de chargement...
La page est en cours de chargement...
La page est en cours de chargement...
La page est en cours de chargement...
La page est en cours de chargement...
La page est en cours de chargement...
La page est en cours de chargement...
La page est en cours de chargement...
La page est en cours de chargement...
La page est en cours de chargement...
La page est en cours de chargement...
La page est en cours de chargement...
La page est en cours de chargement...
La page est en cours de chargement...
La page est en cours de chargement...
La page est en cours de chargement...
La page est en cours de chargement...
La page est en cours de chargement...
La page est en cours de chargement...
La page est en cours de chargement...
La page est en cours de chargement...
La page est en cours de chargement...
La page est en cours de chargement...
La page est en cours de chargement...
La page est en cours de chargement...
La page est en cours de chargement...
La page est en cours de chargement...
La page est en cours de chargement...
La page est en cours de chargement...
La page est en cours de chargement...
La page est en cours de chargement...
La page est en cours de chargement...
La page est en cours de chargement...
La page est en cours de chargement...
La page est en cours de chargement...
La page est en cours de chargement...
La page est en cours de chargement...
La page est en cours de chargement...
La page est en cours de chargement...
La page est en cours de chargement...
La page est en cours de chargement...
La page est en cours de chargement...
La page est en cours de chargement...
La page est en cours de chargement...
La page est en cours de chargement...
La page est en cours de chargement...
La page est en cours de chargement...
La page est en cours de chargement...
La page est en cours de chargement...
La page est en cours de chargement...
La page est en cours de chargement...
La page est en cours de chargement...
La page est en cours de chargement...
La page est en cours de chargement...
La page est en cours de chargement...
La page est en cours de chargement...
La page est en cours de chargement...
La page est en cours de chargement...
La page est en cours de chargement...
La page est en cours de chargement...
La page est en cours de chargement...
La page est en cours de chargement...
La page est en cours de chargement...
La page est en cours de chargement...
La page est en cours de chargement...
La page est en cours de chargement...
La page est en cours de chargement...
La page est en cours de chargement...
La page est en cours de chargement...
La page est en cours de chargement...
La page est en cours de chargement...
La page est en cours de chargement...
La page est en cours de chargement...
La page est en cours de chargement...
La page est en cours de chargement...
La page est en cours de chargement...
La page est en cours de chargement...
La page est en cours de chargement...
La page est en cours de chargement...
La page est en cours de chargement...
La page est en cours de chargement...
La page est en cours de chargement...
La page est en cours de chargement...
La page est en cours de chargement...
La page est en cours de chargement...
La page est en cours de chargement...
La page est en cours de chargement...
La page est en cours de chargement...
La page est en cours de chargement...
La page est en cours de chargement...
La page est en cours de chargement...
La page est en cours de chargement...
La page est en cours de chargement...
La page est en cours de chargement...
La page est en cours de chargement...
La page est en cours de chargement...
La page est en cours de chargement...
La page est en cours de chargement...
La page est en cours de chargement...
La page est en cours de chargement...
La page est en cours de chargement...
La page est en cours de chargement...
La page est en cours de chargement...
La page est en cours de chargement...
La page est en cours de chargement...
La page est en cours de chargement...
La page est en cours de chargement...
La page est en cours de chargement...
La page est en cours de chargement...
La page est en cours de chargement...
La page est en cours de chargement...
La page est en cours de chargement...
La page est en cours de chargement...
La page est en cours de chargement...
La page est en cours de chargement...
La page est en cours de chargement...
La page est en cours de chargement...
La page est en cours de chargement...
La page est en cours de chargement...
La page est en cours de chargement...
La page est en cours de chargement...
La page est en cours de chargement...
La page est en cours de chargement...
La page est en cours de chargement...
La page est en cours de chargement...
La page est en cours de chargement...
La page est en cours de chargement...
La page est en cours de chargement...
La page est en cours de chargement...
La page est en cours de chargement...
La page est en cours de chargement...
La page est en cours de chargement...
La page est en cours de chargement...
La page est en cours de chargement...
La page est en cours de chargement...
La page est en cours de chargement...
La page est en cours de chargement...
La page est en cours de chargement...
La page est en cours de chargement...
La page est en cours de chargement...
La page est en cours de chargement...
La page est en cours de chargement...
La page est en cours de chargement...
La page est en cours de chargement...
La page est en cours de chargement...
La page est en cours de chargement...
La page est en cours de chargement...
La page est en cours de chargement...
La page est en cours de chargement...
La page est en cours de chargement...
La page est en cours de chargement...
La page est en cours de chargement...
La page est en cours de chargement...
La page est en cours de chargement...
La page est en cours de chargement...
La page est en cours de chargement...
La page est en cours de chargement...
La page est en cours de chargement...
La page est en cours de chargement...
La page est en cours de chargement...
La page est en cours de chargement...
La page est en cours de chargement...
La page est en cours de chargement...
La page est en cours de chargement...
La page est en cours de chargement...
La page est en cours de chargement...
La page est en cours de chargement...
La page est en cours de chargement...
La page est en cours de chargement...
La page est en cours de chargement...
La page est en cours de chargement...
La page est en cours de chargement...
La page est en cours de chargement...
La page est en cours de chargement...
La page est en cours de chargement...
La page est en cours de chargement...
La page est en cours de chargement...
La page est en cours de chargement...
La page est en cours de chargement...
La page est en cours de chargement...
La page est en cours de chargement...
La page est en cours de chargement...
La page est en cours de chargement...
La page est en cours de chargement...
La page est en cours de chargement...
La page est en cours de chargement...
La page est en cours de chargement...
-
 1
1
-
 2
2
-
 3
3
-
 4
4
-
 5
5
-
 6
6
-
 7
7
-
 8
8
-
 9
9
-
 10
10
-
 11
11
-
 12
12
-
 13
13
-
 14
14
-
 15
15
-
 16
16
-
 17
17
-
 18
18
-
 19
19
-
 20
20
-
 21
21
-
 22
22
-
 23
23
-
 24
24
-
 25
25
-
 26
26
-
 27
27
-
 28
28
-
 29
29
-
 30
30
-
 31
31
-
 32
32
-
 33
33
-
 34
34
-
 35
35
-
 36
36
-
 37
37
-
 38
38
-
 39
39
-
 40
40
-
 41
41
-
 42
42
-
 43
43
-
 44
44
-
 45
45
-
 46
46
-
 47
47
-
 48
48
-
 49
49
-
 50
50
-
 51
51
-
 52
52
-
 53
53
-
 54
54
-
 55
55
-
 56
56
-
 57
57
-
 58
58
-
 59
59
-
 60
60
-
 61
61
-
 62
62
-
 63
63
-
 64
64
-
 65
65
-
 66
66
-
 67
67
-
 68
68
-
 69
69
-
 70
70
-
 71
71
-
 72
72
-
 73
73
-
 74
74
-
 75
75
-
 76
76
-
 77
77
-
 78
78
-
 79
79
-
 80
80
-
 81
81
-
 82
82
-
 83
83
-
 84
84
-
 85
85
-
 86
86
-
 87
87
-
 88
88
-
 89
89
-
 90
90
-
 91
91
-
 92
92
-
 93
93
-
 94
94
-
 95
95
-
 96
96
-
 97
97
-
 98
98
-
 99
99
-
 100
100
-
 101
101
-
 102
102
-
 103
103
-
 104
104
-
 105
105
-
 106
106
-
 107
107
-
 108
108
-
 109
109
-
 110
110
-
 111
111
-
 112
112
-
 113
113
-
 114
114
-
 115
115
-
 116
116
-
 117
117
-
 118
118
-
 119
119
-
 120
120
-
 121
121
-
 122
122
-
 123
123
-
 124
124
-
 125
125
-
 126
126
-
 127
127
-
 128
128
-
 129
129
-
 130
130
-
 131
131
-
 132
132
-
 133
133
-
 134
134
-
 135
135
-
 136
136
-
 137
137
-
 138
138
-
 139
139
-
 140
140
-
 141
141
-
 142
142
-
 143
143
-
 144
144
-
 145
145
-
 146
146
-
 147
147
-
 148
148
-
 149
149
-
 150
150
-
 151
151
-
 152
152
-
 153
153
-
 154
154
-
 155
155
-
 156
156
-
 157
157
-
 158
158
-
 159
159
-
 160
160
-
 161
161
-
 162
162
-
 163
163
-
 164
164
-
 165
165
-
 166
166
-
 167
167
-
 168
168
-
 169
169
-
 170
170
-
 171
171
-
 172
172
-
 173
173
-
 174
174
-
 175
175
-
 176
176
-
 177
177
-
 178
178
-
 179
179
-
 180
180
-
 181
181
-
 182
182
-
 183
183
-
 184
184
-
 185
185
-
 186
186
-
 187
187
-
 188
188
-
 189
189
-
 190
190
-
 191
191
-
 192
192
-
 193
193
-
 194
194
-
 195
195
-
 196
196
-
 197
197
-
 198
198
-
 199
199
-
 200
200
-
 201
201
-
 202
202
-
 203
203
-
 204
204
-
 205
205
-
 206
206
-
 207
207
-
 208
208
-
 209
209
-
 210
210
-
 211
211
-
 212
212
-
 213
213
-
 214
214
-
 215
215
-
 216
216
-
 217
217
-
 218
218
-
 219
219
-
 220
220
-
 221
221
-
 222
222
-
 223
223
-
 224
224
-
 225
225
-
 226
226
-
 227
227
-
 228
228
-
 229
229


Nikon NIKKOR Z 58mm f/0.95 S Noct Manuel utilisateur
- Catégorie
- Lentilles de caméra
- Taper
- Manuel utilisateur
dans d''autres langues
- italiano: Nikon NIKKOR Z 58mm f/0.95 S Noct Manuale utente
- English: Nikon NIKKOR Z 58mm f/0.95 S Noct User manual
- español: Nikon NIKKOR Z 58mm f/0.95 S Noct Manual de usuario
- Deutsch: Nikon NIKKOR Z 58mm f/0.95 S Noct Benutzerhandbuch
- Nederlands: Nikon NIKKOR Z 58mm f/0.95 S Noct Handleiding
- português: Nikon NIKKOR Z 58mm f/0.95 S Noct Manual do usuário
- polski: Nikon NIKKOR Z 58mm f/0.95 S Noct Instrukcja obsługi
- română: Nikon NIKKOR Z 58mm f/0.95 S Noct Manual de utilizare
Documents connexes
-
Nikon NIKKOR Z 58mm f/0.95 S Noct Manuel utilisateur
-
Nikon NIKKOR Z 70-200mm f/2.8 VR S Manuel utilisateur
-
Nikon NIKKOR Z 50mm f/1.2 S Manuel utilisateur
-
-
-
-
-
-
-
Nikon AF-S NIKKOR 500mm f/5.6E PF ED VR Manuel utilisateur
