Legrand LMSM-ENC1 DLM Segment Manager Enclosure Guide d'installation
- Taper
- Guide d'installation

Wattstopper
®
DLM Segment Manager Enclosure
Installation Instructions • Instructions d’Installation • Instrucciones de Instalación
No: 24818 – 10/16 rev. 1
Catalog Number • Numéro de Catalogue • Número de Catálogo: LMSM-ENC1
Country of Origin: Made in China • Pays d’origine: Fabriqué en Chine • País de origen: Hecho en China
DESCRIPTION
The LMSM-ENC1 assembly provides protection and conduit connection points for the
Segment Manager and an integral 120VAC receptacle. It is designed for applications where
code or the local AHJ requires that low voltage wiring such as DLM Local Network cables,
control and communication wiring be run inside conduit.
ATTENTION: This enclosure is provided with an earthing conductor. Proper grounding of
this enclosure shall be in accordance with all applicable regulations, local and NEC codes.
For complete installation and operation of the Segment Manager, see the instructions
provided with the unit.
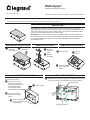
REMOVE ENCLOSURE COVER REMOVE RECEPTACLE REMOVE RECEPTACLE BOX
MOUNT THE ENCLOSURE
Position and mount the box so that the cover is not obstructed
for removal and access.
ATTACH GROUND WIRES
Attach the ground wire coming from the conduit, and a second
ground wire going to the receptacle to the grounding boss.
Slide cover
back and up
Remove
receptacle
Remove
receptacle
plate
Remove screw
Slide receptacle
box to the unlock
position
Lift up to
remove
Punch out one of the
knockout holes located
behind the receptacle box
for line voltage wiring
Line voltage in these
two knockouts only
Mount the enclosure
using 4 mounting screws
(not provided)
Punch out knockout
hole(s) for low voltage
wiring
Attach conduit
Ground screws
Supply ground wire
Loosen
screws (4)
(do not remove)
1 2
3
4
5
6
7
8
9
J
K
L

800.879.8585
www.legrand.us/wattstopper
No.24818 – 10/16 rev. 1
© Copyright 2016 Legrand All Rights Reserved.
© Copyright 2016 Tous droits réservés Legrand.
© Copyright 2016 Legrand Todos los derechos reservados.
Wattstopper warranties its products to be free
of defects in materials and workmanship for a
period of five (5) years. There are no obligations
or liabilities on the part of Wattstopper for
consequential damages arising out of, or in
connection with, the use or performance of this
product or other indirect damages with respect
to loss of property, revenue or profit, or cost of
removal, installation or reinstallation.
Wattstopper garantit que ses produits sont
exempts de défauts de matériaux et de fabrication
pour une période de cinq (5) ans. Wattstopper
ne peut être tenu responsable de tout dommage
consécutif causé par ou lié à l’utilisation ou
à la performance de ce produit ou tout autre
dommage indirect lié à la perte de propriété, de
revenus, ou de profits, ou aux coûts d’enlèvement,
d’installation ou de réinstallation.
Wattstopper garantiza que sus productos
están libres de defectos en materiales y mano
de obra por un período de cinco (5) años. No
existen obligaciones ni responsabilidades por
parte de Wattstopper por daños consecuentes
que se deriven o estén relacionados con el
uso o el rendimiento de este producto u otros
daños indirectos con respecto a la pérdida
de propiedad, renta o ganancias, o al costo
de extracción, instalación o reinstalación.
WARRANTY INFORMATION INFORMATIONS RELATIVES À LA GARANTIE INFORMACIÓN DE LA GARANTÍA
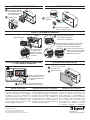
REPLACE RECEPTACLE BOX WIRE RECEPTACLE
ATTACH POWER CABLE AND GROUND WIRE
TO THE SEGMENT MANAGER
REPLACE ENCLOSURE COVER
INSTALL THE SEGMENT MANAGER
Tighten screw.
Pull the wires through
the receptacle box. Slide
the receptacle box into
the locked position.
Wire the
receptacle.
Replace the receptacle
and the receptacle cover.
1
3
0
6
5
r
1
S
E
C
P
RI B
E
A
T ST
ATUS
ww
w
.
w
a
tts
t
op
pe
r.
c
om
|
80
0. 8 7
9
.8 5
8
5
13065r1
SEC PRI BEAT STATUS
www.wattstopper.com | 800.879.8585
13065r1
SEC PRI BEAT STATUS
www.wattstopper.com | 800.879.8585
Line up the lever on
the bottom of the
Segment Manager
with the notch in the
enclosure.
Hang the hooks on the back
of the Segment Manager
over the top of the DIN rail.
Using a screwdriver, pull the lever down while
pushing the Segment Manager against the
enclosure until you hear it snap into place.
Segment Manager
Lever
Notch
Push up on the lever a short
distance until you hear a small
snap. This locks the Segment
Manager to the DIN rail.
DIN rail
13065r1
SEC PRI BEAT STATUS
Attach the ground wire from
the Segment Manager to
the grounding boss on the
enclosure.
Attach the power cable from the Segment
Manager to the receptacle in the enclosure.
Place cover over screws
and slide down.
Tighten screws (4).
M
N
O
P
Q
R
S
T
21
22
23
24
-
 1
1
-
 2
2


Legrand LMSM-ENC1 DLM Segment Manager Enclosure Guide d'installation
- Taper
- Guide d'installation
dans d''autres langues
Documents connexes
-
Legrand LMBR-600- Wireless DLM Border Router (Tri-Lingual) Guide d'installation
-
-
wattstopper LMPW-102-W Guide de démarrage rapide
-
-
-
Legrand LMRC-111/112 Dimming Room Controllers Guide d'installation
-
wattstopper LMIO-101 Digital Input/Output Interface Mode d'emploi
-
-