
Customer service
Monday to Friday: 9 AM - 5 PM E.S.T.
Service à la clientèle
Lundi au vendredi : 9h00 à 17h00 H.N.E.
Tel: 1-866-661-9606
support@artika.com
Made in China
Fabriqué en Chine
rev. 23-Mar-2015
SINGLE PENDANT LIGHT
LUMINAIRE SUSPENDU SIMPLE
Assembly Instructions
IMPORTANT, RETAIN FOR FUTURE REFERENCE: READ CAREFULLY
Instructions d’assemblage
IMPORTANT, CONSERVER POUR CONSULTATION FUTURE: LIRE ATTENTIVEMENT
Artika for Living inc.
Dorval, Canada, H9P 2R2
www.artika.com
For domestic use only
Pour usage domestique seulement

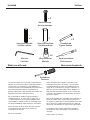
What you will need
Included
Screwdriver
Tournevis
Wire connector
Marrette
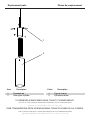
Inner glass cylinder
Cylindre intérieur
Outer glass cylinder
Cylindre extérieur
Machine screw
Vis de mécanique
Vous aurez besoin de
Incluse
Allen key
Clef Allen
Small screwdriver
Petit tournevis
Threaded rod
Tige de xation
x 1 x 1
x 2
x 3
x 3
The installer and/or user must read, understand and
follow these instructions before installing the product.
This product must be properly installed before it is
used. If instructions are not followed, the manufacturer
will not be held responsible for any problems or
product malfunction. Failure to follow instructions and
operating instructions voids the warranty.
We recommend this product to be installed by a
certied electrician. In some states or provinces, it
is a legal requirement for this type of product to be
connected by a certied electrician, according to the
electrical and building codes effective in your region.
Switch off main electrical supply from the fuse box/
circuit breaker before doing any installation or
maintenance on this unit.
Do not use outdoors.
Avant l’installation de ce produit, l’utilisateur et/ou
l’installateur doit avoir lu et compris ces instructions.
Cet appareil doit être installé convenablement avant
usage. Si ces instructions ne sont pas respectées, le
fabricant sera tenu responsable d’aucun problème ni
de dysfonctionnement du produit. Le non respect des
instructions d’installation et/ou d’utilisation annulera la
garantie en vigueur.
Nous recommandons que ce produit soit installé par un
électricien certié. Dans certains états ou provinces, il
est légalement requis que ce type de produit soit installé
par un électricien certié conformément aux codes de
l’électricité et du bâtiment en vigueur dans votre région.
Il est important de couper l’alimentation électrique
du disjoncteur avant de procéder à l’installation ou à
l’entretien.
Ne pas utiliser à l’extérieur.

Instructions d’installationInstallation instructions
5. Connect the white wire from the xture with the
white supply wire from the ceiling using the wire
connector. Connect the black wire from the xture
to the black (or red) supply wire from the junction
box. Connect the ground wire to the green bolt on
the mounting bracket.
6. Push the wires into the junction box. Mount the
xture onto the mounting bracket and secure with
the decorative nuts.
7. Install the light bulbs. Maximum 35 watts.
8. Restore electrical power.
5. Faire la connexion entre le l blanc de la lumière
et le l blanc dans votre boîtier de raccordement
à l’aide d’une marrette. Faire la connexion entre le
l noir de la lampe et le l noir (ou rouge) de votre
boîtier de raccordement à l’aide d’une marrette. Faire
la connexion entre le l de mise à terre et le l de
cuivre à l’aide d’une marrette.
6. Remettre le lage dans le boîtier. Installer la
lumière sur le support de montage. Serrer les vis de
xations.
7. Installer les ampoules. Maximum 35 watts.
8. Réalimenter le courant électrique.
Wire nut
Marrette
Decorative nut
Écrou décoratif
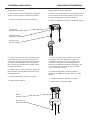
It is recommended to do major height adjustment of
the light before installation.
1. Turn off power at the circuit breaker and the light
switch. Ensure the power is off before continuing.
2. Install the mounting bracket to junction box.
Il est recommandé de faire les ajustements de hauteur
majeurs avant d’installer le luminaire.
1.Couper le courant électrique au niveau du disjoncteur et
sur l’interrupteur de la lumière. S’assurer que le courant
est éteint avant de retirer la lumière à remplacer.
2. Installer le support de montage sur la boîte électrique.
Machine screw
Vis de mécanique
Mounting bracket
Support de montage
Junction box
Boîte électrique

Remplacement d’ampoule
Instructions d’ajustement de hauteur
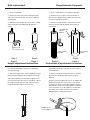
Bulb replacement
Height adjustment instructions
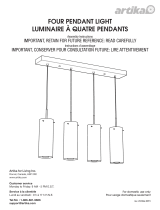
1. Remove allen screws.
2. Screw in light bulb.
3. Attach two allen head screws through the light
and into the notches on the inner glass cylinder as
shown below.
4. Slide the outer cylinder up over the inner cylinder.
Attach three of the threaded rods to retain the
shade.
1. With the power off, measure the distance from
the ceiling to the bottom of where you would like
your light to hang.
2. Adjust the length of the cord suspending the light.
Measure from the bottom of the light to the ceiling.
Adjust the height by unscrewing the support screw
on the junction box cover with a screwdriver. Adjust
the length by pulling on the cord. When you have
the desired length, tighten the set screw.
1. Éteindre le courant. Mesurer la distance entre
le plafond et le bas des cylindres de verre, selon la
hauteur désirée.
2. Ajuster la longueur des ls retenant les cylindres
de verre. Mesurer du bas de la lumière jusqu’au
plafond.
Ajuster la hauteur en dévissant les vis de support de
la boîte électrique avec le tournevis inclus. Ajuster
la longueur en tirant sur le l qui supporte chacune
des lumières. Lorsque la longuer désirée est obtenu,
visser à nouveau les vis de support. Il est possible
d’installer chacune des lumières à une hauteur
différente pour un effet personnalisé.
1. Devisser les vis à 6 pans creux.
2. Visser l’ampoule dans le réceptacle électrique.
3. Attacher les vis à 6 pans creux à la lumière et
dans les trous prépercés du cylindre de verre intéri-
eur comme montré ci-dessous.
4. Glisser le cylindre extérieur autour de la lumière.
Attacher les trois tiges de xation pour sécuriser
l’installation.
Step 2
Étape 2
Step 1
Étape 1
Step 3
Étape 3
Step 4
Étape 4
Support screw
Vis de support
Allen screw
Vis à 6 pans creux
Inner cylinder
Cylindre
Outer cylinder
Cylindre
Threaded rod
Tige de
xation

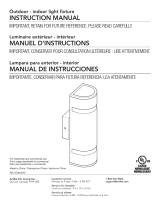
Pièces de remplacement Replacement parts
Outer cylinder
Cylindre
PartieItem
11
22
DescriptionDescription
Tige de xationThreaded rod
Cylindre extérieurOuter glass cylinder
1
2
TO ORDER REPLACEMENT PARTS, PLEASE CONTACT CUSTOMER SERVICE.
* A COPY OF YOUR PURCHASE RECEIPT WILL BE REQUIRED FOR ALL REQUESTED PARTS
(Service only available in USA and Canada)
POUR COMMANDER DES PIÈCES DE REMPLACEMENT, CONTACTEZ LE SERVICE À LA CLIENTÈLE.
* UNE COPIE DE VOTRE REÇU D’ACHAT SERA EXIGÉE POUR TOUTE DEMANDE DE PIÈCE
(Service seulement disponible aux États-Unis et au Canana)

Customer service
Monday to Friday: 9 AM - 5 PM E.S.T.
Service à la clientèle
Lundi au vendredi : 9h00 à 17h00 H.N.E.
Tel: 1-866-661-9606
support@artika.com
Made in China
Fabriqué en Chine
WARRANTY
Artika For Living Inc. is proud to offer you a one
(1) year Warranty. We guarantee our product to
be free of manufacturing defects in material and
workmanship for a period of one (1) year from the
date of purchase. Should a defect arise within the
warranty period, Artika For Living Inc. will provide
replacement product or parts free of charge.
-Our warranty does not cover products installed
incorrectly, or subjected to abnormal use. Normal
wear and tear, misuse, improper maintenance,
alteration of the product or units not installed in
accordance to the installation manual will not be
covered.
-This warranty is valid only on products installed in
accordance with the Building Code effective in the
region where the unit is used.
-Our products are intended for residential use
only. The Warranty does not cover shipping costs,
labour costs or any other cost associated with
the installation or replacement of the product. The
Warranty is extended to the original owner.
-The amount of the claim cannot exceed the original
purchase price of the item.
-Artika will not be held responsible for any direct or
consequential damages or injuries related to the use
of this product. The warranty will be nul and void
if any damage or defect could have been noticed,
repaired or avoided prior installation.
Artika For Living Inc. is not responsible for indirect or
consequential damages arising from improper use or
installation of this product.
Warranty only applicable for purchases made in the
USA or Canada.
For more information:
1-866-661-9606
GARANTIE
Artika For Living Inc. est ère de vous offrir une
garantie de un (1) an. Nous garantissons que notre
produit est exempt de tout défaut de fabrication
ou de matériel pendant une période de un (1) an,
suivant la date d’achat. Si notre produit présente
un problème durant la période de garantie, Artika
For Living Inc. fournira le produit ou les pièces de
remplacement sans frais.
-Notre garantie ne couvre pas les produits installés
incorrectement, ou un produit sujet à une utilisation
anormale. L’usure normale des pièces, une mauvaise
utilisation, un entretien inadéquat, l’altération du
produit ou un produit installé à l’encontre des
instructions d’installation ne sont pas couvert.
-La garantie est valide seulement pour les produits
installés en conformité avec le Code du Bâtiment
effectif dans la province ou ils ont été installés.
-Notre produits est destiné à un usage résidentiel
seulement. La garantie ne couvre pas les frais
d’expédition, les frais de main d’œuvre ou tout autre
coût associé à l’installation ou le remplacement de
nos produits. La garantie est applicable seulement
envers le propriétaire original du produit.
-La valeur de l’application de la garantie ne peut pas
excéder la valeur totale du produit au moment de
l’achat.
- Artika se dégage de toute responsabilité en cas de
dommage direct ou indirect, de tout bris de biens
ou de blessure corporelle. Cette garantie devient
invalide si les défauts de fabrication avaient pu être
découverts, réparés ou évités avant l’installation.
Artika ne sera pas responsable de tout dommage
direct ou indirect causé par une utilisation
inadéquate de ce produits.
Garantie s’applique uniquement sur les produits
achetés aux États-Unis et Canada.
Pour plus d’information:
1-866-661-9606
-
 1
1
-
 2
2
-
 3
3
-
 4
4
-
 5
5
-
 6
6


dans d''autres langues
- English: Artika OME1L User guide
Documents connexes
-
 Artika OME59 Guide d'installation
-
 Artika AMP71-HDBL Mode d'emploi
-
 Artika V3 Manuel utilisateur
-
Artika VAN4RA-HD2BL Mode d'emploi
-
 Artika FMGL-C1 Mode d'emploi
-
 Artika PDT1-CG-HD2BG Champagne Globe 1 Light LED Pendant Manuel utilisateur
-
 Artika CLGL-HD1 Mode d'emploi
-
 Artika FM-CNT-C1 Mode d'emploi
-
 Artika VAN2-RT Mode d'emploi
-
 Artika VAN4M-HD1 Mode d'emploi


