
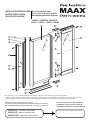
INSTALLATION INSTRUCTIONS
GUIDE D’INSTALLATION
GUÍA DE INSTALACIÓN
For pivot shower door
Pour porte de douche à pivot
Para puerta para ducha de pivote
3
14
8
7
9
6
4
5
13
10
14
16
15
11
15
16 11
12
12
1
2
SAVE THIS GUIDE FOR FUTURE REFERENCE.
CONSERVER POUR UN USAGE ULTÉRIEUR.
CONSERVE ESTE MANUAL COMO REFERENCIA.
Read all instructions carefully before proceeding.
Lire toutes les instructions attentivement avant de commencer l’installation.
Leer detenidamente todas las instrucciones antes de comenzar la instalación.
Serial number • Numéro de série • Número de Serie
IMPORTANT • Record the serial number
IMPORTANT • Noter le numéro de série
IMPORTANTE • Registre el número de serie
MODEL • MODÈLE • MODELO
136415 • 136425 • 136435 • 836425
Did you know you can buy MAAX replacement parts online for your product? Visit parts.maax.com for more information.
Saviez-vous que vous pouvez acheter en ligne des pièces de rechange MAAX pour votre produit? Visitez le parts.maax.com pour plus d’information.
¿Sabía que puede comprar en línea piezas de repuesto MAAX para su producto? Visite parts.maax.com para obtener más información.

2 10049442
DRAWINGS NOT TO SCALE
DESSINS NON À L’ÉCHELLE
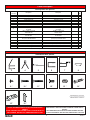
Illustration des pièces
Illustration of Components
Description des pièces
Parts Description
13 *
43
10 *
6
9 *
87
11 *
5
1etroPylbmessa rooD1
Fixed panel
Water retainer Joint d’étanchéité
Plastic drip shield
1liueSlliS5
Wall jamb (striker side)
Striker
Magnet extrusion
*9
#6 x 3/8" (10 mm) screw
"A" QUAD
Vis #6 x 3/8" (10 mm)
"A" QUAD
*10
#8 x 1" (25.4 mm) screw
TRUSS QUAD
Vis #8 x 1" (25.4 mm)
TRUSS QUAD
*11
#6 x 1 1/2" screw (38 mm)
SS Flat QUA
Vis #6 x 1 1/2" (38 mm)
SS Flat QUA
*12
#10 x 5/16" (8 mm)screw
blunt point "B" QUAD FLAT
Vis #10 x 5/16" (8 mm)
(blunt point) "B" QUAD FLAT
2ruecapsErecapS31*
Wall anchor
Plastic pivot support
Plastic cap
Hardware bag
Guide 10049442 - Portes 196141, 196142, 196143
*Items included with hardware bag / Articles inclus dans le sac à quincaillerie.
Item n°
N° de repère
noitpircseDnoitpircseD
ytQ
Qté
1
1
1
1
1
3
3
3
4
6
2
2
1
Déflecteur souple
Montant mural (côté percuteur)
Panneau fixe
Montant percuteur
Aimant
Cheville d'ancrage
Support de pivot en plastique
Capuchon de plastique
Sac de quincaillerie
1
2
3
4
6
7
8
*14
*15
*16
DES CHANGEMENTS PEUVENT TRE APPORTÉS AU PRODUIT
SANS PRÉAVIS. VEUILLEZ UTILISER LE MANUEL FOURNI AVEC LE
PRODUIT.
LES COMMANDES POUR PIÈCES DE REMPLACEMENT DOIVENT
INCLURE LEUR NUMÉRO, DESCRIPTION, DIMENSIONS ET COULEUR.
PRODUCT SPECIFICATIONS ARE SUBJECT TO CHANGE WITHOUT
NOTICE. USE OWNER’S MANUAL INSTRUCTIONS SUPPLIED WITH
PRODUCT.
WHEN ORDERING REPLACEMENT PARTS, PLEASE REFER TO
PART NUMBER, DESCRIPTION, DIMENSIONS AND COLOUR.
15 *
12 * 14 *
16 *

3 10049442
Avant de débuterBefore starting
DES CHANGEMENTS PEUVENT TRE APPORTÉS AU PRODUIT
SANS PRÉAVIS. VEUILLEZ UTILISER LE MANUEL FOURNI AVEC LE
PRODUIT.
LES COMMANDES POUR PIÈCES DE
REMPLACEMENT DOIVENT INCLURE LEUR NUMÉRO,
DESCRIPTION, DIMENSIONS ET COULEUR.
PRODUCT SPECIFICATIONS ARE SUBJECT TO CHANGE WITHOUT
NOTICE. USE OWNER’S MANUAL INSTRUCTIONS SUPPLIED WITH
PRODUCT.
WHEN ORDERING REPLACEMENT PARTS, PLEASE REFER TO
PART NUMBER, DESCRIPTION, DIMENSIONS AND COLOUR.
Upon receipt, make sure your shower door is in good condition
and that all parts are included in the hardware bag. If you have a
problem, please contact your distributor immediately.
Required equipment:
q Square or Phillips screwdriver #1 and #2
q Electric drill
q Drill bit 1/8” (3mm) (and/or other according to wall), 7/64”(3mm)
q Level
q Measuring tape
q Pencil
q Clear silicone caulking
q Masking tape
WARNING:
For optimum operation, it is important that the shower door be
installed level on walls that are also level.
Manipulate metal parts with care.
Lors de la réception, vérifiez si votre porte de douche est en
bonne condition et si toutes les pièces sont incluses dans le sac
de quincaillerie. Si il y a un problème, signalez-le immédiatement
à votre distributeur.
Équipement requis:
q Tournevis carré ou étoile #1 et #2
q Perceuse électrique
q Mèche 1/8” (3mm) (et/ou autre selon le mur), 7/64”(3mm)
q Niveau
q Ruban à mesurer
q Crayon
q Calfeutrant clair de silicone
q Ruban à masquer
ATTENTION:
Pour un fonctionnement optimal, il est important que la porte de
douche soit installée de niveau sur des murs également de niveau.
Manipulez les pièces de métal avec soin.
IMPORTANTIMPORTANT
q Fiberglass or plastic structure may not be of sufficient strength
to support your shower door. To provide for a more secure
mounting of this door, it is important that you use wood framing
behind the face edge of your stall.
q Les structures de fibre de verre ou de plastique peuvent ne
pas avoir la résistance nécessaire pour supporter votre porte
de douche. Pour une installation sécuritaire de votre porte, il
est important d’ultiliser un cadrage de bois derrière le rebord
de l’enclos.

4 10049442
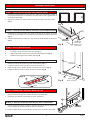
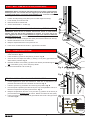
STEP 1 - DIRECTION OF OPENING (REVERSIBLE DOOR)
i. Decide from which direction the door will open, taking into consideration location of
the shower head (this door is reversible). The pivot must be on the opposite side of
the shower head. Fig. A
ii. Mark sill (4) location 1/8” (3mm) away from the interior edge of the shower stall.
Fig. B
ÉTAPE 1 - SENS D’OUVERTURE DE LA PORTE (PORTE RÉVERSIBLE)
i. Déterminez le sens d’ouverture de la porte en fonction de la pomme de douche
(votre porte est réversible). Le pivot doit être du côté opposé à la pomme de douche.
Fig. A
ii. Marquez l’emplacement du seuil (4) à 1/8” (3mm) du rebord intérieur de la douche.
Fig. B
STEP 2 - SILL (5) INSTALLATION
i. Measure door opening (X) along the mark made in step 1.
ii. Cut sill (4) 1/16”(2 mm) shorter than the opening (X).
iii. Apply a light bead of silicone to the grooves underneath the sill. Fig. A
iv. Install and hold in place with masking tape. Fig. B
ÉTAPE 2 - INSTALLATION DU SEUIL (5)
i. Mesurez l’ouverture de la porte (X) sur la marque faite à l’étape 1.
ii. Coupez le seuil (4) 1/16”(2 mm) plus court que l’ouverture (X).
iii. Mettre un léger cordon de silicone dans les rainures sous le seuil. Fig. A
iv. Installez et retenez en place à l’aide de ruban à masquer. Fig. B
STEP 3- LOWER PIVOT SUPPORT INSTALLATION
i. Insert the pivot support (15) into the pivot holder at the bottom of the fixed panel (2).
Ensure that the pivot support is oriented as shown in the illustration.
ii. Fasten the pivot support (15) with the 10 x 5/16” screws (12).
ÉTAPE 3 - INSTALLATION DU SUPPORT DE PIVOT INFÉRIEUR
i. Insérez un support de pivot (15) dans le récepteur de pivot du bas du panneau fixe
(2) en prenant soin d’orienter la tête de celui-ci tel qu’illustré.
ii. Fixez le support de pivot (15) à l’aide des vis #10 x 5/16 (12) fournies à cet effet.
5
Opening (X)
Ouverture (X)
Masking tape
Ruban à masquer
INTERIOR
INTÉRIEUR
15
2
12
Fig. B
X - 1/16" (2 mm)
4
Silicone
Fig. A
1/8"
(3 mm)
Shower stall
interior edge
Rebord intérieur
de la douche
EXTERIOR
EXTÉRIEUR
5
Fig. A
Fig. B
Guide d’installation
Installation Instructions

5 10049442
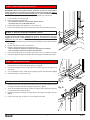
STEP 4 -PIVOT PANELS INSTALLATION
IMPORTANT: Before securing the wall jamb, make sure you have a wood structure
behind your wall. If it is not the case, we suggest you fix the wall jamb with nylon or
spring toggle bolts or use proper anchor harware (14). To ensure a solid wall anchoring
i. Stand fixed panel assembly (2) upright against the exterior lip of the sill (5).
ii. Level vertically on the shower wall.
iii. Mark hole locations and drill wall.
- For ceramic tile wall, use a 7/32”(6mm) carbide drill bit,
- for plastic wall, use a 7/64”(3mm) drill bit.
iv. Fasten fixed panel (2) with three #6 x 1 1/2” screws (11).
v. Insert the two plastic caps (16) at the extremity of the two pivot holders as shown.
ÉTAPE 4 - INSTALLATION DU PANNEAU À PIVOT
IMPORTANT: Avant de fixer le montant assurez-vous d’avoir un cadre de bois
derrière votre mur afin de fixer solidement le montant. Si ce n’est pas le cas, nous
suggérons de le fixer à l’aide d’ailettes en nylon ou à ressort ou les ancrages
appropriés (14). Cela dans le but d’assurer un ancrage solide.
i. Positionnez le panneau fixe (2) en le faisant prendre appui contre le rebord extérieur
du seuil (5).
ii. Nivelez verticalement sur le mur de douche.
iii. Marquez l’emplacement des trous et percez le mur.
- Pour la céramique, utilisez une mèche de 7/32”(6mm) (au carbure),
- Pour le plastique, utilisez une mèche de 7/64”(3mm)
iv. Fixez le panneau fixe (2) au mur à l’aide des vis #6 x 1 1/2” (11) fournies à cet effet.
v. Insérez les capuchons (16) aux extrémités des deux récepteurs de pivot tel qu’illustré.
STEP 5 - DOOR INSTALLATION
i. Insert the spacers (13) into the pin of door panel, hold them with your fingers and
then insert the pin into the lower pivot support (15). Fig. A.
ii. Hold the door sligthly inclined, put the upper pivot support (15) over the upper pin of
door panel.
iii. As you straighten the door, insert the pivot support (15) into the pivot holder. Fig. B.
iv. Fasten it with #10 x 5/16” screws (12).
ÉTAPE 5 - INSTALLATION DE LA PORTE
i. Mettez les espaceurs (13) dans l’axe de pivot du bas de la porte, retenez-les avec
vos doigts et insérez l’axe dans le support de pivot (15). Fig. A
ii. Tenez la porte légèrement inclinée, mettez en position l’autre support de pivot (15)
sur l’axe de pivot du haut de la porte.
iii. Redressez la porte en insérant le support de pivot (15) dans le récepteur de pivot.
Fig. B.
iv. Fixez le tout avec deux vis #10 x 5/16” (12) fournies à cet effet.
2
INTERIOR
INTÉRIEUR
1
Door
Porte
13
1
Door
Porte
2
INTERIOR
INTÉRIEUR
15
12
16
2
Level
Niveau
14
11
5
INTERIOR
INTÉRIEUR
Fig. A
Fig. B

6 10049442
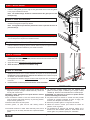
STEP 6 - WALL JAMB INSTALLATION (STRIKER SIDE)
IMPORTANT: Before securing the wall jamb, make sure you have a wood structure
behind your wall. If it is not the case, we suggest you fix the wall jamb with nylon
or spring toggle bolts or use proper anchor hardware (14). To ensure a solid wall
anchoring
i. Position the wall jamb (6) 5/16” (8mm) from the inside edge of the sill (5).
ii. Level vertically on the shower wall.
iii. Mark hole locations and drill wall.
iv. Secure with three #8 x 1” screws (10)
ÉTAPE 6 - INSTALLATION DU MONTANT MURAL (CÔTÉ PERCUTEUR)
IMPORTANT: Avant de fixer le montant assurez-vous d’avoir un cadre de bois
derrière votre mur afin de fixer solidement le montant. Si ce n’est pas le cas,
nous suggérons de le fixer à l’aide d’ailettes en nylon ou à ressort ou utiliser les
ancrages appropriés (14). Cela dans le but d’assurer un ancrage solide.
i. Positionnez le montant mural (6) à 5/16” (8mm) de la bordure intérieure du seuil (5).
ii. Nivelez verticalement sur le mur de douche.
iii. Marquez l’emplacement des trous et percez le mur.
iv. Fixez au mur à l’aide de trois vis #8 x 1” (10) fournies à cet effet.
STEP 7 - STRIKER INSTALLATION
i. Slightly incline the door towards the inside using adjustment screws to permit proper
water evacuation. Fig. A.
i. Insert the striker (7) inside the wall jamb (6) as shown. Fig. B
ii. Close the door and adjust the striker (7), leaving a 1/16” (2mm) gap between the
striker and the pull frame. Fig. C
iii. Mark hole locations on the striker (7) (interior of the shower) and drill through the first
wall of the striker (7) only. Use a 7/64”(3mm) drill bit.
iv. Fasten it with three #6 x 3/8” screws (9).
ÉTAPE 7 - INSTALLATION DU MONTANT PERCUTEUR
i. Incliner légèrement la porte vers l’intérieur à l’aide des vis d’ajustement pour
permettre l’écoulement de l’eau à l’intérieur de la douche. Fig. A
i. Insérez le percuteur (7) à l’intérieur du montant (6) tel qu’illustré. Fig. B
ii. Fermez la porte et ajustez le percuteur de façon à ce qu’il soit parallèle à celle-ci, en
laissant un espace de 1/16” (2mm) entre les deux. Fig. C
iii. Marquez l’emplacement des trous sur le percuteur (7) (intérieur de la douche) et
percez seulement la première paroi de celui-ci. Utilisez une mèche de 7/64” (3mm).
iv. Fixez le percuteur (7) au montant mural (6) à l’aide de trois vis #6 x 3/8” (9) fournies
à cet effet. Fig. B
2
INTERIOR
INTÉRIEUR
15
Door
Porte
1
Vis d'ajustement
INTERIOR
INTÉRIEUR
9
6 7 8
Door
Porte
1
1/16"
(2 mm)
INTERIOR
INTÉRIEUR
Pull frame
Poignée
6
9
7
8
10
Fig. B
Fig. A
EXTERIOR
EXTÉRIEUR
5/16"
(8 mm)
10
5
6
14
Level
Niveau
Fig. C

7 10049442
STEP 8 - WATER GASKET
i. Insert the water gasket (3) on the edge of door glass. Make sure to insert the gasket
in the proper orientation as shown.
Note: The flexible flange should be oriented towards the glass panel of the
fixed panel (2).
ÉTAPE 8 - JOINT D’ÉTANCHÉITÉ
i. Insérez le joint d’étanchéité (3) sur la bordure du verre de la porte. Prenez soin
d’orienter la languette souple tel qu’illustré.
Note: La languette souple doit être positionnée contre le panneau de verre du
panneau fixe (2).
STEP 9 - DRIP SHIELD INSTALLATION
i. Insert plastic drip shield (4) into the bottom frame of the door and cut surplus plastic.
You can dampen the drip shield to facilitate insertion.
ÉTAPE 9 - INSTALLATION DU DÉFLECTEUR SOUPLE
i. Insérez le déflecteur souple (4) dans le cadre du bas de la porte et coupez l’excédent.
Vous pouvez humecter le déflecteur pour faciliter l’insertion.
STEP 10 - SILICONE
i. Apply silicone all around exterior of unit and at the bottom as shown. Do not apply
caulking on the inside of the shower, between the base and the shower door, that
would cause the unit to leak.
ii. Apply also silicone along interior of fixed panel’s wall jamb.
iii. Allow 24 hours for silicone to cure before using.
ÉTAPE 10 - SILICONE
i. Appliquez du silicone sur le contour extérieur de la porte et au bas tel qu’illustré.
N’appliquez pas de calfeutrant à l’intérieur de la douche, entre la base et la porte
de douche, cela causerait des fuites.
ii. Puis appliquez du silicone le long du montant mural du panneau fixe, à l’intérieur de
la douche.
iii. Laissez sécher le silicone pendant 24 heures avant l’utilisation.
INTERIOR
INTÉRIEUR
3
Flexible
flange
Languette
souple
1
Door
Porte
Glass
Verre
4
1
Door
Porte
q Mild liquid household cleaners will keep the painted surface
bright and clean (for example: LIQUID IVORY ®). Rinse well
and dry with a clean cloth.
CAUTION: powder detergents and liquid abrasive cleaners
may damage surfaces.
q Do not allow the surface to come into contact with pro-ducts
such as acetone (nail polish remover), dry clea-ning solution,
lacquer thinner, gasoline, etc.
q Remove dust with a soft, damp cloth.
q Clean grease, oil, paint and ink with rubbing alcohol.
q Accidental scratches or water stains will rarely show, and if
they do they can be easily removed with a liquid automobile
polish.
q Les nettoyeurs ménagers liquides doux sont suffisants pour
garder la surface propre et brillante (par exemple: IVORY
LIQUIDE ®). Rincez à fond et asséchez avec un chiffon propre.
ATTENTION: les détergents en poudre ou liquide abrasifs
peuvent endommager les surfaces.
q Ne jamais mettre une surface en contact avec des produits
contenant de l’acétone (nettoyant de polis à ongle), des
solvants, des décapants, de l’essence, etc.
q Enlevez la poussière grâce à un linge doux et humide.
q Utilisez de l’alcool à friction pour enlever les taches de
peinture, encre ou graisse.
q Les égratignures et marques sont rarement visibles sur la
surface et si elles devaient paraître, il serait facile de les
enlever grâce à un polisseur liquide pour automobile.
NETTOYAGETO CLEAN
1
2
Step ii
Étape ii
Silicone

© MAAX Bath Inc., 2021 PRINTED IN CANADA / IMPRIMÉ AU CANADA / IMPRESO EN CANADA 2021-04-28 10049442
www.maax.com
Technical Services / Service technique / Servicio técnico
CANADA
F. 1 800 201-8308
UNITED STATES
F. 1 800 944-9808
T. 1 877 GET-MAAX (1 877 438-6229)
F. 1 888 361-2045
-
 1
1
-
 2
2
-
 3
3
-
 4
4
-
 5
5
-
 6
6
-
 7
7
-
 8
8


MAAX 136435-900-084-000 Pivolok Deluxe Pivot Shower Door 32 ½-37 x 64 ½ in. Guide d'installation
- Taper
- Guide d'installation
- Ce manuel convient également à
dans d''autres langues
Documents connexes
-
MAAX 101167-000-002 Gilmour Guide d'installation
-
-
-
-
-
-
-
-