La page est en cours de chargement...

VMT115PB, VMT115SN
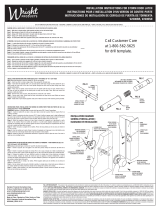
INSTALLATION INSTRUCTIONS FOR ADJUSTABLE MORTISE
INSTRUCTIONS POUR L’INSTALLATION D’UNE MORTAISE RÉGLABLE
INSTRUCCIONES DE INSTALACIÓN PARA MORTAJA AJUSTABLE
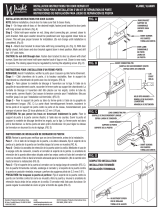
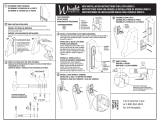
Step 3 - Check spindle hole location and latch bolt orientation
Étape 3 - Vérier l’emplacement du trou de la tige et l’orientation du pêne de verrou.
Paso 3 - Verique la ubicación del agujero del huso y el sentido del pasador del cerrojo.
Step 3A Étape 3A Paso 3A
1
2
3
Spindle hole location - Side view
Place spindle here • Placer la tige ici • Coloque el huso aquí
Place Screw Here
Placer la vis ici
Coloque el tornillo aquí
Correct
Correct
Correcto
Latch bolt orientation - Top view
Emplacement du trou de la tige – vue latérale Orientation du pêne de verrou – vue du dessus
Ubicación del agujero del huso – vista de lado Sentido del pasador del cerrojo – vista desde arriba
1
4
3
5
2
1
2
3
Realice el
Paso 3A
Effectuer les
opérations de
l’Étape 3A
Perform
Step 3A
Realice el Paso 3B
Effectuer les opérations
de l’Étape 3B
Perform
Step 3B
Incorrect
Incorrect
Incorrecto
Go to Step 4
Passer à l’Étape 4
Pase al Paso 4
Go to Step 4
Passer à l’Étape 4
Pase al Paso 4
1-7/8" - 2" • 4,8 - 5,1 cm • 4.8 cm - 5.1 cm
1-5/8" - 1-3/4" • 4,1 - 4,4 cm • 4.1 cm - 4.4 cm
1-3/8" - 1-1/2" • 3,5 - 3,8 cm • 3.5 cm - 3.8 cm
1-1/8" - 1-1/4" • 2,9 - 3,2 cm • 2.9 cm - 3.2 cm
1" • 2,5 cm • 2.5 cm
1-5/8" - 2" • 4,1 - 5,1 cm • 4.1 cm - 5.1 cm
1" - 1-1/2" • 2,5 - 3,8 cm • 2.5 cm - 3.8 cm
1-3/4" - 1-7/8"
4,4 - 4,8 cm • 4.4 cm - 4.8 cm
2"
5,1 cm • 5.1 cm
1-1/2" - 1-5/8"
3,8 - 4,1 cm • 3.8 cm - 4.1 cm
1-1/8" - 1-3/8"
2,9 - 3,5 cm • 2.9 cm - 3.5 cm
1"
2,5 cm / 2.5 cm
Step 1 - Measure door
thickness and select proper
spindle and screws, cut at
spindle if needed.
Étape 1 - Mesurer l’épaisseur
de la porte et choisir la tige et
les vis, couper la tige à plat si
nécessaire.
Paso 1 - Mida el espesor de la
puerta y seleccione huso y
tornillos adecuados; corte el
huso plano en caso necesario.
Step 2 - Insert body
into opening in door.
Étape 2 - Insérer le
corps dans l’ouverture
pratiquée dans la
porte.
Paso 2 - Inserte el
mecanismo en la
abertura de la puerta.
3A
Step 3B Étape 3B Paso 3B
3B

Hampton Products International Corp.
50 Icon, Foothill Ranch, CA 92610-3000
email: [email protected]
www.hamptonproducts.com
1-800-562-5625
Made in China, Fabriqué en Chine, Hecho en China
©2012 Hampton Products International Corp.
95017000_REVB 03/12
FULL LIFETIME WARRANTY - This product is fully warranted to be free of defects in material and workmanship for the life of the product. If a defect in material or workmanship occurs, call 800-562-5625 for instructions on how to have it replaced or repaired free of charge.
This warranty is null and void if the product was used for purposes for which it was not designed, is abused, misused, modied or improperly installed, operated, maintained, and/or repaired. NOT LIABLE FOR INCIDENTAL, INDIRECT, OR CONSEQUENTIAL DAMAGES. Some
states do not allow the exclusion or limitation of incidental or consequential damages, so the above limitation or exclusion may not apply to you. This warranty gives you specic rights, and you may also have other rights that vary from state to state.
GARANTIE TOTALE À VIE - Ce produit est garanti comme étant dépourvu de vices de fabrication et de main d’œuvre pour toute la durée de service du produit. Si un tel vice se manifeste, composer le 1-800-562-5625 pour obtenir les instructions permettant de faire réparer
ou de remplacer gratuitement le produit. Cette garantie est nulle et non avenue si le produit a été utilisé à des ns autres que celles pour lesquelles il a été conçu, s'il a subi des abus, s'il a été mal utilisé ou modié, ou s'il a été incorrectement installé, utilisé, entretenu et/ou
réparé. NOTRE RESPONSABILITÉ NE PEUT ÊTRE MISE EN JEU POUR DES DOMMAGES INDIRECTS QUELS QU’ILS SOIENT. Certains états ou provinces ne permettent pas l’exclusion ou la limitation des dommages indirects et il est possible que les limites ou l’exclusion
ci-dessus ne vous soient pas applicables. Cette garantie vous confère des droits spéciques et il est possible que vous déteniez d’autres droits variant d’un état ou d’une province à l’autre.
GARANTÍA TOTAL DE POR VIDA - Este producto está totalmente garantizado de no tener defectos en materiales y mano de obra durante la vida del producto. Si ocurre un defecto en materiales o en la mano de obra, llame al teléfono 800-562-5625 para obtener instrucciones
sobre cómo poder reemplazarlo o repararlo sin costo alguno. Esta garantía es nula y sin valor si el producto se utilizó para objetivos para el que no fue diseñado, o sufre abuso, mal uso, es modicado o instalado, accionado, mantenido y/o es reparado incorrectament. NO
HAY RESPONSABILIDAD ALGUNA POR DAÑOS INCIDENTALES O INDIRECTOS. Algunos estados no permiten la exclusión o limitación de daños incidentales o indirectos, por lo que esta exclusión puede no ser aplicable a usted. Esta garantía le proporciona derechos legales
y usted podrá tener otros derechos que varían de estado a estado.
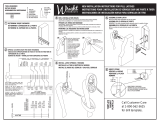
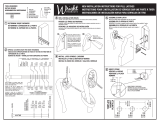
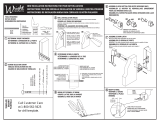
4
Step 4 - Attach body to door.
Étape 4 - Fixer le corps à la porte.
Paso 4 - Fije el mecanismo en la puerta.
Screw, #8 x 1/2"
Vis n° 8 x 1,27 cm
Tornillo, #8 x 1.27 cm
Screw, #8 x 1/2"
Vis n° 8 x 1,27 cm
Tornillo, #8 x 1.27 cm
Screw, #8 x 1/2"
Vis n° 8 x 1,27 cm
Tornillo, #8 x 1.27 cm
Screw, #8 x 1/2"
Vis n° 8 x 1,27 cm
Tornillo, #8 x 1.27 cm
Screw, #8 x 1/2"
Vis n° 8 x 1,27 cm
Tornillo, #8 x 1.27 cm
5.1
5.2
5
5.3
5.5
5.6
5.4
6 7
8
9
3/4"
2 cm
Step 5 - Install lever, bushings, D-ring,
and spindle to outside plate, and tighten
hex screw.
Étape 5 - Installer la poignée, les fourru-
res, l’anneau en D, et la tige sur la plaque
extérieure, et serrer la vis hexagonale.
Paso 5 - Fije la manija, los casquillos, el
anillo D y el huso en la placa exterior y
apriete el tornillo hexagonal.
Step 7 - Fasten inside plate, bushing,
and handle to door.
Étape 7 - Fixer la plaque intérieure, la
fourrure et la poignée à la porte.
Paso 7 - Fije la placa interior, el casquillo
y la manija en la puerta.
Step 9 - Verify opening
depth, and fasten strike
plate to door jamb.
Étape 9 - Vérier la
profondeur d’ouverture et
xer la gâche au cham-
branle de porte.
Paso 9 - VVerique la
profundidad de la abertura
y je la placa hembra a la
jamba de la puerta.
Step 6 - Insert outside handle assembly with small spindle as shown.
Étape 6 - Insérer le mécanisme de la poignée extérieure à l’aide de la petite tige, comme
illustré.
Paso 6 - Inserte el conjunto de la manija exterior con el huso pequeño tal como se
muestra.
Step 8- Tighten hex screw.
Étape 8 - Serrer la vis hexagonale.
Paso 8 - Apriete el tornillo hexagonal.
/