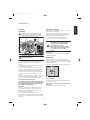
Zanussi ZTK120 Manuel utilisateur
- Catégorie
- Sèche-linge électriques
- Taper
- Manuel utilisateur

Unpacking: see page 5
Débridage: voir page 17
Entfernen der Transportsicherung: s. S. 29
Uitpakken: zie blz. 41
INSTRUCTION BOOKLET
MODE D’EMPLOI
GEBRAUCHSANWEISUNG
GEBRUIKSAANWIJZING
D
F
GB
NL
TUMBLE DRYER
SECHE-LINGE
WÄSCHETROCKNER
TROMMELDROGER
ZTK 120
125981101
D
F
GB
NL
125981101.qxp 2005-03-04 14:19 Page 1

2
Contents
Important safety information ......................3
Disposal ..............................................................3
Tips for environmental protection ............4
Technical specifications................................4
Description of the appliance ......................4
Installation ..........................................................5
• Unpacking ............................................................5
• Positioning ............................................................5
• Electrical connection ............................................5
• Stacking kit............................................................5
• Door reversal ........................................................5
• Connecting a drain hose ......................................6
Use ........................................................................7
• The control panel ..................................................7
• Programme Chart ................................................8
• Operating sequence..............................................9
• Useful hints ........................................................10
Maintenance and Cleaning ........................11
• External cleaning ................................................11
• Cleaning the door................................................11
• Cleaning the filters ..............................................11
• Cleaning the condenser unit ..............................11
• Emptying the water reservoir ..............................12
• Cleaning the air intake grille................................12
Something not working? ............................13
Dear customer,
Please read these operating instructions carefully and pay particular attention to the safety notes indicated in
the first pages.
We recommend that you keep this instruction booklet for future reference and pass it on to any future owners.
Transport damages
After unpacking the machine please check it is not damaged. If in doubt, do not start it but contact your local
Service Centre.
The symbols you will see on some paragraphs of this booklet have the following meaning:
The warning triangle emphasize information that is particularly important for your safety or correct
functioning of the appliance.
The information marked with this symbol provides additional instructions and practical tips on the use of
the appliance.
Tips and information about economical and ecological use of the machine are marked with this symbol.
Our contribution to the protection of the
environment: we use recycled paper.
125981101.qxp 2005-03-04 14:19 Page 2

ENGLISH
3
Important safety information
Installation
• Any electrical work required to install this appliance
should be carried out by a qualified electrician or
competent person.
• Care must be taken to ensure that the appliance
does not stand on the electrical supply cable.
• If the machine is situated on a carpeted floor, please
adjust the feet in order to allow air to circulate freely.
Use
• This appliance is designed for domestic use only. If
the machine is used for any other purposes or is
not used correctly, the manufacturer accepts no
responsibility for any damage that might occur.
• Always unplug the appliance after use.
• Clothes which are dripping wet should not be
placed in the dryer.
• Danger of explosion: Never tumble dry items that have
been in contact with inflammable solvents (petrol,
methylated spirits, dry cleaning fluid and the like). As these
substances are volatile, they could cause an explosion.
Tumble dry only items washed with water.
• Risk of fire: items that have been spotted or soaked with
vegetable or cooking oil constitute a fire hazard and
should not be placed in the tumble dryer.
• If you have washed your laundry with stain
remover you must execute an extra rinse cycle
before loading your tumble dryer.
• Please make sure that no gas lighters have
accidentally been left in pockets of garments to be
loaded into appliance.
• Do not dry canvas shoes or sports shoes, as they
could get stuck between the door and the drum,
thus blocking this latter.
• Leave the door slightly ajar when the appliance is not
being used. This will allow the seal to be preserved.
• Clean fluff filters after using the tumble dryer. To
prevent fire risks, do not use the appliance if the
fluff filters are damaged or without filters.
• Do not allow fluff to accumulate around the dryer.
General safety
• It is dangerous to alter the specifications or attempt
to modify this product in any way.
• Under no circumstances should you attempt to repair
the machine yourself. Repairs carried out by
inexperienced persons may cause injury or serious
malfunctioning. Contact your local Service Centre.
Always insist on genuine spare parts.
Child safety
• Children are often not aware of how dangerous
electrical appliances can be. When the machine is
working, children should be carefully supervised
and not be allowed to play with the appliance.
• The packaging components (e.g. plastic film,
polystyrene) can be dangerous to children - danger
of suffocation! Keep them out of children’s reach.
• Make sure that children or pets do not climb into the drum.
• When the appliance is to be scrapped, cut off the electrical
supply cable and destroy the plug with the remaining
cable. Disable the door catch in order to prevent children
from becoming trapped inside while playing.
These warnings have been provided in the interest of safety. You MUST read them carefully before installing or
using the appliance.
• Packaging materials
The materials marked with the symbol are
recyclable.
This means that they can be recycled by disposing of
them properly in appropriate collection containers.
• Machine
Use authorised disposal sites for your old appliance.
Help to keep your country tidy!
• Old appliance
The symbol on the product or on its packaging
indicates that this product may not be treated as
household waste. Instead it shall be handed over to
the applicable collection point for the recycling of
electrical and electronic equipment. By ensuring this
product is disposed of correctly, you will help prevent
potential negative consequences for the environment
and human health, which could otherwise be caused
by in appropriate waste handling of this product.For
more detailed information about recycling of this
product, please contact your local city office, your
household waste disposal service or the shop where
you purchased the product.
Disposal
125981101.qxp 2005-03-04 14:19 Page 3

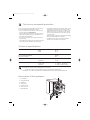
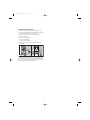
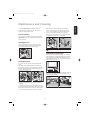
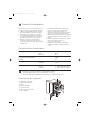
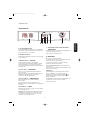
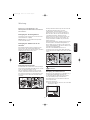
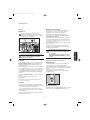
Description of the appliance
01 Control panel
02 Programme guide
03 Fluff filters
04 Rating Plate
05 Consenser Unit
06 Water reservoir
07 Adjustable feet
2
5
3
4
1
3
6
7
4
To save energy and to help protect the environment,
we recommend that you follow these hints:
• Try to load the maximum capacity of the machine
as small loads are uneconomical.
• Always load well spun laundry. The higher the spin
speed, the lower the electricity consumption and
the shorter the drying times.
• Do not over-dry laundry, this avoids creasing and
saves energy.
Select the drying time/section according to the type
of laundry and the required degree of dryness.
• To utilize the maximum load, laundry which is to be
dried ready to put away (store dry) can be dried
together with items to be ironed. To do this, select
the time for iron-dry, remove the iron-dry items at
the end of the programme and then finish-dry the
rest of the load.
• Clean the filters regularly to avoid excessive drying
times and high electricity consumption.
• Ventilate the room well. The room temperature
should not exceed +35°C during drying.
Tips for environmental protection
Technical specifications
DIMENSIONS: Height 85 cm
Width 60 cm
Depth 58 cm
ELECTRICAL CONNECTION: 220/230 V/50 Hz
MAX. POWER ABSORBED: 2400 W
MIN. FUSE RATING: 16 A
MAX. DRYING CAPACITY: Cotton, linen 5 kg
Synthetics 2.5 kg
CONSUMPTION: Cotton, linen 3.64 kWh (5.5 kg store dry)
Cotton, linen 3.64 kWh (5.5 kg iron dry)
Synthetics 1.40 kWh (2.5 kg store dry)
This appliance complies with the following E.E.C. Directives:
- 73/23 EEC of 19.2.73 (Low Voltage Directive) and subsequent modifications;
- 89/336 EEC of 3.5.89 (Electromagnetic Compatibility Directive) and subsequent modifications.
125981101.qxp 2005-03-04 14:20 Page 4

ENGLISH
5
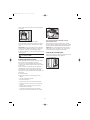
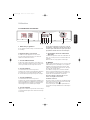
Installation
Warning!
Unpacking
Slide out the polythene bag with the polystyrene
stuffing before using the appliance. Pull off
adhesive strips from inside machine on top of drum.
Should the appliance be moved, it must be
transported vertically.
Positioning
It is recommended that, for your convenience, the
machine is positioned close to your washing
machine.
The tumble dryer must be installed in a clean place,
where dirt does not build up.
Air must be able to circulate freely all round the
appliance. Do not obstruct the front ventilation grille
or the air intake grilles at the back of the machine.
To keep vibration and noise to a minimum when the
dryer is in use, it should be placed on a firm, level
surface.
Once in its permanent operating position, check that
the dryer is absolutely level with the aid of a spirit
level. If it is not, raise or lower the feet until it is.
The feet must never be removed.
Do not restrict the floor clearance through deep-
pile carpets, strips of wood or similar. This might
cause heat build-up which would interfere with
the operation of the appliance.
Important
The hot air emitted by the tumble dryer can reach
temperatures of up to 60°C. The appliance must
therefore not be installed on floors which are not
resistant to high temperatures.
When operating the tumble dryer, the room
temperature must not be lower than +5°C and higher
than +35°C, as it may affect the performance of the
appliance.
P1106
Electrical connection
This machine is designed to operate on a 220-230 V,
single-phase, 50 Hz supply.
Check that your domestic electrical installation can
take the maximum load required (2.4 kW), also
taking into account any other appliances in use.
Connect the machine to an earthed socket, in
accordance with current wiring regulations.
The manufacturer declines any
responsibility for damage or injury
through failure to comply with the
above safety precaution.
Should the appliance power supply
cable need to be replaced, this must
be carried out by our Service
Centre.
Important!
The power supply cable must be accessible after
installing the machine.
Stacking kit
A special stacking kit is available through your
dealer, to enable the mounting of the dryer on top of
a front loading washing machine with cover’s depth
between 48 and 60 cm.
Read carefully the instructions supplied with the kit.
Door reversal
To make it easier to load or unload the laundry the
door can be reversed.
This operation must be carried out by qualified
personnel.
Please contact the nearest Service Centre.
P1148
125981101.qxp 2005-03-04 14:20 Page 5

6
Connecting a drain hose
If there is a sink or drain near the appliance, the
condensed water can be discharged directly through
a hose that is available on the market.
In order to connect the hose to the appliance
proceed as follows:
• Remove the clamp (A);
• Pull out the plug (B);
• Insert the drain hose (C);
• Fasten the hose (C) to the appliance using the
clamp (A).
If the appliance is stacked on the washing machine,
the condensed water can be discharged through the
hose C as shown in figure, but take into account that
the hose must be pointed downwards.
P1161
C
A
B
A
B
C
P1160
125981101.qxp 2005-03-04 14:20 Page 6

7
ENGLISH
Use
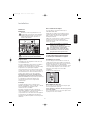
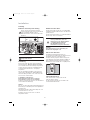
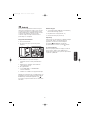
The control panel
1 Programme Guide
This will help you to select the correct time for drying.
2 Mains-ON Light
Comes on when the appliance is switched on
(ON/OFF button pressed down) and goes out when
this button is released.
3 ON/OFF Button “AAN/UIT”
This button is used to switch the dryer on. At the end
of the programme, release this button by pressing it
again to switch the dryer off.
4 Low Temperature Button “LAGE TEMP.”
Press this button to reduce the temperature when
drying particularly delicate cotton or linen items.
In this case you should select a longer drying time.
5 Cool Tumble Button
”
VERFRISSEN”
By depressing this button the heat is cut off. This is
particularly useful to freshen the laundry (e.g. to
remove a persistent odour of moth balls) or to dry
extremely delicate items.
6 Start Button “START”
Press this button to start the dryer after having
selected the programme.
If the door of the appliance is opened while the
programme is running, this button must be
pressed again after closing the door in order to
restart the programme from the point at which it
was interrupted.
7 Water Full Indicator Light “RESERVOIR”
This light illuminates when the reservoir is full or
improperly fitted.
8 Time Selector Dial
The selector dial incorporates two drying cycles, one
of up to 150 minutes at a high temperature for cotton
and linen, and one of up to 100 minutes at a low
temperature for synthetic fabrics. To set the machine
to the selected time, turn the dial clockwise until the
time you want coincides exactly with the pointer.
NEVER attempt to turn the dial in an
anticlockwise direction.
When selecting the drying time you should
remember that it includes a 10 minute cooling phase
(position on the dial).
This phase should not be shortened, stopped or
avoided, as this could cause skin burns or damages
to the laundry.
125981101.qxp 2005-03-04 14:20 Page 7

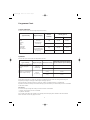
8
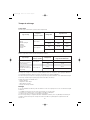
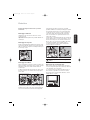
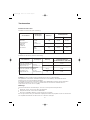
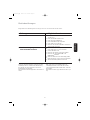
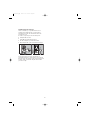
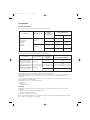
Programme Chart
Attention! Please follow the instructions on labels when drying mixed fabrics.
Drying times are given as a guide only and vary according to the size of the load, the type of laundry, the
degree of spinning prior to drying and the degree of drying required.
Start by selecting a short drying time. If necessary, perform an additional drying cycle afterwards.
Experience will soon enable you to estimate the drying time needed for your usual laundry loads. It is advisable
to take note of them.
Size of load
It is not necessary to weigh the laundry, if these instructions are followed:
• Cottons, linen: full drum, but not overloaded.
• Synthetics: half drum.
For a mixed load (cotton and synthetics, for example) select the drying time suitable for the most delicate
fabrics and then increase it by approx 10 mins.
Cottons and linens
Selector dial up to 150 minutes (high temperature section)
Type of laundry
Cotton
Towelling
Shirts
Sheets
Hand towels
Tablecloths
Table napkins
Degree of drying
Store dry
(wardrobe dry)
(Kastdroog)
5 kg 95-110
85-100
2.5 kg 70-85 60-75
5 kg 85-105 75-90
2.5 kg
45-60
55-70
Iron dry
(not completely dry;
suitable for ironing)
(Strijkdroog)
Amount
of laundry
Drying time in minutes for
laundry spun at
800/1000 rpm 1200/1400 rpm
Synthetics
Selector dial up to 100 minutes (low temperature section)
Type of laundry
Synthetics or mixed fabrics
which do not require
ironing.
Degree of drying
Store dry
(Kastdroog)
2.5 kg 40-50
15-251 kg
Amount of laundry
Drying time in minutes for laundry
spun at a minimum speed of 800 rpm
Synthetics or mixed fabrics
which do require ironing.
Iron dry
(Strijkdroog)
2.5 kg 30-40
10-201 kg
125981101.qxp 2005-03-04 14:20 Page 8

ENGLISH
9
Operating sequence
Before using your tumble dryer for the first time, we
recommend to place a few damp cloths inside the
appliance and dry for 20 minutes.
There may be dust inside a brand new tumble dryer.
Drying
1. Connect the appliance.
2. Open the door.
3. Load the items one at a time, shaking them out
loosely.
4. Close the door. Please check the laundry does
not get caught between the door and filter.
5. Press the AAN/UIT button: the mains-ON light
comes on.
6. Select the drying time.
7. If required, press the Low Temperature button
LAGE TEMP. or the VERFRISSEN button .
8. Press the Start button, the machine starts
operating.
The drum turns alternately in both directions
during drying.
All drying programmes end with a 10 minute
cooling phase (position on selector dial).
The machine stops automatically at the end of
this phase.
9. Release the AAN/UIT button (the mains-ON light
goes out) and immediately remove the laundry.
P1108
P1149
After each use
• Switch the appliance off by releasing the AAN/UIT
button . The mains-ON light goes out.
• Clean the filters (see page 11).
• Empty the water reservoir (see page 12).
Important!
If the drying programme has to be stopped before it
reaches the end, we recommend that you turn the
time selector dial to position (cooling) and wait
until the end of this phase
before removing the laundry. This will avoid a build-
up of heat inside the appliance.
Modifying the programme
To change a programme which is running without
opening the door, first depress the AAN/UIT button
and then turn the time selector dial to the required
time. Press the AAN/UIT button again.
125981101.qxp 2005-03-04 14:20 Page 9

10
Useful hints
• Try to load to the maximum capacity of the
machine as small loads are uneconomical.
For information, here is a list of the average
weights of some common laundry items.
Sheet 700 - 1000 g
Tablecloth 400 - 500 g
Kitchen towel 70 - 120 g
Table napkin 50 - 100 g
Towelling hand towel 150 - 250 g
Bathrobe 1000 - 1500 g
Man’s shirt 200 - 300 g
Pillowcase 100 - 200 g
Man’s pyjamas 400 - 500 g
Ladies’ nightdress 200 - 250 g
• Never tumble dry the following:
Particularly delicate items such as net curtains,
woollen, silk, fabrics with metal trim, nylon tights,
bulky materials such as anoraks, blankets,
eiderdowns, sleeping bags, feather quilts and any
items containing rubber foam or materials similar
to rubber foam.
• Always follow the instructions on garment labels:
may be tumble dried
normal drying (high temperature)
delicate drying (low temperature)
do not tumble dry
• Close pillowcases and covers with fasteners to
prevent small laundry items getting tangled inside
them. Close press studs, zips and hooks and tie
belts and apron strings.
• Sort laundry according to type and degree of
drying required.
• Do not over-dry laundry, this avoids creasing and
saves energy.
• Avoid drying dark clothes with light coloured fluffy
items such as towels as they could attract the fluff.
• The laundry must be thoroughly spun before
tumble drying.
• Easy-care items, too, e.g. shirts, should be briefly
pre-spun before drying (depending on crease
resistance approx. 30 seconds or using the special
brief spin programme of your washing machine).
• Knitted textiles (knitted underwear) may shrink a
little during drying. Please do not overdry items of
this type. It is advisable to allow for shrinkage
when choosing the size of new purchases.
• You can also put starched items into your dryer.
However, to achieve the desired starched effect,
choose the programme “iron dry”. To remove any
starch residues, wipe out the internal drum after
drying with a moist cloth and then rub it dry.
• To avoid a static charge when drying is completed,
use either a fabric softener when you are washing
the laundry or a fabric conditioner specifically for
tumble dryers.
• Remove the laundry when the dryer has finished
drying.
• If individual items are still damp after drying, set a
brief post-drying time, but at least 20 minutes.
This will be necessary particularly for multilayered
items (e.g. collars, pockets, etc.).
125981101.qxp 2005-03-04 14:20 Page 10

ENGLISH
11
Maintenance and Cleaning
You must disconnect the appliance from the
electricity supply, before you can carry out any
cleaning or maintenance work.
External cleaning
Use only soap and water and then dry thoroughly.
Important: do not use methylated spirit, diluents or
similar products.
Cleaning the door
Clean periodically the interior part of the door to
remove any fluff from the seals around the filter.
Accurate cleaning ensures correct drying.
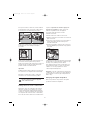
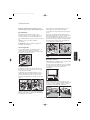
Cleaning the filters
Your dryer will only function well if the filters are
clean.
The filters collect all the fluff which accumulates
during drying and they must therefore be cleaned at
the end of each programme, before removing the
laundry, with a damp cloth.
The filter in the inner door must be removed for
cleaning.
Do not be alarmed by the amount of fluff. It is not
due to excessive wear caused by the dryer. All fabric
loses fluff when drying but it goes un-noticed in the
air. In a tumble dryer it simply collects in the filter.
A
UT
OREVE
RSE
k
g
5
k
g
2
,
5
800 / 90
0
7
0
'
-
9
0
'
3
5
'
-
5
0
'
10
00 / 1200
6
5
'
-
8
5
'
3
0
'
-
4
5
'
8
00 / 900
8
0
'
-
1
0
0
'
5
5
'
-
7
0
'
10
00
/ 1200
7
5
'
-
9
5
'
5
0
'
-
6
5
'
650
5
0
'
-
6
0
'
3
0
'
-
3
5
'
k
g
2
,
5
k
g
1
P1151
P1110
AU
TO
R
EV
ER
SE
k
g
5
k
g
2
,
5
8
00
/
90
0
7
0
'
-
9
0
'
3
5
'
-
5
0
'
10
0
0
/
12
00
6
5
'
-
8
5
'
3
0
'
-
4
5
'
80
0 /
9
00
8
0
'
-
10
0
'
5
5
'
-
7
0
'
100
0
/
12
00
7
5
'
-
9
5
'
5
0
'
-
6
5
'
6
5
0
5
0
'
-
6
0
'
3
0
'
-
3
5
'
k
g
2
,
5
k
g
1
P1150
After a while, a withish patina due to detergent
residue on laundry forms on the filters. When this
occurs, clean the filters (specially the filter in the
door opening) with warm water using a brush.
Remove it as per picture (it can be positioned with
the tooth facing to the left or to the right).
Do not use the appliance without filters.
Cleaning the condenser unit
Clean the air condenser periodically, 3 or 4 times a
year depending on how frequently the dryer is used.
The condenser is situated at the lower part of the
cabinet behind a small door. To open the door, push
the catch as per picture.
To pull out the condenser, first turn the two red stops
downwards and then remove the condenser unit
holding it at the handle.
P1155
P1159
P1177
A
U
T
O
R
E
V
E
R
S
E
k
g
5
k
g
2
,
5
8
0
0
/
9
0
0
7
0
'
-
9
0
'
3
5
'
-
5
0
'
1
0
0
0
/
1
2
0
0
6
5
'
-
8
5
'
3
0
'
-
4
5
'
8
0
0
/
9
0
0
8
0
'
-
1
0
0
'
5
5
'
-
7
0
'
1
0
0
0
/
1
2
0
0
7
5
'
-
9
5
'
5
0
'
-
6
5
'
6
5
0
5
0
'
-
6
0
'
3
0
' -
3
5
'
kg
2
,5
kg
1
P1152
125981101.qxp 2005-03-04 14:20 Page 11

12
Clean it with a brush and rinse it under the shower if
necessary.
Also clean the outside, removing all fluff.
Clean the rubber seal round the condenser cabinet
and in the inner part of the small door with a damp
cloth.
Important! Do not use pointed objects or utensils to
clean the spaces between the plates, as this could
damage the condenser and make it permeable.
Re-fit the condenser, turn the red stops upwards and
close the door.
Do not use this appliance if the condenser
has not been fitted.
Emptying the water reservoir
Water extracted from the laundry condenses inside
the machine and is collected in a reservoir.
The reservoir must be emptied after each drying
cycle to ensure efficient operation when the machine
is next used.
If this is not done a safety device trips: pilot light
“RESERVOIR” on the control panel comes on and
the programme stops, leaving the laundry damp.
The reservoir can be emptied even in the middle of a
programme.
Proceed as follows:
• Open the small door at the lower part of the
cabinet
• Turn the yellow stop upwards
• Pull out the reservoir
• Open the small cover and let water flow down
• Close the small cover and re-insert correctly the
reservoir
•
Push it until it clicks and turn the yellow stop
downwards to lock firmly it
•
• Close the small door and press the START
button again to allow the programme to continue.
P0639
The reservoir must be re-inserted correctly.
Push it until it clicks.
The machine can remain unactive some seconds
before starting the programme and during this period
the water container light “RESERVOIR”remains alight.
Handy tip: The condensed water may be used in a
steam iron or to top up a battery, etc. In this case it
must be filtered (e.g. through a coffee filter).
Cleaning the air intake grille
Using a vacuum cleaner remove the fluff from the air
intake grille at the back of the appliance.
P1162
P1202
125981101.qxp 2005-03-04 14:20 Page 12

FRANÇAIS
13
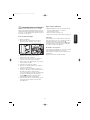
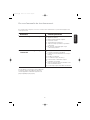
Something not working?
If, after the above checks, there is still a fault, call
your local Service Centre.
Please make sure you give the model and serial
Before contacting your local Service Centre, please make the following checks:
Problem Possible cause
• The dryer does not work:
• The door(s) is(are) open.
• The plug is not fitted into the wall socket.
• There is no electricity supply from the wall socket.
• The selector dial is not set correctly.
• The water reservoir is full or not correctly inserted.
• The start button has not been depressed.
• The dryer does not dry properly:
• The filters are clogged.
• The condenser is clogged.
• The water reservoir is full.
• The selected cycle is not suitable for the laundry.
• Insufficient drying time.
• The laundry has not been spun properly.
• The low temperature LAGE TEMP. or the
VERFRISSEN function has been selected.
• Excessive laundry load.
• The dryer is not correctly installed.
number of the appliance.
This information can be found on the rating plate
(see picture on page 4 ).
125981101.qxp 2005-03-04 14:20 Page 13

14
Sommaire
Avertissements et conseils
importants
. . . . . . . . . . . . . . . . . . . . . . . . . . . .15
Recyclage . . . . . . . . . . . . . . . . . . . . . . . . . . . . .15
Conseils écologiques . . . . . . . . . . . . . . . . .16
Caractéristiques techniques . . . . . . . . . .16
Description de l’appareil . . . . . . . . . . . . . .16
Installation . . . . . . . . . . . . . . . . . . . . . . . . . . . .17
●
Débridage . . . . . . . . . . . . . . . . . . . . . . . . . . . .17
●
Emplacement . . . . . . . . . . . . . . . . . . . . . . . . . .17
●
Raccordement électrique . . . . . . . . . . . . . . . . .17
●
Installation en colonne . . . . . . . . . . . . . . . . . . .17
●
Réversibilité de la porte . . . . . . . . . . . . . . . . . .17
●
Raccordement d’un tuyau d’évacuation . . . . .18
Utilisation . . . . . . . . . . . . . . . . . . . . . . . . . . . . .19
●
Bandeau de commandes . . . . . . . . . . . . . . . . .19
●
Temps de séchage . . . . . . . . . . . . . . . . . . . . .20
●
Comment faire un séchage? . . . . . . . . . . . . . .21
●
Guide de séchage . . . . . . . . . . . . . . . . . . . . . .22
Entretien . . . . . . . . . . . . . . . . . . . . . . . . . . . . . .23
●
Nettoyage extérieur . . . . . . . . . . . . . . . . . . . . .23
●
Nettoyage de la porte . . . . . . . . . . . . . . . . . . .23
●
Nettoyage des filtres . . . . . . . . . . . . . . . . . . . .23
●
Nettoyage du condenseur d’air . . . . . . . . . . . .23
●
Vidange du bac d’eau de condensation . . . . .24
●
Nettoyage de la grille d’aspiration . . . . . . . . . .24
En cas d'anomalie
de fonctionnement
. . . . . . . . . . . . . . . . . . . .25
Chère cliente, Cher client,
veuillez lire attentivement cette notice d’utilisation.
Tenez compte surtout des avertissements importants donnés dans les premières pages de cette notice.
Gardez cette notice d’utilisation pour toute consultation future. Remettez-la à l’acheteur éventuel de votre
appareil.
Dégâts de transport
A la réception de l'appareil, nous vous prions de faire les «réserves d'usage» en présence du livreur (dégâts
esthétiques par exemple).
Comment lire votre notice d’utilisation?
Les symboles suivants vous guideront tout au long de la lecture de votre notice d’utilisation:
Instructions de sécurité
Conseils et recommandations
Informations liées à la protection de l’environnement
Notre contribution à la protection de l’environnement:
nous utilisons du papier recyclé.
125981101.qxp 2005-03-04 14:20 Page 14

FRANÇAIS
15
Avertissements et conseils importants
Installation
●
Si l'installation électrique de votre habitation
nécessite une modification pour le branchement de
votre appareil faites appel à un électricien qualifié.
●
Assurez-vous, après avoir installé l'appareil, que
celui-ci ne repose pas sur le câble d'alimentation.
●
Si le sèche-linge est installé sur un sol recouvert
de moquette, réglez les pieds de façon à ce que
l’air puisse circuler librement autour de l’appareil.
Utilisation
●
Votre appareil est destiné à un usage domestique. Ne
l’utilisez pas à des fins commerciales ou industrielles ou
pour d’autres buts que celui pour lequel il a été conçu.
●
Débranchez toujours l'appareil après son utilisation.
●
N'introduisez jamais dans l'appareil du linge
simplement égoutté.
●
Ne séchez pas d'articles ayant été traités avec des produits
chimiques, tels que les produits utilisés pour le nettoyage
à sec, car ils pourraient provoquer une explosion.
●
Risque d'incendie : ne faites pas sécher dans
votre appareil du linge qui a été taché ou imbibé
d'huile végétale ou d'huile de cuisson.
●
Risque d'incendie : si vous avez prétraité votre linge
avec du détachant (spray ou liquide) avant lavage,
effectuez un cycle de rinçage supplémentaire avant
de le charger dans votre sèche linge.
●
Contrôlez qu'un briquet n'est pas resté dans une
poche.
●
Ne séchez en aucun cas des chaussures
(tennis,etc.), car elles pourraient s’encastrer entre le
hublot et le tambour, bloquant ce dernier.
●
Laissez la porte entrouverte lorsque le sèche-
linge n'est pas utilisé, mais veillez à ce que les
enfants ne s'enferment pas dans l'appareil.
●
Les filtres doivent être nettoyés après chaque utilisation.
N'utilisez jamais l'appareil avec des filtres endommagés
ou sans filtres. Cela pourrait provoquer un incendie.
●
Evitez l’accumulation de poussière autour de l’appareil
pour permettre à l’air de circuler librement.
Sécurité
●
Il est dangereux de modifier ou d'essayer de modifier
les caractéristiques techniques de cet appareil.
●
N'essayez jamais de réparer l'appareil vous-même. Les
réparations effectuées par du personnel non qualifié
peuvent provoquer des dommages importants.
Seul un Service Après-Vente recommandé est
habilité à intervenir. En cas d'intervention, exigez
des pièces de rechange certifiées constructeur.
Sécurité des enfants
●
Les enfants ne sont souvent pas en mesure de
reconnaître les risques émanant des appareils
ménagers. Il est donc indispensable de les garder
sous surveillance lorsque l'appareil fonctionne. Ne
les laissez pas jouer avec le sèche-linge!
●
Les éléments constituant l'emballage (les films
en plastique, les morceaux de styropor par ex.)
peuvent présenter un danger pour les enfants.
Risque d'asphyxie! Gardez les éléments
d'emballage hors de la portée des enfants.
●
Assurez-vous que les enfants ou vos animaux
domestiques ne puissent pas pénétrer dans le
tambour du sèche-linge.
●
Si vous procédez à la mise à la casse de votre appareil,
veillez à mettre hors d'usage ce qui pourrait représenter un
danger: coupez le câble d'alimentation au ras de l'appareil
et détériorez le dispositif de fermeture de la porte.
Vous éviterez ainsi que les enfants s’y enferment
en se mettant ainsi en danger de mort.
Les avertissements suivants sont donnés pour votre sécurité. Nous vous prions de bien vouloir les lire
attentivement avant d'installer et d'utiliser l'appareil.
Recyclage
●
Recyclage de l’emballage
Tous les matériaux marqués par le symbole sont
recyclables. Pour qu’ils puissent être récupérés (recyclés), il est
nécessaire de les déposer dans les déchetteries prévues à cet
effet (renseignez-vous auprès des autorités locales).
●
Mise à la casse de l’ancien appareil
Informez-vous auprès de la municipalité au sujet de
l’endroit où déposer l’ancien appareil pour qu’il
puisse être ensuite recyclé ou détruit.
• Appareiles usagés
Le symbole sur le produit ou son emballage
indique que ce produit ne peut etre traité comme
déchet ménager. Il doit plutôt etre remis au point de
ramassage concerné, se chargeant du recyclage du
matériel électrique et électronique. En vous assurant
que ce produit est éliminé correctement, vous favorisez la
prévention des conséquences négatives pour
l’environnement et la santé humaine qui, sinon, seraient le
résultat d’un traitement inapproprié des déchets de ce
produit. Pour obtenir plus de détails sur le recyclage de ce
produit, veuillez prendre contact avec le bureau municipal
de votre région, votre service d’élimination des déchets
ménagers ou le magasin ou vous avez acheté le produit.
125981101.qxp 2005-03-04 14:20 Page 15

16
Conseils écologiques
Afin de réaliser des économies d’énergie, nous vous
conseillons de respecter les instructions suivantes:
●
Utilisez si possible l’appareil à pleine capacité;
des charges partielles sont peu économiques.
●
Tout le linge à sécher doit être essoré avant
d'être introduit dans le tambour. Plus la vitesse
d'essorage sera importante, plus courte sera la
durée du séchage d'où économie d'énergie.
●
Evitez de sécher le linge trop longtemps:
choisissez le temps/secteur de séchage en
fonction de la nature des textiles et du degré de
séchage désiré.
●
Pour utiliser l'appareil à pleine capacité vous
pouvez sécher en une fois du linge “prêt à
ranger” avec du linge “prêt à repasser”.
Sélectionnez le temps de séchage pour “prêt à
repasser” et à la fin du programme retirez ce
linge. Complétez le programme en sélectionnant
un temps supplémentaire pour le linge “prêt à
ranger”.
●
Nettoyez régulièrement les filtres pour éviter des
temps de séchage trop longs: vous
économiserez de l’énergie.
●
Pendant le fonctionnement de l’appareil, la
température ambiante ne doit pas dépasser
+ 35°C.
Caractéristiques techniques
DIMENSIONS: hauteur 85 cm
largeur 60 cm
profondeur 58 cm
PUISSANCE DE BRANCHEMENT: 220/230 V/50 Hz
PUISSANCE TOTALE ABSORBEE: 2400 W
FUSIBLE: 16 A
CAPACITE DE SECHAGE: coton, lin 5,0 kg
synthétiques 2,5 kg
CONSOMMATIONS: coton, lin 3,64 kWh (5 kg prêt à ranger)
coton, lin 3,70 kWh (5 kg prêt à repasser)
synthétiques 1,40 kWh (2,5 kg prêt à ranger)
Cet appareil est conforme aux Directives Communautaires suivantes:
- 73/23 CEE 19/02/73 (Basse tension) et modifications successives;
- 89/336 CEE 03/05/89 (Compatibilité Electromagnétique) et modifications successives.
Description de l’appareil
1 Bandeau de commandes
2 Guide des programmes
3 Filtres
4 Plaque signalétique
5 Condenseur d’air
6 Bac d’eau de condensation
7 Pieds réglables
2
5
3
4
1
3
6
7
125981101.qxp 2005-03-04 14:21 Page 16

FRANÇAIS
17
Installation
Attention!
Débridage
Enlevez le sachet en polyéthylène avec le
rembourrage en polystyrène avant d’utiliser
l’appareil pour la première fois. Enlevez le
urban adhésif de la partie supérieure a
l'intérieur du tambour
Si l’appareil doit être déplacé par la suite,
il devra être transporté verticalement.
Emplacement
L’installation de votre appareil nécessite un local
convenablement aéré.
Pour que l’appareil fonctionne dans les meilleures
conditions, il est indispensable de le mettre
parfaitement de niveau (emploi d’un niveau à bulle)
en agissant sur les quatre pieds réglables.
Un fonctionnement correct exige une arrivée d’air
exempte de poussière, ainsi qu’une évacuation de
l’air chaud à travers les fentes d’aération situées à
l’avant, en bas, dans le socle du sèche-linge.
Ne démontez pas les pieds, ne limitez pas la
circulation de l’air au sol par des tapis à longs
poils, des moulures, etc. Il pourrait se produire une
accumulation de chaleur qui nuirait au bon
fonctionnement du moteur ou risquerait de
l’endommager.
Remarque:
La chaleur dégagée par le sèche-linge peut
atteindre jusqu’à 60°C. Tenez compte de ce facteur
lors de l’installation de l’appareil sur des
revêtements de sol sensibles.
Pendant le fonctionnement du sèche-linge, la
température ambiante ne doit pas être inférieure à
+5°C ou supérieure à +35°C pour ne pas
compromettre le bon fonctionnement de l’appareil.
L’air doit pouvoir circuler librement à l’arrière de
l’appareil. Les grilles d’aspiration ne doivent pas être
obstruées.
P1106
Raccordement électrique
Ce sèche-linge ne peut être branché qu'en
220-230V/ 50 Hz, 16 A.
Vérifiez que le compteur et les fusibles peuvent
supporter l'intensité absorbée par l'appareil (2.4
kW), en tenant compte des autres appareils
électriques branchés.
Utilisez un socle de prise de courant comportant
une borne de mise à la terre qui doit être
obligatoirement raccordée conformément aux
normes en vigueur.
Notre responsabilité ne saurait être
engagée en cas d'incident ou
d'accident provoqué par une mise à la
terre défectueuse ou inexistante.
Le remplacement éventuel du câble
d’alimentation ne devra être effectué
que par notre service après-vente.
Important!
Le câble d’alimentation doit être facilement
accessible après l’installation de l’appareil.
Installation en colonne
Ce sèche-linge peut être installé en colonne sur
certains lave-linge de notre marque à chargement
frontal ayant une profondeur du couvercle entre 48
et 60 cm. La fixation de ces deux appareils
s'effectue à l'aide du kit vendu sur demande. Ce kit
est à commander auprès de votre revendeur. Les
instructions de montage se trouvent dans
l'emballage.
Veuillez les lire attentivement.
Réversibilité de la porte
Si nécessaire, le sens d’ouverture de la porte peut
être changé de droite à gauche.
Cette opération ne doit être effectuée que par un
technicien qualifié.
Pour ce faire adressez-vous au service après-vente
le plus proche de votre domicile.
P1148
125981101.qxp 2005-03-04 14:21 Page 17

18
Raccordement d’un tuyau d’évacuation
Si le lieu d’emplacement est pourvu d’un dispositif
d’évacuation, l’eau condensée peut directement
être évacuée par un tuyau que vous pourrez vous
procurer auprès de votre magasin vendeur.
Suivez les instructions suivantes pour raccorder le
tuyau à l’arrière de l’appareil:
1. ôtez le collier de serrage A;
2. retirez le bouchon de fermeture B;
3. introduisez le tuyau C à fond;
4. fixez le tuyau C à l’aide du collier A.
Cette solution peut être adoptée aussi lorsque le
sèche-linge est installé en colonne sur le lave-linge.
Faites attention à ce que le tuyau C soit orienté vers
le bas (voir croquis ci-dessous).
P1161
C
A
B
A
B
C
P1160
125981101.qxp 2005-03-04 14:21 Page 18

FRANÇAIS
19
Si la porte de l’appareil est ouverte en cours de
programme, cette touche doit être enclenchée à
nouveau après fermeture de la porte pour que le
programme démarre là où il a été interrompu.
7 Voyant du bac d’eau de condensation
“Bac plein”
Il s’allume lorsque le bac d’eau de condensation est
plein, ou s’il n’est pas inséré correctement dans son
logement.
Dans les deux cas, le programme s’interrompt.
8 Minuteur
Gradué jusqu'à 150 minutes pour le coton et jusqu'à
100 minutes pour les synthétiques, il vous permet
d'afficher un temps de séchage en fonction de la
nature et de la quantité de linge à sécher, ainsi que
du niveau de séchage désiré.
Pour afficher le temps choisi, tournez la manette
dans le sens des aiguilles d'une montre jusqu'à ce
que la graduation correspondante coïncide avec le
repère situé sur le bandeau de commandes.
Ne tournez jamais le minuteur dans le sens
inverse des aiguilles d'une montre.
Ventilation d'air froid
En fin de séchage, une phase de refroidissement de
10 minutes est prévue pour éviter le froissement du
linge (minuteur en position
).
Vous ne devez pas ouvrir la porte prématurément
pour éviter tout risque de brûlures et de dommages
au linge.
Utilisation
Le bandeau de commandes
1 Guide des programmes
Il vous aidera à choisir le temps convenant le mieux
à votre linge.
2 Voyant de mise sous tension
Il s'allume lorsque l'appareil est sous tension
(touche marche/arrêt enclenchée) et s’éteint en
faisant ressortir la même touche.
3 Touche “Marche/Arrêt”
Cette touche permet de mettre le sèche-linge sous
tension. A la fin du programme, faites ressortir cette
touche pour mettre le sèche-linge hors tension.
4 Touche “Délicat”
L’enclenchement de cette touche permet
d’effectuer un séchage à une température inférieure
pour du linge en coton particulièrement délicat.
Il convient alors de prolonger le temps de séchage.
5 Touche “Rafraîchir”
L’enclenchement de cette touche permet
d’effectuer un séchage à température ambiante (les
éléments chauffants sont débranchés) pour du linge
délicat particulièrement fragile ou pour éliminer une
odeur trop prononcée, antimites par exemple.
6 Touche “Départ”
Appuyez sur cette touche pour mettre le sèche-linge
en fonctionnement après avoir sélectionné le temps
de séchage.
125981101.qxp 2005-03-04 14:21 Page 19

20
Temps de séchage
Attention! Conformez-vous aux étiquettes d’entretien du linge pour le séchage des tissus mélangés.
Les temps de séchage ne sont donnés qu'à titre indicatif. Seule votre expérience, après quelques utilisations,
vous permettra d'estimer le temps nécessaire au séchage de vos charges habituelles.
Ne sélectionnez pas une durée de séchage trop longue dès la première utilisation. Vous déterminerez le degré
de séchage souhaité en prolongeant progressivement la durée de séchage.
La durée du séchage est variable selon:
- la nature du linge
- l’importance de la charge
- l’intensité de l’essorage
- la degré de séchage souhaité
Charge
Il est souvent difficile d’estimer le poids des articles à sécher. C’est pourquoi nous vous conseillons de remplir
le tambour:
• en totalité mais sans pression excessive, pour le linge en coton, lin, métis;
• à moitié de son volume pour les cotons traités et les fibres synthétiques;
• au tiers environ de son volume pour les articles très fragiles.
Pour une charge de linge comportant des fibres de différentes natures (coton et synthétiques résistants, par
exemple), choisissez le temps de séchage en fonction des fibres les plus fragiles et augmentez-le de 10
minutes env.
Coton et lin
Minuteur jusqu’à 150 minutes (secteur à haute température)
Type de linge
Peignoir
Serviettes-éponges
Chemises
Linge de lit
Linge de table
Torchons
Degré de
séchage souhaité
Prêt à ranger
5 kg
2.5 kg
5 kg
2.5 kg
Prêt à repasser
Charge maxi
Durée en minutes pour
linge essoré à
Synthétiques
Minuteur jusqu’à 100 minutes (secteur à température réduite)
Type de linge
Synthétiques ou tissus
mélangés ne nécessitant
pas de repassage
Degré de
séchage souhaité
Prêt à ranger
Charge maxi
Durée en minutes pour
linge essoré à 800 tr/min
95-110
85-100
70-85 60-75
85-105 75-90
45-60
55-70
800/1000 rpm 1200/1400 rpm
40-50
15-25
2.5 kg 30-40
10-201 kg
2.5 kg
1 kg
Prêt à repasser
Synthétiques ou tissus
mélangés nécessitant pas
de repassage
125981101.qxp 2005-03-04 14:21 Page 20
La page est en cours de chargement...
La page est en cours de chargement...
La page est en cours de chargement...
La page est en cours de chargement...
La page est en cours de chargement...
La page est en cours de chargement...
La page est en cours de chargement...
La page est en cours de chargement...
La page est en cours de chargement...
La page est en cours de chargement...
La page est en cours de chargement...
La page est en cours de chargement...
La page est en cours de chargement...
La page est en cours de chargement...
La page est en cours de chargement...
La page est en cours de chargement...
La page est en cours de chargement...
La page est en cours de chargement...
La page est en cours de chargement...
La page est en cours de chargement...
La page est en cours de chargement...
La page est en cours de chargement...
La page est en cours de chargement...
La page est en cours de chargement...
La page est en cours de chargement...
La page est en cours de chargement...
La page est en cours de chargement...
La page est en cours de chargement...
La page est en cours de chargement...
La page est en cours de chargement...
-
 1
1
-
 2
2
-
 3
3
-
 4
4
-
 5
5
-
 6
6
-
 7
7
-
 8
8
-
 9
9
-
 10
10
-
 11
11
-
 12
12
-
 13
13
-
 14
14
-
 15
15
-
 16
16
-
 17
17
-
 18
18
-
 19
19
-
 20
20
-
 21
21
-
 22
22
-
 23
23
-
 24
24
-
 25
25
-
 26
26
-
 27
27
-
 28
28
-
 29
29
-
 30
30
-
 31
31
-
 32
32
-
 33
33
-
 34
34
-
 35
35
-
 36
36
-
 37
37
-
 38
38
-
 39
39
-
 40
40
-
 41
41
-
 42
42
-
 43
43
-
 44
44
-
 45
45
-
 46
46
-
 47
47
-
 48
48
-
 49
49
-
 50
50


Zanussi ZTK120 Manuel utilisateur
- Catégorie
- Sèche-linge électriques
- Taper
- Manuel utilisateur
dans d''autres langues
- English: Zanussi ZTK120 User manual
- Deutsch: Zanussi ZTK120 Benutzerhandbuch
- Nederlands: Zanussi ZTK120 Handleiding
Documents connexes
-
Zanussi ZTA 210 Le manuel du propriétaire
-
-
-
-
-
-
-
Zanussi TCE 7224 Manuel utilisateur
-
Zanussi td4100 5 0 kg Manuel utilisateur
