Sony DAV-DZ740 Guide de démarrage rapide
- Taper
- Guide de démarrage rapide

List of parts/Liste des pièces/
1
Projection
Saillie
Slot
Fente
2
3
4
Screw
Vis
5
6
Tube
Tube
7
Speaker Installation Guide
Guide d'installation des enceintes
揚聲器安裝指南
Руководство по установке динамиков
Посібник з установки динаміків
4-262-760-11(1)
DAV-DZ740/DZ640K/DZ840K
DAV-DZ640M/DZ840M
©2011 Sony Corporation Printed in China
English
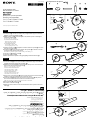
Spread a cloth on the floor to avoid damaging the floor when you assemble the speakers.
1 Insert the post () so that the slot on the lower post aligns with the projection of the base
(), then secure the post with the ring ().
2 Fold the speaker cord () and twist it together. Then, draw the speaker cord through the
bottom hole in the base ().
Use the speaker cords as follows:
For DAV-DZ740/DZ640K/DZ640M:
‒ Front left speaker (L): White
‒ Front right speaker (R): Red
For DAV-DZ840K/DZ840M:
‒ Surround left speaker (L): Blue
‒ Surround right speaker (R): Gray
3 Thread the speaker cord () through the hole on the bottom of the speaker () and out the
hole on the rear of the speaker.
4 Insert the post () into the hole on the bottom of the speaker () so that the screw on the
top of the post faces the front of the speaker.
Be careful not to pinch the speaker cord between the speaker and the post.
5 Secure the post () with the screws ().
6 Connect the speaker cord ().
7 Remove any bends in the speaker cord by gently pulling it from below the base ().
Français
Recouvrez le sol d’un linge pour éviter de l’endommager lors de l’assemblage des enceintes.
1 Insérez le montant () de sorte que la fente du montant inférieur s’aligne sur la saillie de la
base (), puis fixez le montant à l’aide de la bague ().
2 Repliez le cordon d’enceinte () et enroulez-le. Ensuite, faites passer le cordon d’enceinte à
travers l’orifice situé sur le dessous de la base ().
Utilisez les cordons d’enceinte comme suit :
Pour DAV-DZ740/DZ640K/DZ640M:
‒ Enceinte avant gauche (L) : Blanc
‒ Enceinte avant droite (R) : Rouge
Pour DAV-DZ840K/DZ840M:
‒ Enceinte gauche surround (L) : Bleu
‒ Enceinte droite surround (R) : Gris
3 Faites passer le cordon d’enceinte () à travers l’orifice situé sur le dessous de l’enceinte ()
et faites-le ressortir par l’orifice qui se trouve à l’arrière de celle-ci.
4 Insérez le montant () dans l’orifice situé sur le dessous de l’enceinte () afin que la vis
située sur le dessus du montant soit orientée vers l’avant de l’enceinte.
Veillez à ne pas coincer le cordon d’enceinte entre l’enceinte et le montant.
5 Fixez le montant () à l’aide des vis ().
6 Raccordez le cordon d’enceinte ().
7 Eliminez les plis du cordon d’enceinte en tirant délicatement dessus à partir du dessous de
labase ().
×c]SÏ ;Ù a?Ë = ¹(ɹ) ÑyJl`SÏ ÚìDS nvØl5 K_SÏ ×c]SÏ 8 Ñ×>AÏ n_SÏ êa< pf; (ɺ) ×c]SÏ @×Ë
.(ɽ) n`b l;
1
2
:dx neT pLneUÐ èĆHÌ éne_Hn= S
:
DAV-DZ740/DZ640K/DZ640M UÎpfUn=
h=Ì :
(L) î}hUÐ phYnYúÐ pL5UÐ −
}eAÌ :(R) fehUÐ phYnYúÐ pLneUÐ −
:DAV-DZ840K/DZ840M UÎpfUn=
n_SÏ ÔÙl@ì (ɻ) nJ3SÏ W K_SÏ É|Ï 8 Ñ×>AÏ n_SÏ è¯@ (ɸ) nJ3SÏ bF d; Q
.nJ3SÏ W _b!Ï É|Ï 8 Ñ×>AÏ
3
É|Ï 8 ×>AÏ ODSÏ >Ïv pf; (ɻ) nJ3SÏ W K_SÏ É|Ï 8 Ñ×>AÏ n_SÏ 8 (ɺ) ×c]SÏ @×Ë
.nJ3SÏ W WlWùÏ É|Ï ×c]SÏ W îb]SÏ
.(ɼ) OÏDSÏ éÏyFl; (ɺ) ×c]SÏ ;Ù a?Ë
.Øe_UÐí pLneUÐ h= pLneUÐ dH dL `\> øÌ dL Þ}AÐ
4
.(ɼ) OÏDSÏ éÏyFl; (ɺ) ×c]SÏ ;Ù a?Ë
.Øe_UÐí pLneUÐ h= pLneUÐ dH dL `\> øÌ dL Þ}AÐ
5
.(ɸ) nJ3SÏ bF fÈ; Q
6
.(ɹ) ÑyJl`SÏ _FË W P{; F v{H J nJ3SÏ bF 8 ÒÏÉldgÏ îË nSÏÚj; Q
7
(1)
La page est en cours de chargement...
-
 1
1
-
 2
2


Sony DAV-DZ740 Guide de démarrage rapide
- Taper
- Guide de démarrage rapide
dans d''autres langues
- English: Sony DAV-DZ740 Quick start guide
- русский: Sony DAV-DZ740 Инструкция по началу работы