Candy . Manuel utilisateur
- Catégorie
- Réfrigérateurs-congélateurs
- Taper
- Manuel utilisateur

I
F
D
GB
NL
E
P
EL
CONGELATORI VERTICALI
CONGELATEURS VERTICAUX
GEFRIERSCHRÄNKE
UPRIGHT FREEZERS
DIEPVRIEZERS
CONGELADORES VERTICALES
CONGELADORES VERTICAIS
∫∞£∂∆√π ∫∞∆∞æÀ∫∆∂™
3
Art. 92595578 - MODERNA srl - ED. 12-02

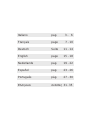
Italiano pag. 3 - 6
Français page 7 - 10
Deutsch Seite 11 - 14
English page 15 - 18
Nederlands pag. 19 - 22
Español pag. 23 - 26
Português pág. 27 - 30
∂ÏÏËÓÈη ÛÂÏ›‰Â˜ 31 - 35

PARTE GENERALE
1) Leggere attentamente le avvertenze contenute nel presente libretto in quanto forniscono
importanti indicazioni riguardanti la sicurezza di installazione, d'uso e di manutenzione.
Conservare con cura questo libretto per ogni ulteriore consultazione.
2) Dopo aver tolto l'imballaggio assicurarsi dell'integrità dell'apparecchio.
Questo apparecchio dovrà essere destinato solo all'uso per il quale è stato espressamen-
te concepito e cioè per la conservazione degli alimenti.
Ogni altro uso è da considerarsi improprio e quindi pericoloso.
Il costruttore non può essere considerato responsabile per eventuali danni derivanti da
usi impropri, erronei ed irragionevoli.
Spedire il certificato di garanzia.
Dichiarazione di conformità: Questa apparecchiatura, nelle parti destinate a venire a
contatto con sostanze alimentari, è conforme alla prescrizione della Dir. CEE 89/109 e al
D.L. di attuazione n. 108 del 25/01/92.
Apparecchio conforme alle Direttive Europee 89/336/CEE, 73/23/CEE e successive
modifiche.
COME USARE IL CONGELATORE
Allacciamento elettrico
Questo congelatore è predisposto per funzionare con la tensione nominale segnata sulla
targa all'interno del prodotto. Gli sbalzi di tensione non devono essere superiori o inferiori
al 10% della tensione nominale.
Prima di collegare l'apparecchio accertarsi che i dati di targa siano rispondenti a quelli
della rete di distribuzione elettrica. La targa è situata all'interno del prodotto.
In caso di incompatibilità tra la presa e la spina dell'apparecchio far sostituire la presa con
altra di tipo adatto da personale professionalemente qualificato. Quest'ultimo, in particola-
re, dovrà anche accertare che la sezione dei cavi della presa sia idonea alla potenza
assorbita dall'apparecchio.
È sconsigliabile l'uso di adattatori, prese multiple e/o prolunghe. La presa per l'alimenta-
zione del congelatore deve essere provvista di messa a terra efficiente. È necessario
verificare questo fondamentale requisito di sicurezza e, in caso di dubbio, richiedere un
controllo accurato dell'impianto da parte di personale professionale qualificato.
Il costruttore non può essere considerato responsabile per eventuali danni causati dalla
mancanza di messa a terra dell'impianto.
INSTALLAZIONE
Nei modelli in cui i piedini non sono già montati, avvitarli negli appositi fori filettati sotto-
stanti il congelatore. Fare attenzione che i due piedini anteriori rimangano leggermente
svitati per dare al congelatore una leggera inclinazione verso il retro.
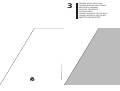
Nei congelatori verticali ove previsto, applicare gli appositi distanziatori (fig. 1) per ottenere
una perfetta circolazione d'aria nella parete retrostante: si raccomanda di non ostruire le aper-
ture o fessure di ventilazione o di smaltimento calore lasciando almento uno spazio di 5 cm.
Evitare di installare il congelatore troppo vicino a fonti di calore. Si deve evitare l'installa-
zione in un locale nel quale la temperatura rimane molto tempo al di sotto di +16° C o al
di sopra di +32°C.
3

Il congelatore può essere anche installato sottopensile; in questo caso, bisogna che sia
garantita la libera circolazione dell'aria, lasciando uno spazio libero di circa 5 centimetri
frontalmente o nella parte posteriore del pensile.
Una errata installazione può causare danni a persone, animali o cose, nei confronti dei
quali il costruttore non può essere considerato responsabile.
INFORMAZIONI PER L'AMBIENTE
Imballaggio, trattamento rifiuti
Dopo avere disimballato l'apparecchio non buttare l'imballo nella spazzatura ma selezio-
nate i diversi materiali (come polistirolo, cartone ecc.) secondo le prescrizioni locali per lo
smaltimento dei rifiuti e secondo le norme vigenti.
Attenzione
Questo apparecchio è prodotto senza utilizzo di CFC: il circuito refrigerante contiene flui-
do HFC R 134a o, alternativamente, gas isobutano R 600 a. Per maggiori dettagli, riferirsi
alla targhetta matricola dell'apparecchio.
Per le operazioni di pulizia non deve essere utilizzato alcun attrezzo o metodo diverso da
quanto descritto nell'apposito capitolo, per evitare il danneggiamento dell'apparecchio.
Per gli apparecchi con isobutano (R 600 a)
L'isobutano è un gas naturale senza effetti sull'ambiente, ma infiammabile. È quindi indi-
spensabile accertarsi che:
- l'installazione dell'apparecchio avvenga in locali di volume libero superiore a 3 metri cubi
- le aperture di ventilazione dell'apparecchio siano tenute libere e pulite
- il circuito refrigerante dell'apparecchio non venga danneggiato sia internamente (utiliz-
zando impropriamente oggetti taglienti o appuntiti) sia esternamente (operazioni impro-
prie durante la pulizia del circuito condensatore).
Al termine della vita funzionale dell'apparecchio, lo stesso, dovrà essere messo in sicu-
rezza prima dell'invio alla discarica. Per questa operazione rivolgersi al Vs. negoziante o
all'Ente Locale preposto.
REGOLAZIONE TEMPERATURE
La temperatura ambiente, il carico e la frequenza d'apertura della porta dell'elettrodome-
stico influiscono sulla temperatura interna. Quando si modifica la regolazione, la macchi-
na frigorifera può non mettersi subito in moto perché è in pausa. La regolazione delle
temperature è ottenuta agendo sulla manopola del termostato che si trova all'esterno del
congelatore.
Ruotando la manopola in senso orario, si ottengono temperature sempre piò basse. Si
consiglia di tenere la manopola del termostato su una posizione media aumentando di
qualche numero quando il congelatore viene frequentemente aperto o quando vengono
introdotti molti cibi da congelare.
QUADRO COMANDI Fig. 2
Inserendo la spina alla rete, la spia verde (B) si accende.
Il termostato A comanda il congelatore.
Sulla posizione "●" il congelatore non funziona, la spia verde (B) è accesa.
Ruotando la manopola in senso orario l'apparecchio si avvia.
La spia rossa (C) se accesa indica che la temperatura nella cella congelatore non è suffi-
cientemente bassa e ciò può dipendere da:
- apparecchio appena messo in funzione,
4

- porta rimasta aperta o non chiusa bene,
- introduzione di prodotto da congelare.
La spia rossa si spegne quando la temperatura interna prevista viene raggiunta.
La spia gialla (D) si accende quando la manopola del termostato (A), girando in senso
orario, viene portata nel punto "SUPER" che mette in funzionamento continuo il com-
pressore.
CONSERVAZIONE CONGELAMENTO
Il simbolo indica la possibilità di conservare a bassa temperatura i surgelati a lun-
go termine nonchè di congelare i cibi freschi.
I tempi di conservazione sono strettamente legati al mantenimento della temperatura per
cui eventuali alterazioni influiscono sulla durata di conservazione.
In caso di mancanza di energia elettrica non aprire assolutamente la porta. Per 10-12
ore, i cibi congelati non si alterano. Per interruzioni più lunghe è necessario procedere
all'avvolgimento degli alimenti in fogli di carta per alimenti sistemandoli possibilmente in
un frigorifero o, al limite, in ambienti freschi.
In tal caso è consigliabile consumare gli alimenti entro 24 ore o procedere alla loro cottu-
ra ed al successivo congelamento.
Negli apparecchi che ne sono provvisti, l'accumulatore di freddo, nel caso d'interruzione
di corrente, permette di mantenere più a lungo la qualità degli alimenti surgelati, impeden-
done un rapido riscaldamento.
L'accumulatore deve essere posto nel ripiano superiore.
Per le prove normative di conservazione, si consiglia di togliere tutti i cesti ad esclusione
degli ultimi due.
Per congelare prodotti freschi si consiglia di:
- Trasferire se necessario i prodotti già congelati nello scomparto di conservazione.
- Mettere il termostato sulla posizione "SUPER" di congelamento rapido almeno 24 ore
prima di introdurre gli alimenti da congelare; ricordandosi di riportarlo dopo 24 ore dall'ini-
zio della congelazione sulla posizione normale.
La quantità massima da congelare, secondo le modalità previste dalle norme europee, è
quella indicata in targa matricola.
SBRINAMENTO
a) 24 ore prima dello sbrinamento ruotare la manopola del termostato verso i numeri alti
per portare i cibi ad una temperatura più bassa.
b) Avvolgere i cibi congelati in carta per alimenti sistemandoli nel congelatore o in un
ambiente fresco.
c) Disinserire la spina della presa di corrente.
d) Lasciare la porta aperta.
e) A sbrinamento effettuato asciugare l'interno e risistemare i cibi precedentemente tolti.
f) Reinserire quindi la spina nella presa di corrente e lasciar funzionare l'apparecchio per
3/4 ore con il termostato sui numeri alti.
I congelatori verticali sono dotati di un sistema di evacuazione di acqua di sbrinamento
costituito da uno sgocciolatoio estraibile, posizionato sul bordo inferiore della cella.
PULIZIA
Ad evitare formazioni di cattivi odori è consigliabile una pulizia periodica all'interno del
congelatore e delle guarnizioni magnetiche porte almeno due o tre volte l'anno.
a) Prima di effettuare qualsiasi operazione di pulizia o di manutenzione, disinserire l'ap-
5
❋
❋

parecchio dalla rete di alimentazione elettrica staccando la spina. (Non basta portare la
manopola del termostato sulla posizione "
●").
b) Svuotare il congelatore dai cibi e dai cubetti di ghiaccio.
c) Attendere che la brina sull'evaporatore sia sciolta.
d) Pulire l'interno del congelatore usando acqua tiepida con aggiunta di uno o due cuc-
chiai di bicarbonato di sodio, risciacquare ed asciugare. ATTENZIONE non usare detersi-
vi, abrasivi o solventi.
e) Prima di riporre i cibi nel congelatore farlo funzionare almeno un'ora.
Quando il congelatore deve rimanere per lunghi periodi inattivo, dopo un'accurata pulizia,
lasciare la spina di alimentazione staccata e le porta socchiusa.
ASSISTENZA TECNICA
Per eventuale riparazione rivolgersi solamente ad un centro di assistenza tecnica autoriz-
zato dal costruttore e richiedere l'utilizzo di pezzi di ricambio originali. Il mancato rispetto
di quanto sopra può compromettere la sicurezza dell'apparecchio. Se il vostro congelato-
re non funziona, o se il suo funzionamento è anormale, controllate questi punti prima di
richiedere l'Assistenza Tecnica.
1) Arriva la corrente alla presa a cui è allacciato il congelatore? Provatelo con una lampadina.
2) La spina di allacciamento è forse staccata dalla presa di corrente, Inseritela.
3) Il termostato è forse sulla posizione "
●" (fermo)? Giratelo sulla posizione 4.
4) Avete forse lasciato formarsi uno strato di brina troppo spesso sull'evaporatore (più di
4-5 mm)? Scongelatelo (vedi "Sbrinamento").
5) Sono forse stati mal disposti i cibi all'interno del congelatore impedendo la libera circo-
lazione dell'aria?
6) È libera la circolazione dell'aria intorno al condensatore posto dietro l'apparecchio?
Allontanatelo dal muro.
Se il problema dovesse persistere, componendo il
“Numero Utile” indicato a lato sarete messi in contat-
to direttamente con il Centro Assistenza Autorizzato
a Voi più vicino.
È importante che comunichiate al Centro Assistenza Tecnica il modello che troverete scrit-
to sulla targhetta posta all'interno del congelatore (o sul foglio di garanzia).
Fornendo tali informazioni otterete un intervento più tempestivo ed adeguato.
Importante: Il riscaldamento perimetrale della cella congelatore è indice di corretto
funzionamento.
INVERSIONE DEL SENSO DI APERTURA DELLA PORTA CONGELATORI VERTICALI
Utensili necessari: — chiave a tubo da 8
— cacciavite a stella
Inversione della porta frigorifero (fig. 3)
1) Si consiglia di sdraiare o inclinare di circa 45° il congelatore, essendo necessario ope-
rare sulla parte inferiore dell'apparecchio per poter togliere la cerniera inferiore.
2) Togliere la cerniera inferiore (e le relative rondelle), agendo sulle viti A indicate in figura.
3) Togliere la porta.
4) Asportare dal cruscotto la membrana di plastica che ricopre la cerniera superiore sinistra.
5) Svitare il perno C della cerniera superiore destra e rimontarlo a sinistra.
6) Rimontare la porta operando in senso inverso (3-2); ricordarsi di rimontare anche le
rondelle distanziatrici interposte tra porta e cerniera.
7) Spostare la maniglia dal lato sinistro al lato destro agendo sulle viti corrispondenti.
8) Riportare l'apparecchio in posizione verticale.
6
SERVIZIO ASSISTENZA TECNICA
199.123.123
☎

PARTIE GENERALE
1) Lire attentivement les instructions contenues dans ce livret car elles vous donnent d'im-
portantes indications au sujet de la sécurité, de l'emploi, de l'entreten et de l'installation.
Conserver soigneusement ce livret qui pourra vous aider par la suite.
2) Après avoir déballé l'appareil, vérifiez son bon état, et signalez toute anomalie à votre
revendeur.
Cet appareil ne doit être destiné qu'à l'emploi pour lequel il a été prévu, c'est-à-dire pour
la conservation des aliments.
Tout autre emploi est abusif, donc dangereux.
Le constructeur ne peut être retenu responsable de dommages éventuellement causés
par un emploi abusif, erroné et déraisonnable.
Déclaration de conformité: Cet appareil est, dans ses parties destinées à entrer en con-
tact avec des substances alimentaires, conforme à la prescription de la Dir. EEC 89/109.
Cet appareil est conforme aux directives 89/336/EEC, 73/23/EEC et modifications
successives.
UTILISATION DU CONGELATEUR
Branchement éléctrique
Ce congélateur est conçu pour fonctionner selon la tension nominale de courant indiquée
sur la plaquette à l'intérieur de l'appareil. Les écarts de tension ne doivent pas dépasser,
en plus ou en moins, 10% de la tension nominale.
Avant de brancher l'appareil, vérifier que les données techniques de la plaquette, se trou-
vant à l'intérieur de l'appareil correspondent à celles du réseau de distribution éléctrique.
En cas d'incompatibilté entre la prise et la fiche de l'appareil, faire remplacer la prise par
un technicien qualifié qui contrôlera également que la section des câbles de la prise cor-
respond à la puissance absorbée par l'appareil.
Nous déconseillons vivement l'emploi d'adaptateur de prises à fiches multiples et/ou de
rallonges. La prise d'alimentation du réfrigérateur doit avoir une excellente mise à la terre.
Il faut absolument vérifier ce dispositif de sécurité et, en cas de doute, faire contrôler l'ins-
tallation par un technicien qualifié.
Le constructeur n'est absolument pas responsable des dommages éventuels causés par
l'absence de mise à la terre de l'équipement.
INSTALLATION
En cas de modèle dont les pieds ne sont pas montés, visser ces derniers dans les trous
filetés situés en-dessous du congélateur. Les deux pieds avant doivent être légèrement
dévissés afin de laisser au congélateur une faible inclinaison en arrière.
Le cas échéant, appliquer les entretoises (fig. 1) pour obtenir une circulation parfaite de
l'air sur la paroi arrière: faire attention à ne pas boucher les fentes de ventilation ou d'abat-
tage de la chaleur en laissant un espace d'au moins 5 cm. entre le condenseur et le mur.
Eviter d'installer le congélateur près d'une source de chaleur. Eviter également l'installa-
tion dans une pièce où la température reste longtemps intérieure à +16°C et supérieure à
+32°C.
Le congélateur peut-être aussi installé sous les éléments de cuisine; dans ce cas la libre
circulation de l'air doit être garantie, laissant un espace libre d'environ 5 centimètres entre
7

le meuble et l'appareil ou dans la partie postérieure du meuble.
Une mauvaise installation peut causer des dommages aux personnes, aux animaux et
aux choses et le constructeur ne peut en être retenu responsable.
INFORMATION POUR L'ENVIRONNEMENT
Emballage, traitement des déchets
Après avoir déballé l'appareil, ne pas jeter l'emballage à la poubelle mais trier les diffé-
rents matériaux (comme le polystyrène, le carton, etc...) selon les prescriptions locales
pour l'élimination des ordures et selon les normes en vigueur.
Attention
Cet appareil est produit sans utiliser de CFC; le circuit réfrigérant contient un fluide HFC
R 134a ou, alternativement, du gaz isobutante R 600 a. Pour plus de détails, voir la pla-
quette d'immatriculation de l'appareil.
Pour les opérations de nettoyage, n'utiliser aucun outil ou méthode autre que ce qui est
décrit dans le chapitre s'y rapportant pour éviter d'endommager l'appareil.
Pour les appareils à l'isobutante (R 600 a)
L'isobutant est un gaz naturel qui n'a aucun effet sur l'environnement mais qui est inflam-
mable. Il est donc indispensable de s'assurer que:
- l'installation de l'appareil se fait dans des locaux ayant un volume libre de plus de 3 mètres cube;
- les ouvertures de ventilation de l'appareil sont maintenues libres et propres;
- le circuit réfrigérant de l'appareil n'est pas endommagé, que ce soit intérieurement (en
utilisant des objets coupants ou pointus de façon incorrecte) ou extérieurement (opéra-
tions incorrectes en cours de nettoyage du circuit condensateur).
Au terme de la durée de vie de l'appareil, celui-ci devra être mis en condition de sécurité
avant de l'envoyer à la décharge. Pour cela, s'adresser à votre vendeur ou à l'administra-
tion locale chargée de cela.
REGLAGE DE LA TEMPERATURE
La température ambiante, la charge et la fréquence d'ouverture de la porte de l'appareil
éléctro-ménager, influencent la température interne. Quand on modifie le réglage, l'appa-
reil peut ne pas démarrer immédiatement car il est en pause. Le réglage de la température
se fait en agissant sur la manette du thermostat qui se trouve à l'exterieur du congélateur.
En faisant tourner la manette du thermostat dans le sens des aiguilles d'une montre, on
obtient une temperature de plus en plus basse. On conseille de laisser la manette du
thermostat sur une position intermédiaire en augmentant de quelques numéros si le
réfrigérateur est souvent ouvert ou si l'on introduit beaucoup de denrées à congeler.
TABLEAU DE BORD Fig. 2
En raccordant la fiche au reseau, le voyant lumineux vert (B) s'allume.
Le thermostat A commande le congelateur; sur la position "●" le congélateur ne fonction-
ne pas, le voyant lumineux vert (B) est allumé.
En tournant la manette dans le sens horaire l'appareil demarre.
Si le témoin rouge (C) est allumé, celui-ci indique que la témperature dans la cellule du
congélateur n'est pas suffisamment basse et que par conséquent cette baisse de tempé-
rature peut provenir de:
- Appareil mis à peine sous tension.
- Porte restée ouverte ou entrouverte.
- Introduction de produit à congeler.
8

Le témoin rouge s'éteint lorsque la témperature normale intérieure est atteinte.
Le voyant lumineux jaune (D) s'allume quand la manette du thermostat (A) tournee dans
le sens horaire: est en face de la position "SUPER" qui fait fonctionner le compresseur en
mode continu.
CONSERVATION ET CONGELATION
Le symbole indique la possibilité de conserver les surgelés à basse température
et pendant une longue période ainsi que de congeler des produits frais.
Les temps de conservation dépendent strictement du maintien de la température; par
conséquent des variations éventuelles de température influent directement sur la durée
de la conservation.
En cas de panne d'éléctricité n'ouvrez absolument pas la porte. Les denrées conservées
ne subissent aucun dommage si la panne dure de 10 à 12 heures. En cas d'interruption
plus longue, envelopper les produits dans du papier spécial pour aliments et placez-les,
autant que possible, dans un réfrigérateur ou, à la limite, dans un endroit frais.
En tout cas, il est conseillé de consommer ces denrées dans un délai de 24 heures ou de
les faire cuire et les congeler ensuite.
Pour les modèles qui en sont équipés, l'accumulateur de froid, dans le cas d'une coupure
de courant, conserve les aliments surgelés plus longtemps, empêchant ainsi un rapide
réchauffement.
L'accumulateur doit être placé dans la partie supérieure.
Pour les tests de conservation, il est conseillé d'enlever tous les paniers sauf les deux
derniers.
Pour congeler des produits frais nous conseillons de:
- transférer, le cas échéant, les produits déjà congelés dans le compartiment de conservation;
- placer le thermostat sur la position "SUPER" de congélation rapide au moins 24 heures
avant d'introduire les denrées qui doivent être congelées;
- après 24 heures à partir du début de la congélation, ne pas oublier de remettre l'inter-
rupteur sur la position initiale.
La quantité maximum à congeler est, selon les modalités prévues par les normes
européennes, indiquée sur la plaquette.
DEGIVRAGE
a) 24 heures avant le dégivrage, tourner la manette du thermostat sur les chiffres les plus
élévés afin de porter les denrées à la température la plus basse.
b) Envelopper les denrées congelées dans du papier pour aliments et placer-les dans le
réfrigérateur ou dans un endroit frais.
c) Débrancher la fiche de la prise de courant.
d) Laisser la porte ouverte.
e) Une fois le dégivrage effectué, sécher l'intérieur et remettre en place les aliments
précédemment enlevés.
f) Rebrancher le courant et laisser fonctionner l'appareil pendant 3 à 4 heures avec le
thermostat tourné sur les chiffres les plus élévés.
NOTE: il est conseillé, en tout cas, de consommer les denrées dans un délai de 24 heu-
res ou de bien de les faire cuire et de les congeler ensuite.
Les congélateurs verticaux ont un système de vidange de l'eau de dégivrage qui se com-
pose d'un égouttoir extractible, placé sur le bord inférieur de la cuve.
ENTRETIEN
Afin d'éviter la formation de mauvaises odeurs, nous conseillons de nettoyer périodique-
ment l'intérieur du congélateur au moins deux ou trois fois par an.
9
❋
❋

a) Avant de procéder aux opérations de nettoyage ou d'entretien, débrancher l'appareil
du réseau d'alimentation électrique en enlevant la fiche (il ne suffit pas de placer la
manette du thermostat sur "
●").
b) Vider le congélateur et enlever les cubes de glace.
c) Attendre que tout le givre, formé sur l'évaporateur, soit fondu.
d) Nettoyer l'intérieur du congélateur en utilisant une solution d'eau tiède et de bicarbona-
de de soude; rincer et sécher. ATTENTION ne jamais utiliser de produits détergents
abrasifs ou solvants.
e) Remettre le congélateur en fonctionnement au moins une heure avant d'y placer les aliments.
Lorsque l'appareil ne doit pas être utilisé pendant un certain temps, effectuer un nettoya-
ge à fond et laisser l'appareil débranché avec sa porte entr'ouverte.
ASSISTANCE TECHNIQUE
En cas de réparations, adressez-vous à votre revendeur et exiger le montage des pièces
de rechange d'origine.
Si les conditions ci-dessus ne sont pas respectées, le fonctionnement de l'appareil peut
être compromis.
Si le réfrigérateur ne fonctionne pas, ou si le fonctionnement est anormal, effectuer les
contrôles suivants avant d'appeler le technicien.
1) Le courant arrive à la prise de branchement du réfrigérateur? Essayer à l'aide d'une
lampe.
2) La fiche de connexion est-elle débranchée? L'introduire.
3) Le thermostat est-il sur la position "●" (arrêt)? Tourner la manette sur la position 4.
4) Y-a-t-il du givre sur l'évaporateur? (plus de 4 à 5 mm)? Effectuer le dégivrage (voir
"Dégivrage").
5) Les aliments sont-ils-bien placés à l'intérieur du réfrigérateur et laissent-ils une circula-
tions suffisante d'air?
6) La circulation de l'air du condensateur placé derrère le congélateur est-elle libre?
Eloigner l'appareil du mur.
Si le défaut persiste, adressez-vous à votre revendeur en communiquant le type du
modèle que vous trouverez sur la plaquette placée à l'intérieur du congélateur (ou sur le
feuillet de garantie). A l'aide de ces informations vous obtiendrez une intervention plus
rapide et plus appropriée.
Important: Le chauffage périmétral du compartiment de congélation indique un
fonctionnement correct.
REVERSIBILITÉ DU SENS D'OUVERTURE DE LA PORTE ET DES CONGELATEURS
VERTICAUX
Outillage nécessaire: — clé à tube 8
— tounevis cruciforme
Inversion de la porte du congélateur (fig. 3)
1) Renverser le congélateur, ou incliner de 45° car il faudra agir sur la partie inférieure de
l'appareil pour enlever la charnière inférieure.
2) En dévissant les vis A (voir la figure), enlever la charnière intérieure et ses rondelles.
3) Enlever la porte.
4) Enlever la membrane en plastique qui couvre la charnière supérieure gauche.
5) Dévisser le pivot C de la charnière supérieure droite et le remonter à gauche.
6) Remonter la porte en agissant en sens inverse (3-2). Ne pas oublier de remonter éga-
lement les rondelles servant d'entretoise entre la porte et la charnière.
8) Remettre l'appareil en position verticale.
10

ALLGEMEINES
1) Lesen Sie dieses Handbuch aufmerksam durch. Es enthält wichtige Hinweise über die
Sicherheit bei der Aufstellung, den Gebrauch und die Wartung Ihres Gerätes.
Bewahren Sie dieses Handbuch griffbereit auf.
2) Überzeugen Sie sich nach Entfernung der Verpackung von der Unversehrtheit Ihres
Gerätes. Dieses Gerät ist nur für die Aufbewahrung von Lebensmitteln bestimmt. Jeder
andere Gebrauch ist ungeeignet und somit unzweckmäßig.
Der Hersteller haftet nicht für eventuelle Schäden aus unzweckmäßigem, falschem oder
unvernünftigem Gebaruch.
Senden Sie den Garantieschein ein.
Zulassungserklärung: Dieses Gerät entspricht der EG-Vorschrift 89/109 ECC für die
Bereiche, die mit Lebensmitteln in Berührung kommen.
Das Gerät entspricht den Europäischen Richtlinien 89/336/ECC, 73/23/ECC und
deren nachträglichen Änderungen.
BENUTZUNG DES GEFRIERGERÄTES
Elektrischer Anschluß
Dieses Gefriergerät funktioniert mit der Netzspannung, die auf dem Schild im Inneren des
Gerätes angegeben ist. Spannungsabweichungen dürfen nicht mehr als +10% der
Netzspannung betragen.
Vergewissern Sie sich vor Anschluß des Gerätes, daß die vorhandene Netzspannung
den Angaben des Herstellers entspricht.
Von dem Gebrauch von Adaptern, Mehrfachsteckdosen und/oder Verlängerungskabeln
ist abzuraten.
Die Steckdose für das Gefriergerät muß eine ausreichende Erdung haben. Der Hersteller haftet
in keiner Weise für Schäden, die durch das Fehlen einer entsprechenden Erdung entstehen.
Lassen Sie im Zweifelsfall eine genaue Kontrolle durch qualifiziertes Fachpersonal durchführen.
AUFSTELLUNG
Bei Modellen, an denen die Füße noch nicht angebracht sind, müssen die beiliegenden
Füße in die jeweiligen Gewindelöcher unter dem Gefriergerät eingeschraubt werden.
Es ist darauf zu achten, daß die beiden vorderen Füße etwas weniger eingeschraubt wer-
den als die hinteren, damit das Gerät leicht nach hinten geneigt ist.
Falls vorgesehen, die hinteren Abstandstücke (Fig. 1) anbringen, damit eine perfekte
Luftzirkulation an der Hinterwand entsteht. Es wird empfohlen, die Öffnungen oder
Schlitze für die Lüftung bzw. den Wärmeabzug nicht zu verstopfen und mindestens einen
Wandabstand von 5 cm. einzuhalten.
Es muß vermieden werden, das Gefriergerät dicht an einer Wärmequelle aufzustellen.
Räume, deren Temperatur lange Zeit unter +16°C oder über +32°C liegt, eignen sich
nicht zur Aufstellung des Gerätes.
Achten Sie darauf, daß eine ausreichende Luftzirkulation gewährleistet ist.
Der Hersteller haftet nicht für Fehler, die aus fehlerhafter Aufstellung resultieren.
INFORMATIONEN ZUR UMWELTFREUNDLICHEN ENTSORGUNG
Entsorgung der Verpackung
Entsorgen Sie bitte die Verpackung ordnungsemäß, indem Sie die verschiedenen
11

Materialien (Styropor, Pappe, Kartonage usw.) vorsortieren und getrennt in den dafür vor-
gesehenen Abfallbehältem deponieren.
Achtung:
Dieses Gerät ist FCKW-frei. Der Kältekreislauf ist mit dem FKW R 134a gefüllt oder ande-
renfalls mit dem Naturgas R 600a (zusätzlich FKW-frei). Genauere Informationen entneh-
men Sie bitte dem Typenschild im Inneren des Geräts.
Für die Reinigung dürfen keine anderen Gegenstände oder Verfahren eingesetzt werden
als die in dem entsprechenden Abschnitt dieser Bedienungsanleitung beschriebenen, um
Beschädigungen des Geräts zu vermeiden.
Für die Geräte mit dem Kältemittel Isobutan (R 600a) gilt:
Isobutan ist ein umweltfreundliches, aber brennbares Naturgas. Es ist deshalb unver-
zichtbar sicherzustellen, daß:
- das Gerät in einem Raum aufgestellt wird, in dem mindestens 3 Kubikmeter Rauminhalt
frei sind;
- die Belüftungsöffnungen des Geräts freigelassen und gereinigt werden;
- der Kühlkreislauf des Geräts nicht beschädigt wird, weder intern durch das Benutzen
schneidender oder stechender Gegenstände noch extern durch das unsachgemäße
Reinigen des Verflüssigers.
Wenn Sie das Gerät nach Jahren außer Betrieb nehmen, muß das Kältemittel entsorgt
werden, bevor es zur Deponie transportiert wird. Bitte wenden Sie sich an Ihren
Fachhändler oder die vorhandenen kommunalen Entsorgungseinrichtungen.
TEMPERATUR EINSTELLEN
Die Umgebungstemperatur, die Beladung und die Häufigkeit, mit der Sie die Gerätetür
öffnen, beeinflussen die Innentemperatur. Wenn Sie die Temperatureinstellung ändern,
kann es vorkommen, daß das Kälteaggregat nicht augenblicklich anspringt, da es in einer
Ruhephase ist. Die Temperatur wird durch das Drehen am Thermostat außen am Gerät
eingestellt.
Wenn Sie den Drehknopf im Uhrzeigersinn drehen, senken Sie die Temperaturen immer
weiter ab. Es empfiehlt sich, den Thermostat-Knopf auf eine mittlere Position einzustel-
len. Wenn das Gerät häufig geöffnet wird oder wenn größere Mengen Kühlguts eingeführt
werden, sollte der Thermostat höher gestellt werden.
BEDIENFELD Abb. 2
Wenn der Stecker eingesteckt wird, leuchtet die grüne Kontrollampe (B) auf.
Der Thermostat A steuert die Temperatur des Gefrierschrankes.
Auf Position "●" kühlt das Gerät nicht, die grüne Kontrollampe (B) leuchtet.
Wird der Thermostatknopf im Uhrzeigersinn gedreht, tritt das Gerät in Funktion.
Wenn die rote Kontrollampe (C) leuchtet, ist die Temperatur im Gefrierraum nicht niedrig
genug. Das kann folgende Gründe haben:
- Das Gerät wurde gerade in Betrieb genommen.
- Die Tür ist offen bzw. nicht richtig geschlossen.
- Neues Gefriergut wurde in den Gefrierschrank gegeben.
Die rote Lampe schaltet aus, wenn die vorgesehene Innen-Temperatur erreicht wird.
Die gelbe Kontrollampe (D) leuchtet auf, wenn der Thermostatknopf (A) durch Drehen im
Uhrzeigersinn auf Position "SUPER" gebracht wird, womit der Kompressor auf
Dauerbetrieb eingestellt wird.
12

AUFBEWAHRUNG UND EINFRIEREN
Das - Zeichen zeigt die Möglichkeit an, die Tiefkühlwaren bei niedriger
Temperatur für lange Zeit aufzubewahren und die frischen Nahrungsmittel einzufrieren.
Bei Stromausfall auf keinen Fall die Tür öffnen.
Für 10 bis 12 Stunden verderben die eingefrorenen Waren nicht.
Bei längeren Unterbrechungen müssen die Nahrungsmittel in Papier oder Folie einge-
schlagen und möglichst in einem Tiefkühler oder an einem kühlen Ort aufbewahrt werden.
In diesem Falle ist es angebracht, die Lebensmittel innerhalb von 24 Stunden zu verzeh-
ren oder sie zu kochen und dann einzufrieren.
Durch den Kälteakku (mitgeliefert nur bei einigen Modellen) wird die Lagerzeit bei
Stromausfall erhöht, da das Auftauen des Gefriergutes zusätzlich verzögert wird.
Der Kälteakku muß im obersten Gefrierfach gelagert werden.
Zur Durchführung von Gefrierprüfungen nach Norm wird geraten, alle Körbe bis auf die
unteren zwei entfernen.
Für das Einfrieren frischer Produkte rät man:
- Falls erforderlich, die bereits eingefrorenen Produkte in das Aufbewahrungsfach legen,
- den Thermostaten auf schnelles Einfrieren "SUPER" stellen wenigstens 24 Stunden,
bevor die einzufrierenden Lebensmittel hineingelegt werden und nicht vergessen, den
Schalter spätestens 24 Stunden nach dem Beginn des Einfriervorganges wieder auf die
Ausgangsposition zu stellen.
Die maximale Menge con Lebensmitteln, die laut europäischen Richtlinien eingefroren
werden darf, ist auf dem Matrikelschild angegeben.
ABTAUEN
a) 24 Stunden vor dem Abtauen den Thermostaten höher stellen, um die Lebensmittel
auf eine niedrige Temperatur zu bringen.
b) die eingefrorenen Lebensmittel in Papier oder Lebensmittelfolie wickeln und in den
Tiefkühler oder an einen kühlen Ort legen.
c) Den Stecker aus der Steckdose ziehen.
d) Die Tür offen lassen.
e) Nach dem Abtauen das Geräte-Innere trocknen und die Nahrungsmittel wieder hineinlegen.
f) Den Stecker in die Steckdose stecken und das Gerät 3/4 Stunden mit hoch eingestell-
tem Thermostat laufen lassen, danach wieder in Normal-Position einstellen.
Die Gefrierschränke sind mit einem System zum Auffangen des Abtauwassers ausgestat-
tet. Es handelt sich hierbei um eine herausziehbare Tauwasserführung, die sich im
Roden des Innengehäuses befindet.
REINIGUNG
Zur Vermeidung übler Gerüche ist eine periodische Reinigung des Geräteinneren wenig-
stens 2 bis 3 Mal pro Jahr angebracht.
a) Vor Beginn eines jeden Säuberungs - oder Wartungsvorganges ist das Gerät durch
Herausziehen des Steckers vom Stromnetz zu trennen. Das Stellen des Thermostat-
schalters auf "●" ist nicht ausreichend.
b) Die Lebensmittel aus dem Gerät herausnehmen.
c) Abwarten, bis das Eis auf dem Verdampfer getaut ist.
d) Das Geräte-Innere mit lauwarmem Wasser mit einem Zusatz von 1 bis 2 Löffeln Salz
reinigen, nachspülen und trocknen. ACHTUNG: Keine Scheuer - Spül - oder
Lösungsmittel verwenden!
13
❋
❋

e) Die Lebensmittel wieder ins Gerät legen und das Gerät wieder anschalten.
Soll das Gerät längere Zeit nicht benutzt werden, ist nach gründlicher Reinigung die Tür
anzulehnen und der Stecker nicht wieder in die Steckdose zu stecken.
TECHNISCHER KUNDENDIENST
Für eventuelle Reparaturen sollten Sie sich nur an einen vom Hersteller autorisierten
Kundendienst wenden und die Verwendung von Originalersatzteilen verlangen.
Eine Nichteachtung dieser Hinweise kann die Sicherheit des Gerätes beeinträchtigen.
Falls Ihr Kühlgerät nicht funktionieren sollte oder nicht normal läuft, kontrollieren Sie bitte
folgende Punkte, bevor Sie den Kundendienst rufen:
1) Kommt Strom aus der Steckdose, an der das Gerät angeschlossen ist? Prüfen Sie
dies mit einem Spannungsmesser oder evtl. mit einer Lampe.
2) Sitzt der Anschlußstecker richtig in der Steckdose? Evtl. wieder richtig einstecken.
3) Steht der Thermostat auf "
●"? Stellen Sie den Thermostatschalter wieder auf Betrieb 4.
4) Ist die Eisschicht auf dem Verdampfer und im Tiefkühlfach dicker als 4-5 mm.? Tauen
Sie das Gerät ab (siehe "Abtauen").
5) Liegen die Lebensmittel so im Gerät, daß die Luft zirkulieren kann? Evtl. die
Lebensmittel anders hineinlegen.
6) Kann die Luft an der Geräterückseite frei um den Kondensator zirkulieren? Evtl. das
Gerät weiter von der Wand abrücken.
Sollte Ihr Gerät trotzdem nicht funktionieren, rufen Sie den Kundendienst unter Nennung
Ihres Modells (siehe Schild im Geräteinnenraum bzw. Garantieunterlagen), nur so wird
ein schneller Service möglich sein.
Während des Betriebs Kann eine Erwärmung außen am Gehäuse auftreten.
WECHSELBARER TÜRANSCHLAG DER TIEFKÜHLSCHRÄNKE
Notwendige Werkzeuge: — Steckschlüssel 8 mm.
— Kreuzschraubenzieher
Wechseln der Tür (Abb. 3)
1) Es ist ratsam, den Tiefkühler hinzulegen oder um 45° zu neigen, da an dem unteren
Teil des Gerätes gearbeitet werden muß, um das untere Scharnier zu entfernen;
2) Unteres Scharnier und die entsprechenden Unterlegscheiben entfernen durch Lockern
der Schrauben A (Siehe Abb.).
3) Die Tür abnehmen.
4) Die Kunststoffabdeckung vom Bedienfeld abnehmen, die das obere Scharnier zudeckt.
5) Den Stift C des oberen rechten Scharniers abschrauben und links anbringen.
6) Die Tür wieder anbringen und in umgekehrter Reihenfolge vorgehen (3-2).
Nicht vergessen, auch die Abstandsunterlegscheiben zwischen Tür und Scharnier anzu-
bringen.
7) Den Griff von der linken auf die rechte Seite durch Lösen der entsprechenden
Schrauben versetzen.
8) Das Gerät wieder senkrecht stellen.
14

GENERAL INFORMATION
1) Carefully read the instructions contained in this handbook since they provide important
information relative to safety during installation, use and maintenance.
Keep this handbook carefully for future reference.
2) Once the appliance has been unpacked make sure that it is undamaged.
This appliance should be used only for the purpose for which it was specifically designed,
namely for the conservation of foodstuffs.
Any other use is considered unsuitable, and thus dangerous.
The manufacturer declines all responsibility for any damage that may be caused by
unsuitable, incorrect or unreasonable use.
Send off the warranty certificate.
Declaration of compliance: the parts of this appliance that may come into contact with
foodstuffs comply with the provisions of EEC Directive 89/109.
This appliance complies with Directives 89/336/EEC, 73/23/EEC and following changes.
HOW TO USE THE FREEZER
Electrical connection
This freezer is set to work at the nominal voltage indicated on the rating plate inside the pro-
duct. Voltage fluctuations should not be greater or less than 10% of the nominal voltage.
Before connecting the appliance ensure that the data to be found on the rating plate insi-
de the product is the same as the mains supply.
In the case of incompatibility between the socket and the plug of the appliance, have the
socket replaced with another suitable one by a qualified electrician, who will also verify
that the capacity of the socket wiring is adequate for the power absorbed by the applian-
ce. The use of multiple socket adapters and/or extension cables is not recommended.
The supply socket of the freezer must be properly earthed. This fundamental safety requi-
rement must be verified and, if there are any doubts, the installation should be thoroughly
checked by a professional electrician.
The manufacturer declines all responsibility for any damage caused by the appliance not
being earthed.
INSTALLATION
For models where the feet are not already fitted, screw these into the relative threaded
holes under the freezer. Ensure that the two front feet are not quite fully screwed home,
so that the freezer leans slightly backwards.
Where applicable, fit the appropriate spacers (Pict. 1) in order to obtain proper air circulation
between the freezer and the wall behind: it is also recommended not to block any ventilation
or heat dispersal openings or grilles, leaving a space of at least 5 cm.
Do not install the freezer close to soutces of heat. Furthermore, do not install the freezer
anywhere where the temperature will be below + 16°C or above + 32°C for long periods.
Should the cabinet be installed below a wall unit a minimum gap of a 5 cm must be left
either on the back or on the top of the unit to allow air circulation.
Incorrect installation could cause damage to people, animals or things, for which the
manufacturer declines all responsibility.
15

ENVIRONMENTAL INFORMATION
Packaging and waste treatment
After unpacking the appliance, do not throw the packaging in the garbage but separate
the various materials (such as styrofoam, cardboard. etc.) according to the local regula-
tions and procedures for waste disposal.
Important:
This appliance has been produced without CFCs. The refrigerating circuit contains HFC R
134a fluid, or alternatively, R 600a isobutane gas. For further details, look at the serial
number plate on the appliance.
When cleaning the appliance, use only the materials and the procedure specified in the
section dealing with cleaning. Otherwise the appliance may be damaged.
For appliances with isobutane (R 600 a)
Isobutane is a natural gas that does not harm the environment.
Isobutane is, however, flammable. You must therefore ensure that:
- when the appliance is installed there is more than 3 cubic metres of air around it;
- the appliance's ventilation vents are kept unobstructed and clean;
- the appliance's refrigerating circuit is not damaged neither internally, through the use of
sharp or pointed objects nor because the condenser unit was incorrectly cleaned.
At the end of the appliance's working life it must be stored before being disposed of. For
information on proper disposal of the appliance, consult your retailer or the local authority
responsible for disposal.
TEMPERATURE CONTROL
The ambient temperature, the load and the frequency with which the doors of the applian-
ce are opened all affect the internal temperature. When the control value is changed the
freezer cannot start up immediately because it has been halted. Temperature regulation
is done using the thermostat knob to be found outside the freezer.
By turning the knob clockwise lower temperatures are reached. It is recommended to keep
the thermostat knob at a mid point position and to increase it by a few numbers when the
freezer is opened frequently or when a lage quantity of food to be frozen is put in.
CONTROL PANEL Fig. 2
When the plug is inserted, the green light (B) lights up.
The thermostat A controls the freezer temperature.
On Position "●" the freezer will not operate although the green light will still be on.
Turning the knob clockwise will start the appliance.
The red warning light (C) when lit up means that the temperature in the freezer compart-
ment is not adequate. This could depend on:
- When appliance is firstly plugged in.
- Door left open or not properly closed.
- Insertion of fresh food to be frozen in the freezer compartement.
- The red light goes off once the freezer compartment has reached the required temperature.
By turning the thermostat knob to "SUPER" the yellow light (D) will illuminate, indicating
that the fast freeze has been started making the compressor work continuously.
16

CONSERVATION AND FREEZING
The symbol shows that frozen products can be stored for a long time and that
fresh foods can be frozen.
Conservation times are closely connected with maintaining the temperature, thus any
changes will affect the life of the product.
In the case of a power cut do not, under any circumstances, open the door. The frozen
foods will remain wholesome for 10-12 hours. For longer periods the food should be
wrapped in special foodstuff paper and preferably put into another freezer or, at least, in a
cool place.
In this case it is advisable to eat the food within 24 hours or to cook it and then to re-
freeze it.
In some models, equipped with cool packs, in case of interruption in power the temperatu-
re is kept low for a longer period of time, keeping the frozen foods at the right temperature.
The cool pack must be placed in the upper shelf.
For the standard refrigeration tests, we recommend that you remove all the baskets,
apart from the last two.
For freezing fresh produce we advise:
- If necessary move items already frozen into the conservation compartment.
- Set the thermostat control to the fast freeze position "SUPER" at least 24 hours before
putting in the food to be frozen; remembering to set it back to its original position after 24
hours from when freezing commenced.
The maximum quantity that can be frozen, as laid down by European standards, is indica-
ted on the rating plate.
DEFROSTING
a) 24 hours before defrosting set the thermostat control to the coldest position so as to
reduce the temperature of the food.
b) Wrap frozen products in special foodstuff paper and put them in another freezer or a
cool place.
c) Disconnect plug from socket.
d) Leave door open.
e) When defrosting is completed, dry the interior and replace the products.
f) Then reinsert the plug into the socket and let the appliance work for 3/4 hours on the
coldest position.
Upright freezers are fitted with a system for expelling defrosted water consisting of a
removable draining tube located at the bottom of the freezing compartment.
CLEANING
To prevent the formation of unpleasant smells, it is recommended that the freezer be
cleaned periodically, at least two or three times a year.
a) Before carrying out any cleaning or maintenance, disconnect the appliance from the
power supply by pulling out the plug (it is not enough to set the thermostat control to "
●").
b) Remove all food and ice cubes from the freezer.
c) Wait until the frost has melted off the evaporator.
d) Clean the interior of the freezer using lukewarm water into which has been dissolved
one or two spoonfuls of bicarbonate of soda; rinse and dry. IMPORTANT: do not use
detergents, abrasives or soaps.
17
❋
❋

e) Switch the freezer on for at least 1 hour before replacing the foods.
When the freezer is to be out of use for a long period, after a thorough cleaning it should
be left unplugged and with its doors partially open.
SERVICING
For any repairs use only Service Centres recommended by the manufacturer and insist
that only original spares be used. Non-observance of the above could prejudice the safety
of the appliance.
If your freezer does not work, or if it does not work properly, check these points before
making a Service call.
1) Is power getting to the socket to which the freezer is connected? Try it with a lamp.
2) Is the connecting plug not plugged into the socket? Plug it in.
3) Is the thermostat perhaps at position "
●"? turn it to position 4.
4) Have you let too much frost accumulate on the evaporator (more than 4 to 5 mm)?
Defrost it (see "Defrosting").
5) Has the food been badly placed inside the freezer, hindering free circulation of air?
6) Can air circulate freely around the condenser behind the freezer? Move it further away
from the wall.
If you have a problem in or out of guarantee, please contact GIAS UK on Tel: 08705-99 00 11
for manufacturers service, giving the model type which you will find on the rating plate
inside the freezer (or on the warranty form). You will get prompter and better service by
giving this information.
Important: A layer of heat around the freezer cell shows that the appliance is
working properly
HOW TO REVERSE THE DIRECTION OF THE DOOR OPENING
Necessary: — n° 8 box spanner
— Philips screwdriver
Reversing the door (Pict. 3)
1) It is advisable to lay the freezer on its side or to lean it at an angle of about 45°, since it
is necessary to work on the bottom of the appliance in order remove the lower hinge.
2) Remove the lower hinge (and relative washer) by loosening screws A as shown in the
figure.
3) Remove the door.
4) Remove the plastic film, covering the upper left-hand hinge, from the facing.
5) Unscrew journal C from the upper right-hand hinge and refit it on the left.
6) Replace the door working in a reverse fashion (3-2); remembering to refit the spacing
washers between door and hinge.
7) Shift the handle from right to left, using the appropriate screws.
8) Reset the appliance in an upright position.
18

ALGEMEEN
1) Lees de instructies die u in dit boekje aantreft aandachtig door: ze geven belangrijke
aanwijzingen over de veiligheid bij installatie, gebruik en onderhoud.
Bewaar dit boekje zorgvuldig zodat u het altijd kunt raadplegen.
2) Overtuig U ervan dat het apparaat niet beschadigd is, nadat U de verpakking verwij-
derd heeft.
Dit apparaat moet alleen maar gebruikt worden waarvoor het ontwikkeld is: om leven-
smiddelen te bewaren.
Ieder ander gebruik moet als onjuist beschouwd worden en dus als gevaarlijk.
De fabrikant is niet aansprakelijk voor eventuele schade die veroorzaakt is door onjuist of
onredelijk gebruik.
Stuur het garantiebewijs binnen 10 dagen op.
Vermelding van overeenstemming: De onderdelen die in kontakt komen met voedsel
voldoen aan de EEC richtlijn 89/109.
Dit apparaat voldoet aan de EEC richtlijnen 89/336, 73/23 en eventuele wijzigingen.
HOE GEBRUIKT MEN DE VRIEZER
Elektrische aansluiting
Voordat u het apparaat aansluit, controleer dan of de netspanning overeenkomt met die
aangegeven op het typeplaatje aan de binnenkant van het apparaat.
Het gebruik van driewegstekkers, verloopstekkers en verlengsnoeren wordt afgeraden.
Het apparaat moet op een goed geaard stopkontakt worden aangesloten.
De fabrikant is niet aansprakelijk voor eventuele schade die het gevolg is van een
verkeerde elektrische aansluiting van het apparaat.
INSTALLATIE
Op de modellen waarop de voetjes nog niet gemonteerd zijn, moet men deze zelf aanbren-
gen door ze in de openingen te draaien die zich aan de onderkant van de vrieskist bevinden.
Zorg er hierbij wel voor dat de voorste voetjes niet helemaal vast gedraaid worden, zodat de
vrieskist iets achterover leunt. Bij vrieskasten moet men de afstandstukjes monteren (fig. 1)
om een goede ventilatie te verzekeren langs de achterwand. Het is heel belangrijk dat de
ventilatie roosters of openingen altijd een ruimte van minstens 5 cm. vrij om zich heen hebben.
Plaats het apparaat ver van warmtebronnen vandaan en installeer het niet in een ruimte
waar de temperatuur lang onder +16°C of boven +32°C blijft.
De vriezer kan ook hangend worden bevestigd; in dat geval moet de vrije luchtcirculatie
gegarandeerd zijn, waartoe een ruimte van ongeveer 5 cm aan de voorkant of aan de
achterkant van de hangende construktie open dient te blijven.
Een foute plaatsing kan schade aan personen, dieren of voorwerpen veroorzaken waar-
voor de fabrikant niet verantwoordelijk gesteld kan worden.
MILIEU
Verpakking en afvalverwerking
Gooi de verpakking van de koelkast niet bij het huisvuil, maar scheid de verschillende
materialen (piepschuim, karton etc.) in overeenstemming met de plaatselijke regels en
procedures voor afvalscheiding.
19

Belangrijk
Dit apparaat is CFK-vrij. Het koelsysteem bevat hetzij de vloeistof HFK R 134a hetzij het
isobutaangas R 600a. Verdere informatie vindt u op serienummerplaatje in de koelkast.
Reinig het apparaat alleen op die manier en met die materialen zoals staat beschreven
onder het kopje schoonmaken. Anders kunt u het apparaat schade toebrengen.
Koelkasten met isobutaan (R 600a)
Isobutaan is een natuurlijk gas en niet schadelijk voor het milieu. Isobutaan is wel ontv-
lambaar. U moet er daarom zeker van zijn dat:
- bij de installatie 3 kubieke meter ruimte rond het apparaat vrij blijft;
- de ventilatie van het apparaat niet wordt belemmerd en schoon is;
- het koelsysteem noch inwendig is beschadigd door gebruik van scherpe voorwerpen
noch uitwendig, omdat de condensator niet op de juiste manier is schoongemaakt.
Sla het apparaat op voor u het aan het eind van de levensduur van de hand doet.
Informeer bij de winkelier of bij de lokale autoriteiten hoe het apparaat op de juiste manier
van de hand gedaan kan worden.
TEMPERATUUR INSTELLING
De binnentemperatuur van het apparaat wordt beinvloed door de omgevingstemperatuur,
de lading en het aantal malen dat de deur geopend wordt. Wanneer men de ingestelde
temperatuur veranderd, kan het zijn dat de motor niet meteen in werking gaat. De tempe-
ratuur schakelaar zit aan de buitenkant van de vriezer.
Door de knop naar rechts te draaien, wordt de temperatuur steeds lager. Het is raadzaam
de thermostaatknop op een gemiddelde temperatuur in te stellen en deze een paar cijfers
hoger te draaien als de vriezer vaak geopend wordt of als de lading erg groot is.
BEDIENINGSPANEEL Fig. 2
Door de stekker in het stopkontakt te steken gaat het groene lichtje (B) branden.
Met de temperatuur knop A kunt u de temperatuur in de diepvries regelen.
Bij stand "●" werkt de diepvriezer niet en is het groene lichtje (B) uit. Door de knop met
de klok mee te draaien, wordt de diepvriezer in werking gesteld.
Wanneer het rode lichtje gaat branden betekent dat de temperatuur van het vriesgedeelte
te hoog is.
Dit kan te maken hebben met:
- Dat u de deur heeft open laten staan of niet goed dicht heeft gedaan.
- Het in de vriesgedeelte leggen van vers voedsel.
- Het rode lichtje gaat uit wanneer de temperatuur in het vriesgedeelte het juiste niveau
heeft bereikt.
Het gele lichtje (D) gaat branden als de compressor in werking wordt gesteld; door bijv.
de thermostaatknop (A) met de klok mee te draaien en op de "SUPER" stand te zetten.
BEWAREN EN INVRIEZEN
Het symbool geeft aan dat diepvriesvoedsel langdurig op lage temperatuur
bewaard kan worden en vers voedsel ingevroren kan worden. Als de temperatuur kon-
stant blijft, zijn de bewaartijden ook langer, terwijl bij verschillerde temperaturen de
bewaartijden verminderen.
Wanneer de stroom uitvalt de deur absoluut niet openen; Gedurende 10-12 uur kan het
voedsel onveranderd in de vriezer blijven. Mocht de stroomuitval langer duren, dan moet
20
❋
❋
La page charge ...
La page charge ...
La page charge ...
La page charge ...
La page charge ...
La page charge ...
La page charge ...
La page charge ...
La page charge ...
La page charge ...
La page charge ...
La page charge ...
La page charge ...
La page charge ...
La page charge ...
La page charge ...
-
 1
1
-
 2
2
-
 3
3
-
 4
4
-
 5
5
-
 6
6
-
 7
7
-
 8
8
-
 9
9
-
 10
10
-
 11
11
-
 12
12
-
 13
13
-
 14
14
-
 15
15
-
 16
16
-
 17
17
-
 18
18
-
 19
19
-
 20
20
-
 21
21
-
 22
22
-
 23
23
-
 24
24
-
 25
25
-
 26
26
-
 27
27
-
 28
28
-
 29
29
-
 30
30
-
 31
31
-
 32
32
-
 33
33
-
 34
34
-
 35
35
-
 36
36


Candy . Manuel utilisateur
- Catégorie
- Réfrigérateurs-congélateurs
- Taper
- Manuel utilisateur
dans d''autres langues
- italiano: Candy . Manuale utente
- English: Candy . User manual
- español: Candy . Manual de usuario
- Deutsch: Candy . Benutzerhandbuch
- Nederlands: Candy . Handleiding
- português: Candy . Manual do usuário