Hilti SD 4500-A18 Mode d'emploi
- Catégorie
- Outils électroportatifs
- Taper
- Mode d'emploi

SD 4500-A18
English en
Français fr
Español es
Português pt
Printed: 26.10.2015 | Doc-Nr: PUB / 5070552 / 000 / 03

1
Printed: 26.10.2015 | Doc-Nr: PUB / 5070552 / 000 / 03

2
3
4
5
Printed: 26.10.2015 | Doc-Nr: PUB / 5070552 / 000 / 03

6
7
8
9
Printed: 26.10.2015 | Doc-Nr: PUB / 5070552 / 000 / 03

SD 4500-A18
en Original operating instructions . . . . . . . . . . . . . . . . . . . . . . . . . . . . . . . . . . . . . . . 1
fr Mode d'emploi original . . . . . . . . . . . . . . . . . . . . . . . . . . . . . . . . . . . . . . . . . . . 10
es Manual de instrucciones original . . . . . . . . . . . . . . . . . . . . . . . . . . . . . . . . . . . . 20
pt Manual de instruções original . . . . . . . . . . . . . . . . . . . . . . . . . . . . . . . . . . . . . . 30
Printed: 26.10.2015 | Doc-Nr: PUB / 5070552 / 000 / 03

Printed: 26.10.2015 | Doc-Nr: PUB / 5070552 / 000 / 03

1
1 Information about the documentation
1.1 Explanation of signs used
1.1.1 Warnings
Warnings alert persons to hazards that occur when handling or using the product. The following signal words
are used in combination with a symbol:
DANGER! Draws attention to imminent danger that will lead to serious personal injury or fatality.
WARNING! Draws attention to a potentially dangerous situation that could lead to serious per-
sonal injury or fatality.
CAUTION! Draws attention to a potentially dangerous situation that could lead to slight personal
injury or damage to the equipment or other property.
1.1.2 Symbols
The following symbols are used:
Draws attention to instructions or other useful information.
Read the operating instructions before use.
Rated speed under no load
Revolutions per minute
Revolutions per minute
Direct current (DC)
1.1.3 Illustrations
The illustrations in these operating instructions are intended to convey a basic understanding and may differ
from the actual version of the product:
These numbers refer to the corresponding illustrations found at the beginning of these operating
instructions.
The numbering in the illustrations reflects the order of the work steps in the illustration and may
deviate from the numbering of work steps in the text.
Item reference numbers are used in the overview illustration. In the product overview section, the
numbers shown in the legend relate to these item reference numbers.
1.2 About this documentation
▶ Read these operating instructions before the product is used or operated for the first time. This is a
prerequisite for safe, trouble-free handling and use of the product.
▶ Observe the safety instructions and warnings in this documentation and on the tool.
▶ Always keep the operating instructions with the power tool and make sure that they are with the power
tool when it is given to other persons.
Changes and errors excepted.
1.3 Product information
Hilti products are designed for professional use and may be operated, serviced and maintained only by
trained, authorized personnel. This personnel must be informed of any particular hazards that may be
encountered. The product and its ancillary equipment may present hazards when used incorrectly by
untrained personnel or when used not as directed.
• Make a note of the designation and serial number printed on the identification plate in the following table.
▶ Always quote this information when you contact a Hilti representative or Hilti Service to enquire about
the product.
Printed: 26.10.2015 | Doc-Nr: PUB / 5070552 / 000 / 03

2
Product information
Type:
Generation: 01
Serial number:
2 Safety
2.1 Safety instructions
The safety instructions listed in the following section include all general safety instructions for power tools
which, in accordance with the applicable standards, require to be listed in the operating instructions.
Accordingly, some of the instructions listed may not be relevant to this power tool.
2.1.1 General power tool safety warnings
WARNING
Read all safety warnings and all instructions. Failure to follow the warnings and instructions may result in
electric shock, fire and/or serious injury.
Save all warnings and instructions for future reference.
The term “power tool” in the warnings refers to your mains-operated (corded) power tool or battery-operated
(cordless) power tool.
Work area safety
▶ Keep work area clean and well lit. Cluttered or dark areas invite accidents.
▶ Do not operate power tools in explosive atmospheres, such as in the presence of flammable
liquids, gases or dust. Power tools create sparks which may ignite the dust or fumes.
▶ Keep children and bystanders away while operating a power tool. Distractions can cause you to lose
control.
Electrical safety
▶ Power tool plugs must match the outlet. Never modify the plug in any way. Do not use any adapter
plugs with earthed (grounded) power tools. Unmodified plugs and matching outlets will reduce risk of
electric shock.
▶ Avoid body contact with earthed or grounded surfaces, such as pipes, radiators, ranges and
refrigerators. There is an increased risk of electric shock if your body is earthed or grounded.
▶ Do not expose power tools to rain or wet conditions. Water entering a power tool will increase the
risk of electric shock.
▶ Do not abuse the cord. Never use the cord for carrying, pulling or unplugging the power tool. Keep
cord away from heat, oil, sharp edges or moving parts. Damaged or entangled cords increase the
risk of electric shock.
▶ When operating a power tool outdoors, use an extension cord suitable for outdoor use. Use of a
cord suitable for outdoor use reduces the risk of electric shock.
▶ If operating a power tool in a damp location is unavoidable, use a residual current device (RCD)
protected supply. Use of an RCD reduces the risk of electric shock.
Personal safety
▶ Stay alert, watch what you are doing and use common sense when operating a power tool. Do
not use a power tool while you are tired or under the influence of drugs, alcohol or medication. A
moment of inattention while operating power tools may result in serious personal injury.
▶ Use personal protective equipment. Always wear eye protection. Protective equipment such as dust
mask, non-skid safety shoes, hard hat, or hearing protection used for appropriate conditions will reduce
personal injuries.
▶ Prevent unintentional starting. Ensure the switch is in the off‐position before connecting to power
source and/or battery pack, picking up or carrying the tool. Carrying power tools with your finger on
the switch or energising power tools that have the switch on invites accidents.
▶ Remove any adjusting key or wrench before turning the power tool on. A wrench or a key left
attached to a rotating part of the power tool may result in personal injury.
▶ Do not overreach. Keep proper footing and balance at all times. This enables better control of the
power tool in unexpected situations.
▶ Dress properly. Do not wear loose clothing or jewellery. Keep your hair, clothing and gloves away
from moving parts. Loose clothes, jewellery or long hair can be caught in moving parts.
Printed: 26.10.2015 | Doc-Nr: PUB / 5070552 / 000 / 03

3
▶ If devices are provided for the connection of dust extraction and collection facilities, ensure these
are connected and properly used. Use of dust collection can reduce dust-related hazards.
Power tool use and care
▶ Do not force the power tool. Use the correct power tool for your application. The correct power tool will
do the job better and safer at the rate for which it was designed.
▶ Do not use the power tool if the switch does not turn it on and off. Any power tool that cannot be
controlled with the switch is dangerous and must be repaired.
▶ Disconnect the plug from the power source and/or the battery pack from the power tool before
making any adjustments, changing accessories, or storing power tools. Such preventive safety
measures reduce the risk of starting the power tool accidentally.
▶ Store idle power tools out of the reach of children and do not allow persons unfamiliar with the
power tool or these instructions to operate the power tool. Power tools are dangerous in the hands
of untrained users.
▶ Maintain power tools. Check for misalignment or binding of moving parts, breakage of parts and
any other condition that may affect the power tool’s operation. If damaged, have the power tool
repaired before use. Many accidents are caused by poorly maintained power tools.
▶ Keep cutting tools sharp and clean. Properly maintained cutting tools with sharp cutting edges are
less likely to bind and are easier to control.
▶ Use the power tool, accessories and tool bits etc. in accordance with these instructions, taking
into account the working conditions and the work to be performed. Use of the power tool for
operations different from those intended could result in a hazardous situation.
Battery tool use and care
▶ Recharge only with the charger specified by the manufacturer. A charger that is suitable for one type
of battery pack may create a risk of fire when used with another battery pack.
▶ Use power tools only with specifically designated battery packs. Use of any other battery packs may
create a risk of injury and fire.
▶ When battery pack is not in use, keep it away from other metal objects, like paper clips, coins,
keys, nails, screws or other small metal objects, that can make a connection from one terminal to
another. Shorting the battery terminals together may cause burns or a fire.
▶ Under abusive conditions, liquid may be ejected from the battery; avoid contact. If contact
accidentally occurs, flush with water. If liquid contacts eyes, additionally seek medical help. Liquid
ejected from the battery may cause irritation or burns.
Service
▶ Have your power tool serviced by a qualified repair person using only identical replacement parts.
This will ensure that the safety of the power tool is maintained.
2.1.2 Drill/driver safety warnings
▶ Hold power tool by insulated gripping surfaces, when performing an operation where the fastener
may contact hidden wiring. Fasteners contacting a "live" wire may make exposed metal parts of the
power tool "live" and could give the operator an electric shock.
2.1.3 Additional safety instructions
Personal safety
▶ Tampering with or modification of the power tool is not permitted.
▶ Wear ear protectors. Exposure to noise can cause hearing loss.
▶ Keep the tool, especially its grip surfaces, clean and free from oil and grease. Do not use cleaning
agents containing silicone.
▶ Improve the blood circulation in your fingers by relaxing your hands and exercising your fingers
during breaks between working.
▶ Avoid touching rotating parts. Switch the power tool on only after bringing it into position at the
workpiece. Touching rotating parts, especially rotating tools or other accessories, may lead to injury.
▶ Activate the safety lock (forward / reverse selector switch in the middle position) when storing or
transporting the tool.
▶ The power tool is not intended for use by inexperienced persons who have received no special
training.
▶ Keep the power tool out of reach of children.
▶ Avoid unintentional starting. Never carry the power tool with your finger on the on/off switch.
Remove the battery from the power tool during work breaks, before carrying out maintenance,
before changing accessory tools and before transporting the power tool.
Printed: 26.10.2015 | Doc-Nr: PUB / 5070552 / 000 / 03

4
▶ Check that the belt hook is fitted securely before beginning work.
▶ Do not carry the power tool by the depth gauge. This clip-on part could pull off inadvertently.
▶ Check that the power tool is placed in a secure position when it is laid down, especially when used
with the magazine and / or extension.
▶ Check that accessory tools are compatible with the power tool’s chuck/drive system and that they
are fitted and secured correctly.
▶ Dust from material such as paint containing lead, some wood species, minerals and metal may
be harmful. Contact with or inhalation of the dust may cause allergic reactions and/or respiratory
diseases among operators or bystanders. Certain kinds of dust such as oak and beech wood dust
are classified as carcinogenic, especially in conjunction with additives for wood conditioning (chromate,
wood preservative). Material containing asbestos may be worked on only by specialists. Use a dust
removal system that is as effective as possible. Accordingly, use a suitable vacuum cleaner of
the type recommended by Hilti for wood dust and/or mineral dust and which is designed for use
with this power tool. Ensure that the workplace is well ventilated. Observe national regulations
applicable to the materials you intend to work with.
▶ Observe the nationally applicable industrial safety regulations.
Electrical safety
▶ Before beginning work, check the working area (e.g. using a metal detector) to ensure that no
concealed electric cables or gas and water pipes are present. External metal parts of the tool may
become live, for example, when an electric cable is damaged accidentally. This presents a serious risk
of electric shock.
Personal safety
▶ The user and all other persons in the vicinity must wear suitable protective equipment including
protective glasses, a hard hat, ear protection, protective gloves and light respiratory protection
while the power tool is in use.
Use and care of battery-powered tools
▶ Check that the tool is switched off before inserting the battery. Inserting a battery into an electric
tool that is switched on can lead to accidents.
▶ Do not expose batteries to high temperatures and keep them away from fire. There is a risk of
explosion.
▶ Do not disassemble, crush or incinerate batteries and do not subject them to temperatures over
80°C (176°F). This presents a risk of fire, explosion or injury through contact with caustic substances.
▶ Avoid ingress of moisture. Ingress of moisture may cause a short circuit, resulting in burning injuries or
fire.
▶ Observe the special guidelines applicable to the transport, storage and use of lithium-ion batteries.
▶ Avoid short circuiting the battery terminals. Check that the battery terminals and the terminals in
the power tool are free from foreign objects before inserting the battery in the tool. Short circuiting
the battery terminals presents a risk of fire, explosion and chemical burns.
▶ Do not continue to use or attempt to charge damaged batteries (e.g. batteries with cracks, broken
parts, bent or pushed-in/pulled-out contacts).
▶ Do not use the battery as a power source for other unspecified power tools or appliances.
▶ If the battery is too hot to touch it may be defective. In this case, place the power tool in a non-
flammable location, well away from flammable materials, where it can be kept under observation
and allowed to cool down. Contact Hilti Service after the battery has cooled down.
3 Description
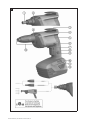
3.1 Overview of the product 1
@ Chuck
; Power tool / accessory interface (snap-on
connection)
= Universal hook
% Motor cooling air intake
& Grip
( Air exit
) Forward / reverse selector switch with
safety lock
+ Control switch (with electronic speed
control)
§ Lockbutton for continuous operation
/ Belt hook
: Charge state and fault display (Li-ion
battery)
∙ Battery release buttons
$ Depth gauge
Printed: 26.10.2015 | Doc-Nr: PUB / 5070552 / 000 / 03

5
3.2 Intended use
The product described is a hand-held cordless drywall screwdriver equipped with a clutch.
Use only the drywall screws specified in the technical data.
For optimum handling characteristics we recommend that the screwdriver is gripped in the in-line position.
The motor cooling air is drawn in through the cooling air slots and blown out of the screwdriver through the
air vents.
▶ Use only Hilti Liion batteries of the B 18 series with this product.
▶ Use only the Hilti battery chargers from the C4/36 series for these batteries.
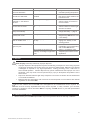
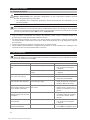
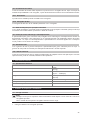
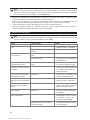
3.3 Charge state display
The charge state of the Liion battery is displayed after pressing one of the release buttons lightly (press only
until slight resistance is felt).
Status Meaning
4 LEDs light. • Charge state: 75 % to 100 %
3 LEDs light. • Charge state: 50 % to 75 %
2 LEDs light. • Charge state: 25 % to 50 %
1 LED lights. • Charge state: 10 % to 25 %
1 LED blinks. • Charge state: < 10 %
Note
Battery charge state cannot be displayed while the control switch is pressed and for up to 5 seconds
after releasing the control switch.
3.4 Items supplied
Drywall screwdriver, depth gauge, bit, bit holder, operating instructions
Note
You can find other system products approved for use with your product at your local Hilti Center or
online at: www.hilti.com.
3.5 Depth gauge
The depth gauge is attached to the screwdriver by way of a snap-on connection and can be simply pulled
off or pushed on. The optimum screwdriving depth can be set by turning the depth gauge. The further the
depth gauge is turned, i.e. bringing it closer to the screwdriver body, the deeper the screws will be driven.
3.6 Accessory tools
Among the accessory tools available are the bit holder and magazine bit. The chuck for the accessory tools
becomes accessible after removing the depth gauge or the magazine.
3.6.1 Bit holder
The bit holder is used when no magazine is fitted.
3.6.2 Magazine bit
The magazine bit must be used in conjunction with the magazine.
3.7 Lockbutton for continuous operation
The screwdriver can be set to sustained operating mode by pressing the lockbutton. It is then no longer
necessary to maintain constant pressure on the control switch.
3.8 Overloading and overheating protection
The drywall screwdriver is protected from overloading and overheating by an automatic cut-out. Overloading
or overheating is indicated by the four LEDs blinking. After overheating, when the control switch is pressed
to restart the screwdriver, there may be a delay before the screwdriver restarts.
Printed: 26.10.2015 | Doc-Nr: PUB / 5070552 / 000 / 03

6
3.9 Belt hook
Using the belt hook, the drywall screwdriver can be carried conveniently, close to the body, on a belt. The
belt hook can be fitted to allow attachment on the left or right side of the body.
3.10 Universal hook
The universal hook allows the screwdriver to be put aside or stored temporarily in a number of different
ways. If the hook is not required it can be removed by unscrewing the two retaining screws.
4 Technical data
4.1 Screwdriver
Rated voltage
21.6 V
Weight
4.6 lb
(2.1 kg)
Rated speed under no load
0 Hz … 83.3 Hz
(0 rpm … 5,000 rpm)
Maximum torque
7.0 ftlb
f
(9.5 Nm)
Socket/bit drive
Hex socket
1
/
4
"
Screw length
≤ 55 mm
Screw diameter
≤ 4.2 mm
5 Preliminary and finishing work
5.1 Charging the battery
Note
Make sure that the outer surfaces of the battery are clean and dry before inserting the battery in an
approved battery charger.
Read the operating instructions for the charger for further information about the charging procedure.
▶ Use an approved charger to charge the battery.
5.2 Inserting the battery 2
WARNING
Risk of injury! Inadvertent starting of the screwdriver.
▶ Before fitting the battery, check that the screwdriver is switched off and that the forward / reverse
switch is in the middle position (i.e. safety lock engaged).
WARNING
Risk of injury! Hazard presented by a falling battery.
▶ A falling battery may present a risk of injury to yourself and others. Check that the battery is
securely seated in the power tool.
WARNING
Electrical hazard! Risk of short circuiting.
▶ Before inserting the battery, check to ensure that the battery terminals and the contacts on the
screwdriver are free from foreign objects.
▶ Insert the battery.
Printed: 26.10.2015 | Doc-Nr: PUB / 5070552 / 000 / 03

7
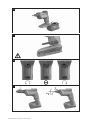
5.3 Fitting the belt hook in the alternative position 3
1. Press both battery release buttons simultaneously and pull the battery out of the screwdriver.
2. Unscrew both belt hook retaining screws.
3. Bring the belt hook and threaded piece into place on the other side of the tool.
4. Reinsert and tighten the two retaining screws.
5.4 Working safely with the belt hook and universal hook
▶ Before beginning work, make sure that the belt hook and universal hook are securely attached to the
screwdriver.
▶ Use the universal hook only when necessary. Lay the screwdriver down in a safe place when it is not in
use for a long period.
5.5 Forward / reverse 4
Note
The control switch is locked when the forward / reverse switch is in the middle position (safety lock).
▶ Set the forward / reverse selector switch to forward or reverse rotation.
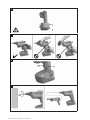
5.6 Changing the bit
1. Pull the depth gauge away from the power tool, releasing the snap-on connection.
2. Change the bit.
3. Refit the depth gauge to the power tool.
5.7 Changing the accessory tool. 5
1. Pull the depth gauge away from the power tool, releasing the snap-on connection.
2. Push the chuck towards the screwdriver, turning the chuck slightly at the same time, and then hold it in
this position.
3. Remove the accessory tool with your other hand.
4. Insert the desired accessory tool in the chuck, pushing it into the screwdriver as far as it will go.
5.8 Removing the battery 6
▶ Press both battery release buttons simultaneously and pull the battery out of the screwdriver.
5.9 Transport and storage of batteries
Observe the nationally and internationally applicable transport regulations when shipping batteries by road,
rail, sea or air.
6 Driving and removing screws
6.1 Driving screws 7
WARNING
Electrical hazards There is a risk of electric shock if a screw is driven into a concealed electric cable
and, at the same time, the bit holder or depth gauge is touched.
▶ Hold the screwdriver only by the grip when driving or removing screws.
1. Set the screwdriver to forward rotation.
2. Check that the battery is in the working position.
3. Position the screw on the bit and bring the tip of the screw into contact with the working surface.
4. Use the control switch to regulate the speed of the screwdriver.
6.2 Removing screws
1. Pull the depth gauge off.
2. Set the screwdriver to reverse rotation.
3. Insert the bit in the head of the screw and use the control switch to regulate the speed of the screwdriver.
Printed: 26.10.2015 | Doc-Nr: PUB / 5070552 / 000 / 03

8
4. Refit the depth gauge after removing the screws.
6.3 Switching on in sustained operating mode 8
▶ Switch on in sustained operating mode.
6.4 Switching off after sustained operation
▶ Press the control switch.
◁ The lockbutton returns to its original position.
6.5 Screwdriver / depth gauge interface 9
Note
With the drive spindle exposed in this way, the following operations can be carried out:
Removing screws (set to reverse rotation),
changing bits,
changing bit holders,
changing to magazine mode with the SMD 57 magazine,
redriving screws.
▶ Pull the depth gauge away from the power tool, releasing the snap-on connection.
7 Care and maintenance
7.1 Care of the product
WARNING
Electrical hazards! Improper repairs to electrical parts may lead to serious injuries.
▶ Electrical parts may be repaired only by trained electrical specialists.
Note
To help ensure safe and reliable operation, use only genuine Hilti spare parts and consumables. Spare
parts, consumables and accessories approved by Hilti for use with the product can be found at your
local Hilti Center or online at: www.hilti.com
▶ Keep the screwdriver, especially its grip surfaces, clean and free from oil and grease. Do not use cleaning
agents containing silicone.
▶ Never operate the product when the air vents are blocked. Clean the air vents carefully using a dry brush.
Do not permit foreign objects to enter the interior of the screwdriver.
▶ Clean the outer surfaces of the power tool with a damp cloth at regular intervals.
▶ Do not use a spray, pressure jet washer or running water for cleaning. This may negatively affect the
electrical safety of the screwdriver.
8 Troubleshooting
Note
If the trouble you are experiencing is not listed in this table or you are unable to remedy the problem
by yourself, please contact Hilti Service.
Trouble or fault Possible cause Action to be taken
The screwdriver doesn’t
work.
Low battery. ▶ Use an approved charger to
charge the battery. → page 6
The battery is not in the working
position.
▶ Insert the battery. → page 6
The screwdriver doesn’t work
and one LED blinks.
Low battery. ▶ Change or charge the battery.
Printed: 26.10.2015 | Doc-Nr: PUB / 5070552 / 000 / 03

9
Trouble or fault Possible cause Action to be taken
The screwdriver doesn’t work
and one LED blinks.
The battery is too hot or too cold. ▶ Bring the battery to the recom-
mended operating temperature.
The screwdriver doesn’t work
and all four LEDs blink.
The overload cut-out has been
activated.
▶ Release the control switch and
then press it again. Reduce the
load on the tool.
The control switch can’t be
pressed, i.e. the switch is
locked.
The safety lock is engaged. ▶ Set the forward / reverse
selector switch to forward or
reverse rotation.
The screwdriver runs but the
screw can’t be driven.
The wrong direction of rotation is
set.
▶ Use the forward / reverse
selector switch to set the right
direction of rotation.
Running speed suddenly
drops considerably.
Low battery. ▶ Use an approved charger to
charge the battery. → page 6
The battery runs down more
quickly than usual.
Battery condition is not optimal. ▶ Have the battery condition
diagnosed by Hilti Service or fit
a new battery.
The battery doesn’t engage
with an audible click.
The retaining lugs on the battery
are dirty.
▶ Clean the retaining lugs and
engage the battery in the
working position.
The screwdriver or the battery
gets very hot.
Electrical fault. ▶ Switch the screwdriver off
immediately, remove the battery
and contact Hilti Service.
The screwdriver has been over-
loaded by exceeding its application
limits.
▶ Select a screwdriver with
adequate performance for the
application.
9 Disposal
WARNING
Risk of injury. Hazards presented by improper disposal.
▶ Improper disposal of the equipment may have the following consequences: The burning of plastic
components generates toxic fumes which may present a health hazard. Batteries may explode
if damaged or exposed to very high temperatures, causing poisoning, burns, acid burns or
environmental pollution. Careless disposal may permit unauthorized and improper use of the
equipment. This may result in serious personal injury, injury to third parties and pollution of the
environment.
▶ Dispose of defective batteries right away. Keep them out of reach of children. Do not disassemble
or incinerate the batteries.
▶ Batteries that have reached the end of their life must be disposed of in accordance with national
regulations or returned to Hilti.
Most of the materials from which Hilti tools and appliances are manufactured can be recycled. The
materials must be correctly separated before they can be recycled. In many countries, your old tools,
machines or appliances can be returned to Hilti for recycling. Ask Hilti Service or your Hilti representative
for further information.
10 Manufacturer’s warranty
▶ Please contact your local Hilti representative if you have questions about the warranty conditions.
Printed: 26.10.2015 | Doc-Nr: PUB / 5070552 / 000 / 03

10
1 Indications relatives à la documentation
1.1 Explication des symboles
1.1.1 Avertissements
Les avertissements attirent l'attention sur des dangers liés à l'utilisation du produit. Les termes de
signalisation suivants sont utilisés en combinaison avec un symbole :
DANGER ! Pour un danger imminent qui peut entraîner de graves blessures corporelles ou la
mort.
AVERTISSEMENT ! Pour attirer l'attention sur une situation pouvant présenter des dangers
susceptibles d'entraîner des blessures corporelles graves ou la mort.
ATTENTION ! Pour attirer l'attention sur une situation pouvant présenter des dangers entraînant
des blessures corporelles légères ou des dégâts matériels.
1.1.2 Symboles
Les symboles suivants sont utilisés :
Pour des conseils d'utilisation et autres informations utiles
Lire le mode d'emploi avant d'utiliser l'appareil
Vitesse nominale à vide
Tours par minute
Tours par minute
Courant continu
1.1.3 Illustrations
Les illustrations dans le présent mode d'emploi servent à faciliter la compréhension essentielle et peuvent
différer de la version effective :
Ces chiffres renvoient à l'illustration correspondante au début du présent mode d'emploi.
La numérotation des illustrations détermine la séquence des étapes de travail dans l'image et
peut se différencier de la numérotation des étapes de travail dans le texte.
Les numéros de position sont repris dans la vue d'ensemble relative à l'illustration. Dans la sec-
tion Vue d’ensemble des produits, les numéros des légendes renvoient à ces numéros de posi-
tion.
1.2 À propos de cette documentation
▶ Avant de mettre l'appareil en marche, lire impérativement ce mode d'emploi. C'est la condition
préalablement requise pour assurer la sécurité du travail et un maniement sans perturbations.
▶ Bien respecter les consignes de sécurité et les avertissements de la présente documentation ainsi que
celles figurant sur l'appareil.
▶ Toujours conserver le mode d'emploi à proximité de l'appareil et transmettre l'appareil à des tiers
uniquement avec ce mode d'emploi.
Sous réserve de modifications ou d'erreurs.
1.3 Informations produit
Les produits Hilti sont conçus pour les utilisateurs professionnels et ne doivent être utilisés, entretenus et
réparés que par un personnel agréé et formé à cet effet. Ce personnel doit être au courant des dangers
inhérents à l'utilisation de l'appareil. Le produit et ses accessoires peuvent s'avérer dangereux s'ils sont
utilisés de manière incorrecte par un personnel non qualifié ou de manière non conforme à l'usage prévu.
• Reporter la désignation et le numéro de série qui se trouvent sur la plaque signalétique dans le tableau
suivant.
Printed: 26.10.2015 | Doc-Nr: PUB / 5070552 / 000 / 03

11
▶ Toujours fournir ces informations en cas de questions relatives au produit pour communiquer avec notre
représentant ou agence Hilti.
Caractéristiques produit
Type :
Génération : 01
Numéro de série :
2 Sécurité
2.1 Consignes de sécurité
Les indications de sécurité du chapitre suivant contiennent toutes les indications générales de sécurité
pour les outils électriques qui, selon les normes applicables, doivent être spécifiées dans le présent mode
d'emploi. Par conséquent, il est possible que certaines indications ne se rapportent pas à cet appareil.
2.1.1 Indications générales de sécurité pour les outils électriques
AVERTISSEMENT Lire et comprendre toutes les consignes de sécurité et instructions. Tout
manquement à l'observation des consignes de sécurité et instructions risque de provoquer une électrocution,
un incendie et/ou de graves blessures.
Les consignes de sécurité et instructions doivent être intégralement conservées pour les utilisations
futures.
La notion d'« outil électroportatif » mentionnée dans les consignes de sécurité se rapporte à des outils
électriques raccordés au secteur (avec câble de raccordement) et à des outils électriques sur accu (sans
câble de raccordement).
Sécurité sur le lieu de travail
▶ Conserver la zone de travail propre et bien éclairée. Un lieu de travail en désordre ou mal éclairé
augmente le risque d'accidents.
▶ Ne pas faire fonctionner les outils électriques en atmosphère explosive et où se trouvent des
liquides, des gaz ou poussières inflammables. Les outils électriques produisent des étincelles qui
peuvent enflammer les poussières ou les fumées.
▶ Maintenir les enfants et les personnes présentes à l'écart pendant l'utilisation de l'outil électro-
portatif. En cas d'inattention il y a risque de perdre le contrôle de l'appareil.
Sécurité relative au système électrique
▶ La fiche de secteur de l'outil électroportatif doit être adaptée à la prise de courant. Ne jamais
modifier la fiche de quelque façon que ce soit. Ne pas utiliser d'adaptateurs avec des outils
électriques à branchement de terre. Des fiches non modifiées et des prises de courant adaptées
réduiront le risque de choc électrique.
▶
Éviter le contact physique avec des surfaces mises à la terre tels que tuyaux, radiateurs, cuisinières
et réfrigérateurs. Il y a un risque élevé de choc électrique au cas où votre corps serait relié à la terre.
▶ Ne pas exposer les outils électroportatifs à la pluie ou à l'humidité. La pénétration d'eau à l'intérieur
d'un outil électroportatif augmentera le risque d'un choc électrique.
▶ Ne jamais utiliser le cordon à d'autres fins que celles prévues, telles que pour porter, accrocher ou
débrancher l'outil électroportatif de la prise de courant. Maintenir le cordon à l'écart de la chaleur,
des parties grasses, des bords tranchants ou des parties de l'appareil en mouvement. Des cordons
endommagés ou emmêlés augmentent le risque de choc électrique.
▶ Si l'outil électroportatif est utilisé à l'extérieur, utiliser uniquement une rallonge homologuée pour
les applications extérieures. L'utilisation d'une rallonge électrique homologuée pour les applications
extérieures diminue le risque d'un choc électrique.
▶ Si l'utilisation de l'outil électrique dans un environnement humide ne peut pas être évitée, utiliser
un interrupteur de protection contre les courants de court-circuit. L'utilisation d'un tel interrupteur
de protection réduit le risque d'une décharge électrique.
Sécurité des personnes
▶ Rester vigilant, surveiller ce que l'on fait. Faire preuve de bon sens en utilisant l'outil électroportatif.
Ne pas utiliser l'outil électroportatif si vous êtes fatigué ou sous l'emprise de l'alcool, de drogues
ou de médicaments. Un moment d'inattention lors de l'utilisation de l'outil électroportatif peut entraîner
des blessures graves.
▶ Utiliser un équipement de sécurité et toujours porter une protection pour les yeux. Les équipements
de protection personnels tels que masque antipoussière, chaussures de sécurité antidérapantes, casque
Printed: 26.10.2015 | Doc-Nr: PUB / 5070552 / 000 / 03

12
de protection ou protection acoustique suivant l'utilisation de l'outil électroportatif, réduiront le risque de
blessures des personnes.
▶
Éviter une mise en service par mégarde. S'assurer que l'outil électroportatif est arrêté avant de le
brancher à la source de courant et/ou à l'accu, de le prendre ou de le porter. Le fait de porter l'outil
électroportatif avec le doigt sur l'interrupteur ou de brancher l'appareil sur la source de courant lorsque
l'interrupteur est en position de fonctionnement peut entraîner des accidents.
▶ Retirer tout outil de réglage ou toute clé avant de mettre l'outil électroportatif en fonctionnement.
Une clé ou un outil se trouvant sur une partie en rotation peut causer des blessures.
▶ Adopter une bonne posture. Veiller à toujours garder une position stable et équilibrée. Cela permet
un meilleur contrôle de l'outil électroportatif dans des situations inattendues.
▶ S'habiller de manière adaptée. Ne pas porter de vêtements amples ni de bijoux. Garder les
cheveux, les vêtements et les gants à distance des parties en mouvement. Des vêtements amples,
des bijoux ou des cheveux longs peuvent être happés par des parties en mouvement.
▶ Si des dispositifs servant à aspirer ou à recueillir les poussières doivent être utilisés, s'assurer
qu'ils sont effectivement raccordés et correctement utilisés. L'utilisation d'un dispositif d'aspiration
de la poussière peut réduire les risques dus aux poussières.
Utilisation et maniement de l'outil électroportatif
▶ Ne pas forcer l'appareil. Utiliser l'outil électroportatif adapté au travail à effectuer. Un outil
électroportatif approprié réalisera mieux le travail et de manière plus sûre au régime pour lequel il a été
conçu.
▶ Ne pas utiliser d'outil électroportatif dont l'interrupteur est défectueux. Tout outil électroportatif qui
ne peut plus être mis en ou hors fonctionnement est dangereux et doit être réparé.
▶ Débrancher la fiche de la prise de courant et/ou l'accu avant d'effectuer des réglages sur l'appareil,
de changer les accessoires, ou de ranger l'appareil. Cette mesure de précaution empêche une mise
en fonctionnement par mégarde de l'outil électroportatif.
▶ Conserver les outils électroportatifs non utilisés hors de portée des enfants. Ne pas permettre
l'utilisation de l'appareil à des personnes qui ne se sont pas familiarisées avec celui-ci ou qui n'ont
pas lu ces instructions. Les outils électroportatifs sont dangereux lorsqu'ils sont entre les mains de
personnes non initiées.
▶ Prendre soin des outils électroportatifs. Vérifier que les parties en mouvement fonctionnent
correctement et qu'elles ne sont pas coincées, et contrôler si des parties sont cassées ou
endommagées de sorte que le bon fonctionnement de l'outil électroportatif s'en trouve entravé.
Faire réparer les parties endommagées avant d'utiliser l'appareil. De nombreux accidents sont dus
à des outils électroportatifs mal entretenus.
▶ Garder les outils de coupe affûtés et propres. Des outils destinés à couper correctement entretenus
avec des bords tranchants bien aiguisés se coincent moins souvent et peuvent être guidés plus
facilement.
▶ L'outil électroportatif, les accessoires, les outils amovibles, etc. doivent être utilisés conformément
à ces instructions. Tenir également compte des conditions de travail et du travail à réaliser.
L'utilisation des outils électroportatifs à d'autres fins que celles prévues peut entraîner des situations
dangereuses.
Utilisation et maniement de l'outil sur accu
▶ Ne charger les accus que dans des chargeurs recommandés par le fabricant. Si un chargeur
approprié à un type spécifique d'accus est utilisé avec des accus non recommandés pour celui-ci, il y a
risque d'incendie.
▶ Dans les outils électroportatifs, utiliser uniquement les accus spécialement prévus pour ceux-ci.
L'utilisation de tout autre accu peut entraîner des blessures et des risques d'incendie.
▶ Tenir l'accu non utilisé à l'écart de tous objets métalliques tels qu'agrafes, pièces de monnaie, clés,
clous, vis ou autres, étant donné qu'un pontage peut provoquer un court-circuit. Un court-circuit
entre les contacts d'accu peut provoquer des brûlures ou un incendie.
▶
En cas d'utilisation abusive, du liquide peut sortir de l'accu. Éviter tout contact avec ce liquide. En
cas de contact par mégarde, rincer soigneusement avec de l'eau. Au cas où le liquide rentrerait
dans les yeux, consulter en plus un médecin. Le liquide qui sort de l'accu peut entraîner des irritations
de la peau ou causer des brûlures.
Service
▶ L'outil électroportatif doit uniquement être réparé par un personnel qualifié et seulement avec des
pièces de rechange d'origine. Ceci permet d'assurer la sécurité de l'appareil.
Printed: 26.10.2015 | Doc-Nr: PUB / 5070552 / 000 / 03

13
2.1.2 Consignes de sécurité pour visseuse
▶ Lors des travaux pendant lesquels la vis risque de toucher des câbles électriques cachés, tenir
l'appareil uniquement par les surfaces isolées des poignées. Le contact de la vis avec un câble
conducteur risque aussi de mettre les parties métalliques de l'appareil sous tension et de provoquer une
décharge électrique.
2.1.3 Consignes de sécurité supplémentaires
Sécurité des personnes
▶ Toute manipulation ou modification de l'appareil est interdite.
▶ Porter un casque antibruit. Le bruit peut entraîner des pertes auditives.
▶ Tenir l'appareil, en particulier les surfaces de préhension, sec, propre et exempt d'huile et de
graisse. Ne pas utiliser de nettoyants à base de silicone.
▶ Faire régulièrement des pauses et des exercices de relaxation et de massage des doigts pour
favoriser l'irrigation sanguine dans les doigts.
▶
Éviter de toucher des pièces en rotation. Brancher l'appareil uniquement dans l'espace de travail.
Le fait de toucher des pièces en rotation, en particulier des outils en rotation, risque d'entraîner des
blessures.
▶ Activer le blocage anti-démarrage (inverseur du sens de rotation droite / gauche en position
médiane) pour le stockage et le transport de l'appareil.
▶ L'appareil n'est pas destiné à être utilisé par des personnes affaiblies sans encadrement.
▶ L'appareil doit être tenu à l'écart des enfants.
▶
Éviter tout démarrage intempestif de l'appareil. Ne pas porter l'appareil avec le doigt sur
l'interrupteur Marche/Arrêt. Lorsque l'appareil n'est pas utilisé pendant une pause, avant un
entretien, lors du remplacement d'outils ou du transport, l'accu doit être retiré de l'appareil.
▶ Avant de commencer à travailler, vérifier que la patte d'accrochage à la ceinture est bien fixée.
▶ Ne pas porter l'appareil par la butée de profondeur. L'assemblage à encliquetage peut se détacher
inopinément.
▶ En déposant l'appareil, veiller à ce que sa position soit stable, notamment pour ce qui est du
chargeur et/ou de la rallonge.
▶ Vérifier que les outils amovibles sont bien munis du système d'emmanchement adapté à l'appareil
et qu'ils sont toujours correctement verrouillés dans le mandrin.
▶ Les poussières de matériaux telles que des poussières de peinture au plomb, de certains types de bois,
minéraux et métaux, peuvent être nocives pour la santé. Le contact ou l'aspiration des poussières peut
provoquer des réactions allergiques et/ou des maladies respiratoires de l'utilisateur ou de toute personne
se trouvant à proximité. Certaines poussières, telles que des poussières de chêne ou de hêtre, sont
considérées comme cancérigènes, en particulier lorsqu'elles sont combinées à des additifs destinés
au traitement du bois (chromate, produit de protection du bois). Les matériaux contenant de l'amiante
doivent seulement être manipulés par un personnel spécialisé. Utiliser si possible un dispositif
d'aspiration de poussière efficace. Utiliser un aspirateur mobile pour bois et/ou poussières
minérales recommandé par Hilti, spécialement étudié pour cet outil électroportatif. Veiller à ce que
le poste de travail soit bien ventilé. Respecter les prescriptions locales en vigueur qui s'appliquent
aux matériaux travaillés.
▶ Il convient également d'observer la législation locale en matière de protection au travail.
Sécurité relative au système électrique
▶ Avant d'entamer le travail, vérifier, par exemple à l'aide d'un détecteur de métaux, qu'il n'y a pas
de câbles ou gaines électriques, tuyaux de gaz ou d’eau cachés dans la zone d'intervention. Toute
pièce métallique extérieure à l'appareil peut devenir conductrice, par exemple si un câble électrique est
endommagé par inadvertance. Cela peut entraîner un grave danger d'électrocution.
Sécurité des personnes
▶ L'utilisateur et les personnes se trouvant à proximité pendant l'utilisation de l'appareil doivent
porter un équipement de protection tel que des lunettes de protection adaptées, un casque de
protection, un casque antibruit, des gants de protection ainsi qu'un masque respiratoire léger.
Utilisation et emploi soigneux des appareils sans fil
▶ S'assurer que l’appareil est effectivement en position d’arrêt avant de monter l’accumulateur. Le
fait de monter un accumulateur dans un outil électroportatif en position de fonctionnement peut causer
des accidents.
▶ Ne pas exposer les accus à des températures élevées ni au feu. Il y a risque d'explosion.
▶ Les accus ne doivent pas être démontés, écrasés, chauffés à une température supérieure à 80 °C
(176 °F) ou jetés au feu. Sinon, il y a risque d'incendie, d'explosion et de brûlure.
Printed: 26.10.2015 | Doc-Nr: PUB / 5070552 / 000 / 03

14
▶
Éviter toute pénétration d'humidité. Toute infiltration d'humidité risque de provoquer un court-circuit
et des brûlures ou un incendie.
▶ Respecter les directives spécifiques relatives au transport, au stockage et à l'utilisation des accus
LiIon.
▶
Éviter tout court-circuit sur l'accu. Avant de réinsérer l'accu dans l'appareil, s'assurer que les
contacts de l'accu et dans l'appareil sont exempts de corps étrangers. Si les contacts d'un accu
sont court-circuités, il y a risque d'incendie, d'explosion et de brûlure.
▶ Les accus endommagés (p. ex. accus fissurés, pièces cassées, contacts tordus, déformés vers
l'intérieur et/ou l'extérieur) ne doivent plus être chargés ni utilisés.
▶ Ne pas utiliser les accus comme source d'énergie pour d'autres appareils non spécifiés.
▶ Si l'accu est trop chaud pour être touché, il est probablement défectueux. Déposer l'appareil à un
endroit non inflammable d'où il peut être surveillé, suffisamment loin de matériaux potentiellement
inflammables et le laisser refroidir. Contacter le S.A.V. Hilti une fois l'accu refroidi.
3 Description
3.1 Vue d'ensemble du produit 1
@ Mandrin
; Interface appareil / accessoires (assem-
blage à encliquetage)
= Crochet universel
% Entrée / aspiration de l'air de refroidisse-
ment du moteur
& Poignée
( Sortie d'air
) Inverseur du sens de rotation droite /
gauche avec dispositif de blocage
+ Interrupteur de commande (avec variateur
de vitesse électronique)
§ Bouton de blocage pour fonctionnement en
continu
/ Patte d'accrochage à la ceinture
: Affichage de l'état de charge et des défauts
(accu Li-Ion)
∙ Boutons de déverrouillage pour accu
$ Butée de profondeur
3.2 Utilisation conforme à l'usage prévu
Le produit décrit est une visseuse pour pose à sec sur accu à guidage manuel avec fonction d'embrayage.
Utiliser uniquement des vis telles que spécifiées dans les caractéristiques techniques.
Pour un maniement optimal, nous recommandons d'utiliser la visseuse dans le sens longitudinal.
L'air nécessaire au refroidissement du moteur est aspiré à travers les fentes d'aération et soufflé hors de la
visseuse par le biais de la sortie d'air.
▶ Pour ce produit, utiliser exclusivement les accus LiIon Hilti de la série B 18.
▶ Pour ces accus, utiliser exclusivement les chargeurs Hilti de la série C4/36.
3.3 Indicateur de l'état de charge
Lors de l'utilisation de l'accu Li-Ion, l'état de charge peut être visualisé en appuyant légèrement sur un des
boutons de déverrouillage (au maximal jusqu'à une résistance perceptible).
État Signification
4 LED allumées. • État de charge : 75 % à 100 %
3 LED allumées. • État de charge : 50 % à 75 %
2 LED allumées. • État de charge : 25 % à 50 %
1 LED allumée. • État de charge : 10 % à 25 %
1 LED clignote. • État de charge : < 10 %
Remarque
Il n'est pas possible d'interroger l'indicateur de l'état de charge lorsque le variateur électronique de
vitesse est actionné et jusqu'à 5 secondes après avoir relâché le variateur électronique de vitesse.
3.4 Éléments livrés
Visseuse pour pose à sec, butée de profondeur, embout, porte-embout, mode d'emploi
Printed: 26.10.2015 | Doc-Nr: PUB / 5070552 / 000 / 03
La page est en cours de chargement...
La page est en cours de chargement...
La page est en cours de chargement...
La page est en cours de chargement...
La page est en cours de chargement...
La page est en cours de chargement...
La page est en cours de chargement...
La page est en cours de chargement...
La page est en cours de chargement...
La page est en cours de chargement...
La page est en cours de chargement...
La page est en cours de chargement...
La page est en cours de chargement...
La page est en cours de chargement...
La page est en cours de chargement...
La page est en cours de chargement...
La page est en cours de chargement...
La page est en cours de chargement...
La page est en cours de chargement...
La page est en cours de chargement...
La page est en cours de chargement...
La page est en cours de chargement...
La page est en cours de chargement...
La page est en cours de chargement...
La page est en cours de chargement...
La page est en cours de chargement...
La page est en cours de chargement...
La page est en cours de chargement...
-
 1
1
-
 2
2
-
 3
3
-
 4
4
-
 5
5
-
 6
6
-
 7
7
-
 8
8
-
 9
9
-
 10
10
-
 11
11
-
 12
12
-
 13
13
-
 14
14
-
 15
15
-
 16
16
-
 17
17
-
 18
18
-
 19
19
-
 20
20
-
 21
21
-
 22
22
-
 23
23
-
 24
24
-
 25
25
-
 26
26
-
 27
27
-
 28
28
-
 29
29
-
 30
30
-
 31
31
-
 32
32
-
 33
33
-
 34
34
-
 35
35
-
 36
36
-
 37
37
-
 38
38
-
 39
39
-
 40
40
-
 41
41
-
 42
42
-
 43
43
-
 44
44
-
 45
45
-
 46
46
-
 47
47
-
 48
48


Hilti SD 4500-A18 Mode d'emploi
- Catégorie
- Outils électroportatifs
- Taper
- Mode d'emploi
dans d''autres langues
- English: Hilti SD 4500-A18 Operating instructions
- español: Hilti SD 4500-A18 Instrucciones de operación
- português: Hilti SD 4500-A18 Instruções de operação