Fagor 5H-590X Le manuel du propriétaire
- Catégorie
- Barbecues
- Taper
- Le manuel du propriétaire
Ce manuel convient également à

Using your oven
Instrucciones de uso de su horno
O guia de utilização do seu forno
Le guide d’utilisation de votre four
Bedienungsanleitung Ihres Backofens
FR
EN
DE
ES
PT
5H-580
5H-590
99636922_A_ML.qxp 21/10/2005 16:22 Page 1

2
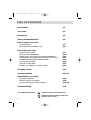
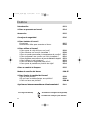
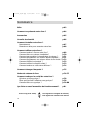
List of contents
Introduction p.3
Your oven p.4
Accessories p.5
Safety recommendations p.6
How to install your oven
Connecting up p.7
Dimensions for installation use p.8
How to use your oven
How to set the clock p.9
How to cook straightaway p.10
Entering your own choice of cooking temperature p.11
Programming a cooking session to start right away ? p.11
Programming your chosen cooking end time p.12
How to use the timer p.13
Using the child safety p.13
Putting your display on standby mode p.14
Changing a bulb p.15
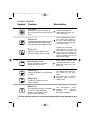
Cooking methods p.16-17
Cleaning the oven cavity
Pyrolysis explained p.18
When to clean by pyrolysis p.18
How to use the pyro-clean program p.19-20
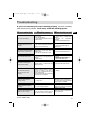
Troubleshooting p.21
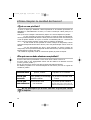
Throughout this manual,
indicates safety recommendations,
indicates advice to help you make the
best use of your oven
99636922_A_ML.qxp 21/10/2005 16:22 Page 2

3
EN
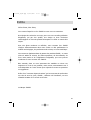
Dear Customer,
Thank you for buying a FAGOR oven.
Our design staff have produced a new generation of kitchen equipment, to
make everyday cooking a pleasure.
You will find that the clean lines and modern look of your FAGOR oven blends
in perfectly with your kitchen décor. It is easy to use and performs to a high
standard.
FAGOR also makes a range of products that will enhance your kitchen such
as hobs, extractor hoods, built-in dishwashers, microwave ovens and
refrigerators. There are models to complement your new FAGOR oven.
Of course, we make every effort to ensure that our products meet all your
requirements, and our Customer Relations department is at your disposal, to
answer all your questions and to listen to all your suggestions (see back
cover of manual).
FAGOR is certain that by setting new standards of excellence by which
comparisons can be made, customers will find that FAGOR appliances offer a
better and more exciting way of living.
The FAGOR name.
Introduction
99636922_A_ML.qxp 21/10/2005 16:22 Page 3

4
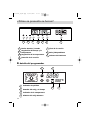
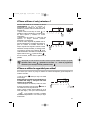
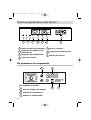
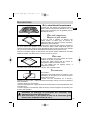
Your oven
START/STOP button
Time and temperature
adjustment
Temperature adjustment
Cooking time
Cooking complete
Independent timer
Programme selector
1
2
3
4
5
6
7
The oven programmer
1
2
3
4
Pyrolysis indicator
Clock and time display
Temperature indicator
Timer indicator
1
2
3
4
1
3
2
4
5
6
7
99636922_A_ML.qxp 21/10/2005 16:22 Page 4

5
EN
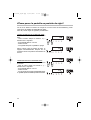
Accessories
Never cover the inside of your oven with aluminium foil in order to avoid
cleaning. By causing overheating you will damage the interior enamel of
the oven.
After cooking, never pick up hot pans, utensils and accessories using
your bare hands (oven shelf, spit, dripping plan, spit cradle, etc).
Anti-tipping safety grid
The grid can be used to hold all dishes and moulds
containing foodstuffs to be cooked or browned. It
can be used for barbecues (to be placed directly on
the grid).
Multi-purpose dish with
Sliding system
It serves as a cake dish and has a sloped edge. It is
used for cooking pastries such as cream puffs,
meringues, madeleines, puff pastry, etc.
Inserted in the sliding system, it collects juices and
fat from grilled meat. It can also be used half-full of
water for double-boiler cooking methods. Avoid placing roasts or meats directly in the dish
because you are certain to have major spattering on the oven walls.
Thanks to this sliding system, you can totally remove your enamelled dish and easily access
your preparations while they are cooking.
Hollow dish
It is used to collect juices and grease from cooking
with the high grill or the pulsed grill.
It can be used as a cooking dish when suitable for
the size of the item to be cooked (e.g. whole poultry
surrounded with vegetables, at moderate
temperature).
Never place this dish directly on the base, except in GRILL position.
Turnspit
To use it:
• Place the multi-purpose dish in the shelf support
no.1 to collect cooking juices or on the base for
roasting large pieces of meat.
• Attach one of the forks onto the spit; pierce the
piece of meat being roasted; insert the second fork; centre the meat and tighten the
assembly by screwing in the two forks.
• place the spit in its support.
• Gently push to lodge the tip of the spit in the guide slot located at the back of the oven.
• remove the handle by unscrewing it. After cooking, screw the handle back into the spit to
remove it without burning yourself.
AR
AV
99636922_A_ML.qxp 21/10/2005 16:22 Page 5

6
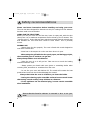
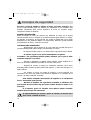
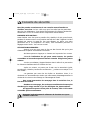
Safety recommendations
Please read these instructions before installing and using your oven.
The oven has been designed for domestic use only for cooking food. No asbestos
has been used in its construction.
USING FOR THE FIRST TIME:
Before you use your oven for the first time, leave it empty and, with the door
closed, turn it on to maximum temperature and let it heat up for 15 minutes. This
"runs the oven in". During this time there may be some smell from the mineral wool
that insulates the oven and there could be some smoke. This is perfectly
normal.
NORMAL USE:
- Always close the door properly. The oven is fitted with a seal designed to
work with a closed door.
- Never lean or let anyone sit on the oven door when it is open.
- When using the grill with the door partly open, and during pyrolysis,
the accessible parts or surfaces can get hot.
Always keep children at a safe distance.
- When the oven is on it will get hot. Take care not to touch the heating
elements inside the oven.
- Always protect your hands with oven gloves or something similar when
removing food, accessories or containers from the oven.
- Do not line your oven with kitchen foil. The metal will increase the heat
produced and could ruin the food and damage the enamel.
Always check that the oven is off before you clean the inside.
- During the cleaning cycle accessible surfaces become much hotter
than during normal cooking. Keep children at a distance.
- If the appliance has an electrical plug, it must remain accessible
after installation.
Ensure that the function selector is returned to 0 to re-use your
oven.
99636922_A_ML.qxp 21/10/2005 16:22 Page 6

7
EN
How to install your oven
As a specialist, you alone are competent to install and connect up Fagor
appliances.
Our guarantee therefore applies only and exclusively to appliances which have
been installed and connected up by you in accordance with the provisions of
current regulations.
Failure to meet this requirement would incur the fitter's liability and release the
Fagor company from any liability.
Connecting up
Electrical connections must be made as per the connection plate fixed to the back of the
appliance, by an electrical fitter. Who must ensure that the appliance has been connected
up in accordance with fitting instructions and local regulations.
Where the appliance is not connected to the mains electricity supply by a plug, an omni polar
cutout device (with a contacts gap of at least 3 mm) must be fitted on the supply side of
the connection to meet safety requirements.
NOTE: When power is connected, the electronics of the oven are initialised; this neutralizes
the lighting for a few seconds.
If the oven is connected to the power supply by a plug, this must remain accessible once
the oven has been fitted.
We cannot accept any liability in the event of an accident resulting from non-existent or
faulty earthing.
If the power supply cable is damaged, it presents a potential hazard. It must be replaced by
the manufacturer, its after-sales service.
Operating voltage...................................................................220-240 V ~ 50 Hz
Total power of oven..............................................................................2.925 kW
Nominal power of grill.............................................................................2.65 kW
Energy consumption
-while heating to 175°C........................................................................0.205 kWh
-to maintain 175°C for 1 hour................................................................0.410 kWh
TOTAL..................................................................................................0.615 kWh
Inside dimensions of oven
Width........................................................................................................43 cm
Height.......................................................................................................19 cm
Depth........................................................................................................38 cm
Effective volume................................................................................... .32 litres
min.
network voltage connection diameter of fuse
cable
230V~ 50Hz 1 Ph + N 1.5 mm
2
16 A
99636922_A_ML.qxp 21/10/2005 16:22 Page 7

8
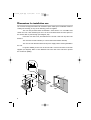
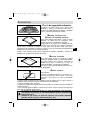
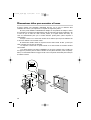
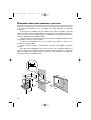
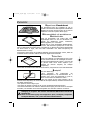
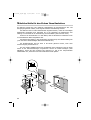
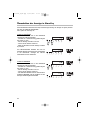
Dimensions for installation use
The oven has an high-performance air circulation system which gives remarkable results for
cooking and cleaning, as long as the following points are applied:
The oven may be fitted either underneath a work surface or in a suitable sized
column unit. Cut a hole measuring 50 mm x 50 mm in the back wall of the insert space for
the electric cable to pass through (See diagram, left).
Centre the oven in the unit, and make that it is at least 2 mm from any other unit
beside it.
The unit must be heat-resistant (or covered with heat-resistant material).
The oven must be disconnected from the power supply while it is being installed in
the unit.
For greater stability, fix the oven in the unit with 2 screws in the holes on the side
uprights (see diagram). Make a 3 mm diameter hole in the side of the unit first to prevent
the wood from splitting.
560
595
540
22
376
380
560-580
20
50
10
50
550
mini
560-580
550 mini
400
310
390
99636922_A_ML.qxp 21/10/2005 16:22 Page 8

9
EN
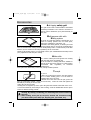
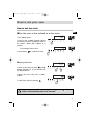
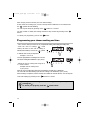
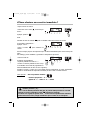
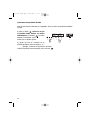
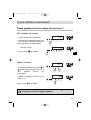
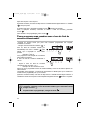
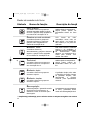
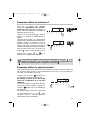
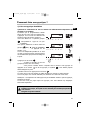
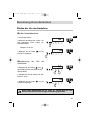
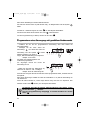
How to set the clock
If you forget to confirm the time by pressing button , the oven
will do it automatically after a few seconds.
How to use your oven
Altering the clock
• Press on both Press on both and
buttons together for a few seconds until
the display blinks.
• Adjust the time using the + and -
buttons
• Confirm the time by pressing .
When the oven is first switched on at the mains
• The display blinks.
• Press on the + and - buttons until the
correct time is shown (Keeping a finger on
the button, rather than tapping it, is
quicker).
The example shows 12.30.
• Press button to confirm the time.
99636922_A_ML.qxp 21/10/2005 16:22 Page 9

10
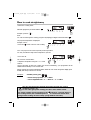
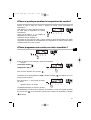
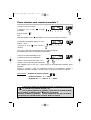
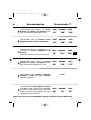
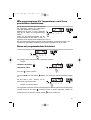
How to cook straightaway
• Select the cooking mode
Select the program of your choice with the ,
Example: position " ".
Note:
You can scroll through the cooking programs by keeping your finger on the touch control .
The proposed temperature is displayed:
Example: 220°C.
• Push the touch control to start cooking.
Your oven proposes the most frequently used temperature.
You may nevertheless adjust this temperature yourself.
• Press the °C.
The °C touch control blinks.
• Adjust the temperature using the + or - touch
controls.
• Even if pressing °C does not confirm your choice immediately, your programme will be
validated automatically a few seconds later.
During cooking, the chosen temperature blinks. When the oven is hot enough the display glows
steadily and a beep sounds for 3 seconds.
Exception
: Variable power grill:
- Power level proposed: - 4 - = 100%
- Can be adjusted from - 1 - = 50% to - 4 - = 100%
The door should only be left half-open when the grills are used on
maximum power (-4-).
For the other grill power settings, the door must remain closed.
Turn off the cooking cycle by pressing on the button for 1 second. During a
grill cooking session, the accessible parts of your oven become hotter than
during normal cooking. Be sure to keep young children well away.
2
1/3
99636922_A_ML.qxp 21/10/2005 16:22 Page 10

11
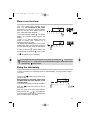
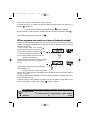
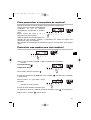
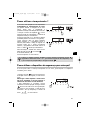
Entering your own choice of cooking temperature
During the selection of the cooking mode or during the cooking cycle, you can enter your
own choice of temperature:
Press on the °C (about 2 seconds) button
until the temperature figures starts flashing.
Adjust the temperature using the + or -
buttons until you reach the temperature that
you wish to record.
Confirm your choice by pressing on button °C.
When you cook in future, the temperature that you have just recorded will be used.
This cooking temperature adjustment operation can be renewed as often as you wish
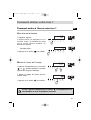
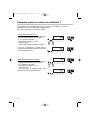
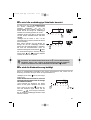
Programming a cooking session to start right away?
Set the chosen cooking mode and possibly adjust the temperature.
Example:
Natural convection
Temperature: 220° C.
Press on the “cooking time” button .
The cooking time begins flashing at 0:00 as well as the symbol to show that
adjustment is now possible.
Press on the + or - buttons to set the desired
time.
Example: 25 minutes cooking time.
The cooking time that you have set will be
automatically recorded after a few seconds or can be confirmed by pressing once again on
the button. The clock time will then appear once again on the display and the
symbol stops flashing.
EN
99636922_A_ML.qxp 21/10/2005 16:22 Page 11

12
After carrying out these actions, the oven starts heating.
At the end of the cooking cycle, a series of beeps will be emitted for a few minutes and
the symbol will start flashing.
You can stop the beeps by pressing on the button for 1 second.
You may consult or modify the cooking end time at any moment by pressing on the
button.
To cancel your programme, press on the button.
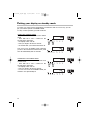
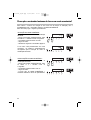
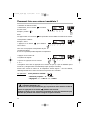
- Carry out the same procedure as for programmed cooking, After setting the cooking time,
- Press the "end of cooking" , touch
control; the time for the end of cooking is
indicated and flashes, as does the symbol
to indicate that it may be adjusted.
Example : It is 12.30
You have programmed a cooking time of 30 min.
The end of cooking time indicated is 1 pm (13.00).
- Adjust the end of cooking time using the +
or - touch controls
Example: End of cooking time:
2 pm (14.00).
Once the end of cooking time has been programmed, normal time is displayed.
The oven will now start heating up in time for cooking to be finished by 2 pm (14.00).
When cooking is completed, a series of beeps are emitted for several minutes. You can stop the
oven from beeping by pressing on the button for 1 second.
You may consult or change the end of cooking time at any time by
pressing the .
To cancel your program, press the touch control.
Programming your chosen cooking end time
99636922_A_ML.qxp 21/10/2005 16:23 Page 12

13
Using the child safety.
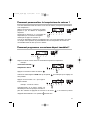
How to use the timer
• Press on the button until you hear a long
drawn-out beep.
Keep pressing on the touch control until
the bleep stops and a key appears on the
indicator panel.
• To unlock the controls, repeat the operation.
Press the touch control until you hear a
long bleep.
Keep your finger on the touch control until the
bleep stops and the key disappears
from the display panel. Only the "independent
timer" function remains functional.
You may change the remaining time at any point by pressing the touch control
and using the + or - touch controls. To cancel the timer program, set the time at 0.00
and press the touch control.
Your oven is fitted with a separate minute
timer. It is not connected to the oven's
programmes. You can use it just like a kitchen
timer. For this, the timer display makes the
hour of day temporarily disappear.
• Press the hourglass symbol . The display
flashes; the hourglass symbol appears and
flashes.
• Press + or - until the display shows the
length of cooking time required (up to
59 minutes and 50 seconds).
The display stops flashing after a few seconds
and the timer starts, counting down the time in
seconds. When the time is up, the timer bleeps
to warn you and the symbol flashes. Stop
the bleeping by pressing the touch control
or . Normal time is now displayed.
In order to prevent your oven being turned on unintentionally, you may lock the controls.
To do this:
EN
99636922_A_ML.qxp 21/10/2005 16:23 Page 13

14
Putting your display on standby mode
START
STOP
To reduce your oven's power consumption to a minimum when it is not in use, you can
put your readout system in STANDBY MODE.
To carry out this operation, proceed as follows:
GOING INTO STANDBY MODE:
- Your oven must be in normal time readout
mode.
- Press both the + and - controls for five
seconds at the same time.
- The display reads “Lcd off”
- Take your fingers off the two controls.
- 30 seconds later your readout will switch off.
Your oven is now in standby mode; whenever
you are in the normal time readout mode, it will
turn off automatically after 30 seconds.
COMING OUT OF STANDBY MODE:
- Your oven must be in the normal time
readout mode.
- Press both the + and - controls for five
seconds at the same time.
- The display reads “Lcd on”.
- Take your fingers off the two controls.
- You are now out of the STANDBY MODE; the
readout is now permanently lit.
99636922_A_ML.qxp 21/10/2005 16:23 Page 14

15
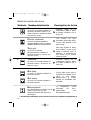
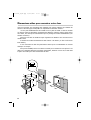
•The light bulb is housed in the ceiling of your oven.
a) Unscrew the protective shade
(see diagram).
b) Unscrew the bulb, turning it to the left.
A bulb is used:
- 15 W
- 220-240 V
- 300°C
- E 14 fitting
c) Change the bulb, replace the shade
and switch your oven back on at the
mains.
Warning! Switch off the power at the main switch before
attempting to change the bulb. Leave the oven to cool if
necessary.
Changing a bulb
bulb fitting
unscrew
cover
Using a rubber glove makes it easier to unscrew the cover and
the bulb.
EN
99636922_A_ML.qxp 21/10/2005 16:23 Page 15

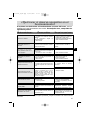
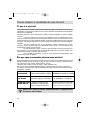
16
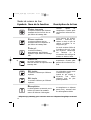
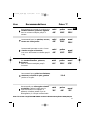
Combined
Cooking is carried out by the lower and
upper elements at the bottom of the
oven, and by the air circulation device.
Turbo grill
Cooking is done alternately by
the top element and by the fan.
D
ouble grill
Cooking is carried out by the upper
element.
Single grill
Cooking is carried out by the
upper element.
Symbol
Feature
Description
* Cooking methods referred to in the advertisement about energy labelling in acco
F
an oven
A heater element at the back of
the oven and the fan help cook the
food.
Oven rapidly reaches the
selected temperature.
Some dishes can start off
in the cold oven.
Three combined heat sources:
lots of heat at the bottom of
the oven, a little ambient heat
and a slight heat from the grill
to brown your food.
The double grill covers the
full surface of the oven
shelf.
The single grill is equally
efficient, but covers a
smaller area.
Reheating is not required.
Poultry and juicy or crisp roast
meat joints are cooked on all
sides. The spit continues to
operate until the door is opened.
Place the dripping pan on the
bottom shelf setting.
C
onventional oven
Food is cooked by a top and
bottom element. No fan.
Oven rapidly reaches the
selected temperature. Some
dishes can start off in the
cold oven.
Defrosting
The defrosting function is provided
by the fan, which circulates
ambient air around the food
product to be defrosted.
The temperature never
exceeds 50°C, thereby
providing optimum
defrosting conditions.
Cooking methods
*
99636922_A_ML.qxp 21/10/2005 16:23 Page 16

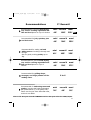
17
Recommended for juicy quiches, pies
and fruit tarts.
Recommended for grilling chops,
sausages, and large prawns and for
making toast.
Recommendations
Recommended to prevent meat drying
out, and for cooking vegetables and
fish and food placed on up to 3 shelves.
Recommended for sealing red and
white meat and cooking it through and
through.
Also for gently cooking poultry up to
2kg.
Cº Recom’d
mini
recom’d
40°
180°
250°
mini
recom’d
maxi
40°
200°
250°
1 to 4
Recommended to prevent meat drying
out, and for cooking vegetables and
fish and food placed on up to 3
shelves.
Recommended for defrosting meat and
poultry. Use the shelf with the dripping
pan placed below it, or the pastry tray.
Never use the juice from defrosted meat,
as this is not edible.
mini
recom’d
maxi
30°
40°
50°
mini
recom’d
maxi
40°
195°
250°
mini
recom’d
maxi
40°
220°
275°
maxi
EN
rdance with European Standard EN50304 and the European Directive 2002/40/EC.
99636922_A_ML.qxp 21/10/2005 16:23 Page 17

18
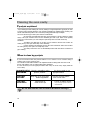
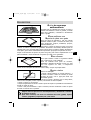
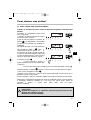
Pyrolysis explained
FOOD WITH LITTLE Biscuits, vegetables, cakes You do not need to use
SPATTERING quiches, soufflés pyrolysis feature
FOOD THAT Meat, fish (in an open dish) Use the pyrolysis feature
SPATTERS stuffed vegetables after 3 oven uses
FOOD THAT Large pieces of If a lot of spitting occurs
SPITS BADLY meat on the spit run the pyrolysis feature
afterwards
If your oven smokes when the pre-heat feature is on or if there is a lot of smoke during a
cooking cycle run the pyrolysis cycle.
You can also use this feature if there is an unpleasant smell of cooking when the oven is cold
Do not wait until the oven is coated in dirt before cleaning it.
It is not necessary to run the pyrolysis feature after every use of the oven, simply when the
oven is dirty.
When to clean by pyrolysis
Do not wait until the oven is coated in dirt before cleaning it.
- Pyro-cleaning involves cleaning the oven by heating to a high temperature (pyrolysis) in order
to remove grime and dirt inside the oven caused by splashing or dripping during cooking. The
smoke and smell this produces are removed by being passed through a catalyst.
The oven has three pyro-clean cycles suited to all situations.
- An economic cycle that lasts 1h30 (the oven is locked for 2 hours to allow for cooling
down). This cycle consumes 25% less the standard pyro-clean cycle. When used regularly
(every two or three times you cook meat) this cycle keeps the oven clean under any
conditions.
- A medium cycle that lasts 1h 45 (the oven is locked for 2hours 15m to allow for
cooling down). This cycle cleans dirty ovens efficiently.
- A super-cleaning cycle that lasts 2 hours (the oven is locked for 2hours 30m to allow
for cooling down). This cycle is for really dirty ovens.
- For safety reasons the door is automatically locked shut after about 2 minutes of
pyro-cleaning.
Cleaning the oven cavity
99636922_A_ML.qxp 21/10/2005 16:23 Page 18

19
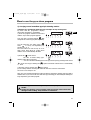
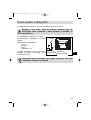
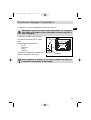
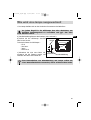
How to use the pyro-clean program
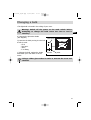
1) Carrying out an immediate pyrolysis cleaning session
a) Remove any accessories from the oven and wipe off any excess grime.
b) Check that the programmer displays
normal time and that it is not flashing.
c) Press the program selection touch control
until the "Pyro-clean" program appears.
Your oven has 3 pyrolysis symbols that
correspond to 1 two-hour pyro (Non-adjustable).
You can select the two other cycles (
1h45, or 1h30) non-adjustable, by
pressing the - or +.
The oven cannot be used for 2h, 2h 15 or
2h30. These times allow for cooling down
until the door is automatically unlocked.
d) Press the touch control
The door is locked during pyro-
cleaning (after about 2 minutes).
- You can consult the finishing time for the pyro-clean cycle by pressing touch control
. At the end of pyro-cleaning the symbol remains lit until the door is automatically
unlocked.
e) Stop the oven by pressing the touch control
f) Use a damp cloth for removing the white ash after the oven has cooled down.
The oven is now ready for use.
Note: The pyro-cleaning temperature cannot be altered. During the cleaning cycle the light is
switched off. If your oven is still not clean after pyro-cleaning you have delayed cleaning too
long. Repeat the pyro-clean program.
Never hang household linen (towels, dishcloths, etc.) on the oven door
handle.
During the cleaning cycle accessible surfaces become much hotter than
during normal cooking. Keep children at a distance.
EN
99636922_A_ML.qxp 21/10/2005 16:23 Page 19

20
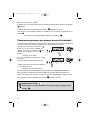
2) How to program your pyro-clean to start when you want
Follow the instructions given in the section entitled "How to use the pyro-clean
program", then:
a) Press touch control , the
finishing time for the pyro-clean
program flashes and the symbol
also flashes to show that
this time can be modified.
b) Set the time the program is due to
finish by pressing the + or - touch controls.
Example: End of the pyro-clean program at 5h00.
When the pyro-clean program is over, press the touch control.
99636922_A_ML.qxp 21/10/2005 16:23 Page 20
La page est en cours de chargement...
La page est en cours de chargement...
La page est en cours de chargement...
La page est en cours de chargement...
La page est en cours de chargement...
La page est en cours de chargement...
La page est en cours de chargement...
La page est en cours de chargement...
La page est en cours de chargement...
La page est en cours de chargement...
La page est en cours de chargement...
La page est en cours de chargement...
La page est en cours de chargement...
La page est en cours de chargement...
La page est en cours de chargement...
La page est en cours de chargement...
La page est en cours de chargement...
La page est en cours de chargement...
La page est en cours de chargement...
La page est en cours de chargement...
La page est en cours de chargement...
La page est en cours de chargement...
La page est en cours de chargement...
La page est en cours de chargement...
La page est en cours de chargement...
La page est en cours de chargement...
La page est en cours de chargement...
La page est en cours de chargement...
La page est en cours de chargement...
La page est en cours de chargement...
La page est en cours de chargement...
La page est en cours de chargement...
La page est en cours de chargement...
La page est en cours de chargement...
La page est en cours de chargement...
La page est en cours de chargement...
La page est en cours de chargement...
La page est en cours de chargement...
La page est en cours de chargement...
La page est en cours de chargement...
La page est en cours de chargement...
La page est en cours de chargement...
La page est en cours de chargement...
La page est en cours de chargement...
La page est en cours de chargement...
La page est en cours de chargement...
La page est en cours de chargement...
La page est en cours de chargement...
La page est en cours de chargement...
La page est en cours de chargement...
La page est en cours de chargement...
La page est en cours de chargement...
La page est en cours de chargement...
La page est en cours de chargement...
La page est en cours de chargement...
La page est en cours de chargement...
La page est en cours de chargement...
La page est en cours de chargement...
La page est en cours de chargement...
La page est en cours de chargement...
La page est en cours de chargement...
La page est en cours de chargement...
La page est en cours de chargement...
La page est en cours de chargement...
La page est en cours de chargement...
La page est en cours de chargement...
La page est en cours de chargement...
La page est en cours de chargement...
La page est en cours de chargement...
La page est en cours de chargement...
La page est en cours de chargement...
La page est en cours de chargement...
La page est en cours de chargement...
La page est en cours de chargement...
La page est en cours de chargement...
La page est en cours de chargement...
La page est en cours de chargement...
La page est en cours de chargement...
La page est en cours de chargement...
La page est en cours de chargement...
La page est en cours de chargement...
La page est en cours de chargement...
La page est en cours de chargement...
La page est en cours de chargement...
-
 1
1
-
 2
2
-
 3
3
-
 4
4
-
 5
5
-
 6
6
-
 7
7
-
 8
8
-
 9
9
-
 10
10
-
 11
11
-
 12
12
-
 13
13
-
 14
14
-
 15
15
-
 16
16
-
 17
17
-
 18
18
-
 19
19
-
 20
20
-
 21
21
-
 22
22
-
 23
23
-
 24
24
-
 25
25
-
 26
26
-
 27
27
-
 28
28
-
 29
29
-
 30
30
-
 31
31
-
 32
32
-
 33
33
-
 34
34
-
 35
35
-
 36
36
-
 37
37
-
 38
38
-
 39
39
-
 40
40
-
 41
41
-
 42
42
-
 43
43
-
 44
44
-
 45
45
-
 46
46
-
 47
47
-
 48
48
-
 49
49
-
 50
50
-
 51
51
-
 52
52
-
 53
53
-
 54
54
-
 55
55
-
 56
56
-
 57
57
-
 58
58
-
 59
59
-
 60
60
-
 61
61
-
 62
62
-
 63
63
-
 64
64
-
 65
65
-
 66
66
-
 67
67
-
 68
68
-
 69
69
-
 70
70
-
 71
71
-
 72
72
-
 73
73
-
 74
74
-
 75
75
-
 76
76
-
 77
77
-
 78
78
-
 79
79
-
 80
80
-
 81
81
-
 82
82
-
 83
83
-
 84
84
-
 85
85
-
 86
86
-
 87
87
-
 88
88
-
 89
89
-
 90
90
-
 91
91
-
 92
92
-
 93
93
-
 94
94
-
 95
95
-
 96
96
-
 97
97
-
 98
98
-
 99
99
-
 100
100
-
 101
101
-
 102
102
-
 103
103
-
 104
104


Fagor 5H-590X Le manuel du propriétaire
- Catégorie
- Barbecues
- Taper
- Le manuel du propriétaire
- Ce manuel convient également à
dans d''autres langues
- English: Fagor 5H-590X Owner's manual
- español: Fagor 5H-590X El manual del propietario
- Deutsch: Fagor 5H-590X Bedienungsanleitung
- português: Fagor 5H-590X Manual do proprietário