Victor 1225-3A Le manuel du propriétaire
- Catégorie
- Calculatrices
- Taper
- Le manuel du propriétaire
Ce manuel convient également à

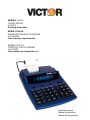
SERIES 1225-3A
12-DIGIT DISPLAY
2-COLOR
Printing Calculator
SERIE 1225-3A
GRAND AFFICHAGE DE 12 CHIFFRES
2 COULEURS
Calculatrices Imprimantes
SERIE 1225-3A
12 DÍGITOS, CON LCD GRANDE
2 COLORES
Calculadora de Impresión en
Instruction Manual
Manuel d'instructions
Manual de Instrucciones

E1
PREFACE
Congratulations on your choice of a Victor electronic
calculator. Careful design, quality materials, painstaking
workmanship, and advanced research and productions
facilities have given you a calculator that, with proper care,
will provide years of trouble-free service. To assure future
optimum performance, ask your Victor representative about
low cost protection offered by Victor's Extended Guarantee
Protection Program.
This operating manual describes the features and operation
of the Victor 1225-3A. This calculator also features the four
basic arithmetic operations, grand total, sigma, percentage,
percent of change, change sign, item count, non-date add
functions, programmable tax rate, back space, cost, sell,
margin, and four key memory functions.

E2
TABLE OF CONTENTS
Operations and General Maintenance
Replacing the ink roller
Loading Paper
Display Symbols
Keyboard
Diagrams
Keyboard Layout
Slide Switch
Features Key
Features
Date and Time Functions
Application Examples
Setting the Date and Time
Warranty
Extended Warranty
SPECIFICATION
Display : 12 digits, fluorescent.
Printing Speed : 2.03 lines/second
Printing Paper : Width 58mm, (2.25inch)MAX
Power Sources : 1) AC100V-
240V 2)
50/60Hz
Ambient Temperature : 0°~40°C
(32°~104°F) Power Consumption : 4.5W
Dimension : 260mm(L) x 198mm(W) x 65mm(H)
Ink Roller : Tow color MS37901
Printing Color : 2-Color (minus and negative in
red) Weight : 750g
PREPARATION
A. Power source
This unit receives its operating power from the AC
power source. When power is in ON position, pressing
[D/#] key will only print the digits displayed in the front

E3
panel.
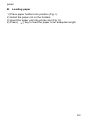
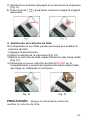
B. Loading paper
1)
Place paper holders into position (Fig. l).
2)
Install the paper roll on the holders.
3)
Insert the paper end into printer slot (Fig. II).
4)
Press [ ] key to feed the paper to an adequate length.

E4
Fig. I Fig. II
C. Replacing the ink roller
If the printing becomes faint, the ink roller may need to be
replaced.
1)
Turn the power off.
2)
Open the printer cover (Fig. III).
3)
Remove the old ink roller by pulling it up (Fig. IV).
4)
Insert the new ink roller MS37901 in the compartment and
gently press it down until it snaps into place.
Fig. III Fig. IV
CAUTION: Turn the power off before replacing ink roller.

E5
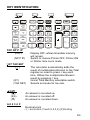
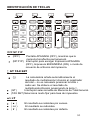
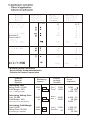
KEY IDENTIFICATION
OFF NP P IP
(OFF) Display OFF, whiles time/date memory
will remain.
(NP P IP) Switch to choose Printer OFF, Printer ON
or Printer item count mode.
∑
GT TAX SET
( ∑ ) The calculator automatically adds the
result of multiplication/division to the Total
register-no need to press + key each
time. Obtain the multiplication/division
result by pressing = key.
(GT) Grand Total Memory selectable switch.
(TAX SET) Selects set mode for tax rate.
▲
5/4
▼
(▲) An answer is rounded up.
(5/4) An answer is rounded off.
(▼) An answer is rounded down.
A 0 2 3 4 F
Decimal point
(A) accoutant,Fixed (0,2,3,4),(F)floating

E6
[0]~ [9] [00] :Numeral keys
[.] :Decimal point key
[+] :Add key
[-] :Subtract key
[×] :Multiplication key
[÷] :Division key
[=] :Equal key
[%±] :Percent key
[MS] :Memory subtotal recall key
[MT] :Memory total clear key
[M+] :Memory plus key
[M-] :Memory minus key
[D/#] :Date/Number key print key
[ ] :Paper feed key
[ /S] :Subtotal key
[C/CE] :Clear last calculation/Clear last entry
[ ] :Back space key
[ ] :Inverts sign of the displayed number at
Key entry
[TAX+] or [TAX-] :TAX+ Calculates the amount, using the
stored rate, and adds it to the original
price before tax
TAX- Calculates the amount of tax
to be deducted (using the stored tax
displayed value to find the pre-tax
sales amount
Prints TAX / Included TAX
(TAX=3)
A TAX+ = A(3/100)
= A+(A(3/100))
Prints TAX / excluded TAX
(TAX=3)
A TAX- = A - A (1+3/100)
= A / (1+3/100)
[∆%] :Prints difference (Computes the %
of change between two values)
A ∆% B = B - A
= (B - A) / A
A ∆% B +/- = - (B + A)
= - (B + A) / A
[*/T] : Total key
[COST] [MARGIN] [SELL] :Used for calculating the cost,

E7
[GT]
[SET]
[AM/PM]
[12/24]
[FORMAT]
selling price and profit margin
amount. Enter the value of any 2
items to obtain the balance value
item. (e.g. enter the value of the
cost and the selling price to obtain
the profit margin.)
:In Grand total mode, adds the
total register to the GT register by
The (*/T) key
:Used to set the date and time in
calendar & clock mode
:Used to switch between AM or PM
at clock mode time setting
:Used to switch between 12 or 24
hour at clock mode time setting
:Used to select date format
between “YYYY/MM/DD”,
“DD/MM/YYYY” or “MM/DD/YYYY” at
calendar mode
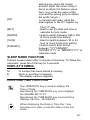
SLEEP MODE FUNCTION
Product powers down after 5 minutes of inactivity. To Wake the
calculator, press the C/CE key for 5 seconds
DISPLAY SYMBOL
M
: A number has been stored in memory
E : Error or overflow of capacity
–
: The display value is negative
DATE AND TIME FUNCTION
The TIME/DATE key is used to display the
Time or Date.
Depressing the TIME/DATE key once displays
the dateMM-DD-YYYY.
Depressing the TIME/DATE key a second time
displays the time , HH-MM-SS.
When displaying the Date or Time the = key
becomes a to enter or exit the date or time set
mode.

E8
TIME
TIME TIME
When displaying the Time the ÷ key becomes
a key to toggle between the 12(AM/PM) or 24
hour clock mode.
When displaying the Time in the set mode the
× key becomes a key to toggle between AM
and PM when in the 12 hour time mode.
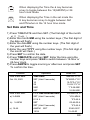
Set Date and Time
1)
Press TIME/DATE and then SET. (The first digit of the month
will flash.)
2)
Enter the month MM using the number keys. (The first digit of
the date will flash.)
3)
Enter the date DD using the number keys. (The first digit of
the year will flash.)
4)
Enter the year YYYY using the number keys. (The first digit of
the month will flash.)
5)
Press SET to confirm the date.
6)
Press TIME/DATE and then SET. Enter the time using the
number keys and press 12/24 to switch between 12-hour or
24-hour clock.
7)
Press AM/PM to toggle morning or afternoon and press SET
To confirm the time.
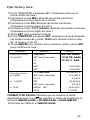
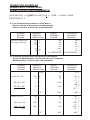
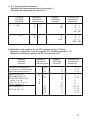
Problem
Operation
Read-Out
How to set date:
TIME/DATE
MM-DD-YYYY
Oct. 29, 2001 SET (Hold 3 seconds)
“M”M-DD-YYYY
10
10-“D”D-YYYY
29 10-29-“2”YYY
2001
“1”0-29-2001
SET
10-29-2001
How to set time:
C/CE
TIME
/
DATE
TIME
/
DATE
HH-MM-SS A
a) 3:45AM
SET (Hold 3 seconds)
“H”H-MM A
0 3 4 5
“0”3-45 A
b) 3:45PM SET 03-45-00 A
SET (Hold 3 seconds) “0”3-45 A
c) 15:45 AM/PM SET 03-45-00 P
12/24
15-45-00

E9
RESET
DATE FORMAT: While displaying the date, depressing the %±
key allows changingthe date format mode from MM-DD-YYYY to
DD-MM-YYYY or YYYY-MM-DD. The default date format is
MM-DD-YYYY.
REPLACING THE BACK-UP BATTERY:
1)
Using a screwdriver remove the three screws on the back cover
of the calculator.
2)
To separate the front and back cover halves, carefully insert and
twist a flat-blade screwdriver between them.
3)
Use a flat-blade screwdriver to gently pry out the battery.
4)
Position the new battery so the positive (+) side is up. Slide one
edge of the battery under the tab on the battery holder,
then press the battery into place.
5)
Snap the cover halves back together. Then reinsert and tighten
the screws.
NOTE: Memory backup battery retains the tax rate, calendar and
clock setting,
when the power is off or even when the AC cord is
disconnected.
Battery: 1 Lithium battery (Type: CR 2032)
Battery life: Backup time 1000 hours
RESET:
Electromagnetic interference or electrostatic discharge may cause
the display to malfunction or the contents of the memory to be
lost or altered. Should this occur, use the tip of a ball point pen
(or similar sharp object) to press the [RESET] button on the bottom
of the calculator. After resetting, be sure to set the tax rate, time
and date again.
CAUTION:
Risk of Explosion if Battery is replaced by an Incorrect Type.
Dispose of Used Batteries According to the Instructions.

F1
PRÉFACE
Nous vous félicitons d'avoir choisi une calculatrice
électronique Victor. Son design soigné, ses matériaux de
qualité, sa fabrication minutieuse ainsi que des installations
de recherche et de production de pointe ont contribué à la
conception d'une calculatrice qui, avec les soins appropriés,
vous procurera des années de service sans problèmes. Afin
de vous garantir un rendement futur optimal, informez-vous
auprès de votre représentant Victor relativement à la
protection, à faible coût, offerte par le Programme de
protection de garantie prolongée.
Ce guide d'utilisation décrit les caractéristiques et les
fonctions du Victor 1225-3A. Cette calculatrice comprend
les fonctions suivantes : les quatre opérations de calcul
arithmétique fondamentales, le total général, somme
automatique, le pourcentage, la différence de pourcentage
entre deux valeurs, le symbole de différence, le compte
d'articles, les fonctions d'additions non datées, le taux
d'imposition programmable, le rappel arrière et quatre
touches de fonctions de mémoire.

F2
TABLE DES MATIÈRES
Fonctionnement et entretien général
Remplacement du rouleau encreur
Chargement du papier
Symboles d'affichage
Schéma du clavier
Disposition du clavier
Interrupteur à glissière
Description des touches
Exemples d'opérations
Réglage de la date et de l'heure
Garantie
Garantie prolongée
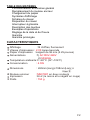
CARACTERISTIQUES
Affichage :12 chiffres, fluorescent
Vitesse d’impression : 2.03 lignes/seconde
Papier d’impression :Largeur de 58 mm.(2.25 pouces)
Alimentations
:1) AC100V-240V
2) 50/60Hz
Température ambiante:0°~40°C (32°~104°F)
Consommation : 4.5W
Dimensions : 260mm(Long)×198mm(Larg.)×
65mm(H)
Rouleau encreur :MS37901 en deux couleurs
Impression :En 2 (le moins et le négatif en rouge)
Poids : 750 g

F3
PREPARATION
A.
Source d'alimentation
Cet appareil reçoit sa puissance de fonctionnement de
I’Alimentation CA.
Quand I'alimentation est dans la position ON
(MARCHE),en appuyant sur la touche [D/#],on n’ imprime
que les chifres affichés dans le panneau d’affichage avant.
B.
Chargement du papier
1)
Placez les porte-papier en position (Fig. I).
2)
Installez le rouleau de papier sur les porte-papier
3)
Introduisez l’extrémité du papier dans la fente de l’imprimante
(Fig. II).
4)
Appuyez sur la touche [ ] pour introduire une longueur de
papier suffisante.
Fig. I Fig. II
C.
Remplacement du Rouleau encreur
Si l’impression devient a peine visible, le rouleau encreur peut
avoir besoin d’être remplacé.
1)
Mettez l’alimentation a l’arrkt.
2)
Ouvrez le couvercle de l’imprimante (Fig. III).
3)
Retirez l’ancien rouleau encreur en le tirant vers le haut (Fig. IV).
4)
Introduisez le nouveau rouleau encreur MS37901 dans le
compartiment et enfoncez-le doucement jusqu’a ce qu’il se
mette en place d’un coup sec.

F4
Fig. III Fig. IV
ATTENTION: Arrktez l’alimentation avant de remplacer le
rouleau encreur.
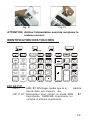
IDENTIFICATION DES TOUCHES
OFF NP P IP
(OFF) ARR
ÊT Affichage, tandis que la m
émoire
heure/date est conserv ée.
(NP P IP) Interrupteur pour choisir le mode ARR ÊT
lmprimante, MARCHE lmprimante ou
compte d'articles lmprimante.

F5
∑
GT TAX SET
(
∑
) La calculatrice djoute automatiquement le
résultat de la multiplication/dicision au registre
de total - aucun becun besoin d’appuyer chaque
fois sur la touche+.Obteenez le résultat de la
multiplication/division en appuyant sur la
Touche=.
(GT) Commutateur de mémoire a choisir pour le Total
Général.
(TAX SET) Choisit le mode établi pour le taux d’imposition.
▲ 5/4 ▼
(▲) Une réponse est arrondie au chiffre supérieur.
(5/4) Une réponse est arrondie au chiffre inférieur.
(▼) Une réponse est arrondie au chiffre inférieur.
A 0 2 3 4 F
[0]~[9][00]
:R églage des d écimales
(A) comptable, VIRGULE FIXE
(0,2,3,4),(F)Virgule flottante
:Touches num ériques
[.]
[+]
[-]
[×]
[÷]
[=]
[%±]
[MS]
[MT]
[M+]
[M-]
[D/#]
[ ]
[ ]
[C/CE]
[ ]
[ ]
:Touches virgule décimale
:Touches Ajouter
:Touches Soustraire
:Touches Multiplication
:Touches Division
:Touches Egalité
:Touches Pour cent
:Touches Rappel de mémoire de
sous-total
:Touches Effacement de mémoire de
total
:Touches de mémoire plus
:Touches de mémoire moins
:Touches d’impression Date/numéro
:Touches d’entraonement du papier
:Touches de Sous-total
:Effacement/Effacement entrére
:Touches de Rappel arrière
:Inverse le signe du nombre affiché a
l’entrée de touche

F6
[TAX+]OR[TAX-]
[COCT][SELL][MARGN]
[GT]
[*/T]
[ ]
:Calcule le montant de la taxe, en
utilisant le taux mémorisé et I’ajoute
au prix d’origine avant taxe
:TAX-Calcule le montant de la taxe a
dédiore (en utilisant le taux
d’imposition mémorisé) et le
soustrait de la valeur affichée pour
trouver le montant des ventes avant
taxe
:Imprime TAX / TAX lncluse(TAX=3)
A TAX+ = (3/100)
= A+ (A(3/100))
:Imprime TAX / TAX lncluse(TAX=3)
A TAX- = A- A(1+3/100)
=A/ (1+3/100)
Utilisé pour calculer le montant
du coûts, vendant et de la marge
bénéficiaire. Entrez la valeur de 2
éléments,n’importe lesquels,
pour trouver I’élément
d’équilibrage(parexemple,entrez
la valeur du coût et vendant pour
obtenir la marge bénéficiaire.)
:En mode de Total général, ajoute
le registre de total au registre GT
par la touche(*/T)
:Touche de Total
:Imprime la différence (Calcule le
% de changement entre deux
valeurs)
A ∆%B =B - A
=(B- A)/A
A ∆%B +/- =-(B+A)
=-(B+A)/A
FONCTION DE MODE SOMMEIL
Le produit s'éteint après 5 minutes d'inactivité. Pour réveiller la
calculatrice, appuyez sur la touche C / CE pendant 5 secondes

F7
SYMBOOLES D’AFFICHAGE
M : Un nombre a été mémorisé dans la mémoire
E : Erreur ou dépassement de capacité
–
: La valeur d’affivhage est négative
FONCTIONS DATE et HEURE
La touche TIME/DATE est utilisée pour afficher
I’Heure ou la date. En appuyant sur la touche
TIME/DATE,on affiche la date MM-JJ-AAAA. En
appuyant sur la touche TIME/DATE une deuxième
fois, on affiche I’heure, HH-MM-SS.
Quand on affiche la Date ou I’Heure, la touche=
devient une touche permettant d’introduire ou de
quitter le mode de réglage de la date ou de I’heure.
Quand on affiche I’Heure, la touche÷devient une
touche permenttant de basculer entre le mode
d'horloge de 12heures
(AM/PM)[MATIN/APRÉS-MIDI]ou de 24 heures
Quand on affiche I’Heure dans le mode
“set”(réglage), la touche × devient une touche
permettant de basculer entre AM (MATIN)et
PM(APRÈS-MID) dans le mode de I’heure.
Réglage de la Date et de l’Heure
1)
Appuyer sur TIME/DATE et ensuite sur SET. (Le premier chiffre
du mois clignotera.)
2)
Entrer le mois MM en utilisant les touches numériques. (Le
premier chiffre de la date clignotera.)
3)
Entrer la date JJ en utilisant les touches numériques.
(Le premier chiffre de l’année clignotera.)
4)
Entrer l’année AAAA en utilisant les touches
numériques. (Le premier chiffre du mois clignotera.)
5)
Appuyer sur SET pour confirmer la date.
6)
Appuyer sur TIME/DATE et ensuite sur SET. Entrer l’heure en
utilisant les touches numériques et appuyer sur 12/24 pour
commuter entre l’horloge de 12 heures et celle de 24 heures.

F8
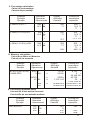
How to set date:
Oct. 29, 2001
How to set time:
MM-DD-YYYY
“M”M
-DD-YYYY
10-“D”D-YYYY
10-29-“2”YYY
Problem
Operation
Read-Out
TIME
TIME TIME
7)
Appuyer AM/PM pour basculer sur le matin ou l’après-midi et
appuyer sur SET pour confirmer l’heure.
Problème
Opération
Sortie
Comment régler
La date:
Oct.29,2001
TIME/DATE
SET (Hold 3 seconds)
10
MM
-
JJ
-
AAAA
"
M
"
M
-
JJ
-
AAAA
10
-"
J
"
J
-
AAAA
29
10
-
29
-"
2
"
AAA
2001
“1”0-29-2001
SET
10-29-2001
Comment régler
I’heure:
a)
3:45AM
b)
3:45PM
c) 15:45
C/CE
TIME
/
DATE
TIME
/
DATE
HH-MM-SS A
SET (Hold 3 seconds)
“H”H-MM A
0 3 4 5
“0”3-45 A
SET
03-45-00 A
SET (Hold 3 seconds) “0”3-45 A
AM/PM SET 03-45-00 P
12/24
15-45-00
FORMAT DE LA DATE:
Tout en affichant la date, en appuyant sur la
touche
%±
, on permet de faire passer le mode de format de date de
MM-JJ-AAAA
à
JJ-MM-AAAA
ou à
AAAA-MM-JJ
.Le format implicite est
MM-JJ-AAAA
.
REMPLACEMENT DE LA PILE:
1)
Enlevez les 3 vis au dos de la calculatrice à l’aide d’un tournevis à pjointe
Phillips.
2)
Pour séparer le devant du dos, insérez avec soin la lame plate d’un
tournevis entre les deux sections et tournez-la.
3)
Utilisez un tournevis à lame plate pour soulever la pile.
4)
Placez la nouvelle pile, côté positif (+) exposé. Glissez un bord de la pile
sous la patte du support puis poussez la pile en place.
5)
Enclenchez les deux sections du boîtier ensemble et remettez les vis.
NOTE
:
Pile de secours permettant de garder en mémoire, le tarif de TVA,
les réglages du calendrier et de l’heure, lorsque l’appareil est éteint ou
même lorsque le cordon secteur est débranché.
Pile: 1 pile lithuim (Type: CR 2032)
Durée de la pile: Heure de souper 1000

F9
RESTAURATION
:
Des parasites électromagnétiques ou une décharge électromagnétique
peuvent causer un mauvais fonctionnement de l’affichage ou la perte ou la
modification du contenu de la mémoire. Si cela se produit, utilisez le bout
d’un stylo à bille (ou d’un objet pointu semblable) pour appuyer sur le bouton
[RESET] à l’arrière de la calculatrice. Après la restauration, assurez-vous
de régler à nouveau le taux d’imposition, l’heure et la date.
ATTENTION:
Risque d'explosion si la pile est remplacée par un type
incorrect.
Éliminer les piles usagées conformément aux
instructions.
RESET

PREFACIO
Felicitaciones, en su eleccioñ de una calculadora electronica
Victor. Con diseño cuidadoso, partes de calidad, habilidad
esmerada, con investigación avanzada y facilidad de
producciones te da una calculadora que con cuidado
apropriado, proporcionará anos de servicio sin ningun
problema. Y para asegurar el desempeño óptimo futuro,
preguntele a su representante de Victor acerca de protección
de bajo costo ofrecida por el programa prolongado de la
protección de garantia de Victor.
Este manual operador describe las caracteristicas y
operacion de la Victor 1225-3A. Esta calculadora tambien
caracteriza las cuatro operaciones básicas de arithmetrica,
suma total,sigma, porcentaje, cambio de porcentaje, cambio
del signo, cuenta de articulos, funciones de suma de no
fecha, imposición programmable, tecla para retroceder para
atras, costo, venta, margen y cuatro teclas de funciones de
memoria. La Victor 1225-3A tambien tiene caracteristicas de
calendario y reloj.
S1
La page charge ...
La page charge ...
La page charge ...
La page charge ...
La page charge ...
La page charge ...
La page charge ...
La page charge ...
La page charge ...
La page charge ...
La page charge ...
La page charge ...
La page charge ...
La page charge ...
La page charge ...
La page charge ...
La page charge ...
La page charge ...
-
 1
1
-
 2
2
-
 3
3
-
 4
4
-
 5
5
-
 6
6
-
 7
7
-
 8
8
-
 9
9
-
 10
10
-
 11
11
-
 12
12
-
 13
13
-
 14
14
-
 15
15
-
 16
16
-
 17
17
-
 18
18
-
 19
19
-
 20
20
-
 21
21
-
 22
22
-
 23
23
-
 24
24
-
 25
25
-
 26
26
-
 27
27
-
 28
28
-
 29
29
-
 30
30
-
 31
31
-
 32
32
-
 33
33
-
 34
34
-
 35
35
-
 36
36
-
 37
37
-
 38
38


Victor 1225-3A Le manuel du propriétaire
- Catégorie
- Calculatrices
- Taper
- Le manuel du propriétaire
- Ce manuel convient également à
dans d''autres langues
- English: Victor 1225-3A Owner's manual
- español: Victor 1225-3A El manual del propietario
Documents connexes
-
Victor 1220-4 Le manuel du propriétaire
-
-
-
-
-
-
-
Victor 1240-3A Manuel utilisateur
-