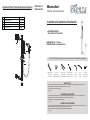
Brienza BRN-MCHS-BN Guide d'installation
- Taper
- Guide d'installation

BRN-MCHS-CP
BRN-MCHS-BN
Moncalieri
Slide Bar with Hand Shower
Installation/Installation/Instalación
CUSTOMER SERVICE
TOLL-FREE 1-877-482-5422
Tools You Will Need / Outils dont vous aurez besoin / Herramientas necesarias
Replacement Parts / Pièces de rechange / Repuestos
SAFETY TIPS
• If you use soldering for the installation of the faucet, the seats, cartridges and washers will have to be removed
before using flame. Otherwise, warranty will be void on those parts.
• Cover your drain to avoid losing parts.
• 0℃~55℃.
CONSIGNES DE SÉCURITÉ
• Si vous posez le robinet par brasage, il est essentiel de retirer les sièges, les cartouches et les rondelles avant
d’appliquer la flamme, faute de quoi la garantie sur ces pièces sera annulée.
• Couvrez le drain pour ne pas perdre des pièces.
• 0℃~55℃.
CONSEJOS DE SEGURIDAD
• En el caso de utilizar soldadura para instalar el grifo, remueva los asientos, cartuchos y arandelas antes de usar la
llama. De lo contrario, se anulará la garantía para esos componentes.
• Tape la boca del desagüe para prevenir la pérdida de piezas pequeñas.
• 0℃~55℃.
Adjustable Wrench
Clé à molette
Llave ajustable
Phillips Screwdriver
Tournevis cruciforme
Destornillador cruciforme
Groove join pliers
Pince multiprise
Pinzas ajustables
Pipe Tape
Ruban pour tuyau
Cinta selladora para rosca
Pencil
Crayon
Lápiz
Drill
Perceuse
Taladro
Hex Wrench
Clé hexagonale
Llave hexagonal
NO. Description Part NO.
1 Mounting Hardware
5Y0110000PL0
2
Hand Shower 5F0005300
3
Hand Shower Hose 51014603
4
Slide Bar Set Screw & Allen Key 9Q243400NT
2
3
4
1
BRN-MCHS-CP - Chrome
BRN-MCHS-BN - Brushed Nickel

Installation/Installation/Instalación
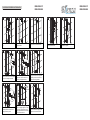
Temporarily place slide bar on the
mounting brackets to check alignment.
If necessary, loosen the screws and
realign the mounting brackets.
Place the mounting brackets over the
wall anchors. Secure them to the
wall using the supplied screws.
Drive the wall anchors into the drilled
holes with a Phillips screwdriver.
Place sliding bar assembly on the
mounting bracket and then fix the
sliding bar with top cover.
Apply teflon tape to supply nipple.
Thread on supply nipple to 1/2" NPT
water supply. Apply teflon tape to
supply nipple and thread on bushing
with 12mm allen wrench.
9
Push on hand shower supply outlet
nipple and secure with set screw.
8
4 5 6
Drill 1/4" holes in marked locations.
Align brackets and mark drill holes in
desired location.
Determine the location of the sliding
bar.
1 2 3
7
Teflon Tape
12mm
Allen
Wrench
Connect Shower Hose. Installation complete.
1110
BRN-MCHS-CP
BRN-MCHS-BN
BRN-MCHS-CP
BRN-MCHS-BN
-
 1
1
-
 2
2


Brienza BRN-MCHS-BN Guide d'installation
- Taper
- Guide d'installation
dans d''autres langues
Autres documents
-
Broan BPDP136SS Mode d'emploi
-
Sanyo SAP-CR186GH5N Installation Instructions Manual
-
KitchenAid KGCP484KSS Manuel utilisateur
-
American Standard 1662.551.295 Guide d'installation
-
-
Fontaine BRN-MBDVV-ORB Guide d'installation
-
-
-
Lifetime 60011 Le manuel du propriétaire