Kichler Lighting 44078BK Manuel utilisateur
- Taper
- Manuel utilisateur

Date Issued: 09/27/17 IS-44078-CB
We’re here to help 866-558-5706
Hrs: M-F 9am to 5pm EST
CAUTION – RISK OF SHOCK –
Disconnect Power at the main circuit breaker panel or main
fusebox before starting and during the installation.
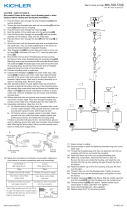
1) Passxturewirefromthecoupling[1]ontopofxturethrough
endofstem[2].Threadendofstemontoxturebody.NOTE:
Threadlockingcompoundmustbeappliedtoallstemthreads
asnotedwitharrowsymboltopreventaccidentalrotationof
xtureduringcleaning,relamping,etc.
2) Passxturewirethroughdesiredstemsandscrewstems
together
3) Threadonesmallthreadedpipeintoendofloop[3].
4) Passxturewirethroughloop.Threadloopontoendoflast
stem.
5) Takeathreadedpipe[4]frompartsbagandscrewinscrew
collarloop[5]aminimumof6mm(1/4”).Lockintoplacewith
hexnut[6].
6) Runanotherhexnutdownthreadedpipealmosttouching
rsthexnut.Nowscrewthreadedpipeintomountingstrap[7].
Mountingstrapmustbepositionedwithextrudedthreadfaced
intooutletbox[8].Threadedpipemustprotrudeoutthebackof
mountingstrap.Screwthirdhexnutontoendofthreadedpipe
protrudingfrombackofmountingstrap.
7) Connectmountingstraptooutletbox.
8) Unscrewthethreadedringfromscrewcollarloop.Takecano-
py[9]andpassoverscrewcollarloop.Approximatelyonehalf
ofthescrewcollarloopexteriorthreadsshouldbeexposed.
Adjustscrewcollarloopbyturningassemblyupordownin
mountingstrap.Removecanopy.
9) Afterdesiredpositionisfound,tightenbothtopandbottom
hexnutsupagainstthebottomandtopofthemountingstrap.
10)Slipcanopyoverscrewcollarloopandthreadonthreaded
ring.Attachchainlink[10](withxtureconnected)tobottomof
screwcollarloop.Unscrewthreadedring[11],letcanopyand
threadedringslipdown.(Closechainlinkendstogetherusing
chainpliersorpaddedplierstopreventdamagetonish.)
11)Weaveelectricalwireandgroundwirethroughchainlinksno
morethan3inchesapart.Passwirethroughthreadedring,
canopy,screwcollarloop,threadedpipeandintooutletbox.
12)Groundinginstructions:(SeeIllus.AorB).
A) Onxtureswheremountingstrapisprovidedwitha
holeandtworaiseddimples.Wrapgroundwirefrom
outletboxaroundgreengroundscrew,andthreadinto
hole.
B) Onxtureswhereacuppedwasherisprovided.Attach
groundwirefromoutletboxundercuppedwasherand
greengroundscrew,andthreadintomountingstrap.
Ifxtureisprovidedwithgroundwire.Connectxtureground
wiretooutletboxgroundwirewithwireconnectorafterfollow-
ingtheabovesteps.Neverconnectgroundwiretoblackor
whitepowersupplywires.
GREEN GROUND
SCREW
CUPPED
WASHER
OUTLET BOX
GROUND
FIXTURE
GROUND
DIMPLES
WIRE CONNECTOR
OUTLET BOX
GROUND
GREEN GROUND
SCREW
FIXTURE
GROUND
A
B
13)Makewireconnections.Referencechartbelowforcorrectcon-
nectionsandwireaccordingly.
14)Raisecanopytoceiling.
15)Securecanopyinplacebytighteningthreadedringontoscrew
collarloop.
16)Insertrecommendedbulbs.(Insertbulbsintouppersockets
rst).
Connect Black or
Red Supply Wire to:
Connect
White Supply Wire to:
Black White
*Parallel cord (round & smooth)
*Parallel cord (square & ridged)
Clear, Brown, Gold or Black
without tracer
Clear, Brown, Gold or Black
with tracer
Insulated wire (other than green)
with copper conductor
Insulated wire (other than green)
with silver conductor
*Note: When parallel wires (SPT I & SPT II)
are used. The neutral wire is square shaped
or ridged and the other wire will be round in
shape or smooth (see illus.)
Neutral Wire
1
2
7
6
11
5
►
10
4
8
3
9
►
►
►
►

Date Issued: 09/27/17 IS-44078-CB
INSTRUCTIONS
For Assembling and Installing Fixtures in Canada
Pour L’assemblage et L’installation Au Canada
Nous sommes là pour vous aider 866-558-5706
Heures : du lundi au vendredi, de 9h à 17h (heure de l’Est)
ATTENTION – RISQUE DE DÉCHARGES ÉLECTRIQUES -
Couper le courant au niveau du panneau du disjoncteur du
circuit principal ou de la boîte à fusibles principale avant de
procéder à l’installation.
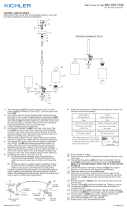
1) Passer le l de xation de l’accouplement sur le dessus de
l’appareil par l’extrémité de la tige[1][2]. Enler l’extrémité de
la tige sur le corps de l’appareil.
REMARQUE: le composé de verrouillage de letage doit être
appliqué à tous les ls de la tige comme indiqué avec un sym-
bole éché pour empêcher la rotation accidentelle du luminaire
pendant le nettoyage, la relamping, etc.
2) Passer le l de xation à travers les tiges souhaitées et les
tiges de vis ensemble.
3) Visser le petit tube leté dans l’extrémité de la boucle[3].
4) Passer le l de xation par la boucle. Enler la boucle sur
l’extrémité de la dernière tige.
5) Prendre leté raccord[4] du sac de pièces et des vis dans la
boucle de col vissé[5] un minimum de 6 mm (1/4 po). Fixer
avec l’écrou hexagonal[6].
6) Couler un autre écrou hexagonal raccord leté touchant
presque le premier écrou hexagonal. Maintenant visser tuyau
leté sur une courroie de xation[7]. Sangle de xation doit
être positionné avec l extrudé rencontré en boîte de sortie[8].
Raccord leté doit dépasser de l’arrière de la sangle de xa-
tion. Troisième écrou hexagonal sur l’extrémité du raccord à vis
qui dépassent de l’arrière de la sangle de xation à vis.
7) Fixez la bride de montage à la boîte de sortie.
8) Dévisser la bague letée du collier à vis. Passer le cache sur
le collier à vis[9]. La moitié du letage extérieur du collier à vis
doit être visible. Ajuster le collier à vis en tournant l’ensemble
vers le haut ou le bas dans la bride de montage. Enlever le
cache.
9) Une fois bien positionné, serrer les écrous hexagonaux en
haut et en bas contre le dessous et le dessus de la bride de
montage.
10) Passer le cache sur le collier à vis et visser la bague letée.
Fixer la chaîne[11] (avec le luminaire connecté) sur la partie
inférieure du collier à vis. Dévisser la bague letée[9], laisser le
cache et la bague letée glisser vers le bas.
(Cierre los extre-
mos de los eslabones de cadena, usando pinza para cadena o
pinza acolchada para evitar daño al acabado.)
11) Tissent le l électrique et l de terre par l’intermédiaire de
chaîne relie. Passer le l à travers la bague letée, verrière,
boucle de col vissé, tige letée et dans la boîte de sortie.
12) Connecter les ls. Se porter au tableau ci-dessous pour faire
les connexions.
13) Placer le cache au plafond.
14) Fixer le cache en serrant la bague letée sur le collier-écrou.
15) Insérez des ampoules recommandées. (Insert bulbs into upper
sockets rst).
Connecter le fil noir ou
rouge de la boite
Connecter le fil blanc de la boîte
A Noir A Blanc
*Au cordon parallèle (rond et lisse)
*Au cordon parallele (à angles droits el strié)
Au bransparent, doré, marron, ou
noir sans fil distinctif
Au transparent, doré, marron, ou
noir avec un til distinctif
Fil isolé (sauf fil vert) avec
conducteur en cuivre
Fil isolé (sauf fil vert) avec
conducteur en argent
*Remarque: Avec emploi d’un fil paralléle
(SPT I et SPT II). Le fil neutre est á angles
droits ou strié et l’autre fil doit étre rond ou
lisse (Voir le schéma).
Fil Neutre
1
2
7
6
11
5
►
10
4
8
3
9
►
►
►
►
-
 1
1
-
 2
2
Kichler Lighting 44078BK Manuel utilisateur
- Taper
- Manuel utilisateur
dans d''autres langues
- English: Kichler Lighting 44078BK User manual
Documents connexes
-
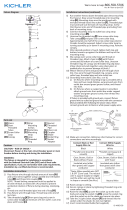 Kichler Lighting 44303WZC Manuel utilisateur
-
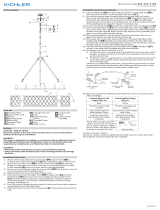 Kichler Lighting 52078PAL Manuel utilisateur
-
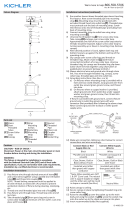 Kichler Lighting 44302WZC Manuel utilisateur
-
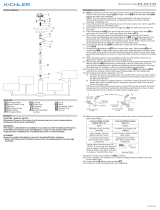 Kichler Lighting 52052CG Manuel utilisateur
-
Kichler Lighting 44073DBK Manuel utilisateur
-
 Kichler Lighting 44031NI Manuel utilisateur
-
 Kichler Lighting 44030NI Manuel utilisateur
-
 Kichler Lighting 44029NI Manuel utilisateur


