

en-us
2
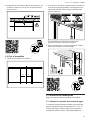
Table of contents
1 IMPORTANT SAFETY INSTRUCTIONS.................... 3
1.1 Safety definitions....................................................... 3
1.2 General information................................................... 3
1.3 Safe Installation ........................................................ 3
1.4 Electrical safety......................................................... 3
1.5 State of California Proposition 65 Warnings .............. 4
2 Before you begin....................................................... 5
2.1 Inspect the Dishwasher............................................. 5
2.2 Parts Included........................................................... 5
2.3 Tools and Parts Needed ........................................... 5
2.4 Pre-install Checklist................................................... 6
2.5 Electrical Requirements ............................................ 6
2.6 Cabinet Requirements .............................................. 6
3 Installation Preparation ............................................ 7
4 Installation Procedure .............................................. 7
4.1 Attach Water Inlet Hose ............................................ 7
4.2 Attach Drain Hose..................................................... 8
4.3 Pre-level the Dishwasher .......................................... 8
4.4 Attach Power Cord.................................................... 9
4.5 Mounting Brackets .................................................... 9
4.6 Install Dishwasher in Cabinet Space ....................... 10
4.7 Level the Dishwasher.............................................. 11
4.8 Secure the Dishwasher........................................... 11
5 Dishwasher Connection ......................................... 12
5.1 Installing the Water Inlet Connection....................... 12
5.2 Installing the Drain Connection ............................... 13
5.3 Electrical Connection and Test Cycle...................... 13
5.4 Attach the Toe Panel............................................... 14
6 Customer Service ................................................... 14
6.1 Model number (E-Nr.) and production number
(FD) ........................................................................ 14

en-us
3
Read all instructions carefully before use. These
precautions will reduce the risk of electrical shock, fire and
injury to persons. When using kitchen appliances, basic
safety precautions must be followed including those in the
following pages.
1.1 Safety definitions
Here you can find explanations of the safety signal words
used in this manual.
WARNING
This indicates that death or serious injuries may occur as
a result of non-observance of this warning.
CAUTION
This indicates that minor or moderate injuries may occur
as a result of non-observance of this warning.
NOTICE:
This indicates that damage to the appliance or property
may occur as a result of non-compliance with this
advisory.
Note:This alerts you to important information and/or tips.
1.2 General information
To reduce the risk of fire, electrical shock, or serious
injury, observe the following.
¡Read and understand all instructions before using the
appliance.
¡Keep the provided documents in a safe place for future
reference or for the next owner.
¡Do not connect the appliance if it has been damaged in
transit.
¡Severe product damage and/or injury could result from
the use of unqualified service technicians or non-
original parts. All repairs must be performed by an
authorized service provider using only original
equipment factory replacement parts.
¡NSF/ANSI 184 Certified residential dishwashers are not
intended for licensed food establishments.
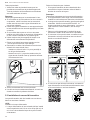
1.3 Safe Installation
Follow these safety instructions when installing the
appliance.
¡These instructions are intended for use by qualified
installers only. The dishwasher must be installed by a
qualified technician or installer.
¡The dishwasher drain hose must be installed with a
portion of it at least 33″ (84 cm) off the floor; otherwise
the dishwasher may not drain properly.
¡This dishwasher is not for outdoor use. It is intended for
indoor residential use only, and should not be used in
commercial food service establishments.
¡This dishwasher is designed to be enclosed on the top
and both sides by cabinetry.
¡NEW INSTALLATION - If the dishwasher is a new
installation, ensure all connections are properly made
before the dishwasher is moved into place.
¡REPLACEMENT - If the dishwasher is replacing
another dishwasher, check the existing dishwasher
connections for compatibility with the new dishwasher,
and replace parts as necessary.
¡This appliance has been found to be in compliance with
CAN/CSA-C22.2 No. 167/UL 749. It is the responsibility
of the owner and the installer to determine if additional
requirements and standards apply in specific
installations.
WARNING
Under certain conditions, hydrogen gas may be produced
in a hot water system that has not been used for two
weeks or more. Hydrogen gas is explosive.
▶Before using a dishwasher that is connected to a hot
water system that has been unused for two weeks or
longer, turn on all hot water faucets and let the water
flow from each for several minutes. This will release
any accumulated hydrogen gas. As the gas is
explosive, do not smoke or use an open flame during
this time.
1.4 Electrical safety
Follow these safety instructions to avoid electrical shock.
¡The dishwasher must be properly grounded before
operating. This appliance must be connected to a
grounded metal permanent wiring system or an
equipment grounding conductor must be run with the
circuit conductors and connected to the equipment
grounding terminal or lead on the dishwasher.
¡DO NOT use an extension cord
¡DO NOT reuse an old power cord; only use the cord
provided.
¡Make sure that the dishwasher is connected to a
suitable ground in compliance with all local codes or, in
the absence of a local code, with the NATIONAL
IMPORTANT SAFETY INSTRUCTIONS
READ AND SAVE THESE INSTRUCTIONS

en-us
4
ELECTRICAL CODE in the United States or the
CANADIAN ELECTRIC CODE C22.1-latest edition in
Canada as well as any provincial/state or municipal or
local codes that apply
¡Installations requiring hard wiring and terminal block -
The accessory terminal block/junction box model,
SMZPCJB1UC, designed for permanent wire
connection, is not included but can be ordered through
Customer Service by calling 1-800-944-2904. Follow
the instructions included with the kit.
WARNING
Avoid Electrical Shock
▶Do not work on an energized circuit. Doing so could
result in serious injury or death. Only qualified
electricians should perform electrical work. Do not
attempt any work on the dishwasher electric supply
circuit until you are certain the circuit is de-energized.
▶To avoid possible injury or property damage, care
should be exercised when the dishwasher is installed or
removed to reduce the likelihood of damage to the
power cord.
WARNING
Avoid Fire Hazard
▶Make sure electrical work is properly installed and
checked by qualified electricians.
▶Make sure there are no loose electrical connections.
Make sure all electrical connections are properly made.
Loose and improperly installed electrical connections
can result in overheating!
Wall outlet connections
▶Only use the provided power cord for wall socket
connections.
▶DO NOT attach an extension cord or any type of
modified cord or adapter with this appliance.
▶DO NOT cut or splice the power cord.
▶DO NOT alter the power cord in any way.
Permanent wire connections (in addition to the warnings
above)
▶Only use the junction box power cord, sold as
Accessory kit #SMZPCJB1UC.
▶Carefully review the terminal block installation
instructions.
▶DO NOT remove, alter or bypass the terminal block.
1.5 State of California Proposition 65
Warnings
This product may contain a chemical known to the State
of California, which can cause cancer or reproductive
harm. Therefore, the packaging of your product may bear
the following label as required by California:
IMPORTANT SAFETY INSTRUCTIONS
READ AND SAVE THESE INSTRUCTIONS

Before you begin en-us
5
Before you begin
2 Before you begin
Before you begin
Read these instructions before you begin to install your
appliance.
2.1 Inspect the Dishwasher
After unpacking the dishwasher and prior to installation,
thoroughly inspect the dishwasher for possible freight or
cosmetic damage. Report any damage immediately.
Cosmetic defects must be reported within 30 days of
installation. NOTE: Do not discard any bags or items that
come with the original package until after the entire
installation has been completed.
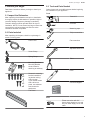
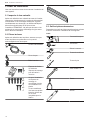
2.2 Parts Included
After unpacking all the parts, check for any damage in
transit or missing parts.
Power Cord
Screw Clamp
Spring Clamp
Mounting Brackets
Mounting Bracket
wood screws for
attaching to cabinetry
3/4”
3/4”
Screws for mounting
bracket installation,
leg leveler locking,
and toe panel
If your model comes
with a white toe
panel, use stainless
steel screws for
attachment
Toe Panel
2.3 Tools and Parts Needed
Gather these tools and additional parts before beginning
the installation of your appliance.
Tools
Power drill
Hole saw
Measuring tape
Phillips screwdriver
Flat screwdriver
Adjustable wrench x2
Pliers
Level
Coarse sandpaper
Parts
Elbow connection with 3/4"
female hose threads on one end
fits your water supply line on the
other.

en-us Before you begin
6
Water inlet hose - minimum 3/8"
outer diameter copper tubing or
metal braided dishwasher supply
line.
* Both the elbow and the water
inlet hose can be found in the
dishwasher supply kit
SMZSH1ABUC.
Shut-off valve and fittings
appropriate for hot water supply
line.
2.4 Pre-install Checklist
Ensure that the following requirements are met when
planning the installation of your appliance.
WARNING
Avoid Scalding or Electric Shock Hazard
▶Make sure the water supply and electrical supply are
shut off before installation or service.
▶Do not allow the electrical and supply lines to touch.
¡Select a location as close to the sink as possible for
easy access to water supply and drain lines.
¡Be sure the unit is installed close enough to the sink so
the drain hose length does not exceed 92" (2337 mm)
and so that a portion of the drain hose is raised at least
33" above the floor level.
¡Ensure that the enclosure is square and the opening is
at least 34" ( 863.3 mm) high and 24" (609.6 mm) wide.
¡Check that the opening in the cabinet is large enough
for routing the electric cable, water line, and drain hose,
and if not, create a new opening. See
¡If the opening is wood, be sure it is sanded smooth. If it
is metal, be sure it is covered by a protective gasket.
¡Be sure that your water heater set at 120° F (49° C)
and the water pressure measures at 15-145 psi (1-10
bar)
¡Determine the mounting method based on the
dishwasher model and counter-top type. See
→
"Mounting Brackets", Page9
.
¡Only use the included hardware for the installation. If
you are replacing a dishwasher, dispose of old hose
and other equipment properly.
¡To avoid scratching the floor, have floor protection
ready for when the dishwasher will be slid into the
cabinet.
2.5 Electrical Requirements
Ensure that the following electrical requirements are met.
Dishwasher electrical rating
Volts 120
Hertz 60
Amperes 12
Watts 1,440 (max)
Electrical Supply
The customer has the responsibility of ensuring that the
dishwasher electrical installation is in compliance with all
national and local electrical codes and ordinances. The
dishwasher is designed for an electrical supply of 120V,
60 Hz, AC, connected to a dishwasher-dedicated, properly
grounded electrical circuit with a fuse or breaker rated 15
or 20 amps.
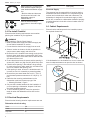
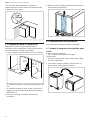
2.6 Cabinet Requirements
Ensure that the cabinet space for the installation meets
the required dimensions.
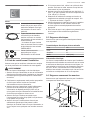
If the dishwasher is to be installed in a corner, ensure that
there is adequate clearance to open the door as shown.

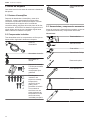
Installation Preparation en-us
7
Installation Preparation
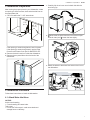
3 Installation Preparation
Installation Preparation
After locating the proper place for your dishwasher, create
an opening to allow for water, drain and electrical lines on
the appropriate side.
1. Cut a hole within the 7 x 2.5" area shown.
7"
(17.8 cm)
2 ½"
(6.3 cm)
ø 2 ½"
(6.3 cm)
or
If the opening is made through wood, sand it smooth.
If the opening is made through metal, use the Edge
Protector with Power Cord clips Kit SMZEPCC1UC.
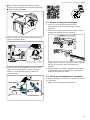
2. Remove the drain hose from inside the dishwasher.
3. Remove the toe panel fleece from the back of the
dishwasher.
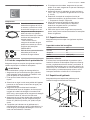
Installation Procedure
4 Installation Procedure
Installation Procedure
Follow these instructions to install the dishwasher.
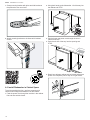
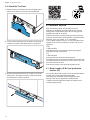
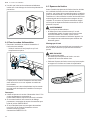
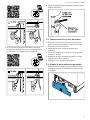
4.1 Attach Water Inlet Hose
NOTICE:
Avoid cross-threading
▶Cross-threading will cause leaks.
Teflon tape
▶Do not use Teflon tape; it could cause leaks and
damage floors or cabinetry.
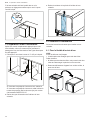
1. Carefully flip the unit over onto its back side with the
door facing up.
2. Remove the toe panel from the front of the unit (set
aside for later) and loosen the feet slightly.
3. Attach the elbow to the water inlet valve on the front of
the dishwasher.

en-us Installation Procedure
8
4. Attach the hot water line to the elbow. Use two
wrenches to tighten, using one to stabilize and avoid
putting stress on the water inlet valve.
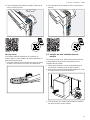
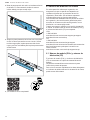
4.2 Attach Drain Hose
1. Flip unit back upright, making sure the waterline is not
pinched.
2. Facing the back of the unit, orient the drain hose toward
direction of sink.
IMPORTANT: Route hose toward sink PRIOR TO
connection. Do not turn after attachment.
3. Attach drain hose elbow to back of unit using pliers to
install the spring clamp
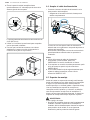
4.3 Pre-level the Dishwasher
Set the dishwasher to the correct height before it goes into
the cabinet.
1. Measure the height of the cabinet opening.
2. Raise the front of the dishwasher to approximately 1/2"
lower than the height of the opening by turning all three
feet.
The maximum height the unit can be raised to is 34.5"
(867.3 mm)
3. Use a level on the top front to see that the feet are
even.
4. Once the unit is at a satisfactory height, insert a leg
leveler locking screw in back foot.

Installation Procedure en-us
9
4.4 Attach Power Cord
▶Plug the end of the supply cord into the back of the
dishwasher.
‒Be sure to push it all the way in until fully seated.
The outlet for the power supply cord should be located
in a cabinet or wall adjacent to the dishwasher cabinet.
Do not plug dishwasher into the wall outlet until all the
steps of the installation are complete.
Notes
¡Only use the included power cord. If cord is missing
order kit SMZPC002UC through Customer Service.
¡If you require a permanent wiring connection, order kit
junction box accessory kit SMZPCJB1UC.
¡If local electrical codes require clips to secure the power
cord wire to the dishwasher, use accessory kit
SMZEPCC1UC.
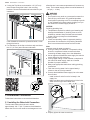
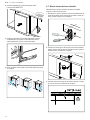
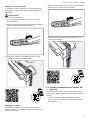
4.5 Mounting Brackets
Before installing the supplied mounting brackets, decide
which method of securing the dishwasher into its
enclosure will be used, top (wood or porous material) or
side (stone or solid surface). Once the mounting brackets
are installed on the dishwasher, removing them is difficult
and will damage the mounting brackets and the
dishwasher. If you have a Fully Integrated Panel, do not
attach mounting brackets until after attaching the panel to
the door.
WARNING
Avoid tip over hazard
▶Do not use the dishwasher until it is completely
installed. When opening the door on an uninstalled
dishwasher, carefully open the door while supporting
the rear of the unit. Failure to follow this warning can
result in serious injury.
Top Mount
Top Mount is used for counter tops made of wood or other
materials that can be easily drilled.
CAUTION
Avoid sharp edges
▶Do not break the mounting brackets; causes sharp
edges.
1. Grasp mounting bracket with pliers and fold bracket at
the perforation over onto itself.
2. Attach mounting brackets to the frame with included
3/4" (19mm) screws.
Side Mount
Side Mount is used for counter tops made of marble,
granite, or other solid surface material that cannot be
easily drilled.

en-us Installation Procedure
10
1. Grasp mounting bracket with pliers and fold bracket at
the perforation over onto itself.
2. Attach mounting brackets to the frame with included
screws.
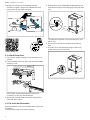
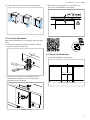
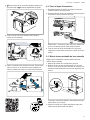
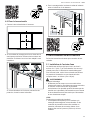
4.6 Install Dishwasher in Cabinet Space
To avoid scratching the floor, use floor protection and
caution when sliding the dishwasher into the cabinet.
1. Feed the power cord through the low hole in the cabinet
first and then add the hoses.
2. Using both hands, push dishwasher 1/3 of the way into
the cabinet and STOP.
3. Pull the hoses and power cord through the hole in
cabinet as shown.
4. Push the unit 2/3 of the way into the opening and
STOP.
5. Reach into adjacent cabinet and pull hoses and excess
power cord completely out so they do not get kinked.

Installation Procedure en-us
11
6. Finally, push the unit in until flush with cabinet door.
4.7 Level the Dishwasher
Now that the dishwasher is in the cabinet, check the levels
again.
1. Level side to side by turning feet clockwise to raise or
counter-clockwise to lower front.
2. Use a level to check that your dishwasher is level.
Check that the countertop is level and adjust the
dishwasher to the countertop.
3. Make sure the top of the door is no less than 1/4"
(6mm) from the underside of the counter.
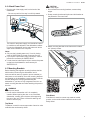
4.8 Secure the Dishwasher
1. Center the dishwasher in the opening.
x x
=

en-us Dishwasher Connection
12
2. If using the Top Mount, and screw the 1/2" (12.7mm)
wood screws through the holes in the mounting
brackets. Choose the bracket hole best suited for your
installation.
If the dishwasher came with a protective barrier, screw
through the barrier.
3. For Side Mount, lift the flap on the deco strip and insert
the 1/2" (12.7mm) wood screws underneath.
Dishwasher Connection
5 Dishwasher Connection
Dishwasher Connection
Follow these instructions to connect the dishwasher.
5.1 Installing the Water Inlet Connection
The hot water heater should be set to deliver
approximately 120° F (49° C) water to the dishwasher.
Water that is too hot can cause some detergents to lose
effectiveness. Lower water temperatures will increase run
times. The hot water supply pressure must be between 15
- 145 psi (1 - 10 bar).
WARNING
Scalding Hazard
▶Do not perform any work on a pressured hot water line.
Serious injury could result. Only qualified plumbers
should perform plumbing work. Do not attempt any work
on the dishwasher hot water supply plumbing until you
are certain the hot water supply is shut off.
NOTICE:
Soldering plumbing lines
▶Temperatures required for soldering and sweating will
damage the dishwasher. If plumbing lines are to be
soldered or sweated, keep the heat source at least 6
inches (152.4 mm) away from the dishwasher.
Plumbing codes
▶Check local plumbing codes for approved plumbing
procedures and accessories. All plumbing should be
done in accordance with national and local codes.
Note
Important notes for water connection:
¡If using a solder joint instead of a compression fitting,
be sure to complete all solder connections before
connecting the water supply line to the dishwasher.
¡Use an approved dishwasher water supply line with the
correct fittings for this connection.
¡If using copper tubing or other material not depicted in
this manual for water supply, defer to a licensed
plumber for proper installation.
¡Always use appropriate seals when making plumbing
connections.
1. Flush the incoming water line for approximately 1
minute to clear any foreign material.
2. Connect the dishwasher water supply line to the water
shut off valve.
‒Install a shut off valve if one isn’t already in the
supply line.
‒Make sure there are no sharp bends or kinks in the
water line that might restrict water flow.
3. Properly tighten all water connections.

Dishwasher Connection en-us
13
4. After all connections are made, turn on the hot water
and check for leaks.
5.2 Installing the Drain Connection
The drain hose must be installed with either a high loop or
an air gap.
NOTICE:
Proper drain hose installation
▶The dishwasher drain hose must be installed with a
portion of it at least 33” (84 cm) off the floor; otherwise
the dishwasher may not drain properly.
Remove garbage disposal plug
▶If the dishwasher drain hose will be connected to a
garbage disposal connection, first remove the plug from
the disposal connection.
Note
Important notes for drain connection:
¡If local ordinance require an air gap, install it according
to the manufacturer’s instructions.
¡The drain hose length can be extended if necessary.
Use kit #SGZ1010UC. The maximum length of the drain
hose, including the hose leading to the air gap, is 150″
(380 cm).
1. Place hose clamp around end of drain hose BEFORE
connecting to the plumbing.
2. If you have a garbage disposal, connect the drain hose
to the garbage disposal with either a high loop or an air
gap.
3. If you do not have a garbage disposal, connect the
drain hose to the drain connection with either a high
loop or an air gap.
4. Tighten the hose clamp around the house plumbing.
5.3 Electrical Connection and Test Cycle
1. For wall outlet connections, plug the dishwasher into the
outlet.
2. Turn on power supply.
3. Make sure the water supply is on.
4. Turn the dishwasher on and run a test cycle for 15
minutes.
5. Check to make sure the cycle operates and there are
no leaks while it is running.
6. Stop the cycle and turn off the dishwasher.

en-us Customer Service
14
5.4 Attach the Toe Panel
1. Remove the toe panel fleece from the packaging and
insert it at the base on the front of the dishwasher.
2. Tuck the top of the fleece into the base front opening. If
necessary, fold the lower edge under for a proper fit.
3. Attach the toe panel with the 3/4" screws so it is flush
with the floor. Use black screws for a black toe panel
and stainless for a white toe panel.
4. Your installation is complete!
Customer Service
6 Customer Service
Customer Service
With any warranty repair, we will make sure your
appliance is repaired by an authorized service provider
using genuine replacement parts. We use only genuine
replacement parts for all repairs.
Detailed information on the warranty period and terms of
warranty can be found in the Statement of Limited Product
Warranty, from your retailer, or on our website.
If you contact Customer Service, you will need the model
number (E-Nr.) and the production number (FD) of your
appliance.
USA:
1-800-944-2904
www.bosch-home.com/us/owner-support/get-support
www.bosch-home.com/us/shop
CA:
1-800-944-2904
www.bosch-home.ca/en/service/get-support
www.bosch-home.ca/en/service/cleaners-and-accessories
For assistance with connecting to HomeConnect, you can
also view instructions here:
www.home-connect.com/us/en/help-support/set-up
6.1 Model number (E-Nr.) and production
number (FD)
You can find the model number (E-Nr.) and the production
number (FD) on the appliance's rating plate.
The rating plate is located inside the appliance door.
Making a note of your appliance's details and the
Customer Service telephone number will enable you to
find them again quickly.

fr-ca
15
Table des matières
1 IMPORTANTES CONSIGNES DE SÉCURITÉ ........ 16
1.1 Définitions des termes de sécurité .......................... 16
1.2 Informations générales............................................ 16
1.3 Installation sûre....................................................... 16
1.4 Sécurité électrique .................................................. 17
1.5 Mises en garde conformément à la proposition 65
de l'État de Californie.............................................. 17
2 Avant de commencer.............................................. 18
2.1 Inspecter le lave-vaisselle ....................................... 18
2.2 Pièces incluses ....................................................... 18
2.3 Outils et pièces nécessaires.................................... 18
2.4 Liste de contrôle avant l’installation......................... 19
2.5 Exigences électriques ............................................. 19
2.6 Exigences concernant les armoires......................... 19
3 Préparation avant l’installation .............................. 20
4 Procédure d’installation ......................................... 20
4.1 Fixer le flexible d’arrivée d’eau................................ 20
4.2 Fixer le tuyau d’évacuation...................................... 21
4.3 Mise à niveau préalable du lave-vaisselle ............... 21
4.4 Fixer le cordon d’alimentation ................................. 22
4.5 Équerres de fixation ................................................ 22
4.6 Installer un lave-vaisselle dans un meuble .............. 23
4.7 Mise à niveau du lave-vaisselle............................... 24
4.8 Fixer le lave-vaisselle.............................................. 25
5 Raccordement du lave-vaisselle............................ 25
5.1 Installation de l’arrivée d’eau................................... 25
5.2 Installation du raccord d’évacuation ........................ 26
5.3 Connexion électrique et cycle d’essai ..................... 27
5.4 Fixer la plinthe......................................................... 27
6 Service à la clientèle............................................... 28
6.1 Numéro de modèle (E-Nr.) et numéro de
fabrication (FD) ....................................................... 28

fr-ca
16
Lisez toutes les instructions attentivement avant
l’utilisation. Ces précautions réduiront le risque
d’électrocution, d’incendie et de blessure pour les
personnes utilisant l’appareil. Lorsque vous utilisez des
appareils électroménagers, il importe de suivre les
précautions de sécurité de base, y compris celles
indiquées dans les pages suivantes.
1.1 Définitions des termes de sécurité
Vous trouverez ici des explications sur les mots de
signalisation de sécurité utilisés dans ce manuel.
AVERTISSEMENT
Signale un risque de mort ou de blessure grave si
l’avertissement n’est pas respecté.
MISE EN GARDE
Signale un risque de blessures mineures ou modérées si
l’avertissement n’est pas respecté.
AVIS :
Ceci indique que la non-conformité à cet avis de sécurité
peut entraîner des dégâts matériels ou endommager
l'appareil.
Remarque:Ceci vous signale des informations et/ou
indications importantes.
1.2 Informations générales
Pour réduire le risque d'incendie, de choc électrique, ou
de blessures graves, respectez les consignes suivantes.
¡Veuillez lire et comprendre toutes les notices avant
d’utiliser l’appareil.
¡Conservez tous les documents préparés pour
consultation ultérieure ou pour les remettre au
propriétaire suivant.
¡Ne branchez pas l’appareil si ce dernier a été
endommagé durant le transport.
¡Des dommages et / ou blessures graves au produit
peuvent résulter de l'utilisation de techniciens de
service non qualifiés ou de pièces non originales. Tous
les travaux de réparation doivent être effectués par un
technicien d’entretien qualifié utilisant uniquement des
pièces de rechange d’origine.
¡Les lave-vaisselle domestiques certifiés NSF/ANSI184
ne sont pas destinés aux établissements de services
alimentaires agréés.
1.3 Installation sûre
Suivez les consignes de sécurité suivantes lors de
l’installation de l’appareil.
¡Ces instructions d’installation sont destinées à des
installateurs qualifiés uniquement. Le lave-vaisselle doit
être installé par un technicien ou un installateur qualifié.
¡Le tuyau d’évacuation du lave-vaisselle doit être installé
avec une partie de celui-ci à au moins 33po (84cm) du
sol, sinon le lave-vaisselle risque de ne pas s’écouler
correctement.
¡Ce lave-vaisselle ne doit pas être utilisé à l’extérieur. Il
est destiné à un usage résidentiel intérieur uniquement
et ne doit pas être utilisé dans les établissements de
restauration commerciale.
¡Ce lave-vaisselle est conçu pour être entouré
d’armoires sur le dessus et les deux côtés.
¡NOUVELLE INSTALLATION - Si le lave-vaisselle est
une nouvelle installation, assurez-vous que tous les
raccordements sont correctement effectués avant de
mettre le lave-vaisselle en place.
¡REMPLACEMENT - Si le lave-vaisselle remplace un
autre lave-vaisselle, assurez-vous que les
raccordements du lave-vaisselle existant sont
compatibles avec le nouveau lave-vaisselle et
remplacez les pièces si nécessaire.
¡Cet appareil a été jugé conforme à la norme CAN/CSA-
C22.2 n°167/UL749. Il est de la responsabilité du
propriétaire et de l’installateur de déterminer si des
exigences et des normes supplémentaires s’appliquent
à des installations spécifiques.
AVERTISSEMENT
Sous certaines conditions, de l'hydrogène gazeux peut se
créer dans un système d'eau chaude inutilisé pendant
deux semaines ou plus. L'hydrogène gazeux est de
nature explosive.
▶Avant d'utiliser un lave-vaisselle connecté à un système
d'eau chaude inutilisé pendant deux semaines ou plus,
ouvrir tous les robinets d'eau chaude et laisser l'eau
s'écouler pendant plusieurs minutes. Ceci libérera toute
accumulation d’hydrogène gazeux. Compte tenu de la
nature explosive du gaz, éviter de fumer ou d'utiliser
des flammes nues à ce moment.
IMPORTANTES CONSIGNES DE SÉCURITÉ
LIRE ET CONSERVER CES INSTRUCTIONS

fr-ca
17
1.4 Sécurité électrique
Suivez les consignes de sécurité suivantes pour éviter
tout choc électrique.
¡Le lave-vaisselle doit être correctement mis à la terre
avant de fonctionner. Cet équipement doit être branché
à un système de câblage permanent en métal et mis à
la terre, ou un conducteur de mise à la terre
d’équipement doit être intégré aux conducteurs
d’alimentation et connecté au terminal de mise à la
masse de l’équipement ou à la broche de raccordement
du lave-vaisselle.
¡N’utilisez PAS de rallonge
¡Ne réutilisez PAS un vieux cordon d’alimentation;
utilisez uniquement le cordon fourni.
¡Assurez-vous que le lave-vaisselle est correctement
relié à la terre conformément à tous les codes
municipaux ou, en l’absence de code municipal, au
NATIONAL ELECTRICAL CODE aux États-Unis ou au
CODE CANADIEN DE L’ÉLECTRICITÉ C22.1
(dernière édition) au Canada, ainsi qu’à tous les codes
provinciaux/étatiques ou municipaux applicables
¡Installations nécessitant un câblage réel et un bornier -
Le modèle accessoire de bornier/boîte de jonction,
SMZPCJB1UC, conçu pour un branchement
permanent des fils, peut être commandé auprès du
service à la clientèle au 1-800-944-2904. Suivez les
instructions fournies avec la trousse.
AVERTISSEMENT
Éviter les chocs électriques
▶Ne travaillez pas sur un circuit sous tension. Cela
pourrait entraîner des blessures graves ou la mort.
Seuls des électriciens qualifiés doivent effectuer des
travaux électriques. Ne tentez pas de travailler sur le
circuit d’alimentation électrique du lave-vaisselle avant
d’être certain que le circuit est hors tension.
▶Pour éviter toute blessure ou tout dommage matériel,
faites attention lors de l’installation ou du retrait du lave-
vaisselle afin de réduire la probabilité d’endommager le
cordon d’alimentation.
AVERTISSEMENT
Éviter les risques d’incendie
▶Assurez-vous que les travaux électriques sont
correctement effectués et contrôlés par des électriciens
qualifiés.
▶Assurez-vous qu’il n’y a pas de connexions électriques
lâches. Assurez-vous que toutes les connexions
électriques sont correctement effectuées. Des
connexions électriques lâches et mal installées peuvent
entraîner une surchauffe!
Prises murales
▶Utilisez uniquement le câble d’alimentation fourni pour
brancher l’appareil dans une prise murale.
▶N’attachez PAS de rallonge, un autre type de câble
modifié ou un adaptateur avec cet appareil.
▶ÉVITEZ de fendre ou de trancher le câble
d’alimentation.
▶ÉVITEZ de modifier le câble d’alimentation d’une façon
quelconque.
Connexions permanentes de fils (en plus des
avertissements ci-dessus)
▶Utilisez uniquement le cordon d’alimentation de la boîte
de jonction, vendu comme la trousse d’accessoires
#SMZPCJB1UC.
▶Lisez attentivement les instructions d’installation du
bornier.
▶Ne retirez, ne modifiez et ne contournez PAS le
bornier.
1.5 Mises en garde conformément à la
proposition 65 de l'État de Californie
Ce produit pourrait contenir un produit chimique reconnu
par l'État de la Californie comme cancérigène ou ayant
des effets nocifs sur la reproduction. Par conséquent,
vous pourriez devoir apposer l'étiquette suivante sur
l'emballage du produit comme requis par la Californie:
IMPORTANTES CONSIGNES DE SÉCURITÉ
LIRE ET CONSERVER CES INSTRUCTIONS

fr-ca Avant de commencer
18
Avant de commencer
2 Avant de commencer
Avant de commencer
Lisez ces instructions avant de commencer l’installation de
votre appareil.
2.1 Inspecter le lave-vaisselle
Après avoir déballé le lave-vaisselle et avant de l’installer,
inspectez-le minutieusement à la recherche d’éventuelles
marchandises ou de dommages esthétiques. Signalez
immédiatement tout dommage. Les défauts esthétiques
doivent être signalés dans les 30 jours suivant
l’installation. REMARQUE : Ne jetez pas les sacs ou les
articles qui se trouvent dans l’emballage d’origine avant
d’avoir terminé l’installation.
2.2 Pièces incluses
Après avoir déballé toutes les pièces, assurez-vous que
toutes les pièces sont présentes et n’ont pas été
endommagées durant le transport.
Cordon d’alimentation
Pince à capot
Bride à tension
Équerres de fixation
Vis à bois de
l’équerre de montage
pour la fixation à
l’armoire
3/4”
3/4”
Vis pour l’installation
de l’équerre de
montage, le
verrouillage du patin
de nivellement et la
plinthe
Si votre modèle est
livré avec une plinthe
blanche, utilisez des
vis en acier
inoxydable pour la
fixation
Plinthe
2.3 Outils et pièces nécessaires
Rassemblez les outils et pièces supplémentaires suivants
avant de commencer l’installation de votre appareil.
Outils
Perceuse électrique
Scie-cloche
Ruban à mesurer
Tournevis cruciforme
Tournevis plat
Clé à molette x2
Pinces
Niveau

Avant de commencer fr-ca
19
Papier abrasif
Pièces
Le raccord coudé avec filetage
femelle 3/4po pour tuyau à une
extrémité s’adapte à votre ligne
d’alimentation en eau à l’autre
extrémité.
Tuyau d’arrivée d’eau - tube en
cuivre de 3/8po de diamètre
extérieur minimum ou conduite
d’alimentation du lave-vaisselle à
tresse métallique.
* Le coude et le tuyau d’arrivée
d’eau se trouvent dans la trousse
de fournitures du lave-vaisselle
SMZSH1ABUC.
Vanne d’arrêt et raccords
appropriés pour la ligne
d’alimentation en eau chaude.
2.4 Liste de contrôle avant l’installation
Assurez-vous que les conditions suivantes sont remplies
lors de la planification de l’installation de votre appareil.
AVERTISSEMENT
Éviter les risques d’échaudage ou de choc électrique
▶Assurez-vous que l’alimentation en eau et l’alimentation
électrique sont fermées avant l’installation ou l’entretien.
▶Ne laissez pas les lignes électriques et d’alimentation
se toucher.
¡Choisissez un emplacement aussi proche que possible
de l’évier pour faciliter l’accès aux conduites
d’alimentation en eau et d’évacuation.
¡Assurez-vous que l’appareil est installé suffisamment
près de l’évier de sorte que la longueur du tuyau
d’évacuation ne dépasse pas 92po (2337mm) et
qu’une partie du tuyau d’évacuation soit surélevée d’au
moins 33po par rapport au niveau du sol.
¡Assurez-vous que l’enceinte est carrée et que
l’ouverture est d’au moins 34po (863,3mm) de haut et
24po (609,6mm) de large.
¡Assurez-vous que l’ouverture dans l’armoire est
suffisamment grande pour faire passer le câble
électrique, la conduite d’eau et le tuyau d’évacuation, et
si ce n’est pas le cas, pratiquez une nouvelle ouverture.
Voir
¡Si l’ouverture est en bois, veillez à ce qu’elle soit bien
poncée. Si elle est en métal, assurez-vous qu’elle est
recouverte d’un joint de protection.
¡Assurez-vous que votre chauffe-eau est réglé à 49°C
(120°F) et que la pression de l’eau est comprise entre
15 et 145psi (1 à 10bars)
¡Déterminez la méthode de montage en fonction du
modèle de lave-vaisselle et du type de comptoir. Voir
→
"Équerres de fixation", Page22
.
¡Utilisez uniquement le matériel fourni pour l’installation.
Si vous remplacez un lave-vaisselle, éliminez les
anciens tuyaux et autres équipements de manière
appropriée.
¡Pour éviter de rayer le sol, préparez une protection pour
le sol lorsque le lave-vaisselle sera glissé dans
l’armoire.
2.5 Exigences électriques
Assurez-vous que les exigences électriques suivantes
sont respectées.
Caractéristiques électriques du lave-vaisselle
Volts 120
Hertz 60
Ampères 12
Watts 1440 (max)
Alimentation électrique
Le client a la responsabilité de s’assurer que l’installation
électrique du lave-vaisselle est conforme à tous les codes
et ordonnances électriques nationaux et municipaux. Le
lave-vaisselle est conçu pour une alimentation électrique
de 120V, 60Hz, CA, branchée à un circuit électrique
dédié au lave-vaisselle, correctement mis à la terre, avec
un fusible ou un disjoncteur de 15 ou 20ampères.
2.6 Exigences concernant les armoires
Assurez-vous que l’espace de l’armoire pour l’installation
correspond aux dimensions requises.

fr-ca Préparation avant l’installation
20
Si le lave-vaisselle doit être installé dans un coin,
prévoyez un dégagement suffisant pour ouvrir la porte
comme indiqué.
Préparation avant l’installation
3 Préparation avant l’installation
Préparation avant l’installation
Après avoir trouvé l’emplacement approprié pour votre
lave-vaisselle, créez une ouverture pour permettre le
passage de l’eau, de l’évacuation et des lignes électriques
du côté approprié.
1. Découpez un trou dans la zone de 7 x 2,5po indiquée.
7"
(17.8 cm)
2 ½"
(6.3 cm)
ø 2 ½"
(6.3 cm)
or
Si l’ouverture est pratiquée à travers le bois, sablez-la.
Si l’ouverture est pratiquée à travers du métal, utilisez la
trousse de protection des bords avec clips pour cordon
d’alimentation SMZEPCC1UC.
2. Retirez le tuyau d’évacuation de l’intérieur du lave-
vaisselle.
3. Retirez le molleton de la plinthe à l’arrière du lave-
vaisselle.
Procédure d’installation
4 Procédure d’installation
Procédure d’installation
Suivez les instructions suivantes pour installer le lave-
vaisselle.
4.1 Fixer le flexible d’arrivée d’eau
AVIS :
Évitez de déformer les filetages
▶La déformation des filetages peut créer des fuites.
Ruban de téflon
▶N’utilisez pas de ruban de téflon; cela pourrait créer des
fuites et endommager le plancher ou les armoires.
1. Retournez délicatement l’appareil sur sa face arrière, la
porte vers le haut.
La page est en cours de chargement...
La page est en cours de chargement...
La page est en cours de chargement...
La page est en cours de chargement...
La page est en cours de chargement...
La page est en cours de chargement...
La page est en cours de chargement...
La page est en cours de chargement...
La page est en cours de chargement...
La page est en cours de chargement...
La page est en cours de chargement...
La page est en cours de chargement...
La page est en cours de chargement...
La page est en cours de chargement...
La page est en cours de chargement...
La page est en cours de chargement...
La page est en cours de chargement...
La page est en cours de chargement...
La page est en cours de chargement...
La page est en cours de chargement...
La page est en cours de chargement...
La page est en cours de chargement...
La page est en cours de chargement...
La page est en cours de chargement...
-
 1
1
-
 2
2
-
 3
3
-
 4
4
-
 5
5
-
 6
6
-
 7
7
-
 8
8
-
 9
9
-
 10
10
-
 11
11
-
 12
12
-
 13
13
-
 14
14
-
 15
15
-
 16
16
-
 17
17
-
 18
18
-
 19
19
-
 20
20
-
 21
21
-
 22
22
-
 23
23
-
 24
24
-
 25
25
-
 26
26
-
 27
27
-
 28
28
-
 29
29
-
 30
30
-
 31
31
-
 32
32
-
 33
33
-
 34
34
-
 35
35
-
 36
36
-
 37
37
-
 38
38
-
 39
39
-
 40
40
-
 41
41
-
 42
42
-
 43
43
-
 44
44


dans d''autres langues
- English: Bosch SHE4AEM6N User manual
- español: Bosch SHE4AEM6N Manual de usuario