LIVARNO 380183 Le manuel du propriétaire
- Catégorie
- Éclairage au plafond
- Taper
- Le manuel du propriétaire

LED-DECKENLEUCHTE
/LED CEILING LIGHT/
PLAFONNIER À LED
IAN 380183_2110
LED-DECKENLEUCHTE
Montage-, Bedienungs- und Sicherheitshinweise
LED CEILING LIGHT
Assembly, operating and safety instructions
LED-PLAFONDLAMP
Montage-, bedienings- en veiligheidsinstructies
STROPNÍ LED SVÍTIDLO
Pokyny k montáži, obsluze a bezpečnostní pokyny
LAMPA SUFITOWA LED
Wskazówki montażu, obsługi i bezpieczeństwa
LED LOFTSLAMPE
Monterings-, betjenings- og sikkerhedshenvisninger
LÁMPARA LED DE TECHO
Instrucciones de montaje, de uso y de seguridad
STROPNA LED-SVETILKA
Navodila za montažo, uporabo in varnostna navodila
LED MENNYEZETI LÁMPA
Szerelési, használati és biztonsági tudnivalók
LAMPADA LED DA SOFFITTO
Istruzioni di montaggio, d’uso e di sicurezza
PLAFONNIER À LED
Instructions de montage, d‘utilisation et consignes de sécurité
STROPNÉ LED SVIETIDLO
Pokyny pre montáž, obsluhu a bezpečnostné pokyny

Klappen Sie vor dem Lesen die beiden Seiten mit den Abbildungen aus und machen Sie sich anschließend mit allen
Funktionen des Gerätes vertraut.
Before reading, unfold both pages containing illustrations and familiarise yourself with all functions of the device.
Avant de lire le mode d‘emploi, ouvrez les deux pages contenant les illustrations et familiarisez-vous ensuite avec toutes
les fonctions de l‘appareil.
Vouw vóór het lezen de beide pagina‘s met de afbeeldingen open en maak u vertrouwd met alle functies van het
apparaat.
Przed przeczytaniem proszę rozłożyć obie strony z ilustracjami, a następnie proszę zapoznać się z wszystkimi funkcjami
urządzenia.
Před čtením si odklopte obě dvě strany s obrázky a potom se seznamte se všemi funkcemi přístroje.
Pred čítaním si odklopte obidve strany s obrázkami a potom sa oboznámte so všetkými funkciami prístroja.
Antes de empezar a leer abra las dos páginas que contienen las imágenes y, en seguida, familiarícese con todas las
funciones del dispositivo.
Før du læser, vend begge sidene med billeder frem og bliv bekendt med alle apparatets funktioner.
Prima di leggere aprire le due pagine con le immagini e prendere confidenza con le diverse funzioni dell’apparecchio.
Olvasás előtt kattintson az ábrákat tartalmazó mindkét oldalra és végezetül ismerje meg a készülék mindegyik funkcióját.
Pred branjem obe strani s slikami odprite navzven in se nato seznanite z vsemi funkcijami naprave.
DE/AT/CH Montage-, Bedienungs- und Sicherheitshinweise Seite 5
GB/IE Assembly, operating and safety instructions Page 13
FR/BE Instructions de montage, d‘utilisation et consignes de sécurité Page 21
NL/BE Montage-, bedienings- en veiligheidsinstructies Pagina 29
PL Wskazówki montażu, obsługi i bezpieczeństwa Strona 37
CZ Pokyny k montáži, obsluze a bezpečnostní pokyny Strana 45
SK Pokyny pre montáž, obsluhu a bezpečnostné pokyny Strana 53
ES Instrucciones de montaje, de uso y de seguridad Página 61
DK Monterings-, betjenings- og sikkerhedshenvisninger Side 69
IT Istruzioni di montaggio, d’uso e di sicurezza Pagina 77
HU Szerelési, használati és biztonsági tudnivalók Oldal 85
SI Navodila za montažo, uporabo in varnostna navodila Stran 95

14162305L
A B
C D
E F
G
H
1
2
3
4
5
6
7
8
9
1
2
3
10

14162402L
A B C
D E F
G H I
J K L
M
11
3
3
11
12
310
13
4
5
6
7
8
9
12
3
10
4

5 DE/AT/CH
Inhaltsverzeichnis
Legende der verwendeten Piktogramme ........................................................... Seite 6
Einleitung ......................................................................................................................................... Seite 7
Bestimmungsgemäße Verwendung ....................................................................................................Seite 7
Lieferumfang ........................................................................................................................................ Seite 7
Teilebeschreibung ...............................................................................................................................Seite 7
Technische Daten ................................................................................................................................Seite 7
Sicherheit ......................................................................................................................................... Seite 8
Sicherheitshinweise .............................................................................................................................Seite 8
Vorbereitung ................................................................................................................................Seite 9
Benötigtes Werkzeug und Material ...................................................................................................Seite 9
Leuchte montieren ...................................................................................................................Seite 9
Inbetriebnahme ......................................................................................................................... Seite 10
Wartung und Reinigung .....................................................................................................Seite 10
Entsorgung .....................................................................................................................................Seite 10
Informationen .............................................................................................................................Seite 11
Garantie ..............................................................................................................................................Seite 11
Konformitätserklärung .........................................................................................................................Seite 11
Hersteller / Service ..............................................................................................................................Seite 11
V2.0

6 DE/AT/CH
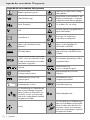
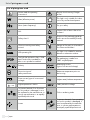
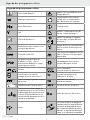
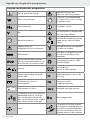
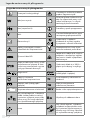
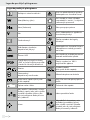
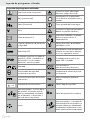
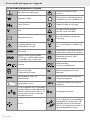
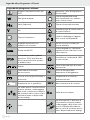
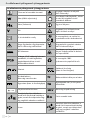
Legende der verwendeten Piktogramme
Legende der verwendeten Piktogramme
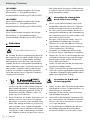
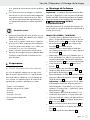
Bedienungsanleitung lesen! Warnung vor elektrischem Schlag!
Lebensgefahr!
Watt (Wirkleistung)
Diese Leuchte ist ausschließlich für den
Betrieb im Innenbereich, in trockenen
und geschlossenen Räumen geeignet.
Hertz (Frequenz) So verhalten Sie sich richtig
Volt Vorsicht! Verbrennungsgefahr durch
heiße Oberflächen!
Schutzklasse II
b
a
Entsorgen Sie Verpackung
und Gerät umweltgerecht!
Warn- und Sicherheitshinweise
beachten! Lebens- und Unfallgefahr für
Kleinkinder und Kinder
LED-Lebensdauer Diese Leuchte ist nicht geeignet für
externe Dimmer und elektronische
Schalter.
Die Leuchte besitzt den Schutzgrad
„IP20“ und ist ausschließlich für den
Einsatz im Innenbereich von privaten
Haushalten vorgesehen.
Die Verpackung besteht aus 100 %
recyceltem Papier.
+
-
SEC
L
N
Polarität Wechselspannung
(Strom- und Spannungsart)
Kurzschlussfester
Sicherheitstransformator tc Referenztemperatur-Punkt am
Gehäuse
d.c. DC Gleichspannung (Strom- und
Spannungsart) ta höchste Bemessungs- /
Umgebungstemperatur
Lichttemperatur in Kelvin SELV Schutzkleinspannung
Zur Vermeidung von Gefährdungen
darf eine beschädigte Lichtquelle
dieses Produkts ausschließlich vom
Hersteller, seinem Servicevertreter
oder einer vergleichbaren Fachkraft
ausgetauscht werden.
Ra Farbwiedergabeindex
Lumen
Zur Vermeidung von Gefährdungen
darf ein beschädigtes Betriebsgerät
dieses Produkts ausschließlich vom
Hersteller, seinem Servicevertreter
oder einer vergleichbaren Fachkraft
ausgetauscht werden.
Einleitung

7 DE/AT/CH
Legende der verwendeten Piktogramme Einleitung
LED-Deckenleuchte
Einleitung
Wir beglückwünschen Sie zum Kauf Ihres
neuen Gerätes. Sie haben sich damit für
ein hochwertiges Produkt entschieden.
Bitte lesen Sie diese Bedienungsanleitung vollständig
und sorgfältig durch. Klappen Sie die Seite mit den
Abbildungen aus. Diese Anleitung gehört zu diesem
Produkt und enthält wichtige Hinweise zur Inbetrieb-
nahme und Handhabung. Beachten Sie immer alle
Sicherheitshinweise. Prüfen Sie vor der Inbetriebnahme,
ob die korrekte Spannung vorhanden ist und ob alle
Teile richtig montiert sind. Sollten Sie Fragen haben
oder unsicher in Bezug auf die Handhabung des
Gerätes sein, setzen Sie sich bitte mit Ihrem Händler
oder der Servicestelle in Verbindung. Bewahren Sie
diese Anleitung bitte sorgfältig auf und geben Sie sie
ggf. an Dritte weiter.
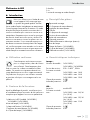
Bestimmungsgemäße
Verwendung
Diese Leuchte ist ausschließlich für den
Betrieb im Innenbereich, in trockenen und
geschlossenen Räumen geeignet. Die
Leuchte kann auf allen normal entflammbaren Ober-
flächen befestigt werden. Das Produkt ist nur für den
Einsatz in privaten Haushalten und nicht für den
kommerziellen Gebrauch vorgesehen. Dieses Produkt
ist vorgesehen für den normalen Betrieb und kann für
die Wand- oder Deckenmontage eingesetzt werden.
Lieferumfang
Kontrollieren Sie unmittelbar nach dem Auspacken
immer den Lieferumfang auf Vollständigkeit sowie
den einwandfreien Zustand des Gerätes.
1 LED-Deckenleuchte (Modell 14162305L /
14162402L / 14162508L)
4 Leuchtenarme (14162402L)
1 Befestigungsplatte (14162402L)
1 Anschlussgehäuse (14162402L)
8 Schrauben (Leuchtenarme) (14162402L)
2 Dübel
2 Schrauben
1 Montage- und Bedienungsanleitung
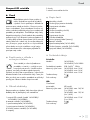
Teilebeschreibung
1 Montagewinkel
2 Schraube (Anschlussgehäuse)
3 Anschlussgehäuse
4 Dübel
5 Schraube (Montagewinkel)
6 Lüsterklemme
7 Anschlusskasten
8 Schutzschlauch
9 Netzanschlusskabel (extern)
10 Leuchtenarm
11 Befestigungsplatte (14162402L)
12 Schraube (Leuchtenarm) (14162402L)
13 Verbindungskabel (14162402L)
Technische Daten
Leuchte:
Modellnummer: 14162305L / 14162402L /
14162508L
Betriebsspannung: 230–240 V~, 50 Hz
Nennleistung max: 14162305L: max. 18 W
14162402L: max. 16 W
14162508L: max. 15 W
Schutzklasse: II /
Schutzart: IP20
LED:
Leuchtmittel: LED-Modul
Nennleistung max: 14162305L: max. 16,5 W
(3 x 5,5 W)
14162402L: max. 15,2 W
(4 x 3,8 W)
14162508L: max. 13 W
(2 x 6,5 W)
Schutzklasse: II /
Schutzart: IP20

8 DE/AT/CH
14162305L:
Dieses Produkt enthält Lichtquellen der Energie-
effizienzklasse „F“ (Energieeffizienzklasse
entsprechend der Verordnung (EU) 2019/2015).
14162402L:
Dieses Produkt enthält Lichtquellen der Energie-
effizienzklasse „F“ (Energieeffizienzklasse
entsprechend der Verordnung (EU) 2019/2015).
14162508L:
Dieses Produkt enthält Lichtquellen der Energie-
effizienzklasse „F“ (Energieeffizienzklasse
entsprechend der Verordnung (EU) 2019/2015).
Sicherheit
Sicherheitshinweise
Bei Schäden, die durch Nichtbeachtung dieser Be-
dienungsanleitung verursacht werden, erlischt der
Garantieanspruch! Für Folgeschäden wird keine
Haftung übernommen! Bei Sach- oder Personen-
schäden, die durch unsachgemäße Handhabung
oder Nichtbeachtung der Sicherheitshinweise verur-
sacht werden, wird keine Haftung übernommen!
Es dürfen ausschließlich mitgelieferte Einzelteile
verwendet werden, da sonst jegliche Gewährleis-
tungsanprüche erlöschen.
LEBENS-
UND UNFALLGEFAHR FÜR
KLEINKINDER UND KINDER!
Lassen Sie Kinder niemals unbeaufsichtigt mit
dem Verpackungsmaterial. Es besteht Erstickungs-
gefahr durch Verpackungsmaterial. Kinder un-
terschätzen häufig die Gefahren. Halten Sie
Kinder stets vom Produkt fern.
Dieses Gerät kann von Kindern ab 8 Jahren und
darüber sowie von Personen mit verringerten
physischen, sensorischen oder mentalen Fähig-
keiten oder Mangel an Erfahrung und Wissen
benutzt werden, wenn sie beaufsichtigt oder
bezüglich des sicheren Gebrauchs des Gerätes
unterwiesen wurden und die daraus resultieren-
den Gefahren verstehen. Kinder dürfen nicht mit
dem Gerät spielen. Reinigung und Benutzerwar-
tung dürfen nicht von Kindern ohne Beaufsichti-
gung durchgeführt werden.
Vermeiden Sie Lebensgefahr
durch elektrischen Schlag
Lassen Sie die Elektroinstallation durch einen
ausgebildeten Elektriker oder eine für Elektroins-
tallationen eingewiesene Person durchführen.
Bei Sach- oder Personenschäden, die durch un-
sachgemäße Handhabung oder Nichtbeachtung
der Sicherheitshinweise verursacht werden, wird
keine Haftung übernommen!
Benutzen Sie Ihre Leuchte niemals, wenn Sie
irgendwelche Beschädigungen feststellen.
Entfernen Sie vor der Montage die Sicherung
oder schalten Sie den Leitungsschutzschalter im
Sicherungskasten aus (0-Stellung).
Vermeiden Sie unbedingt die Berührung der
Leuchte mit Wasser oder anderen Flüssigkeiten.
Vergewissern Sie sich vor der Montage, dass die
vorhandene Netzspannung mit der benötigten
Betriebsspannung der Leuchte übereinstimmt
(siehe „Technische Daten“).
Stellen Sie sicher, dass bei der Montage keine
Leitungen beschädigt werden.
Öffnen Sie niemals eines der elektrischen Betri
ebs-
mittel oder stecken irgendwelche Gegenstände
in dieselben. Derartige Eingriffe bedeuten Lebens-
gefahr durch elektrischen Schlag.
Vermeiden Sie Brand- und
Verletzungsgefahr
Stellen Sie sicher, dass die Leuchte ausgeschaltet
und abgekühlt ist, bevor Sie diese berühren, um
Verbrennungen zu vermeiden.
Befestigen Sie die Leuchte nicht auf feuchtem
oder leitendem Untergrund.
Nicht direkt in die Lichtquelle (Leuchtmittel, LED
etc.) hineinschauen. Die Lichtquelle (Leuchtmittel,
LED etc.) nicht mit einem optischen Instrument
(z. B. Lupe) betrachten.
Zur Vermeidung von Gefährdungen darf eine
beschädigte äußere flexible Leitung dieser
Leuchte ausschließlich vom Hersteller, seinem
Einleitung / Sicherheit Sicherheit / Vorbereitung / Leuchte montieren

9 DE/AT/CH
Einleitung / Sicherheit
Servicevertreter oder einer vergleichbaren
Fachkraft ausgetauscht werden.
Zur Vermeidung von Gefährdungen darf eine
beschädigte Lichtquelle dieses Produkts aus-
schließlich vom Hersteller, seinem Servicever-
treter oder einer vergleichbaren Fachkraft
ausgetauscht werden.
So verhalten Sie sich richtig
Montieren Sie die Leuchte so, dass sie vor
Feuchtigkeit, Verschmutzung und zu starker
Erwärmung geschützt ist.
Seien Sie stets aufmerksam! Achten Sie immer
darauf was Sie tun und gehen Sie stets mit Ver-
nunft vor. Verwenden Sie die Leuchte in keinem
Fall, wenn Sie unkonzentriert sind oder sich un-
wohl fühlen.
Machen Sie sich vor der Verwendung mit allen
Anweisungen und Abbildungen in dieser Anlei-
tung sowie mit der Leuchte selbst vertraut.
Vorbereitung
Benötigtes Werkzeug
und Material
Die genannten Werkzeuge und Materialien sind nic
ht
im Lieferumfang enthalten. Es handelt sich hierbei
um unverbindliche Angaben und Werte zur Orien-
tierung. Die Beschaffenheit des Materials richtet sich
nach den individuellen Gegebenheiten vor Ort.
- Bleistift / Markierwerkzeug
- 2-poliger Spannungsprüfer
- Schraubendreher
- Bohrmaschine
- Bohrer (ca. ø 6 mm)
- Seitenschneider
- Leiter
Leuchte montieren
Wichtig: Der elektrische Anschluss muss durch
einen ausgebildeten Elektriker oder eine für Elektro-
installationen eingewiesene Person erfolgen. Diese
muss Kenntnis über die Eigenschaften der Leuchte
und Anschlussbestimmungen haben.
STROMSCHLAGGEFAHR!
Entfernen Sie die Sicherung oder schalten Sie den
Leitungsschutzschalter im Sicherungskasten aus
(0-Stellung), bevor Sie mit der Montage der Leuchte
beginnen.
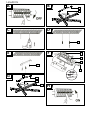
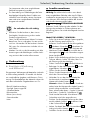
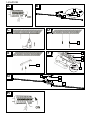
Modell 14162305L / 14162508L:
Prüfen Sie mit einem 2-poligem Spannungsprüfer,
ob die Zuleitung spannungsfrei ist.
Entfernen Sie die seitlich am Anschlussgehäuse
3 sichtbaren Schrauben 2 und nehmen Sie
den Montagewinkel 1 auf der Rückseite ab.
Markieren Sie die Bohrlöcher mit Hilfe der im
Montagewinkel 1 für die Schrauben vorgese-
henen Langlöcher.
Bohren Sie nun die Befestigungslöcher (ca. ø 6 mm
,
Tiefe ca. 40 mm). Stellen Sie sicher, dass Sie
die Zuleitung nicht beschädigen.
Führen Sie die Dübel 4 in die Bohrlöcher ein.
Befestigen Sie den Montagewinkel 1 mit den
mitgelieferten Schrauben 5.
Öffnen Sie den Anschlusskasten 7.
Führen Sie das Netzanschlusskabel (extern) 9
durch den Schutzschlauch 8.
Verbinden Sie nun das Anschlusskabel der
Leuchte mittels Lüsterklemme 6 mit dem
Netzanschlusskabel (extern) 9.
Hinweis: Achten Sie darauf, dass Sie die ein-
zelnen Leiter des Netzanschlusskabels (extern)
jeweils richtig anschließen: stromführender
Leiter, schwarz oder braun = Symbol L, Neutral-
leiter, blau = Symbol N, Schutzklasse II / .
Diese Leuchte besitzt die Schutzklasse 2. Der
Schutzleiter wird nicht angeschlossen.
Drücken Sie die doppelte Isolierung des Netz-
anschlusskabels (extern) 9 mindestens 8 mm
in den Schutzschlauch 8 hinein.
Achten Sie darauf, dass der Schutzschlauch 8
richtig im Anschlusskasten 7 sitzt.
Schließen Sie den Anschlusskasten 7.
Sicherheit / Vorbereitung / Leuchte montieren

10 DE/AT/CH
Entsorgung / Informationen
Verschrauben Sie nun die Leuchte mittels der
Schrauben 2 mit dem Montagewinkel 1.
Bringen Sie die Leuchtenarme 10 in die ge-
wünschte Position.
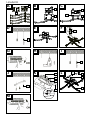
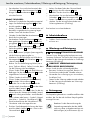
Modell 14162402L:
Entfernen Sie sämtliches Verpackungsmaterial.
Legen Sie die Befestigungsplatte 11 auf das
Anschlussgehäuse 3.
Achten Sie darauf, dass die Schraublöcher auf
den dafür vorgesehenen Aussparung liegen.
Achten Sie auf die korrekte Position.
Schieben Sie die Kabel der Leuchtenarme 10
durch die Aussparungen.
Verschrauben Sie die Leuchtenarme 10 mit den
dazu gehörigen Schrauben 12 mit der Befesti-
gungsplatte 11 und dem Anschlussgehäuse 3.
Verbinden Sie die Leuchtenarme 10 mit den
Verbindungskabeln 13 in dem Anschlussge-
häuse 3.
Prüfen Sie mit einem 2-poligem Spannungsprüfer,
ob die Zuleitung spannungsfrei ist.
Markieren Sie die Bohrlöcher mit Hilfe der im
Montagewinkel 1 für die Schrauben 5 vorge-
sehenen Langlöcher.
Bohren Sie nun die Befestigungslöcher (ca. ø
6 mm, Tiefe ca. 40 mm). Stellen Sie sicher, dass
Sie die Zuleitung nicht beschädigen.
Führen Sie die Dübel 4 in die Bohrlöcher ein.
Befestigen Sie den Montagewinkel 1 mit den
mitgelieferten Schrauben 5.
Öffnen Sie den Anschlusskasten 7.
Führen Sie das Netzanschlusskabel (extern)
9 durch den Schutzschlauch 8.
Verbinden Sie nun das Anschlusskabel der
Leuchte mittels Lüsterklemme 6 mit dem Netz-
anschlusskabel (extern) 9.
Hinweis: Achten Sie darauf, dass Sie die ein-
zelnen Leiter des Netzanschlusskabels (extern)
9 jeweils richtig anschließen: stromführender
Leiter, schwarz oder braun = Symbol L, Neutral-
leiter, blau = Symbol N, Schutzklasse II / .
Diese Leuchte besitzt die Schutzklasse 2. Der
Schutzleiter wird nicht angeschlossen.
Drücken SIe die doppelte Isolierung des Netz-
anschlusskabels (extern) 9 min. 8 mm in den
Schutzschlauch 8 hinein.
Achten Sie darauf, dass der Schutzschlauch
8 richtig im Anschlusskasten 7 sitzt.
Schließen Sie den Anschlusskasten 7.
Verschrauben Sie nun die Leuchte mittels der
Schrauben 2 mit dem Montagewinkel 1.
Setzen Sie die Sicherung wieder ein oder
schalten Sie den Leitungsschutzschalter am
Sicherungskasten ein (I-Stellung).
Ihre Leuchte ist nun betriebsbereit.
Inbetriebnahme
Schalten Sie die Leuchte über den Wandschalt
er
ein bzw. aus.
Wartung und Reinigung
STROMSCHLAGGEFAHR!
Trennen Sie zur Reinigung die Leuchte zuerst vom
Stromnetz. Entfernen Sie hierfür die Sicherung oder
schalten Sie den Leitungsschutzschalter im Sicherungs-
kasten aus (0-Stellung).
VORSICHT! VERBRENNUNGSGEFAHR
DURCH HEISSE OBERFLÄCHEN!
Lassen Sie die Leuchte vollständig abkühlen.
Benutzen Sie keine Lösungsmittel, Benzin o. Ä.
Die Leuchte würde hierbei Schaden nehmen.
Verwenden Sie zur Reinigung nur ein trockenes,
fusselfreies Tuch.
Setzen Sie die Sicherung wieder ein oder schalten
Sie den Leitungsschutzschalter am Sicherungs-
kasten ein (I-Stellung).
Entsorgung
Die Verpackung besteht aus umweltfreundlichen Ma-
terialien, die Sie über die örtlichen Recyclingstellen
entsorgen können.
b
a
Beachten Sie die Kennzeichnung der
Verpackungsmaterialien bei der Abfall-
trennung, diese sind gekennzeichnet mit
Abkürzungen (a) und Nummern (b) mit
Leuchte montieren / Inbetriebnahme / Wartung und Reinigung / Entsorgung

11 DE/AT/CH
Entsorgung / Informationen
folgender Bedeutung: 1–7: Kunststoffe /
20–22: Papier und Pappe / 80–98:
Verbundstoffe.
Das Produkt und die Verpackungsmateria-
lien sind recycelbar, entsorgen Sie diese
getrennt für eine bessere Abfallbehandlung.
Das Triman-Logo gilt nur für Frankreich.
Werfen Sie Ihr Produkt, wenn es ausge-
dient hat, im Interesse des Umweltschutzes
nicht in den Hausmüll, sondern führen
Sie es einer fachgerechten Entsorgung
zu. Über Sammelstellen und deren
Öffnungszeiten können Sie sich bei Ihrer
zuständigen Verwaltung informieren.
Informationen
Garantie
Sie erhalten zum Zeitpunkt des Kaufs auf dieses Gerät
36 Monate Garantie. Das Gerät wurde sorgfältig
produziert und einer genauen Qualitätskontrolle
unterzogen. Innerhalb der Garantiezeit beheben
wir kostenlos alle Material- oder Herstellerfehler.
Sollten sich dennoch während der Garantiezeit
Mängel herausstellen, senden Sie das Gerät bitte
an die aufgeführte Service-Adresse unter Angabe
folgender Modellnummer: 14162305L /
14162402L / 14162508L.
Von der Garantie ausgeschlossen sind Schäden
durch nicht sachgemäße Handhabung, Nichtbe-
achtung der Bedienungsanleitung oder Eingriff durch
nicht autorisierte Personen sowie Verschleißteile (wie
z. B. Leuchtmittel). Durch die Garantieleistung wird
die Garantiezeit weder verlängert noch erneuert.
Konformitätserklärung
Dieses Produkt erfüllt die Anforderungen der gelten
den
europäischen und nationalen Richtlinien. Die Konfor-
mität wurde nachgewiesen. Entsprechende Erklärun-
gen und Unterlagen sind beim Hersteller hinterlegt.
Hersteller / Service
Briloner Leuchten GmbH & Co. KG
Im Kissen 2
59929 Brilon
DEUTSCHLAND
Tel.: +49 29 61 / 97 12–800
Fax: +49 29 61 / 97 12–199
E-Mail: [email protected]
www.briloner.com
Kostenlose Servicenummer:
Tel.: 00800 / 27456637
IAN 380183_2110
Bitte halten Sie für alle Anfragen den Kassenbon
und die Artikelnummer (IAN 380183_2110) als
Nachweis für den Kauf bereit.
Leuchte montieren / Inbetriebnahme / Wartung und Reinigung / Entsorgung

12
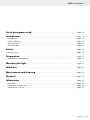
Table of contents

13 GB/IE
List of pictograms used ........................................................................................................Page 14
Introduction ................................................................................................................................... Page 15
Intended use ........................................................................................................................................ Page 15
Scope of delivery ................................................................................................................................Page 15
Parts description ..................................................................................................................................Page 15
Technical data ..................................................................................................................................... Page 15
Safety .................................................................................................................................................Page 16
Safety notices ......................................................................................................................................Page 16
Preparation ...................................................................................................................................Page 17
Required tools and material ...............................................................................................................Page 17
Mounting the light ...................................................................................................................Page 17
Initial use .........................................................................................................................................Page 18
Maintenance and cleaning ............................................................................................... Page 18
Disposal ............................................................................................................................................Page 18
Information....................................................................................................................................Page 18
Warranty .............................................................................................................................................Page 18
Declaration of conformity ...................................................................................................................Page 19
Manufacturer / Service .......................................................................................................................Page 19
Table of contents

14 GB/IE
Introduction List of pictograms used
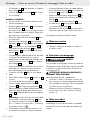
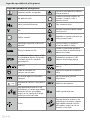
List of pictograms used
Please read the operating
instructions! Electric shock warning! Danger
to life!
Watt (effective power) This light is only suitable for indoor
use in dry and enclosed spaces.
Hertz (mains frequency) For your safety
Volt Caution! Risk of burns due to hot
surfaces!
Safety class II
b
a
Dispose of the packaging and de-
vice in an environmentally-friendly
manner!
Observe warnings and safety
notices! Danger to life and risk of accidents
for infants and children!
LED operating life This light is not suitable for external
dimmers or electronic switches.
The light has protection class “IP20”
and is exclusively intended for in-
door use in private households.
The packaging is made from
100% recycled paper.
+
-
SEC
L
N
Polarity Alternating current
(type of current and voltage)
Short-circuit proof
safety transformer tc Reference temperature point on
the housing
d.c. DC Direct current (type of current and
voltage) ta Highest rated / ambient temperature
Light temperature in Kelvin SELV Safety extra-low voltage
To prevent hazards, if an illuminant
on this product is damaged, it must
be replaced by the manufacturer, its
service representative or an equally
qualified professional.
Ra Colour rendering index
Lumen
To prevent hazards, if an operating
unit on this product is damaged, it
must be replaced by the manufac-
turer, its service representative or
an equally qualified professional.

15 GB/IE
Introduction
LED Ceiling Light
Introduction
Congratulations on the purchase of your
new appliance. You have selected a high
quality product. Please be sure to care-
fully read all the instructions for use. Fold out the
page with illustrations. These instructions are part
of the product and contain important information
on setup and handling. Always observe all safety
instructions. Before using this product for the first
time verify the correct voltage and that all parts are
properly installed. If you have any questions or are
unsure about operating the product, please contact
your distributor or service centre. Please keep these
instructions in a safe place and pass them on to
third parties if necessary.
Intended use
This light is only suitable for indoor use in
dry and enclosed spaces. The light can
be mounted onto any normally inflamma-
ble surface. This product is only intended for private
household use and not for commercial purposes.
This product is intended for normal operation and
can be used for wall or ceiling mounting.
Scope of delivery
Check that all the parts are present and that the
appliance is in perfect condition immediately after
unpacking.
1 LED Ceiling Light (model 14162305L /
14162402L / 14162508L)
4 lamp arms (14162402L)
1 fastening plate (14162402L)
1 connection housing (14162402L)
8 screws (lamp arms) (14162402L)
2 screw anchors
2 screws
1 instructions for assembly and use
Parts description
1 Mounting bracket
2 Screw (connection housing)
3 Connection housing
4 Wall plug
5 Screw (mounting bracket)
6 Lustre terminal
7 Junction box
8 Protective tube
9 Mains connection cable (external)
10 Lamp arm
11 Fastening plate (14162402L)
12 Screw (lamp arm) (14162402L)
13 Connection cable (14162402L)
Technical data
Light:
Model number: 14162305L / 14162402L /
14162508L
Operating voltage: 230–240 V~, 50 Hz
Max. rated power: 14162305L: max. 18 W
14162402L: max. 16 W
14162508L: max. 15 W
Protection class: II /
IP rating: IP20
LED:
Illuminant: LED module
Max. rated power: 14162305L: max. 16.5 W
(3 x 5.5 W)
14162402L: max. 15.2 W
(4 x 3.8 W)
14162508L: max. 13 W
(2 x 6.5 W)
Protection class: II /
IP rating: IP20
14162305L:
This product contains illuminants from energy
efficiency category “F” (energy efficiency category
corresponding to Ordinance (EU) 2019/2015).
List of pictograms used

16 GB/IE
Safety / Preparation / Mounting the light Introduction / Safety
14162402L:
This product contains illuminants from energy
efficiency category “F” (energy efficiency category
corresponding to Ordinance (EU) 2019/2015).
14162508L:
This product contains illuminants from energy
efficiency category “F” (energy efficiency category
corresponding to Ordinance (EU) 2019/2015).
Safety
Safety notices
Damage due to failure to comply with these instruc-
tions for use will void the warranty! We assume no
liability for consequential damages! We assume no
liability for property damage or personal injury
due to improper handling or failure to comply with
the safety instructions! Only use the included parts,
using other parts will void the warranty.
DANGER TO
LIFE AND ACCIDENT HAZARD
FOR TODDLERS AND SMALL
CHILDREN!
Never leave children unsupervised with the
packaging material. The packaging material
poses a suffocation hazard. Children frequently
underestimate the dangers. Please always keep
the product out of the reach of children.
This device may be used by children aged 8
years and up, as well as by persons with reduced
physical, sensory or mental capacities, or lacking
experience and/or knowledge, so long as they
are supervised or instructed in the safe use of
the device and understand the associated risks.
Do not allow children to play with the device.
Cleaning and user maintenance must not be
performed by children without supervision.
Avoid the risk of fatal injury
from electric shock
Ensure that a qualified electrician, or a person
trained to carry out electrical installations, per-
forms the electrical installation.
We assume no liability for property damage
or personal injury due to improper handling
or failure to observe the safety notices!
Never use the light if any defects have been
identified.
Prior to installation, remove the fuse or switch
off the circuit breaker (0 setting) in the fuse box.
Ensure that the light does not come into contact
with water or other liquids under any circum-
stances.
Prior to installation, verify the available mains
voltage corresponds with the operating voltage
required for the light (see “Technical data“).
Be sure not to damage any wires during
installation.
Never open any of the components of the elec-
trical equipment or insert any objects into the
same components. This will pose a risk of fatal
injury from electric shock.
Prevent fire and
injury hazards
To prevent burns, be sure the light is switched
off and cooled down before touching it.
Do not attach the light to a damp or conductive
substrate.
Do not look directly into the light source (lamp,
LED, etc.). Do not look into the light source (lamp,
LED, etc.) with an optical instrument (e.g. mag-
nifier).
To prevent hazards, if the external flexible lead
on this lamp is damaged, it must only be re-
placed by the manufacturer, its service repre-
sentative or an equally qualified professional.
To prevent hazards, if an illuminant on this
product is damaged, it must be replaced by
the manufacturer, its service representative or
an equally qualified professional.

17 GB/IE
Safety / Preparation / Mounting the light
For your safety
Install the light so it is protected from moisture,
dirt and extreme heating.
Always be attentive! Always pay attention to
what you are doing and use common sense.
Never use the light if you are having difficulty
concentrating or do not feel well.
Familiarise yourself with all instructions and
diagrams in this manual as well as with the
light itself before use.
Preparation
Required tools and material
The tools and materials specified are not included.
This information and these values are non-binding
and are only provided as a reference. The nature
of the material is determined by the individual local
conditions.
- Pencil / marking tool
- 2-pole voltage tester
- Screwdriver
- Electric drill
- Drill (approx ø 6 mm)
- Side cutting pliers
- Ladder
Mounting the light
Important: The electrical connection must be
performed by a qualified electrician or a person
trained in electrical installations. This person must
be familiar with the properties of the light and the
connection requirements.
RISK OF ELECTRIC SHOCK!
Prior to installation, remove the fuse or switch off
the circuit breaker in the fuse box (Position 0).
Model 14162305L / 14162508L:
Use a 2-pole voltage tester to check whether
the power cable is voltage-free.
Remove the screws 2 visible at the side of the
connection housing 3 and remove the mount-
ing bracket 1 at the back.
Use the slotted holes on the mounting bracket 1
to mark the bores.
Now drill the fixing holes (approx. 6 mm, depth
approx. 40 mm). Be sure not to damage the
supply line.
Insert the plugs 4 into the bores.
Fasten the mounting bracket 1 with the
provided screws 5.
Open the junction box 7.
Feed the mains cable (external) 9 through
the protective tube 8.
Now use the lustre terminal 6 to connect the
connection cable for the light to the mains con-
nection cable (external) 9.
Note: Be sure to connect the individual leads o
n
the mains connection cable (external) correctly:
l
ive wire, black or brown = symbol L, neutral w
ire,
blue = symbol N, protection class II / .
This light is classified as protection class 2. The
protective earth wire is not connected.
Push the mains connection cord (external) 9
double insulation at least 8 mm into the protec-
tive tube 8.
Be sure the protective tube 8 is seated correctly
at the junction box 7.
Close the junction box 7.
Now use the screws 2 to fasten the light to
the mounting bracket 1.
Adjust the lamp arms 10 to the desired position.
Model 14162402L:
Remove all packaging material.
Place the fastening plate 11 on the connection
housing 3.
Make sure that the screw holes are in the re-
cess provided for them. Pay attention to the
correct position.
Push the cables of the lamp arms 10 through
the recesses.
Screw the lamp arms 10 to the fastening plate
11 and the connection housing 3 with the
corresponding screws 12 .
Connect the lamp arms 10 with the connecting
cables 13 in the connection housing 3.
Introduction / Safety

18 GB/IE
InformationMounting the light / Maintenance and cleaning / Disposal / Information
Use a 2-pole voltage tester to check whether
the power cable is voltage-free.
Use the slotted holes on the mounting bracket
1 intended for the screws 5 as a guide to
mark the drilling holes.
Now drill the fixing holes (approx. 6 mm, depth
approx. 40 mm). Be sure not to damage the
supply line.
Insert the plugs 4 into the bores.
Fasten the mounting bracket 1 with the
provided screws 5.
Open the junction box 7.
Feed the mains cable (external) 9 through
the protective tube 8.
Now use the lustre terminal 6 to connect the
connection cable for the light to the mains con-
nection cable (external) 9.
Note: Be sure to connect the individual leads o
n
the mains connection cable (external) correctly:
l
ive wire, black or brown = symbol L, neutral w
ire,
blue = symbol N, protection class II / .
This light is classified as protection class 2. The
protective earth wire is not connected.
Push the mains connection cord (external) 9
double insulation at least 8 mm into the protec-
tive tube 8.
Be sure the protective tube 8 is seated correctly
at the junction box 7.
Close the junction box 7.
Now use the screws 2 to fasten the light to
the mounting bracket 1.
Replace the fuse or switch on the circuit breaker
(I setting) in the fuse box.
Your light is now ready to use.
Initial use
Use the wall switch to switch the light on or off.
Maintenance and cleaning
RISK OF ELECTRIC SHOCK!
Disconnect the light from the mains circuit before
cleaning. To do so, remove the fuse or switch off
the circuit breaker in the fuse box (0 position).
CAUTION! RISK OF BURNS DUE TO
HOT SURFACES!
Allow the light to cool down completely.
Do not use solvents, benzene or similar
substances. They could damage the light.
Only use a dry, lint-free cloth for cleaning.
Replace the fuse or switch on the circuit
breaker (Position I) inside the fuse box.
Disposal
The packaging is made entirely of recyclable mate-
rials, which you may dispose of at local recycling
facilities.
b
a
Observe the marking of the packaging
materials for waste separation, which
are marked with abbreviations (a) and
numbers (b) with following meaning:
1–7: plastics / 20–22: paper and fibre-
board / 80–98: composite materials.
The product and packaging materials
are recyclable, dispose of it separately
for better waste treatment. The Triman
logo is valid in France only.
To help protect the environment, please
dispose of the product properly when it
has reached the end of its useful life and
not in the household waste. Information
on collection points and their opening
hours can be obtained from your local
authority.
Information
Warranty
A 36 month warranty is extended for this appliance
at the time of purchase. The appliance has been
manufactured with care under strict quality control.
During the warranty period any defects in material

19 GB/IE
Information
or manufacture will be replaced free of charge. In
the event of a defect during the warranty period,
please send the appliance to the service address
listed, indicating the following model number:
14162305L / 14162402L / 14162508L.
Expendable parts (such as bulbs) and damage
caused by improper handling, failure to observe
the instructions for use or modification by unauthor-
ised persons are excluded from the warranty. The
performance of services under the warranty does
not extend or renew the warranty period.
Declaration of conformity
This product fulfils the requirements of the applicable
European and national directives. Conformity has
been demonstrated. The relevant declarations and
documents are held by the manufacturer.
Manufacturer / Service
Briloner Leuchten GmbH & Co. KG
Im Kissen 2
59929 Brilon
GERMANY
Tel.: +49 29 61 / 97 12–800
Fax: +49 29 61 / 97 12–199
E-Mail: [email protected]
www.briloner.com
Free service number:
Tel.: 00800 / 27456637
IAN 380183_2110
Please have your receipt and item number (IAN
380183_2110) ready as your proof of purchase
when enquiring about your product.
Mounting the light / Maintenance and cleaning / Disposal / Information

20
Table des matières
La page est en cours de chargement...
La page est en cours de chargement...
La page est en cours de chargement...
La page est en cours de chargement...
La page est en cours de chargement...
La page est en cours de chargement...
La page est en cours de chargement...
La page est en cours de chargement...
La page est en cours de chargement...
La page est en cours de chargement...
La page est en cours de chargement...
La page est en cours de chargement...
La page est en cours de chargement...
La page est en cours de chargement...
La page est en cours de chargement...
La page est en cours de chargement...
La page est en cours de chargement...
La page est en cours de chargement...
La page est en cours de chargement...
La page est en cours de chargement...
La page est en cours de chargement...
La page est en cours de chargement...
La page est en cours de chargement...
La page est en cours de chargement...
La page est en cours de chargement...
La page est en cours de chargement...
La page est en cours de chargement...
La page est en cours de chargement...
La page est en cours de chargement...
La page est en cours de chargement...
La page est en cours de chargement...
La page est en cours de chargement...
La page est en cours de chargement...
La page est en cours de chargement...
La page est en cours de chargement...
La page est en cours de chargement...
La page est en cours de chargement...
La page est en cours de chargement...
La page est en cours de chargement...
La page est en cours de chargement...
La page est en cours de chargement...
La page est en cours de chargement...
La page est en cours de chargement...
La page est en cours de chargement...
La page est en cours de chargement...
La page est en cours de chargement...
La page est en cours de chargement...
La page est en cours de chargement...
La page est en cours de chargement...
La page est en cours de chargement...
La page est en cours de chargement...
La page est en cours de chargement...
La page est en cours de chargement...
La page est en cours de chargement...
La page est en cours de chargement...
La page est en cours de chargement...
La page est en cours de chargement...
La page est en cours de chargement...
La page est en cours de chargement...
La page est en cours de chargement...
La page est en cours de chargement...
La page est en cours de chargement...
La page est en cours de chargement...
La page est en cours de chargement...
La page est en cours de chargement...
La page est en cours de chargement...
La page est en cours de chargement...
La page est en cours de chargement...
La page est en cours de chargement...
La page est en cours de chargement...
La page est en cours de chargement...
La page est en cours de chargement...
La page est en cours de chargement...
La page est en cours de chargement...
La page est en cours de chargement...
La page est en cours de chargement...
La page est en cours de chargement...
La page est en cours de chargement...
La page est en cours de chargement...
La page est en cours de chargement...
La page est en cours de chargement...
La page est en cours de chargement...
La page est en cours de chargement...
La page est en cours de chargement...
-
 1
1
-
 2
2
-
 3
3
-
 4
4
-
 5
5
-
 6
6
-
 7
7
-
 8
8
-
 9
9
-
 10
10
-
 11
11
-
 12
12
-
 13
13
-
 14
14
-
 15
15
-
 16
16
-
 17
17
-
 18
18
-
 19
19
-
 20
20
-
 21
21
-
 22
22
-
 23
23
-
 24
24
-
 25
25
-
 26
26
-
 27
27
-
 28
28
-
 29
29
-
 30
30
-
 31
31
-
 32
32
-
 33
33
-
 34
34
-
 35
35
-
 36
36
-
 37
37
-
 38
38
-
 39
39
-
 40
40
-
 41
41
-
 42
42
-
 43
43
-
 44
44
-
 45
45
-
 46
46
-
 47
47
-
 48
48
-
 49
49
-
 50
50
-
 51
51
-
 52
52
-
 53
53
-
 54
54
-
 55
55
-
 56
56
-
 57
57
-
 58
58
-
 59
59
-
 60
60
-
 61
61
-
 62
62
-
 63
63
-
 64
64
-
 65
65
-
 66
66
-
 67
67
-
 68
68
-
 69
69
-
 70
70
-
 71
71
-
 72
72
-
 73
73
-
 74
74
-
 75
75
-
 76
76
-
 77
77
-
 78
78
-
 79
79
-
 80
80
-
 81
81
-
 82
82
-
 83
83
-
 84
84
-
 85
85
-
 86
86
-
 87
87
-
 88
88
-
 89
89
-
 90
90
-
 91
91
-
 92
92
-
 93
93
-
 94
94
-
 95
95
-
 96
96
-
 97
97
-
 98
98
-
 99
99
-
 100
100
-
 101
101
-
 102
102
-
 103
103
-
 104
104


LIVARNO 380183 Le manuel du propriétaire
- Catégorie
- Éclairage au plafond
- Taper
- Le manuel du propriétaire
dans d''autres langues
- italiano: LIVARNO 380183 Manuale del proprietario
- español: LIVARNO 380183 El manual del propietario
- Deutsch: LIVARNO 380183 Bedienungsanleitung
- Nederlands: LIVARNO 380183 de handleiding
- slovenčina: LIVARNO 380183 Návod na obsluhu
- polski: LIVARNO 380183 Instrukcja obsługi
Documents connexes
-
LIVARNO 367066 Le manuel du propriétaire
-
-
-
-
-
-
-
-
-