
Instruction CPRB Feb-16 page 1 of 4
CPRB SERIES
COREPRO
Read and understand these instructions before installing luminaire:
This luminaire is intended for installation in accordance with the National Electrical Code and local
regulations. To assure full compliance with local codes and regulations, check with your local electrical
inspector before installation. To prevent electrical shock, turn off electricity at fuse box before proceeding.
Retain these instructions for maintenance reference.
Veuillez lire attentivement ces instructions avant d’installer le luminaire.
Ce luminaire est prévu pour une installation conforme au National Electrical Code (NEC) et aux
règlements locaux applicables. Pour confirmer la conformité aux codes et règlements locaux, veuillez
contacter un inspecteur en électricité de votre région avant l’installation. Pour prévenir un choc électrique,
couper l’électricité au coffret de fusibles ou au disjoncteur avant de procéder. Veuillez conserver ces
instructions comme référence d’entretien.
X” Min.
X” Min.
1.
2.
CP4RB
CP5RB & CP6RB
3.
4.

Instruction CPRB Feb-16 page 2 of 4
CPRB SERIES
COREPRO
5.
6.
7.
Inner
Spring
Clip (D)
Position
8.
WARNING: Risk of fire or electric shock. LED Retrofit Kit installation requires knowledge of
luminaire electrical systems. If not qualified, do not attempt installation. Contact a qualified
electrician. This retrofit kit is only suitable for installation into Listed IC or Non-IC Rough-in
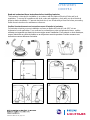
Sections with cylindrical recessed metal housings. The internal dimensions per aperture:
•CP4RB Series, minimum 4.0” (102mm) diameter and 5.12” (130mm) height.
•CP5RB Series, minimum 5.1” (130mm) diameter and 7.5” (190mm) height.
•CP6RB Series, minimum 6.1” (155mm) diameter and 7.5” (190mm) height.
See Figure 1 for a graphic depiction of these dimensions.
INSTALLATION:
1. Turn off power to the fixture at the fuse or circuit breaker box. Remove the lamp and/or the trim if any are still
installed in the housing.
2. Adjust the position of the socket plate to its maximum height in the housing. If at this maximum height the
distance from the socket to the housing opening is less than 3.75” (95 mm), detach the socket from the socket
plate (Figure 2).
NOTE: For the Capri model RR4, it may be necessary to detach the thermal protector from the side of the housing
to avoid damage and to allow the LED Retrofit Downlight to fit. Discard the metal cover of the thermal protector,
and fasten the thermal protector to the wiring behind the socket using a cable tie (Figure 3). If any part is removed
from the luminaire or the luminaire modified in any way in order to install this kit the included label that states; “This
luminaire has been modified and can no longer operate the originally intended lamp.” must be applied where visible
inside the recessed housing.

Instruction CPRB Feb-16 page 3 of 4
CPRB SERIES
COREPRO
INSTALLATION:
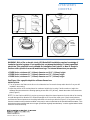
3. Screw E26 (B) socket adapter into the socket inside the Rough-in housing (Figure 4).
4. Connect the earth wire of the socket adapter (B) to the side of the housing with the supplied #8 (E) screw in an
existing or drilled 1/8” hole (Figure 5).
5. Plug the connector of E26 socket (B) adapter into the LED Retrofit Downlight’s (A) connector (Figure 6). Make
sure connector is fully engaged.
6. Center the LED Retrofit Downlight (A) in the housing opening. Avoid interference with anything protruding from
the Rough-in housing walls. Push it straight up until it is tight against the ceiling
(Figure 7).
NOTE: For CP5RB Series, spring clip (D) must be adjusted to the inner position for Philips’ Lytening 1004IC
Rough-in Sections. Rough-in Sections by other must use the outer position. For CP6RB Series, spring clip (D)
must be adjusted to the outer position for Philips’ Lytening 1104IC Rough-in Sections. Rough-in Sections by other
must use the inner position. See figure 8.
REMOVAL:
1. Turn off power to the fixture;
2. Pull trim down from ceiling;
3. Disconnect the trim from the socket adapter.
AVERTISSEMENT: Risque d'incendie ou de choc électrique. Des connaissances en systèmes
électriques de luminaires sont nécessaires pour l'installation de cette trousse d'adaptation DEL. Si
vous n'avez pas ces connaissances, ne pas procéder à l'installation. Contacter un électricien
qualifié. Cette trousse d'adaptation ne convient qu'aux luminaires incandescents homologués IC
ou NON-IC avec compartiments de métal cylindrique encastré et dont le diamètre interne du
compartiment encastré.
•Série CP4RB: diamètre minimum de 4po (102mm) et 5.12po (130mm) de hauteur
•Série CP5RB: diamètre minimum de 5.1po (130mm) et 7.5po (190mm) de hauteur
•Série CP6RB: diamètre minimum de 6.1po (155mm) et 7.5po (190mm) de hauteur
Voir la figure 1 pour une image graphique de ces dimensions.
MÉTHODE DE CÂBLAGE
1. Couper l'alimentation du luminaire à la boîte de fusibles ou de disjoncteurs. Retirer la lampe et les garnitures, s'il y
en a encore dans le compartiment.
2. Régler la position de la plaque de la prise pour qu'elle atteigne sa hauteur maximale dans le compartiment.Si à
cette hauteur maximale la distance entre la prise et l’ouverture du compartiment est inférieure à 3 ¾ pouces (95
mm), démonter la prise de la plaque, et retirer la plaque de la prise du compartiment (figure 2).
NOTE: DELPour le modèle Capri RR4, il peut être nécessaire de retirer le dispositif de protection thermique
de la paroi du compartiment afin d’éviter de l’endommager, et de permettre à la garniture DEL de
rentrer. Dans ce cas, éliminer le couvercle métallique du dispositif de protection thermique , et fixer
ce dispositif au câblage en arrière de l’adaptateur en utilisant le collier de serrage prévu à cet effet
(figure 3) afin de le maintenir en dehors du passage lors de l’installation de la garniture DEL. Si une
quelconque partie du luminaire est retirée ou si the luminaire est modifié de quelque façons que ce
soit afin d’installer ce module, l’étiquette incluse indiquant les informations de changement de lampe et «This
luminaire has been modified and can no longer operate the originally intended lamp.» doit être utilisé.

Instruction CPRB Feb-16 page 4 of 4
CPRB SERIES
COREPRO
MÉTHODE DE CÂBLAGE
3. Visser l'adaptateur de prise E26 (B) dans la prise de la base se trouvant dans le compartiment (figure 4).
4. Connecter le fil de terre de l’adaptateur au compartiment. La méthode de connexion peut varier selon le type de
compartiment (figure 5). par la vis fournie #8 (E) vissée dans un trou existant ou dans un nouveau trou de 1/8
pouce (3mm) percé dans le compartiment.
5. Brancher le connecteur de l'adaptateur de prise E26 (B) dans le connecteur homologue de la garniture DEL
(figure 6). Vérifier que les connecteurs sont bien branchés ensembles.
6. Center le module (A) dans l’ouverture du boîtier d’encastrement. Pousser tout droit pour le mettre de niveau au
plafond en évitant toute interférence avec les murs du boîtier d’encastrement. Voir vignette 7.
Note: Pour la série CP5RB, l’agrafe à ressort (D) doit être installée en position intérieur avec les boîtier
d’encastrement Philips de la série 1004IC. Pour tous autres cadres, l’agrafe à ressort doit être installée en position
extérieur. Pour la série CP6RB, l’agrafe à ressort (D) doit être installée en position extérieur avec les boîtier
d’encastrement Philips de la série 1104IC. Pour tous autres cadres, l’agrafe à ressort doit être installée en position
intérieur. Voir vignette 8.
INSTALLATION DU MODULE DANS UN COMPARTIMENT ENCASTRÉ
Centrer la garniture DEL dans l'ouverture du compartiment. Aligner les quatre ressorts de rétention sur le
compartiment encastré afin d'éviter toute interférence avec une projection des parois du compartiment. Pousser vers
le haut jusqu'à ce qu'elle soit bien appuyée contre le plafond (figure 6).
Pour retirer la garniture DEL :
1. Couper l'alimentation du luminaire à la boîte de fusibles ou de disjoncteurs.
2. Tirer la garniture loin du plafond.
3. Débrancher la garniture de l'adaptateur de prise.
CP4RB Series CP5RB Series CP6RB Series
Philips Halo AllPro Seagull Philips Halo Juno Lithonia Philips Halo Juno Lithonia Progress
CP4RN H99ICT E1400ATSB 1179 CP5RN H5ICAT IC20NW L5
CP6RN
H7ICAT IC22 L7X P87-AT
CP4RR 1105 CP5RR H5RICAT IC20N L5R
CP65RR
P4 1004IC H5T
1104IC
P4R 1004ICR H5RT
1104ICR
P4AIC CR5QP
CR1NBQP
R4 CRR5QP
QL6NBQP
R4ASICG
PR75ASICNB
RR4
PRR75ICX
FDIC4V50 FD2IC6V90
-
 1
1
-
 2
2
-
 3
3
-
 4
4


Lightolier CorePro LED Downlight Install Instructions
- Taper
- Install Instructions
- Ce manuel convient également à
dans d''autres langues
- English: Lightolier CorePro LED Downlight
Documents connexes
Autres documents
-
Halo SLD606930WHR Mode d'emploi
-
-
Halo SMD6R6950WH Mode d'emploi
-
-
Eaton SLD606830WH Mode d'emploi
-
Halo ML5609930 Mode d'emploi
-
-
Halo SLD405930WHR Mode d'emploi
-
Halo RA406930WHR-CA Mode d'emploi
-