Danby SPRWC140D1SS Manuel utilisateur
- Catégorie
- Boissons glacées
- Taper
- Manuel utilisateur
Ce manuel convient également à

DANBY PRODUCTS LIMITED, ONTARIO, CANADA N1H 6Z9
DANBY PRODUCTS INC., FINDLAY, OHIO, USA 45840
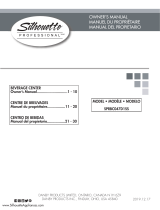
OWNER’S MANUAL
MANUEL DU PROPRIÉTAIRE
MANUAL DEL PROPIETARIO
www.SilhouetteAppliances.com
2020.04.15
WINE COOLER
Owner’s Manual.............................1 - 13
REFROIDISSEUR DE VIN
Manuel du propriétaire.................14 - 26
ENFRIADOR DE VINO
Manual del propietario.................27 - 39
MODEL • MODÈLE • MODELO
SPRWC140D1SS

1
Model Number: ________________________________________________
Serial Number: ________________________________________________
Date of Purchase: ______________________________________________
Need Help?
Before you call for service, here are a few things you can do to help us serve you better.
Read this owner’s manual:
It contains instructions to help you use and maintain your appliance properly.
If you receive a damaged appliance:
Immediately contact the retailer or builder that sold you the appliance.
Save time and money:
Check the troubleshooting section at the end of this manual before calling. This section
will help you solve common problems that may occur.
Welcome
Welcome to the Silhouette family. We are proud of our quality products and we believe in
dependable service. We suggest that you read this owner’s manual before plugging in your new
appliance as it contains important operation information, safety information, troubleshooting and
maintenance tips to ensure the reliability and longevity of your appliance.
Visit www.SilhouetteAppliances.com to access self service tools, FAQs and much more. For
additional assistance call 1-844-455-6097.
Note the information below; you will need this information to obtain service under warranty.
You must provide the original purchase receipt to validate your warranty and receive service.
1-844-455-6097

2
SAFETY REQUIREMENTS
DANGER: Risk of fi re or explosion. Flammable
refrigerant used. Do not puncture refrigerant tubing.
• Do not use mechanical devices to defrost
refrigerator.
• Ensure that servicing is done by factory
authorized service personnel, to minimize
product damage or safety issues.
• If the power supply cord is damaged, it must be
replaced by the manufacturer, its service agent
or similar qualifi ed person in order to avoid
hazard.
• Consult repair manual or owner’s guide before
attempting to service this product. All safety
precautions must be followed.
• Dispose of properly in accordance with federal
or local regulations.
• Follow handling instructions carefully.
• Do not store explosive substances such as
aerosol cans with a fl ammable propellant in this
appliance.
WARNING: Keep ventilation openings, in the
appliance enclosure or in the built-in structure, clear
of obstruction.
WARNING: Do not use mechanical devices or other
means to accelerate the defrosting process, other
than those recommended by the manufacturer.
WARNING: Do not damage the refrigerant circuit.
WARNING: Do not use electrical appliances inside
the food storage compartments of the appliance,
unless they are of the type recommended by the
manufacturer.
CAUTION: Children should be supervised to ensure
that they do not play with the appliance.
DANGER: Risk of child entrapment. Before throwing
away an old appliance:
• Remove the door or lid.
• Leave shelves in place so that children may not
easily climb inside.
DANGER: Do not add a lock to the door or lid. This
can cause child entrapment and harm.
SAFETY REQUIREMENTS
This appliance is not intended for use by persons
(including children) whose physical, sensory or
mental capabilities may be different or reduced,
or who lack experience or knowledge, unless such
persons receive supervision or training to operate
the appliance by a person responsible for their
safety.
This appliance is intended to be used in household
and similar applications such as:
• Staff kitchen areas in shops, offi ces and other
working environments;
• Farm houses and by clients in hotels, motels and
other residential type environments;
• Bed and breakfast type environments;
• Catering and similar non-retail applications.
GROUNDING INSTRUCTIONS
This appliance must be grounded. Grounding
reduces the risk of electrical shock by providing an
escape wire for the electrical current.
This appliance has a cord that has a grounding
wire with a 3-prong plug. The power cord must be
plugged into an outlet that is properly grounded.
If the outlet is a 2-prong wall outlet, it must be
replaced with a properly grounded 3-prong wall
outlet. The serial rating plate indicates the voltage
and frequency the appliance is designed for.
WARNING - Improper use of the grounding
plug can result in a risk of electric shock.
Consult a qualifi ed electrician or service agent
if the grounding instructions are not completely
understood, or if doubt exists as to whether the
appliance is properly grounded.
Do not connect your appliance to extension
cords or together with another appliance in the
same wall outlet. Do not splice the power cord.
Do not under any circumstances cut or remove the
third ground prong from the power cord. Do not
use extension cords or ungrounded (two prongs)
adapters.
Important Safety Information
READ AND FOLLOW ALL SAFETY INSTRUCTIONS
SAVE THESE INSTRUCTIONS!

3
INSTALLATION INSTRUCTIONS
LOCATION
• Two people should be used when moving the
appliance.
• Remove interior and exterior packaging prior to
installation. Wipe the outside of the appliance
with a soft, dry cloth and the inside with a
lukewarm wet cloth.
• Place the appliance on a fl oor that is strong
enough to support it when it is fully loaded.
• Do not place the appliance in direct sunlight or
near sources of heat, such as a stove or heater,
as this can increase electrical consumption.
Extreme cold ambient temperatures may also
cause the appliance to perform improperly.
• Do not use the appliance near water, for
example in a wet basement or near a sink.
• This appliance is intended for household use
only. It is not designed for outside installation,
including anywhere that is not temperature
controlled (garages, porches, vehicles, etc.).
• Before connecting the appliance to a power
source, let it stand upright for approximately
6 hours. This will reduce the possibility of a
malfunction in the cooling system from handling
during transportation.
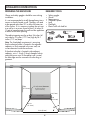
• This appliance is 23.4 inches (59.5 cm) wide
by 69.8 inches (177.3 cm) high by 28.6 inches
(72.7 cm) deep.
FRONT VENT
This appliance is front breathing. Do not block the
front air vent as this will result in high operating
temperatures, higher energy usage and possible
system overheating and failure.
LEVELING INSTRUCTIONS
There is an adjustable leg on the bottom of the
appliance that can be turned up or down to ensure
that the appliance is level. It is important that the
appliance is level to minimize noise and vibration.
To level the appliance:
1. Turn the leveling leg counter-clockwise as far as
it will go, until the top of the foot is touching the
bottom of the cabinet.
2. Slowly turn the leveling leg clockwise until the
appliance is level.
IMPORTANT
Ensure that the door is fully closed when the
appliance is in operation. Failure to fully close
the door can lead to excessive condensation
and potential water damage to fl ooring under
the appliance. Danby will not be responsible for
damages from misuse.

4
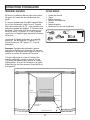
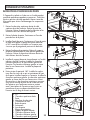
INSTALLATION INSTRUCTIONS
Electrical AccessElectric
a
l Access
*If electrical outlet in
adjacent cabinetry
70 in
(177.9 cm)
2 in (5 cm)
6 in
(15.2 cm)
1.5 in (3.8 cm) diameter
24 in (61 cm)
90°
28.1 in
(71.3 cm)
PREPARING THE ENCLOSURE
Gloves and safety goggles should be worn during
installation.
It is not recommended to install the appliance into a
corner or directly beside a wall. The door will need
to be opened more than 90° to allow full extension
of the shelves. If it is necessary to place the unit next
to a wall or in a corner, leave at least 2-4 inches (5-
10 cm) of space between the wall and the appliance
to allow for the door opening.
The cabinet opening must be at least 24 inches (61
cm) wide by 70 inches (177.9 cm) high by 28.1
inches (71.3 cm) deep.
Note: The listed depth requirement is assuming
that the electrical outlet is located in the adjacent
cabinetry or fl ush mounted in the rear wall, not
surface mounted inside the enclosure.
If the electrical outlet is located inside adjacent
cabinetry, cut a 1.5 inch (3.8 cm) diameter hole to
admit the power cord. If the cabinet wall is metal,
the hole edge must be covered with a bushing or
grommet.
REQUIRED TOOLS
• Safety goggles
• Gloves
• Tape measure
• Carpenter square
• Level
• Flashlight
• Electric drill with hole bit
Tape measure
Carpenter square
Electric drill with hole bit
Gloves
Level
Safety goggles
Flashlight

INSTALLATION INSTRUCTIONS
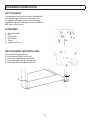
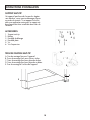
ANTI-TIP BRACKET
This appliance may tip when shelves are extended,
causing damage, injury or loss of contents. If
this appliance is being used in a free standing
application, the anti-tip bracket must be installed on
both sides of the cabinet.
ACCESSORIES
1. Anti-tip bracket
2. Bolt
3. Lock Washer
4. Flat Washer
5. Screws
6. Expansion Screws
ANTI-TIP BRACKET MOUNTING HOLES
A: Fixed mounting hole for unit
B: Fixed mounting holes for drywall
C: Fixed mounting holes for wood fl oor
D: Fixed mounting holes for concrete fl oor
E: Mounting holes on the back of the unit
A
B
C
D
E
E
1
2 3
4
5 6
5

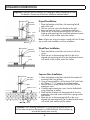
Drywall Installation:
1. Place the bracket on the fl oor with mounting hole B
against the wall.
2. Use two screws to secure the bracket to the wall.
3. Ensure at least one screw is secured to a wall stud.
4. Place the unit so that the mounting hole E on the unit is
lined up with mounting hole A on the bracket and secure
with a bolt, a lock washer and a fl at washer.
Note: At least one screw must enter a wood wall stud. If there
are no wall studs available, use fl oor installation.
Wood Floor Installation:
1. Place the bracket on the fl oor and secure it with two
screws.
2. Place the unit so that mounting hole E on the unit is
aligned with mounting hole A on the bracket and secure
with a bolt, a lock washer and a fl at washer.
Concrete Floor Installation:
1. Place the bracket on the fl oor and mark the location of
mounting hole D on the fl oor.
2. Using a concrete drill bit, drill an 8mm (3/8”) pilot hole
45~55mm (1.7”~2”) deep at the marked location.
3. Remove the nut, spring washer and washer from the
expansion screw.
4. Carefully tap the expansion screw into the drilled hole
using a hammer or mallet.
5. Place the fl oor bracket with mounting hole D over the
expansion screw and secure with the nut, spring washer
and washer.
6. Place the unit so that mounting hole E on the unit is
aligned with mounting hold A on the bracket and secure
with a bolt, lock washer and fl at washer.
Anti-tip bracket
Flat washer
Lock washer
Bolt
Screw
Wall stud
Anti-tip bracket
Flat washer
Lock washer
Bolt
Screw
Anti-tip bracket
Flat washer
Lock washer
Bolt
Expansion screw
INSTALLATION INSTRUCTIONS
Important: Determine the fi nal location of the appliance before attempting to install
the bracket. Choose one of the three installation methods below.
Important: After installing the bracket, try using light force to tip the unit. If
the unit does not tip then the bracket is installed correctly. If the unit does tip,
reinstall the bracket more securely.
6

7
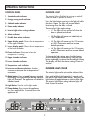
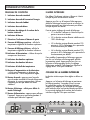
OPERATING INSTRUCTIONS
CONTROL PANEL
1. Standard mode indicator
2. Energy saving mode indicator
3. Sabbath mode indicator
4. Demo mode indicator
5. Interior light colour setting indicator
6. Alarm indicator
7. Disable door alarm indicator
8. Upper display panel: Shows the set temperature
of the upper chamber.
9. Lower display panel: Shows the set temperature
of the lower chamber.
10. Power indicator: Illuminates when the
compressor is running.
11. Upper chamber indicator
12. Lower chamber indicator
13. Temperature scale indicator
14. Increase and decrease buttons: Used to
increase or decrease the set temperature 1°
increments.
15. Mode button: Press to toggle between standard
and energy saving mode. The relevant indicator
light will illuminate. The appliance will default to
standard mode.
16. Light Button: Used to set the light mode.
17. Power button: Press to turn the appliance
on. Press and hold for 3 seconds to turn the
appliance off.
Std Eco
Sab Demo
1
2
3 4 5
6
7
10
13
14
15
16
17
12
8
13
11
14
9
INTERIOR LIGHT
The interior light will default to turning on and off
when the door is opened or closed.
Press the light button once to turn the light off while
the door is open. The light will resume default
functioning when the door is closed.
There are four light mode settings:
• L1: The light will turn on and off when the
door is opened and closed.
• L2: The light will remain on indefi nitely at
100% illumination.
• L3: The light will remain on for 120 minutes
at 100% illumination and then resume
default operation.
• L4: The light will remain on for 120 minutes
at 50% illumination and then resume default
operation.
To change the light setting, press the light button
once to display the current setting. Press the light
button repeatedly to choose the desired light setting.
The display will fl ash the chosen setting 5 times to
confi rm.
INTERIOR LIGHT COLOR
The interior light can be set to either white or blue.
Press and hold the light button for 3 seconds until
the interior light color symbol fl ashes, then press the
light button to toggle between a white or blue light.
The interior light colour setting indicator light will
fl ash 5 times to confi rm.

8
OPERATING INSTRUCTIONS
FUNCTION INSTRUCTION
The default temperature setting is 54°F (12°C). The
default temperature scale is °F.
To switch the display between °F and °C, press
and hold the increase and decrease buttons
simultaneously for approximately 3-5 seconds.
The temperature can be set as low as 41°F (5°C) or
as high as 64°F (18°C).
Actual temperature inside the appliance can vary
based on ambient temperature, how often the
door is opened and how many warm bottles have
recently been added to the appliance.
If the appliance loses power, the control panel
will remember the set temperature. Once power
is restored, the appliance will return to normal
functioning automatically.
If the inner cabinet temperature is higher than
73°F (23°C) for one hour, the error code “HI” will
show on the display, the alarm indicator light will
illuminate and an alarm will sound.
If the inner cabinet temperature is lower than 32°F
(0°C) the error code “LO” will show on the display,
the alarm indicator light will illuminate and an
alarm will sound.
If the inner cabinet temperature remains at 32°F
(0°C) for more than 30 minutes, the error code
“CL” will show on the display, the alarm indicator
light will illuminate and an alarm will sound. The
appliance will stop functioning to prevent the
contents from freezing.
DEMO MODE
Demo mode is only intended to be used on the sales
fl oor. It can be used to show how the appliance will
look while running without engaging the compressor
or the cooling function. The fan will run on low
speed but all alarms and beeping will be disabled.
Press and hold the increase button and the power
button at the same time for 10 seconds to enable
demo mode. The demo mode indicator light will
illuminate.
Press and hold the increase button and the power
button at the same time for 10 seconds to return the
appliance to standard mode.
OPEN DOOR ALARM
If the door is not closed completely for 5 minutes, the
alarm indicator light will illuminate and an alarm will
sound.
The open door alarm can be silenced temporarily by
pressing the power button once. The alarm indicator
light will remain illuminated and the interior light will
continue to fl ash until the door is closed.
If the door is closed and the alarm continues to sound,
check that the actuator at the bottom of the door is
making contact with the switch on the appliance.
DISABLE OPEN DOOR ALARM
The audible door alarm can be permanently turned
off if desired. The alarm indicator light and the
interior light will continue to illuminate if the door is
left open for more than 5 minutes.
To disable the open door alarm, press and hold the
mode button and the light button at the same time for
3 seconds until the disable door alarm indicator light
illuminates. In future if the door is left open the alarm
indicator light and the interior light will still fl ash, but
the audible door alarm will not sound.
ENERGY SAVING MODE
Energy saving mode will turn off the interior light,
the control panel lights and the display. The energy
saving mode indicator light will illuminate.
Pressing the increase or decrease button will cause
the display to turn on for 5 seconds before resuming
energy saving mode.
SABBATH MODE
Sabbath mode can be used to disable all interior
lights and sounds from the appliance.
Press and hold the increase button and the mode
button at the same time for 5 seconds to enable
Sabbath mode. The SAB symbol will illuminate and
the display will show “Sb” to indicate that Sabbath
mode is active.
Press and hold the increase button and the mode
button for 5 seconds to return the appliance to
standard mode.

OPERATING INSTRUCTIONS
9
STORAGE INSTRUCTIONS
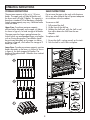
The maximum capacity of this unit is 135 wine
bottles. The upper zone will hold 60 bottles and
the lower zone will hold 75 bottles. This capacity is
based on a standard 750 ml Bordeaux style bottle.
Actual storage capacity may vary if different bottle
sized are stored.
Upper Zone: To achieve maximum capacity,
position bottles alternately on the upper six shelves
as shown in fi gure A, for total storage of 60 bottles.
The upper zone has larger spacing between the
shelves which can accommodate larger wine bottles
such as Pinot or Burgundies. These bottles should
be positioned alternately on the upper six shelves
as shown in fi gure B, which allows for storage of 9
bottles per shelf.
Lower Zone: To achieve maximum capacity, position
bottles alternately on the lower six shelves as shown
in fi gure A, for total storage of 60 bottles. The
bottom of the cabinet holds 15 bottles when stocked
as per fi gure C.
SHELF INSTRUCTIONS
Do not cover the gaps on the racks with aluminum
foil or any other material that will prevent adequate
air circulation within the cabinet.
To remove a shelf:
1. Fully extend the shelf.
2. Lift the front of the shelf up.
3. Holding the shelf track, push the shelf in and
then up to release the shelf from the rear
dampers.
To replace a shelf:
1. Ensure the shelf is resting securely on the track.
2. Push the shelf in until it locks into place.
A
B
C

10
OPERATING INSTRUCTIONS
DOOR REVERSAL INSTRUCTIONS
If the appliance is placed on its back or side for any
length of time during this process, it must be allowed
to remain upright for 6 hours before plugging it in
to avoid damage to the internal components.
1. Remove the upper right hinge from the top
right side of the cabinet. Remove the door from
the cabinet. Remove the hinge sleeve and hole
covers from the top of the door.
2. Remove the door stop, the actuator and the door
axis from the bottom of the door.
3. Install the door stop, the actuator and the door
axis on the top of the door. The door will need to
be fl ipped 180° before being reinstalled on the
cabinet to ensure that the door handle is on the
correct side.
4. Remove the kickplate. Remove the roller door
support from the lower left side of the cabinet.
Remove the lower right hinge from the lower
right side of the cabinet.
5. Install the roller door support on the lower right
side of the cabinet. Install the lower left hinge on
the lower left side of the cabinet. The lower left
hinge can be found in the accessory bag. Install
the kickplate.
6. Rotate the door 180°. Install the hole covers in
the holes in what is now the top of the door.
Install the door on the cabinet. Install the upper
left hinge. The upper left hinge can be found in
the accessory bag. Before tightening the upper
hinge screws, ensure that the top of the door is
level with the top of the cabinet, that the actuator
is making contact with the switch on the cabinet
and that the rubber gasket makes a good seal
with the cabinet all the way around.
A
B
1
C
D
E
F
G
H
2
3
F
G
H
4
J
K
I
5
I
J
L
6
M
A
E
A. Screws
B. Upper Right Hinge
C. Door
D. Hinge Sleeve
E. Hole Covers
F. Door Stop
G. Actuator
H. Door Axis
I. Kickplate
J. Roller Door Support
K. Lower Right Hinge
L. Lower Left Hinge
M. Upper Left Hinge

11
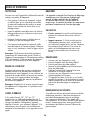
CARE & MAINTENANCE
CLEANING
Ensure the appliance is unplugged before cleaning.
• To clean the inside of the appliance, use a soft
cloth and a solution of a tablespoon of baking
soda to one quart of water or a mild soap
solution or some mild detergent.
• Wash removable shelves in a mild detergent
solution, then dry and wipe with a soft cloth.
• Clean the outside with a soft, damp cloth and
some mild detergent.
• It is important to keep the area clean where the
door seals against the cabinet. Clean this area
with a soapy cloth. Rinse with a damp cloth and
let dry.
Note: Do not use cleaners containing ammonia or
alcohol on the appliance. Ammonia or alcohol can
damage the appearance of the appliance. Never
use any commercial or abrasive cleaners or sharp
objects on any part of the appliance.
POWER FAILURE
Most power failures are corrected within a few
hours and should not affect the temperature of your
appliance if you minimize the number of times the
door is opened. If the power is going to be off for
a longer period of time, take the proper steps to
protect your contents.
Note: Wait 3 to 5 minutes before attempting
to restart the appliance if operation has been
interrupted.
ERROR CODES
If the “HI”, “LO” or “CL” error codes appear on
the display for more than 5 minutes, a power reset
may rectify the issue. Unplug the appliance, wait 5
minutes and then plug the unit back in. If the error
code persists after a power reset, contact consumer
care or an authorized service agent.
DEFROST
This unit is equipped with an automatic defrost
function and does not require manual defrosting.
Defrost water from the appliance is channeled into
a drip tray located above the compressor. Heat
transfer from the compressor causes the defrost
water to evaporate.
VACATION
• Short vacations: Leave the appliance operating
during vacations of less than three weeks.
• Long vacations: If the appliance will not be used
for several months, remove all items and turn
off the appliance. Clean and dry the interior
thoroughly. To prevent odor and mold growth,
leave the door open slightly, blocking it open if
necessary.
MOVING
• Make sure the appliance is empty.
• Secure the shelves with tape.
• Secure the door with tape.
• Turn the adjustable foot up to the base to avoid
damage.
• Protect the outside of the appliance with a
blanket or similar item.
• Be sure the appliance stays in the upright
position during transportation.
• If the appliance is placed on its back or side
during transportation, upon reaching the
destination, allow it to remain upright for 6
hours before plugging in to avoid damage to
internal components.
DISPOSAL
This appliance may not be treated as regular
household waste, it should be taken to the
appropriate waste collection point for recycling
of electrical components. For information on local
waste collection points, contact your local waste
removal agency or government offi ce.

12
Silhouette Consumer Care: 1-844-455-6097
Hours of operation:
Monday to Thursday 8:30 am - 6:00 pm Eastern Standard Time
Friday 8:30 am - 4:00 pm Eastern Standard Time
Information in this manual is subject to change without notice.
TROUBLESHOOTING
PROBLEM POSSIBLE CAUSE
No power • A fuse may be blown or the circuit breaker
tripped
• Plug not fully inserted into the wall outlet
Internal temperature not cold enough
Appliance runs continuously
Alarm sounding and “HI” on the display panel
Alarm indicator light is illuminated
• Door is not shut properly or opened excessively
• Exhaust vent is obstructed
• Recently added a large quantity of warm bottles
to the cabinet
• Close proximity to heat source or direct sunlight
• Ambient temperature or humidity is very high
• Possible system leak, evaporator fan failure or
compressor failure
• Demo mode is active
• The actuator on the bottom of the door is not
making contact with the switch on the cabinet
Condensation on the cabinet or door • Door is not shut properly or opened excessively
• Ambient temperature or humidity is very high
Alarm sounding and “LO” on the display panel
Alarm indicator light is illuminated
• Ambient temperature is excessively low
• Sensor failure
• Evaporator temperature is too low
Display is not functioning and interior light will
not turn on
• The appliance may be operating in energy
saving mode or Sabbath mode

LIMITED IN-HOME APPLIANCE WARRANTY
This quality product is warranted to be free from manufacturer’s defects in material and workmanship, provided that the unit is used under the normal operating
conditions intended by the manufacturer.
This warranty is available only to the person to whom the unit was originally sold by Danby Products Limited (Canada) or Danby Products Inc. (U.S.A.) (hereafter
“Danby”) or by an authorized distributor of Danby, and is non-transferable.
TERMS OF WARRANTY
Plastic parts, are warranted for thirty (30) days only from purchase date, with no extensions provided.
First Year
During the rst twelve (12) months, any functional parts of this product found to be defective, will be repaired or replaced, at warrantor’s
option, at no charge to the ORIGINAL purchaser.
To obtain
Danby reserves the right to limit the boundaries of “In Home Service” to the proximity of an Authorized Service Depot. Any app liance
Service
requiring service outside the limited boundaries of “In Home Service” , it will be the consumer’s responsibility to transport the appliance (at
their own expense) to the original retailer (point of purchase) or a service depot for repair. See “Boundaries of In Home Serv ice” below.
Contact your dealer from whom your unit was purchased, or contact your nearest authorized Danby service depot, where service
must be performed by a qualied service technician.
If service is performed on the units by anyone other than an authorized service depot, or the unit is used for commercial appli cation, all
obligations of Danby under this warranty shall be void.
Boundaries of
If the appliance is installed in a location that is 100 kilometers (62 miles) or more from the nearest service center your unit must be
In Home Service
delivered to the nearest authorized Danby Service Depot, as service must only be performed by a technician qualied and certif ied for
warranty service by Danby. Transportation charges to and from the service location are not protected by this warranty and are t he
responsibility of the purchaser.
Nothing within this warranty shall imply that Danby will be responsible or liable for any spoilage or damage to food or other c ontents of this appliance, whether due
to any defect of the appliance, or its use, whether proper or improper.
EXCLUSIONS
Save as herein provided, Danby, there are no other warranties, conditions, representations or guarantees, express or implied, m ade or intended by Danby or its
authorized distributors and all other warranties, conditions, representations or guarantees, including any warranties, conditio ns, representations or guarantees
under any Sale of Goods Act or like legislation or statue is hereby expressly excluded. Save as herein provided, Danby shall no t be responsible for any damages
to persons or property, including the unit itself, howsoever caused or any consequential damages arising from the malfunction o f the unit and by the purchase of
the unit, the purchaser does hereby agree to indemnify and hold harmless Danby from any claim for damages to persons or propert y caused by the unit.
GENERAL PROVISIONS
No warranty or insurance herein contained or set out shall apply when damage or repair is caused by any of the following:
1) Power failure.
2) Damage in transit or when moving the appliance.
3) Improper power supply such as low voltage, defective house wiring or inadequate fuses.
4) Accident, alteration, abuse or misuse of the appliance such as inadequate air circulation in the room or abnormal operating con ditions
(extremely high or low room temperature).
5) Use for commercial or industrial purposes (ie. If the appliance is not installed in a domestic residence).
6) Fire, water damage, theft, war, riot, hostility, acts of God such as hurricanes, oods etc.
7) Service calls resulting in customer education.
8) Improper Installation (ie. Building-in of a free standing appliance or using an appliance outdoors that is not approved for out door application).
Proof of purchase date will be required for warranty claims; so, please retain bills of sale. In the event warranty service is required, present this document to our
AUTHORIZED SERVICE DEPOT.
Danby Products Limited
PO Box 1778, Guelph, Ontario, Canada N1H 6Z9
Telephone: (519) 837-0920 FAX: (519) 837-0449
Danby Products Inc.
PO Box 669, Findlay, Ohio, U.S.A. 45840
Telephone: (419) 425-8627 FAX: (419) 425-8629
04/09
1-800-263-2629
Warranty Service
In-home
Danby reserves the right to limit the boundaries of “In Home Service” to the proximity of an authorized service
depot. Any appliance requiring service outside the limited boundaries of “In Home Service”, will be the consumer’s
responsibility to transport at their own expense to the original point of purchase or a service depot for repair. If the
appliance is installed in a location that is 100 kilometers (62 miles) or more from the nearest service center, it must
be delivered to the nearest authorized Danby Service Depot by the purchaser.
Transportation charges to and from the service location are not protected by this warranty and are the
responsibility of the purchaser.
During the first twenty four (24) months, any functional parts of this product found to be defective, will be repaired
or replaced, at warrantor’s option, at no charge to the original purchaser.
Contact the dealer where the unit was purchased, or contact the nearest authorized Danby service depot, where
service must be performed by a qualified service technician. If service is performed on the unit by anyone other
than an authorized service depot, all obligations of Danby under this warranty shall be void.
First 24 months
To obtain service
Boundaries of
in-home service
LIMITED “IN HOME” WARRANTY
This quality product is warranted to be free from manufacturer’s defects in material and workmanship, provided that the unit is used
under the normal operating conditions intended by the manufacturer.
This warranty is available only to the person to whom the unit was originally sold by Danby Products Limited (Canada) or Danby
Products Inc. (U.S.A.) (hereafter “Danby”) or by an authorized distributor of Danby, and is non-transferable.
TERMS OF WARRANTY
Plastic parts are warranted for thirty (30) days from the date of purchase, with no extensions provided.
Nothing within this warranty shall imply that Danby will be responsible or liable for any spoilage or damage to food or other
contents of this appliance, whether due to any defect of the appliance, or its use, whether proper or improper.
EXCLUSIONS
Save as herein provided, by Danby, there are no other warranties, conditions, representations or guarantees, express or implied, made
or intended by Danby or its authorized distributors and all other warranties, conditions, representations or guarantees, including any
warranties, conditions, representations or guarantees under any Sale of Goods Act or like legislation or statute is hereby expressly
excluded. Save as herein provided, Danby shall not be responsible for any damages to persons or property, including the unit itself,
howsoever caused or any consequential damages arising from the malfunction of the unit and by the purchase of the unit, the
purchaser does hereby agree to indemnify and hold harmless Danby from any claim for damages to persons or property caused by
the unit.
GENERAL PROVISIONS
No warranty or insurance herein contained or set out shall apply when damage or repair is caused by any of the following:
1) Power failure.
2) Damage in transit or when moving the appliance.
3) Improper power supply such as low voltage, defective house wiring or inadequate fuses.
4) Accident, alteration, abuse or misuse of the appliance such as inadequate air circulation in the room or abnormal operating
conditions (ie. extremely high or low room temperature).
5) Use for commercial or industrial purposes (ie. If the appliance is not installed in a domestic residence).
6) Fire, water damage, theft, war, riot, hostility, acts of God such as hurricanes, floods etc.
7) Service calls resulting in customer education.
8) Improper Installation (ie. Building-in of a free standing appliance or using an appliance outdoors that is not approved for outdoor
application, including but not limited to: garages, patios, porches or anywhere that is not properly insulated or climate controlled).
Proof of purchase date will be required for warranty claims; retain bills of sale. In the event that warranty service is required, present
the proof of purchase to our authorized service depot.
Warranty Service
In Home
Danby Products Limited
PO Box 1778, Guelph, Ontario, Canada N1H 6Z9
Telephone: (519) 837-0920 FAX: (519) 837-0449
Danby Products Inc.
PO Box 669, Findlay, Ohio, U.S.A. 45840
Telephone: (419) 425-8627 FAX: (419) 425-8629
1-844-455-6097
04/17

14
Numéro de modèle: ____________________________________________
Numéro de serie: ______________________________________________
Date d’achat: __________________________________________________
Besoin d’assistance?
Avant d’appeler pour service, voici quelques choses que vous pouvez faire pour nous
aider à mieux vous servir.
Lire ce manuel du propriétaire:
Il contient des instructions pour vous aider à utiliser et à maintenir votre appareil
correctement.
Si vous recevez un appareil endommagé:
Contactez immédiatement le revendeur ou l’entrepreneur qui vous a vendu l’appareil.
Gagnez du temps et de l’argent:
Avant d’appeler pour service, consultez la section de dépannage à la fi n de ce manuel.
Cette section vous aidera à résoudre les problèmes courants pouvant survenir.
Bienvenue
Bienvenue à la famille Silhouette. Nous sommes fi ers de la qualité de nos produits et nous croyons
en le service fi able. Nous vous suggérons de lire ce manual d’utilisation avant de brancher
votre nouvel appareil car il contient des informations inportantes sur l’utilisation, la sécurité, le
dépannage et la maintenance, afi n d’assurer la fi abilité et la longévité de votre appareil.
Visitez www.SilhouetteAppliances.com pour accéder aux outils d’autoservice, aux FAQ et bien
plus encore. Pour obtenir de l’aide supplémentaire, composez 1-844-455-6097.
Notez les informations ci-dessous; Vous aurez besoin de cette information pour obtenir un
service sous garantie.
Vous devez fournir le reçu d’achat original pour valider votre garantie et recevoir le service.
1-844-455-6097

15
EXIGENCES DE SÉCURITÉ
DANGER : Risque d’incendie ou d’explosion.
Liquide frigorigène infl ammable utilisé. Ne pas
percer les tubes de réfrigérant.
• N’utilisez pas de dispositifs mécaniques pour
dégivrer le réfrigérateur.
• Assurez-vous que l’entretien est effectué par le
personnel de service autorisé en usine, afi n de
minimiser les dommages sur les produits ou les
questions de sécurité.
• Consultez le manuel de réparation ou le guide
du propriétaire avant d’essayer de réparer
ce produit. Toutes les précautions de sécurité
doivent être respectées.
• Éliminer conformément aux règlements fédéraux
ou locaux.
• Suivez attentivement les instructions de
manutention.
• Ne pas stocker des substances explosives
comme les bombes aérosol avec un propulseur
infl ammable dans cet appareil.
AVERTISSEMENT : Garder les ouvertures de
ventilation, dans l’enceinte de l’appareil ou dans la
structure intégrée, sans obstruction.
AVERTISSEMENT : N’utilisez pas de dispositifs
mécaniques ou d’autres moyens pour accélérer
le processus de dégivrage, autres que ceux
recommandés par le fabricant.
AVERTISSEMENT : Ne pas endommager le circuit de
réfrigérant.
AVERTISSEMENT : N’utilisez pas d’appareils
électriques à l’intérieur des compartiments de
stockage d’aliments de l’appareil, à moins qu’ils ne
soient du type recommandé par le fabricant.
ATTENTION : Les enfants devraient être surveillés
pour s’assurer qu’ils ne jouent pas avec l’appareil.
DANGER : Risque de piégeage des enfants. Avant
de jeter un ancien appareil :
• Retirez la porte ou le couvercle.
• Laissez les étagères en place afi n que les enfants
ne puissent pas facilement monter à l’intérieur.
DANGER: N’ajoutez pas de verrou à la porte ou
au couvercle. Cela peut entraîner le piégeage et le
préjudice des enfants.
EXIGENCES DE SÉCURITÉ
Cet appareil n’est pas destiné à être utilisé par
des personnes (y compris des enfants) dont les
capacités physiques, sensorielles ou mentales
peuvent être différentes ou réduites, ou qui n’ont
pas d’expérience ou de connaissances, à moins que
ces personnes ne reçoivent de supervision ou de
formation pour faire fonctionner l’appareil par une
personne responsable de leur sécurité.
Cet appareil est destiné à être utilisé dans des
applications domestiques et similaires telles que:
• Cuisines du personnel dans les magasins, les
bureaux et autres environnements de travail;
• Les maisons de ferme et par les clients dans les
hôtels, motels et autres environnements de type
résidentiel;
• Chambres d’hôtes;
• Restauration et applications similaires non
commerciales.
INSTRUCTIONS DE MISE À LA TERRE
Cet appareil doit être mis à la terre. La mise à
la terre réduit le risque de choc électrique en
fournissant un fi l d’échappement pour le courant
électrique.
Cet appareil possède un cordon doté d’un fi l de
mise à la terre avec une fi che à 3 broches. Le
cordon d’alimentation doit être branché sur une
prise correctement mise à la terre. Si la sortie
est une prise murale à 2 broches, elle doit être
remplacée par une prise murale à 3 broches
correctement mise à la terre. La plaque signalétique
en série indique la tension et la fréquence
auxquelles l’appareil est conçu.
AVERTISSEMENT - Une utilisation incorrecte de la
fi che de mise à la terre peut entraîner un risque
d’électrocution. Consultez un électricien qualifi é
ou un agent de service si les instructions de mise
à la terre ne sont pas complètement comprises ou
s’il existe un doute quant à savoir si l’appareil est
correctement mis à la terre.
Ne branchez pas votre appareil à des rallonges
ou avec un autre appareil dans la même prise
murale. Ne pas épisser le cordon d’alimentation.
Ne coupez ou retirez en aucun cas la troisième
broche du cordon d’alimentation. N’utilisez pas de
cordons de prolongement ou d’adaptateurs sans
mise à la terre (deux broches).
Si le cordon d’alimentation est endommagé, il doit
être remplacé par le fabricant, son agent de service
ou une personne qualifi ée similaire afi n d’éviter tout
risque.
Consignes de sécurité importantes
LIRE ET SUIVRE TOUTES LES INSTRUCTIONS DE SÉCURITÉ
GARDEZ CES INSTRUCTIONS!

16
INSTRUCTIONS D’INSTALLATION
EMPLACEMENT
• Deux personnes doivent être utilisées pour
déplacer l’appareil.
• Retirer l‘emballage intérieur et extérieur avant
l’installation. Essuyez l’extérieur de l’appareil
avec un chiffon doux et sec et à l’intérieur avec
un chiffon humide tiède.
• Placez votre appareil sur un plancher qui
est assez fort pour le soutenir quand il est
complètement chargé.
• Ne placez pas l’appareil directement dans la
lumière du soleil ou à proximité de sources de
chaleur, comme un poêle ou un réchauffeur,
car cela peut augmenter la consommation
électrique. Des températures ambiantes extrêmes
et froides peuvent également provoquer
dysfonctionnement de l’appareil.
• Ne pas utiliser ce produit près de l’eau, par
exemple, dans un sous-sol humide ou près d’un
évier.
• Cet appareil est destiné à un usage domestique
seulement. Cette unité n’est pas conçue pour une
installation extérieure, y compris une installation
où la température n’est pas contrôlée (garages,
porches, carports, etc.).
• Avant de brancher l‘appareil à une source
d’alimentation, laissez - le debout pendant
environ 6 heures; Ceci réduira la possibilité
d’un dysfonctionnement dans le système de
refroidissement de la manipulation pendant le
transport.
• Cet appareil est 23,4 pouces (59,5 cm) de large
par 69,8 pouces (177,3 cm) de haut par 28,6
pouces (72,7 cm) de profondeur.
ÉVACUATION AVANT
Cet appareil est une respiration avant. Ne
bloquez pas l’évent avant car cela entraînera
des températures de fonctionnement élevées,
une consommation d’énergie plus élevée et une
éventuelle surchauffe et une panne du système.
INSTRUCTIONS DE NIVEAU
Il y a deux pattes réglables sur le bas de l’appareil
qui peuvent être montés ou bas pour s’assurer
que l’appareil est au niveau. Il est important que
l’appareil soit à niveau pour minimiser les bruits et
les vibrations. Pour niveler l’appareil:
1. Tournez le pied de mise à niveau dans le sens
antihoraire aussi loin que possible, jusqu’à ce
que le haut du pied touche le bas de l’armoire.
2. Tournez lentement le pied de mise à niveau dans
le sens des aiguilles d’une montre jusqu’à ce que
l’appareil soit de niveau.
IMPORTANTE
Assurez-vous que la porte est complètement
fermée lorsque l’appareil est en marche. Le
fait de ne pas fermer complètement la porte
peut entraîner une condensation excessive et
des dégâts d’eau potentiels au plancher sous
l’appareil. Danby ne sera pas responsable des
dommages résultant d’une mauvaise utilisation.

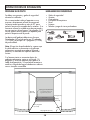
Accès électriqueAccès électri
q
u
e
*Si la prise électrique est
dans des armoires adjacentes
2 po (5 cm)
6 po
(15,3 cm)
1,5 po (3,8 cm) diamètre
24 pouces (61 cm)
90°
70 po
(177,9 cm)
28,1 pouces
(71,3 cm)
17
INSTRUCTIONS D’INSTALLATION
PRÉPARER L’ENCEINTE
En faire les installations décrites dans cette section,
des gants, les lunette de sécurité devraient être
portés.
Il n’est pas recommandé d’installer l’appareil dans
un coin ou directement à côté d’un mur. La porte
devra être ouverte plus de 90 ° pour permettre une
extension complète des étagères. S’il est nécessaire
de placer l’unité à côté d’un mur ou dans un coin,
laisser au moins 2-4 pouces (5-10 cm) d’espace
entre le mur et l’appareil pour permettre l’ouverture
de la porte.
L’ouverture de l’armoire doit avoir au moins 24
pouces (61 cm) de large par 70 pouces (177,9
cm) de hauteur par 28,1 pouces (71,3 cm) de
profondeur.
Remarque: L’exigence de profondeur suppose
que la prise électrique est située dans les armoires
adjacentes ou encastrées dans la paroi arrière, non
montées en surface à l’intérieur de l’enceinte.
Si la prise électrique est située à l’intérieur des
armoires adjacentes, couper un trou de 3,8 cm
(1,5 pouce) de diamètre pour admirer le cordon
d’alimentation. Si le mur de l’armoire est en métal,
le bord du trou doit être recouvert d’une douille ou
d’un passe-fi l.
OUTILS REQUIS
• Lunette de sécurité
• Gants
• Ruban à mesurer
• Equerre de charpentier
• Niveau
• Lampe de poche
• Perceuse et jeu de scie cylindrique
Ruban à
mesurer
Equerre de
charpentier
Perceuse et jeu de
scie cylindrique
Gants
Niveau
Lunette de sécurité
Lampe de poche

INSTRUCTIONS D’INSTALLATION
18
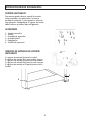
SUPPORT ANTI-TIP
Cet appareil peut basculer lorsque les étagères
sont étendues, ce qui peut endommager, blesser
ou perdre le contenu. Si cet appareil est utilisé
dans une application autonome, le support anti-
basculement doit être installé des deux côtés de
l’armoire.
ACCESSOIRES
1. Support anti-tip
2. Boulon
3. Rondelle de blocage
4. Rondelle plate
5. Vis
6. Vis d’expansion
TROU DE FIXATION ANTI-TIP
A: Trou de montage fi xe pour l’appareil
B: Trous de montage fi xes pour cloisons sèches
C: Trous de montage fi xes pour plancher de bois
D: Trous de montage fi xes pour plancher en béton
E: Trou de montage à l’arrière de l’appareil
A
B
C
D
E
E
1
2 3
4
5 6

INSTRUCTIONS D’INSTALLATION
19
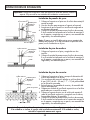
Installation contre la cloison sèche:
1. Placez le support sur le sol avec le trou de montage B
contre le mur.
2. Utilisez deux vis pour fi xer le support au mur.
3. Assurez-vous qu’au moins une vis est fi xée à un poteau
mural.
4. Placez l‘appareil de sorte que le trou de montage E de
l’appareil soit aligné avec le trou de montage A sur le
support et fi xez - le avec un boulon, une rondelle de
blocage et une rondelle plate.
Remarque: Au moins une vis doit pénétrer dans un montant
en bois. S’il n’y a pas de goujons disponibles, utilisez
l’installation au sol.
Installation avec plancher en bois:
1. Placez le support sur le sol et fi xez-le avec deux vis.
2. Placez l‘appareil de sorte que le trou de montage E de
l’appareil soit aligné avec le trou de montage A sur le
support et fi xez - le avec un boulon, une rondelle de
blocage et une rondelle plate.
Installation au sol en béton:
1. Placez le support sur le sol et marquez l’emplacement du
trou de montage D sur le plancher.
2. À l’aide d’une mèche de béton, percer un trou pilote de 8
mm (3/8“) de 45 ~ 55 mm (1,7” ~ 2“) de profondeur à
l’emplacement marqué.
3. Retirez l’écrou, la rondelle élastique et la rondelle de la
vis d’expansion.
4. Taper soigneusement la vis de dilatation dans le trou foré
à l‘aide d’un marteau ou d‘un maillet.
5. Placez le support de sol avec le trou de montage D sur
la vis de dilatation et fi xez - le avec l‘écrou, la rondelle
élastique et la rondelle.
6. Placez l‘appareil de sorte que le trou de montage E de
l’appareil soit aligné sur la fi xation A du support et fi xez
- le à l‘aide d’un boulon, d‘une rondelle de blocage et
d’une rondelle plate.
Support anti-basculement
Rondelle plate
Rondelle frein
Boulon
Vis
Poteau mural
Support anti-basculement
Rondelle plate
Rondelle frein
Boulon
Vis
Support anti-basculement
Rondelle plate
Rondelle frein
Boulon
Vis d’expansion
Important: Déterminez l’emplacement fi nal de l’appareil avant d’essayer d’installer
le support. Choisir l’une des trois méthodes d’installation ci-dessous.
Important: Après avoir installé le support, essayez d’utiliser une force légère pour faire
basculer l’appareil. Si l’appareil ne pointe pas, le support est installé correctement. Si l‘appareil
fait une pointe, réinstallez le support plus solidement.
La page charge ...
La page charge ...
La page charge ...
La page charge ...
La page charge ...
La page charge ...
La page charge ...
La page charge ...
La page charge ...
La page charge ...
La page charge ...
La page charge ...
La page charge ...
La page charge ...
La page charge ...
La page charge ...
La page charge ...
La page charge ...
La page charge ...
La page charge ...
La page charge ...
La page charge ...
-
 1
1
-
 2
2
-
 3
3
-
 4
4
-
 5
5
-
 6
6
-
 7
7
-
 8
8
-
 9
9
-
 10
10
-
 11
11
-
 12
12
-
 13
13
-
 14
14
-
 15
15
-
 16
16
-
 17
17
-
 18
18
-
 19
19
-
 20
20
-
 21
21
-
 22
22
-
 23
23
-
 24
24
-
 25
25
-
 26
26
-
 27
27
-
 28
28
-
 29
29
-
 30
30
-
 31
31
-
 32
32
-
 33
33
-
 34
34
-
 35
35
-
 36
36
-
 37
37
-
 38
38
-
 39
39
-
 40
40
-
 41
41
-
 42
42


Danby SPRWC140D1SS Manuel utilisateur
- Catégorie
- Boissons glacées
- Taper
- Manuel utilisateur
- Ce manuel convient également à
dans d''autres langues
- English: Danby SPRWC140D1SS User manual
- español: Danby SPRWC140D1SS Manual de usuario
Documents connexes
-
Danby SPRWC031D1SS Manuel utilisateur
-
Danby SR001 Le manuel du propriétaire
-
Summit SWC057D1BSS Manuel utilisateur
-
 SILHOUETTE PROFESSIONAL SPRBC056D1SS Le manuel du propriétaire
-
 SILHOUETTE PROFESSIONAL SPRBC047D1SS Lorraine Le manuel du propriétaire
-
Danby SWC057D1BSS Stilton Le manuel du propriétaire
-
Danby Silhouette SBC057D1BSS Le manuel du propriétaire
-
-
Danby DAR055D1BSSPRO Le manuel du propriétaire
-
 DANBY SILHOUETTE SBC051D1BSS Le manuel du propriétaire


