MyBinding MBM Ideal 4605 Manuel utilisateur
- Catégorie
- Destructeurs de papier
- Taper
- Manuel utilisateur
La page charge ...
La page charge ...

IDEAL 4605
IDEAL 4605-Cross/Cut
Betriebsanleitung
Operating Instructions
Mode d’emploi
Gebruiksaanwijzing
Manuale d’istruzione
Instrucciones para el uso
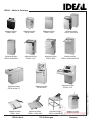
Empfohlenes Zubehör / Recommended Accessories / Accessoires Recommandés
Aanbevolen toebehoren / Accessori Raccomandati / Accesorios Recomendados:
Nr
. 9000 610 Nr. 9000 030
Umweltverträgliches Spezialöl Plastiksäcke (50 Stück)
Environmentally friendly oil Plastic bags (50 pieces)
Huile spéciale biodégradable Sacs plastiques (50 pièces)
Milieuvriendelijke olie Plastic zakken (50 stuks)
Olio biodegradabile Sacchi di plastica (50 pezzi)
Aceite biodegradable Bolsas de plástico (50 bolsas)

-2-
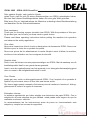
Sehr geehrte Kundin, sehr geehrter Kunde,
vielen Dank, daß Sie sich für einen Aktenvernichter von IDEAL entschieden haben.
Mit dem Kauf dieses Qualitätsproduktes haben Sie eine gute Wahl getroffen.
Bitte lesen Sie vor Inbetriebnahme der Maschine unbedingt diese Betriebsanleitung
und beachten Sie die Sicherheitshinweise.
Dear customers,
Thank you for choosing a paper shredder from IDEAL. With the purchase of this qua-
lity product you can be sure you have made a good choice.
Please read these operating instructions before putting the machine into operation
and observe the safety regulations.
Cher client,
Nous vous remercions d’avoir choisi un destructeur de documents IDEAL. Nous vous
félicitons pour le choix de ce produit de qualité.
Nous vous prions de lire attentivement le mode d’emploi avant d’utiliser la machine,
et attirons votre attention sur les consignes de sécurité.
Geachte klant,
Dank u voor het kiezen van een papiervernietiger van IDEAL. Met de aankoop van dit
kwaliteitsprodukt heeft u een goede keuze gemaakt.
Leest u voor de ingebruikname van het apparaat a.u.b. deze gebruiksaanwijzing goed
door en neemt u de veiligheidsinstructies in acht.
Caro Cliente,
grazie per aver scelto un distruggidocumenti IDEAL. Con l’acquisto di un prodotto di
qualità Lei può essere sicuro di aver fatto una buona scelta.
Per favore legga questo manuale d’istruzione prima di mettere in funzione il distrug-
gidocumenti e osservi le regole di sicurezza.
Estimados clientes:
Le estamos agradecidos por haber elegido una destructora de papel IDEAL. Con la
adquisición de esta máquina de gran calidad, usted puede estar seguro de que ha
realizado una buena elección.
Le recomendamos lea las instrucciones antes de poner en funcionamiento esta
máquina y cumpla las normas de seguridad.
IDEAL 4605 • IDEAL 4605-Cross/Cut
La page charge ...
La page charge ...

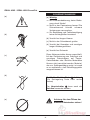
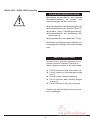
(a) Important:
➞ Operation by one person at a time
only; no operation by children!
➞ Do not reach into the feed opening of
the cutting head. The rotating cutters
will cause severe injuries
➞ Do not use ladders or other means to
climb onto the machine during opera-
tion or servicing
(b) Long hair can become entangled in
cutting head
(c) Don’t reach into the feed-opening of
the cutting head
(d) Take care of ties and other loose
pieces of clothing
(e) Be careful of loose jewellery
Paper shredders are for use in shredding
documents and other sensitive informati-
on on paper. Carbon ribbon cassettes or
similar items cannot be shredded.
Material which could form loops must be
pre-cut to eliminate the danger of injuries.
(a) Impor
tant:
➞ une seule personne à la fois est auto-
risée à utiliser la machine. Celle-ci ne
doit pas être utilisée par des enfants!
➞ Ne pas introduire les mains dans
l’ouverture de la machine. Les
couteaux du bloc de coupe peuvent
entraîner des blessures graves.
➞ Pour dégager un bourrage ou pendant
l’utilisation, ne pas introduire d’objets
pour faire levier, dans le bloc de
coupe.
(b) Attention aux cheveux longs
(c) Ne pas introduire les mains dans le
bloc de coupe
(d) Attention au port de cravate et autres
vêtements flottants
(e) Attention au port de bijoux
Ce destructeur sert uniquement à détruire
les documents et autres supports d’infor-
mations sur papier. Les cassettes à ruban
ou des matériaux semblables ne peuvent
être détruits. Des matériaux, qui de par
leur forme, peuvent être dangereux pour
l’opérateur (ficelle, bandes etc.) doivent
être précoupés avant introduction dans le
destructeur, pour éviter tout accident.
-5-
SAFETY PRECAUTIONS CONSIGNES DE SECURITE
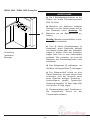
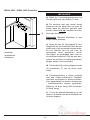
Impor
tant: Please remove the
plug from the electrical socket
before removing any covers!
In case of danger press the emergency
stop key
B
! (For unlocking the key must
be turned to the right)
The main switch
C
can also be used as
an emergency stop.
Attention:
Débrancher la ma-
chine avant ouverture.
En cas de danger, actionner la touche
d’arrêt d’urgence
B
! (Pour le déver-
rouillage, tourner la touche vers la droite)
L’interrupteur principal
C
peut être uti-
lisé comme touche d’arrêt d’urgence.
La page charge ...
La page charge ...
La page charge ...

-9-
La machine dispose de fonctions d’arrêt,
qui doivent être controllées au moins 1
fois par an. Ces vérifications doivent étre
consignées.
➜ interrupteur principal C
➜ arrêt d’urgence B
➜ touches marche-avant, arrêt, marche-
arrière
➜ arrêt à l’ouverture de l’entonnoir D
➜ arrêt en cas de porte ouverte H
Le câble d’alimentation ainsi que toutes
les protections doivent être en bon état et
fixées correctement.
VERIFICATION DE SECURITE
VEILIGHEIDSCONTROLE
Minimaal één maal per jaar de onder-
staande uitschakelfuncties controleren en
deze ook noteren.
➜ uitschakelfunctie hoofdschakelaar C
➜ uitschakelfunctie noodknop B
➜ vooruit-, stop-, terugloopschakelaar
➜ uitschakelfunctie bij geopende
trechter D
➜ uitschakelfunctie bij geopende deur H
Kabel en kabelbehuizing dienen correct
bevestigd en onbeschadigd te zijn.
CONTROLLI DI SICUREZZA
Eseguire almeno una volta all’anno i
seguenti controlli e registrare sempre i
risultati.
➜ Funzione spegnimento pannello prin-
cipale C
➜ Funzione spegnimento del tasto di
emergenza B
➜ Pulsante stop, avanti, indietro
➜ Funzione spegnimento a imbuto di
imbocco aperto D
➜ Funzione spegnimento a sportello
aperto H
Il cavo di alimentazione, le protezioni e la
carrozzeria devono essere intatti e fissati
correttamente.
Al menos una vez al año las siguientes
funciones de desconexión deben de ser
comprobadas. Deben guardarse los datos
de estas inspecciones.
➜ Función de desconexión del inter-
ruptor principal C
➜ Función de desconexión de la llave de
emergencia B
➜ Interruptor de inicio, paro y marcha atrás
➜ Función de desconexión cuando la
tolva está abierta D
➜ Desconexión si la puerta H está
abierta.
El cable y la caja deben mantenerse
indemnes.
INSPECCIONES DE SEGURIDAD
La page charge ...

-11-
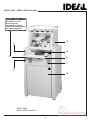
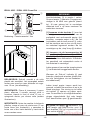
INSTALLATION MONTAGE
a) Loosen the 4 screws holding the
machine on the pallet with the help of a
wrench (13 mm).
b) Use several strong people to lift the
machine from the pallet. Then roll the
machine to its destination (Attention:
Do
not lift the machine by the hopper).
Impor
tant: Machine should only be instal-
led in a dry location.
c) Open the door H. Remove the waste
bin 0 and put a plastic bag in, folding the
bag end over the top of the waste bin 0.
Then push the waste bin into the cabinet.
Close the door, otherwise the machine will
not function for safety reasons.
d) Raise the feeding table F so that the
air slits G are open.
e) These machines come with a Cekon-
plug. If a corresponding Cekon-socket is
not available, it should be installed by a
trained electrican: 3-phase A/C power -
voltage as per specification sticker. Circuit
protection: 16 amp. slow blowing (230
Volt-Version: 30 amp. slow blowing).
f) After reading the operating instructions
slide them into the holder inside the door.
a) Dévisser les 4 boulons de la palette
avec une clé de 13 mm.
b) Après déballage, retirer la machine de
la palette à plusieurs, et la rouler jusqu’au
lieu d’installation (Attention:
Ne jamais
soulever la machine par l’entonnoir).
Impor
tant: La machine ne doit pas être
utilisée en endroit humide.
c) Ouvrir la porte H. Retirer le chariot à
déchets 0 et y introduire un sac plastique
en le rabattant sur les bords du chariot à
déchets 0. Replacer ensuite le chariot à
déchets dans son logement en le pous-
sant vers l’avant. Fermer la porte, sinon le
destructeur, pour des raisons de sécurité,
ne fonctionnera pas.
d) Remonter la tablette F pour libérer
les aérations G.
e) Ce destructeur est équipé d’un moteur
triphasé. Les caractéristiques du moteur
se retrouvent sur la plaque signalétique
de la machine. Le secteur doit être
protégé par des fusibles de 16 ampères à
fusion lente en version 400 Volts (Version
230 Volts: 30 ampères à fusion lente).
f) Après consultation, ranger le mode
d’emploi dans son emplacement derrière
la porte.
La page charge ...
La page charge ...
La page charge ...

-15-
OPERATION UTILISATION
Push the main switch C to position l.
Green LED 5 illuminates. The paper
shredder is now ready for operation.
Depending on the type of material and the
amount to be shredded there are 2 diffe-
rent shredding possibilities:
[1] Feeding via the f
eeding hopper D
(for shredding the contents of waste bas-
kets, crumpled paper, newspapers, com-
puter printouts, etc.): Press the switch for
forward operation 0. The machine will
switch on and can be fed via the hopper.
After shredding, press the stop button 1.
[2] Feeding via the shred opening
E
with automatic Start/Stop: When paper
is inserted the machine will automatically
start due to a photo electric cell and after-
wards will automatically stop.
If necessary, it is possible to reverse by
pressing the reverse button 2.
When the bag full light 4 is lit, please
change the full shred bag (Plastic bags
are available from the manufacturer - see
accessories).
If too much paper is fed, the machine swit-
ches off and reverses automatically. The
hopper D may be opened to clear jams -
the machine is then isolated for safety rea-
sons. The red control symbol for
‘door/hopper open’ 3 will light.
Basculer l’interrupteur principal C sur I.
La LED 5 s’allume. Le destructeur est
prêt à fonctionner. Selon la nature et les
quantités des matériaux à détruire, deux
modes d’introduction sont possibles:
[1] Intr
oduction par l’entonnoir D
(destruction de contenu entier de corbeil-
les à papier, papiers froissés, journaux,
listings, etc.): Appuyer sur la touche „mar-
che-avant“ 0, la machine se met en mar-
che et peut être alimentée par l’entonnoir.
Après destruction, appuyer sur la touche
„arrêt“ 1.
[2] Intr
oduction directe par l’ouverture
située près du bloc de coupe E
(Marche/arrêt automatique par cellule):
La machine se met en marche automa-
tiquement lors de l’introduction du papier
dans l’ouverture, et s’arrête après leur
passage.
En cas de besoin, la touche „marche-
arrière“ 2 permet d’inverser le sens de
rotation des cylindres de coupe.
Si le témoin „Sac plein“ 4 s’allume, rem-
placer le sac plastique (cf. accessoires
recommandés).
Si une quantité trop importante de papier
est introduite, le destructeur s’arrête auto-
matiquement et effectue une marche-
arrière pour dégager le papier bloqué.
Pour dégager le papier bloqué, il est
également possible d’ouvrir l’entonnoir D.
Un dispositif de sécurité empêche alors la
remise en route de la machine. Le voyant
rouge „porte/entonnoir ouvert“ s’allume 3.
In case of danger press the emergency
stop key
B
! The red control symbol for
‘door/hopper open’ 3 will light. For
unlocking the key must be turned to the
right.
En cas de danger, appuyer sur la tou-
che d’arrêt d’urgence
B
! Le voyant
rouge „porte/entonnoir ouvert“ s’allume
3.Pour déverouiller, tourner le bouton
vers la droite.
La page charge ...
La page charge ...
La page charge ...

-19-
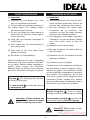
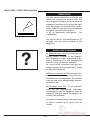
MAINTENANCE
ENTRETIEN
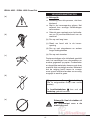
POSSIBLE MALFUNCTIONS
INCIDENTS EVENTUELS
After every shred bag change, the entire
length of the cutting head should be oiled
(to do this the hopper can be opened).
Then briefly switch on the machine to let
the oil spread over the cutting head (A
special oil for this purpose is available
from the manufacturer - see accessories).
From time to time clean the photo cell E
with a small brush or something similar.
Lors de chaque changement de sac,
déposer plusieurs filets d’huile sur toute la
largeur du bloc de coupe (l’entonnoir peut
être ouvert pour cette opération). Faire
tourner brièvement la machine pour que
l’huile se répartisse dans le bloc de coupe
(huile spéciale - voir accessoires recom-
mandés).
Il est nécessaire de nettoyer régulière-
ment la cellule E avec un petit pinceau.
● Machine will not start! Check the fol-
lowing points: Machine is plugged in?
Fuse is O.K.? Main switch is in position l?
Emergency stop key B is unlocked? Bag
full? Door and hopper closed?
➜ Press button for forward operation or
feed paper in the middle of the shred ope-
ning E, so that it passes through the
photo cell.
● Machine stops! In case of extreme
overloading the motor protection switch
will cut off the power supply. The machine
starts after a short cooling down period
automatically.
● Rotating feeding paddles do not run!
Material has jammed, the clutch prevents
damage to the feeding paddles. Stop
machine, and remove the material after
reversing.
If none of these points are applicable,
contact your dealer.
● La machine ne fonctionne pas! Vérifier
les points suivants: Prise de courant?
Fusibles? Interrupteur principal sur „I“?
Touche d’arrêt d’urgence B déverroul-
liée? Sac plein? Porte et entonnoir fermé?
➜ Appuyer sur la touche „marche-avant“
ou introduire du papier dans le milieu de
l’ouverture E, afin que la cellule fonc-
tionne.
● La machine s’arrête! En cas de sur-
charge extrême, le disjoncteur coupe l’ali-
mentation électrique. Après un court
temps de refroidissement, la machine
redémarre automatiquement.
● L’axe à ailettes reste bloqué! Un
matériau est coincé et l’embrayage patine
pour empêcher la détérioration de l’axe à
ailettes. Arrêter de suite la machine.
Appuyer sur la touche „marche-arrière“ et
retirer le matériau.
Si le disfonctionnement persiste après ces
vérifications, veuillez contacter le SAV.
La page charge ...
La page charge ...
La page charge ...

-23-
INFORMATIONS DU FABRICANT DICHIARAZIONE DEL FABBRICANTE
VERKLARING VAN DE FABRIKANT DECLARACIÓN DEL FABRICANTE
Cette machine a subi les contrôles de
sécurité et correspond aux directives
européennes 89/392, 73/23 et 89/336.
Le fabricant est certifié DIN EN ISO 9001.
Les destructeurs IDEAL sont conformes
au Code du Travail.
Les indications techniques se retrouvent
sur la plaque signalétique de la machine.
Nor
mes et prescriptions techniques appli-
cables: Version 400 Volts: 292; 294;
27779; 55014-1; 55014-2; 60950; 61000-
3-2; 61000-3-3 / 3~: UL 802 D E.D.P.
Equipment /
c
UL 802 D E.D.P. Equipment.
Niv
eau sonore: Au poste de travail, le
niveau sonore est inférieur aux valeurs
maximales autorisées par la norme EN
27779 (75 décibels).
Questa macchina ha ottenuto il marchio
GS ed è conforme alle norme EC 89/392,
73/23 e 89/336.
Al fabbricante è riconosciuta la certifica-
zione DIN EN ISO 9001 degli standard
di qualità.
Le esatte specifiche tecniche si trovano
sull’etichetta adesiva del distruggidocu-
menti.
Nor
me e specifiche tecniche applicabili:
Versione a 400 Volt: 292; 294; 27779;
55014-1; 55014-2; 60950; 61000-3-2;
61000-3-3 / 3~: UL 802 D E.D.P.
Equipment /
c
UL 802 D E.D.P. Equipment.
Inf
ormazioni sul livello di rumorosità: Il
livello delle emissioni acustiche nell’am-
biente di utilizzo risulta inferiore al valore
massimo di 75 db (A), fissato con norma-
tiva EN 27779.
Deze machine is goedgekeurd door toon-
aangevende, onafhankelijke veiligheids-
instituten en voldoet aan EG-normen
89/392, 73/23 en 89/336.
De fabrikant is gecertificeerd volgens DIN
EN ISO 9001.
De precieze technische specificaties vindt
u op het typeplaatje op het apparaat.
Nor
men en technische waarden: 400 Volt
versie: 292; 294; 27779; 55014-1; 55014-
2; 60950; 61000-3-2; 61000-3-3 / 3~:
UL 802 D E.D.P. Equipment /
c
UL 802
D E.D.P. Equipment.
Geluidsniv
eau informatie: Het geluids-
niveau op de werkplek is lager dan het
volgens EN norm 27779 maximaal toege-
stane geluids-niveau van 75 db (A).
Esta máquina está aprobada por labora-
torios de seguridad independientes y de
conformidad con las regulaciones-CE
89/392, 73/23 y 89/336.
El fabricante está certificado por las nor-
mativas de calidad DIN EN ISO 9001.
Las especificaciones técnicas exactas se
encuentran adheridas a la máquina.
Nor
mativas aplicadas y especificaciones
técnicas: Versión 400 V.: 292; 294; 27779;
55014-1; 55014-2; 60950; 61000-3-2;
61000-3-3 / 3~: UL 802 D E.D.P.
Equipment /
c
UL 802 D E.D.P. Equipment.
Niv
el de ruido: El nivel de ruido en el
lugar de trabajo es inferior al nivel máximo
permitido de 75 db (A) por la normativa
EN 27779.
-
 1
1
-
 2
2
-
 3
3
-
 4
4
-
 5
5
-
 6
6
-
 7
7
-
 8
8
-
 9
9
-
 10
10
-
 11
11
-
 12
12
-
 13
13
-
 14
14
-
 15
15
-
 16
16
-
 17
17
-
 18
18
-
 19
19
-
 20
20
-
 21
21
-
 22
22
-
 23
23
-
 24
24
-
 25
25


MyBinding MBM Ideal 4605 Manuel utilisateur
- Catégorie
- Destructeurs de papier
- Taper
- Manuel utilisateur
dans d''autres langues
- italiano: MyBinding MBM Ideal 4605 Manuale utente
- English: MyBinding MBM Ideal 4605 User manual
- español: MyBinding MBM Ideal 4605 Manual de usuario
- Deutsch: MyBinding MBM Ideal 4605 Benutzerhandbuch
- Nederlands: MyBinding MBM Ideal 4605 Handleiding