
DWC-127633
Dishwasher Compact (EN)
Kompakt-Geschirrspüler (DE)
Mini lave-vaisselle (FR)
Kompakt diskmaskin (SE)
Mini vaatwasser (NL)
Kompaktowa zmywarka (PL)
Lavavajillas compacto (ES)

- 1 -
Content – Inhalt – Teneur – Innehåll – Inhoud – Treść –
Contenido
Instruction manual – English ...................................................................................... - 2 -
Bedienungsanleitung – German ............................................................................... - 12 -
Mode d‘emploi – French .......................................................................................... - 23 -
Bruksanvisning – Swedish ........................................................................................ - 34 -
Gebruiksaanwijzing – Dutch ..................................................................................... - 44 -
Instrukcja obsługi – Polish ........................................................................................ - 55 -
Manual de Instrucciones – Spanish .......................................................................... - 67 -

- 2 -
Instruction manual – English
SAFETY INSTRUCTIONS
Before use make sure to read all of the below instructions in
order to avoid injury or damage, and to get the best results
from the appliance. Make sure to keep this manual in a safe
place. If you give or transfer this appliance to someone else
make sure to also include this manual.
In case of damage caused by user failing to follow the
instructions in this manual the warranty will be void. The
manufacturer/importer accepts no liability for damages
caused by failure to follow the manual, a negligent use or use
not in accordance with the requirements of this manual.
1. Read and save these instructions. Attention: pictures in the
instruction manual are for reference only.
2. This appliance can be used by children aged from 8 years
and above and persons with reduced physical, sensory or
mental capabilities or lack of experience and knowledge if
they have been given supervision or instruction concerning
use of the appliance in a safe way and understand the
hazards involved. Children shall not play with the appliance.
Cleaning and user maintenance shall not be made by
children without supervision.
3. If the supply cord is damaged, it must be replaced by the
manufacturer, its service agent or similarly qualified
persons in order to avoid a hazard.
4. This appliance is intended to be used in household and
similar applications such as: staff kitchen areas in shops,
offices and other working environments; farm houses; by
clients in hotels, motels and other residential type
environment; bed and breakfast type environments.
5. Packaging material could be dangerous for children!
6. This appliance is for indoor household use only.
7. Unplug before cleaning and performing maintenance on
the appliance.

- 3 -
8. Before inserting the plug into the mains socket, please
check that the voltage and frequency comply with the
specifications on the rating label.
9. Always plug the appliance into an earthed plug socket.
10. Ensure that the mains cable is not hung over sharp edges
and keep it away from hot objects and open flames.
11. Do not immerse the appliance or the mains plug in water
or other liquids. There is danger to life due to electric shock!
12. To remove the plug from the plug socket, pull the plug. Do
not pull the power cord.
13. Do not touch the appliance if it falls into water. Remove the
plug from its socket, turn off the appliance and send it to
an authorized service center for repair.
14. Do not plug or unplug the appliance from the electrical
outlet with a wet hand.
15. Never attempt to open the housing of the appliance, or to
repair the appliance yourself. This could cause electric
shock.
16. Do not use the appliance for other than intended use.
17. Do not wind the cord around the appliance and do not
bend it.
18. Do not abuse, sit on, or stand on the door or dish rack of
the dishwasher.
19. Do not operate your dishwasher unless all enclosure panels
are properly in place.
20. Do not open the door during use to avoid hot water flying
out causing any hurts. There is a risk of water squirting out.
21. Do not place any heavy objects on or stand on the door
when it is open. The appliance could tip forward.
22. When loading items to be washed:
Locate sharp items so that they are not likely to damage
the door seal;
Warning: knives and other utensils with sharp points
must be loaded in the basket with their points facing
down or placed in a horizontal position.

- 4 -
23. Do not wash plastic items unless they are marked
“dishwasher safe” or the equivalent. For unmarked plastic
items, check the manufacturer’s recommendations.
24. Use only detergent and rinse agents recommended for use
in an automatic dishwasher.
25. Never use soap, laundry detergent, or hand washing
detergent in your dishwasher.
26. The door should not be left open, since this could increase
the risk of tripping.
27. Do not tamper with controls.
28. The appliance needs to be connected to the main water
valve using a new hose set. Old sets should not be reused.
29. The maximum permissible inlet water pressure is 1MPa.
30. The minimum permissible inlet water pressure is 0.04MPa.
31. The openings must not be obstructed by a carpet.
32. Up to 2 sets of tableware can be cleaned at one time.
33. Do not place the appliance in the environment under 0℃.
34. Do not place and use the appliance in the platform which
is not stable, wet or inflammable avoiding any damage.
35. Do not place and use the appliance within 150mm far from
gas stoven or heater.
36. Do not tilt or move the appliance when washing.
37. Knives and other items with sharp points shall not face
towards persons avoiding any hurts when opening the door.
38. Do not touch or block the side air outlet.
39. IMPORTANT After usage turn off the water tap.

- 5 -
DWC-127633 EN
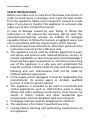
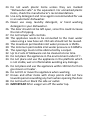
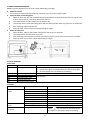
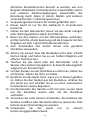
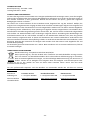
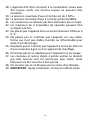
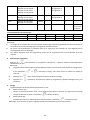
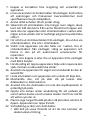
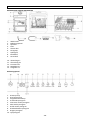
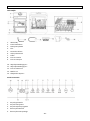
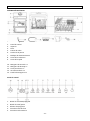
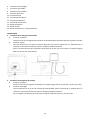
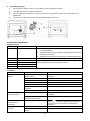
PARTS DESCRIPTION
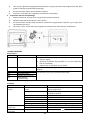
1. Water inlet
2. Control panel
3. Spray arm
4. Filter
5. Glass door
6. Door handle
7. Storage rack
8. Cutlery basket
9. Tableware basket
10. Inlet hose X 1
11. Drain hose X 1
12. Fruit basket X 1
13. Cup X 1
14. Hose collar X 1
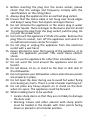
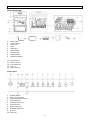
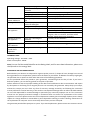
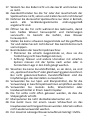
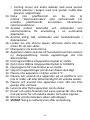
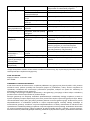
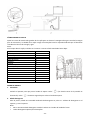
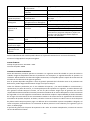
Control panel
1. Standby button
2. Start / pause button
3. Program selection button
4. Fruit mode icon
5. Intensive mode icon
6. Eco mode icon
7. Quick mode icon
8. Standard mode icon
9. Dry icon
10. Time icon

- 6 -
11. Door open icon
12. Temperature icon
13. Display screen
14. Tank mode
15. Tap mode
16. Dry mode + storage mode button
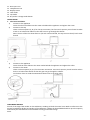
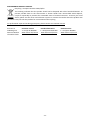
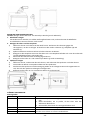
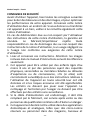
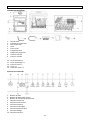
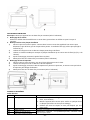
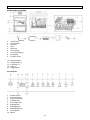
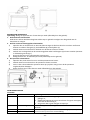
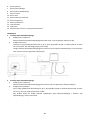
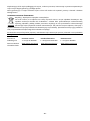
INSTALLATION
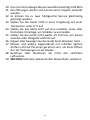
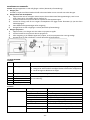
1. Inlet hose installation
1) Connect to the appliance
Insert the inlet hose elbow into the water inlet behind the appliance and tighten the screw.
2) Connect to the tap
There are three options (A, B, C) for the tap connection, but for B and C options you will need to make
a hole on or behind the cabinet so that the hose can go through the cabinet.
Note: the size of the inlet hose elbow is 3/4’ with internal thread, the tap size must be 3/4’ with outer
thread.
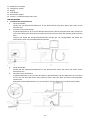
2. Drain hose installation
1) Connect to the appliance
Insert the drain hose elbow to the water outlet behind the appliance and tighten the collar.
2) Connect to the sewer
There are three options (A, B, C) for the sewer connection. For B and C options you will need to make a
hole on or behind the cabinet so that the pipe can go through the cabinet.
Fix the drain hose to avoid the wastewater flowing out to the other place.
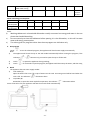
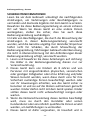
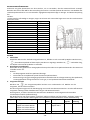
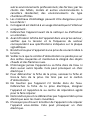
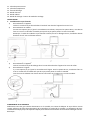
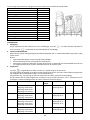
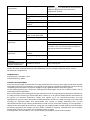
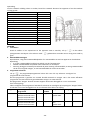
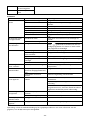
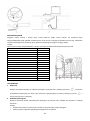
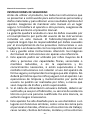
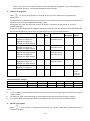
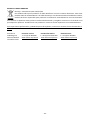
TABLEWARE LOADING
Get rid of the large food residue on the tableware, avoiding to block the water hose. Make a reference to the
picture for tableware display and quality of the tableware. Loading the household dishwasher up to the capacity
indicated by the manufacturer will contribute to energy and water savings.
Note:

- 7 -
In order to fully clean the tableware, please tilt the tableware internally or put stained face down.
Tableware
Quality
190mm dessert plate
3
130mm dessert bowl
1
70mm Mug
1
60mm glass
2
Fork
2
Knife
2
Soup spoon
2
Dessert spoon
2
Tea spoon
2
230mm soup plate
1
140mm saucer
1
78mm cup
1
213mm bowl
1
Serving fork
1
195mm dessert plate
1
OPERATION
1. Power on
Plug in, the appliance will be in standby mode. Touch “ ”, the other icons in the display screen will appear.
Touch “ ” for 3 seconds to switch back to the standby.
2. Add detergent
Open the door, add moderate detergent powder, or 1pc detergent block into the appliance; then close the
door.
Note:
No detergent is needed when using the fruit washing mode.
Use the detergent which is special for dishwashers.
The dosage: 8-10g each washing circle. Please use the proper dosage of detergent, too little detergent
will not clean the dishes well; too much detergent will cause the residue.
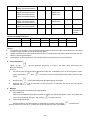
3. Program selection
Touch “ ”, the program icons will light one by one, select the program you want to start.
Eco program is suitable to clean normally soiled tableware. It is the most efficient program in terms of its
combined energy and water consumption.
The program “Dry” has two steps: 60 minutes drying time and 73 hours circular fresh air (storage).
If needed, you can select the program “Standard”, then touch the icon “Dry”; you will have 1 more hour of
drying time and 73 hours circular fresh air for storage.
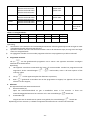
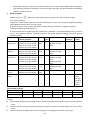
Program
Program execution
Time
Detergent
Temperature
Drying
time
Storage
Standard
Hot water washing
Cold water rinsing
Cold water rinsing
Hot water rinsing
69 Min
8g
Washing 55℃
Rinsing 68℃
60 Min
/
Quick
Hot water washing
Cold water rinsing
Hot water rinsing
29 Min
8g
Washing 50℃
Rinsing 62℃
60 Min
/
Intensive
Hot water washing
Hot water rinsing
Cold water rinsing
Hot water rinsing
89 Min
12g
Washing 55℃
Rinsing 55℃
Rinsing 75℃
60 Min
/
Eco
Hot water washing
Cold water rinsing
Hot water rinsing
59 Min
8g
Washing 55℃
Rinsing 68℃
60 Min
/

- 8 -
Fruit
Cold water rinsing
Cold water rinsing
19 Min
/
/
/
/
Dry
/
/
/
/
60 Min
Circulating
fresh air
73 hours
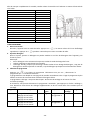
Water and energy consumption:
Standard
Quick
Intensive
Eco
Fruit
Dry
Water
consumption
5L
5L
5L
5L
5L
5L
Energy
consumption
0.45Kwh
0.31Kwh
0.48Kwh
0.40Kwh
0.01Kwh
0.162Kwh
Note:
1) Washing tableware in a household dishwasher usually consumes less energy and water in the use
phase than hand dishwashing.
2) Do not manual pre-rinse the tableware before putting it in the dishwasher, as this will increase
water and energy consumption.
3) The values given for programs other than the eco program are indicative only.
4. Run program
Touch “ ” to run the selected program, the appliance will check water supply automatically.
Note:
1) The appliance will check the tap or the tank model automatically before running the program, if the
indicators “ ” “ ” become red, you need to open the tap or fill the tank.
2) Touch “ ” to pause the appliance during washing;
3) Touch “ ” for 3 seconds to quit the program, the appliance will drain away the water, and then stop;
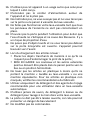
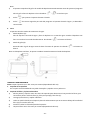
5. Wash
The appliance has two water supply modes:
1) Tank mode (A):
Open the water inlet cover, fill 3 cups of water into the tank. A warning sound will be heard when the
tank is full. The indicator “ ” illuminates white.
2) Tap mode (B):
Remember to open the water tap before operation, the indicator “ ” illuminates white.
Note: If the tank is full, the appliance will switch into tank mode automatically.

- 9 -
CLEANING AND MAINTANANCE
Note: Clean the appliance once or twice a week (depending on usage).
1. Clean the surface
Use a soft cloth moistened with mild soap, and then use a dry cloth to wipe it again.
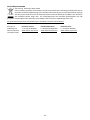
2. Clean the filter and heating plate
1) Open the door and take out the basket. Rotate anticlockwise to disassemble the filter set, which have
3 parts, filter mesh (A), main filter (B) and fine filter (C).
2) Use water to flush and brush each part of the filter set.
3) Use a damp cloth to clean the heating plate which is under the filter mesh (A) (if there is any limescale).
4) After cleaning, replace the filter set.
5) Clean the filter once or twice a week (depending on usage).
3. Clean the spray arm
1) Open the door, take out the basket, then pull out the spray arm upwards.
2) Use water to flush and brush the spray arm.
3) After cleaning, press the spray arm back into position, make sure the spray arm can move smoothly.
4) Clean the filter one or twice a week (depending on usage).
FAULT & PROBLEM
Fault codes
Code
Fault
How to deal with
E2
Draining
1. Check drain pipe, be sure the pipe is straight, no bending;
2. Power off to check if anything blocks the filter or drain pipe;
3. Be sure all pipes are not blocked by something.
E3
Overflowing
Tilt the machine to 30-45 degree, let water flow out.
E4
Temperature fault
Restart the appliance, if still fault, please contact our service
department.
E5
Communication fault
E6
Heating plate fault
E7
Hydraulic pressure fault
Problems
Fault
Reason
How to deal with
Tableware is not
clean
Incorrect tableware loading
Be sure enough gap between the tableware.
Spray arm trapped
Be sure noting trap the spray arm.
Blocked spray arm
Clean the spray arm.
Blocked filter
Clean the filter set.
Incorrect filter installation
Correctly assemble the filter set.
Incorrect program selection
Select appropriate washing program.
No detergent
Add detergent (block/powder/liquid).
Appliance does not
start
Water shortage
Add water till the indicator light illuminates white
The door is not closed fully
Check the door and close the door fully.
Cannot select the
program
The appliance is working.
Touch “ ” for 3 seconds to quit the program-
in-progress or wait for the program finishing.

- 10 -
Tableware is wet
Inappropriate program
Select appropriate program
Poor dry effect for plastic
tableware
Wipe to dry by hand
Incorrect tableware loading
Correct the tableware loading
Drying program not finish
Wait till the drying program finishes
Wooden tableware
Wipe to dry by hand
Discoloration of
plastic tableware
Washing temperature is too
high
Select program with lower temperature
Detergent left
Blocked spray arm, no water
flushes the detergent
Be sure the spray arm moves smoothly
Detergent with poor quality
Use qualified detergent
Amount of foam in
the appliance
Used incorrect detergent
Use the special detergent for dishwasher
Open the appliance, wipe out the foam by hand
Fill 2-3L water into the appliance, select any
program, after 1-2 minutes, the foam will be
drained; repeat the process if needed.
Abnormal sound in
the appliance
Spray arm is knocking the
tableware
Correctly set the tableware
Tableware moves slightly
Correctly set the tableware
Egg custard left on
the tableware
Protein solidification
Clean the tableware with egg custard by hand
Water drops left
inside of the
appliance
Drying time is not enough
Select “dry” program
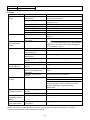
TECHNICAL DATA
Operating voltage: 220-240V ~ 50Hz
Power consumption: 950W
Note: You can find the model identifier on the Rating Label, and for more data information, please scan
the QR code on the energy label.
GUARANTEE AND CUSTOMER SERVICE
Before delivery our devices are subjected to rigorous quality control. If, despite all care, damage has occurred
during production or transportation, please return the device to your dealer. In addition to statutory legal rights,
the purchaser has an option to claim under the terms of the following guarantee:
For the purchased device we provide 2 years guarantee, commencing from the day of sale. If you have a
defective product, you can directly go back to the point of purchase.
Defects which arise due to improper handling of the device and malfunctions due to interventions and repairs
by third parties or the fitting of non-original parts are not covered by this guarantee. Always keep your receipt,
without the receipt you can’t claim any form of warranty. Damage caused by not following the instruction
manual, will lead to a void of warranty, if this results in consequential damages then we will not be liable. Neither
can we hold responsible for material damage or personal injury caused by improper use or if the instruction
manual are not properly executed. Damage to accessories does not mean free replacement of the whole
appliance. In such case please contact our service department. Broken glass or breakage of plastic parts is always
subject to a charge. Defects to consumables or parts subjected to wearing, as well as cleaning, maintenance or
the replacement of said parts are not covered by the warranty and are to be paid.
The guarantee period of the spare parts is 2 years. If you need replacement, please contact our customer service.

- 11 -
ENVIRONMENT FRIENDLY DISPOSAL
Recycling – European Directive 2012/19/EU
This marking indicates that this product should not be disposed with other household wastes. To
prevent possible harm to the environment or human health from uncontrolled waste disposal,
recycle it responsibly to promote the sustainable reuse of material resources. To return your used
device, please use the return and collection systems or contact the retailer where the product was
purchased. They can take this product for environmental safe recycling.
For professional repair and ordering spare parts, please contact our customer service.
Emerio B.V. Customer service: Kundeninformation: Klantenservice:
Oudeweg 115 T: +31 (0) 23 3034369 T: +49 (0) 3222 1097 600 T: +31 (0) 23 3034369
2031 CC Haarlem www.emerio.eu/service www.emerio.eu/service www.emerio.eu/service
The Netherlands

- 12 -
Bedienungsanleitung – German
SICHERHEITSINFORMATIONEN
Lesen Sie vor dem Gebrauch unbedingt die nachfolgenden
Anleitungen, um Verletzungen oder Beschädigungen zu
vermeiden und das beste Ergebnis mit dem Gerät zu erzielen.
Bewahren Sie diese Bedienungsanleitung an einem sicheren
Ort auf. Wenn Sie dieses Gerät an eine andere Person
weitergeben, stellen Sie sicher, dass Sie auch diese
Bedienungsanleitung aushändigen.
Im Falle von Beschädigungen, die durch die Missachtung der
Anleitungen in dieser Bedienungsanleitung verursacht
wurden, wird die Garantie ungültig. Der Hersteller/Importeur
haftet nicht für Schäden, die durch Missachtung der
Bedienungsanleitung, fahrlässigen Gebrauch oder Benutzung,
die nicht in Übereinstimmung mit den Anforderungen dieser
Bedienungsanleitung erfolgt, verursacht wurden.
1. Lesen und bewahren Sie diese Anleitungen auf. Achtung:
Die Bilder in der Bedienungsanleitung dienen nur zur
Veranschaulichung.
2. Dieses Gerät kann von Kindern ab 8 Jahren und von
Personen mit eingeschränkten physischen, sensorischen
oder geistigen Fähigkeiten oder ohne Erfahrung und/oder
Wissen benutzt werden, wenn diese durch eine für ihre
Sicherheit zuständige Person beaufsichtigt werden oder
von ihr Anweisungen erhielten, wie das Gerät sicher zu
benutzen ist und sie auf die Risiken aufmerksam gemacht
wurden. Kinder dürfen nicht mit dem Gerät spielen. Kinder
sollten dieses Gerät nicht unbeaufsichtigt reinigen oder
warten.
3. Wenn die Netzanschlussleitung dieses Gerätes beschädigt
wird, muss sie durch den Hersteller oder seinen
Kundendienst oder eine ähnlich qualifizierte Person ersetzt
werden, um Gefährdungen zu vermeiden.
4. Dieses Gerät ist dafür vorgesehen, im Haushalt und in

- 13 -
ähnlichen Einsatzbereichen benutzt zu werden, wie zum
Beispiel: Mitarbeiter-Küchenbereiche in Geschäften, Büros
und anderen Arbeitsumgebungen; Bauernhöfe; die
Benutzung durch Gäste in Hotels, Motels und anderen
Unterkunftsarten; Frühstückspensionen;
5. Verpackungsmaterial kann für Kinder gefährlich sein!
6. Dieses Gerät ist nur für den Gebrauch in Innenräumen
bestimmt.
7. Ziehen Sie den Netzstecker, bevor Sie das Gerät reinigen
oder Wartungsarbeiten daran durchführen.
8. Bevor Sie den Stecker mit der Netzsteckdose verbinden,
prüfen Sie bitte, ob die Spannung und die Frequenz mit den
Angaben auf dem Typenschild übereinstimmen.
9. Zum Anschließen des Geräts immer eine geerdete
Steckdose verwenden.
10. Achten Sie darauf, dass das Netzkabel nicht über scharfe
Kanten hängt und halten Sie es von heißen Objekten und
offenen Flammen fern.
11. Tauchen Sie das Gerät oder den Netzstecker nicht in
Wasser oder andere Flüssigkeiten. Es besteht Lebensgefahr
aufgrund von Stromschlag!
12. Um den Stecker aus der Steckdose zu entfernen, ziehen Sie
am Stecker. Ziehen Sie nicht am Kabel.
13. Berühren Sie das Gerät nicht, wenn es ins Wasser gefallen
ist. Ziehen Sie den Stecker aus der Steckdose, schalten Sie
das Gerät aus und schicken Sie es an einen autorisierten
Kundendienst zwecks Reparatur.
14. Den Netzstecker des Gerätes nicht mit einer nassen Hand
aus der Steckdose ziehen oder mit der Steckdose
verbinden.
15. Versuchen Sie unter keinen Umständen, das Gehäuse des
Gerätes zu öffnen oder das Gerät selbst zu reparieren. Dies
könnte einen Stromschlag verursachen.
16. Verwenden Sie das Gerät nur zu seinem
bestimmungsgemäßen Zweck.

- 14 -
17. Wickeln Sie das Kabel nicht um das Gerät und knicken Sie
es nicht.
18. Zweckentfremden Sie die Tür oder den Geschirrkorb der
Spülmaschine nicht, setzen und stellen Sie sich nicht darauf.
19. Nehmen Sie die Geschirrspülmaschine nur dann in Betrieb,
wenn alle Verkleidungselemente ordnungsgemäß
angebracht sind.
20. Ö ffnen Sie die Tür nicht während des Gebrauchs, damit
kein heißes Wasser herausspritzt und Verletzungen
verursacht. Es besteht die Gefahr, dass Wasser
herausspritzt.
21. Stellen Sie keine schweren Gegenstände auf die geöffnete
Tür und stellen Sie sich nicht darauf. Das Gerät könnte nach
vorne kippen.
22. Beim Beladen der Geschirrspülmaschine:
Platzieren Sie scharfe Gegenstände so, dass sie die
Türdichtung nicht beschädigen können;
Achtung: Messer und andere Utensilien mit scharfen
Spitzen müssen mit der Spitze nach unten oder in
horizontaler Lage in den Korb gelegt werden.
23. Waschen Sie keine Kunststoffartikel, es sei denn, sie sind
als „spülmaschinenfest" oder gleichwertig gekennzeichnet.
Bei nicht gekennzeichneten Kunststoffartikeln sind die
Empfehlungen des Herstellers zu beachten.
24. Verwenden Sie nur Spül- und Klarspülmittel, die für die
Verwendung in Geschirrspülmaschinen empfohlen werden.
25. Verwenden Sie niemals Seife, Waschmittel oder
Handwaschmittel in Ihrem Geschirrspüler.
26. Die Tür sollte nicht offen gelassen werden, da dies die
Stolpergefahr erhöht.
27. Manipulieren Sie nicht die Bedienelementen vor.
28. Das Gerät muss mit einem neuen Schlauchset an das
Hauptwasserventil angeschlossen werden. Alte Sets sollten
nicht wiederverwendet werden.
29. Der maximal zulässige Wasserzulaufdruck beträgt 1 MPa.

- 15 -
30. Der minimal zulässige Wasserzulaufdruck beträgt 0,04 MPa.
31. Die Ö ffnungen dürfen nicht durch einen Teppich verdeckt
werden.
32. Es können bis zu zwei Tafelgeschirr-Service gleichzeitig
gereinigt werden.
33. Stellen Sie das Gerät nicht in einer Umgebung mit einer
Temperatur unter 0 °C auf.
34. Stellen Sie das Gerät nicht auf eine instabile, nasse oder
brennbare Unterlage, um Schäden zu vermeiden.
35. Stellen Sie das Gerät nicht weiter als 150 mm von einem
Gasofen oder Heizgerät entfernt auf.
36. Kippen oder bewegen Sie das Gerät beim Waschen nicht.
37. Messer und andere Gegenstände mit scharfen Spitzen
dürfen nicht auf Personen gerichtet sein, um beim Ö ffnen
der Tür Verletzungen zu vermeiden.
38. Berühren oder blockieren Sie nicht den seitlichen
Luftauslass.
39. WICHTIG Nach dem Gebrauch den Wasserhahn zudrehen.

- 16 -
DWC-127633 DE
BEZEICHNUNG DER EINZELTEILE
1. Wasserzulauf
2. Bedienfeld
3. Sprüharm
4. Filter
5. Glastür
6. Türgriff
7. Geschirrständer
8. Besteckkorb
9. Geschirrkorb
10. Zulaufschlauch X 1
11. Ablaufschlauch X 1
12. Obstkorb X 1
13. Becher X 1
14. Schlauchmanschette X 1
Bedienfeld
1. Stand-by-Taste
2. Start/Pause-Taste
3. Programmwahltaste
4. Obstprogramm-Symbol
5. Intensivprogramm-Symbol
6. ECO-Programm-Symbol
7. Schnellprogramm-Symbol
8. Standardprogramm-Symbol
9. Trocknen-Symbol
10. Uhrzeitsymbol

- 17 -
11. Geöffnete Tür-Symbol
12. Temperatur-Symbol
13. Display
14. Tank-Modus
15. Wasserhahn-Modus
16. Trocken- + Aufbewahrungsmodus-Taste
INBETRIEBNAHME
1. Installation des Zulaufschlauchs
1) Gerät anschließen
Stecken Sie den Zulaufschlauchkrümmer in den Wasserzulauf hinter dem Gerät und ziehen Sie die
Schraube fest.
2) Anschluss an den Wasserhahn
Es gibt drei Optionen (A, B, C) für den Wasserhahnanschluss, aber für die Optionen B und C müssen Sie
ein Loch auf oder hinter dem Schrank machen, damit der Schlauch durch den Schrank geführt werden
kann.
Hinweis: Die Größe des Zulaufschlauchkrümmers beträgt 3/4' mit Innengewinde, die Größe des
Wasserhahns muss 3/4' mit Außengewinde betragen.
2. Installation des Ablaufschlauchs
1) Gerät anschließen
Stecken Sie den Ablaufschlauchkrümmer in den Wasserauslass hinter dem Gerät und ziehen Sie die
Manschette fest.
2) Anschluss an die Kanalisation
Es gibt drei Optionen (A, B, C) für den Anschluss an die Kanalisation. Bei den Optionen B und C müssen
Sie ein Loch auf dem oder hinter dem Schrank machen, damit das Rohr durch den Schrank geführt
werden kann.
Befestigen Sie den Ablaufschlauch, um zu verhindern, dass das Abwasser an anderer Stelle abläuft.

- 18 -
BELADEN DER SPÜ LMASCHINE
Entfernen Sie grobe Speisereste von dem Geschirr, um zu vermeiden, dass der Wasserschlauch verstopft.
Beziehen Sie sich auf das Bild für die Darstellung des Geschirrs und die Qualität des Geschirrs. Das Beladen der
Haushaltsspülmaschine bis zur vom Hersteller angegebenen Kapazität trägt zur Energie- und Wassereinsparung
bei.
Hinweis:
Um das Geschirr vollständig zu reinigen, neigen Sie es bitte nach innen oder legen Sie es mit der verschmutzten
Seite nach unten.
Tafelgeschirr
Menge
190 mm Dessertteller
3
130 mm Dessertschale
1
70 mm Becher
1
60 mm Glas
2
Gabel
2
Messer
2
Suppenlöffel
2
Dessertlöffel
2
Teelöffel
2
230 mm Suppenteller
1
140 mm Untertasse
1
78 mm Tasse
1
213 mm Schale
1
Serviergabel
1
195 mm Dessertteller
1
BETRIEB
1. Einschalten
Sobald das Gerät an die Steckdose angeschlossen ist, befindet es sich im Stand-by-Modus. Berühren Sie „
“, die anderen Symbole auf dem Display werden nun angezeigt. Berühren Sie „ “ 3 Sekunden lang,
um wieder in den Stand-by-Modus zu wechseln.
2. Hinzufügen von Spülmittel
Ö ffnen Sie die Tür, geben Sie ein wenig Spülmaschinenpulver oder einen Spülmaschinentab in das Gerät und
schließen Sie die Tür.
Hinweis:
Im Obstprogramm wird kein Spülmittel benötigt.
Verwenden Sie ein Spülmittel speziell für Geschirrspülmaschinen.
Die Dosierung: 8-10 g pro Reinigungszyklus Bitte verwenden Sie die richtige Dosierung des Spülmittels;
zu wenig Spülmittel reinigt das Geschirr nicht gut; zu viel Spülmittel hinterlässt Rückstände.
3. Programm-Auswahl
Berühren Sie „ “; die Programmsymbole leuchten nun nacheinander auf. Wählen Sie das
Programm, das Sie starten möchten.
Das Eco-Programm eignet sich für die Reinigung von normal verschmutztem Geschirr. Es ist das effizienteste
Programm in Bezug auf den kombinierten Energie- und Wasserverbrauch.
Das Programm „Trocknen“ besteht aus zwei Schritten: 60 Minuten Trocknungszeit und 73 Stunden
zirkulierende Frischluft (Aufbewahrung).
Bei Bedarf können Sie das Programm „Standard“ wählen und dann auf das Symbol „Trocknen“ tippen. Sie
haben dann noch 1 Stunde Trocknungszeit und 73 Stunden Frischluftzirkulation für die Aufbewahrung.
Programm
Programmausführung
Zeit
Wasch-
mittel
Temperatur
Trocknu-
ngszeit
Aufbe-
wahrung
Standard
Reinigen mit heißem Wasser
Spülen mit kaltem Wasser
Spülen mit kaltem Wasser
Spülen mit heißem Wasser
69 min
8 g
Reinigen 55 °C
Spülen 68 °C
60 min
/
Schnell
Reinigen mit heißem Wasser
29 min
8 g
Reinigen 50 °C
60 min
/

- 19 -
Spülen mit kaltem Wasser
Spülen mit heißem Wasser
Spülen 62 °C
Intensiv
Reinigen mit heißem Wasser
Spülen mit heißem Wasser
Spülen mit kaltem Wasser
Spülen mit heißem Wasser
89 min
12 g
Reinigen 55 °C
Spülen 55°C
Spülen 75°C
60 min
/
Eco
Reinigen mit heißem Wasser
Spülen mit kaltem Wasser
Spülen mit heißem Wasser
59 min
8 g
Reinigen 55 °C
Spülen 68 °C
60 min
/
Obst
Spülen mit kaltem Wasser
Spülen mit kaltem Wasser
19 min
/
/
/
/
Trocknen
/
/
/
/
60 min
Zirkulierende
Frischluft 73
Stunden
Wasser und Energieverbrauch:
Standard
Schnell
Intensiv
Eco
Obst
Trocknen
Wasserverbrauch
5 l
5 l
5 l
5 l
5 l
5 l
Energieverbrauch
0,45 kWh
0,31 kWh
0,48 kWh
0,40 kWh
0,01 kWh
0,162 kWh
Hinweis:
1) Das Spülen von Geschirr in einem Haushaltsgeschirrspüler verbraucht in der Gebrauchsphase in der Regel
weniger Energie und Wasser als das Spülen von Hand.
2) Spülen Sie das Geschirr nicht manuell ab, bevor Sie es in die Spülmaschine stellen. Dadurch erhöht sich der
Wasser- und Energieverbrauch.
3) Die Angaben zu den Programmen, mit Ausnahme des ECO-Programms, sind nur Richtwerte.
4. Programm starten
Tippen Sie auf „ “, um das gewählte Programm zu starten; das Gerät prüft automatisch die
Wasserversorgung.
Hinweis:
1) Das Gerät prüft automatisch den Wasserhahn oder das Tankmodell, bevor es das Programm startet.
Wenn die Anzeige „ “ bzw. „ “ rot leuchtet, müssen Sie den Wasserhahn öffnen oder den Tank
füllen.
2) Berühren Sie „ “, um das Gerät während des Spülvorgangs anzuhalten.
3) Berühren Sie „ “ für 3 Sekunden, um das Programm zu beenden, das Gerät lässt das Wasser
ablaufen und stoppt dann.
5. Reinigen
Das Gerät verfügt über zwei Wasserversorgungsmodi:
1) Tank-Modus (A)
Ö ffnen Sie die Abdeckung des Wasserzulaufs und füllen Sie drei Becher Wasser in den Tank. Wenn der
Tank voll ist, ertönt ein Warnton. Die Anzeige „ “ leuchtet weiß auf.
2) Wasserhahn-Modus (B):
Denken Sie daran, den Wasserhahn vor dem Betrieb zu öffnen, die Anzeige „ “ leuchtet weiß.
Hinweis: Wenn der Tank voll ist, schaltet das Gerät automatisch in den Tank-Modus.
La page est en cours de chargement...
La page est en cours de chargement...
La page est en cours de chargement...
La page est en cours de chargement...
La page est en cours de chargement...
La page est en cours de chargement...
La page est en cours de chargement...
La page est en cours de chargement...
La page est en cours de chargement...
La page est en cours de chargement...
La page est en cours de chargement...
La page est en cours de chargement...
La page est en cours de chargement...
La page est en cours de chargement...
La page est en cours de chargement...
La page est en cours de chargement...
La page est en cours de chargement...
La page est en cours de chargement...
La page est en cours de chargement...
La page est en cours de chargement...
La page est en cours de chargement...
La page est en cours de chargement...
La page est en cours de chargement...
La page est en cours de chargement...
La page est en cours de chargement...
La page est en cours de chargement...
La page est en cours de chargement...
La page est en cours de chargement...
La page est en cours de chargement...
La page est en cours de chargement...
La page est en cours de chargement...
La page est en cours de chargement...
La page est en cours de chargement...
La page est en cours de chargement...
La page est en cours de chargement...
La page est en cours de chargement...
La page est en cours de chargement...
La page est en cours de chargement...
La page est en cours de chargement...
La page est en cours de chargement...
La page est en cours de chargement...
La page est en cours de chargement...
La page est en cours de chargement...
La page est en cours de chargement...
La page est en cours de chargement...
La page est en cours de chargement...
La page est en cours de chargement...
La page est en cours de chargement...
La page est en cours de chargement...
La page est en cours de chargement...
La page est en cours de chargement...
La page est en cours de chargement...
La page est en cours de chargement...
La page est en cours de chargement...
La page est en cours de chargement...
La page est en cours de chargement...
La page est en cours de chargement...
La page est en cours de chargement...
La page est en cours de chargement...
-
 1
1
-
 2
2
-
 3
3
-
 4
4
-
 5
5
-
 6
6
-
 7
7
-
 8
8
-
 9
9
-
 10
10
-
 11
11
-
 12
12
-
 13
13
-
 14
14
-
 15
15
-
 16
16
-
 17
17
-
 18
18
-
 19
19
-
 20
20
-
 21
21
-
 22
22
-
 23
23
-
 24
24
-
 25
25
-
 26
26
-
 27
27
-
 28
28
-
 29
29
-
 30
30
-
 31
31
-
 32
32
-
 33
33
-
 34
34
-
 35
35
-
 36
36
-
 37
37
-
 38
38
-
 39
39
-
 40
40
-
 41
41
-
 42
42
-
 43
43
-
 44
44
-
 45
45
-
 46
46
-
 47
47
-
 48
48
-
 49
49
-
 50
50
-
 51
51
-
 52
52
-
 53
53
-
 54
54
-
 55
55
-
 56
56
-
 57
57
-
 58
58
-
 59
59
-
 60
60
-
 61
61
-
 62
62
-
 63
63
-
 64
64
-
 65
65
-
 66
66
-
 67
67
-
 68
68
-
 69
69
-
 70
70
-
 71
71
-
 72
72
-
 73
73
-
 74
74
-
 75
75
-
 76
76
-
 77
77
-
 78
78
-
 79
79


dans d''autres langues
- español: Emerio DWC-127633 Manual de usuario
- Deutsch: Emerio DWC-127633 Benutzerhandbuch
- Nederlands: Emerio DWC-127633 Handleiding
- polski: Emerio DWC-127633 Instrukcja obsługi
- svenska: Emerio DWC-127633 Användarmanual