
TABLE OF CONTENTS
www.frigidaire.com USA 1-800-944-9044 www.frigidaire.ca Canada 1-800-265-8352
All about the
Use & Care
of your Compact Refrigerator
A13390901 (February 2018)
Important Safety Instructions ......................2
Features At A Glance ..................................4
Installation ................................................5
Door Removal/Reversal Instructions ............6
Controls .....................................................9
Optional Features .....................................10
Care & Cleaning .......................................11
Before You Call ........................................12
Major Appliance Warranty .........................13

2
WARNING
WARNING indicates a potentially hazardous
situation which, if not avoided, could result
in death or serious injury.
IMPORTANT
IMPORTANT indicates installation, operation
or maintenance information which is impor-
tant but not hazard-related.
DANGER
DANGER indicates an imminently hazardous
situation which, if not avoided, will result in
death or serious injury.
CAUTION
CAUTION indicates a potentially hazardous
situation which, if not avoided, may result in
minor or moderate injury.
Denitions
This is the safety alert symbol. It is used to
alert you to potential personal injury hazards.
Obey all safety messages that follow this
symbol to avoid possible injury or death.
IMPORTANT SAFETY INSTRUCTIONS
For your Safety
• DO NOT store or use gasoline, or other
ammable liquids in the vicinity of this or
any other appliance. Read product labels
for warnings regarding ammability and
other hazards.
• DO NOT operate the refrigerator in the
presence of explosive fumes.
• Avoid contact with any moving parts of
automatic ice maker.
• Remove all staples from the carton.
Staples can cause severe cuts, and also
destroy nishes if they come in contact
with other appliances or furniture.
WARNING
Please read all instructions before using this
refrigerator.
IMPORTANT
CFC/HCFC Disposal
Your old refrigerator may have a cooling
system that used CFCs or HCFCs (chlorouo-
rocarbons or hydrochlorouorocarbons). CFCs
and HCFCs are believed to harm stratospheric
ozone if released to the atmosphere. Other
refrigerants may also cause harm to the envi-
ronment if released to the atmosphere.
If you are throwing away your old refrigera-
tor, make sure the refrigerant is removed for
proper disposal by a qualied technician. If
you intentionally release refrigerant, you may
be subject to nes and imprisonment under
provisions of environmental legislation.
DANGER
DANGER Risk of re or explosion.
Flammable refrigerant used. Do not use
mechanical devices to defrost refrigerator.
Do not puncture refrigerant tubing.
DANGER Risk of re or explosion.
Flammable refrigerant used. To be repaired
only by trained service personnel. Do not
puncture refrigerant tubing.
CAUTION
CAUTION Risk of re or explosion.
Flammable refrigerant used. Consult repair
manual/owner’s guide before attempting to
service this product. All safety precautions
must be followed.
CAUTION Risk of re or explosion. Dispose of
property in accordance with federal or local
regulations. Flammable refrigerant used.
CAUTION Risk of re or explosion due
to puncture of refrigerant tubing. Follow
handling instructions carefully. Flammable
refrigerant used.

3
IMPORTANT SAFETY INSTRUCTIONS
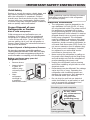
Grounding type wall receptacle
Power cord with
3-prong grounded plug
Do not, under
any circumstances,
cut, remove,
or bypass the
grounding prong.
Electrical information
• The refrigerator must be plugged into its
own dedicated 115 Volt, 60 Hz., 15 Amp,
AC only electrical outlet. The power cord of
the appliance is equipped with a three-
prong grounding plug for your protection
against electrical shock hazards. It must be
plugged directly into a properly grounded
three prong receptacle. The receptacle
must be installed in accordance with local
codes and ordinances. Consult a qualied
electrician. Avoid connecting refrigerator to
a Ground Fault Interrupter (GFI) circuit. Do
not use an extension cord or adapter plug.
• If the power cord is damaged, it should
be replaced by an authorized service
technician to prevent any risk.
• Never unplug the refrigerator by pulling on
the power cord. Always grip the plug rmly,
and pull straight out from the receptacle to
prevent damaging the power cord.
• Unplug the refrigerator before cleaning
and before replacing a light bulb to avoid
electrical shock.
• Performance may be affected if the voltage
varies by 10% or more. Operating the
refrigerator with insufcient power can
damage the compressor. Such damage is
not covered under your warranty.
• Do not plug the unit into an electrical
outlet controlled by a wall switch or pull
cord to prevent the refrigerator from
being turned off accidentally.
WARNING
These guidelines must be followed to ensure
that safety mechanisms in this refrigerator
will operate properly.
Child Safety
Destroy or recycle the carton, plastic bags, and
any exterior wrapping material immediately
after the refrigerator is unpacked. Children
should never use these items to play. Cartons
covered with rugs, bedspreads, plastic sheets
or stretch wrap may become airtight chambers,
and can quickly cause suffocation.
Proper Disposal of your
Refrigerator or Freezer
Risk of child entrapment
Child entrapment and suffocation are not
problems of the past. Junked or abandoned
refrigerators or freezers are still dangerous
– even if they will sit for “just a few days”. If
you are getting rid of your old refrigerator or
freezer, please follow the instructions below to
help prevent accidents.
Proper Disposal of Refrigerators/Freezers
We strongly encourage responsible appliance
recycling/disposal methods. Check with your utility
company or visit www.energystar.gov/recycle for
more information on recycling your old refrigerator.
Before you throw away your old
refrigerator/freezer:
• Remove doors.
• Leave shelves
in place so
children may
not easily climb
inside.
• Have
refrigerant
removed by
a qualied
service technician.

4
FEATURES AT A GLANCE
Features may vary according to model
Some Models
Some Models

5
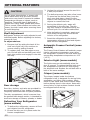
INSTALLATION
CAUTION
Do not install the refrigerator where the
surrounding air temperature may fall to
50°F (10°C) or below. The refrigerator
compartment contents may freeze. Do
not install the refrigerator where the
surrounding air temperature may reach
110°F (43°C) or above. The refrigerator and
freezer compartments may rise to above
normal operating temperatures.
Do not block the lower front of your
refrigerator. Sufcient air circulation is
essential for the proper operation of your
refrigerator.
This Use & Care Guide provides general
operating instructions for your model. Use the
refrigerator only as instructed in this Use &
Care Guide. Before starting the refrigerator,
follow these important rst steps.
Location
• Choose a place that is near a grounded
electrical outlet. Do Not use an extension
cord or an adapter plug.
• If possible, place the refrigerator out of
direct sunlight and away from the range,
dishwasher or other heat sources.
• The refrigerator must be installed on a
oor that is level and strong enough to
support a fully loaded refrigerator.
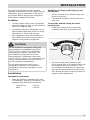
Installation
Installation clearances
• Allow the following clearances for ease
of installation, proper air circulation, and
plumbing and electrical connections:
Sides & Top 3 inches
Back 4 inches
Guidelines for nal positioning of your
refrigerator:
• All four corners of the cabinet must rest
rmly on the oor.
• The cabinet should be level at the front
and rear.
To level the cabinet using the front
leveling feet:
• Lower the leveling feet on each side
clockwise until they contact the oor.
Extend Retract
• Use the leveling feet (located on the
front) ensure that all 4 corners of the unit
are resting rmly on a solid oor. Turn
the leveling feet clockwise to retract the
feet and counterclockwise to extend the
feet. Ensure the oor is strong enough to
support a fully loaded unit.

6
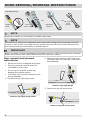
NOTE
The direction in which your refrigerator doors open (door swing) can be reversed, from left
to right or right to left, by moving the door hinges from one side to the other. Reversing the
door swing should be performed by a qualied person.
NOTE
Single door models do not include the middle hinge steps
DOOR REMOVAL/REVERSAL INSTRUCTIONS
Door removal and reversal
instructions:
• Ensure the unit is unplugged and empty.
• All parts removed must be saved for
reinstallation of the door.
• Do not lay the unit at as this may
damage the coolant system.
• It is better that 2 people handle the unit
during assembly.
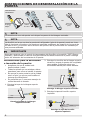
1. Remove the top right hinge cover.
IMPORTANT
Before you begin, turn the refrigerator temperature control to “OFF” and remove the electrical
power cord from the wall outlet. Remove any food from door shelves.
Adjustable
Wrench
Socket
Wrench Set
3/8" (10mm)
Fixed
Wrench
Tools Necessary:
Phillips
TM
Head
oror
2. Remove screws from top right hinge and
lift freezer door off. Place on a soft pad to
avoid damage.
Remove top right hinge cover
Remove top right hinge
Remove top left screw cover
3. Remove the top left screw cover.

7
DOOR REMOVAL/REVERSAL INSTRUCTIONS
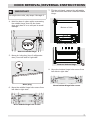
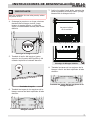
4. Hold the door in place while unscrewing
the middle hinge, then lift the lower
door and place it on a soft pad to avoid
damage.
Remove middle hinge
5. Move pin hole plug (top of refrigerator
door) from left side to right side.
6. Move the middle hinge hole covers from
left side to right side.
Move middle hinge hole covers
Move plug
8. Move the bottom hinge hole covers from
left side to right side.
7. Tilt the unit back, remove the adjustable
feet from both sides then unscrew bottom
hinge.
Move bottom hinge hole covers
Remove bottom hinge
Bottom of Unit
Remove adjustable feet
IMPORTANT
For single door units, skip steps 4 through 6.

8
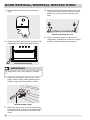
10. Attach the left bottom hinge. Replace both
adjustable feet. Stand the unit upright.
DOOR REMOVAL/REVERSAL INSTRUCTIONS
11 Place the refrigerator door on the lower
hinge. Hold in place while attaching the
middle hinge and then tighten screws.
14 Plug in electrical power cord and turn
refrigerator temperature control to center
position. Adjust setting as necessary.
Attach bottom hinge
Attach middle hinge
Attach top hinge & cover
IMPORTANT
For single door units, skip steps 11 through
12.
13 Locate the top left hinge and the top left
hinge cover and attach to the top of unit.
Attach the screw cover to the top right
side.
9. Locate left bottom hinge (in accessory
bag).
12 Place the upper door on the center hinge.
Ensure the door is aligned horizontally and
vertically so that the seal is closed on all
sides.

9
CONTROLS
Cool Down Period
For best performance, allow 4 hours for the refrigerator to cool down completely. The
refrigerator will run continuously for the rst several hours.
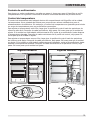
Temperature Control
The temperature control is located inside the refrigerator compartment of the unit. The
temperature is factory preset to provide satisfactory food storage temperatures. However,
the temperature control is adjustable to provide a range of temperatures for your personal
satisfaction.
To adjust the temperature colder, turn the control knob toward the higher number setting. After
each movement, allow 24 hours for the unit to adjust. If the unit is still not cold enough, repeat
until desired temperature is achieved. After each movement of the control knob, allow the unit
to adjust for 24 hours.
To adjust the temperature warmer, turn the control knob toward the lower number setting.
After each movement, allow 24 hours for the unit to adjust. If the unit is still not warm enough,
repeat until desired temperature is achieved. After each movement of the control knob, allow
the unit to adjust for 24 hours.
Some Models
4
5
3
2
6
Some Models
4
5
1
3
2
0

10
OPTIONAL FEATURES
Shelf Adjustment
Refrigerator shelves are easily adjusted to suit
individual needs. Before adjusting the shelves,
remove all food.
To adjust shelves:
1. Remove shelf by raising the back of the
shelf out of side rail, then continue to
remove shelf by pulling forward.
2. To replace shelf, rest side edges on any
pair of shelf rails and carefully push shelf
back into position and engage in the side
rail stop.
CAUTION
Do not clean glass shelves or covers with
warm water when they are cold. Shelves
and covers may break if exposed to sudden
temperature changes or impact, such as
bumping. Tempered glass is designed to
shatter into many small, pebble-size pieces.
This is normal. Glass shelves and covers are
heavy. Use both hands when removing them
to avoid dropping.
Glass Shelf
Crisper (some models)
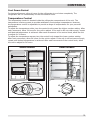
Door storage
Door bins, shelves, and racks are provided for
convenient storage of jars, bottles, and cans.
Frequently used items can be quickly selected.
The dairy compartment, which is warmer than
the general food storage section, is intended for
short term storage of cheese, spreads, or butter.
Defrosting Your Refrigerator
(some models)
1. To defrost the refrigerator, remove all food
and objects from the refrigerator.
2. Ensure the drip pan is in place under the
freezer compartment.
3. Unplug the unit and ensure the cord is in
a safe, dry location.
4. The defrost process may take a few hours.
To speed up the defrost time, keep the
door open and place a bowl of warm
water in the refrigerator. Never use sharp
objects to remove the frost.
5. During the defrost cycle, water will
accumulate in the drip tray. The drip
tray may need to be emptied during the
defrost cycle. Do not leave unattended.
6. After defrosting is complete, empty and
wipe down the drip tray as well as the
interior of the refrigerator.
7. Reset the refrigerator to the desired
temperature and put all food and objects
back into the refrigerator.
Automatic Freezer Control (some
models)
The Freeze Control feature will maintain proper
interior refrigerator temperature even when
the refrigerator is placed in an area where the
surrounding temperature drops down to 10°F
(-12°C).
Interior Light (some models)
The light comes on automatically when the
door is opened. To replace the light bulb, turn
the temperature control to OFF and unplug
the electrical cord. Replace the old bulb with a
bulb of the same wattage.
Crisper (some models)
The crisper, located under the bottom
refrigerator shelf, is designed for storing fruits,
vegetables, and other fresh produce. Wash
items in clear water and remove excess water
before placing them in the crisper. Items with
strong odors or high moisture content should
be wrapped before storing.

11
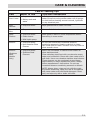
Care & Cleaning Tips
Part What To Use Tips and Precautions
Interior &
Door Liners
• Soap and water
• Baking soda and
water
Use 2 tablespoons of baking soda in 1 quart of warm
water. Be sure to wring excess water out of sponge
or cloth before cleaning around controls, light bulb
or any electrical part.
Door
Gaskets
• Soap and water Wipe gaskets with a clean soft cloth.
Drawers &
Bins
• Soap and water Use a soft cloth to clean drawer runners and tracks.
Glass
Shelves
• Soap and water
• Glass cleaner
• Mild liquid sprays
Allow glass to warm to room temperature before
immersing in warm water.
Exterior • Soap and water
• Non Abrasive Glass
Cleaner
Do not use commercial household cleaners
containing ammonia, bleach or alcohol to clean.
Use a soft cloth to clean. DO NOT use a dry cloth to
clean smooth doors.
Exterior
(Stainless
Steel
Models
Only)
• Soap and water
• Stainless Steel
Cleaners
Never use CHLORIDE or cleaners with bleach to
clean stainless steel.
Clean stainless steel front with non-abrasive soapy
water and a dishcloth. Rinse with clean water and a
soft cloth. Use a non-abrasive stainless steel cleaner.
These cleaners can be purchased at most home
improvement or major department stores. Always
follow manufacturer’s instructions. Do not use
household cleaners containing ammonia or bleach.
NOTE: Always clean, wipe and dry with the grain
to prevent scratching. Wash the rest of the cabinet
with warm water and mild liquid detergent. Rinse
well, and wipe dry with a clean soft cloth.
CARE & CLEANING

12
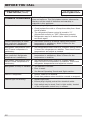
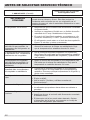
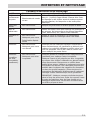
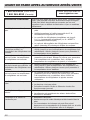
Common Occurrences
Before calling for service, review this list. It may save you
time and expense. This list includes common occurrences
that are not the result of defective workmanship or
materials in this appliance.
Refrigerator does not run. • Ensure plug is tightly pushed into electrical outlet.
• Check/replace fuse with a 15 amp time-delay fuse. Reset
circuit breaker.
• The refrigerator/freezer control is turned to “0”
(Mechanical controls) or “OFF” (Electronic controls).
• Refrigerator may be in defrost cycle. Wait 20 minutes
and check again.
Freezer temperature is colder
than preferred. Refrigerator
temperature is satisfactory.
• Set freezer control to a warmer setting until freezer
temperature is satisfactory. Allow 24 hours for the
temperature to stabilize.
Refrigerator temperature is too
cold. Freezer temperature is
satisfactory.
• Set refrigerator/freezer control to a warmer setting. Allow
24 hours for temperature to stabilize. Then check freezer
temperatures and adjust as needed.
Freezer temperature is warmer
than preferred. Refrigerator
temperature is satisfactory.
• Set freezer control to a colder setting until freezer
temperature is satisfactory. Allow 24 hours for the
temperature to stabilize.
Refrigerator temperature is too
warm. Freezer temperature is
satisfactory.
• Set refrigerator/freezer control to a colder setting.
Allow 24 hours for temperature to stabilize. Then check
refrigerator temperatures and adjust as needed.
Refrigerator is noisy or vibrates. • The cabinet is not level.
• Floor is weak.
• See Normal Operating Sounds and Sights section.
Odors in refrigerator. • Interior needs to be cleaned.
• Foods that produce odors should be covered or wrapped.
Cabinet light not working. • Replace light bulb.
• Ensure plug is tightly pushed into electrical outlet.
• Light switch may be stuck. Push in light switch, located
on the refrigerator control box, to release.
BEFORE YOU CALL
Visit our web site at
www.frigidaire.com.
1-800-944-9044 (United States)
1-800-265-8352 (Canada)

13
MAJOR APPLIANCE WARRANTY
Your appliance is covered by a one year limited warranty. For one year from your original date of
purchase, Electrolux will pay all costs for repairing or replacing any parts of this appliance that prove
to be defective in materials or workmanship when such appliance is installed, used and maintained in
accordance with the provided instructions.
Exclusions
If You Need Service
This warranty does not cover the following:
1. Products with original serial numbers that have been removed, altered or cannot be readily determined.
2. Product that has been transferred from its original owner to another party or removed outside
the USA or Canada.
3. Rust on the interior or exterior of the unit.
4. Products purchased “as-is” are not covered by this warranty.
5. Food loss due to any refrigerator or freezer failures.
6. Products used in a commercial setting.
7. Service calls which do not involve malfunction or defects in materials or workmanship, or for appliances
not in ordinary household use or used other than in accordance with the provided instructions.
8. Service calls to correct the installation of your appliance or to instruct you how to use your appliance.
9. Expenses for making the appliance accessible for servicing, such as removal of trim, cupboards,
shelves, etc., which are not a part of the appliance when it is shipped from the factory.
10. Service calls to repair or replace appliance light bulbs, air lters, water lters, other
consumables, or knobs, handles, or other cosmetic parts.
11. Surcharges including, but not limited to, any after hour, weekend, or holiday service calls, tolls, ferry
trip charges, or mileage expense for service calls to remote areas, including the state of Alaska.
12. Damages to the nish of appliance or home incurred during installation, including but not
limited to oors, cabinets, walls, etc.
13. Damages caused by: services performed by unauthorized service companies; use of parts other than
genuine Electrolux parts or parts obtained from persons other than authorized service companies; or
external causes such as abuse, misuse, inadequate power supply, accidents, res, or acts of God.
DISCLAIMER OF IMPLIED WARRANTIES; LIMITATION OF REMEDIES
CUSTOMER’S SOLE AND EXCLUSIVE REMEDY UNDER THIS LIMITED WARRANTY SHALL BE PRODUCT
REPAIR OR REPLACEMENT AS PROVIDED HEREIN. CLAIMS BASED ON IMPLIED WARRANTIES,
INCLUDING WARRANTIES OF MERCHANTABILITY OR FITNESS FOR A PARTICULAR PURPOSE, ARE
LIMITED TO ONE YEAR OR THE SHORTEST PERIOD ALLOWED BY LAW, BUT NOT LESS THAN ONE
YEAR. ELECTROLUX SHALL NOT BE LIABLE FOR CONSEQUENTIAL OR INCIDENTAL DAMAGES SUCH
AS PROPERTY DAMAGE AND INCIDENTAL EXPENSES RESULTING FROM ANY BREACH OF THIS
WRITTEN LIMITED WARRANTY OR ANY IMPLIED WARRANTY. SOME STATES AND PROVINCES DO
NOT ALLOW THE EXCLUSION OR LIMITATION OF INCIDENTAL OR CONSEQUENTIAL DAMAGES,
OR LIMITATIONS ON THE DURATION OF IMPLIED WARRANTIES, SO THESE LIMITATIONS OR
EXCLUSIONS MAY NOT APPLY TO YOU. THIS WRITTEN WARRANTY GIVES YOU SPECIFIC LEGAL
RIGHTS. YOU MAY ALSO HAVE OTHER RIGHTS THAT VARY FROM STATE TO STATE.
This warranty only applies in the USA and Canada. In the USA, your appliance is warranted by
Electrolux Major Appliances North America, a division of Electrolux Home Products, Inc. In Canada,
your appliance is warranted by Electrolux Canada Corp. Electrolux authorizes no person to change
or add to any obligations under this warranty. Obligations for service and parts under this warranty
must be performed by Electrolux or an authorized service company. Product features or specications
as described or illustrated are subject to change without notice.
Keep your receipt, delivery slip, or some other appropriate payment record to establish the warranty
period should service be required. If service is performed, it is in your best interest to obtain and
keep all receipts. Service under this warranty must be obtained by contacting Electrolux at the
addresses or phone numbers below.
USA
1.800.944.9044
Frigidaire
10200 David Taylor Drive
Charlotte, NC 28262
Canada
1.800.265.8352
Electrolux Canada Corp.
5855 Terry Fox Way
Mississauga, Ontario, Canada
L5V 3E4


ÍNDICE
www.frigidaire.com EE. UU.1-800-944-9044 www.frigidaire.ca Canadá 1-800-265-8352
Todo acerca del
uso y cuidado
de su compacto refrigerador
A13390901 (febrero 2018)
Instrucciones importantes de seguridad .......2
Características generales .............................4
Instalación .................................................5
Instrucciones de desinstalación de la puerta ....6
Controles ...................................................9
Características opcionales .........................10
Cuidado y limpieza ...................................11
Antes de solicitar servicio técnico ..............12
Garantía de los electrodomésticos grandes ....13

2
INSTRUCCIONES IMPORTANTES DE SEGURIDAD
PELIGRO
PELIGRO Riesgo de incendio o explosión.
Se ha utilizado refrigerante inamable.
No utilice dispositivos mecánicos para
descongelar el frigoríco. No perfore el tubo
del refrigerante.
PELIGRO Riesgo de incendio o explosión.
Se ha utilizado refrigerante inamable.
Solo debe ser reparado por personal de
servicio capacitado. No perfore el tubo del
refrigerante.
PELIGRO
PRECAUCIÓN Riesgo de incendio o
explosión. Se ha utilizado refrigerante
inamable. Consulte el manual de
reparación o la guía del propietario antes
de intentar reparar este producto. Se deben
seguir todas las precauciones de seguridad.
PRECAUCIÓN Riesgo de incendio o
explosión. Deshágase de la propiedad de
acuerdo con las reglamentaciones federales
o locales. Se ha utilizado refrigerante
inamable.
PRECAUCIÓN Riesgo de incendio o
explosión debido a la perforación del tubo
de refrigerante. Siga atentamente las
instrucciones de manejo. Se ha utilizado
refrigerante inamable.
ADVERTENCIA
ADVERTENCIA indica una situación
potencialmente peligrosa que, si no se evita,
podría causar lesiones personales graves o
la muerte.
IMPORTANTE
IMPORTANTE indica información de insta-
lación, funcionamiento o mantenimiento que
es importante, pero que no está relacionada
con la seguridad.
PELIGRO
PELIGRO indica una situación de peligro
inminente que, si no se evita, podría causar
lesiones graves o la muerte.
PRECAUCIÓN
PRECAUCIÓN indica una situación
potencialmente peligrosa que, si no se evita,
podría causar lesiones personales leves o
moderadas.
Deniciones
Este es el símbolo de alerta de seguridad.
Se usa para alertar sobre peligros potenciales de
lesiones personales. Obedezca todos los mensajes
de seguridad que tengan este símbolo para evitar
posibles lesiones personales o la muerte.
Para su seguridad
• NO almacene ni utilice gasolina ni otros
líquidos inamables en las inmediaciones
de este o cualquier otro artefacto. Lea las
etiquetas de los productos para informarse
sobre la combustibilidad y otros peligros.
• NO haga funcionar el refrigerador en la
presencia de vapores explosivos.
• Evite cualquier contacto con las piezas
móviles del fabricador automático de hielo.
• Quite todas las grapas de la caja de
cartón. Las grapas pueden causar cortes
graves y dañar los acabados si entran en
contacto con otros artefactos o muebles.
ADVERTENCIA
Lea todas las instrucciones antes de usar
este refrigerador.
IMPORTANTE
Es posible que su frigoríco antiguo cuente
con un sistema de refrigeración que utilice
CFC o HCFC (clorouorocarburos o hidro-
clorouorocarburos). Se considera que si
los CFC y HCFC se emiten a la atmósfera
pueden dañar el ozono estratosférico. Es
posible que otros refrigerantes también
perjudiquen el medio ambiente si se emiten
a la atmósfera.
En caso de que vaya a tirar su frigoríco
antiguo, asegúrese de que un técnico cuali-
cado se encarga de retirar el refrigerante
para su correcta eliminación. Si emite re-
frigerantes de manera intencionada, puede
ser objeto de multas o encarcelamiento con-
forme a las disposiciones de la legislación en
materia de medio ambiente.

3
INSTRUCCIONES IMPORTANTES DE SEGURIDAD
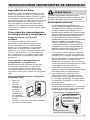
Información eléctrica
• El refrigerador debe enchufarse en su
propio y exclusivo tomacorriente eléctrico de
115 voltios, 60 Hz, 15 Amp, CA solamente.
El cordón eléctrico está equipado con un
enchufe de tres clavijas con conexión a tierra
para su protección contra riesgos de choque
eléctrico. Debe enchufarse directamente
en un tomacorriente para tres clavijas
debidamente puesto a tierra. El tomacorriente
debe ser instalado de acuerdo con los
códigos y reglamentos locales. Consulte a
un electricista calicado. Evite conectar el
refrigerador a un circuito de interruptor de
falla de conexión a tierra (GFI). No use un
cable de extensión ni un adaptador.
• Si se daña el cordón eléctrico, debe ser
reemplazado por un técnico de servicio
calicado, a n de evitar cualquier riesgo.
• Nunca desenchufe el refrigerador tirando
del cordón eléctrico. Siempre sujete
rmemente el enchufe y tire en dirección
recta hacia afuera del tomacorriente, para
evitar dañar el cordón eléctrico.
• Desenchufe el refrigerador antes de la
limpieza y antes de reemplazar una bombilla,
para evitar sufrir un choque eléctrico.
• Una variación de voltaje de 10% o
más puede afectar el rendimiento del
refrigerador. Si el refrigerador funciona
con energía insuciente, se puede dañar
el compresor. Este daño no está cubierto
por la garantía.
• No enchufe el refrigerador a un
tomacorriente controlado por un interruptor
de pared o de cordón, pues el refrigerador
puede apagarse accidentalmente.
ADVERTENCIA
Se deben seguir estas instrucciones para
asegurarse de que los mecanismos de seguridad
de este refrigerador funcionen correctamente.
Seguridad de los niños
Destruya o recicle inmediatamente la caja de
cartón, las bolsas de plástico y cualquier otro
material de empaque exterior después de que
el refrigerador sea desempacado. Los niños
nunca deben jugar con estos objetos. Las cajas
de cartón cubiertas con alfombras, colchas,
hojas de plástico o envolturas elastizadas y
cualquier otro material de empaque pueden
convertirse en cámaras sin aire y causar asxia
rápidamente.
Cómo desechar adecuadamente
los refrigeradores y congeladores
Riesgo de que los niños queden
atrapados
Los riesgos de que los niños queden
atrapados o sufran asxia al jugar dentro
de un refrigerador no son problemas del
pasado. Los refrigeradores o congeladores
desechados o abandonados todavía son
peligrosos, aun cuando se dejen abandonados
"solo por algunos días". Si se va a deshacer
de su refrigerador o congelador usado, siga
las instrucciones a continuación para evitar
accidentes.
Cómo desechar adecuadamente los
refrigeradores y congeladores
Recomendamos usar métodos de reciclaje
y eliminación responsables. Consulte con
su compañía eléctrica local o visite www.
recyclemyoldfridge.com para obtener más
información sobre cómo reciclar su refrigerador
viejo.
Antes de deshacerse de su refrigerador/
congelador viejo:
• Retire las
puertas.
• Deje las
bandejas en
su lugar, de
modo que
los niños no
puedan entrar
con facilidad
en este espacio
interior.
• Solicite a un técnico de servicio calicado
que retire el refrigerante.
Tomacorriente con puesta a tierra
No corte, retire ni
deshabilite la clavija
de conexión a tierra
bajo ninguna
circunstancia.
Cordón eléctrico de 3
clavijas con puesta a tierra

4
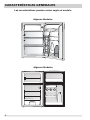
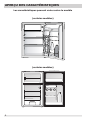
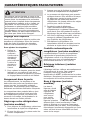
CARACTERÍSTICAS GENERALES
Las características pueden variar según el modelo
Algunos Modelos
Algunos Modelos

5
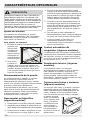
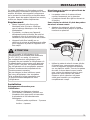
INSTALACIÓN
PRECAUCIÓN
No instale el frigoríco en lugares en que la
temperatura del aire ambiental pueda llegar
a los 50 °F (10 °C) o a una temperatura
menor. El contenido del compartimento del
frigoríco podría congelarse. No instale el
frigoríco en lugares en que la temperatura
del aire ambiental pueda llegar a los 110 °F
(43 °C) o menor valor. Los compartimentos
del frigoríco y del congelador pueden
superar las temperaturas normales de
funcionamiento.
No bloquee el frente inferior de su
frigoríco. Una circulación de aire suciente
es esencial para el correcto funcionamiento
de su frigoríco.
Esta Guía de uso y cuidado le proporciona
instrucciones de funcionamiento generales
sobre su modelo. Use su refrigerador solamente
como en ella se indica. Antes de encender el
refrigerador, siga estos importantes primeros
pasos.
Ubicación
• Elija un lugar que se encuentre próximo
a un tomacorriente con conexión a tierra.
No utilice un cable de extensión ni un
adaptador.
• Si es posible, coloque el refrigerador
en un lugar donde no reciba luz solar
directa. Colóquelo lejos de la estufa, del
lavavajillas o de cualquier otra fuente de
calor.
• El refrigerador debe ser instalado en
un piso que tenga la supercie nivelada
y que resista el peso del refrigerador
completamente cargado.
Instalación
Espacios libres para la instalación
• Deje los siguientes espacios libres para
facilitar la instalación del refrigerador,
la circulación adecuada del aire y las
conexiones eléctricas y de plomería:
Laterales y techo - 3 pulgadas (7,5 cm)
Posterior - 4 pulgadas (10 cm)
Consejos para la colocación del
refrigerador en su ubicación nal:
• Las cuatro esquinas de la unidad deben
descansar rmemente sobre el piso.
• La unidad debe estar nivelada en la parte
delantera y trasera.
Para nivelar el gabinete usando las patas
frontales de nivelado:
• Haga descender las patas de nivelado de
cada lado, en el sentido de las agujas del
reloj hasta que toquen el piso.
Ampliar
Retraer
• Use las patas de nivelado (ubicadas en
el frente) para asegurarse de que las 4
esquinas de la unidad están rmemente
apoyadas sobre el piso sólido. Gire las
patas de nivelación en el sentido de
las agujas del reloj para retraerlas y
en el sentido contrario para extraerlas.
Asegúrese de que el piso tenga
resistencia suciente para el peso de un
frigoríco con plena carga.

6
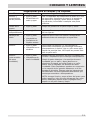
NOTA
La dirección en la que se abre la puerta del refrigerador (giro de la puerta) puede ser inver-
tida de izquierda a derecha o de derecha a izquierda cambiando las bisagras de la puerta de
un lado al otro. La inversión de la dirección de apertura de la puerta debe ser realizada por
una persona calicada.
NOTA
Los modelos de una sola puerta no incluyen los pasos de las bisagras centrales.
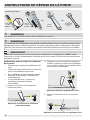
INSTRUCCIONES DE DESINSTALACIÓN DE LA
PUERTA
Instrucciones para la extracción
e inversión de la puerta:
• Asegúrese de que la unidad esté
desenchufada y vacía.
• Todas las piezas que se extraigan deben
guardarse para volver a instalar la puerta.
• No apoyar la parte posterior de la unidad
sobre el piso, ya que se podría dañar el
sistema de enfriamiento.
• Es preferible que 2 personas manejen la
unidad durante el armado.
1. Extraiga la tapa de la bisagra superior
derecha.
IMPORTANTE
Antes de comenzar, gire el control de temperatura del frigoríco a la posición “OFF” (Desco-
nectado) y desconecte el cable de energía eléctrica del tomacorriente de la pared. Extraiga
todos los alimentos de los estantes de la puerta.
Llave
ajustable
Juego de
llaves
de cubo
Llave fija
de 10 mm
(3/8")
Herramientas
necesarias:
Destornillador
de punta
Philips
MR
oror
2. Extraiga los tornillos de la bisagra superior
derecha y levante la puerta del congelador
para sacarla. Colóquela sobre una
almohadilla blanda para evitar dañarla.
Extraiga la tapa de la bisagra
superior derecha
Extraiga la bisagra superior derecha
Extraiga la tapa del tornillo
superior izquierdo
3. Extraiga la tapa del tornillo superior
izquierdo.
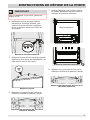
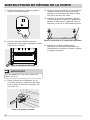
La page charge ...
La page charge ...
La page charge ...
La page charge ...
La page charge ...
La page charge ...
La page charge ...
La page charge ...
La page charge ...
La page charge ...
La page charge ...
La page charge ...
La page charge ...
La page charge ...
La page charge ...
La page charge ...
La page charge ...
La page charge ...
La page charge ...
La page charge ...
La page charge ...
La page charge ...
La page charge ...
La page charge ...
-
 1
1
-
 2
2
-
 3
3
-
 4
4
-
 5
5
-
 6
6
-
 7
7
-
 8
8
-
 9
9
-
 10
10
-
 11
11
-
 12
12
-
 13
13
-
 14
14
-
 15
15
-
 16
16
-
 17
17
-
 18
18
-
 19
19
-
 20
20
-
 21
21
-
 22
22
-
 23
23
-
 24
24
-
 25
25
-
 26
26
-
 27
27
-
 28
28
-
 29
29
-
 30
30
-
 31
31
-
 32
32
-
 33
33
-
 34
34
-
 35
35
-
 36
36
-
 37
37
-
 38
38
-
 39
39
-
 40
40
-
 41
41
-
 42
42
-
 43
43
-
 44
44


Frigidaire FFPE3322UM Manuel utilisateur
- Taper
- Manuel utilisateur
- Ce manuel convient également à
dans d''autres langues
- italiano: Frigidaire FFPE3322UM Manuale utente
- English: Frigidaire FFPE3322UM User manual
- español: Frigidaire FFPE3322UM Manual de usuario