La page est en cours de chargement...

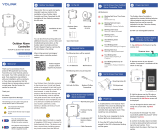
Get to Know Water Leak
Sensor 2
E
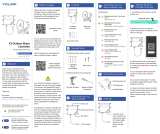
Get to Know Water Leak
Sensor 2, Continued.
E
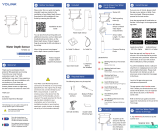
In the Box
C
Wall-Mounting Slot
Battery
Compartment
Open the app and tap Sign up for an
account. You will be required to provide
a username and a password. Follow the
instructions, to set up a new account.
Allow notifications, when prompted.
You will immediately receive a welcome
email from no-reply@yosmart.com with
some helpful information. Please mark
the yosmart.com domain as safe, to
ensure you receive important messages
in the future.
Log in to the app using your new
username and password.
The app opens to the Favorite screen.
This is where your favorite devices and
scenes will be shown. You can organize
your devices by room, in the Rooms
screen, later.
Refer to the full user guide and online
support for instructions on the use of the
YoLink app.
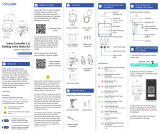
Install the App
G
If you are new to YoLink, please install
the app on your phone or tablet, if you
have not already. Otherwise, please
proceed to the next section
Scan the appropriate QR code below or
find the “YoLink app” on the appropriate
app store.
Apple phone/tablet
iOS 9.0 or higher
Android phone/
tablet 4.4 or higher
LED Behaviors
Water Leak
Sensor 2
Sensor Cable
Mounting Hook
The following items may be required:
Quick Start Guide
Alarm Tones
One Beep
Device power-up/button pressed
Two Beeps
Warning
(Two beeps every 2 seconds for the
first minute. Two beeps every 5
seconds for the next 12 hours.
Sustaining two beeps once a minute
after 12 hours)
Phono Jack
SET Button
Phono Plug
Sensor Cable
Used for water
detection
Phono Jack
Used for extending
sensor cable
Status LED
* Not visible while there is no operation
with the SET button or while device is in
normal monitoring status
Required Items
D
Double-Sided
Mounting Tape
Rubbing Alcohol
Pads
Quick Start Guide
YS7904-UC
Water Leak Sensor 2
Revision Feb. 20, 2023
Welcome!
A
Thank you for purchasing YoLink
products! We appreciate you trusting
YoLink for your smart home & automa-
tion needs. Your 100% satisfaction is our
goal. If you experience any problems
with your installation, with our products
or if you have any questions that this
manual does not answer, please contact
us right away. See the Contact Us
section for more info.
Thank you!
Eric Vanzo
Customer Experience Manager
Pour des instructions en
français, scannez les codes
QR dans la section suivante.
Para obtener instrucciones en
español, escanee los códigos
QR en la siguiente sección.
Fr
Es
Before You Begin
B
Installation & User
Guide
Product Support
Support produit
Soporte de producto
Your Water Leak Sensor 2 connects to
the internet via a YoLink hub (Speaker-
Hub or the original YoLink Hub), and it
does not connect directly to your WiFi or
local network. In order for remote
access to the device from the app, and
for full functionality, a hub is required.
This guide assumes the YoLink app has
been installed on your smartphone, and
a YoLink hub is installed and online (or
your location, apartment, condo,
etcetera, is already served by a YoLink
wireless network).
You can also find all current guides and
additional resources, such as videos and
troubleshooting instructions, on the
Water Leak Sensor 2 Product Support
Page by scanning the QR code below or
by visiting:
https://shop.yosmart.com/pages/
water-leak-sensor-2-product-
support
Please note: this is a quick start guide,
intended to get you started on the
installation of your Water Leak Sensor 2.
Download the full Installation & User
Guide by scanning this QR code:
The following icons are used in this guide to
convey specific types of information:
Very important information
(can save you time!)
Good to know info but may not apply
to you
2 x AAA Batteries
(Pre-Installed)
Blinking Red Once
Water Alert
Water Detected or Water Not
Detected (Depending on Mode)
Blinking Green
Connecting to Cloud
Fast Blinking Green
Control-D2D Pairing in Progress
Slow Blinking Green
Updating
Fast Blinking Red
Control-D2D Unpairing in
Progress
Blinking Red And Green
Alternately
Restoring to Factory Defaults
Press the SET
button, briefly, until
the LED blinks
green.
Power-Up
F

Installation
I
Contact Us
J
We are here for you, if you ever need any
assistance installing, setting up or using
a YoLink app or product!
Need help? For fastest service, please
email us 24/7 at service@yosmart.com
Or call us at 831-292-4831 (US phone
support hours: Monday - Friday, 9AM to
5PM Pacific)
You can also find additional support and
ways to contact us at:
www.yosmart.com/support-and-service
Or scan the QR code:
3. If you still are unsure how to place the
cable, or whether or not you need
additional cables, you can test the
location by simulating a water leak. For
example, pour a small amount of water
on the area where you expect a water
leak may occur. Observe how the water
pools or expands over the area.
Consider the slope of the floor, which
may be prominent in basement or
mechanical spaces that have a floor
drain (generally, all points on the floor
will slope down to the drain). Try to
place the cable so that it is in the path of
pooling or moving water.
4. Lay the cable(s) on the floor, as
required for your application, temporarily,
at this time, so that you can determine
the appropriate location for the sensor.
Install the mounting hook:
1. After the location and placement of
the cable(s) has been determined, define
the location of the sensor. The mounting
hook should be installed at this location.
(If you intend to mount the Water Leak
Sensor 2 using another method, such as
double-sided mounting tape or Velco, do
so at this time, per the manufacturer's
instructions.)
2. Clean the surface where the mounting
hook will be placed, using rubbing
alcohol (recommended) or a degreaser
that does not leave a residue on the
surface. In order for the pre-installed
mounting tape to adhere to the surface,
the surface must be clean, dry and free
of dirt, oils, grease, or other cleaning
agent residue.
3. Remove the plastic backing from the
mounting tape on the mounting hook.
4. With the hook facing up, as shown,
press it firmly against the mounting
surface and maintain pressure for at
least 5 seconds.
Install and test the Water Leak Sensor 2:
1. Hang the sensor on the mounting
hook, using the slot on the back of the
sensor. Ensure it is secure, by gently
tugging on it.
2. It is important that you test each
sensor, to ensure it will work properly
when needed! Please note, before
testing, if the sensing cable is emersed
in water, it can take an extended period
to dry. You can perform a "functional
test" of the leak sensor by pouring water
in the detection area, but we aware of the
extended drying time. One testing
method is to use a paper towel or cloth
that is slightly damp with water. Place
this gently on the sensing cable, allowing
it several seconds to respond. The
sounder should activate and the LED
should flash red.
Finally, if you have any feedback or
suggestions for us, please email us at
feedback@yosmart.com
Thank you for trusting YoLink!
Eric Vanzo
Customer Experience Manager
Support
Home Page
15375 Barranca Parkway
Ste. J-107 | Irvine, California 92618
© 2023 YOSMART, INC IRVINE,
CALIFORNIA
Installation, Continued.
I
3. The Water Leak Sensor 2 has an
integral sounder alarm. Its use is
optional, as it can be enabled or
disabled, in the app settings. Please
note, using this sounder as your primary
means of notification is discouraged, as
various factors, such as the distance
from where you are to this sensor, the
number of doors, walls or floors that may
be between the sensor and you, if you
are asleep, etcetera, can all reduce the
chance you will hear the alarm. If a
siren alarm is preferred, please consider
one of our siren products and our
SpeakerHubs (audio, tone and
message-playing, hubs). Also, please
note, the use of the sounder does reduce
the maximum life of the batteries.
4. The Water Leak Sensor 2 is typically
mounted on the wall or on a stable
vertical surface, near the floor.
5. While the sensing cable(s) can be
placed in a confined space, such as
behind a refrigerator, the sensor should
be placed in an accessible location (for
example, to allow for easy battery
replacement later).
Determine the sensor location and
approximate cable placement:
1. Connect the cable to the sensor, by
plugging the male end of the cable into
the sensor. If you are using additional
cables, connect them at this time.
2. The applications for the Water Leak
Sensor 2 are numerous and this quick
start guide can not address all of them in
detail. But the sensing cable(s) will
typically be placed so that they encircle
the region where a water leak may occur.
Some common examples are placing the
cable around the base of a toilet, or
around the inside perimeter of a
bathroom vanity with sink, around a
laundry washing machine or water
heater. In addition to placing the cable
to surround an area, snaking the cable
back and forth across a region may
provide better coverage, resulting in a
faster response time.
Location considerations:
Before installing your Water Leak Sensor
2, consider the following important
factors:
1. This device is intended for indoor use,
only. The sensor body should not be
installed where it will normally get wet or
be submerged.
2. Additional cables can be added to
extend the length of the water detection
cable and/or to expand the detection
region (to cover a larger area). The total
length of the final arrangement of cables
must not exceed 30 feet or 9 meters.
Add Your Water Leak
Sensor 2 to the App
H
1. Tap Add Device (if shown) or tap the
scanner icon:
Scanner icon
2. Approve access to your phone’s
camera, if requested. A viewfinder will be
shown on the app.
3. Hold the phone over the QR code so
that the code appears in the viewfinder.If
successful, the Add Device screen will be
displayed.
4. Follow the instructions to add your
Water Leak Sensor 2 to the app.
Spare cables can be purchased, allowing
for a quick replacement after a water
leak event!
3. Unplug the sensing cable and allow it
time to dry, or actively dry it with a heat
source like a hairdryer. Reinsert the
cable until it no longer causes a leak
alert response response.
Refer to the full user guide and/or the
product support page, for additional
information, and to complete the
settings in the app.
1/2