
SSAAFFEETTYY
AANNDD
OOPPEERRAATTIINNGG
MMAANNUUAALL
FFOORR
1144""
&&
1188""
DDUUAALL
MMOOTTOORR
UUPPRRIIGGHHTT
VVAACCUUUUMMSS
PN 344761 - Dual Motor Uprights Manual - Printed in USA 03/31/06
PAGE 1
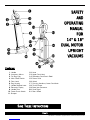
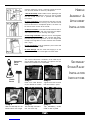
Features:
1. Handle 12. Hose
2. Accessory Mount 13. Upper Cord Hook
3. Full Bag Light 14. Secondary Cord Strain Relief
4. Main Power Switch 15. Power Cord
5. Door Latch 16. Wand
6. Bag Housing 17. Carrying Handle w/Lower Cord Hook
7. Handle Release Lever 18. Thumb Screw
8. Electronic Display 19. Base Inlet Connector
9. Handle Pivot 20. Cord Pigtail
10. Power Brush Nozzle 21. Rear Wheel
11. Bumper
SSAVE TTHESE IINSTRUCTIONS

This vacuum cleaner will afford you many
years of trouble-free operating satisfaction,
provided it is given proper care. All parts
have passed rigid quality control standards
prior to being assembled to produce the
finished product. Prior to packaging, this
vacuum was again inspected for assurance
of flawless assembly.
Your vacuum is protectively packed to pre-
vent damage in shipment. We recommend
that upon delivery, unpack the vacuum and
inspect it for any possible damage. Only a
visual examination will reveal damage that
may have occurred.
If damage is discovered, immediately notify
the transportation company that delivered
your vacuum. As a shipper, we are unable
to report claims for concealed damage.
You must originate any claims within 5
days.
This manual is for your protection and
information. PLEASE READ CAREFULLY
since failure to follow precautions could
result in discomfort or injury.
READ ALL
INSTRUCTIONS
BEFORE
OPERATING
Electric shock could occur if used on wet surfaces.
DO NOT expose to rain - Store Indoors
When using this electric vacuum, basic precautions should always
be followed, including the following:
1) DO NOT leave the vacuum when
plugged in. Unplug it from the outlet
when not in use and before servicing.
2) This is NOT a toy. Close attention is
necessary when used around or near
children.
3) Use this vacuum only as described
in this safety manual. Use only manu-
facturer’s recommended attachments
and accessories.
4) DO NOT use the vacuum with dam-
aged cord or plug. If the vacuum is not
working as it should, because it has
been dropped, damaged, left outdoors
or dropped into water, contact an
authorized service center or factory.
5) DO NOT pull vacuum by the cord, use
cord as a handle, close a door on the
cord or pull cord around sharp edges
and corners. DO NOT run vacuum over
the cord. Keep cord away from heated
surfaces.
6) DO NOT unplug the vacuum by pulling
on the cord. To unplug, grasp the plug,
not the cord.
7) DO NOT handle the vacuum plug or
vacuum with wet hands.
8) DO NOT put any objects into open-
ings. DO NOT use with any openings
blocked; keep free of dust, lint, hair, and
anything that may reduce air flow.
9) Turn OFF all of the controls before
unplugging.
10) Keep hair, loose clothing, fingers,
and all parts of the body away from
openings and moving parts.
11) DO NOT pick up anything that is
smoking or burning such as cigarettes,
matches, or hot ashes.
12) DO NOT use without dust bag
and/or filters in place.
13) Use extra care when cleaning on
stairs.
14) DO NOT use this vacuum to pick up
flammable or combustible liquids such
as gasoline or use in areas where they
may be present.
15) DO NOT use where anesthetics or
oxygen is used.
16) Replace damaged or worn parts
immediately with genuine original equip-
ment parts to maintain safety and to
protect your limited warranty.
17) DO NOT use an extension cord
unless absolutely necessary. If an exten-
sion cord is used, then wire size must
be #14 gauge or larger and should not
exceed 50 feet in length. The extension
cord must be three-wire type to insure
GROUNDING protection.
This vacuum must be connected to a
properly grounded outlet only. See
grounding instructions (Page 3).
IIMPORTANT
SAFETY
INSTRUCTIONS
PAGE 2
WARNING:
SAVE THESE INSTRUCTIONS

Improper use of the grounding plug can result in
a risk of electric shock.
GGROUNDING
IINSTRUCTIONS
Electrical equipment must be grounded. If
it should malfunction or breakdown,
grounding provides a path of least resist-
ance for electrical current to reduce the
risk of electric shock. This vacuum is
equipped with a cord having an equipment-
grounding conductor and grounding plug.
The plug must be inserted into an appropri-
ate outlet that is properly installed and
grounded in accordance with all local
codes and ordinances.
If repair or replacement of the cord or plug
is necessary, DO NOT connect the ground-
ed wire to either flat blade terminal. The
wire with insulation having an outer sur-
face that is green with or without yellow
stripes is the grounding wire.
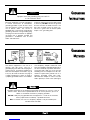
GGROUNDING
MMETHODS
This electric equipment is for use on a
nominal 120 volt circuit, and has a
grounded plug that looks like the plug illus-
trated in (Fig A). A temporary adaptor that
looks like the adaptor illustrated in (Fig B
& C) may be used to connect this plug to
a 2-pole receptacle as shown in (Fig B) if
a properly grounded outlet is not available.
The temporary adaptor should be used
only until a properly grounded outlet (Fig A)
can be installed by a qualified electrician.
The green color rigid ear, lug or the like
extending from the adaptor must be con-
nected to a permanent ground such as a
properly grounded outlet box cover.
Whenever the adaptor is used, it must be
held in place by a metal screw. (See Fig B)
Improper connection of the equipment-grounding conductor can result in a risk of
electric shock. Check with a qualified electrician or service person if you are in
doubt as to whether the outlet is properly grounded.
DO NOT modify the plug provided with the equipment. If it will not fit the outlet,
have a proper outlet installed by a qualified electrician.
Note: In Canada, the use of a temporary adaptor is not permitted by the
Canadian Electrical Code.
DANGER:
WARNING:
PAGE 3

IMPORTANTES
MESURES
DESECURITE
1) Ne pas laisser l'appareil sans surveil-
lance lorsqu'il est branché. Débrancher
lorsque l'appareil n'est pas utilise ét
avant l'entretien.
2) Ne pas permettre aux enfants de
jouer avec l'appareil. Une attention par-
ticulière est nécessaire lorsque l'ap-
pareil
est utilisé par des enfants ou à proxim-
ité de ces derniers.
3) N'utiliser que conformément à cette
notice avec les accessoires recom-
mandés par le fabricant.
4) Ne pas utiliser si le cordon ou la fiche
est endommagé. Retourner l'appareil à
un atelier de réparation s'il ne fonct-
ionne pas bien, s'il est tombé ou s'il a
été endommagé, oublié à l'extérieur ou
immergé.
5) Ne pas débrancher en tirant sur le
cordon. Tirer plutôt la fiche.
6) Ne pas tirer, soulever ou traîner l'ap-
pareil par le cordon. Ne pas utiliser le
cordon comme une poignée, le coincer
dans l'embrasure d'une porte ou l'appuy-
er contre des arêtes vives ou des coins.
Ne pas faire rouler l'appareil sur le cor-
don. Garder le cordon à l'écarte des
surfaces chaudes.
7) N'insérer aucun objet dans les ouver-
tures. Ne pas utiliser l'appareil
lorsqu'une ouverture est bloquée.
S'assurer que de la poussière, de la
peluche, des cheveux ou d'autres
matières ne réduisent pas le débit d'air.
8) Ne pas toucher la fiche ou l'appareil
lorsque vos mains sont humides.
9) Maintenir les cheveux, les vêtements
amples, les doigts et toutes les parties
du corps à l'écart des ouvertures et des
pièces mobiles.
10) Ne pas utiliser l'appareil si le sac à
poussière ou le filtre n'est pas en place.
11) Ne pas apsirer de matières en com-
busion ou qui dégagent de la fumée,
comme des cigarettes, des allumettes
ou des cendres chaudes.
12) Mettre toutes les commandes à la
position ARRET avant dé debrancher
l'appareil.
13) User de prudence lors du nettoyage
des escaliers.
14) Ne pas aspirer des liquides inflam-
mables ou combustibles, comme de
l'essence, et ne pas faire fonctionner
dans des endroits où peuvent se trouver
de tels liquides.
15) Toujours mettre l’interruptuer de
l’appariel à la position ARRET avant de
brancher ou de débrancher la brosse à
moteur.
16) Ne brancher qu'à une prise de
courant avec mise àla terre. Voir les
instructions visant la mise à la terre.
Cet appareil doit être mis à la terre. En
cas dé défaillance ou de panne
éventuelles, la mise à la terre fournit au
courant un chemin de moindre résis-
tance qui réduit le risque de choc élec-
trique. Cet appareil est pourvu d'un cor-
don muni d'un conducteur de terre et
d'une fiche avec broche de terre. La
fiche doit être branchée dans une prise
appropriée correctement instalée et
mise à la terre conformément aux règle-
ments et ordonnances municipaux.
Cet appareil est destiné à un circuit de 120V et est
muni d'une fiche de mise à la terre semblable à
celle illustrée par le croquis A de la figure "A".
S'assurer que l'appareil est branché à une prise de
courant ayant la même configuration que la fiche.
Aucun adaptatteur ne devrait être utilisé avec cet
appareil.
AVERTISSEMENT
Un conducteur de terre mal raccordé
peut entraîner un risque de choc élec-
trique. Consulter un électricien ou un
technicien d'entretien qualifié si vous
n'êtes pas certain que la prise soit cor-
rectement mise à la terre. Ne pas mod-
ifier la fiche fournie avec l'appareil-si elle
ne peut être inséreé dans la prise, faire
installer une prise adéquate par un élec-
tricien qualifié.
INSTRUCTIONS
VISANT LAA MISE
A LATERRI
PAGE 4
LIRE TOUTES LES INSTRUCTIONS AVANT DE FAIRE
FONCTIONNER (CET APPAREIL)
AVERTISSEMENT:
Pour reduire les risques d'incendie, de choc electrique
ou de blessure:

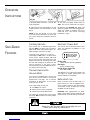
Carefully unpack the vacuum, checking carefully to ensure
that you have located all necessary components.
1.Handle Assembly: Slide handle into the opening of the
vacuum housing until it bottoms out (Fig A). Secure handle
the with thumb screw that is packed with operation
instructions.
2. Hose Installation:Push one end of the hose into the
top opening of the vacuum housing. Push the other end of
hose into the wand. If the operator prefers, the hose may
be slid into notch in back of the handle.
3. Wand Installation:Push lower end of wand into the fit-
ting on the power nozzle and snap wand into the depres-
sion in back of the vacuum housing. (See Fig B)
4. Filter Bag Installation:Open the vacuum housing door
by pushing down on the latch and swinging door down.
Push filter bag onto the bag mount as far as it will go. Fold
the top of the bag down so it won't interfere with the door
latch. (Fig C)
5. Tool Installation:Snap the upholstery and crevice tool
into the holder on the handle.
6. Cord Storage:Coil the cord and hanging it on the
upper hook, or wrap it around upper and lower hook.
HANDLE
ASSEMBLY &
ATTACHMENT
INSTALLATION
SECONDARY
STRAIN RELIEF
INSTALLATION
INSTRUCTIONS
This vacuum come with a secondary strain relief to pro-
tect the power cord from damage. It is important that you
follow the installation instruction below.
Step 2
Tighten the thumb screw to
hold the bracket in place.
Step 3
Slide the cord loop thru the
bottom hole of the triangle.
Step 4
Take the loop and hook it
over the center clip.
Step 5
The secondary strain
relief is now in place.
Secondary
Strain
Relief
Handle
Screw
PAGE 5
Step 1
Place strain relief bracket
on post behind the handle.

Full Bag Indicator
Your vacuum has an indicator light which
will flash RED if the bag is full or airflow is
obstructed. When the indicator light is on,
open the door and check the bag.
If the bag is full, replace it. If is not full
and the light is ON, there is an obstruction
in the system. Check the hose and wand
first. If they are clear, check the inlet in the
power brush base by removing wand from
the inlet and viewing the air path from the
inlet to the brush. If this area is clear,
remove the bag and check deflector port in
the top of vacuum housing.
Thermal Overload On
Vacuum Motor
This vacuum is equipped with a sensor that
shuts off the vacuum motor if the internal
temperature is too high. This is normally
created by an obstruction in the system
cutting off the air flow.
If the motor stops during use:
A. Turn OFF main switch.
B. Unplug vacuum from receptacle.
C. Inspect and remove obstruction.
The motor will automatically restart when
the switch ON and when has motor cooled-
sufficiently.
Electronic Power Alert
This vacuum has an electronic control that
alerts the operator to problems in the
brush section.
!
#Clear operating
#
#Belt out/Broken
#
!Brush Blocked
Green Light
Lower section operating properly.
Red Light
Brush roll obstructed.
Red & Green Lights ON
Drive belt broken.
The operator must constantly monitor the
alert lights for proper performance and
correct problems immediately.
Before Each Use
Check to ensure that the filter bag is in
place and that it is not full. Replace if nec-
essary. Inspect the brush area and remove
any threads, strings, or debris that may be
wrapped around the brush.
CAUTION: Belt replacement or other
repairs to the lower section should only be
performed by an authorized service center.
SAFE-GUARD
FEATURES
Always turn OFF the main switch and unplug the cord
before performing any maintenance
PAGE 6
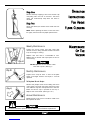
1. Plug the power cord into a 115 volt, 60
cycle receptacle.
2. Adjust the brush height knob to suit the
carpet thickness you are working on. (See
Fig D)
NOTE: On the 18" upright, you may need
to set the height adjustment at (3) for low
pile carpet during the (3 Months) break-in
period.
3. Turn the main power rocker switch to
"ON". The vacuum motor will start (Fig E).
4. Depress the YELLOW foot pedal and
lower the handle to the operating position.
When the handle is lowered, the brush
motor will start. Use normal vacuuming
procedures. (Fig F)
OPERATION
INSTRUCTIONS
CAUTION:

Weekly Maintenance
Inspect the vacuum motor inlet filter. Snap filter
retainer out of it's fitting. Remove the filter and clean
it by vacuuming or shaking.
Replace with new filter if uncleanable or torn.
Replace filter in retainer and snap in place in the vac-
uum housing.
DO NOT operate vacuum without motor
inlet filter in place. (See Fig J)
Monthly Maintenance
Inspect brush strip for wear. If worn to the point
where it no longer touches the carpet, it must be
replaced.
To Replace Brush Strips:
Remove the phillips head screw holding the brush
access plate in place on the end of the brush exten-
sion. Slide the strip out and replace with a new one.
Make sure brush strip is pushed all the way in.
Replace the access door. (See Figs K & L)
Annual Maintenance
Motor brushes in the vacuum and brush motor must
be inspected for wear.
MMAINTENANCE
OOFTTHE
VVACUUM
PAGE 7
SStteepp
OOnnee
Remove wand by snapping it out of the retainer clip
and pulling from the inlet in the base. The brush
motor will automatically stop when the wand is
removed.
SStteepp
TTwwoo
Attach the tool of your choice to the wand and start
cleaning.
NOTE: When replacing the wand, make sure that it
fits tightly into base inlet for proper performance.
OOPERATION
IINSTRUCTIONS
FFOR AABOVE
FFLOOR CCLEANING
CAUTION:
Brushes should be replaced only by authorized maintenance personnel.
CCAUTION::

PPRROOBBLLEEMM::Vacuum motor does not run.
POSSIBLE CAUSE: POSSIBLE SOLUTION:
1. Power cord may not be plugged in. 1. Check to make sure power cord is
plugged into vacuum and outlet.
2. Break in power cord. 2. Repair or replace cord.
3. Thermal overload tripped due to 3. Remove obstruction or change bag.
obstruction or full bag.
4. Main switch failure. 4. Replace switch.
5. Carbon motor brushes worn. 5. Replace brushes.
6. Motor failure. 6. Replace motor.
PPRROOBBLLEEMM::Brush motor does not run.
POSSIBLE CAUSE: POSSIBLE SOLUTION:
1. Lower cable not plugged into 1. Plug into receptacle.
receptacle in vacuum housing.
2. Handle not in operating position. 2. Lower handle.
3. Wand not seated in holder properly. 3. Snap wand properly into holder.
4. Brush obstructed. (Red Light ON) 4. Remove obstruction.
5. Belt broken. (Red & Green Lights ON) 5. Replace belt.
6. Carbon motor brushes worn. 6. Replace carbon brushes.
7. Motor failure. 7. Replace motor.
PPRROOBBLLEEMM::Low suction power.
POSSIBLE CAUSE: POSSIBLE SOLUTION:
1. Filter bag full. 1. Replace filter bag.
2. Vacuum inlet filter plugged. 2. Clean or replace.
3. Hose plugged with debris. 3. Remove debris from hose.
4. Hose/wand not connected properly. 4. Check installation.
PPRROOBBLLEEMM::Poor pickup on carpet.
POSSIBLE CAUSE: POSSIBLE SOLUTION:
1. Low suction power. 1. Check solutions above.
2. Brush area obstructed. 2. Remove obstruction.
3. Brush strip worn. 3. Replace brush strip.
4. Brush not adjusted properly for 4. Check/change adjustment.
carpet pile height.
TROUBLE
SHOOTING
GUIDE
PAGE 8
PN 344761 - Dual Motor Uprights Manual - Printed in USA 03/31/06
®
777 South Street, Newburgh NY 12550-0606
TEL: 800.835.7812 !845.565.8850
FAX: 800.752.6883 !845.565.9392
www.mastercraftusa.com ![email protected]
Disconnect power cord from outlet before servicing this vacuum.
CAUTION:
-
 1
1
-
 2
2
-
 3
3
-
 4
4
-
 5
5
-
 6
6
-
 7
7
-
 8
8


MasterCraft 14" Safety And Operating Manual
- Taper
- Safety And Operating Manual
- Ce manuel convient également à
dans d''autres langues
- English: MasterCraft 14"
Autres documents
-
Dustbane Tracker Operations Manual
-
Pro-Team 107252 Manuel utilisateur
-
ProTeam 1004c Manuel utilisateur
-
-
ProTeam PROFORCE15XP_1 Manuel utilisateur
-
-
-
Clarke 14 Manuel utilisateur
-
-