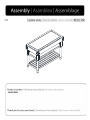
ROOMS TO GO 40825614 Assembly Instructions
- Taper
- Assembly Instructions

KA1012561

2 |
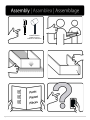
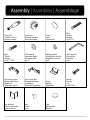
Rubber Hammer
Rubber Hammer
Martillo de goma
Marteau en caoutchouc

3 |

4 |
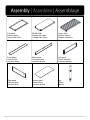
A x1
Top panel
Panel superior
Panneau du haut
B x1
Middle shelf
Estante del medio
L'étagère du milieu
C x1
Lower shelf
Estante inferior
Étagère inférieure
D x1
Front panel
Panel frontal
Panneau avant
E x1
Back panel
Panel posterior
Panneau arrière
F x1
Left panel
Panel izquierdo
Panneau gauche
G x1
Right panel
Panel derecho
Panneau droit
H x1
Bottom panel
Panel inferior
Panneau du bas
I x4
Leg
Pierna
Jambe

5 |
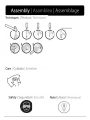
1 x8
Cam bolt
Tornillo de leva
Boulon à came
2 x8
Cam lock
Bloqueo de leva
Serrure à came
3 x8
Cover
Tapa
Couverture
4 x8
Bolt
Tornillo
Boulon
ø
1/4
”
*
2
”
L
5 x8
Bolt
Tornillo
Boulon
ø
1/4
”
*
1
-
1/2
”
L
6 x12
Flat washer
Arandela plana
Rondelle plate
ø
1/4
”
7 x12
Spring washer
Arandela de resorte
Rondelle à ressort
ø
1/4
”
8 x1
Allen wrench
Llave Allen
Clé Allen
ø
1/4
”
9 x1
Arm hinge (right)
Bisagra del brazo
(derecho)
Charnière
(droit)
10 x1
Arm hinge (left)
Bisagra del brazo
(izquierda)
Charnière
(
gauche
)
11 x3
Hinge
Bisagra
Charnière
12 x32
Screw
Tornillo
Vis
ø
1/8
”
*
5/8
”
L
13 x4
Iron bracket
Soporte de hierro
Support de fer
14 x16
Nail
Clavo
Clou
15 x2
Pad
Almohadilla
Tampon

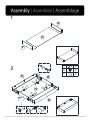
6 |
G
F
H
1x 8
2
3
x 8
x 8
1
1
1
1
1
H
F
G
D
E
2
2
2
2
3
2
3
3
3
3

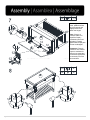
7 |
4x 4
5
7
x 2
x 6
8x 1
6x 6
I
B
C
I
7
6
4
7
6
5
4x 4
5
7
x 2
x 6
6x 6
7
6
4
7
6
5
I
I
B
I
I

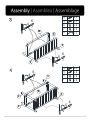
8 |
5x 4
5
8
5
5
5
5
G
E
H
F
B
I
I
9x 1
x 1
10
11 x 3
12 x 13
12
9
10
11
11
11
12
12
12
12
A
9
12
12
11

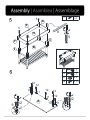
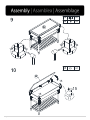
9 |
11
12
12
13 x 2
14 x 8
13
14
14
13
14
14
A
lay Kitchen island on clean,padded surface
like Carpet blanket and slightly lift the lid to
attach the hinges
Floor
12 x 19
12
9
12
12
12
12
12
12
A
H
Note: Lay product on a
clean, padded surface
(such as carpet) and
slightly lift the lid to
attach the hinges.
Nota: Coloque el
producto sobre una
superficie limpia y
acolchada (como una
alfombra) y levante
ligeramente la tapa para
colocar las bisagras.
Remarque: Posez le
produit sur une surface
propre et rembourrée
(telle qu'une moquette)
et soulevez légèrement
le couvercle pour fixer
les charnières.

10 |
13 x 2
14 x 8
13
14
14
13
14
14
A
15
A
15 x 2
15
15

11 |
-
 1
1
-
 2
2
-
 3
3
-
 4
4
-
 5
5
-
 6
6
-
 7
7
-
 8
8
-
 9
9
-
 10
10
-
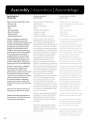 11
11


