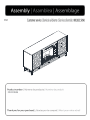
ROOMS TO GO 21612230 Assembly Instructions
- Catégorie
- Cheminées
- Taper
- Assembly Instructions

FA1119656

2 |

3 |

4 |
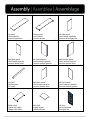
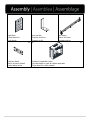
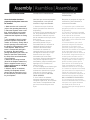
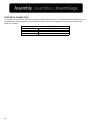
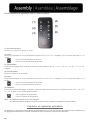
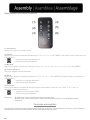
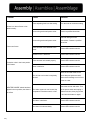
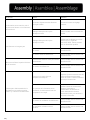
A x1
Top panel
Panel superior
Panneau supérieur
B x1
Bottom panel
Panel inferior
Panneau du bas
C x1
Left side panel
Panel lateral izquierdo
Panneau latéral gauche
D x1
Right side panel
Panel lateral derecho
Panneau latéral droit
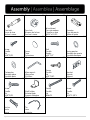
E x1
Left vertical panel
Panel vertical izquierdo
Panneau vertical gauche
F x1
Right vertical panel
Panel vertical derecho
Panneau vertical droit
G x1
Front rail
Riel delantero
Rail avant
H x1
Right back panel
Panel trasero derecho
Panneau arrière droit
I x1
Left back panel
Panel trasero izquierdo
Panneau arrière gauche
J x1
Middle shelf
Estante del medio
L'étagère du milieu
K x2
Side shelf
Estante lateral
Tablette latérale
L x1
Left door
Puerta izquierda
Porte gauche

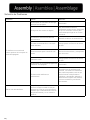
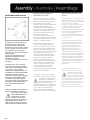
5 |
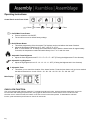
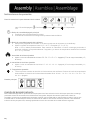
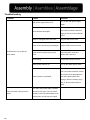
M x1
Right door
Puerta derecha
Porte droite
N x2
Iron bracket
Soporte de hierro
Support en fer
O x2
Iron frame
Marco de hierro
Armature de fer
P x2
Side iron frame
Marco de hierro lateral
Cadre latéral en fer
Q x1
Firebox in separate carton
Caja de fuego en caja de cartón separada
Foyer dans un carton séparé

6 |
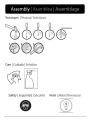
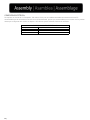
1 x16
Cam bolt
Perno de leva
Boulon à came
2 x16
Cam lock
Bloqueo de la leva
Serrure à came
3 x18
Wood dowel
Taco de madera
Cheville en bois
∅5/16”x1-1/4”L
4 x2
Doorstop
Tope de puerta
Butée de porte
5 x8
Screw
Tornillo
Vis
ø1/8”*5/8”L
6 x16
Cover
Tapa
Couverture
7 x14
Bolt
Tornillo
Boulon
ø1/4”*1/2”
8 x14
Spring washer
Arandela de resorte
Rondelle élastique
9 x14
Flat washer
Arandela plana
Rondelle plate
10 x1
Allen wrench
Lllave allen
Clé Allen
11 x26
Screw
Tornillo
Vis
ø1/8”*5/8”L
12 x4
Bracket
Soporte
Support
13 x8
Screw
Tornillo
Vis
ø1/8”*5/8”L
14 x12
Shelf holder
Estante titular
Support d'étagère
15 x3
Screw
Tornillo
Vis
∅8#x2”L
16 x4
Screw
Tornillo
Vis
ø1/4"*1-3/8"L
17 x4
Anchor
Ancla
Ancre
18 x2
Tie
Lazo
L'attache

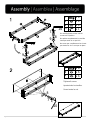
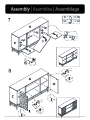
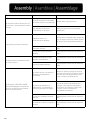
7 |
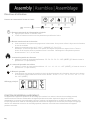
7
8
9
10
x 8
x 8
x 8
x 1
10
7
8
9
10
7
8
9
7
8
9
x 6
x 6
x 6
10
7
8
9
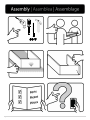
Do not fully tighten screws until all
screws are in position.
No apriete completamente los tornillos
hasta que estén en su posición.
Ne serrez pas complètement les vis tant
que toutes les vis ne sont pas en place.
Tighten all screws.
Apretar todos los tornillos.
Serrez toutes les vis.

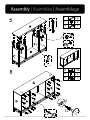
8 |
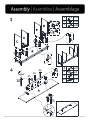
1
2
3
x 8
x 8
x 8
1
3
1
3
1
3
1
3
3x 2
x 2
4
5x 8
3
3
1
3
5
4
5
4
5
4
2
3
2
2
15 x 3
15
15
15
15

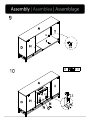
9 |
1
2
3
x 8
x 8
x 8
1
3
1
3
1
3
1
3
2
2
1
1
2
3
11
12
13
x 26
x 2
x 4
12
13
12
13
11
11
11
11
11
11
11
11
11
11
11
11
13
12
11

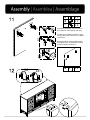
10 |
6x 16
14 x 12
14
14
14
14 14
14
6
6
6

11 |
13 x 4
13
13
13
14
14

12 |
Anti-tipping hardware must be used for
this product to avoid tipping and injury.
El hardware antivuelco debe usarse para
este producto para evitar vuelcos y
lesiones.
Le matériel anti-basculement doit être
utilisé pour ce produit afin d'éviter le
basculement et les blessures.
12
16
17
x 2
x 4
x 4
12
16
17
12
16
17
17
12
18 x 2
18
12
12
18
Anti-tipping hardware must be used for
this product to avoid tipping and injury.
Se debe usar hardware antivuelco para
este producto para evitar que se vuelque
y se lesione.
Une quincaillerie anti-basculement doit
être utilisée pour ce produit afin d'éviter
tout basculement et blessure.

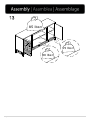
13 |
85 lbs<
15 lbs<
30 lbs<

14 |

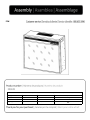
PO#
FA5123
ELECTRICAL SPECIFICATIONS | ESPECIFICACIONES ELÉCTRICAS |CARACTÉRISTIQUES ÉLECTRIQUES
Voltage:
Tensión:
Tension :
120V, 60 Hz
Amps:
Amperios:
Intensité de courant :
12.5 Amps
Watts:
Watts:
Puissance :
1500 Watts
Lighting:
Iluminación:
Éclairage :
LED

2|

3|
Safety |Seguridad |Sécurité
Note! |Nota: |Remarque!

4|
Electric Firebox Insert
User’s Operating Manual
Cámara de combustión
eléctrica insertable
Manual de funcionamiento
del usuario
Foyer électrique
encastrable
Guide de l'utilisateur
Consumer safety
information:
Please read this manual before
installing and operating this
appliance.
WARNING!!!
If the information in this manual is
not followed correctly, an electric
shock or fire may result in property
damage, personal injury, or loss of
life. Do not store or use gasoline or
other flammable vapors or liquids
near this appliance.
Safety Feature:
This unit has an internal thermal
overload protector, when a
temperature that may cause
overheating is reached, the heater
will automatically shut off.
Operation can only resume when
the unit is reset. (See instructions
below)
To Reset Heater:
Unplug the heater and wait 10
minutes for the unit to cool down.
After 10 minutes, plug the heater
again and follow the operating
instructions described in this
manual.
Información de
seguridad para el
consumidor:
Lea este manual antes de instalar y
operar este artefacto.
¡¡¡ADVERTENCIA!!!
Si no sigue correctamente las
instrucciones de este manual, se
puede producir una descarga
eléctrica o un incendio que
ocasione daños a la propiedad,
lesiones corporales o muertes. No
almacene ni use gasolina ni otros
vapores o líquidos inflamables
cerca de este artefacto.
Característica de seguridad:
Esta unidad tiene un protector de
contra sobrecarga térmica interno;
cuando se alcanza una temperatura
que puede causar
sobrecalentamiento, el calefactor
se apaga automáticamente. La
unidad solo puede volver a
funcionar si la restablece. (Consulte
las instrucciones a continuación)
Para restablecer el
calefactor:
Desenchufe el calefactor y espere
10 minutos para que se enfríe.
Después de 10 minutos, vuelva a
enchufar el calefactor y siga las
instrucciones de operación que se
describen en este manual.
Information de sécurité
pour le consommateur:
Veuillez lire ce guide avant
d'installer et d'utiliser cet appareil.
AVERTISSEMENT!!!
Le non-respect de l'information
contenue dans ce guide peut
entraîner un choc électrique ou un
incendie pouvant causer des
dommages matériels, des
blessures ou la mort.
Ne pas entreposer ou utiliser de
l'essence ou d'autres vapeurs et
liquides inflammables près de cet
appareil.
Dispositif de sécurité :
Cette unité comporte un dispositif
de protection de surcharge
thermique interne. Lorsque
l'appareil atteint une température
pouvant entraîner une surchauffe,
la fournaise s'éteint
automatiquement. L'appareil peut
être remis en marche uniquement
après une réinitialisation. (Voir les
directives ci-dessous)
Pour réinitialiser la
fournaise :
Débranchez la fournaise et
attendez 10 minutes jusqu'à ce
qu'elle soit refroidie. Après
10 minutes, branchez la fournaise
et suivez les directives d'utilisation
décrites dans le présent guide.

5|
Important Operating and
Safety Instructions:
CAUTION:
High Temperatures! Keep draperies,
electrical cords, and other
furnishings at least 3 feet (.9 meters)
from the front and away from the
front, sides, and rear of the heater.
WARNING:
Risk of fire – keep combustible
material away from the front of the
electrical fireplace. Servicing should
be done only while the electrical
fireplace is disconnected from the
power supply.
Instrucciones importantes
de operación y seguridad:
PRECAUCIÓN:
Mantenga las cortinas, cables
eléctricos y otros enseres a una
distancia de al menos 3 pies del
área delantera, los costados y el
área trasera del calefactor.
ADVERTENCIA:
Para evitar riesgos de que se
produzca un incendio, mantenga
los materiales combustibles lejos
del área delantera de la chimenea
eléctrica. Solo se debe realizar
mantenimiento mientras la
chimenea eléctrica esté
desconectada del tomacorriente.
Directives importantes
concernant la sécurité et
l'utilisation :
MISE EN GARDE :
Tenir les draperies, les cordons
électriques et tout ameublement à
au moins 3 pieds de l'avant, des
côtés et de l'arrière de la fournaise.
AVERTISSEMENT :
Risque d'incendie, garder tout
matériel combustible loin de l'avant
du foyer électrique. L'entretien ne
doit être réalisé que lorsque le foyer
électrique est débranché.

6|
Important Operating and Safety Information:
When using electrical appliances, the following basic precautions should always be followed to reduce the risk of fire,
electric shock, and injury.
Read all instructions before using this heater.
Use this heater only as described in this manual. Any other use not recommended by the manufacturer may
cause fire, electric shock, or injury.
Before connecting the appliance to the electric source, check that the current and power match those given on
the ratings plate.
This heater is for use with a 120 Volt electrical outlet. The cord has a three-prong grounded plug, which must
be used in a properly grounded three-prong outlet.
Avoid the use of an extension cord since the extension cord may overheat and cause a risk of fire, however, if
you must use an extension cord it has to be a grounded No. 16 AWG minimum size and rated for not less than
1875 watts.
Do not run the cord under carpet. Do not cover cord with throw rug, runner, or similar items. Cord should be
placed away from traffic areas to prevent tripping hazard.
Never use the cord to pull the appliance.
Never leave the appliance unattended while it is in use.
Turn controls to “off” before removing plug from outlet.
Always unplug heater when not in use.
Do not use outdoors.
Only use heater on even and stable surface to prevent the appliance from tipping over.
To prevent possible fire, do not block air intakes or exhaust in any manner. Do not use on soft surfaces, such
as a bed, where openings may be blocked.
Do not use in rooms in which highly flammable materials such as gas, paints, gasoline, solvents, etc. are
stored.
Keep minimum distance of 3 feet between the heater and curtains and other flammable materials.
Do not place the appliance or the plug in water or any other liquid. Should the appliance accidentally fall into
water, unplug the appliance immediately and have it checked by a qualified person before using it again.
Do not use the appliance with wet hands, on a damp floor, or when the appliance itself is wet.
The appliance must not be used if the glass is damaged.
Do not operate any heater with a damaged cord or plug, after the heater malfunctions or has been dropped or
damaged.
The warm air vent becomes very hot during operation—do not touch. During operation, only touch the
appliance’s switches and handles.
The appliance should not be moved when hot. Never touch the hot parts with your bare skin.
Do not insert or allow foreign objects to enter any ventilation or exhaust opening as this may cause an electric
shock or fire, or damage to the heater.
Please turn off the unit manually when leaving/not in use for extended period.
Please turn off the unit manually when the power goes out.
Please BEWARE that the plug may become hot.
It’s highly recommended to plug the unit to outlet with GFR/GFCI receptacle.
SAVE THESE INSTRUCTIONS
La page est en cours de chargement...
La page est en cours de chargement...
La page est en cours de chargement...
La page est en cours de chargement...
La page est en cours de chargement...
La page est en cours de chargement...
La page est en cours de chargement...
La page est en cours de chargement...
La page est en cours de chargement...
La page est en cours de chargement...
La page est en cours de chargement...
La page est en cours de chargement...
La page est en cours de chargement...
La page est en cours de chargement...
La page est en cours de chargement...
La page est en cours de chargement...
La page est en cours de chargement...
La page est en cours de chargement...
La page est en cours de chargement...
La page est en cours de chargement...
La page est en cours de chargement...
La page est en cours de chargement...
-
 1
1
-
 2
2
-
 3
3
-
 4
4
-
 5
5
-
 6
6
-
 7
7
-
 8
8
-
 9
9
-
 10
10
-
 11
11
-
 12
12
-
 13
13
-
 14
14
-
 15
15
-
 16
16
-
 17
17
-
 18
18
-
 19
19
-
 20
20
-
 21
21
-
 22
22
-
 23
23
-
 24
24
-
 25
25
-
 26
26
-
 27
27
-
 28
28
-
 29
29
-
 30
30
-
 31
31
-
 32
32
-
 33
33
-
 34
34
-
 35
35
-
 36
36
-
 37
37
-
 38
38
-
 39
39
-
 40
40
-
 41
41
-
 42
42


ROOMS TO GO 21612230 Assembly Instructions
- Catégorie
- Cheminées
- Taper
- Assembly Instructions
dans d''autres langues
- English: ROOMS TO GO 21612230
- español: ROOMS TO GO 21612230
Documents connexes
-
ROOMS TO GO 21810812 Assembly Instructions
-
-
ROOMS TO GO HD054216 Mode d'emploi
-
Southern Enterprises HD064840 Manuel utilisateur
-
-
-
-
-
Southern Enterprises 21612622 Mode d'emploi
-